Challenge 1 Parts of the Microscope T Trimpe


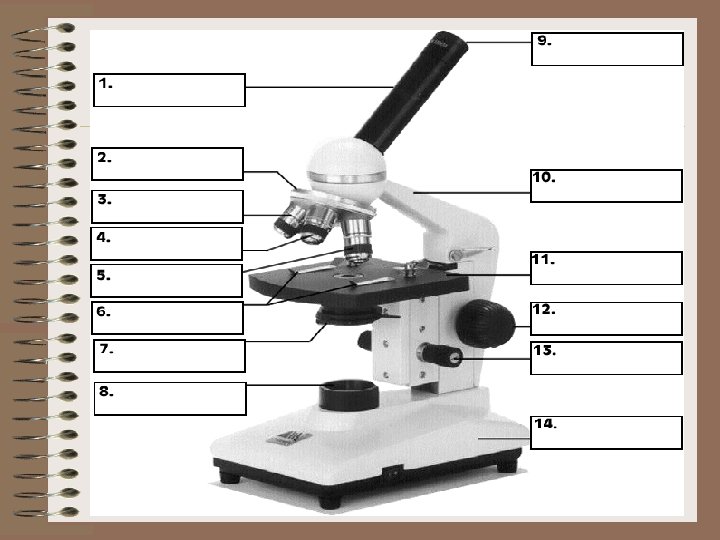
 Body Tube Nosepiece Arm Objectives Stage Clips Coarse Adjustment Diaphragm Light")


- Slides: 61
Challenge #1 Parts of the Microscope T. Trimpe 2008 http: //sciencespot. net/
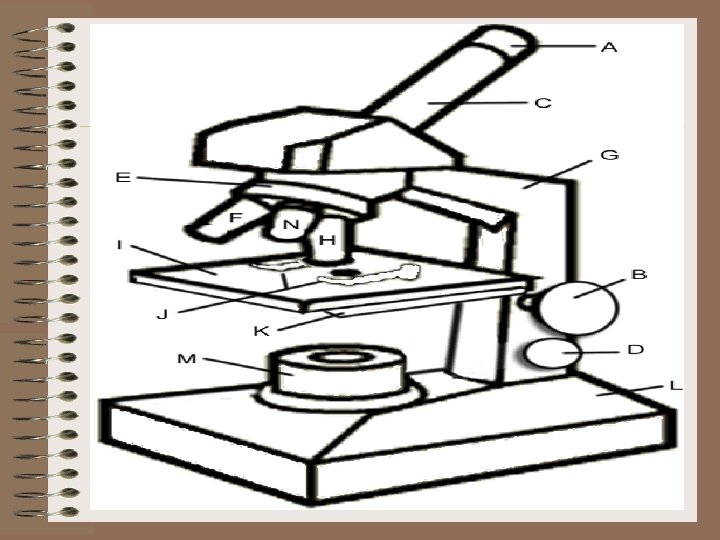
Identify the parts of a microscope. Arm Body Tube Coarse Adjustment Diaphragm Fine Adjustment Objective Lenses Ocular Lens Stage D A B C E F G H
The answers are. . . A. Body Tube D A B. Objective Lenses C. Diaphragm D. Ocular Lens B E. Arm F. Stage G. Coarse Adjustment H. Fine Adjustment C E F G H
Challenge #2 Parts of the Microscope T. Trimpe 2008 http: //sciencespot. net/
Label the parts of the microscope using the words provided. Ocular Lens Diaphragm DD Objectives Nosepiece Fine Adjustment Knob Coarse Adjustment Knob AA BB CC EE FF
The answers are … D Nosepiece Objectives Diaphragm Ocular Lens A B C E F Coarse Adjustment Knob Fine Adjustment Knob
Powers of Magnification T. Trimpe 2008 http: //sciencespot. net/
Fill in the missing information in the chart based on your knowledge of powers of magnification. Ocular Lens Objective Lens Power of Magnification 5 20 A 10 B 400 C 10 120
The answers are … Ocular Lens X Objective Lens Power of Magnification = 5 20 100 A 10 40 B 400 12 C 10 120
Challenge #3 What do you know about microscopes? T. Trimpe 2008 http: //sciencespot. net/
The answers are … 1. If you have three objectives – 10 X, 30 X, and 40 X, which one has the lowest power of magnification? 10 X 2. Which of these images would be taken with a high power objective? HIGH POWER 3. How does your view of a specimen change as you increase your power of magnification? You are able to see the specimen in more detail, but you cannot see as much of it.
Challenge #5 What do you know about microscopes? T. Trimpe 2008 http: //sciencespot. net/
Answer each question about microscopes. 1. What part regulates the amount of light on a specimen? 2. If the eyepiece has a power of 12 X and the objective has a power of 10 X, what is the power of magnification? 3. What part of the microscope holds the objective lenses? 4. What part allows you to make small changes in your view of a specimen?
The answers are … 1. What part regulates the amount of light on a specimen? Diaphragm 2. If the eyepiece has a power of 12 X and the objective has a power of 10 X, what is the power of magnification? 12 X x 10 X = 120 X 3. What part of the microscope holds the objective lenses? Nosepiece 4. What part allows you to make small changes in your view of a specimen? Fine adjustment knob
What do you know about microscopes? T. Trimpe 2008 http: //sciencespot. net/
Answer these questions based on your knowledge of microscopes. 1. Where should you hold on to the microscope when you carry it? 2. What is the scientific term for the eyepiece? 3. If the ocular lens has a power of 4 X and the objective you are using has a power of 10 X, what is your power of magnification? 4. What is the function of the diaphragm?
The answers are … 1. Where should you hold on to the microscope when you carry it? Arm & Base 2. What is the scientific term for the eyepiece? Ocular Lens 3. If the ocular lens has a power of 4 X and the objective you are using has a power of 10 X, what is your power of magnification? 4 X x 10 X = 40 X 4. What is the function of the diaphragm? It regulates the amount of light that passes through the specimen.
Crime 360: Scanning Electron Microscope
Watch the video and then answer the questions. 1. Where was the metal fragment found? A. On a shirt B. On a shoe C. On a pair of pants 2. Fill in the missing information in this statement: The scanning electron microscope can ______ a very small sample and determine what materials make it up. 3. How does the special microscope work? A. It creates an image with a beam of electrons. B. It creates an image using lights and mirrors. C. It creates an image by taking a digital image and enlarging it. 4. What type of metal was the fragment? A. Lead B. Aluminum C. Steel
The answers are … 1. Where was the metal fragment found? A. On a shirt B. On a shoe C. On a pair of pants 2. Fill in the missing information in this statement: magnify The scanning electron microscope can ___________ a very small sample and determine what materials make it up. 3. How does the special microscope work? A. It creates an image with a beam of electrons. B. It creates an image using lights and mirrors. C. It creates an image by taking a digital image and enlarging it. 4. What type of metal was the fragment? A. Lead B. Aluminum C. Steel
Comparison Microscope
Scanning Electron Microscope
Scanning Electron Microscope • Scanning Electron Microscope Images • scanning electron microscope • top 10 bugs
Compound Light Microscope
Introduction to the Microscope §Care §Parts §Focusing
• Make sure all backpacks and other items are out of the isles • Always carry with 2 hands by holding the arm and the base. • Only use lens paper for cleaning • Do not force knobs • Always store covered
General Procedures • Always start and end with low power. • Never remove a slide when the high power objective lens is in place - it will scratch the lens! • Always wrap the cord before putting the microscope up. • Always cover the microscope if a cover is available.
Microscope Parts and Functions
Structure and Function of the Microscope • http: //Structure and Function of the Microscope
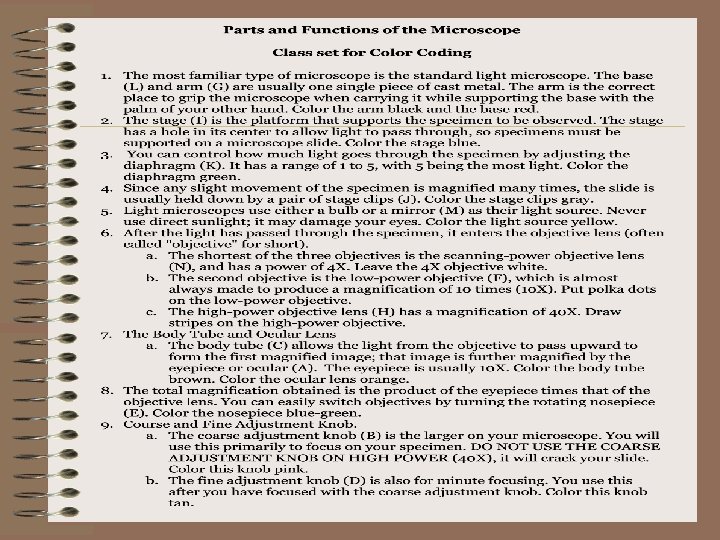
Ocular lens (Eyepiece) Body Tube Nosepiece Arm Objectives Stage Clips Coarse Adjustment Diaphragm Light Fine Adjustment Base Always carry a microscope with one hand holding the arm and one hand under the base.
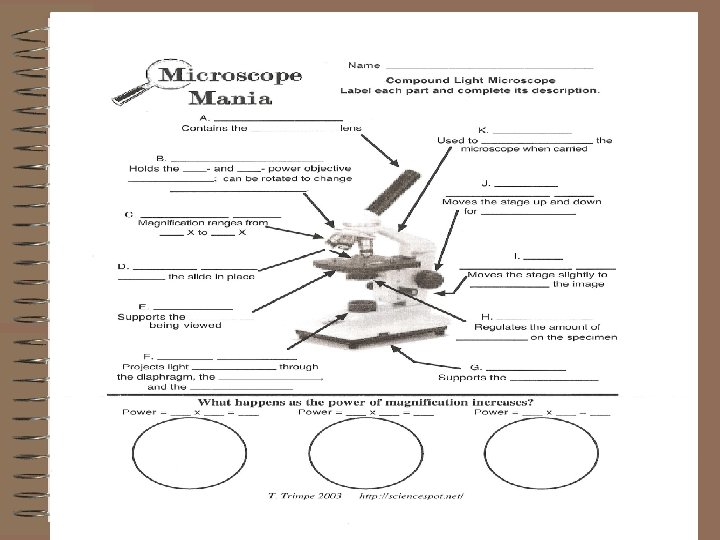
Parts of the Microscope
Magnification Total Magnification Focusing Field of View Depth of Field
What’s my power? To calculate the power of magnification, multiply the power of the ocular lens by the power of the objective. What are the powers of magnification for each of the objectives we have on our microscopes? Fill in the table on your worksheet.
Total Magnification
What happens as the power of magnification increases? • Power = 10 x 4 = 40 • Power = 10 x 10 = 100 • Power = 10 x 40 = 400
Comparing Powers of Magnification We can see better details with higher the powers of magnification, but we cannot see as much of the image. Which of these images would be viewed at a higher power of magnification?
Focusing your specimen Focusing Field of View Depth of Field
• Place the Slide on the Microscope • Use Stage Clips • Click Nosepiece to the lowest (shortest) setting • Look into the Eyepiece • Use the Coarse Focus first
Focusing Specimens
Field of View
Field of View • http: //www. microscope. org/advanced/magnification 2. htm • What happens to the field of view as the magnification increases? – Make sure you sketches reflect this.
Depth of Focus
Depth of Focus
Sketching your Specimen
Drawing Specimens • Use a pencil – you can erase and shade areas. (I will allow you to use a small amount of color from colored pencils to help you for your practical. • Drawings should be labeled with specimen name, magnification, and some sort of special notation that will help you remember the slide to study for your practical. • The circle indicates the viewing field. If your specimen takes up the whole viewing field, make sure your drawing reflects that.
Show detail in your sketches!
Show details in your sketching!
Sketch your specimens clearly and accurately! • http: //www. microscope. org/microscopeapplications. htm
Let’s give it a try. . . 1 – Turn on the microscope and then rotate the nosepiece to click the red-banded objective into place. 2 – Place a slide on the stage and secure it using the stage clips. Use the coarse adjustment knob (large knob) to get it the image into view and then use the fine adjustment knob (small knob) to make it clearer. 3 – Once you have the image in view, rotate the nosepiece to view it under different powers. Draw what you see on your worksheet! Be careful with the largest objective! Sometimes there is not enough room and you will not be able to use it! 4 – When you are done, turn off the microscope and put up the slides you used.
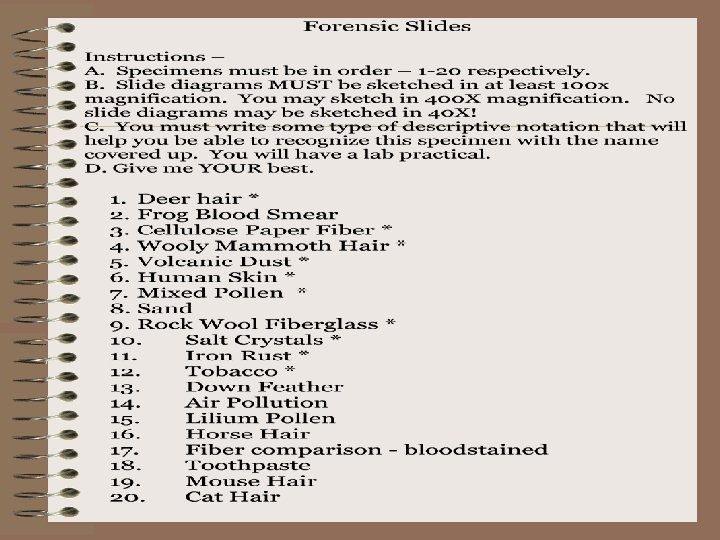
Instructions – • • Specimens must be in order – 1 -20 respectively! Number First!! • Slide diagrams MUST be sketched in at least 100 x magnification. • You may sketch in 400 X magnification. • Total magnification should be recorded on specimen sheet. • No slide diagrams may be sketched in 40 X! • You must write some type of descriptive notation that will help you be able to recognize this specimen with the name covered up. You will have a lab practical. • Sketch with neatness and accuracy. • Give me YOUR best.
Forensic Slides Instructions – • Specimens must be in order – 1 -20 respectively! Number First!! • Slide diagrams MUST be sketched in at least 100 x magnification. • You may sketch in 400 X magnification. • No slide diagrams may be sketched in 40 X! • You must write some type of descriptive notation that will help you be able to • recognize this specimen with the name covered up. You will have a lab practical. • Give me YOUR best. 1. Deer hair * slightly broken – be careful 2. Frog Blood Smear 3. Cellulose Paper Fiber 4. Wooly Mammoth Hair 5. Mouse Hair 6. Germinating Pollen 7. Mixed Pollen 8. Sand 9. Human blood 10. Salt Crystals 11. Cat Hair 12. Sawdust 13. Gunshot Residue 14. DNA in Animal Cells 15. Lilium Pollen 16. Common Dust 17. Fiber comparison – bloodstained 18. Dandruff 19. Iron Rust 20. Volcanic Dust
How to make a wet-mount slide … 1 – Get a clean slide and coverslip from your teacher. 2 – Place ONE drop of water in the middle of the slide. Don’t use too much or the water will run off the edge and make a mess! 3 – Place the edge of the cover slip on one side of the water drop. 4 - Slowly lower the cover slip on top of the drop. Cover Slip Lower slowly 5 – Place the slide on the stage and view it first with the red-banded objective. Once you see the image, you can rotate the nosepiece to view the slide with the different objectives. You do not need to use the stage clips when viewing wet-mount slides!