Microscope Notes Parts of a microscope 1 Eye


- Slides: 8
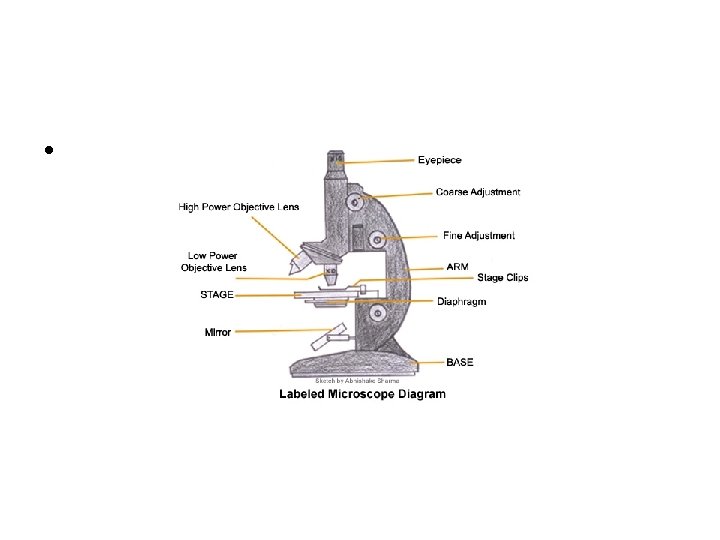
Microscope Notes
Parts of a microscope • 1. Eye piece/ocular- the piece that is looked through, has a power of 10. • 2. Body tube- skinny tube attached to the eye piece that allows light to shine from the light source. • 3. Nose piece- rotates the objective lenses • 4. Objective lens (high, medium and low) used to magnify the specimen on the stage. – High power (longest lens = 40 X) – Medium power (middle lens = 10 X) – Low power (shortest lens = 4 X)
• 5. Stage- the slide is placed here. • 6. Stage clips- holds the slide in place • 7. Aperture- hole in the stage that allows light to pass through the specimen. • 8. Diaphragm- thin disk below the stage that adjusts the amount of light needed. • 9. Legs/base- holds the entire microscope up.
• 10. Light source- provides light to see the object. • 11. Course adjustment- large knob that brings the stage closer to the objectives. Focuses the specimen. • 12. Fine adjustment- smaller knob that fine tunes the image. • 13. Arm- attaches the upper portion of the microscope to the base.
• 14. Slide- the rectangular piece that holds the specimen. • 15. Cover slip- the plastic square piece that covers the specimen.
Microscope Rules • 1. When carrying the microscope you must carry it with the ARM and the BASE. • 2. The microscope must always be stored with the lowest powered objective in place. • 3. When bringing an object into focus you must use the lowest powered objective and the course adjustment. • 4. ONLY use the FINE adjustment on the highest powered objective. • 5. Lenses should only be cleaned with lens paper. • 6. The whole microscope must be kept away from the edge of the lab table.
Creating a wet mount slide • • 1. Obtain a slide 2. Place the specimen on the center of the slide 3. Place ONE or TWO drops of water ON the specimen 4. Take the corner of the cover slip and place it near the drop of water and CAREFULLY lower the cover slip on to the water and specimen. • **IF you see perfectly round, white circles when looking through the eye piece THEN you are observing air bubbles • ** Slides and cover slips may be cleaned with water and a paper towel.