ENGINEERING DRAWING Manohar Khushalani mkiiitd for internal use
- Slides: 49

ENGINEERING DRAWING Manohar Khushalani mk_iiitd (for internal use only)

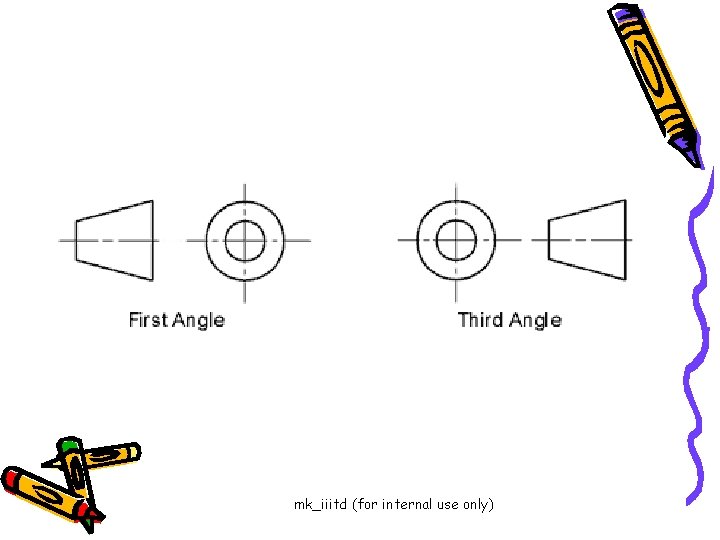
The aim of an engineering drawing is to convey all the necessary information of how to make the part to the manufacturing department. For most parts, the information cannot be conveyed in a single view. Rather than using several sheets of paper with different views of the part, several views can be combined on a single drawing using one of the two available projection systems, first angle, and third angle projection. mk_iiitd (for internal use only)

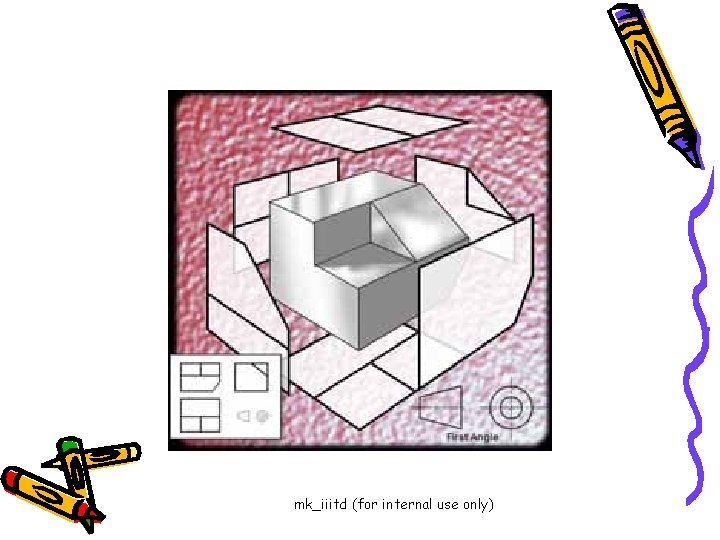
With first angle projection, the view you will now look at is projected through to the other side of the object. So if we are drawing the three visible sides of the object illustrated in first angle projection, we are drawing the views projected on the other side of the object and not the nearest side mk_iiitd (for internal use only)

mk_iiitd (for internal use only)

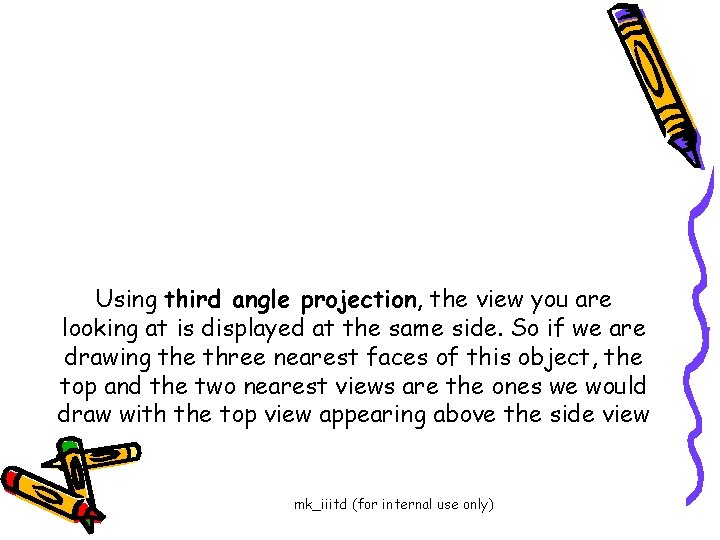
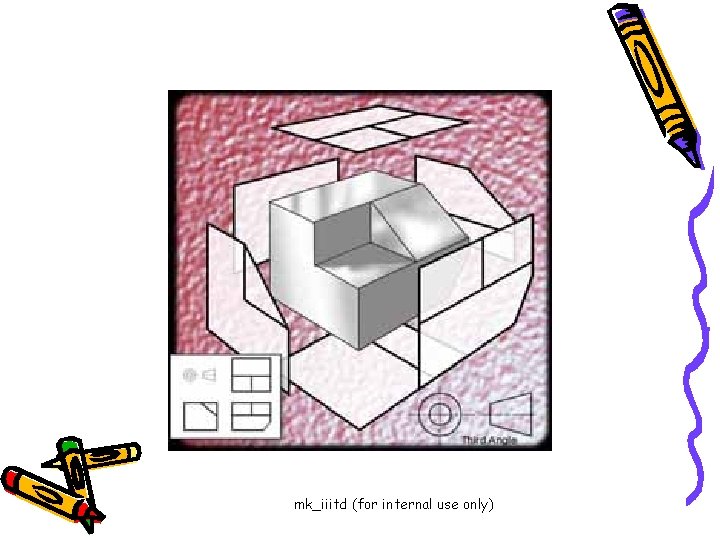
Using third angle projection, the view you are looking at is displayed at the same side. So if we are drawing the three nearest faces of this object, the top and the two nearest views are the ones we would draw with the top view appearing above the side view mk_iiitd (for internal use only)

mk_iiitd (for internal use only)

mk_iiitd (for internal use only)

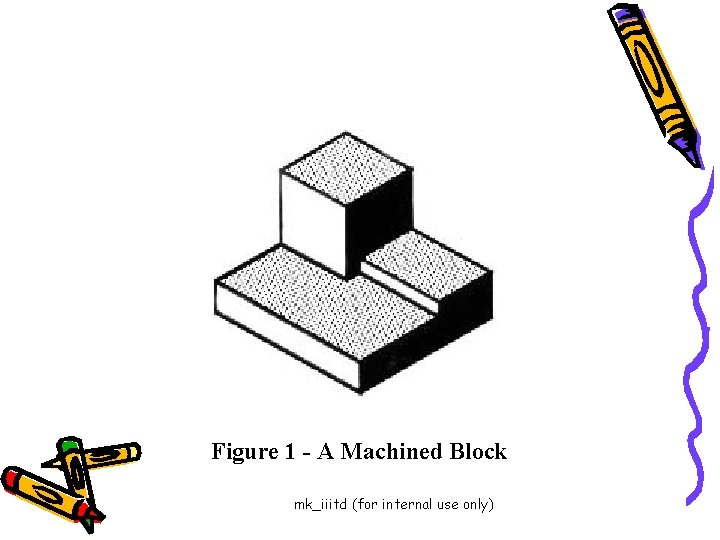
Figure 1 - A Machined Block mk_iiitd (for internal use only)

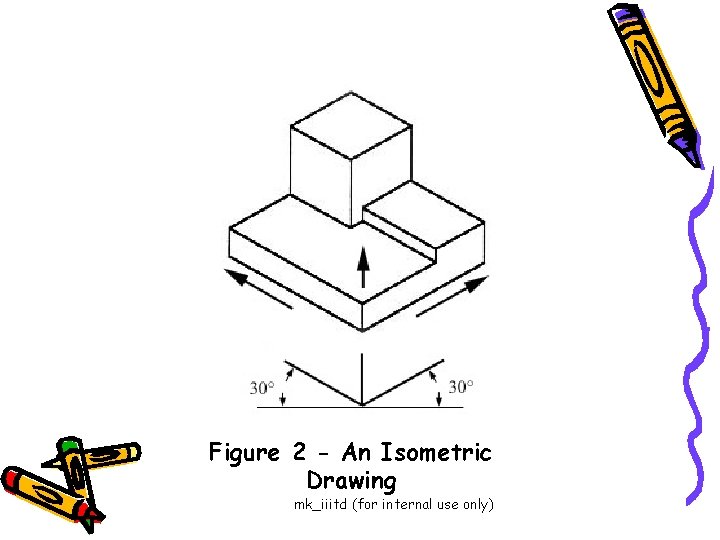
Figure 2 - An Isometric Drawing mk_iiitd (for internal use only)

Isometric Drawing The representation of the object in figure 2 is called an isometric drawing. This is one of a family of three-dimensional views called pictorial drawings. In an isometric drawing, the object's vertical lines are drawn vertically, and the horizontal lines in the width and depth planes are shown at 30 degrees to the horizontal. When drawn under these guidelines, the lines parallel to these three axes are at their true (scale) lengths. Lines that are not parallel to these axes will not be of their true length. mk_iiitd (for internal use only)

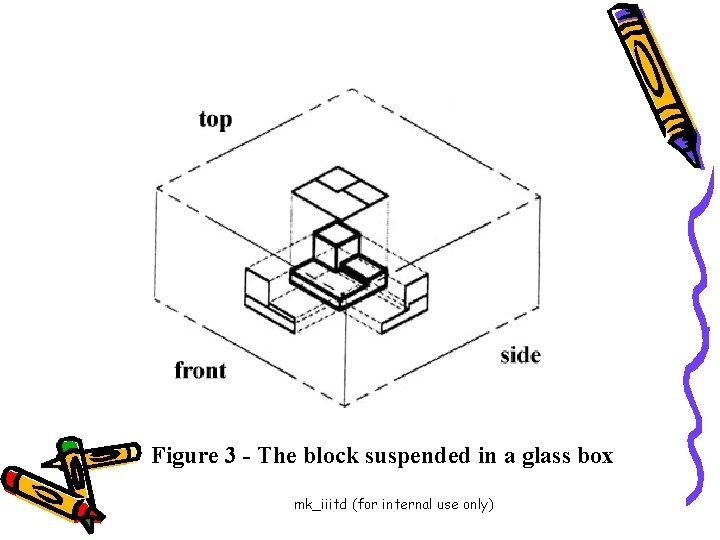
Figure 3 - The block suspended in a glass box mk_iiitd (for internal use only)

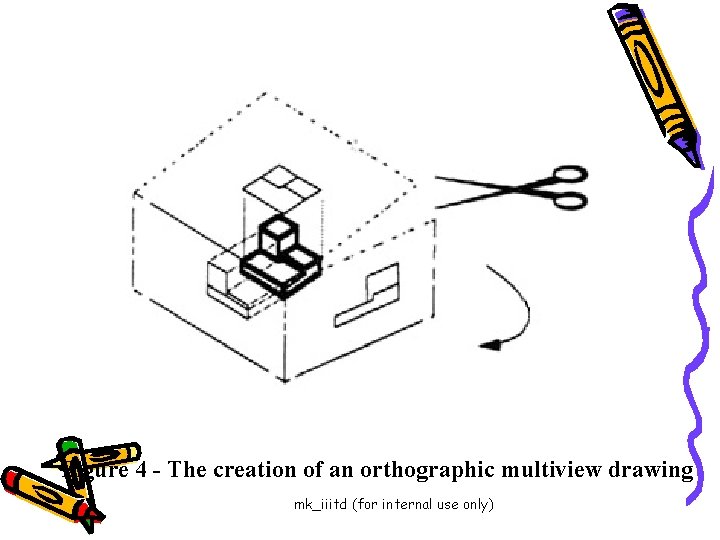
Orthographic or Multiview Drawing Imagine that you have an object suspended by transparent threads inside a glass box, as in figure 3. Then draw the object on each of three faces as seen from that direction. Unfold the box (figure 4) and you have three views. We call this an "orthographic" or "multiview" drawing. mk_iiitd (for internal use only)

Figure 4 - The creation of an orthographic multiview drawing mk_iiitd (for internal use only)

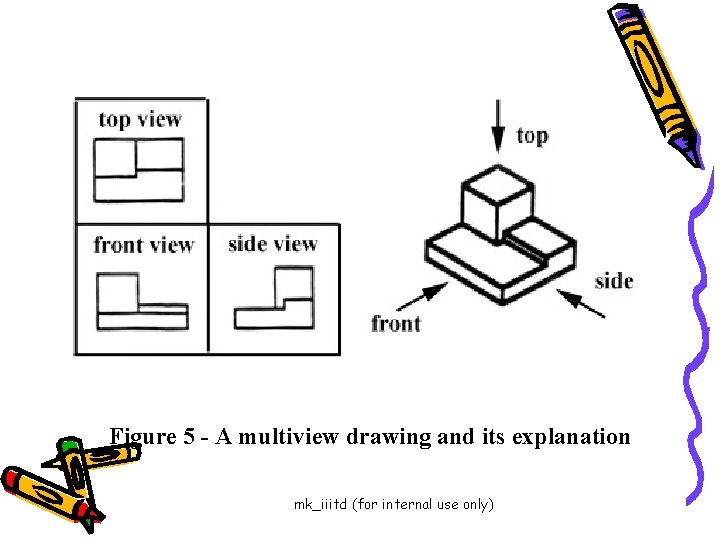
Figure 5 - A multiview drawing and its explanation mk_iiitd (for internal use only)

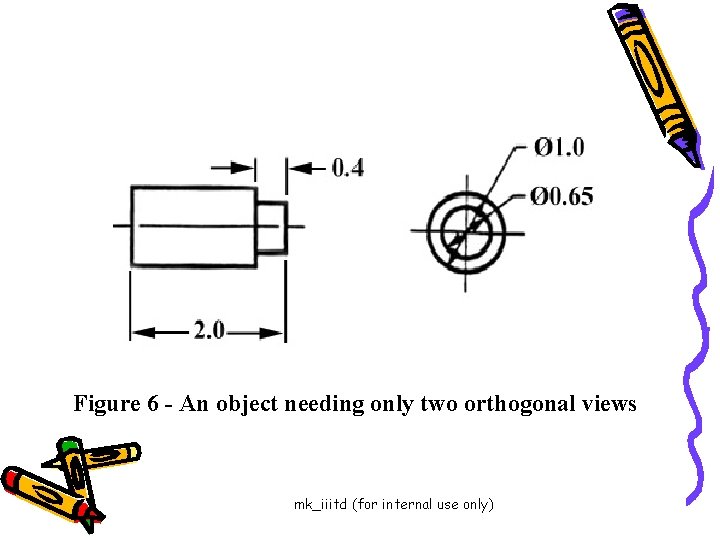
Figure 5 showed how the three views appear on a piece of paper after unfolding the box Which views should one choose for a multiview drawing? The views that reveal every detail about the object. Three views are not always necessary; we need only as many views as are required to describe the object fully. For example, some objects need only two views, while others need four. The circular object in figure 6 requires only two views. mk_iiitd (for internal use only)

Figure 6 - An object needing only two orthogonal views mk_iiitd (for internal use only)

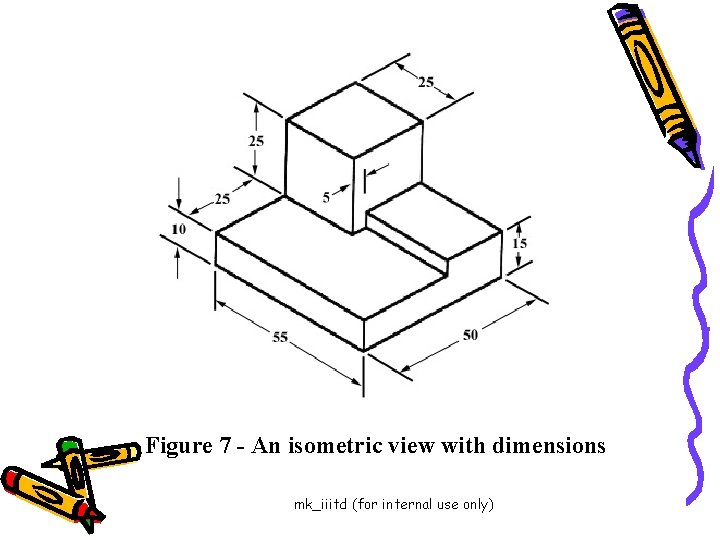
Figure 7 - An isometric view with dimensions mk_iiitd (for internal use only)

We have "dimensioned" the object in the isometric drawing in figure 7. As a general guideline to dimensioning, try to think that you would make an object and dimension it in the most useful way. Put in exactly as many dimensions as are necessary for the craftsperson to make it -no more, no less. Do not put in redundant dimensions. Not only will these clutter the drawing, but if "tolerances" or accuracy levels have been included, the redundant dimensions often lead to conflicts when the tolerance allowances can be added in different ways. Repeatedly measuring from one point to another will lead to inaccuracies. It is often better to measure from one end to various points. This gives the dimensions a reference standard. It is helpful to choose the placement of the dimension in the order in which a craftsman would create the object. mk_iiitd (for internal use only)

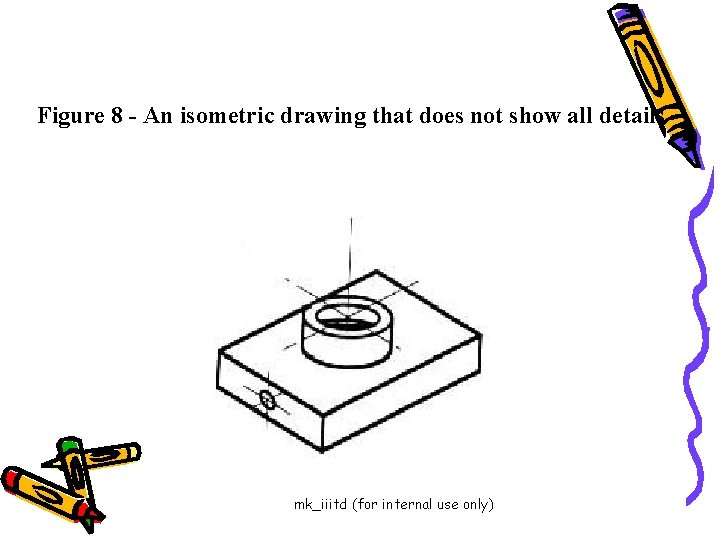
Sectioning There are many times when the interior details of an object cannot be seen from the outside (see figure 8). mk_iiitd (for internal use only)

Figure 8 - An isometric drawing that does not show all details mk_iiitd (for internal use only)

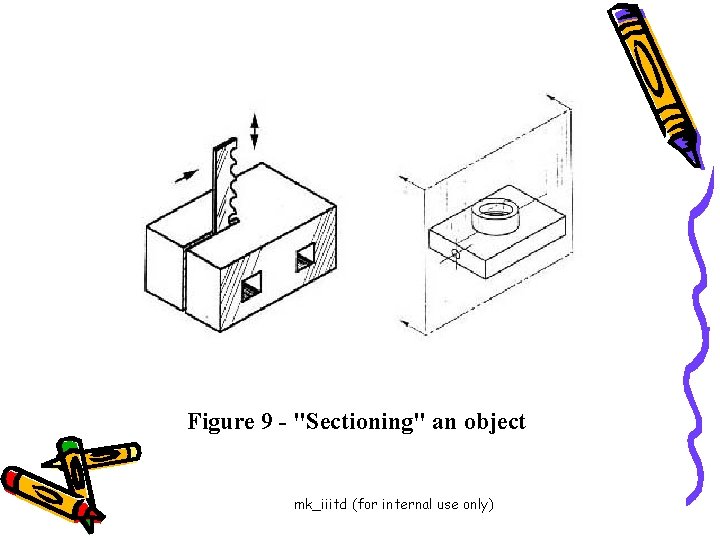
We can get around this by pretending to cut the object on a plane and showing the "sectional view". The sectional view is applicable to objects like engine blocks, where the interior details are intricate and would be very difficult to understand through the use of "hidden" lines (hidden lines are, by convention, dotted) on an orthographic or isometric drawing. Imagine slicing the object in the middle (figure 9): mk_iiitd (for internal use only)

Figure 9 - "Sectioning" an object mk_iiitd (for internal use only)

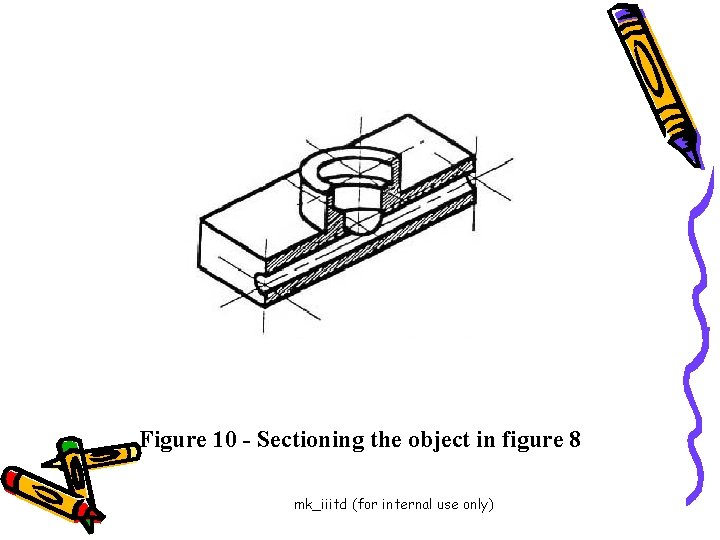
Figure 10 - Sectioning the object in figure 8 mk_iiitd (for internal use only)

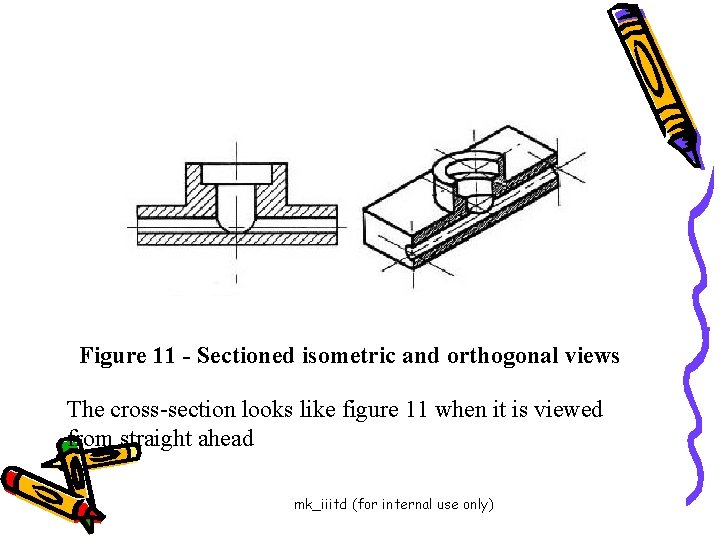
Take away the front half (figure 10) and what you have is a full section view (figure 11). mk_iiitd (for internal use only)

Figure 11 - Sectioned isometric and orthogonal views The cross-section looks like figure 11 when it is viewed from straight ahead mk_iiitd (for internal use only)

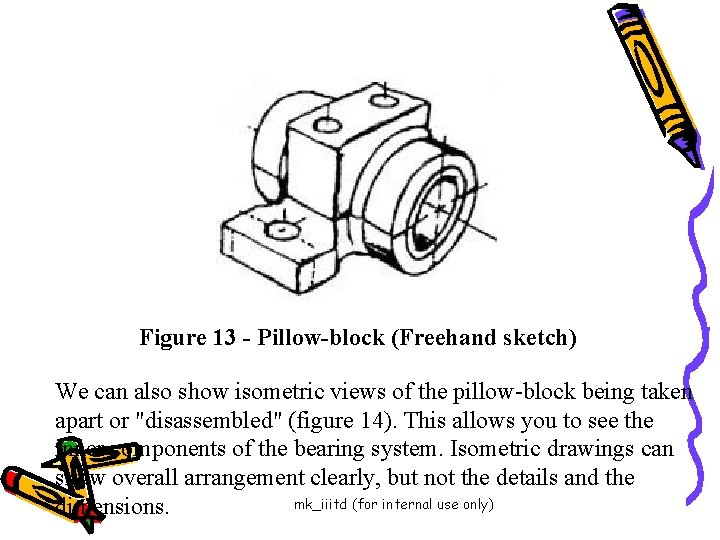
"Assembly" Drawings An isometric view of an "assembled" pillow-block bearing system is shown in figure 13. It corresponds closely to what you actually see when viewing the object from a particular angle. We cannot tell what the inside of the part looks like from this view. mk_iiitd (for internal use only)

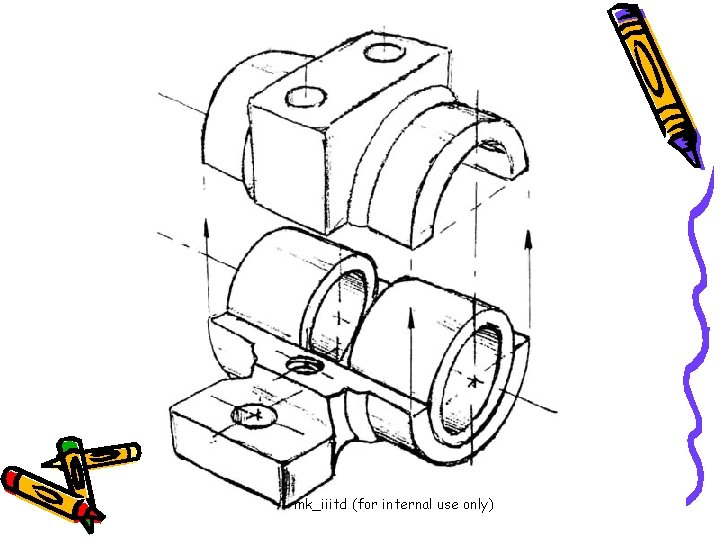
Figure 13 - Pillow-block (Freehand sketch) We can also show isometric views of the pillow-block being taken apart or "disassembled" (figure 14). This allows you to see the inner components of the bearing system. Isometric drawings can show overall arrangement clearly, but not the details and the mk_iiitd (for internal use only) dimensions.

mk_iiitd (for internal use only)

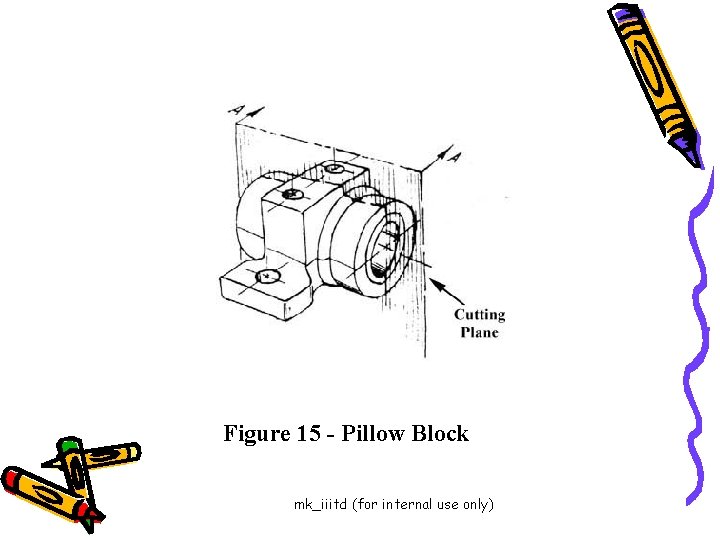
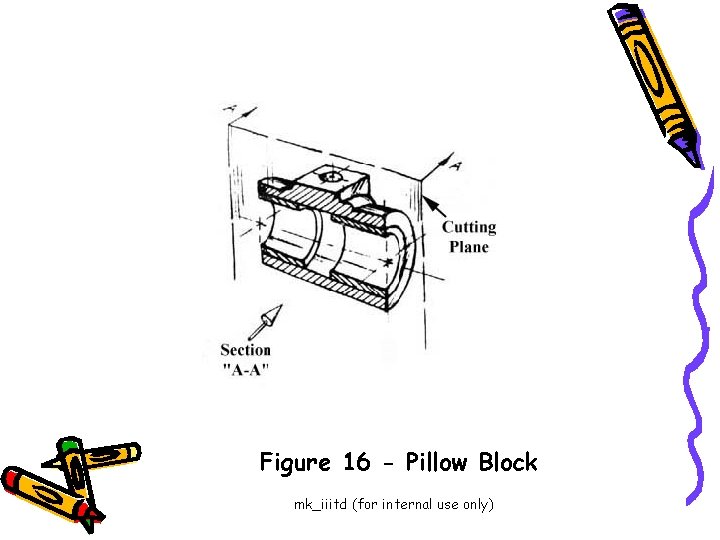
Cross-Sectional Views A cross-sectional view portrays a cut-away portion of the object and is another way to show hidden components in a device. Imagine a plane that cuts vertically through the center of the pillow block as shown in figure 15. Then imagine removing the material from the front of this plane, as shown in figure 16. mk_iiitd (for internal use only)

Figure 15 - Pillow Block mk_iiitd (for internal use only)

Figure 16 - Pillow Block mk_iiitd (for internal use only)

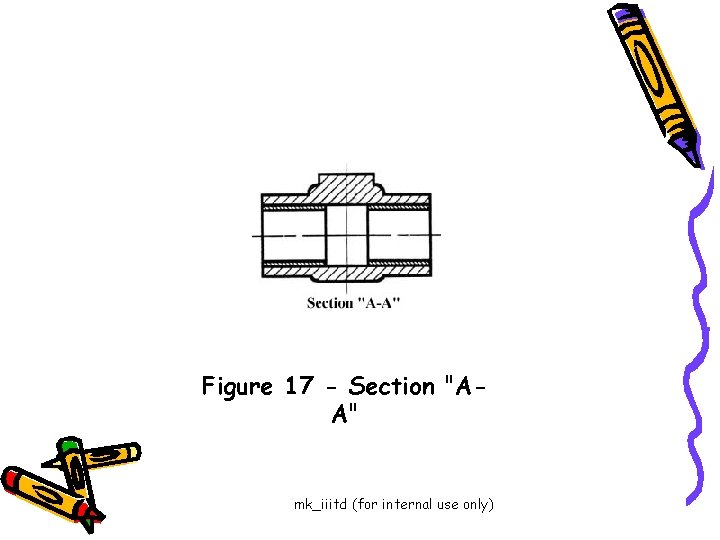
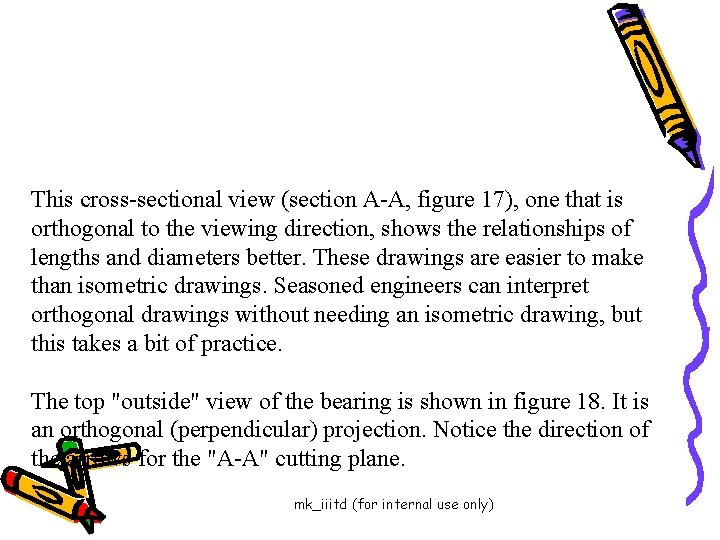
Figure 17 - Section "AA" mk_iiitd (for internal use only)

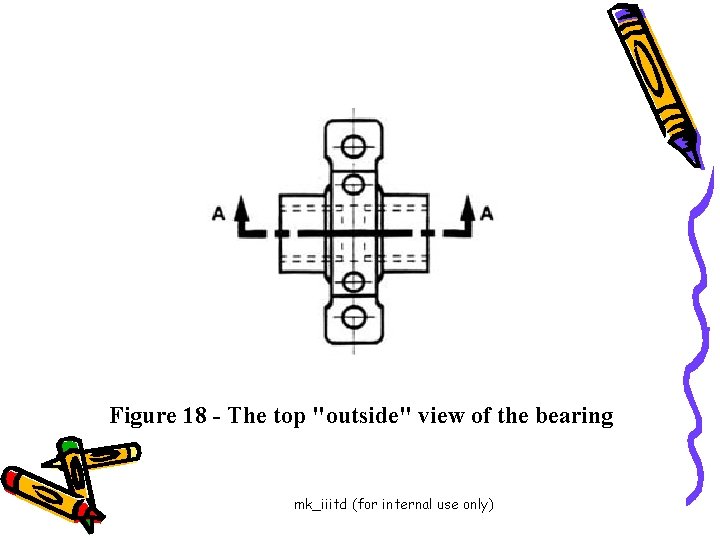
This cross-sectional view (section A-A, figure 17), one that is orthogonal to the viewing direction, shows the relationships of lengths and diameters better. These drawings are easier to make than isometric drawings. Seasoned engineers can interpret orthogonal drawings without needing an isometric drawing, but this takes a bit of practice. The top "outside" view of the bearing is shown in figure 18. It is an orthogonal (perpendicular) projection. Notice the direction of the arrows for the "A-A" cutting plane. mk_iiitd (for internal use only)

Figure 18 - The top "outside" view of the bearing mk_iiitd (for internal use only)

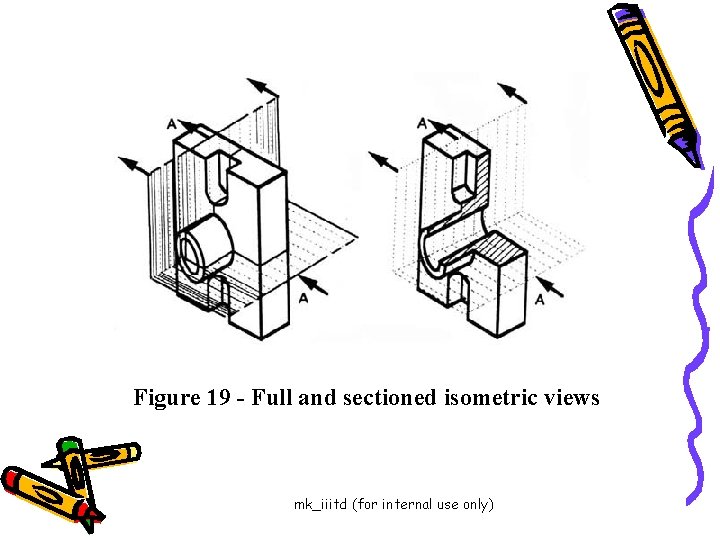
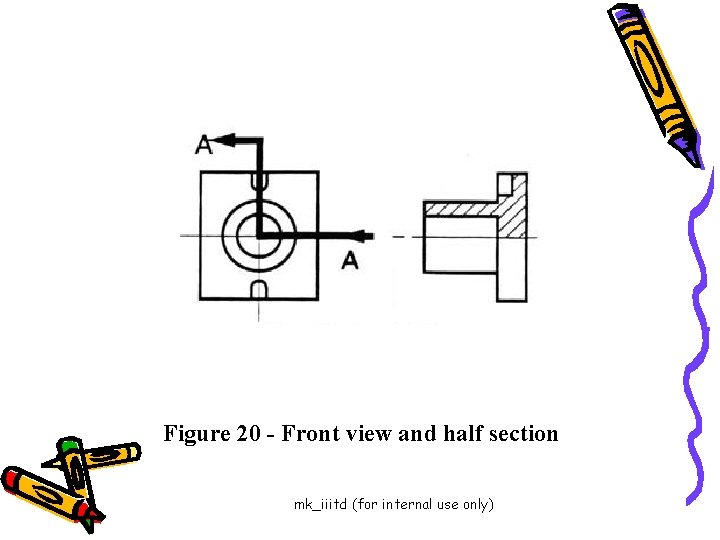
Half-Sections A half-section is a view of an object showing one-half of the view in section, as in figure 19 and 20. mk_iiitd (for internal use only)

Figure 19 - Full and sectioned isometric views mk_iiitd (for internal use only)

Figure 20 - Front view and half section mk_iiitd (for internal use only)

The diagonal lines on the section drawing are used to indicate the area that has been theoretically cut. These lines are called section lining or cross-hatching. The lines are thin and are usually drawn at a 45 -degree angle to the major outline of the object. The spacing between lines should be uniform. A second, rarer, use of cross-hatching is to indicate the material of the object. One form of cross-hatching may be used for cast iron, another for bronze, and so forth. More usually, the type of material is indicated elsewhere on the drawing, making the use of different types of cross-hatching unnecessary. mk_iiitd (for internal use only)

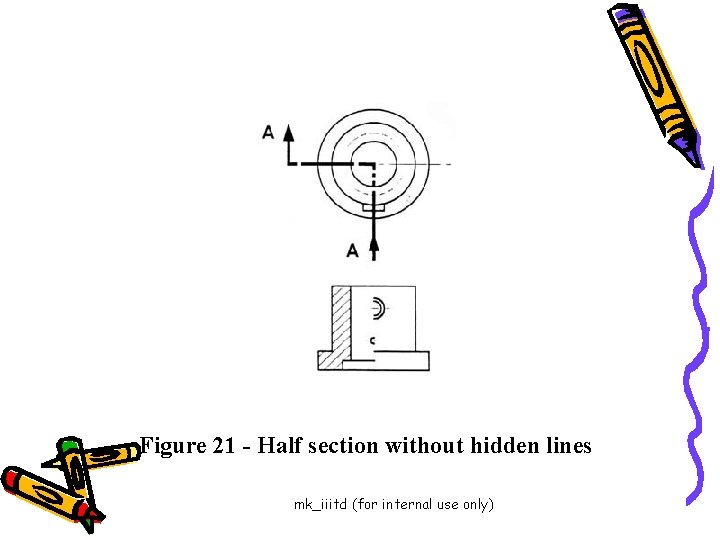
Figure 21 - Half section without hidden lines mk_iiitd (for internal use only)

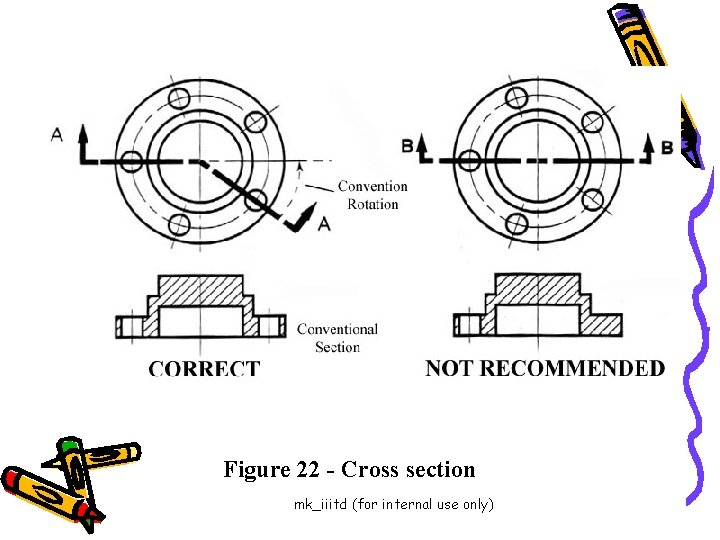
Sectioning Objects with Holes, Ribs, Etc. The cross-section on the right of figure 22 is technically correct. However, the convention in a drawing is to show the view on the left as the preferred method for sectioning this type of object mk_iiitd (for internal use only)

Figure 22 - Cross section mk_iiitd (for internal use only)

Constructing an isometric circle mk_iiitd (for internal use only)

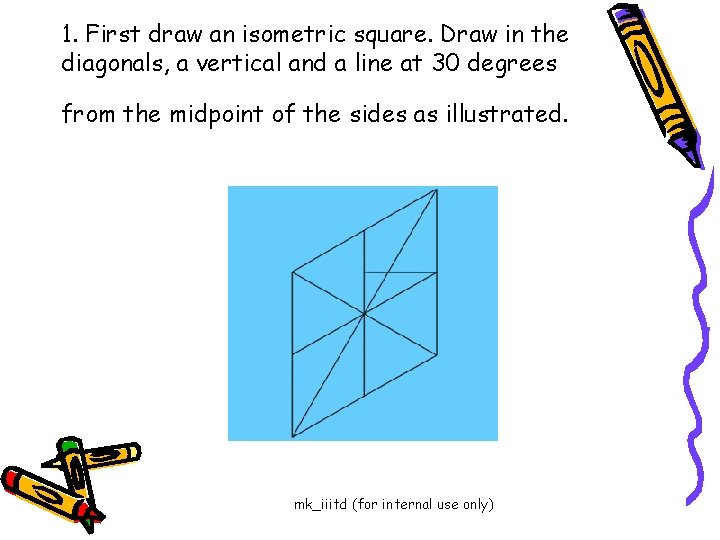
1. First draw an isometric square. Draw in the diagonals, a vertical and a line at 30 degrees from the midpoint of the sides as illustrated. mk_iiitd (for internal use only)

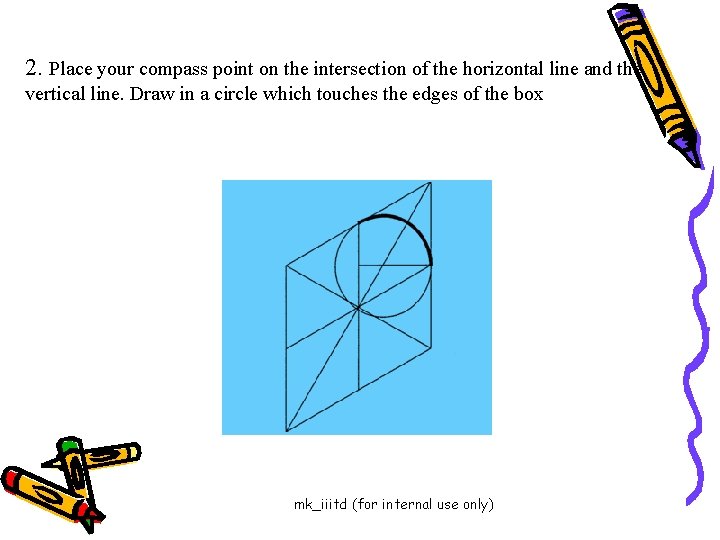
2. Place your compass point on the intersection of the horizontal line and the vertical line. Draw in a circle which touches the edges of the box mk_iiitd (for internal use only)

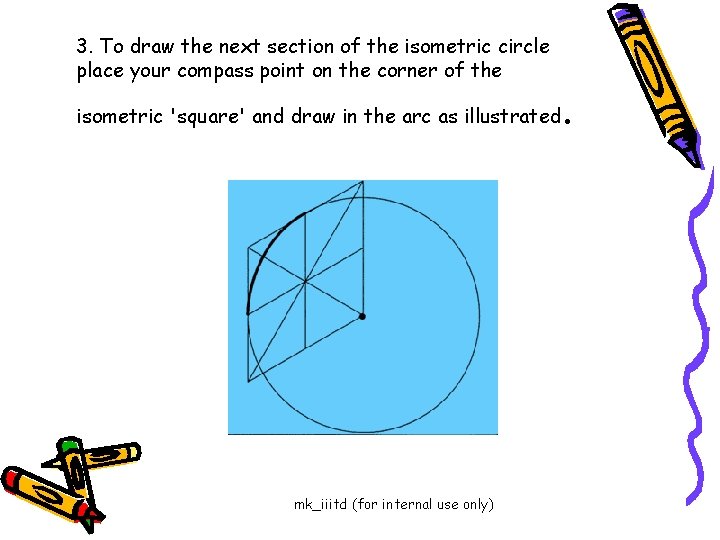
3. To draw the next section of the isometric circle place your compass point on the corner of the isometric 'square' and draw in the arc as illustrated mk_iiitd (for internal use only) .

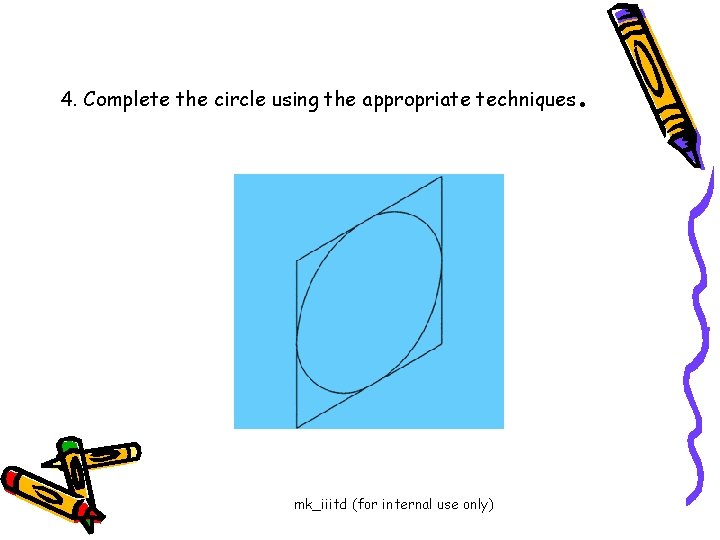
4. Complete the circle using the appropriate techniques mk_iiitd (for internal use only) .

Axinometric Drawing Sometimes known as Planometric Drawing mk_iiitd (for internal use only)

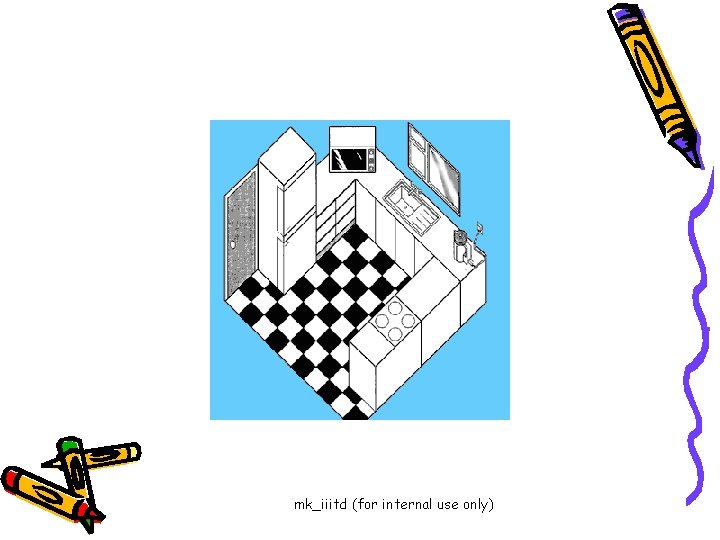
Axonometric or planometric as it is sometimes known is a method of drawing a plan view with a third dimension. It is used by interior designers, architects and landscape gardeners. Axonometric works by drawing a plan view at a 45 degree angle with the depth added vertically. All lengths are drawn as their true lengths unlike when you use oblique. This gives the impression that you are viewing the objects from above. One advantage of axonometric is that circles drawn on the top faces of objects can be drawn as a normal circle. mk_iiitd (for internal use only)

mk_iiitd (for internal use only)