Activity Intent Intent v Intent Intent Constructor Intent

 ü Intent Constructor Intent () Intent (o: Intent) Intent (action:")

 v 모듈 수준의 build. gradle 파일에 'kotlin-android-extensions' 플러그인을 추가하고 동기화")


 v activity_first. xml 파일 수정 <? xml")
 v activity_second. xml 파일 생성 <?")


 intent. data")

; intent. put.")


 l 사용자에게 권한")


 v 액티비티 ü 뷰 생성 q View 클래스의 인스턴스를 Layout 파일에 생성 q")
 v activity_sub_display. xml 파일에 화면")


")


 v 보조 Activity로 사용할")


 v 이전 Lotto 프로젝트에 작성 v build. gradle 파일의 plug-in 추가 id")
 v Main. Activity. kt 파일의 on. Create 메소드에 추가 // 랜덤으로 번호")
 v Constellation. Activity. kt 파일 수정 import kotlinx. android. synthetic. main. activity_constellation.")
 v Name. Activity. kt 파일 수정 import kotlinx. android. synthetic. main. activity_name.")
 v Main. Activity. kt 파일의 on. Create 메소드에서 랜덤으로 번호 생성 카드를")
 v Result. Activity. kt 파일에 데이터를 받아서 수정하는 코드를 작성 class Result.")
 v Result. Activity. kt 파일에 데이터를 받아서 수정하는 코드를 작성 fun update.")
 v Constellation. Activity. kt 파일 수정 class Constellation. Activity : App. Compat.")
 v Constellation. Activity. kt 파일 수정 override fun on. Create(saved. Instance. State:")
 v Constellation. Activity. kt 파일 수정 // 현재 Date. Picker 의 월,")
 v Result. Activity. kt 파일의 on. Create 메소드에 추가 // 전달받은 별자리를")
 v Name. Activity. kt 파일 수정 class Name. Activity : App. Compat.")
 v Name. Activity. kt 파일 수정 override fun on. Create(saved. Instance. State:")
 v Name. Activity. kt 파일 수정 // 입력받은 이름을 추가로 전달한다. intent.")
 v Result. Activity. kt 파일의 on. Create 메소드에 추가 // 전달받은 이름을")


은 API Level 24(Android")


 v activity_setting. xml 파일에서 화면 수정")


 {")


- Slides: 131
Activity & Intent
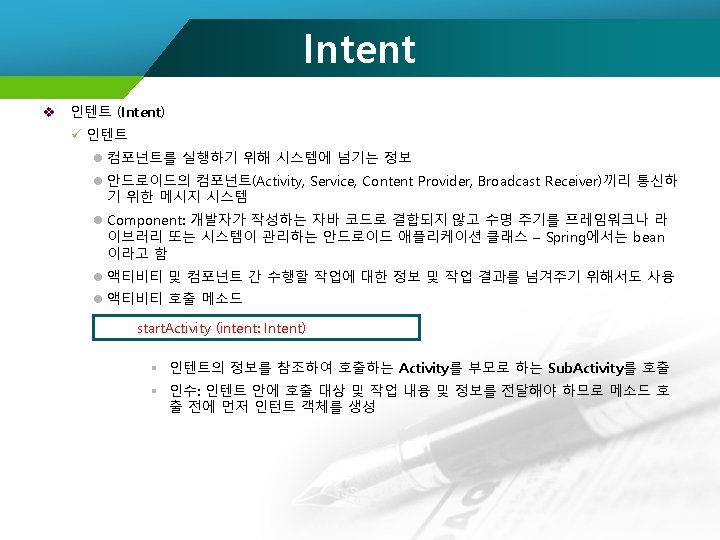
Intent v 인텐트 (Intent) ü Intent Constructor Intent () Intent (o: Intent) Intent (action: String [, uri]) Intent (package. Context: Context, cls: Class<? >) Intent (action: String, uri: Uri, package. Context: Context, cls: Class<? > ) l 액션, uri, 클래스 등을 취하는 생성자를 주로 사용 l Intent (package. Context: Context, cls: Class<? >) 내부의 서브 액티비티 호출 시 사용되는 생성자로 액티비티 클래스 구현을 위한 컨텍스트, 호출할 액티비티 클래스 정보가 인수로 전달하는데 명시적 인텐트를 만 들 때 주로 이용
Intent
Intent v 프로젝트 생성(activity) v 모듈 수준의 build. gradle 파일에 'kotlin-android-extensions' 플러그인을 추가하고 동기화
Intent v activity_main. xml 파일 수정 <? xml version="1. 0" encoding="utf-8"? > <Linear. Layout xmlns: android="http: //schemas. android. com/apk/res/android" android: orientation="vertical" android: layout_width="match_parent" android: layout_height="match_parent" > <Text. View android: layout_width="match_parent" android: layout_height="wrap_content" android: text="Main. Activity" android: text. Size="30 sp" android: text. Color="#ff 0000" /> <Button android: id="@+id/call" android: layout_width="wrap_content" android: layout_height="wrap_content" android: text="Sub Call" /> </Linear. Layout>
Intent v Sub. Activity 추가 v activity_sub. xml 파일 수정 <? xml version="1. 0" encoding="utf-8"? > <Linear. Layout xmlns: android="http: //schemas. android. com/apk/res/android" android: orientation="vertical" android: layout_width="match_parent" android: layout_height="match_parent" > <Text. View android: layout_width="match_parent" android: layout_height="wrap_content" android: text="Sub. Activity" android: text. Size="20 sp" android: text. Color="#00 ff 00" /> <Button android: id="@+id/close" android: layout_width="wrap_content" android: layout_height="wrap_content" android: text="Close" /> </Linear. Layout>
Intent v src 디렉토리의 Sub. Activity. kt 파일의 on. Create 메소드에 추가 작성 class Sub. Activity : App. Compat. Activity() { override fun on. Create(saved. Instance. State: Bundle? ) { super. on. Create(saved. Instance. State) set. Content. View(R. layout. activity_sub) } } close. set. On. Click. Listener{finish()}
Intent v Main. Activity. kt 파일의 on. Create 메소드에 추가 class Main. Activity : App. Compat. Activity() { override fun on. Create(saved. Instance. State: Bundle? ) { super. on. Create(saved. Instance. State) set. Content. View(R. layout. activity_main) } } } call. set. On. Click. Listener{ val intent = Intent(this@Main. Activity, Sub. Activity: : class. java) start. Activity(intent)
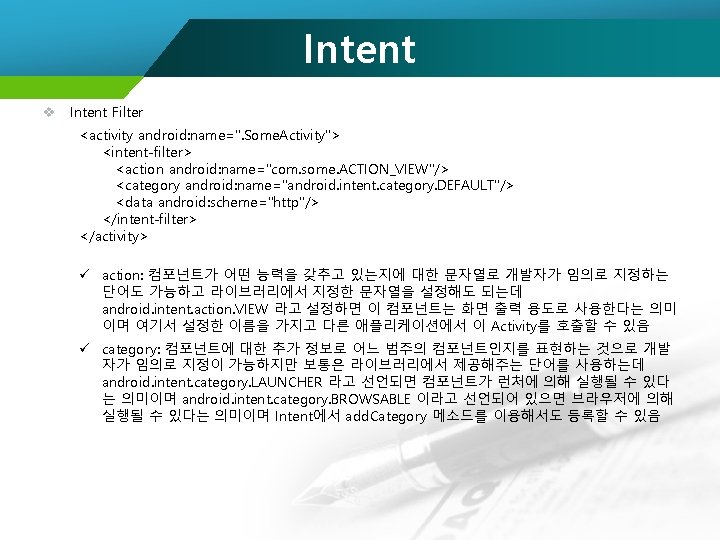
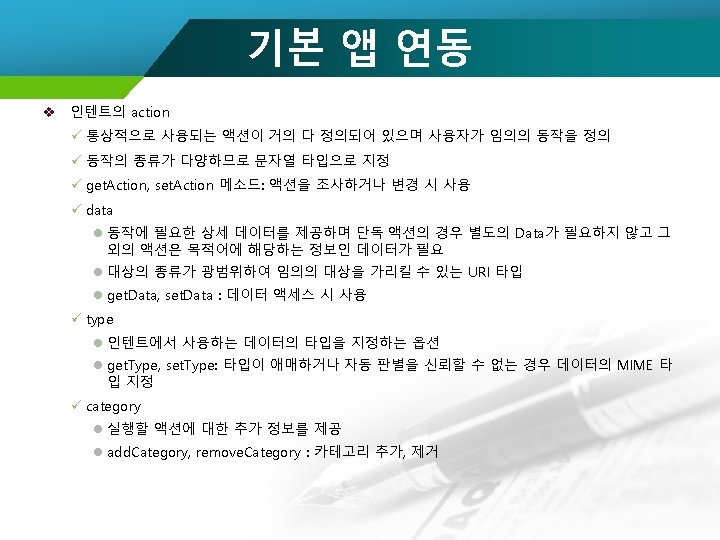
Intent v Intent Filter <activity android: name=". Some. Activity"> <intent-filter> <action android: name="com. some. ACTION_VIEW"/> <category android: name="android. intent. category. DEFAULT"/> <data android: scheme="http"/> </intent-filter> </activity> ü data: data는 컴포넌트를 실행하기 위해 필요한 데이터에 대한 상세 정보를 명시하기 위해서 사용하는데 android: scheme, android: host, android: port 등의 여러 개의 단어로 선언하며 Intent에서 set. Data 메소드를 이용해서 데이터를 설정하며 데이터는 URL 문자열로 Uri 객체 로 표현 Intent intent = new Intent(); Intent. set. Action(“com. some. ACTION_VIEW”); Intent. set. Data(Uri. parse(http: //. . . ); start. Activity(intent); ü Intent를 만들 때 존재하지 않는 name을 이용하는 경우 Activity는 에러 발생
Intent v Intent Filter ü 웹에서 앱 실행 q 앱 설정 – Android. Manifest. xml 파일에 작성 <activity android: name=". Main. Activity" android: screen. Orientation="portrait"> <intent-filter> <action android: name="android. intent. action. MAIN" /> <category android: name="android. intent. category. LAUNCHER" /> </intent-filter> <action android: name="android. intent. action. VIEW" /> <category android: name="android. intent. category. DEFAULT" /> <category android: name="android. intent. category. BROWSABLE" /> <data android: host="main_web" android: scheme="myappandroi" /> </intent-filter> </activity> q web 설정 o 링크 <a href="Intent: // myappandroi#Intent; scheme= main_web; package=com. test. myapp; end"> o 자바스크립트 location. href = 'intent: //main_web#Intent; scheme=myappandroi; package=com. myappandroi. m; en d';
Intent v 암시적 인텐트 사용을 위해서 Android. Manifest 파일의 Activity 등록 코드 수정 <activity android: name=". Sub. Activity"> <intent-filter> <action android: name="com. example. ACTION_VIEW"/> <category android: name="android. intent. category. DEFAULT"/> </intent-filter> </activity>
Intent v 암시적 인텐트 사용을 위해서 Main. Activity의 버튼 클릭 이벤트 수정 call. set. On. Click. Listener{ //val intent = Intent(this@Main. Activity, Sub. Activity: : class. kt) //암시적 인텐트 사용 val intent : Intent = Intent() intent. set. Action("com. example. ACTION_VIEW") start. Activity(intent) }
Intent
Intent v 실행 가능한 Activity 생성(First. Activity) v activity_first. xml 파일 수정 <? xml version="1. 0" encoding="utf-8"? > <Linear. Layout xmlns: android="http: //schemas. android. com/apk/res/android" android: orientation="vertical" android: layout_width="match_parent" android: layout_height="match_parent" > <Text. View android: id="@+id/text" android: layout_width="match_parent" android: layout_height="wrap_content" android: text="Sample" /> <Button android: id="@+id/btnedit" android: layout_width="match_parent" android: layout_height="wrap_content" android: text="Edit" /> </Linear. Layout>
Intent v Sub 액티비티로 사용할 Activity 생성(Second. Activity) v activity_second. xml 파일 생성 <? xml version="1. 0" encoding="utf-8"? > <Linear. Layout xmlns: android="http: //schemas. android. com/apk/res/android" android: orientation="vertical" android: layout_width="match_parent" android: layout_height="match_parent" > <Edit. Text android: id="@+id/stredit" android: layout_width="match_parent" android: layout_height="wrap_content" /> <Button android: id="@+id/btnok" android: layout_width="match_parent" android: layout_height="wrap_content" android: text="OK"/> <Button android: id="@+id/btncancel" android: layout_width="match_parent" android: layout_height="wrap_content" android: text="Cancel" /> </Linear. Layout>
Intent v Second. Activity. kt 파일을 수정 import kotlinx. android. synthetic. main. activity_second. * class Second. Activity : App. Compat. Activity() { override fun on. Create(saved. Instance. State: Bundle? ) { super. on. Create(saved. Instance. State) set. Content. View(R. layout. activity_second) val intent = intent val text = intent. get. String. Extra("Text. In") if (text != null) { stredit. set. Text(text) }
Intent v Second. Activity. kt 파일을 수정 val handler: View. On. Click. Listener = object : View. On. Click. Listener { override fun on. Click(v: View) { when (v. id) { R. id. btnok -> { val intent = Intent() intent. put. Extra("Text. Out", stredit. get. Text(). to. String()) set. Result(Activity. RESULT_OK, intent) finish() } R. id. btncancel -> { set. Result(Activity. RESULT_CANCELED) finish() } } } } btnok. set. On. Click. Listener(handler) btncancel. set. On. Click. Listener(handler)
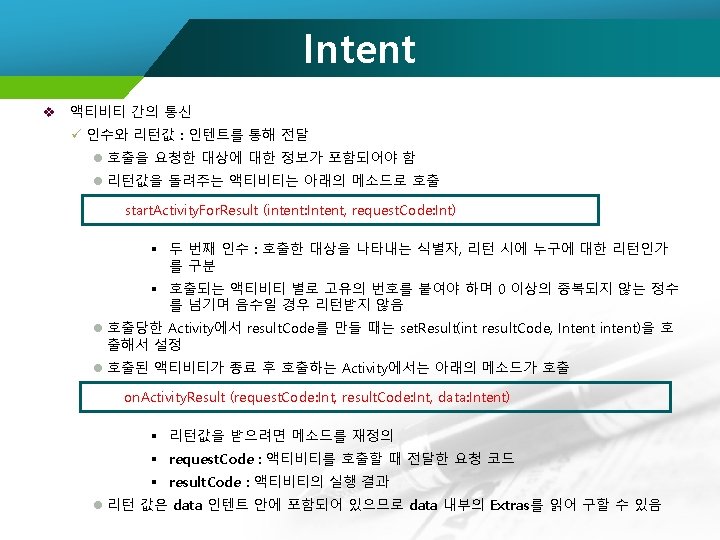
Intent v First. Activity. kt 파일을 수정 import kotlinx. android. synthetic. main. activity_first. * class First. Activity : App. Compat. Activity() { val ACT_EDIT = 0 override fun on. Create(saved. Instance. State: Bundle? ) { super. on. Create(saved. Instance. State) set. Content. View(R. layout. activity_first) } btnedit. set. On. Click. Listener(object : View. On. Click. Listener { override fun on. Click(v: View? ) { val intent = Intent(this@First. Activity, Second. Activity: : class. java) intent. put. Extra("Text. In", text? . text. to. String()) start. Activity. For. Result(intent, ACT_EDIT) } })
Intent v First. Activity. kt 파일을 수정 override fun on. Activity. Result(request. Code: Int, result. Code: Int, data: Intent? ) { super. on. Activity. Result(request. Code, result. Code, data) when(request. Code) { ACT_EDIT -> { if (result. Code == RESULT_OK) { text. set. Text(data? . get. String. Extra("Text. Out")); } } }
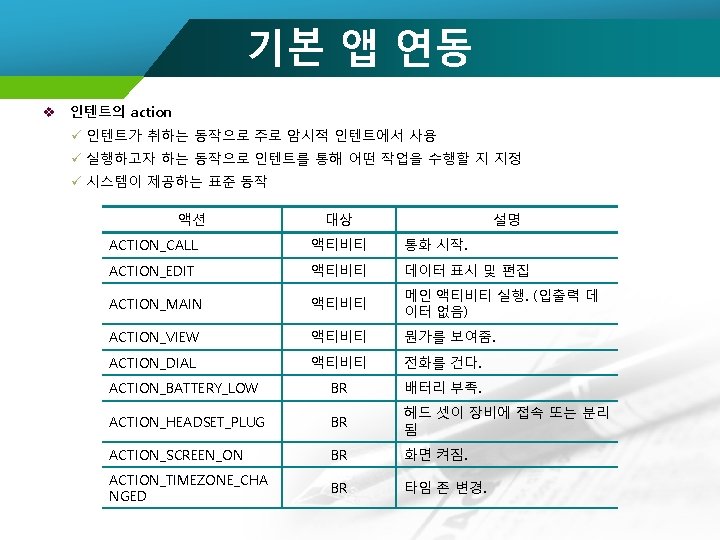
기본 앱 연동 v 주소록 앱 실행 val intent = Intent(Intent. ACTION_PICK) intent. data = Contacts. Contract. Common. Data. Kinds. Phone. CONTENT_URI ü 주소록 앱에서 선택한 데이터 넘겨받기 override protected fun on. Activity. Result(request. Code: Int, result. Code: Int, data: Intent? ) { super. on. Activity. Result(request. Code, result. Code, data) if (request. Code == 10 && result. Code == Activity. RESULT_OK) { val result = data? . data. String result. View. set. Text(result) } } ü 인텐트의 data. get. Data. String ( ) 함수를 이용하여 넘어온 URL 값 획득 ü URL 정보의 맨 마지막 단어가 선택한 홍길동의 식별자
기본 앱 연동 v 카메라 앱 사용: 인텐트 발생만으로도 쉽게 사진촬영과 촬영된 사진 데이터 획득 ü 썸네일로 이미지 받기 위한 인텐트 호출 val intent = Intent(Media. Store. ACTION_IMAGE_CAPTURE) start. Activity. For. Result(intent, 30) ü 결과 처리 protected void on. Activity. Result(int request. Code, int result. Code, Intent data) { if(request. Code==30 && result. Code==RESULT_OK){ val bitmap = data? . extras!!["data"] as Bitmap? result. Image. View. set. Image. Bitmap(bitmap) } }
기본 앱 연동 v 동영상 촬영 Intent intent = Intent(Media. Store. ACTION_VIDEO_CAPTURE); intent. put. Extra(Media. Store. EXTRA_VIDEO_QUALITY, 0); intent. put. Extra(Media. Store. EXTRA_DURATION_LIMIT, 20); intent. put. Extra(Media. Store. EXTRA_SIZE_LIMIT, 1024 * 10); intent. put. Extra(Media. Store. EXTRA_OUTPUT, video. URI); start. Activity. For. Result(intent, 20);
기본 앱 연동 v 갤러리 앱 사용 ü 갤러리 앱 화면 출력 val intent: Intent = Intent(Intent. ACTION_PICK); intent. set. Type(Media. Store. Images. Media. CONTENT_TYPE); intent. set. Data(Media. Store. Images. Media. EXTERNAL_CONTENT_URI); start. Activity. For. Result(intent, 20); ü 선택된 사진에 대한 정보 얻기 override protected fun on. Activity. Result(request. Code: Int, result. Code: Int, data: Intent? ) { if(request. Code==20 && result. Code==RESULT_OK){ val result: String = data. get. Data. String(); result. View. set. Text(result); } }
기본 앱 연동 v 갤러리 앱 사용 ü 선택된 사진을 전체 화면으로 보기 Intent intent = new Intent(); intent. set. Action(Intent. ACTION_VIEW); Uri photo. URI = File. Provider. get. Uri. For. File(Activity. this, Build. Config. APPLICATION_ID + ". provider", file. Path); intent. set. Data. And. Type(photo. URI, "image/*"); //외부 앱에서 현재 데이터를 이용하는 것이므로 intent. add. Flags(Intent. FLAG_GRANT_READ_URI_PERMISSION); start. Activity(intent);
기본 앱 연동 v 음성 인식 앱 사용 ü 음성 인식 앱 출력 val intent = Intent(Recognizer. Intent. ACTION_RECOGNIZE_SPEECH) intent. put. Extra(Recognizer. Intent. EXTRA_LANGUAGE_MODEL, Recognizer. Intent. LANGUAGE_MODEL_FREE_FORM) intent. put. Extra(Recognizer. Intent. EXTRA_PROMPT, "음성인식 테스트") start. Activity. For. Result(intent, 50) ü 음성 인식 앱의 결과 얻기 val results = data? . get. String. Array. List. Extra(Recognizer. Intent. EXTRA_RESULTS) val result = results!![0] v 지도 앱 출력 val intent = Intent(Intent. ACTION_VIEW, Uri. parse("geo: 37. 5662952, 126. 9779451")) start. Activity(intent)
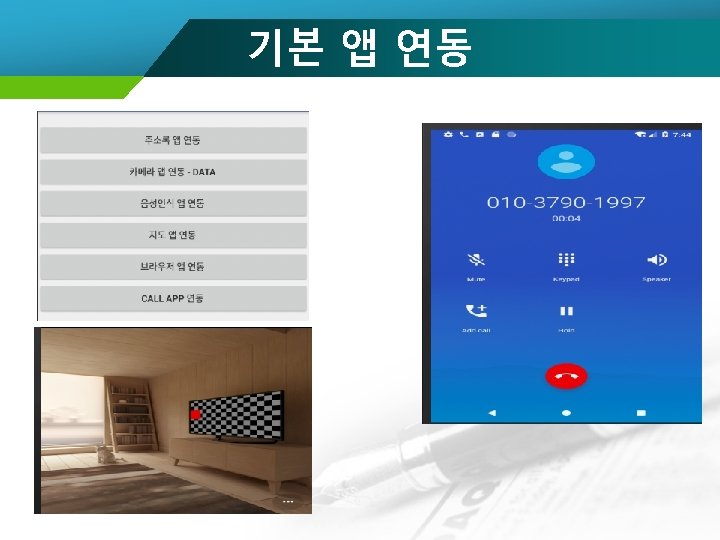
기본 앱 연동 v 브라우저 앱 사용 val intent = Intent(Intent. ACTION_VIEW, Uri. parse("http: //www. seoul. go. kr")) start. Activity(intent) v 전화 앱 출력 ü 권한 부여 <uses-permission android: name="android. permission. CALL_PHONE"/> ü 전화걸기 val intent = Intent(Intent. ACTION_CALL, Uri. parse("tel: 010 -3790 -1997")) start. Activity(intent)
기본 앱 연동 v 앱 설치 여부 확인 – Package. Manager 의 query. Intent. Activities 메소드 활용 val pm: Package. Manager = get. Package. Manager(); val activities = pm. query. Intent. Activities(intent, 0); if(activities. size() > 0){ 존재하는 경우 수행할 코드; } else{ 존재하지 않을 때 수행할 코드; }
권한부여 v Android Permission – 권한을 확인해야 하는 경우 ü READ_CALENDAR, WRITE_CALENDAR ü CAMERA ü READ_CONTACTS, WRITE_CONTACTS ü GET_ACCOUNTS ü ACCESS_FINE_LOCATION, ACCESS_COARSE_LOCATION ü RECORD_AUDIO ü READ_PHONE_STATE, CALL_PHONE ü READ_CALL_LOG, WRITE_CALL_LOG ü ADD_VOICEMAIL ü USE_SIP ü PROCESS_OUTGOING_CALLS ü BODY_SENSORS ü SEND_SMS ü RECEIVE_SMS ü READ_SMS ü RECEIVE_WAP_PUSH ü RECEIVE_MMS ü READ_EXTERNAL_STORAGE, WRITE_EXTERNAL_STORAGE
권한부여 v 동적 권한 확인 ü 권한 확인 val permission. Check = Context. Compat. check. Self. Permission(this, Manifest. permission. WRITE_CALENDAR); if(permission. Check== Package. Manager. PERMISSION_DENIED){ // 권한 없음 }else{ // 권한 있음 }
권한부여 v 동적 권한 확인 ü 권한 허가 요청하기: request. Permissions() l 사용자에게 권한 허가를 요청하는 대화상자를 띄울 수 있음 if (should. Show. Request. Permission. Rationale(Manifest. permission. CALL_PHONE)) { val dialog: Alert. Dialog. Builder = Alert. Dialog. Builder( this@Main. Activity) dialog. set. Title("권한이 필요합니다. "). set. Message("이 기능을 사용하기 위해서는 단말기의 "전화걸 기" 권한이 필요합니다. 계속 하시겠습니까? "). set. Positive. Button("네", Dialog. Interface. On. Click. Listener { dialog, which -> if (Build. VERSION. SDK_INT >= Build. VERSION_CODES. M) { // CALL_PHONE 권한을 Android OS에 요청 request. Permissions(array. Of(Manifest. permission. CALL_PHONE), 1000) } }). set. Negative. Button("아니요", Dialog. Interface. On. Click. Listener { dialog, which -> Toast. make. Text(this@Main. Activity, "기능을 취소했습니다", Toast. LENGTH_SHORT). show() }). create(). show() } else { // CALL_PHONE 권한을 Android OS에 요청한다. request. Permissions(array. Of(Manifest. permission. CALL_PHONE), 1000) }
권한부여 v 동적 권한 확인 ü 권한 허가 요청 후 결과 가져오기: on. Request. Permissions. Result() 이 메소드는 Activity의 on. Activity. Result()와 비슷한 개념 ü MY_PERMISSIONS_REQUEST_READ_CONTACTS로 보낸 요청 코드에 대해서 결과값을 가져오고 그에 대한 처리를 해주어야 함 override fun on. Request. Permissions. Result(request. Code: Int, permissions: Array<String? >, grant. Results: Int. Array) { if (request. Code == 1000) { // 요청한 권한을 사용자가 "허용" 했다면. . . if (grant. Results. size > 0 && grant. Results[0] == Package. Manager. PERMISSION_GRANTED) { 권한이 있을 때 수행할 내용 //Add Check Permission if (Activity. Compat. check. Self. Permission(this, Manifest. permission. CALL_PHONE) !== Package. Manager. PERMISSION_GRANTED) { start. Activity(intent) } } else { Toast. make. Text(this@Main. Activity, "권한 요청을 거부했습니다. ", Toast. LENGTH_SHORT). show() } } }
기본 앱 연동 v Android. Manifest. xml 파일에 전화걸기 권한 부여 <uses-permission android: name="android. permission. CALL_PHONE" /> v 실행 가능한 Activity 생성(Basic. App. Activity)
기본 앱 연동 v activity_basic_app. xml 파일에 화면 디자인 <? xml version="1. 0" encoding="utf-8"? > <Linear. Layout xmlns: android="http: //schemas. android. com/apk/res/android" android: id="@+id/activity_lab 2" android: layout_width="match_parent" android: layout_height="match_parent" android: orientation="vertical"> <Text. View android: id="@+id/result. View" android: layout_width="match_parent" android: layout_height="wrap_content" /> <Button android: id="@+id/btn_contacts" android: layout_width="match_parent" android: layout_height="wrap_content" android: text="주소록 앱 연동 "/>
기본 앱 연동 <Button android: id="@+id/btn_camera_data" android: layout_width="match_parent" android: layout_height="wrap_content" android: text="카메라 앱 연동 - Data "/> <Button android: id="@+id/btn_speech" android: layout_width="match_parent" android: layout_height="wrap_content" android: text="음성인식 앱 연동 "/> <Button android: id="@+id/btn_map" android: layout_width="match_parent" android: layout_height="wrap_content" android: text="지도 앱 연동 "/>
기본 앱 연동 <Button android: id="@+id/btn_browser" android: layout_width="match_parent" android: layout_height="wrap_content" android: text="브라우저 앱 연동 "/> <Button android: id="@+id/btn_call" android: layout_width="match_parent" android: layout_height="wrap_content" android: text="Call App 연동 "/> <Image. View android: id="@+id/result. Image. View" android: layout_width="wrap_content" android: layout_height="wrap_content" android: clickable="true"/> </Linear. Layout>
기본 앱 연동 v Basic. App. Activity 클래스의 상단에 import kotlinx. android. synthetic. main. activity_basic_app. * v Basic. App. Activity 파일에 버튼의 클릭 이벤트 처리를 위한 핸들러를 추가 var click. Handler: View. On. Click. Listener = object : View. On. Click. Listener{ override fun on. Click(v: View) { if (v === btn_contacts) { val intent = Intent(Intent. ACTION_PICK) intent. data = Contacts. Contract. Common. Data. Kinds. Phone. CONTENT_URI start. Activity. For. Result(intent, 10) } else if (v === btn_speech) { val intent = Intent(Recognizer. Intent. ACTION_RECOGNIZE_SPEECH) intent. put. Extra(Recognizer. Intent. EXTRA_LANGUAGE_MODEL, Recognizer. Intent. LANGUAGE_MODEL_FREE_FORM) intent. put. Extra(Recognizer. Intent. EXTRA_PROMPT, "음성인식 테스트") start. Activity. For. Result(intent, 50) }
기본 앱 연동 v Basic. App. Activity 파일에 버튼의 클릭 이벤트 처리를 위한 핸들러를 추가 else if (v === btn_camera_data) { val intent = Intent(Media. Store. ACTION_IMAGE_CAPTURE) start. Activity. For. Result(intent, 30) } else if (v === btn_map) { val intent = Intent(Intent. ACTION_VIEW, Uri. parse("geo: 37. 5662952, 126. 9779451")) start. Activity(intent) } else if (v === btn_browser) { val intent = Intent(Intent. ACTION_VIEW, Uri. parse("http: //www. seoul. go. kr")) start. Activity(intent) } else if (v === btn_call) { if (Context. Compat. check. Self. Permission(this@Basic. App. Activity, Manifest. permission. CALL_PHONE) === Package. Manager. PERMISSION_GRANTED) { val intent = Intent(Intent. ACTION_CALL, Uri. parse("tel: 010 -3790 -1997")) start. Activity(intent) } else { Activity. Compat. request. Permissions(this@Basic. App. Activity, array. Of<String>(Manifest. permission. CALL_PHONE), 100) } }
기본 앱 연동 v Basci. App. Activity 파일의 on. Create 메소드에 버튼의 클릭 이벤트 처리를 위한 코드를 추가 btn_contacts. set. On. Click. Listener(click. Handler); btn_camera_data. set. On. Click. Listener(click. Handler); btn_speech. set. On. Click. Listener(click. Handler); btn_map. set. On. Click. Listener(click. Handler); btn_browser. set. On. Click. Listener(click. Handler); btn_call. set. On. Click. Listener(click. Handler);
기본 앱 연동 v Basic. App. Activity 클래스에 호출한 Activity가 종료된 후 호출되는 메소드 구현 override protected fun on. Activity. Result(request. Code: Int, result. Code: Int, data: Intent? ) { super. on. Activity. Result(request. Code, result. Code, data) if (request. Code == 10 && result. Code == Activity. RESULT_OK) { val result = data? . data. String result. View. set. Text(result) } else if (request. Code == 30 && result. Code == Activity. RESULT_OK) { val bitmap = data? . extras!!["data"] as Bitmap? result. Image. View. set. Image. Bitmap(bitmap) } else if (request. Code == 50 && result. Code == Activity. RESULT_OK) { val results = data? . get. String. Array. List. Extra(Recognizer. Intent. EXTRA_RESULTS) val result = results!![0] result. View. set. Text(result) } }
액티비티(Activity) v 액티비티 ü 뷰 생성 q View 클래스의 인스턴스를 Layout 파일에 생성 q Layout 파일에 디자인 한 View 가져오기 l XML 파일에 디자인 한 뷰 전개 – 출력 및 리턴 o Layout. Inflater. inflater(res. Id: Int, parent: View. Group): View -> Instance 메소 드라서 인스턴스가 필요 o View. inflate(context: Context, res. Id: Int, root: View) : View -> Static 메소드 l Layout. Inflater 인스턴스 생성 o get. System. Service(Context. LAYOUT_INFLATER_SERVICE) as Layout. Inflater o Layout. Inflater. from(context: Context)
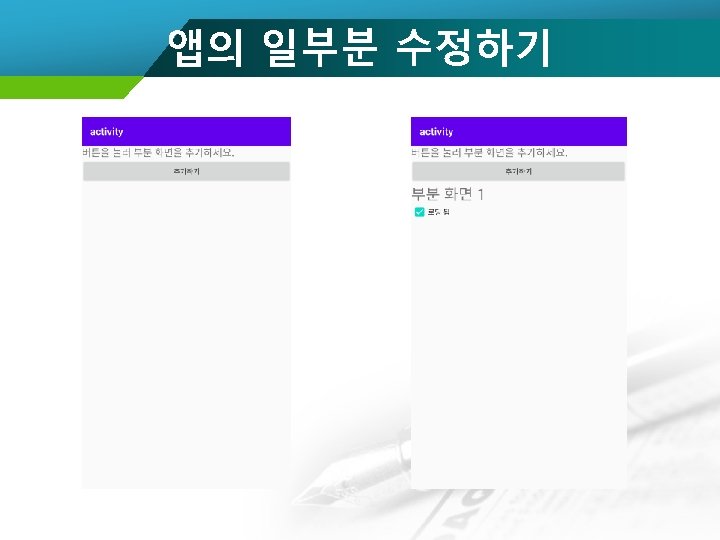
기본 앱 연동 v 실행 가능한 Activity(Sub. Display. Activity) v activity_sub_display. xml 파일에 화면 디자인 수정 <? xml version="1. 0" encoding="utf-8"? > <Linear. Layout xmlns: android="http: //schemas. android. com/apk/res/android" android: layout_width="match_parent" android: layout_height="match_parent" android: orientation="vertical"> <Text. View android: id="@+id/text. View" android: layout_width="match_parent" android: layout_height="wrap_content" android: text="버튼을 눌러 부분 화면을 추가하세요. " android: text. Size="20 sp" /> <Button android: id="@+id/button" android: layout_width="match_parent" android: layout_height="wrap_content" android: text="추가하기" />
기본 앱 연동 v activity_sub_display. xml 파일에 화면 디자인 수정 <Linear. Layout android: id="@+id/container" android: layout_width="match_parent" android: layout_height="match_parent" android: orientation="vertical"> </Linear. Layout>
기본 앱 연동 v layout 디렉토리에 sub. xml 파일을 추가하고 디자인 수정 <? xml version="1. 0" encoding="utf-8"? > <Linear. Layout xmlns: android="http: //schemas. android. com/apk/res/android" android: orientation="vertical" android: layout_width="match_parent" android: layout_height="match_parent"> <Text. View android: id="@+id/text. View 2" android: layout_width="match_parent" android: layout_height="wrap_content" android: text="부분 화면 1" android: text. Size="30 sp" /> <Check. Box android: id="@+id/check. Box" android: layout_width="match_parent" android: layout_height="wrap_content" android: text="동의합니다" /> </Linear. Layout>
기본 앱 연동 v Sub. Display. Activity. kt 파일의 on. Create 메소드에 버튼의 클릭 이벤트 처리 코드 추가 button. set. On. Click. Listener { val inflater = get. System. Service(Context. LAYOUT_INFLATER_SERVICE) as Layout. Inflater inflater. inflate(R. layout. sub, container, true) container. check. Box. text = "로딩 됨" }
Activity 상태 저장 v 상태 저장 ü 데이터 저장 fun on. Save. Instance. State(outstate: Bundle) { super. on. Save. Instance. State(out. State); out. State. put. String("data 1", "hello"); out. State. put. Int("data 2", 100); } ü 데이터 복원 fun on. Restore. Instance. State(saved. Instance. State: Bundle) { super. on. Restore. Instance. State(saved. Instance. State); String data 1=saved. Instance. State. get. String("data 1"); int data 2=saved. Instance. State. get. Int("data 2"); }
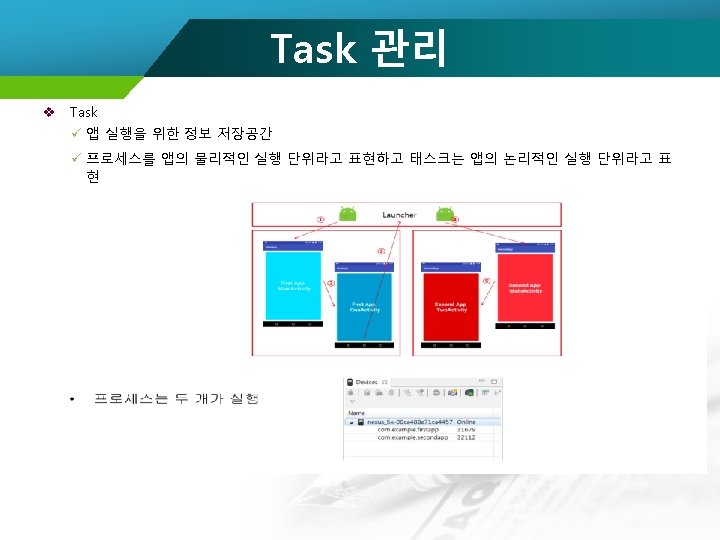
Task 관리 v 만일 First. App을 실행하여 First. App의 Main. Activity를 실행하고 자신의 One. Activity를 실행 한 후 One. Activity에서 Second. App의 Main. Activity를 실행한 경우 Task는 1개만 생성
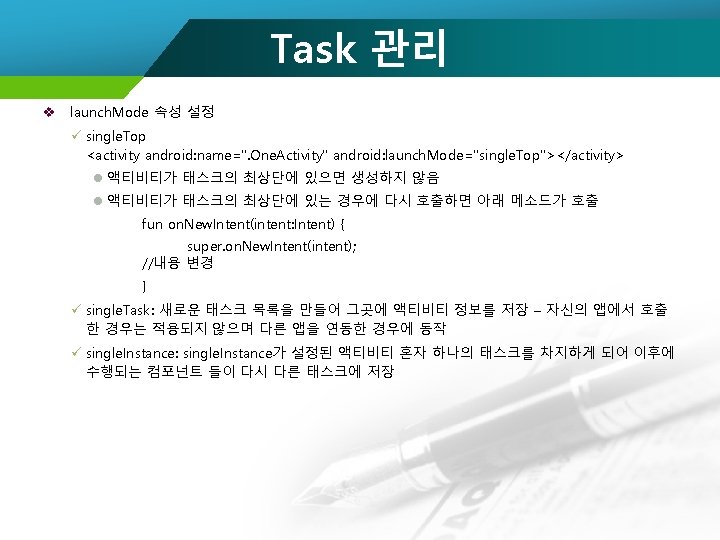
Task 관리 v launch. Mode 속성 설정 ü 액티비티를 등록하는 Android. Manifest. xml 파일에 설정 ü launch. Mode 속성값으로는 standard, single. Top, single. Task, single. Instance를 지정 <activity android: name=". One. Activity" android: launch. Mode="standard"> ü standard l 기본값으로 인텐트가 발생하면 매번 액티비티를 생성하고, 태스크 목록에 반복해서 올리겠다는 의미
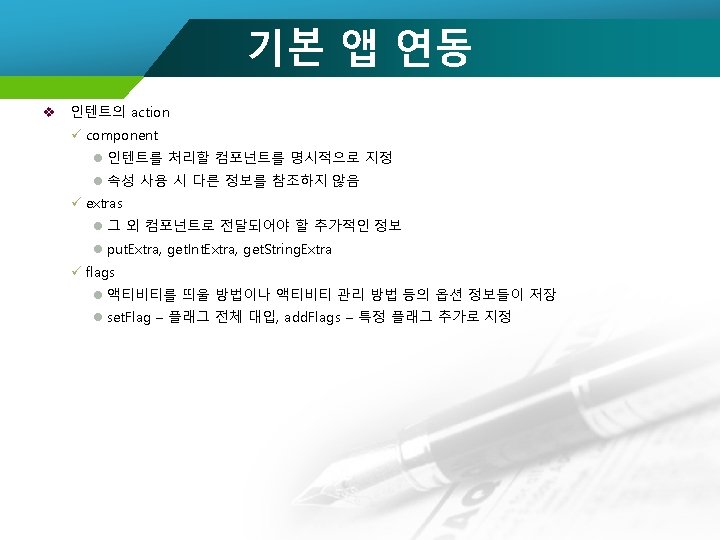
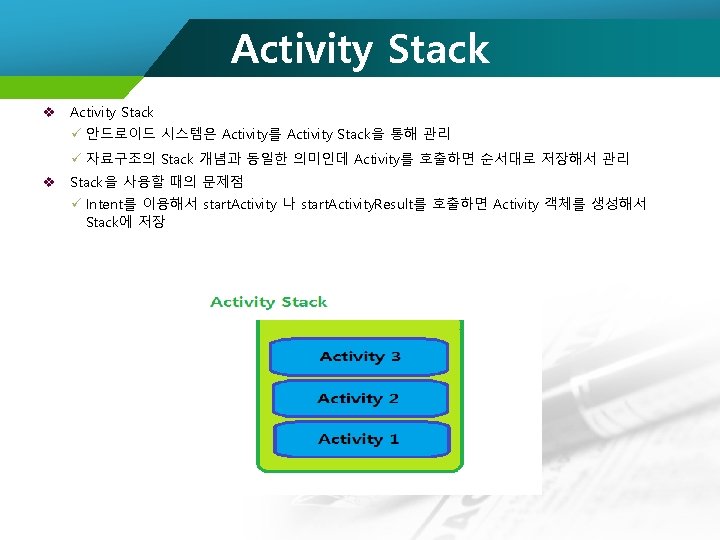
Activity Stack v Android Stack ü Flag를 이용하지 않고 동일한 Activity를 여러 번 호출하면 Stack에 동일한 Activity 객체가 여러 개 생성 ü 안드로이드에서는 Flag를 이용해서 Activity 객체를 재사용 할지 여부를 지정 가능 ü Intent 객체의 set. Flags라는 메소드에 Intent에 설정된 상수를 대입 Intent intent=new Intent(Main. Activity. this, Two. Activity. class); intent. set. Flags(Intent. FLAG_ACTIVITY_CLEAR_TOP); start. Activity(intent); ü 상수 ü FLAG_ACTIVITY_CLEAR_WHEN_TASK_RESET(Deprecated): 태스크 목록을 리셋 - 이전 액티비 티 정보를 삭제 ü FLAG_ACTIVITY_SINGLE_TOP: 하나만 생성해서 사용 ü FLAG_ACTIVITY_CLEAR_TOP: 위에 있는 모든 Activity 종료 ü FLAG_ACTIVITY_NO_HISTORY: 첫번째 Activity만 유지
Activity Stack v FLAG_ACTIVITY_SINGLE_TOP: 동일한 Activity를 다시 호출하면 새로 생성하지 않고 이전 Activity 를 사용
Activity Stack v FLAG_ACTIVITY_NO_HISTORY
Activity Stack v FLAG_ACTIVITY_CLEAR_TOP
Activity Stack v FLAG_ACTIVITY_NO_HISTORY: 처음 사용된 Activity를 제외하고는 Stack 에 쌓이지 않음 액티비티(Activity)
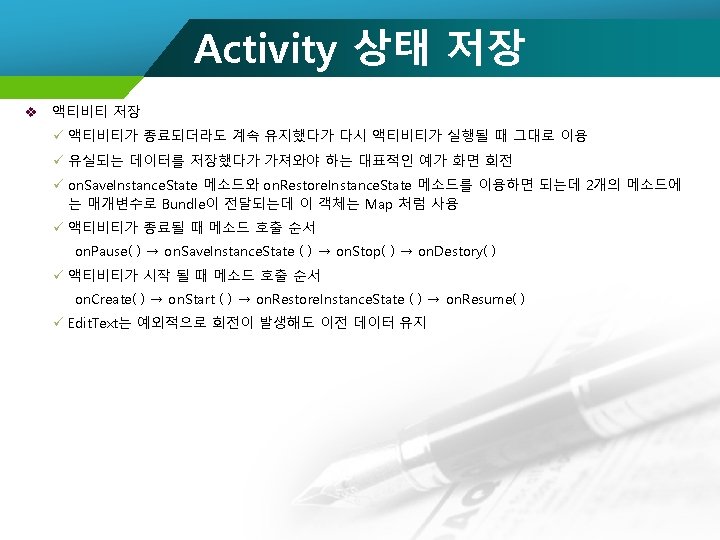
Activity 상태 저장
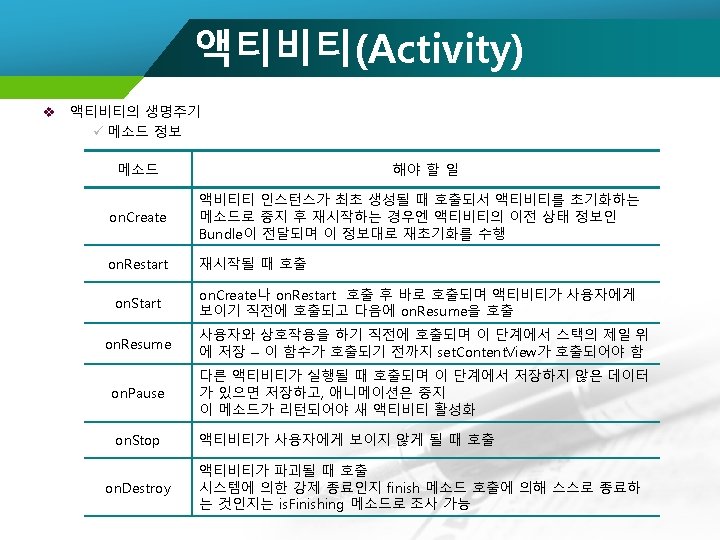
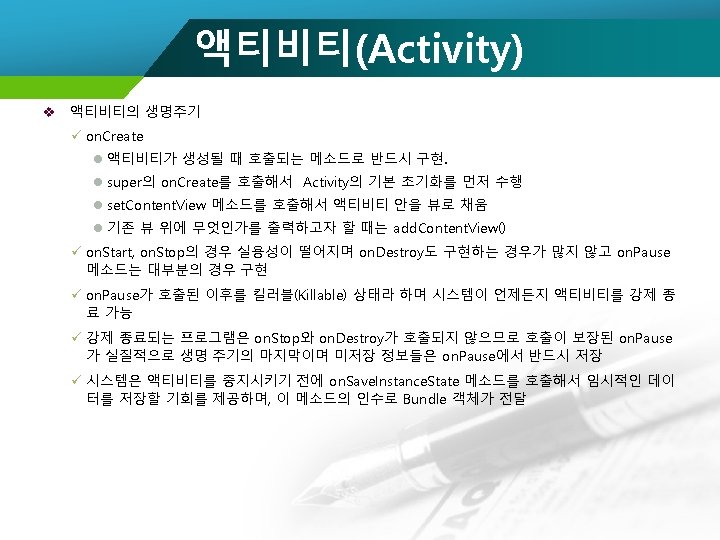
Activity 수명 주기
Activity 수명 주기 v 실행 가능한 Activity 생성(Life. Cycle. Activity) v 보조 Activity로 사용할 Sub. Life. Activity를 생성 v activity_sub_life. xml 파일에 디자인 <? xml version="1. 0" encoding="utf-8"? > <Relative. Layout xmlns: android="http: //schemas. android. com/apk/res/android" xmlns: tools="http: //schemas. android. com/tools" android: id="@+id/activity_detail" android: layout_width="match_parent" android: layout_height="250 dp" android: padding="16 dp" android: background="#ff 0000"> <Text. View android: id="@+id/detail_name" android: layout_width="match_parent" android: layout_height="wrap_content" android: text="This is Sub. Life. Activity" android: text. Size="30 dp" android: text. Color="#ffffff" android: gravity="center_horizontal"/>
Activity 수명 주기 v activity_sub_life. xml 파일에 디자인 <Text. View android: id="@+id/detail_count" android: layout_width="match_parent" android: layout_height="wrap_content" android: text="0" android: text. Size="40 dp" android: text. Color="#ffffff" android: gravity="center_horizontal" android: layout_below="@+id/detail_name" android: layout_margin. Top="16 dp"/> <Edit. Text android: id="@+id/detail_edit" android: layout_width="match_parent" android: layout_height="wrap_content" android: layout_below="@id/detail_count" android: background="#ffffff"/> <Button android: id="@+id/detail_btn" android: layout_width="match_parent" android: layout_height="wrap_content" android: layout_below="@id/detail_edit" android: text="Count" android: layout_margin. Top="16 dp"/> </Relative. Layout>
Activity 수명 주기 v 보조 Activity로 사용할 Sub. Life. Activity. kt 파일에 작성 import kotlinx. android. synthetic. main. activity_sub_life. * class Sub. Life. Activity : App. Compat. Activity() { var count = 0 override fun on. Create(saved. Instance. State: Bundle? ) { super. on. Create(saved. Instance. State) set. Content. View(R. layout. activity_sub_life) } } detail_btn. set. On. Click. Listener(object : View. On. Click. Listener { override fun on. Click(v: View? ) { count++ detail_count. set. Text(count. to. String()) } })
Activity 수명 주기 v 대화상자 Activity로 사용할 Dialog. Activity를 생성 v activity_dialog. xml 파일에 디자인 <? xml version="1. 0" encoding="utf-8"? > <Linear. Layout xmlns: android="http: //schemas. android. com/apk/res/android" android: orientation="vertical" android: layout_width="225 dp" android: layout_height="120 dp" android: background="@android: color/holo_blue_dark" android: padding="12 dp"> <Text. View android: layout_width="match_parent" android: layout_height="wrap_content" android: text="This is Dialog. Activity" android: gravity="center_horizontal" android: text. Size="24 dp" android: text. Color="@android: color/white" android: padding. Bottom="12 dp"/>
Activity 수명 주기 v activity_dialog. xml 파일에 디자인 <Button android: id="@+id/btn_finish_dialog" android: layout_height="wrap_content" android: layout_width="wrap_content" android: text="finish" android: text. Size="12 dp" android: layout_gravity="center_horizontal" android: on. Click="finish. Dialog" /> </Linear. Layout>
Activity 수명 주기 v 대화상자 Activity로 사용할 Dialog. Activity. kt 파일에 작성 class Dialog. Activity : Activity() { override fun on. Create(saved. Instance. State: Bundle? ) { super. on. Create(saved. Instance. State) request. Window. Feature(Window. FEATURE_NO_TITLE) set. Content. View(R. layout. activity_dialog) } } fun finish. Dialog(v: View? ) { finish() }
Activity 수명 주기 v Android. Manifest. xml 파일에 Dialog. Activity 등록 부분에 다이얼로그 테마 설정 ("@style/Theme. App. Compat. Dialog” 으로 설정해야 할 수도 있음) <activity android: name=". Dialog. Activity" android: theme="@android: style/Theme. Dialog"></activity> v 사용자 항목 뷰로 사용할 item_main_list. xml 파일을 layout 디렉토리에 생성 <? xml version="1. 0" encoding="utf-8"? > <Text. View xmlns: android="http: //schemas. android. com/apk/res/android" android: layout_width="match_parent" android: layout_height="wrap_content" android: text. Size="25 dp" android: text. Style="bold"/>
Activity 수명 주기 v activity_life_cycle. xml 파일에 화면 디자인 코드를 작성 <? xml version="1. 0" encoding="utf-8"? > <Relative. Layout xmlns: android="http: //schemas. android. com/apk/res/android" xmlns: tools="http: //schemas. android. com/tools" android: id="@+id/activity_main" android: layout_width="match_parent" android: layout_height="match_parent" android: padding="16 dp"> <Linear. Layout android: id="@+id/main_btn" android: layout_width="match_parent" android: layout_height="wrap_content" android: orientation="horizontal"> <Button android: id="@+id/main_btn_detail" android: layout_width="0 dp" android: layout_height="wrap_content" android: layout_weight="1" android: text="Go Sub. Life. Activity"/>
Activity 수명 주기 v activity_life_cycle. xml 파일에 화면 디자인 코드를 작성 <Button android: id="@+id/main_btn_dialog" android: layout_width="0 dp" android: layout_height="wrap_content" android: layout_weight="1" android: text="Go Dialog. Activity"/> </Linear. Layout> <List. View android: id="@+id/main_list" android: layout_width="match_parent" android: layout_height="wrap_content" android: layout_below="@id/main_btn"/> </Relative. Layout>
Activity 수명 주기 v Life. Cycle. Activity. kt 파일에 import kotlinx. android. synthetic. main. activity_life_cycle. * v Life. Cycle. Activity. kt 파일에 인스턴스 변수 선언 var datas: Array. List<String>? = null var adapter: Array. Adapter<String>? = null
Activity 수명 주기 v Life. Cycle. Activity. kt 파일의 on. Creat 메소드에 버튼의 클릭 이벤트 처리 코드를 추가 override fun on. Create(saved. Instance. State: Bundle? ) { super. on. Create(saved. Instance. State) set. Content. View(R. layout. activity_life_cycle) val click. Listener: View. On. Click. Listener = object : View. On. Click. Listener { override fun on. Click(v: View) { if (v === main_btn_detail) { val intent = Intent(this@Life. Cycle. Activity, Sub. Life. Activity: : class. java) start. Activity(intent) } else if (v === main_btn_dialog) { val intent = Intent(this@Life. Cycle. Activity, Dialog. Activity: : class. java) start. Activity(intent) } } } main_btn_detail. set. On. Click. Listener(click. Listener) main_btn_dialog. set. On. Click. Listener(click. Listener)
Activity 수명 주기 v Life. Cycle. Activity. kt 파일의 on. Creat 메소드에 버튼의 클릭 이벤트 처리 코드를 추가 datas = Array. List() datas!!. add("on. Create. . ") adapter = Array. Adapter(this, R. layout. item_main_list, datas!!) main_list. set. Adapter(adapter) }
Activity 수명 주기 v Life. Cycle. Activity. kt 파일에 Activity 수명 주기 관련 메소드를 구현 override fun on. Resume() { super. on. Resume() datas!!. add("on. Resume. . ") adapter!!. notify. Data. Set. Changed() } override fun on. Pause() { super. on. Pause() datas!!. add("on. Pause. . ") adapter!!. notify. Data. Set. Changed() } override fun on. Start() { super. on. Start() datas!!. add("on. Start. . ") adapter!!. notify. Data. Set. Changed() } override fun on. Stop() { super. on. Stop() datas!!. add("on. Stop. . ") adapter!!. notify. Data. Set. Changed() }
Activity 수명 주기 v Life. Cycle. Activity. kt 파일에 Activity 수명 주기 관련 메소드를 구현 override fun on. Restart() { super. on. Restart() datas!!. add("on. Restart. . ") adapter!!. notify. Data. Set. Changed() } override fun on. Destroy() { super. on. Destroy() datas!!. add("on. Destory. . ") adapter!!. notify. Data. Set. Changed() } override fun on. Save. Instance. State(out. State: Bundle) { super. on. Save. Instance. State(out. State) datas!!. add("on. Save. Instance. Statel. . ") adapter!!. notify. Data. Set. Changed() out. State. put. String("data 1", "hello") out. State. put. Int("data 2", 100) }
Activity 수명 주기 v Life. Cycle. Activity. kt 파일에 Activity 수명 주기 관련 메소드를 구현 override fun on. Restore. Instance. State(saved. Instance. State: Bundle) { super. on. Restore. Instance. State(saved. Instance. State) datas!!. add("on. Restore. Instance. State. . ") adapter!!. notify. Data. Set. Changed() val data 1 = saved. Instance. State. get. String("data 1") val data 2 = saved. Instance. State. get. Int("data 2") Toast. make. Text(this, "$data 1: $data 2", Toast. LENGTH_SHORT). show() }
Lotto(화면 이동) v 이전 Lotto 프로젝트에 작성 v build. gradle 파일의 plug-in 추가 id 'kotlin-android-extensions' v activity_main. xml 파일을 열어서 각 Card. View에 id 설정 random. Card, constellation. Card, name. Card v Main. Activity. kt 파일에 import 추가 import kotlinx. android. synthetic. main. activity_main. *
Lotto(화면 이동) v Main. Activity. kt 파일의 on. Create 메소드에 추가 // 랜덤으로 번호 생성 카드의 클릭 이벤트 리스너 random. Card. set. On. Click. Listener { // Result. Activity 를 시작하는 Intent 생성 val intent = Intent(this, Result. Activity: : class. java) } // Result. Activity 를 시작하는 Intent 를 만들고 start. Activity 로 실행 start. Activity(intent) // 별자리로 번호 생성 카드의 클릭 이벤트 리스너 constellation. Card. set. On. Click. Listener { // Constellation. Activity 를 시작하는 Intent 를 만들고 start. Activity 로 실행 start. Activity(Intent(this, Constellation. Activity: : class. java)) } // 이름으로 번호 생성 카드의 클릭 이벤트 리스너 name. Card. set. On. Click. Listener { // Name. Activity 를 시작하는 Intent 를 만들고 start. Activity 로 실행 start. Activity(Intent(this, Name. Activity: : class. java)) }
Lotto(화면 이동) v Constellation. Activity. kt 파일 수정 import kotlinx. android. synthetic. main. activity_constellation. * class Constellation. Activity : App. Compat. Activity() { override fun on. Create(saved. Instance. State: Bundle? ) { super. on. Create(saved. Instance. State) set. Content. View(R. layout. activity_constellation) go. Result. Button. set. On. Click. Listener { start. Activity(Intent(this, Result. Activity: : class. java)) } } back. Button. set. On. Click. Listener{ finish() } }
Lotto(화면 이동) v Name. Activity. kt 파일 수정 import kotlinx. android. synthetic. main. activity_name. * class Name. Activity : App. Compat. Activity() { override fun on. Create(saved. Instance. State: Bundle? ) { super. on. Create(saved. Instance. State) set. Content. View(R. layout. activity_name) // 번호 생성 버튼의 클릭이벤트 리스너 설정 go. Button. set. On. Click. Listener { // Result. Activity 를 시작하는 Intent 생성 val intent = Intent(this, Result. Activity: : class. java) // Result. Activity 를 시작하는 Intent 를 만들고 start. Activity 로 실행 start. Activity(intent) } } } // 뒤로가기 버튼의 클릭이벤트 리스너 설정 back. Button. set. On. Click. Listener { // 액티비티 종료 finish() }
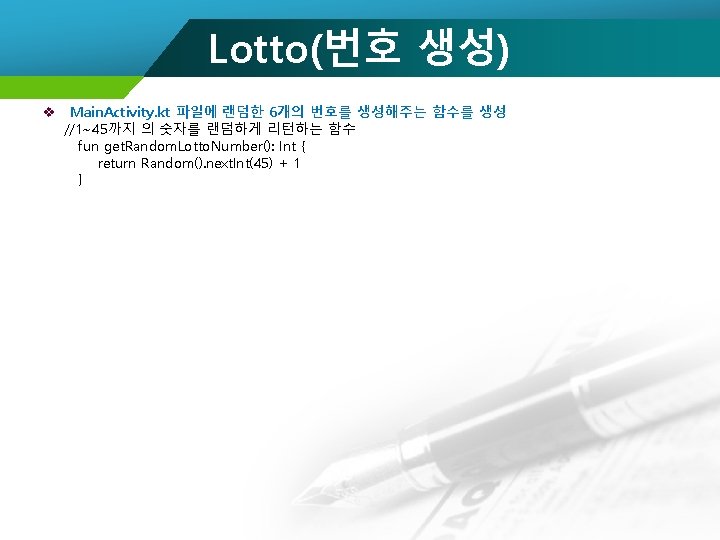
Lotto(번호 생성) v Main. Activity. kt 파일의 on. Create 메소드에서 랜덤으로 번호 생성 카드를 눌렀을 때 수행되는 코 드를 수정 // 랜덤으로 번호 생성 카드의 클릭 이벤트 리스너 random. Card. set. On. Click. Listener { // Result. Activity 를 시작하는 Intent 생성 val intent = Intent(this, Result. Activity: : class. java) // intent 의 결과 데이터를 전달한다. // int 의 리스트를 전달하므로 put. Integer. Array. List. Extra 를 사용한다. intent. put. Integer. Array. List. Extra("result", Array. List(get. Random. Lotto. Numbers())) } // Result. Activity 를 시작하는 Intent 를 만들고 start. Activity 로 실행 start. Activity(intent)
Lotto(번호 생성) v Result. Activity. kt 파일에 데이터를 받아서 수정하는 코드를 작성 class Result. Activity : App. Compat. Activity() { // 로또 1번 공 이미지의 아이디를 사용 val lotto. Image. Start. Id = R. drawable. ball_01 override fun on. Create(saved. Instance. State: Bundle? ) { super. on. Create(saved. Instance. State) set. Content. View(R. layout. activity_result) back. Button. set. On. Click. Listener{ finish() } // 전달받은 결과 배열을 가져온다. val result = intent. get. Integer. Array. List. Extra("result") // 결과 화면 기본 텍스트 result. Label. text = "랜덤으로 생성된n로또번호입니다" } // 전달받은 결과가 있는 경우에만 실행 result? . let { // 결과에 맞게 로또 공 이미지를 업데이트한다. // 전달받은 결과는 정렬되어 있지않으므로 정렬해서 전달한다. update. Lotto. Ball. Image(result. sorted. By { it }) }
Lotto(번호 생성) v Result. Activity. kt 파일에 데이터를 받아서 수정하는 코드를 작성 fun update. Lotto. Ball. Image(result: List<Int>){ // 결과의 사이즈가 6개 미만인경우 에러가 발생할 수 있으므로 바로 리턴한다. if(result. size < 6) return } } // ball_01 이미지 부터 순서대로 이미지 아이디가 있기 때문에 // ball_01 아이디에 결과값 -1 을 하면 목표하는 이미지가 된다 // ex) result[0] 이 2번 공인 경우 ball_01 에서 하나뒤에 이미지가 된다. image. View 01. set. Image. Resource(lotto. Image. Start. Id + (result[0] - 1)) image. View 02. set. Image. Resource(lotto. Image. Start. Id + (result[1] - 1)) image. View 03. set. Image. Resource(lotto. Image. Start. Id + (result[2] - 1)) image. View 04. set. Image. Resource(lotto. Image. Start. Id + (result[3] - 1)) image. View 05. set. Image. Resource(lotto. Image. Start. Id + (result[4] - 1)) image. View 06. set. Image. Resource(lotto. Image. Start. Id + (result[5] - 1))
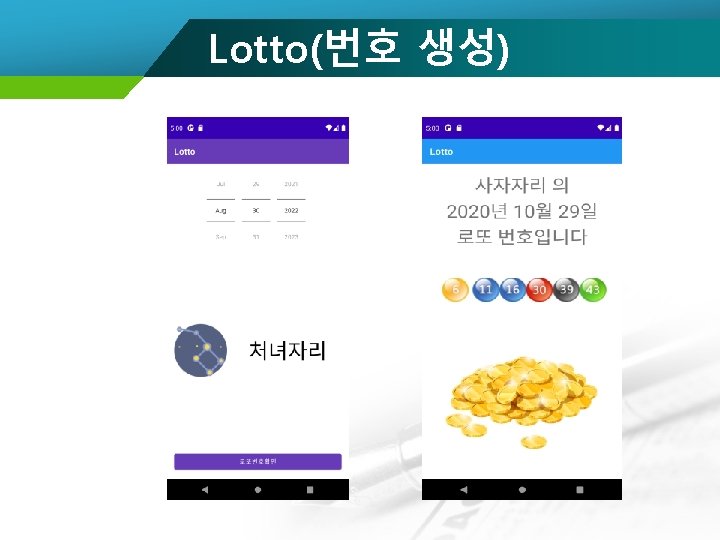
Lotto(번호 생성) v Constellation. Activity. kt 파일 수정 class Constellation. Activity : App. Compat. Activity() { /* 전달받은 월정보, 일정보 기준으로 별자리를 반환한다. */ fun make. Constellation. String(month: Int, day: Int): String { // 전달받은 월 정보와 일 정보를 기반으로 정수형태의 값을 만든다. // ex) 1월 5일 --> 105, 11월 1일 --> 1101 val target = "${month + 1}${String. format("%02 d", day)}". to. Int() when (target) { in 101. . 119 -> return "염소자리" in 120. . 218 -> return "물병자리" in 219. . 320 -> return "물고기자리" in 321. . 419 -> return "양자리" in 420. . 520 -> return "황소자리" in 521. . 621 -> return "쌍둥이자리" in 622. . 722 -> return "게자리" in 723. . 822 -> return "사자자리" in 823. . 923 -> return "처녀자리" in 924. . 1022 -> return "천칭자리" in 1023. . 1122 -> return "전갈자리" in 1123. . 1224 -> return "사수자리" in 1225. . 1231 -> return "염소자리" else -> return "기타별자리" } }
Lotto(번호 생성) v Constellation. Activity. kt 파일 수정 override fun on. Create(saved. Instance. State: Bundle? ) { super. on. Create(saved. Instance. State) set. Content. View(R. layout. activity_constellation) // 로또번호 확인 버튼의 클릭이벤트 리스너 설정 go. Result. Button. set. On. Click. Listener { // Result. Activity 를 시작하는 Intent 생성 val intent = Intent(this, Result. Activity: : class. java) // intent 의 결과 데이터를 전달한다. // int 의 리스트를 전달하므로 put. Integer. Array. List. Extra 를 사용한다. // 전달하는 리스트는 별자리의 해시코드로 생성한 로또번호 intent. put. Integer. Array. List. Extra("result", Array. List(get. Lotto. Numbers. From. Hash(make. Constellation. String(date. Picker. month, date. Picker. day. Of. Month)))) // 별자리를 추가로 전달한다. intent. put. Extra("constellation", make. Constellation. String(date. Picker. month, date. Picker. day. Of. Month)) } // Result. Activity 를 시작하는 Intent 를 만들고 start. Activity 로 실행 start. Activity(intent)
Lotto(번호 생성) v Constellation. Activity. kt 파일 수정 // 현재 Date. Picker 의 월, 일 정보로 별자리 텍스트 변경 text. View. text = make. Constellation. String(date. Picker. month, date. Picker. day. Of. Month) // Date. Picker 의 날짜가 변화하면 별자리를 보여주는 텍스트뷰도 변경 val calendar = Calendar. get. Instance() date. Picker. init(calendar. get(Calendar. YEAR), calendar. get(Calendar. MONTH), calendar. get(Calendar. DAY_OF_MONTH), object : Calendar. View. On. Date. Change. Listener, Date. Picker. On. Date. Changed. Listener { override fun on. Date. Changed(view: Date. Picker? , year: Int, month. Of. Year: Int, day. Of. Month: Int) { // 변경된 시점의 Date. Picker 의 월, 일 정보로 별자리 텍스트 변경 text. View. text = make. Constellation. String(date. Picker. month, date. Picker. day. Of. Month) } override fun on. Selected. Day. Change( view: Calendar. View, year: Int, month: Int, day. Of. Month: Int ) {} }) } }
Lotto(번호 생성) v Result. Activity. kt 파일의 on. Create 메소드에 추가 // 전달받은 별자리를 가져온다 val constellation = intent. get. String. Extra("constellation") // 별자리가 전달된 경우 텍스트 변경 if(!Text. Utils. is. Empty(constellation)){ result. Label. text = "${constellation} 의n${Simple. Date. Format("yyyy년 MM월 dd일 "). format(Date())}n로또 번호입니다" }
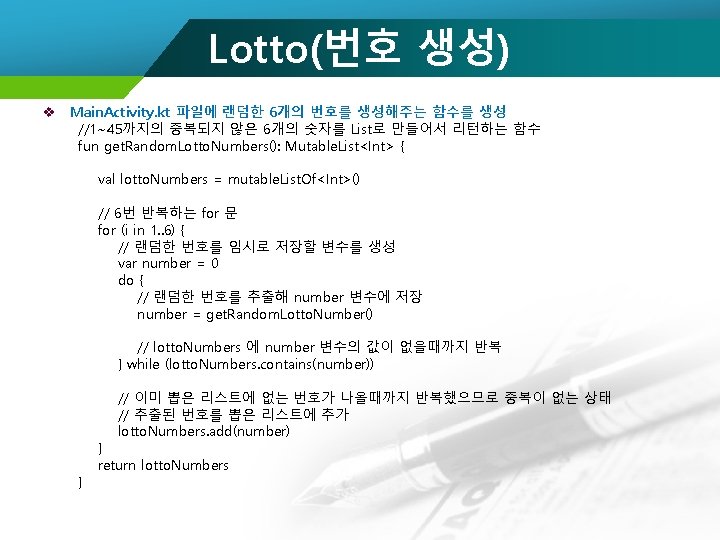
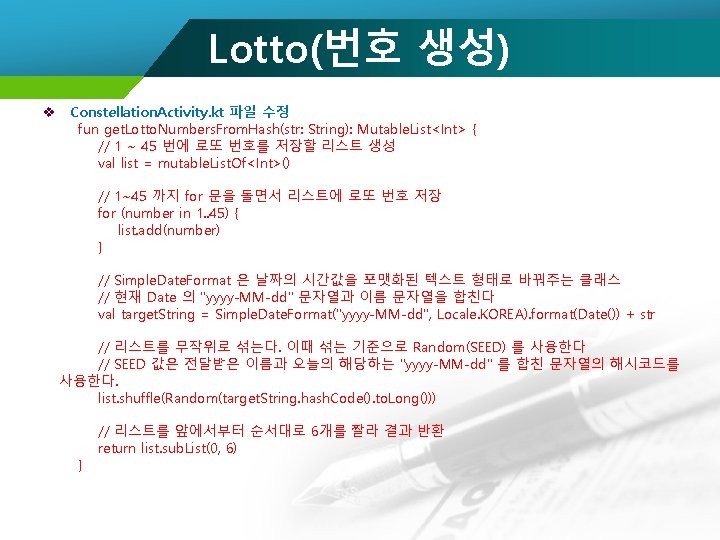
Lotto(번호 생성) v Name. Activity. kt 파일 수정 class Name. Activity : App. Compat. Activity() { fun get. Lotto. Numbers. From. Hash(str: String): Mutable. List<Int> { // 1 ~ 45 번에 로또 번호를 저장할 리스트 생성 val list = mutable. List. Of<Int>() // 1~45 까지 for 문을 돌면서 리스트에 로또 번호 저장 for (number in 1. . 45) { list. add(number) } // Simple. Date. Format 은 날짜의 시간값을 포맷화된 텍스트 형태로 바꿔주는 클래스 // 현재 Date 의 "yyyy-MM-dd" 문자열과 이름 문자열을 합친다 val target. String = Simple. Date. Format("yyyy-MM-dd", Locale. KOREA). format(Date()) + str // 리스트를 무작위로 섞는다. 이때 섞는 기준으로 Random(SEED) 를 사용한다 // SEED 값은 전달받은 이름과 오늘의 해당하는 "yyyy-MM-dd" 를 합친 문자열의 해시코드를 사용한다. list. shuffle(Random(target. String. hash. Code(). to. Long())) } // 리스트를 앞에서부터 순서대로 6개를 짤라 결과 반환 return list. sub. List(0, 6)
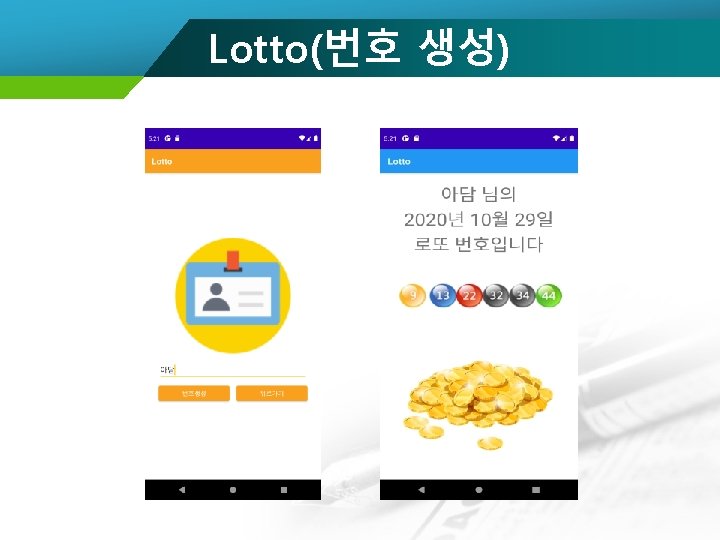
Lotto(번호 생성) v Name. Activity. kt 파일 수정 override fun on. Create(saved. Instance. State: Bundle? ) { super. on. Create(saved. Instance. State) set. Content. View(R. layout. activity_name) // 번호 생성 버튼의 클릭이벤트 리스너 설정 go. Button. set. On. Click. Listener { // 입력된 이름이 없으면 토스트 메세지 출력후 리턴 if(Text. Utils. is. Empty(edit. Text. to. String())) { Toast. make. Text(application. Context, "이름을 입력하세요. ", Toast. LENGTH_SHORT). show() return@set. On. Click. Listener } // Result. Activity 를 시작하는 Intent 생성 val intent = Intent(this, Result. Activity: : class. java) // intent 의 결과 데이터를 전달한다. // int 의 리스트를 전달하므로 put. Integer. Array. List. Extra 를 사용한다. // 전달하는 리스트는 이름의 해시코드로 생성한 로또번호 intent. put. Integer. Array. List. Extra("result", Array. List(get. Lotto. Numbers. From. Hash(edit. Text. to. String())))
Lotto(번호 생성) v Name. Activity. kt 파일 수정 // 입력받은 이름을 추가로 전달한다. intent. put. Extra("name", edit. Text. to. String()) } } } // Result. Activity 를 시작하는 Intent 를 만들고 start. Activity 로 실행 start. Activity(intent) // 뒤로가기 버튼의 클릭이벤트 리스너 설정 back. Button. set. On. Click. Listener { // 액티비티 종료 finish() }
Lotto(번호 생성) v Result. Activity. kt 파일의 on. Create 메소드에 추가 // 전달받은 이름을 가져온다. val name = intent. get. String. Extra("name") // name 이 전달된 경우 결과화면의 텍스트를 변경 if(!Text. Utils. is. Empty(name)){ result. Label. text = "${name} 님의n${Simple. Date. Format("yyyy년 MM월 dd일 "). format(Date())}n로또 번호입니다" }
Activity 설정 v 키보드 제어 객체 val manager: Input. Method. Manager = get. System. Service(Context. INPUT_METHOD_SERVICE) as Input. Method. Manager ü show. Soft. Input(view: View, flags: Int): 키보드 보임 ü hide. Soft. Input. From. Window(window. Token: IBinder, flags: Int): 키보드 숨김 if(v==hide. Btn){ manager. hide. Soft. Input. From. Window(get. Current. Focus(). get. Window. Token(), Input. Method. Manager. HIDE_NOT_ALWAYS); } else if(v==show. Btn) { manager. show. Soft. Input(edit. Text, Input. Method. Manager. SHOW_IMPLICIT); } ü 현 상황과 반대로 키보드 제어 toggle. Soft. Input(show. Flags: Int, hide. Flags: Int) toggle. Soft. Input. From. Window(window. Token: IBinder , show. Flags: Int, hide. Flags: Int) ü 포커스를 설정해서 키보드를 보이고자 할 때는 View객체. request. Focus()를 먼저 호출
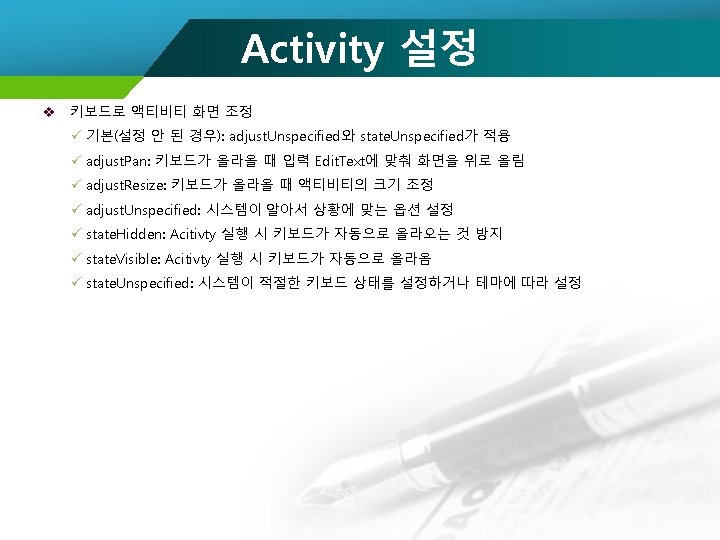
Activity 설정 v 키보드로 액티비티 화면 조정 ü adjust. Pan <activity android: name=". Main. Activity" android: window. Soft. Input. Mode="adjust. Pan">
Activity 설정 v 키보드로 액티비티 화면 조정 ü 처음부터 키보드 출력 <activity android: name=". Main. Activity" android: window. Soft. Input. Mode="adjust. Pan|state. Visible"> ü 처음부터 키보드 올라오지 않도록 하기 <activity android: name=". Main. Activity" android: window. Soft. Input. Mode="adjust. Resize|state. Hidden">
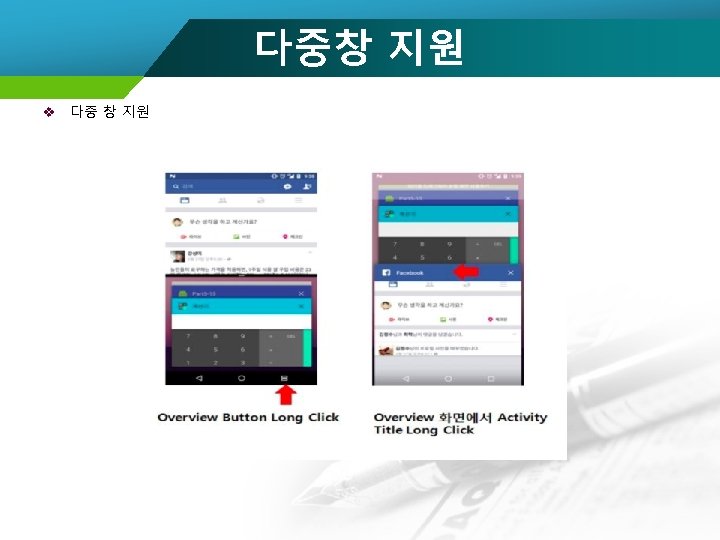
Picture In Picture v Picture In Picture ü 다중 창(Multi Window)은 API Level 24(Android 7. 0)에 추가된 기능 ü 스크린을 분할하여 한 화면에 두 앱을 동시에 띄울 수 있는 기능 ü API Level 26(Android Oreo)에서는 Android TV뿐 아니라 스마트 폰 용 앱에서도 PIP 기능을 구현 가능 ü Activity 안에 다른 Activity를 보이게 할 수 있음 ü 동영상을 재생할 때 많이 사용하는 기법으로 동영상을 보여주다가 사용자가 바탕화면 등으로 빠져 나가면 동영상 화면을 줄여서 귀퉁이에 재생하는 기법 ü PIP를 적용하려면 액티비티에 supports. Picture. In. Picture 설정이 필요 <activity android: name=". Main. Activity" android: supports. Picture. In. Picture="true"> </activity> ü supports. Picture. In. Picture 설정이 true로 지정되면 resizeable. Activity 속성은 자동으로 무시 ü is. In. Picture. Mode( ): 액티비티가 PIP 모드인지 확인 ü on. Picture. In. Picture. Mode. Changed( ): PIP 모드로 전환되거나 PIP 모드에서 해제될 때 호출 ü enter. Picture. In. Picture. Mode( ): 액티비티를 PIP 모드로 전환 val pip. Builder: Picture. In. Picture. Params. Builder = Picture. In. Picture. Params. Builder() enter. Picture. In. Picture. Mode(pip. Builder. build())
다중창 지원 v 앱에서 다중 창을 지원하고 싶지 않으면 액티비티의 resizeable. Activity 속성값을 false로 지정 <activity android: name=". Main. Activity" android: window. Soft. Input. Mode="adjust. Resize|state. Hidden" android: resizeable. Activity="false"> v 다중 창과 관련된 상황을 파악 ü on. Multi. Window. Mode. Changed(): 액티비티가 다중 창 모드로 들어가거나 나올 때 콜백 함수 override fun on. Resume() { super. on. Resume() if(Build. VERSION. SDK_INT >= Build. VERSION_CODES. N) { if(is. In. Multi. Window. Mode()){ //show. Toast("on. Resume. . is. In. Multi. Window. Mode. . . yes. . . "); } } } override fun on. Multi. Window. Mode. Changed(is. In. Multi. Window. Mode: Boolean, configuaration: Configuration) { super. on. Multi. Window. Mode. Changed(is. In. Multi. Window. Mode, configuaration); //show. Toast("on. Multi. Window. Mode. Changed. . . "+is. In. Multi. Window. Mode); }
Picture In Picture
Picture In Picture
회전 v Activity를 특정 방향으로 고정 <activity android: name=". Main. Activity" android: screen. Orientation="portrait"> v 회전 감지 설정 ü 회전이 발생하면 메소드가 호출되도록 설정 <activity android: name=". Lab 3 Activity" android: config. Changes="orientation|screen. Size"> ü 회전이 발생하면 Activity에서 호출되는 메소드 override fun on. Configuration. Changed(new. Config: Configuration) { super. on. Configuration. Changed(new. Config) if (new. Config. orientation === Configuration. ORIENTATION_PORTRAIT) { show. Toast("portrait. . . ") } else { show. Toast("landscape. . . ") } v } 방향에 따라 다른 UI 보여주기 ü layout -land 라는 디렉토리를 만들고 동일한 이름의 layout 파일을 생성 ü on. Configuration. Changed(new. Config: Configuration) 메소드에서 set. Content. View 메소드를 호 출
Activity 설정
Activity 설정 v 실행 가능한 Activity 추가(Setting. Activity) v activity_setting. xml 파일에서 화면 수정 <? xml version="1. 0" encoding="utf-8"? > <Linear. Layout xmlns: android="http: //schemas. android. com/apk/res/android" android: layout_width="match_parent" android: layout_height="match_parent" android: padding="16 dp" android: orientation="vertical"> <Button android: id="@+id/toggle. Btn" android: layout_width="match_parent" android: layout_height="wrap_content" android: text="Keyboard Toggle" /> <Text. View android: layout_width="match_parent" android: layout_height="0 dp" android: layout_weight="1" android: background="@android: color/holo_orange_light" android: clickable="true"/>
Activity 설정 v activity_setting. xml 파일에서 화면 수정 <Edit. Text android: id="@+id/edit" android: layout_width="match_parent" android: layout_height="wrap_content" /> <Text. View android: layout_width="match_parent" android: layout_height="0 dp" android: layout_weight="1" android: background="@android: color/holo_blue_dark" /> </Linear. Layout>
Activity 설정 v Setting. Activity. kt 파일 수정 import kotlinx. android. synthetic. main. activity_setting. * class Setting. Activity : App. Compat. Activity() { override fun on. Create(saved. Instance. State: Bundle? ) { super. on. Create(saved. Instance. State) set. Content. View(R. layout. activity_setting) } toggle. Btn. set. On. Click. Listener(object : View. On. Click. Listener { override fun on. Click(v: View? ) { val manager: Input. Method. Manager = get. System. Service(Context. INPUT_METHOD_SERVICE) as Input. Method. Manager manager. toggle. Soft. Input(Input. Method. Manager. SHOW_FORCED, 0) } })
Activity 설정 v Setting. Activity. kt 파일 수정 private fun show. Toast(message: String) { val toast = Toast. make. Text(this, message, Toast. LENGTH_SHORT) toast. show() } override fun on. Resume() { super. on. Resume() show. Toast("on. Resume. . . ") if (Build. VERSION. SDK_INT > Build. VERSION_CODES. N) { if (is. In. Multi. Window. Mode) { show. Toast("on. Resume. . is. In. Multi. Window. Mode. . yes ") } } } override fun on. Pause() { super. on. Pause() show. Toast("on. Pause. . . ") }
Activity 설정 v Setting. Activity. kt 파일 수정 override fun on. Multi. Window. Mode. Changed(is. In. Multi. Window. Mode: Boolean, configuration: Configuration) { super. on. Multi. Window. Mode. Changed(is. In. Multi. Window. Mode, configuration) show. Toast("on. Multi. Window. Mode. Changed. . . $is. In. Multi. Window. Mode") } } override fun on. Configuration. Changed(new. Config: Configuration) { super. on. Configuration. Changed(new. Config) if (new. Config. orientation === Configuration. ORIENTATION_PORTRAIT) { Log. e("방향", "portrait. . . ") } else { Log. e("방향", "landscape. . . ") } }
Activity 설정 v Android. Manifest. xml 파일에서 Activity 설정 수정 <activity android: name=". Setting. Activity" android: window. Soft. Input. Mode="adjust. Resize|state. Hidden" android: config. Changes="orientation|screen. Size"> <intent-filter> <action android: name="android. intent. action. MAIN" /> <category android: name="android. intent. category. LAUNCHER" /> </intent-filter> </activity>