Caring for a Pediatric Tracheostomy Anatomy of a


. • While")


 the catheter between your fingers as")


- Slides: 54
Caring for a Pediatric Tracheostomy
Anatomy of a Tracheostomy • Surgical opening • Placed in the trachea • Long term treatment for certain airway/breathing problems
Skills necessary for tracheostomy care • Stoma care • Trach suctioning • Trach changes • Providing supplemental oxygen • Manual Resuscitation
Parts of a tracheostomy tube 1. 2. 3. 4. 5. 6. Connector: the part of the trach tube that sticks out of the neck that can connect to the ventilator and the AMBU bag Cannula: the part of the trach tube that goes inside the windpipe (trachea) Cuff: a small balloon filled with air that helps to hold the trach in place and prevent air from escaping around it; the side port allows the balloon to be filled or emptied. Not all trachs have a cuff Neck plate: the part of the trach tubes where the ties are attached; also called "the wings" of the tube Obturator: placed inside the tube to guide the tube into the trachea during insertion Inner Cannula: a replaceable cannula that fits inside the tracheal tube (used on larger trachs) 6 4 1 5 3 5 2
Types of trach tubes • Shiley trach • Bivona trach
Stoma Care
Stoma care • It is important to clean the area around the trach tube at least twice a day. You may have to do this more often right after your child's trach is established because of increased secretions and moisture. The site should be kept as clean and dry as possible. • Watch for signs of infection around the stoma including: • • Redness Odor Pus or discharge Skin breakdown
Stoma Care • Supplies: • • Blanket or Towel roll Sterile water (see Appendix 1, pg. 32) Liquid containers Hydrogen peroxide (if needed) Cotton tipped applicators (swab) Absorbent gauze pad Trach ties (if changing the trach ties at the same time as stoma care)
Stoma Care • Wash hands with soap & water • Dry with a clean towel • Don gloves • Gather supplies
Stoma Care • Place blanket or towel roll under the child’s shoulders • Remove the old absorbent gauze pad if present • Inspect the stoma site for any skin breakdown, signs of infection or rashes
Stoma care • Use wet cotton tipped applicator to clean around stoma site • Swab should be dipped into sterile water. If crusty drainage is present, use ½ strength hydrogen peroxide (mix equal parts sterile water and hydrogen peroxide). Begin at the top of the stoma and wipe in one straight line away from the opening. Discard this swab. With a new wet swab, start again at the top of the stoma on the opposite side and repeat. Discard this swab, and continue this procedure along the border of the stoma until all areas are cleaned. Remember to wipe down the neck plate “wings” as well.
Stoma care • Use dry cotton tipped applicator to dry area around the stoma site. • Use the same procedure as outlined above, but with dry swabs. Be careful not to allow small pieces of cotton to be breathed into the stoma
Stoma care • Place a clean absorbent gauze pad around the cannula and under the neck plate “wings” as needed. Replace the trach ties as needed (refer to Trach Tie Change) Be careful not to cut the gauze, the small pieces can be breathed in
Stoma care • Key Points • Do not apply lotions or powders near the stoma • Only apply ointment as instructed by your doctor • Report any breakdown in the skin, foul odor, drainage or rashes to your nurse or doctor • The skin around your child’s stoma should be the same color as the rest of their skin • The stoma should be pink, like the inside of your child’s mouth
Trach tie change
Trach tie change • Trach ties hold the trach tube in place and must be attached to the trach at all times unless you are performing a trach tie change. You should change the trach ties at least once a day, and whenever they become wet or dirty, regardless of the last time they were changed.
Trach tie change • Supplies • Another person • Blanket or Towel roll • Sterile water (see Appendix 1, pg. 32) • Clean trach ties • Soap & water • Cotton tipped applicators (swab) • Clean washcloths • Nystatin power (if ordered by the physician)
Trach tie change • Procedure • **Follow steps as illustrated with Stoma Care • Agree on who will be the “Holder” • This person is responsible for holding the trach in place while the other person replaces the ties. The Holder must hold the trach in place throughout the entire tie change!
Trach tie change • Remove the trach side from one side (wing). • While the Holder ensures the trach remains in place, detach one side and bring the around the back of the neck to the other side that is still attached.
Trach tie change • Wash the neck. • Use mild soap and water, rinse and then dry thoroughly with a washcloth. Look for signs of skin breakdown or rash around the neck; pay special attention to the back of the neck. • *If needed for skin breakdown, use Nystatin powder (as ordered by the physician). Use away from the stoma to avoid aspiration. Put the powder in your hand apply to the neck.
Trach tie change • Attach clean trach tie to the empty wing. • Bring the rest of the trach tie around the back of the neck to the other side. Place a clean dressing under the trach as needed
Trach tie change • Remove the rest of the old trach tie and attach the new one to the open wing. • Make sure the trach tie is securely attached to the wings, but not too tight around your child’s neck. You should be able to insert your little finger between the tie and the back of the child’s neck
Trach tie change • Key points: • Clean dirty or used trach ties with mild soap and water and hang them to dry. Do not put trach ties in the dryer. • Check trach ties before each use. If they become stiff, frayed, hard, or the Velcro is not sticking, replace them with new trach ties. • Report any breakdown in the skin or rashes to your nurse or doctor.
Suctioning
Suctioning • Suctioning removes mucous from the child's trach. The amount of suctioning needed is different for each child. Suction only as needed but at least once in the morning and once in the evening to check patency. Mucous builds up during sleep. It is good to suction the trach when the child wakes up. Suctioning before eating will help prevent coughing during meals. Try to avoid suctioning after meals to prevent vomiting. • Normal mucous looks clear to white in color and can be thin to slightly thick. Mucous should not look yellow or green in color, or have an odor.
Suctioning • You should suction when the child has any of the following: • • • Mucous at the opening of the trach causing bubbling or gurgling sounds Coughing and bringing up mucous Breathing faster or harder than usual Restless or scared Chest is not moving because of a mucous plug Mouth or lips are pale or blue in color • If child is older, they may be able to tell you when they need to be suctioned.
Suctioning • Determine length of catheter for suctioning • Suctioning should not be inserted any deeper than needed. Suction catheters have numbers of lines at the end of the catheter, Measure one catheter for the correct length for insertion against a spare trach tube and suction no deeper than this number.
Suctioning • Supplies • • Suction machine with tubing Suction catheters Sterile water (see Appendix 1, pg. 32) Clean gloves Saline drops, if needed for thick secretions AMBU bag and mask Extra trach tube Obturator nearby
Suctioning • Wash hands with soap & water • Dry with a clean towel • Don Gloves • Gather supplies
Suctioning • Turn on the suction machine and set the pressure to 80 – 120 mm. Hg • Put on sterile gloves and attach suction catheter to suction tubing. • Make sure not to touch the last 2 -3 inches of the catheter. • Hold the catheter with fingers slightly above the measured mark for suctioning. • This technique will help prevent the catheter from going too deep
Suctioning • Insert the tip of the catheter into the trach while continuing to hold the catheter at the pre-measured mark. • Apply quick suction as you enter to the trach opening, then release as you go down the tube. • This will suction any mucous sitting there that may have been coughed up the trach by your child
Suctioning • Apply suction while twisting (not stirring) the catheter between your fingers as you remove the catheter. • Each suction period should take 3 -5 seconds. Allow for recovery time or give 3 -5 breaths with the AMBU bag, as needed. Repeat steps 6&7 (pg. 15) until the mucous is cleared. For very thick secretions you may have to use saline drops • After you have finished suctioning, clean the catheter by suctioning sterile water through the tubing.
Trach tube change
Trach tube change • Change the trach tube once a week and as needed. Using two people to change the trach tube is best, but in an emergency you MUST be prepared to do this alone. • The child may cough and/or cry while you change out the trach • It is usually best to change the tube prior to meals or at least 2 hours after eating • Do not touch the end of the trach cannula that goes into the trachea • Always have the same size trach and one size smaller within reach during trach change!
Trach tube change • Supplies • • • Another person Towel roll Clean gloves One current size trach tube One size smaller trach tube Clean trach ties Water soluble lubricant Suctioning supplies Clean dressing AMBU bag
Trach tube change • Wash hands with soap & water • Dry with a clean towel • Don gloves • Gather supplies • Attach one side of the trach tie to the wing, and place the obturator into the new/clean trach. • Lubricate the tip of the trach, but be careful to avoid touching the tip of the cannula or allow anything else to touch it
Trach tube change • Place your child on his/her back with a roll under their shoulders • Suction your child’s trach • See (Trach Suctioning)
Trach tube change • The first person removes the trach ties while holding the trach in place • This is a good time to do trach care if the trach change is nonemergent
Trach tube change • Make sure the second person is ready with the new trach before the first person removes the old trach
Trach tube change • The first person removes the old trach and the second person inserts the new one in one curving motion • Keep the child’s neck extended by holding their chin up; this should make insertion easier and you can also fully visualize the stoma
Trach tube change • Once the new trach is inserted, immediately remove the obturator to allow your child to breathe. Do not let go of the trach! Save the obturator in case of accidental decannulation
Trach tube change • Listen or feel for air movement from the trach. If the patient is on a ventilator, reconnect and confirm tidal volume delivery. • Secure the trach in place with new trach ties and dressing. • Repeat suctioning as needed
Trach tube change • Key Points • If the trach does not go in easily: • • Do not force the trach into the windpipe Reposition your child, lift their chin Remember you have time to place the new trach in Re-lubricate the tip of the trach tube and try again If still unable to insert the trach, try one size smaller If unable to insert the smaller trach, call for help If the child is not breathing, begin CPR
Trach tube change • Complications: False tract • Attempt to manually resuscitate the trach, if air only enters with great difficulty, or not at all, then remove the trach and attempt to reinsert the trach. Normal False tract
Humidification • Humidification is very important for a child's trach. As the air passes through your nose, it is warmed and humidified. When air is breathed through the trach, the nose cannot provide the warmth and humidification needed to keep the child's secretions thin and moist. Humidification for the trach helps prevent thickening of the child's mucous which can plug the trach.
Humidification • There are several ways to provide humidification: • Heated trach collar • Cool mist trach collar • HME
Oxygenation • Generally, oxygen is provided through a flowmeter attached to a blender to regulate the FIO 2 between 21%-100% Air Oxygen Blended output
Mucus plugs • Mucous can become thick and "plug" the tracheostomy tube. When this happens, no air flow will be able to pass through the tube. • Signs of a possible mucous plug: • • • No sound of air passing through the trach Blue coloration around the mouth or fingernail beds Child is having difficulty breathing with nasal flaring A "whistling" sound with breathing Inability to pass a suction catheter through the trach tube
Mucus plug • What to do if a mucous plug is present: • Instill saline drops to try to loosen up the mucous; then attempt to suction the trach • Repeat the saline drops and give breaths with the AMBU bag to push the saline drops down to the plug. Attempt to suction again. • If still unable to clear with suction, then remove & replace the trach with a new/clean one.
Mucus plug • Ways to help prevent mucous plugs: • • • Use an aerosol mist collar Perform routine trach changes Suctioning as needed Saline drops with thick secretions Provide enough fluids with feedings
Manual Resuscitation • How to use the AMBU bag • Connect the valve end of the bag to the child's trach. • Squeeze the AMBU bag slowly with one hand; squeeze enough air so that the child's chest gently rises. • Let go of the bag and allow it to refill. The child's chest will go down. • Squeeze and release the bag at the rate your child normally breathes, one breath every 3 seconds. • Do not leave the bag attached to your child's trach without squeezing it to give breaths! • Oxygen should be attached to the AMBU bag via blended oxygen.
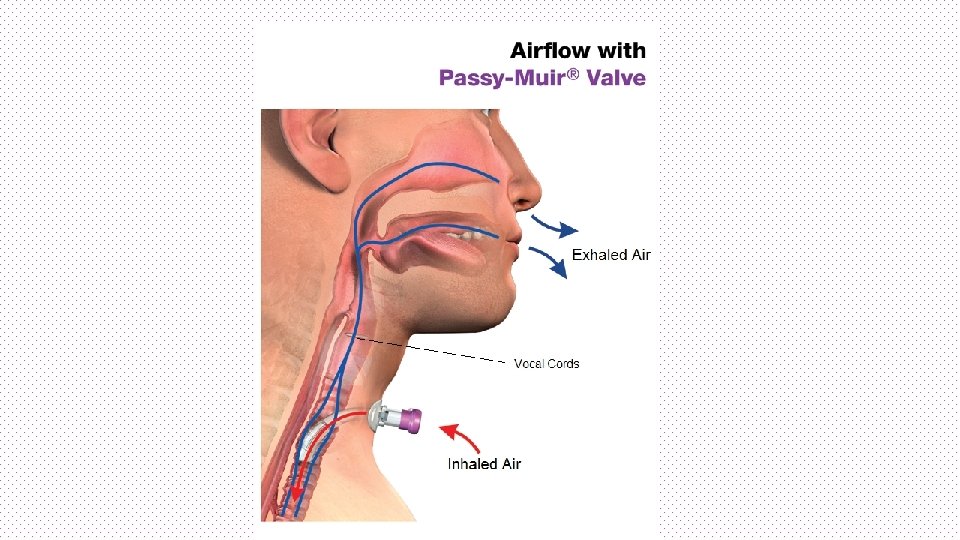
Passey Muir Valve • Allows air to enter the trach but not leave (via a one-way valve) the child must then exhale up through the vocal cords and out the mouth and nose. • Also called a “speaking valve” • Cuffed trachs must have the cuff deflated while using the valve. • If child has difficulty exhaling or making sounds remove the valve and notify the physician
Questions?