Cascading Style Sheets CSS David Pinto Web Standards
 David Pinto")
Cascading Style Sheets (CSS) David Pinto

Web Standards Web Recommendations Standards XHTML 1. 0 or higher n CSS Level 1 & CSS Level 2 n DOM Level 1 & DOM Level 2 n ECMAScript 262 (current Java. Script) n

XHTML n n XHTML 1. 0 Transitional XHTML 1. 0 Strict XHTML 1. 1 XHTML 2. 0 (W 3 C Working Draft) No más desarrollo en HTML!
 n")
Cascading Style Sheets n Los estilos definen cómo desplegar la información (elementos HTML/XML) n Fueron agregados a HTML 4. 0 para solucionar un problema n Los archivos externos de estilo separan presentación de información y ahorran mucho trabajo n Se usan archivos. css n Permite el cambio de apariencia y presentación con solo editar un archivo
 l n Diseño que se coloca")
CSS: Motivación n El concepto de piel (skin) l n Diseño que se coloca por encima de la estructura (esqueleto). Ejemplo: Teléfonos l Estructura: n l Modelo del teléfono Piel: n Placas de colores

CSS: Motivación http: //www. csszengarden. com

CSS: Motivación http: //www. csszengarden. com

CSS: Motivación http: //www. csszengarden. com

CSS: Motivación http: //www. csszengarden. com

CSS: Motivación http: //www. csszengarden. com
 Archivo HTML Archivo CSS <html> <head> <link rel=\"stylesheet\" type=\"text/css\"")
CSS: Ejemplo (Probar este ejemplo) Archivo HTML Archivo CSS <html> <head> <link rel="stylesheet" type="text/css" href="ejemplo 1. css" /> </head> body {background-color: yellow} h 1 {font-size: 36 pt} h 2 {color: blue} p {margin-left: 50 px} <body> <h 1>This header is 36 pt</h 1> <h 2>This header is blue</h 2> <p>This paragraph has a left margin of 50 pixels</p> </body> </html> Archivo CSS body {background-color: blue} h 1 {font-size: 12 pt} h 2 {color: yellow} p {margin-left: 5 px}

CSS: Sintaxis n Tres partes: Un selector l Una propiedad l Un valor l n Sintaxis: l selector {property: value}

CSS: Sintaxis n Uso: l body {color: black} l p {font-family: "sans serif"} l p {textalign: center; color: red} n Uso: l p { text-align: center; color: black; font-family: arial } l h 1, h 2, h 3, h 4, h 5, h 6 { color: green }

CSS: El selector class Se pueden definir diferentes estilos para el mismo elemento n Definición: l l p. right {text-align: right} p. center {text-align: center} n Uso: l <p class="right">This paragraph will be rightaligned. </p> l <p class="center">This paragraph will be centeraligned. </p> l <p class="center bold">This is a paragraph. </p>

CSS: El selector class Se puede omitir el elemento para indicar que se aplicará para cualquier elemento n Definición: l . center {text-align: center} n Uso: l <h 1 class="center">This heading will be centeraligned</h 1> l <p class="center">This paragraph will also be center-aligned. </p>
![CSS: Otros n Definición: l input[type="text"] {background-color: blue} n Comentarios: /* Este es un](http://slidetodoc.com/presentation_image_h/d469fe82fa92ebb93352f44a0f1b85f8/image-17.jpg "CSS: Otros n Definición: l input[type=\"text\"] {background-color: blue} n Comentarios: /* Este es un")
CSS: Otros n Definición: l input[type="text"] {background-color: blue} n Comentarios: /* Este es un comentario */ p { text-align: center; /* Este es otro comentario */ color: black; font-family: arial }

CSS: El selector id Se puede también definir estilos con el selector id n Definición: l #green {color: green} l p#para 1 { text-align: center; color: red } n Uso: <p id="para 1"> Este párrafo está centrado y en color rojo. </p>

CSS: Modo de referencia n Archivos HTML / XHTML Referencia externa: <head> <link rel="stylesheet" type="text/css" href="mystyle. css" /> </head> l Referencia interna: <head> <style type="text/css"> hr {color: sienna} p {margin-left: 20 px} body {background-image: url("images/back 40. gif")} </style> </head> l Referencia en línea: <p style="color: sienna; margin-left: 20 px">This is a paragraph. </p> l

CSS: Modo de referencia n Archivos XML <? xml version="1. 0" encoding="UTF-8" standalone="yes"? > <? xml-stylesheet type="text/css" href="tutorials. css"? > <tutorials> <tutorial> <name>XML Tutorial</name> <url>http: //www. mytutorial. com/xml/tutorial</url> </tutorial> <name>HTML Tutorial</name> <url>http: //www. mytutorial. com/html/tutorial</url> </tutorials>

CSS: Precedencia de valores n Valores por default del navegador n Hoja de estilo externa n Hoja de estilo interna (en la sección de encabezado) n Estilo en línea (dentro de un elemento)

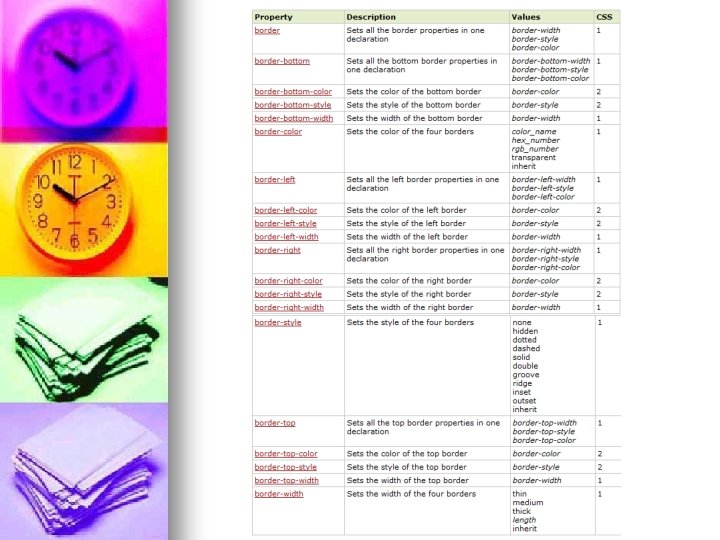
CSS: Background n Propiedades usadas para el efecto background-color l background-image l background-repeat l background-attachment l background-position l

CSS: background-color n body {background-color: #b 0 c 4 de} h 1 {background-color: #6495 ed} p {background-color: #e 0 ffff} div {background-color: #ffffff} n Modos de referencia para el color: n n n l l l nombre - "red“, “white”, “blue”, etc RGB - un valor como "rgb(255, 0, 0)" Hex – un valor como "#ff 0000"
} n body {backgroundimage: url('imagen. jpg')} n body")
CSS: background-image n body {backgroundimage: url(‘imagen. gif')} n body {backgroundimage: url('imagen. jpg')} n body { backgroundimage: url(‘img/imagen. png'); }
; background-repeat: repeat-x; } n body")
CSS: background-repeat n body { background-image: url('gradient 2. png'); background-repeat: repeat-x; } n body { background-image: url('img_tree. png'); background-repeat: no-repeat; }
; background-repeat: no-repeat; background-position: top right;")
CSS: background-repeat background-position n body { background-image: url('img_tree. png'); background-repeat: no-repeat; background-position: top right; } n Versión resumida: body {background: #ffffff url('img_tree. png') no-repeat top right} Se requiere un orden: l background-color l background-image l background-repeat l background-attachment l background-position
; background-repeat: no-repeat; background-attachment: fixed }")
CSS: background-attachment body { background-image: url('smiley. gif'); background-repeat: no-repeat; background-attachment: fixed }

CSS: Propiedades de background

CSS: Ejercicio n Crear un archivo de estilo para el documento XML de la práctica 10. n Usar propiedades background. de

CSS: Texto n Color del texto body {color: blue} l h 1 {color: #00 ff 00} l h 2 {color: rgb(255, 0, 0)} l n Alineación h 1 {text-align: center} l p. date {text-align: right} l p. main {text-align: justify} l

CSS: Texto n Decoración l l l n Transformación l l l n h 1 {text-decoration: overline} h 2 {text-decoration: line-through} h 3 {text-decoration: underline} h 4 {text-decoration: blink} a {text-decoration: none} p. uppercase {text-transform: uppercase} p. lowercase {text-transform: lowercase} p. capitalize {text-transform: capitalize} Identación l p {text-indent: 50 px}

CSS: Propiedades de texto

CSS: Font n p{font-family: "Times New Roman", Georgia, Serif}

CSS: Font n font-style l l l n p. normal {font-style: normal} p. italic {font-style: italic} p. oblique {font-style: oblique} Tres tipos: l l l normal – El texto se muestra de manera normal italic – El texto se muestra en itálica oblique – El texto está inclinado (similar a itálica, pero es soportado menos)
 l l l l")
CSS: Font n font-size -> default = (16 px=1 em) l l l l l h 1 {font-size: 40 px} h 2 {font-size: 30 px} p {font-size: 14 px} h 1 {font-size: 2. 5 em} /* 40 px/16=2. 5 em */ h 2 {font-size: 1. 875 em} /* 30 px/16=1. 875 em */ p {font-size: 0. 875 em} /* 14 px/16=0. 875 em */ body {font-size: 100%} h 1 {font-size: 2. 5 em} h 2 {font-size: 1. 875 em} p {font-size: 0. 875 em}

CSS: Propiedades de font

CSS: Ejercicio n Modificar el archivo CSS del ejercicio anterior e incluir estilo para diferentes elementos de texto.

CSS: El modelo de la caja width: 250 px; padding: 10 px; border: 5 px solid gray; margin: 10 px; 250 px (width) + 20 px (padding) + 10 px (border) + 20 px (margin) = 300 px width: 220 px; padding: 10 px; border: 5 px solid gray; margin: 0 px;

CSS: El modelo de la caja en ciertos navegadores <!DOCTYPE html PUBLIC "-//W 3 C//DTD XHTML 1. 0 Transitional//EN" "http: //www. w 3. org/TR/xhtml 1/DTD/xhtml 1 -transitional. dtd"> <html> <head> <style type="text/css"> div. ex { width: 220 px; padding: 10 px; border: 5 px solid gray; margin: 0 px; } </style> </head>

CSS: Border n p. one { border-style: solid; border-width: 5 px; } p. two { border-style: solid; border-width: medium; } n p. one { border-style: solid; border-color: red; } p. two { border-style: solid; border-color: #98 bf 21; } n p { border-top-style: dotted; border-right-style: solid; border-bottomstyle: dotted; border-left-style: solid; } n border-style: dotted solid; border-style: dotted solid double dashed; border-style: dotted solid double; border-style: dotted solid; border-style: dotted; n n
 n border: 5 px solid red; n Orden de los")
CSS: Border (versión corta) n border: 5 px solid red; n Orden de los valores de la propiedad border-width l border-style l border-color l

CSS: Outlines

CSS: Márgenes n margin-top: 100 px; margin-bottom: 100 px; margin-right: 50 px; margin-left: 50 px; n p. ex 1 {margin-top: 2 cm} n p. bottommargin {margin-bottom: 25% n En corto: l margin: 100 px 50 px;

CSS: Márgenes

CSS: Padding n La propiedad padding limpia una área alrededor del contenido de un elemento (dentro del borde). Se encuentra afectado por el color de fondo del elemento. l padding-top: 25 px; padding-bottom: 25 px; padding-right: 50 px; padding-left: 50 px l padding: 25 px 50 px 75 px 100 px; padding: 25 px 50 px 75 px; padding: 25 px 50 px; padding: 25 px; l l l

CSS: Padding

CSS: Ejercicio n Crear una página simple en HTML que contenga elementos de tipo párrafo (<p>). n Experimentar en la hoja de estilos con el modelo de caja, usando diferentes elementos. n Incluir una imagen (dentro de la hoja de estilo) que no se desplace, a pesar de que el usuario si lo haga en la página HTML.
 n Listas no ordenadas l l ul. circle {list-style-type:")
CSS: list-style-type (listas no ordenadas) n Listas no ordenadas l l ul. circle {list-style-type: circle} ul. square {list-style-type: square}
 n Listas ordenadas l l ol. upper-roman {list-style-type: upper-roman} ol.")
CSS: list-style-type (listas ordenadas) n Listas ordenadas l l ol. upper-roman {list-style-type: upper-roman} ol. lower-alpha {list-style-type: lower-alpha}

CSS: list-style-type n ul. inside {list-style-position: inside} ul. outside {list-style-position: outside} n ul { list-style-image: url('arrow. gif'); } n ul { list-style-type: none; padding: 0 px; margin: 0 px; } li { background-image: url(arrow. gif); background-repeat: no-repeat; background-position: 0 px 5 px; padding-left: 14 px; }

CSS: list-style-type

CSS: Ejercicio n Pruebe el uso de viñetas. Predefinidas y con archivos de imágenes. n Pruebe al menos tres tipos de numeración en las listas ordenadas.

CSS: Tables <html> <head> <style type="text/css"> table. ex 1 { table--layout: auto} table. ex 1 {table layout: auto} table. ex 2 { table--layout: fixed} table. ex 2 {table layout: fixed} </style > </style> </head> <body> <table border="1" width="100%"> table class="ex 1" border= <tr> <td td> > td width="5%">1000000000000000000000000000</td <td width="95%">10000000</td td> > td width= </tr > </tr> </table> <br /> <table border="1" width="100%"> table class="ex 2" border= <tr> <td td> > td width="5%">1000000000000000000000000000</td <td td> > td width="95%">10000000</td </tr > </tr> </table> > </ </body > </body> </html>

CSS: Tables

CSS: Div n n n DIVs pueden ser una alternativa a <table> DIVs son un contenedor comouna celda de una tabla CSS puede posicionar a los DIV <div id="article">xxx</div> #article{ width: 250 px; padding: 5 px; float: right; }


CSS: Dimensiones <html> <head> <style type="text/css"> img. normal {height: auto} img. big {height: 50%} img. small {height: 10%} </style> </head> <body> <img class="normal" src="logocss. gif" width="95" height="84" /><br /> <img class="big" src="logocss. gif" width="95" height="84" /><br /> <img class="small" src="logocss. gif" width="95" height="84" /> </body> </html>

CSS: Display n Hidden l l h 1. hidden {visibility: hidden} h 1. hidden {display: none} Block vs Inline n Ejemplos de elementos bloque l l l n <h 1> <p> <div> Ejemplos de elementos Inline l l <span> <a>
 n li {display: inline} n span {display: block} <html>")
CSS: Display (block vs inline) n li {display: inline} n span {display: block} <html> <head> <style type="text/css"> p {display: inline} </style> </head> <body> <p>A display property with a value of "inline" results in</p> <p>no distance between two elements. </p> </body> </html>
 Ver ejemplo… <head> <style type=\"text/css\"> a { float: left;")
CSS: Display (block vs inline) Ver ejemplo… <head> <style type="text/css"> a { float: left; width: 6 em; text-decoration: none; color: white; background-color: purple; padding: 0. 2 em 0. 6 em; border-right: 1 px solid white; } a: hover {backgroundcolor: #ff 3300} li {display: inline} ul { float: left; width: 100%; padding: 0; margin: 0; list-style-type: none; } </style> </head>

CSS: Display

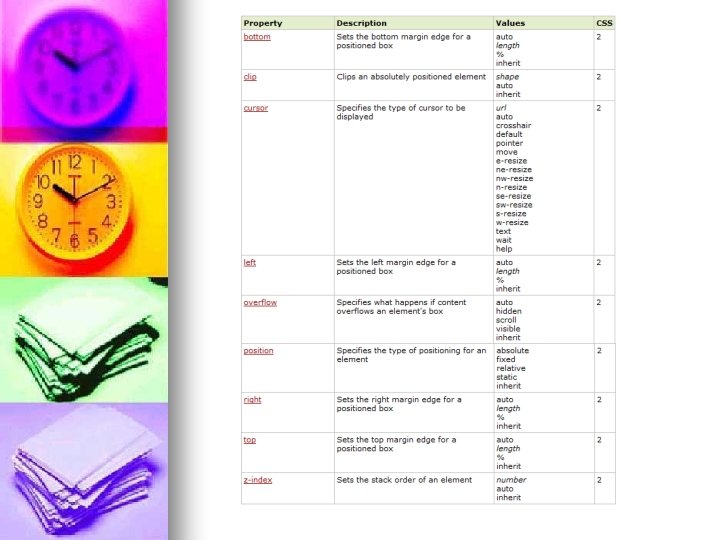
CSS: Posicionamiento n Fijo: n p. pos_fixed { position: fixed; top: 30 px; right: 5 px; } n Relativo y absoluto: h 2. pos_left { position: relative; left: -20 px; } h 2. pos_right { position: relative; left: 20 px; } h 2 { position: absolute; left: 100 px; top: 150 px; } Traslape: img { position: absolute; left: 0 px; top: 0 px; z-index : -1 z-index: -1 }

CSS: Float n La propiedad float permite que un elemento “flote” horizontalmente. De manera que los otros elementos que le siguen se ajusten de acuerdo al valor del float. n Ejemplo: img n { float: right; } Galería de imágenes: . thumbnail { float: left; width: 110 px; height: 90 px; margin: 5 px; } n Desactivar el flotado de los elementos (circundantes): . text_line { clear: both; }

CSS: Float

CSS: Pseudo-Classes n Clases predefinidas y se puede establecer efectos especiales n n a: link {color: #FF 0000} /* unvisited link */ a: visited {color: #00 FF 00} /* visited link */ a: hover {color: #FF 00 FF} /* mouse over link */ a: active {color: #0000 FF} /* selected link */ n a. red: visited {color: #FF 0000} n n <a class="red" href="css_syntax. asp">CSS Syntax</a>

CSS: Pseudo-elementos : after Agrega contenido después de un elemento n : before Agrega contenido antes de un elemento n : first-letter Establece el estilo para el primer carácter de un texto n : first-line Establece el estilo para la primera línea de un texto n
 n Ejemplos: l n p: first-line { color: #ff 0000;")
CSS: Pseudo-elementos (: first-line) n Ejemplos: l n p: first-line { color: #ff 0000; font-variant: small-caps; } Propiedades: l l l l l font properties color properties background properties word-spacing letter-spacing text-decoration vertical-align text-transform line-height clear
 n Ejemplos: l n p: first-letter { color: #ff 0000;")
CSS: Pseudo-elementos (: first-letter) n Ejemplos: l n p: first-letter { color: #ff 0000; font-size: xx-large; } Propiedades: l l l font properties color properties background properties margin properties padding properties border properties text-decoration vertical-align (only if "float" is "none") text-transform line-height float clear

CSS: Pseudo-elementos n Ejemplos: l p. article: first-letter {color: #ff 0000} <p class="article">A paragraph in an article</p> l p: first-letter { color: #ff 0000; font-size: xx-large; } p: first-line { color: #0000 ff; font-variant: small-caps; } l h 1: after { content: url(smiley. gif); } CSS 2

W 3 C CSS 3 recommendation Transparencia: Firefox -- opacity: x [0. 0 – 1. 0] n IE -- filter: alpha(opacity=x) [0 – 100] n NOTA: Entre más bajo el valor, más transparente. n Ejemplos: l<img src=“imagen. jpg" width="150" height="113" alt=“imagen_texto" style="opacity: 0. 4; filter: alpha(opacity=40)" /> l<img src=“imagen. jpg" style="opacity: 0. 4; filter: alpha(opacity=40)" onmouseover="this. style. opacity=1; this. filters. alpha. opacity=100" onmouseout="this. style. opacity=0. 4; this. filters. alpha. opacity=40" />

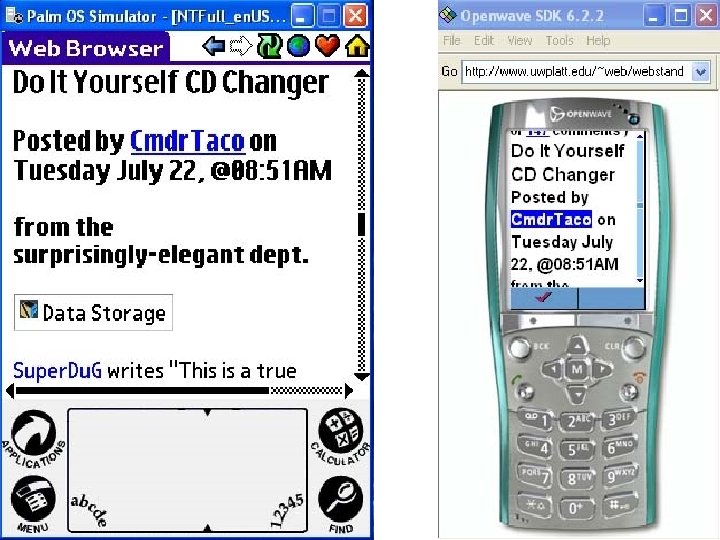
Tipos de dispositivos

Tipos de dispositivos n <html> <head> <style> @media screen { p. test {font-family: verdana, sans-serif; font-size: 14 px} } @media print { p. test {font-family: times, serif; font-size: 10 px} } @media screen, print { p. test {font-weight: bold} } </style> </head> <body>. . </body> </html>

Ejercicios n Diseñar un estilo css para su proyecto de libros.
- Slides: 75