CGI SelfService Portal User Guide Next CGI Group


 to search for")


 next to them. You cannot submit your")


- Slides: 61
CGI Self-Service Portal User Guide Next © CGI Group Inc. CONFIDENTIAL
Welcome to CGI Self-Service Portal The CGI Self-Service Portal is the Council preferred method of raising requests or reporting issues with the Service Desk. However, you may still call the Service Desk if your issue is critical. Next
The User Guide This guide is designed to give you an overview of the CGI Self-Service Portal. To navigate the guide you can either click through using the red boxes which will allow you to treat this guide as you would use the Self. Service Portal, or click on the red arrows at the bottom of each page for a guided tour of the tool. If at any time you would like to return to this page in the guide, simply click on the Edinburgh logo. Contents Next
User Guide Contents Use the links below to access a specific area of this guide, or click Next to continue. 1. 2. 3. 4. 5. 6. 7. Home Page Report a Fault Request Catalogue Item Simple Change Request View your Requests Approving Requests Further Assistance Back Next
Accessing the CGI Self. Service Portal Next
Accessing CGI Self-service Portal The Self-Service Portal is accessed via the below link: Corporate User - https: //portal-uk-prdc. cgi. com/ux/jss-sso/msp? item=CECC L&T User - https: //portal-uk-prdc. cgi. com/ux/jss-sso/msp? item=CECL Hot Tip – Save the link to your Favourites for future easy access Next
This is the new look home page for the CGI Self-Service Portal where all available request forms are shown. Back Next
Report IT Issue Use these forms to raise an incident with the Service Desk to investigate any issues that you may have (e. g. laptop no longer working, no longer able to access email etc. ). Back Next
Request Catalogue Item Use these forms to raise a Service Catalogue request. All available items will be displayed in the different forms. Back Next
Change Use this form to raise a simple change request. Change requests will go through the formal change process and will require approval from the ICT team and the Councils Change Advisory Board (CAB). Back Next
My Activity Displays a list of all your requests. This includes reported faults, catalogue requests and Changes submitted through the Self-Service Portal along with any requests where you have been selected as an approver. Back Next
Search You can use the search bar at the top of the Home page if you’re having trouble finding the correct form. Back Next
Use the items catalogue codes (found in the Service Catalogue) to search for the form you need. Back Next
Remember, click on the Edinburgh logo or Catalogue at any time in this guide to go back to the front page. Back Next
Chargeable Items and Purchase Orders When raising a request for chargeable items (e. g. laptop, phone, non-packaged application etc. ) you must: 1. raise a purchase order before you submit your request; 2. attach the purchase order to your request or provide the purchase order number in your request where prompted. Purchase orders are to be raised via the City of Edinburgh Council’s standard procurement process. Not all items are chargeable so please consult the Service Catalogue on the Orb for costs. Back Next
Click on the highlighted buttons shown to jump to that area of the guide for more information or click Next to be guided through the user guide. Remember, click on the Edinburgh logo or Catalogue at any time in this guide to return to this page of the guide. Back Next Index End Guide
Guidance and instructions will appear at the top of the page. Mandatory fields are shown with a (required) next to them. You cannot submit your issue until all of these fields have been completed. Scroll Down
Give as much detail as you can in the ‘Full fault description’ field as any missing information could result in delays. When you’ve completed the form click Submit Request. If you no longer require assistance click on Cancel. Request Form
Attach any screenshots or accompanying evidence to your request to help the Service Desk in diagnosing your issue. You can attach up to 3 items to your request with a size limit of 5 MB per attachment. You can attach additional attachments to your request from the My Activity screen. Click Remove to go back to the previous page or Cancel to go back to the home page. Request Form
Guidance and instructions will appear at the top of the page along with any hyperlinks to useful documents. Use the dropdowns and buttons to select the item you require. Try selecting Request Type.
Available Service Catalogue items will appear in the menu on each request form. Select AD 0003 now.
More questions may appear depending on the option you choose. Complete all mandatory fields marked with (required) before you submit your form. Scroll Down
Service Requests require approval from an authorised approver or manager. Click on the drop down for further information. When you’ve completed the form click Submit Request. If you no longer require assistance click on Cancel. Change Request
Your Approver should be your line manager and you should make sure your approver is available and aware of your request before you submit. To find your Approver type in their full first and last name in the spaces provided. Approval cont.
If the name you have entered is valid an email address will appear in the drop down. Select the email address and the request will be sent to your Approver once submitted. Approval cont.
If the name you have entered is incorrect the list will not populate and you will not be able to submit your request until you have entered the correct name. Change Request
You can attach up to 3 items to your request with a size limit of 5 MB per attachment. Click Remove to go back to the previous page, Cancel to go back to the home page, or the red arrow below to continue. Change Request
Please note, this form is for simple changes only. Guidance and instructions will appear at the top of the page along with any hyperlinks to useful documents. Before submitting your simple change please ensure you have checked the Service Catalogue on the ORB. Scroll Down
Mandatory fields are shown with a (required) next to them. You cannot submit your change until all of these fields have been completed. Where a free text question has been provided please ensure you provide as much information as possible to help assess what is required. Any missing information may result in a delay or rejection of your change. Scroll Down
All simple change requests raised will go for triage with the Change Team and will go through additional approval steps before any work is started. Like Service Requests, Changes require approval from an authorised approver or manager. Click on the drop down for further information on approvals. Open Requests
You can share any of the forms with a colleague by pressing “copy” and pasting it via Skype or Email.
The telephone number and email address of the Service Desk is displayed within the Contact IT Button. Use either of these methods if you need to contact the Desk directly.
Index
You can input the address of your office base location. ‘Feed Activity’ – Allows you to stay up to date with notifications and broadcasts from the Service Desk ‘Requests’ – Allows you to stay up to date on the status of your requests and any updates. Email – You will receive an email whenever there is an update to your request or if there is a broadcast. In-app Notification – Currently not configured for My. ICT. Index
Alerts are used when requests need attention, e. g. if IT staff asked a question that requires a reply, or it alerts an approval manager when a request is waiting for their approval. Index
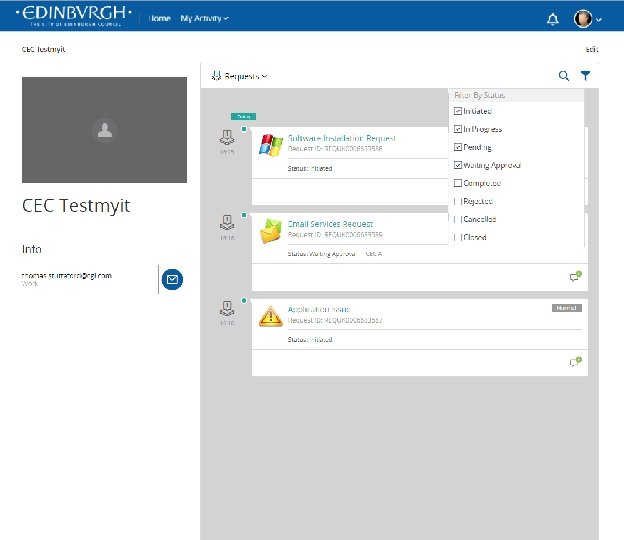
All open service catalogue requests, incidents and changes will appear in the list below. Click on the highlighted buttons for more information. Next
All open service requests, incidents and changes will appear in the list below. Click on the highlighted buttons for more information.
If you have a large list of open tickets you can search the list using the search tool. Use a key word (e. g. Email) or use the REQ number associated with the ticket (e. g. REQUK 0006633589 below).
You can see the full detail of your request in the window below. Request Detail
You can review the detail of your request at any time from this screen. Next
You can see the full detail of your request in the window below. Comments and Attachments
You can add comments or attachments to support your request at any time after it has been submitted. You can also communicate with the support teams. Next
If you are looking for an update or wish to give more detail enter you message and click add. Next
Any response or update from the support team will appear in the Comments section as shown. Next
You can see the full detail of your request in the window below. Request Again
You can click Request Again on any request, incident or change you previously submitted. The new request will have the same information as your previous request. All you have to do is edit the information as required and Submit as normal. Next
You can see the full detail of your request in the window below. Cancel Request
If you would like to cancel your request you can do so at any time. IMPORTANT: Please cancel requests ONLY if they are no longer required or have been raised in error. DO NOT cancel an open request because you feel the work has been completed. These requests will be closed by the Service Desk once completed. Approving Requests
Once cancelled you will no longer see your request in your list. To view previously closed or cancelled requests click the
When you have been selected as an approver for a request you will be notified by email. The list below will show all requests waiting for your approval. Next
Click the title to open the request and review before you approve or reject. Approving a request will send it to the CGI fulfilment teams to complete the work. Rejecting a request will prompt a text box as shown on the next slide. On Hold will place the request on hold until the approver goes back and approves/rejects it. Next
By opening the request you will be able to view the details submitted by the Requestor before you Approve / Reject the request. Request Detail
Review the information provided by the Requestor before approving/rejecting. If an item is chargeable, please check if a Purchase Order number has been provided within the form. Approving
Approving a request will send it to the CGI fulfilment teams to complete the work. Please ensure you check the request and only approve if you are happy it meets business needs. Rejecting
Rejecting a request will prompt a text box, click Reject now.
Insert a reason why you are rejecting the request. This will help inform the requestor on the reason their request has been rejected. On Hold
On Hold will place the request on hold until the approver goes back and approves/rejects it. You can go back at any time to approve or reject a request on hold. Next
Once you have approved or rejected all of the requests in your name your list will be blank and you can close My. ICT or continue back to the home screen. Click on Approvals to go back to the Request screen, the Edinburgh logo to go back to the home screen, or next to continue to the end of the guide. Index Next
Further Assistance Should you require further assistance call the Service Desk, they are there to help. Contact us via telephone on: 0800 085 7232 Or send us an email Edinburgh. ITService. Desk@CGI. com. Provide Feedback Close User Guide
Feedback Please rate your general experience with this user guide. If you have any further comments please include them in your email back to us and we will review and make improvements where possible. Good Needs Improvement Okay Index Close User Guide