HP Open View Data Protector Users Guide Manual


 /var/opt/omni/db 40/datafiles Binary files (DCBF, SMBF,")


- Slides: 107
HP Open. View Data Protector User’s Guide Manual Edition: September 2003 Release A. 05. 00 Hp Open. View Data Protector
Contents 1. Introducing Data Protector The Data Protector Cell Environment……. . . …………… …… 8 How a Backup Session Works……………………. . 9 How a Restore Session Works……………………. 9 Using the Data Protector User Interface……………… 11 Graphical User Interface………………………. . … 11 The Command-Line Interface…………………… 14 Data Protector Online Resources…………………. . . 15 2. Configuring Users and User Groups Data Protector User Right……………………. …. 18 Predefined Data Protector User Groups………………. 21 Adding a New User Group………………………. 23 Adding a New User……………………. 24 Changing User Group Right……………………. . 26 3. Configuring Backup Devices Logical Device……. . . ……………………. 30 Logical Device Types. . . ……………………… 30 Standalone Device……………………… 30 Standalone File Device………………………. 31 Standalone and Cascade………………. . 31 SCSI-II Library ans Jukebox……………… 32 Jukebox Configuration………………………. 33 Staker………………. . …………………. 33 Adding a Device…………………………… 34 Physical Device Selection ………………………. 36 Media Type and Default Selection………………… 36 Advanced Option…………………………. . 38 Library Scanning …………………………… 41 Library Slot Operation…………………………. 41 External Control…………………………… 42 3
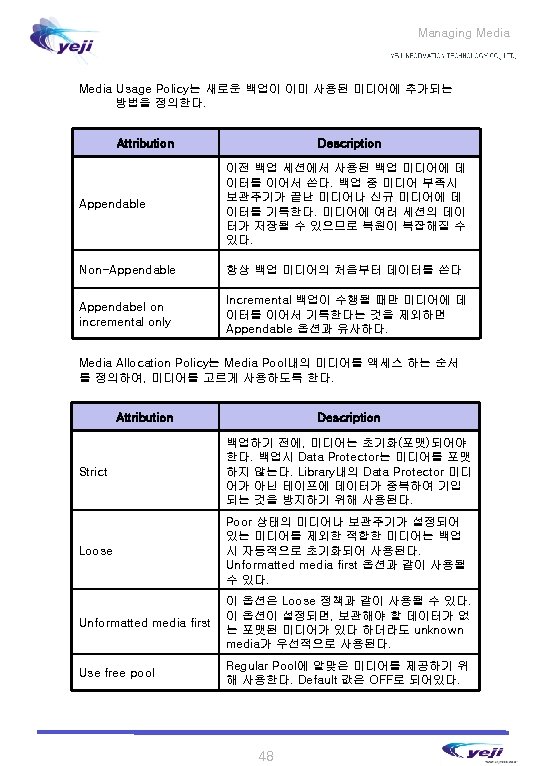
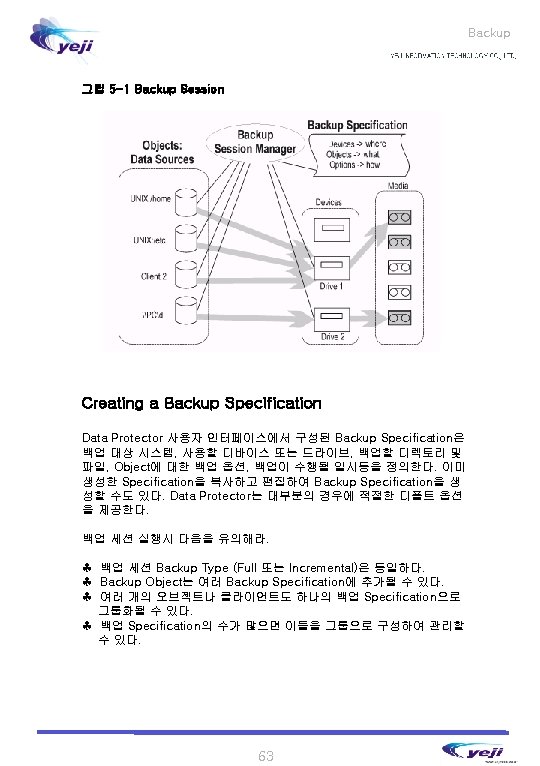
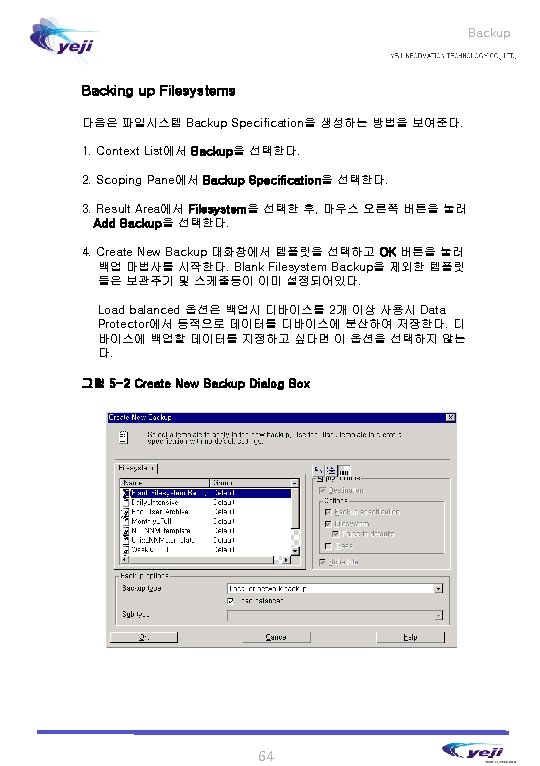
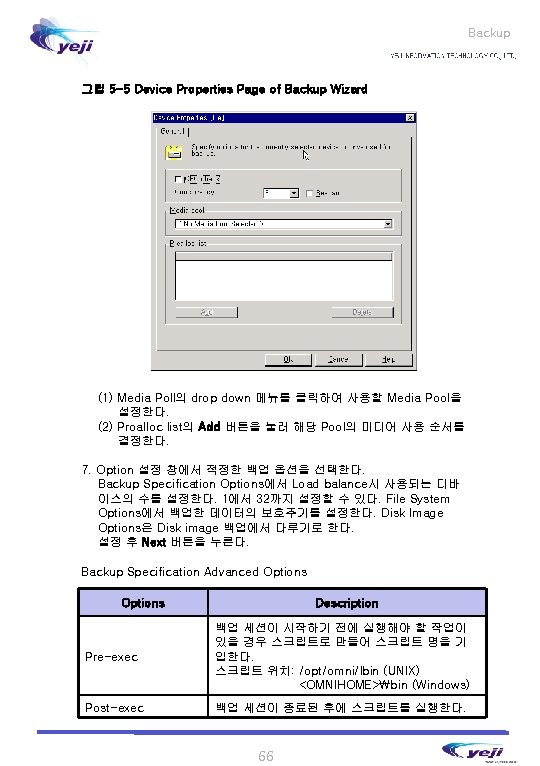
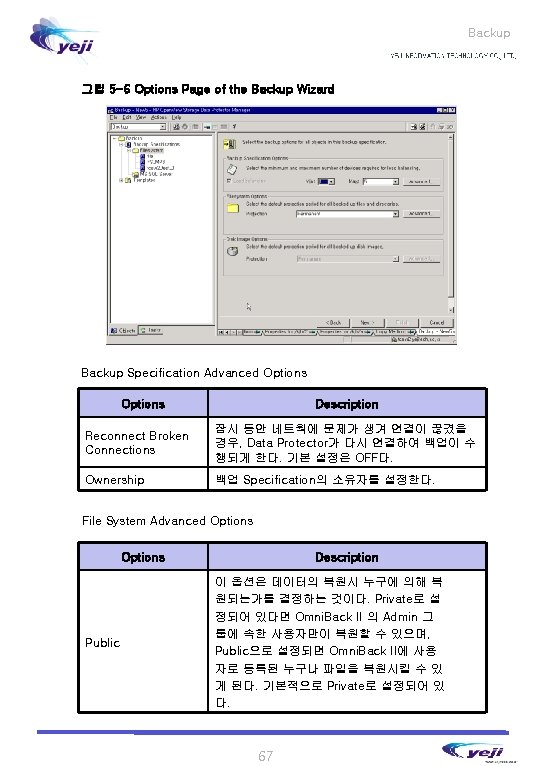
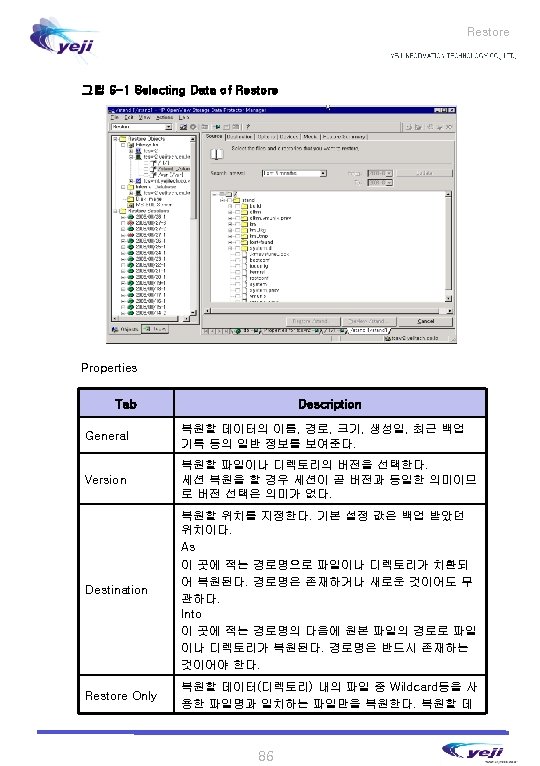
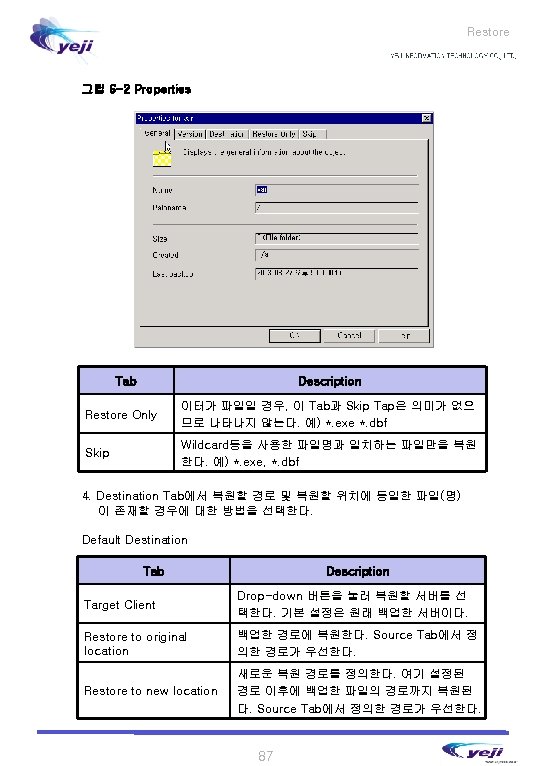
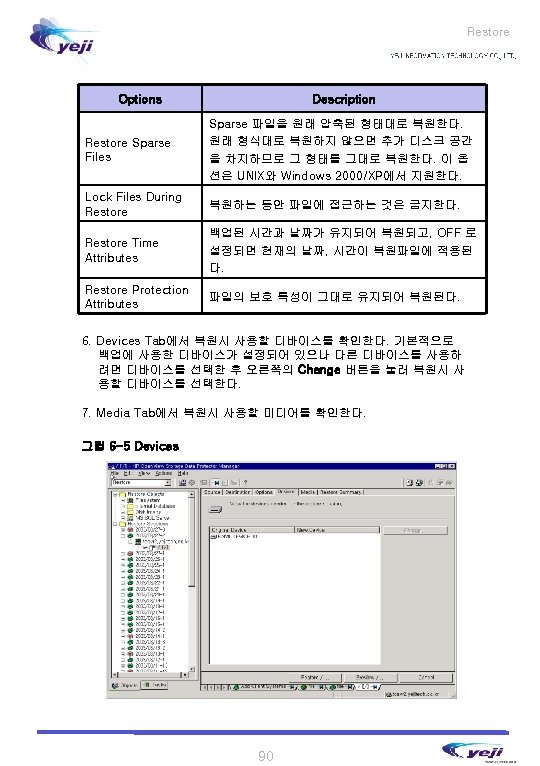
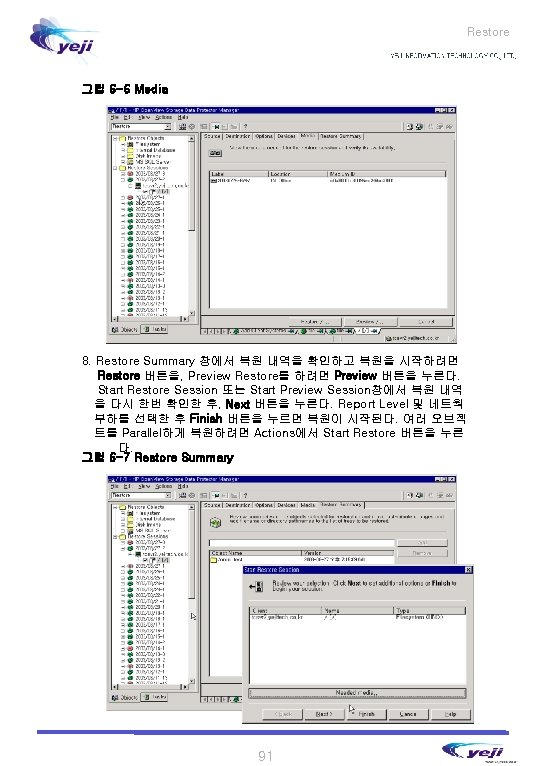
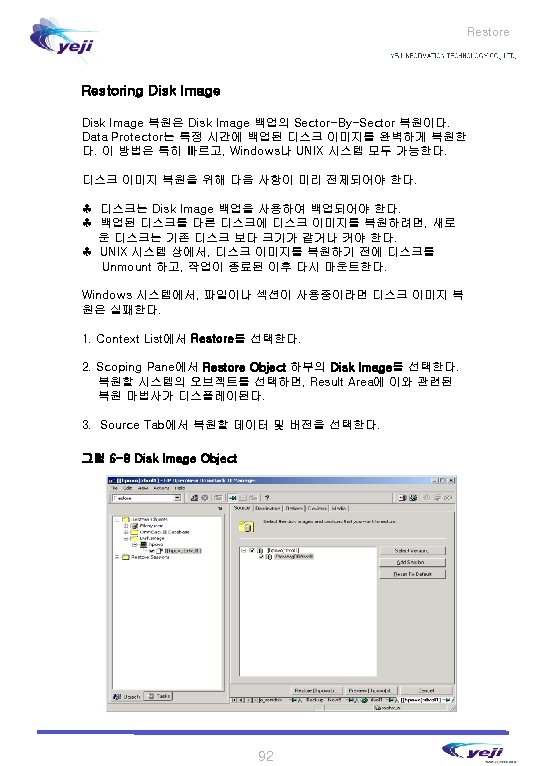
4. Managing Media Overview of Data Protector Media Management…………………. . 44 Creating a Media Pool………………………. 46 Properties of a Media Pool………………………. 46 Adding Media to Media Pool……………………. 47 Formatting Media………………………… 50 Formatting a Medium………………………. 51 Formatting Media in a Library Device……………… 51 Formatting Media in a Magazine………………… 52 Recognizing Other Data Formats………………… 53 Importing Media……………………………. . 54 Importing the Catalog from Media………………… 54 Importing Media in a Magazine Device……………… 55 Recycling Media…………………………… 56 Moving Media to Another Pool……………………. 57 Exporting a Medium…………………………… 57 Verifying Data a Medium………………………… 58 Copying Media……………………………. . 59 5. Backup Configuring a Backup………………………. … 62 Creating a Backup Specification…………………. 63 Backing up Filesystems……………………… 64 Backing up Disk Image Object…………………. . 75 Previewing and Starting Backup…………………. . 79 Modifying Backup Specification…………………. . 79 Copying a Backup Specification…………………. . 80 Deleting a Backup Specification…………………. . 80 Groups of Backup Specification…………………. . . 81 6. Restore Restoring Your Data………………………… 84 Restore Procedure………………………. 85 Restoring Filesystem………………………. …… 85 Restoring Disk Image………………………. 92 4
7. Monitoring Session…………………. . 96 Viewing Currently Running Sessions ………………. 96 Viewing Finished Session……………………… 96 Responding to Mount Request……………. . . …………… 97 Restarting Failed Backups………. ……………………… 97 Aborting Running Session. ………………………. 98 5
6
1 Introducing Data Protector
Introducing Data Protector Using the Data Protector User Interface Windows 와 UNIX시스템은 동일한 사용자 인터페이스를 가지고 있다. Data Protector 사용자 인터페이스는 Graphical User Interface(GUI)와 Command-Line Interface(CLI)로 구성되어 있다. Data Protector 사용자 인터페이스를 사용하여 Data Protector의 모든 기능을 수행할 수 있다. Figure 1 -1 HP Data Protector Graphical User Interface Menu Bar Context List Tool Bar Scoping Pane Results Area Results Tab Navigation Tab Status Bar Graphical User Interface Data Protector GUI는 편리한 사용을 위해 버튼과 텍스트 상자 같은 윈 도우의 기능을 도입했다. 가능하면, 타이핑을 하지 않고 목록에서 선택 할 수 있도록 drop–down 목록을 제공한다. 그뿐 아니라 풍부한 온라인 도움말이 제공되어 각각의 화면이나 작업을 수행하는데 도움을 준다. User의 권한에 따라 Data Protector GUI 의 전체 기능 및 일부 기능을 사용할 수 있다. 사용자 권한에 대한 자세한 정보가 필요하다면 67쪽의 “Data Protector User Right”를 참조한다. 11
Introducing Data Protector Context에 대한 자세한 정보를 보려면 8쪽의 “Context List”를 참조한다. Windows 플랫폼에서 다음 중 하나의 방법으로 Data Protector GUI 를 실행시킬 수 있다. ♣ Data Protector의 전체 기능을 사용하려면 Start Programs HP Data Protector Manager 를 선택한다. ♣ Manager 명령어를 사용해 Data Protector GUI를 시작할 수도 있다. 옵션을 사용하여 여러 개의 Data Protector Context 를 실행할 수도 있다. 예를 들면, manager -backup, -restore 명령은 Backup 과 Restore Context 를 시작한다. Cell Manager 를 표기하고 싶으면 manager -server <Cell Manager_name> 명령을 사용한다. 자세한 정보가 필요하다면, manager -help 명령을 사용한다. UNIX 플랫폼에선 GUI 화면은 다음과 같은 명령어로 실행시킬 수 있다. Command Description xomni Data Protector의 모든 기능을 수행할 수 있는 GUI 시 작한다. xomniadmin 클라이언트, 사용자, 리포트, 내부 데이터베이스를 관리 구성하는 GUI를 시작한다. xomnibackup 백업 GUI를 시작한다. xomnicellmon Mo. M Cell 모니터링 GUI를 시작한다. xomnimonitor Cell 모니터링 GUI를 시작한다. xomnirestore 복원 GUI를 시작한다. xomniinstrec Instant recovery GUI를 시작한다. 이 GUI를 실행하기 위해서는 특별한 라이센스가 필요하다. instant recovery에 대한 자세한 기능을 알고 싶다면 HP Open. View Storage Data Protector HP Sure. Store Disk Array XP Integration Guide를 참조하고 라이센스에 대 한 정보를 얻으려면 HP Open. View Storage Data Protector Install and License Guide를 참조하여라. xomnimom Manager-of-Manager GUI를 시작한다. 이 명령에 대한 자세한 정보는 <Omni. Back_home>/docs/man/omnigui. wri man page 를 참조한다. 12
Introducing Data Protector Help Navigator를 시작하는 방법은 다음과 같다. ♣ F 1 키를 누른다. ♣ Help의 pull-down 메뉴에서 Help Navigator를 선택한다. ♣ Button bar에서 Help Navigator 아이콘을 선택한다. Using the Online Manuals Data Protector는 Adobe acrobat Reader 소프트웨어로 읽을 수 있는 PDF 형식의 오라인 매뉴얼을 제공한다. 한번 설치되면, 온라인 매뉴얼 은 Cell Manger 시스템의 <Data_Protector_home>docs (Windows) 디렉토리나 /opt/omni/doc/C (HP-UX or Solaris) 디렉토리에 존재한다. 16
2 Configuring Users & User Groups
Configuring Users & User Groups 요구되는 권한이다. See private objects Private object 를 볼 수 있다. 20
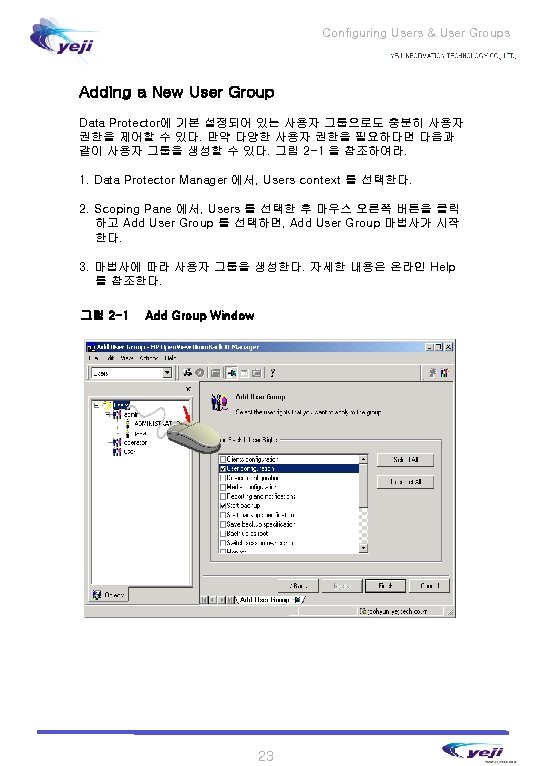
Configuring Users & User Groups Predefined Data Protector User Groups Data Protector 에서 기본적으로 정의된 세가지 그룹 (Admin, Operator, User) 이 있다. 그 그룹들의 권한은 표 2 -1 과 같다. 표 2 -1 Add Group Window User Right Admin Operator Start Backup Y Y Start Datalist Backup Y Y Save Datalist Y Y Backup as Root Y Y Mount Prompt Y Y Start Restore Y Y Restore to Other Hosts Y Y Restore to Other Users Y Y Restore as Root Y Y Monitor Y Y Abort Y Y User Configuration Y Y Device Configuration Y Media Configuration Y Switch Session Ownership Y See Private Object Y User Y Y 각 사용자 그룹의 정확한 사용자 권한을 확인하려면, 그룹을 선택하고 마우스 오른쪽 버튼을 클릭한 다음, 메뉴에서 Properties를 선택한다. Cell Manager에서 설정한 사용자 권한은 사용자 인터페이스가 설치된 컴퓨터에서 Cell Manager에 접속하여 작업하고자 할 때, Data Protector Cell Manger GUI 나 GUI context에 영향을 미친다. 21
Configuring Users & User Groups 그림 2 -2 Add User Window 자세한 내용은 온라인 Help를 참조한다. 25
Configuring Users & User Groups 그림 2 -3 User Rights Window 27
Configuring Users & User Groups 28
3 Configuring Backup Device
Configuring Backup Device Adding a Device 관리자는 GUI를 통해 Logical Device를 정의하거나 <OMNICONF>/ devices 내의 템플릿을 편집하고 omniupload 명령어로 Data Protector Media Management (internal) Database를 업로딩하여 정의할 수 있다. GUI를 통한 구성이 간단하므로 이를 권장한다. 데이터베이스로부터 Configuration을 수정하거나 디바이스 Configuration을 추출하려면 omnidownload 명령을 사용하여 파일을 생성하고 편집한 다음 omniupload를 사용하여 업로드한다. 이들 명령어에 대한 자세한 정보는 다음 section이나 온라인 man page 를 이용한다. Logical Device General Options Logical Device를 추가할 때, 다음과 같은 여러 옵션들을 설정해야 한다. Logical Device Name (max 32 chars) Data Protector에서 사용할 Logical Device 이름을 정 의한다. Example: Oasis_DLT_1(space 사용은 피한다) Description (max 64 chars) 디바이스에 대한 사용자 설명을 기입한다. Example: “Hewlett Packard DLT 7000” Client 물리적인 디바이스가 연결된 시스템 Device Type Standalone, SCSI-II Library, etc. Data Format Data Protector, NDMP, EMC Fastrax 중 선택한다. Library Options Library Device에는 Library 컴포넌트에 대한 Configuration 파라미터가 추가된다. Device Type SCSC-II Library Interface Type SCSI-II, EMC Fastrax, NDMP-Net. App, NDMPCelera NDMP Server 인터페이스 타입이 NDMP인 경우 요청되는 서버 명 34
Configuring Backup Device omniupload/omnidownload Data Protector 데이터베이스로부터 디바이스 정 보를 파일로 추출하는데 사용된다. omniupload 파일로부터 Data Protector 데이터베이스로 새로 운 디바이스 Configuration을 upload할 때 사용된 다. omnicellinfo Cell에 대한 Configuration 정보를 디스플레이하는 데 사용된다. Examples: 아래 테이블은 omniupload/download 명령어에 대한 사용 예제를 보여 준다. Description Command Line Example List the Devices in the Cell omnicellinfo –dev omnidownload –dev_info List the details of a device omnicellinfo –dev –detail omnidownload –list_devices -detail View the device description template file More /etc/opt/omni/devices/configuration. dev Copy a template file before editing cd /etc/opt/omni/devices cp tpstalone. dev dds. dev Edit the file before uploading Vi dds. dev Upload a new device definition into the cell database Omniupload –create_device dds. dev Download a device definition for modification where <dev> is the logical device Omnidownload –device <dev> -file <filename> Upload a modified device configuration Omniupload –modify_device <Logical Name> -file <filename> 35
4 Managing Media
Managing Media 그림 4 -1은 Backup Specification, Device, Media Pool 사이의 관계를 나타낸다. Pool은 백업 세션 동안 사용되고, Default Pool은 디바이스를 정의할 때 같이 정의한다. 그러나 백업 Specification에서 Default Pool 이외의 Pool을 정의할 수 있다. 그림 4 -1 How to Media Pool Relates to Other Component 45
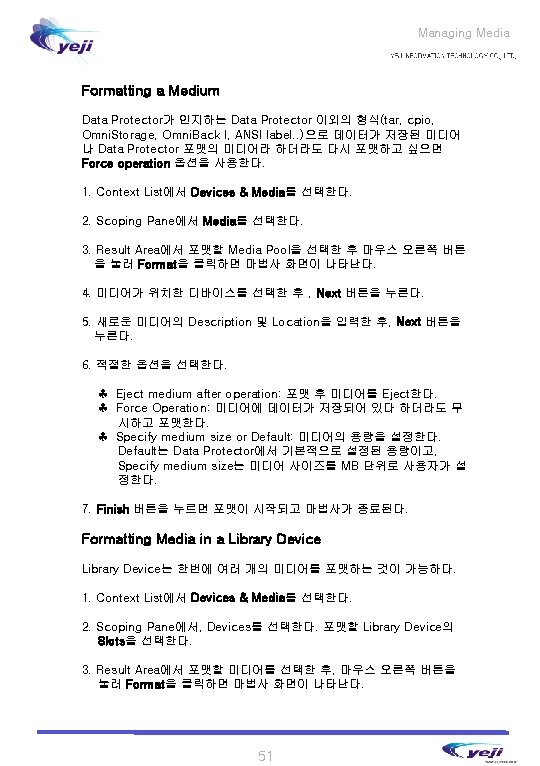
Managing Media ♣ Force Operation: 미디어에 데이터가 저장되어 있다 하더라도 무 시하고 포맷한다. ♣ Specify medium size or Default: 미디어의 용량을 설정한다. Default는 Data Protector에서 기본적으로 설정된 용량이고, Specify medium size는 미디어 사이즈를 MB 단위로 사용자가 설 정한다. 8. Finish 버튼을 누르면 포맷이 시작되고 마법사가 종료된다. Recognizing Other Data Formats Data Protector는 데이터가 기록되어 있는 미디어에 데이터를 Overwrite 를 방지하기 위해 Data Protector 이외의 포맷도 인지한다. Media Format Data Protector Behavior unknown or new Media written with compression, now used without compression Media written without compression, now used with compression Loose Policy: format, use for backup Strict Policy: format, not used for backup Foreign Data Protector(from another cell) Import, or format with the force option tar, cpio, Omni. Storage, Omni. Back I, ANSI label, filesystem Format with the force option Data Protector unprotected media use for backup, or export Data Protector protected media Append backups, or recycle media 53
Managing Media 60
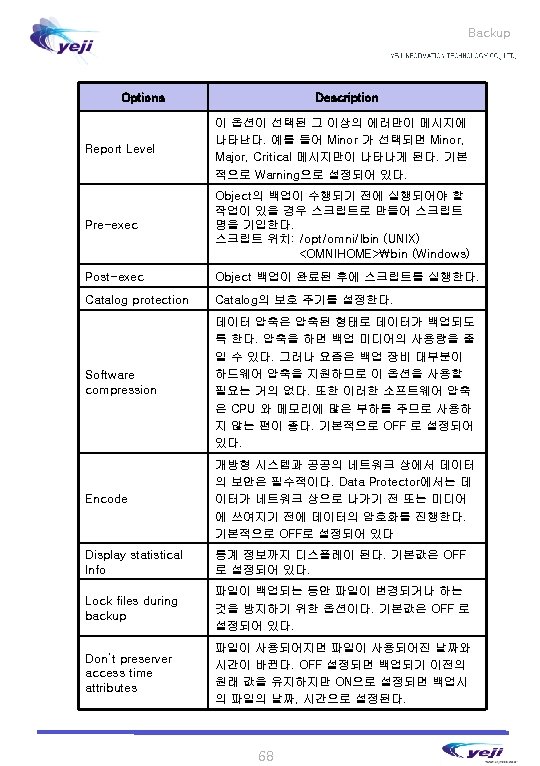
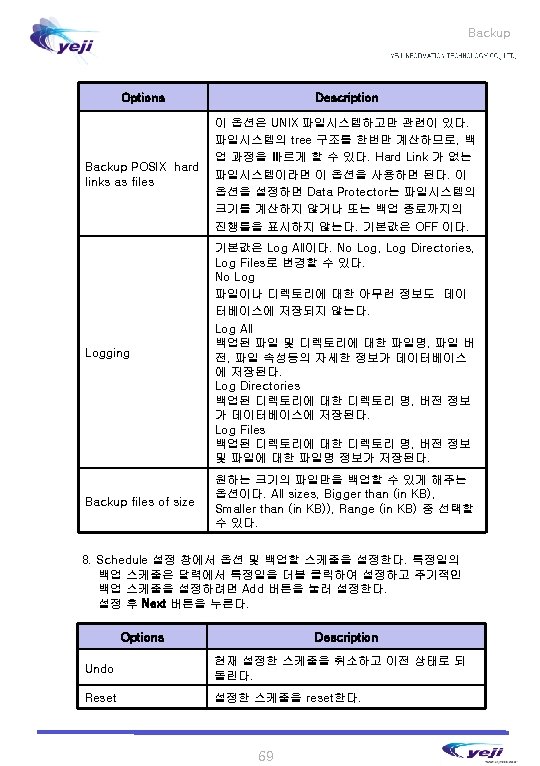
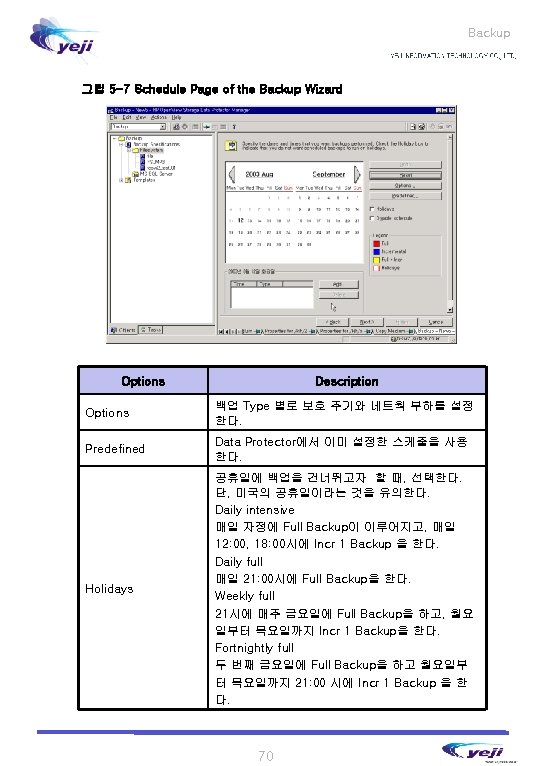
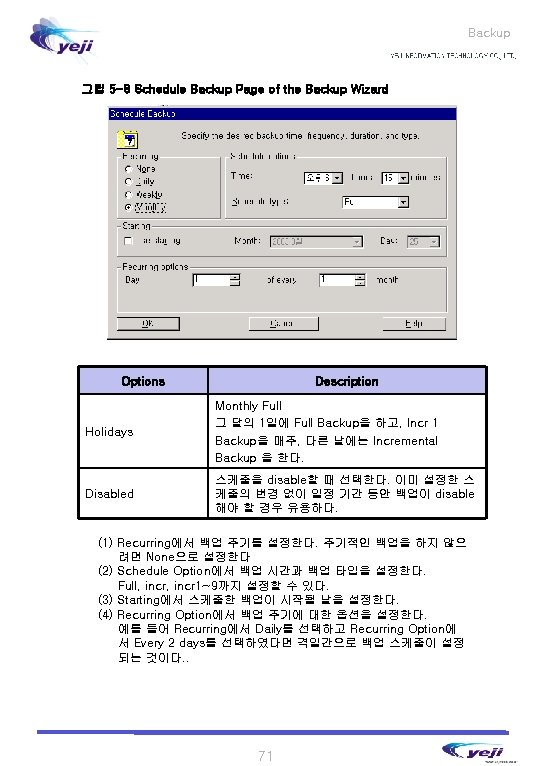
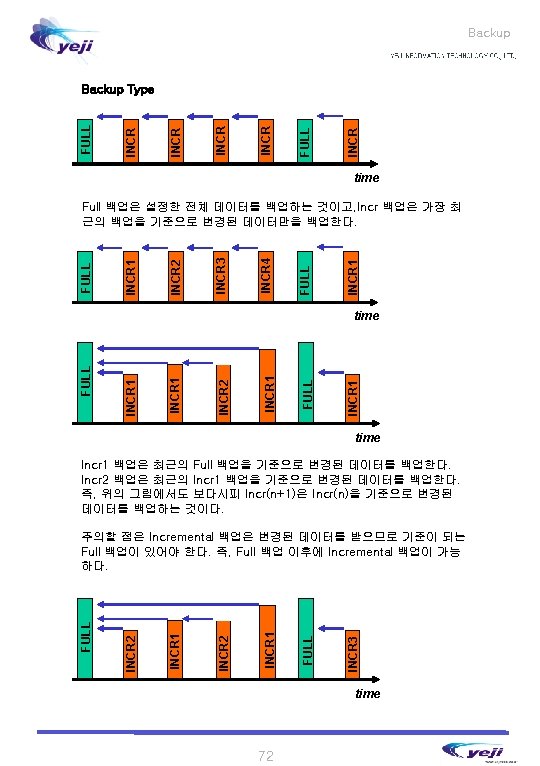
5 Backup
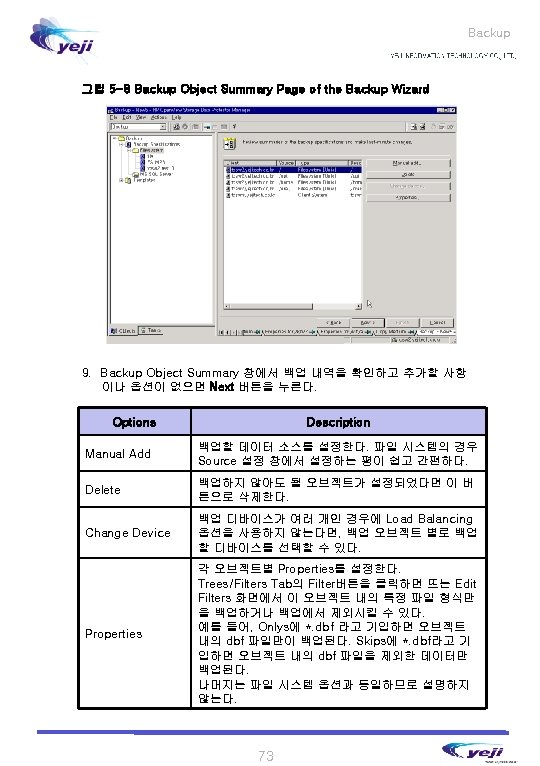
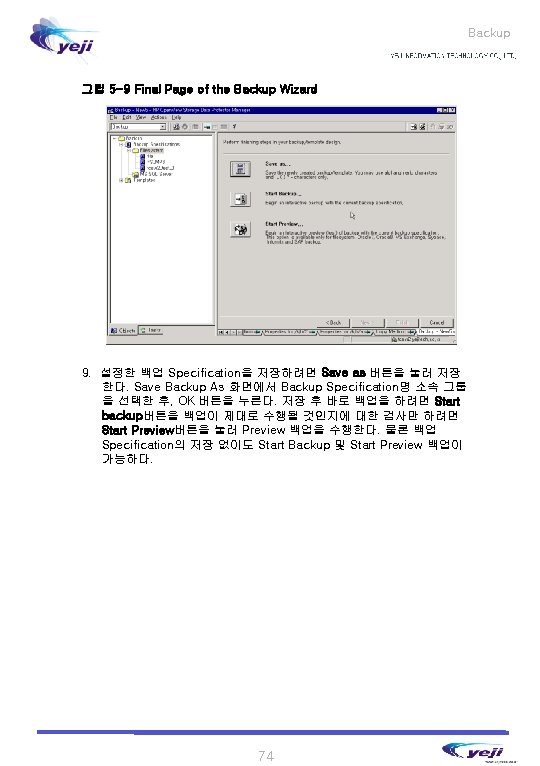
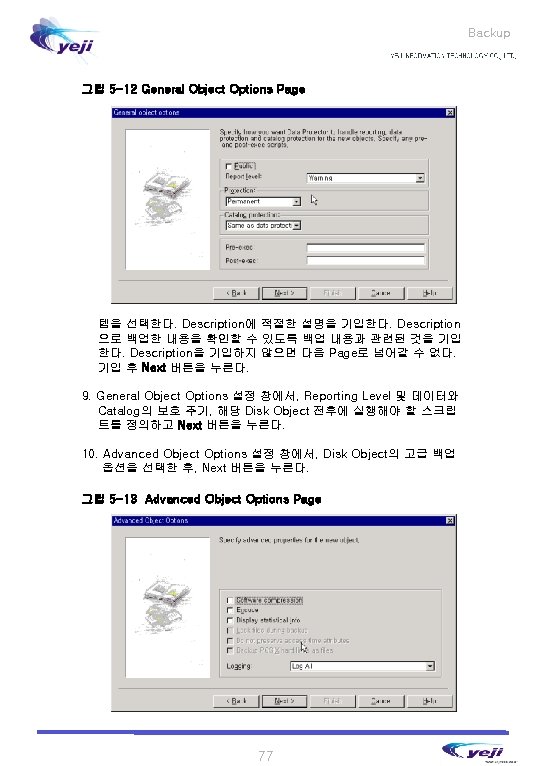
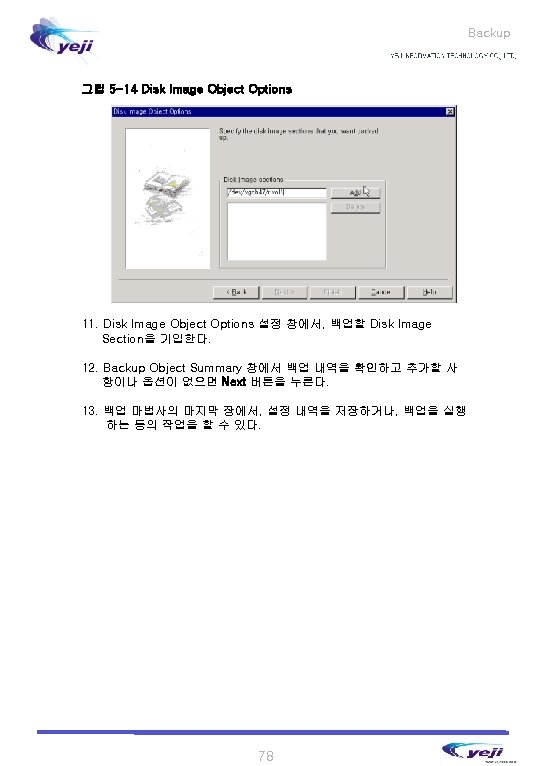
Backup 그림 5 -10 Backup Object Summary Page of the Backup Wizard 6. Backup Object Summary 창에서 Manual add 버튼을 누른다. 7. Backup Object 화면에서 Disk image object를 선택한 후 Next버튼 을 누른다. 8. General Selection에서 백업할 Disk Image가 있는 클라이언트 시스 그림 5 -11 General Selection Page 76
Backup Copying a Backup Specification 이미 생성하여 저장한 Backup Specification의 복제가 가능하다. 1. Context List에서 Backup을 선택한다. 2. Scoping Pane에서 Backup Specification을 선택한 후, 적절한 Backup Specification Type을 클릭하면, 저장된 Backup Specification이 디스플레이된다. 3. 복제할 Backup Specification을 선택한 후, 마우스 오른쪽 버튼을 눌 러 Copy As를 클릭한다. 4. Copy Backup As 화면에서 복제한 Backup Specification 명을 기입 한다. Drop-down 버튼을 눌러 소속될 그룹을 선택한 후 OK 버튼을 누르면 해당 그룹에 기입한 Backup Specification 명으로 복제된다. Deleting a Backup Specification 이미 생성하여 저장한 Backup Specification은 삭제가 가능하다. 1. Context List에서 Backup을 선택한다. 2. Scoping Pane에서 Backup Specification을 선택한 후, 적절한 Backup Specification Type을 클릭하면, 저장된 Backup Specification이 디스플레이된다. 3. 삭제할 Backup Specification을 선택한 후, 마우스 오른쪽 버튼을 눌 러 Delete를 클릭한다. 80
Backup 82
6 Restore
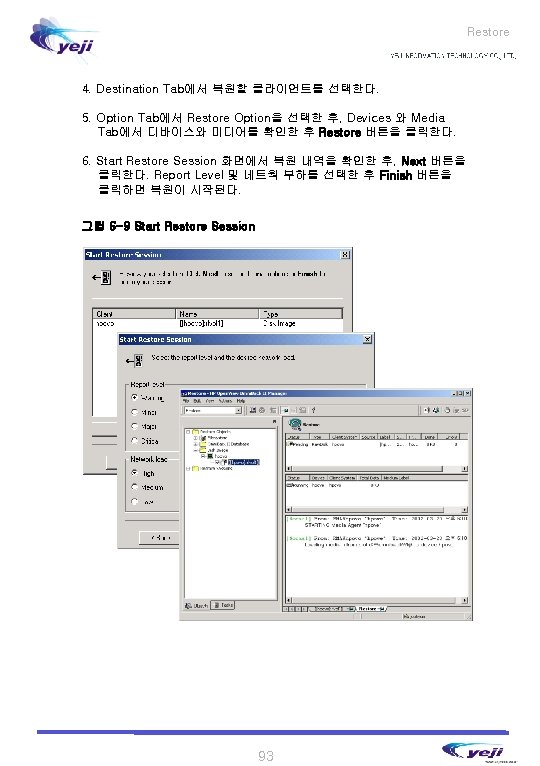
Restore 94
7 Monitoring
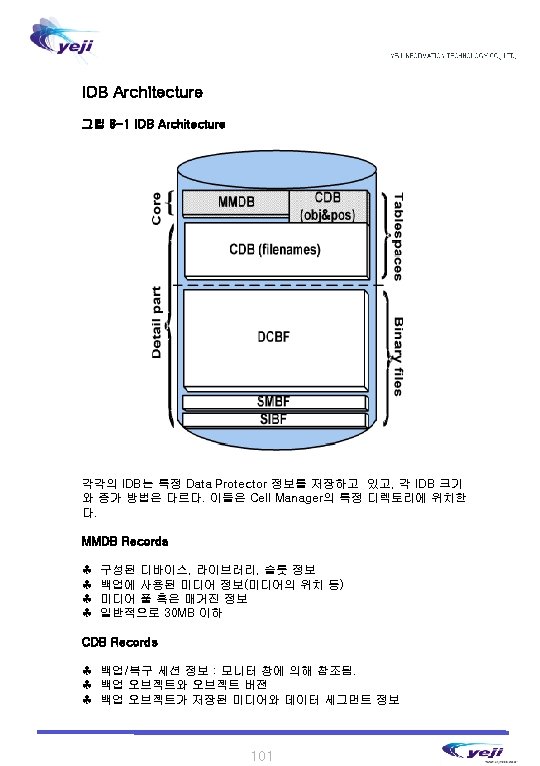
8 Database
IDB Location on UNIX Tablespaces (CDB & MMDB) /var/opt/omni/db 40/datafiles Binary files (DCBF, SMBF, SIBF) • /var/opt/omni/db 40/dcbf • /var/opt/omni/db 40/msg • /var/opt/omni/db 40/meta Transaction logs /var/opt/omni/db 40/logfiles/syslog IDB recovery file /var/opt/omni/db 40/logfiles/rlog 103
Maintaining the Data Protector Database Maintenance Tasks Situation Which Task Can You Perform? The IDB is running out of space • • Obsolete filenames in the IDB • Purge IDB filenames The dynamics of a client system are high or critical • Reduce the growth of the IDB • Extend the size of the IDB You want to check the size of IDB • Check the size of the IDB Extend the size of the IDB Purge the IDB filenames Reduce the growth of the IDB Reduce the current size of the IDB Reducing the Database Growth 백업 Specification에서 logging 레벨과 catalog 보관주기를 조절함으로써 Data Protector 데이터베이스의 크기를 줄일 수 있다. 이는 현재 데이터베이 스 크기에는 영향을 미치지 않지만 향후 데이터베이스의 성장에는 영향을 미 친다. Backup Specification에서 logging 레벨 설정을 줄임으로써, IDB에 저장되는 데이터의 수를 줄일 수 있다. (Log All Log file Log directories No log) Catalog의 보관주기를 줄임으로써, IDB에서 (Restore Brower)정보에 대한 보관주기를 줄일 수 있다. 미디어에는 여전히 그 정보가 남아있다. 104
Reducing the Database Current size 백업이 완전하게 끝난 백업 세션 혹은 특정 오브젝트에 대한 catalog 보관 주 기를 변경함으로써 Data Protector 데이터베이스의 현재 크기를 줄일 수 있 다. 이는 향후의 IDB 성장에 대해 영향을 미치지 않는다. 그림 8 -2 Changing Catalog Protection for a Session 그림 8 -3 Changing Catalog Protection for an Object 105
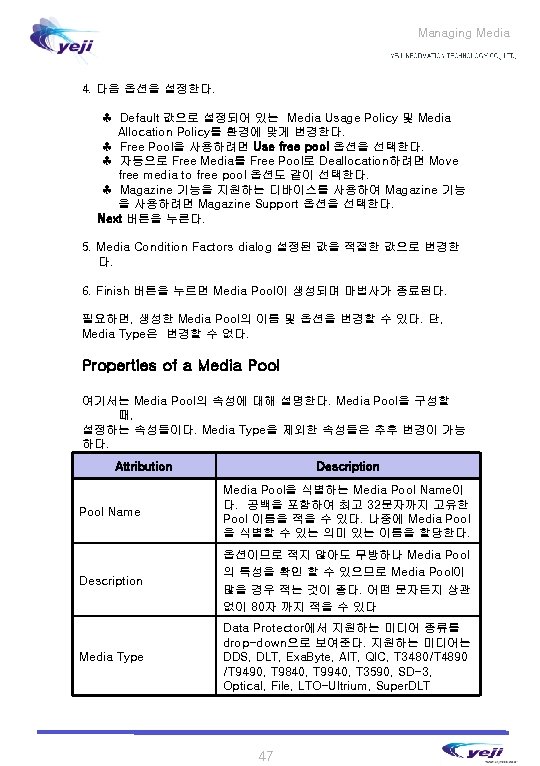
그림 8 -5 Creating a New fnames. dat File Checking the Database Size Data Protector GUI 상에서 Data Protector 데이터베이스의 크기를 점검할 수 있다. CDB, MMDB, DCBF, SMBF 및 SIBF 크기를 점검할 수 있다. 그림 8 -6 Checking the Size of the fnames. dat File (CDB Part) 107