Install Scratch Go to http scratch mit eduscratch1


 You will")


![In the ‘operators’ green button you will find ‘pick random [1] to [10]’ Pick](https://slidetodoc.com/presentation_image_h2/d21114e4351fc4a1c6d281b122e6bb23/image-30.jpg "In the ‘operators’ green button you will find ‘pick random [1] to [10]’ Pick")


![From the blue ‘sensing’ area pick up ‘touching [ v]’ Click on the down](https://slidetodoc.com/presentation_image_h2/d21114e4351fc4a1c6d281b122e6bb23/image-35.jpg "From the blue ‘sensing’ area pick up ‘touching [ v]’ Click on the down")
![From the ‘control’ area pick up ‘broadcast [ v] and wait’ Click on the](https://slidetodoc.com/presentation_image_h2/d21114e4351fc4a1c6d281b122e6bb23/image-36.jpg "From the ‘control’ area pick up ‘broadcast [ v] and wait’ Click on the")


")


- Slides: 60
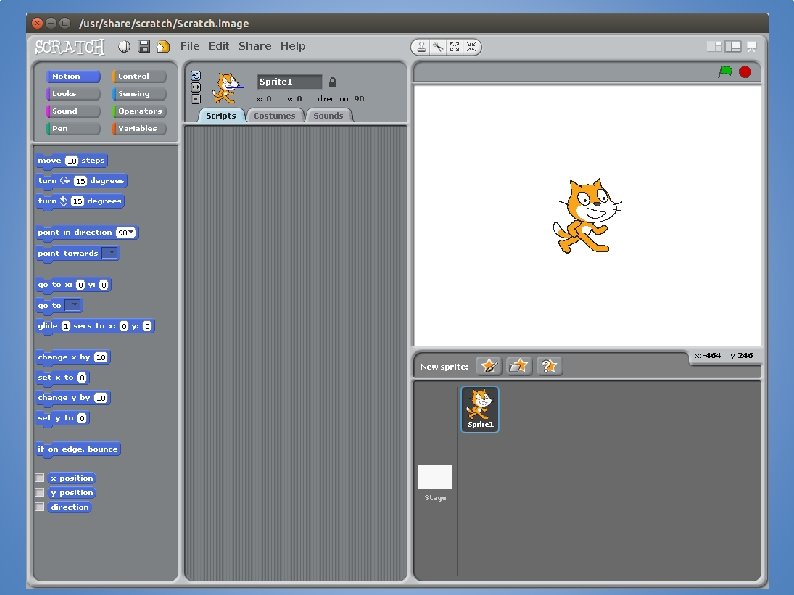
Install Scratch Go to => http: //scratch. mit. edu/scratch_1. 4/
Drag 'change x by 10' to the middle area
Double click on 'change x by 10' what happens ?
Now add another 'change x by 10'. Not too close or they will stick. click on the number and change it to say -10 and double click on that. Try both a few times. What happens ?
If your cat escapes try this button What does it do ?
Select the orange ‘Control’ button in the top left and drag 'when space is pressed' button on onto the main area.
Pick up the existing 'change x by 10’ and stick it to the bottom of the new button – note it gets a white line when it is close enough to stick.
Click on the little arrow next to 'space' and from the drop down menu select ‘right arrow’.
Drag out another 'when space key pressed' button from the left. Change this one to 'left arrow' and attach the ‘change x by -10’ button
What do your left and right keys do now ? Why ? What do the up and down keys do ? Why ?
Click on the 'Motion' button in the top left and add two new commands 'if on edge bounce'. What difference does this make you hit the sides?
Picking the items from Control and Motion, add two more sets. This time pick 'Change Y by 10' and remember to change one to '-10'
Move round again. Do the Up and Down keys work now ? Are they correct ? Why not ? How do you fix it ?
Make the up one read ‘ 10’ and the down one read ‘-10’
The Blue line shows you 'X' or how far left and right the cat is. The Red line shows you 'Y' or how far up and down the cat is.
If the numbers go from -180 to 180 or from -240 to 240, then what two numbers are right in the middle ?
X is 0 and Y is 0
We need some more room. Make the cat smaller by clicking on the four arrows that are pointing at each other and the clicking on the cat about 30 times (not too many or he will shrink away to nothing)
It is a good idea to save your game now and then so you can always go back if it gets messed up or even goes wrong and crashes. Click ‘save’ icon and type in a name. Lets call this one road-rage
Time to change our cat. Click on the cat in the sprite area then click on costumes and import (just above the program area)
Select ‘Animals’ and then pick ‘monkey 1’
Give it a name ‘monkey’ and select the middle button - this stops him spinning round and round when he moves
Now lets add some more sprites… click on the star with the grey folder in front of it
Select ‘Transportation’ and ‘car 1’ Make it smaller by about 30 clicks name it ‘car 1’
Lets add some code to make the car do something (like move) You will find the yellow ones in ‘control’ and the blue ones in ‘motion’ The second blue command is made up of two different things. First get ‘go to X: [ ] and Y: [ ] and then pick up ‘y position’ at the bottom and drop it in the second box. Remember to update the other numbers to match :
The ‘forever loop’ will keep repeating whatever is inside it over and over again.
Fill up the ‘forever loop’ with these items Remember to set the values to the same (and note the bottom X: value says -240)
In the ‘operators’ green button you will find ‘pick random [1] to [10]’ Pick this up and put it in place of each ‘ 1’ Change the values to match :
If you have not done it for a while you should probably hit ‘SAVE’
Now lets test again. Click the green flag. What happens now ?
Still in the car - lets add another bit of code. Start a new block below the one you just made by grabbing a new item and just dropping it further down :
This one will have another ‘forever loop’ so it does what is inside that over and over. Inside that loop we have an ‘IF’. That means that it will only run the bit inside that ‘if’ something happens.
From the blue ‘sensing’ area pick up ‘touching [ v]’ Click on the down arrow and select ‘monkey’ Now what happens if a car touches a monkey ?
From the ‘control’ area pick up ‘broadcast [ v] and wait’ Click on the down arrow and select ‘new’ Call the broadcast ‘ouch’
If all has gone well, you should now have :
If you have not done it for a while you should probably hit ‘SAVE’
Break time… take 5 minutes. Rest your eyes, legs, fingers and all that. Have a drink and a snack - keep up the energy levels - we have a LOT more work to do. . .
Right click on the car in the sprites area and select ‘duplicate’ If you have an Apple Mac it may be CTRL and click. Call this sprite ‘car 2’ now do it again and call it ‘car 3’ and one more time ‘car 4’
When you have done all four :
Each car has the same code you have already written - but you need to make a minor change. Go to car 2 and change the value ‘set y to’ to be -30 So now - Car 1 = -80 Car 2 = -30 Car 3 = 20 and Car 4 = 70
Lets add something to make our monkey a bit hungry. Add a new sprite (the star with the grey folder) and click ‘things’ and ‘banana 1’ Shrink it about 30 clicks and move it to the top middle of the screen Somewhere about X: 0 and Y: 155 remember to rename it to ‘bananas’
Click on the Variables button (in later version of scratch is is called ‘data’) Click ‘make a variable’ and call it ‘lives’. The option below the name stays as ‘For all sprites’ A Variable is like a box with a name on the side (in this case it has ‘lives’ written on it) and it can contain things like numbers. 3 Lives
Click on the monkey in the sprite area and add some more code. This is the bit that deals with his lives and the game ending. Add two bits of code. When you come to the ‘lives’ lines - these are the ones we just created in variables.
First lets test to see if the monkey touches the bananas. Make this as another new bit of code : (the purple bit is in ‘looks’)
. . . and what about if things are not going so well and we have lost our lives ?
and now combine all these bits of code into one block like this :
Your monkey should now have all this code :
One last step… lets make the background look nice. In the sprites area, click on the white box that says ‘stage’. Click on backgrounds and Import. Select ‘Outdoors’ and ‘route 66’
If you have not done it for a while you should probably hit ‘SAVE’
Now lets test again. Click the green flag. What happens now ? Is it fully working yet ?
Hmmmm… car 4 was a little ‘up in the air’. How about if we select it, click ‘costumes’ and ‘Import’ then select ‘transport’ and ‘helicopter 1’ Yes thats a bit more like it : )
What have we used today ? Loops Variables ‘If’
Thats it - you have just coded your first game. Does that make you a Coder. Dojo Ninja ?
No.
A Coder. Dojo Ninja is someone who takes it further and makes it into their own unique game. Some ideas : * What about different graphics ? Where else could you set it ? * * Sound FX - make some NOISE !!! More cars ? planes ? Trucks ? Ice-cream vans ? Things that block the path so you need to go round them. What about moving the bananas every 20 seconds ? * and most important… add your own ideas. . .
Did you miss any steps ? This presentation is available on our website : www. donabate. Dojo. com Click on ‘lessons’
A big thank you to The Donabate Dojo Mentor team. The Community Centre for the room and setting it up. The mums and dads and adults for transport and help and most of all - Thank you to our new Ninjas (thats you) Comments, suggestions, donations, questions to : email : team@donabate. Dojo. com Facebook : www. facebook. com/Donabate. Dojo Twitter : @Donabate. Dojo Website : www. donabate. Dojo. com