BUILDING WITH BRICKS How bricks are laid Halfbrick

BUILDING WITH BRICKS

How bricks are laid

Half-brick wall This is a wall that uses single bricks lengthwise in stretcher bond (110 mm wide) as shown below. Half brick walls are mainly used for the internal walls of a house.

Single-brick wall This is a brick wall that is as thick as the length of a brick (22 mm wide). Single-brick walls can be built in stretcher of English bonds as shown below, and are mainly used for the external walls of a house.

One-and-half brick wall This is a wall consisting of a single-brick and half-brick wall, as shown below, and is used mainly for sturdy foundations and external walls.

Bonding of bricks Bonding in brickwork is actually and expression that refers to the way bricks are arranged and laid in a particular order to obtain the greatest strength or a particular appearance. To maintain maximum strength the bricks must overlap one another in the course above and below throughout the wall.

STRETCHER BOND Each course is a stretcher course which starts or ends with a half-brick to form the bond. This bond is very popular in South Africa. The sketch shows the following walls built in stretcher bond: The corner of a half-brick wall. The corner of a one-brick wall

The sketch shows the following walls built in stretcher bond: T-junction of a half-brick wall with a one-brick wall. T-junction of a one-brick wall with a one-brick wall. T-junction of a half-brick wall with a half-brick wall.

ENGLISH BOND It is built with alternate courses of headers and stretchers. This is a very strong bond.

The sketch shows the following walls built in English bond: The corner of a one-brick wall. T-junction of a half-brick wall with a one-brick wall. T-junction of a one-brick wall with a one-brick wall.

POINTING AND JOINTING “Pointing” is the term used to describe the filling of dagha joints in the bed and perpendicular joints of brickwork. Pointing and jointing are carried out for the following two reasons: to ensure that there are no gaps in the joints and that they are watertight to decorate the wall so that it has a specific desired appearance

Joining of bricks It will sometimes during construction be necessary to join a new wall to an existing wall. The method used to join the two walls is called toothing. At the specified place on the wall, in each second layer, a brick should be taken out. The new wall now ties into the cut-outs in the existing wall.
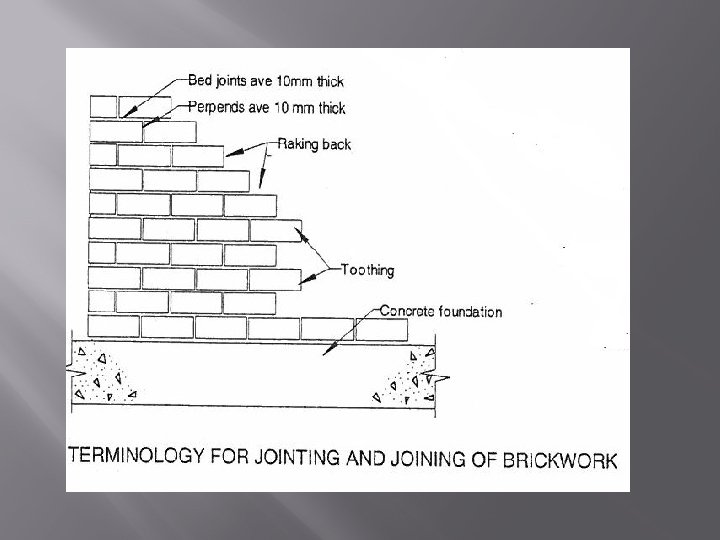

BRICK FORCE Cracks may occur in brickwork but can be controlled using reinforcement in the bed joints between the layers of brick. A wire net of galvanized steel called brick force should be placed between every fourth brick course to help strengthen the walls. Soil movement may sometimes require that even more brick force be used.

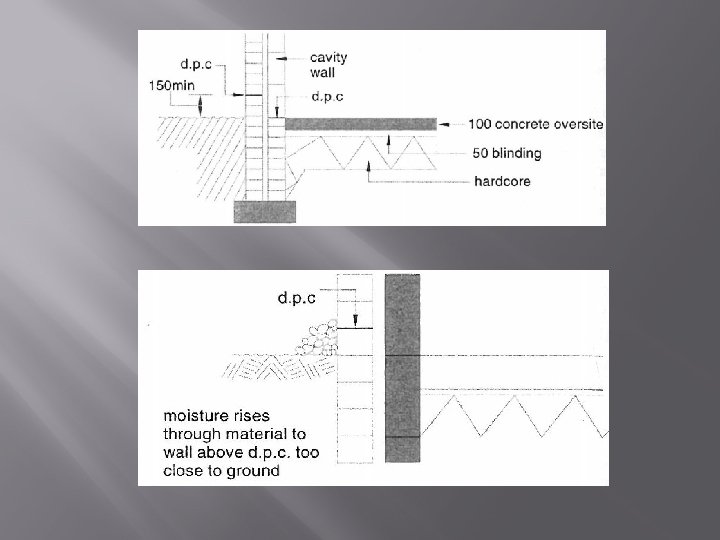
Damp-proofing Before starting to construct the superstructure of a building, a damp-proof course has to be placed on top of the floor slab. This is very important, as the construction below ground floor is vulnerable to dampness from water that soaks into the ground. It is thus a barrier that separates the brickwork below ground from the brickwork above. Due to the importance of this section a short summary of the Grade 10 work on damp proofing for walls is hereby given.

Reasons for damp proofing • • Brickwork becomes full of water and thus the brickwork becomes weak. Dampness in the wall eventually brings dampness into the air, which in itself is unhealthy. Dampness destroys paintwork. Once dampness has gained entry it becomes nearly impossible, or at least very difficult, to remove.

Regulations for damp-proofing • • • NBR states that any wall, including any parapet, pier, column, buttress or chimney forming part of a wall, shall be constructed in such a way that water does not penetrate any part of a building where it will affect the health of durability of the building. A damp-proof course shall not be installed less than 150 mm above the level of the ground. In the case of a solid wall such course shall extend over the full thickness of such wall including any plaster or rendering Where any part of any wall of a room is below ground level it shall be protected by a vertical and horizontal damp-proof course

Types of materials uses as a damp proof course: • Lead • Copper • Bitumen • Polythene • Dense bricks • Asphalt • Slate • Material covered in asphalt
 The term tanking represents laying a damp-proof course underneath that")
Basement waterproofing (Tanking) The term tanking represents laying a damp-proof course underneath that part of the building which is built below the natural ground level. Fig 12. 74 and Fig 12. 75 show a room or basement built below the natural ground level. To avoid building up very high foundation walls in front, we level the back section of the house to form a basement. In order to build the wall, a section next to the wall needs to be excavated. The area must be back filled when the construction is completed.
 that are")
CAVITY WALLS A cavity wall consists of two stone walls (slabs) that are built next to each other, separated by a 50 mm cavity (hollow), and connected by wall ties.

• • The purpose of a cavity wall Because solid walls are not entirely capable of preventing the penetration of water, cavity walls are used since they have better waterproofing qualities. The main purpose is to prevent rainwater from penetrating the building from the outside. Thermal insulation Sound insulation

• • • Advantages Prevents rainwater from penetrating the inner wall surface Good heat, cold and sound insulation Cheaper material can be used for the outer walls Expensive exterior finishes can be avoided (plastering). Disadvantages Cavity walls require expert designs They require highly skilled workmanship Constant supervision is necessary Vertical damp-proof coursing must be laid in the hollow They are more expensive than solid wall construction 50 -100 mm of the floor space is lost

Wall ties The most commonly used wall tie is the galvanized wire butterfly tie. The tie is laid with the triangular ends on the brickwork across the cavity and with the twist in the center pointing downwards in the cavity so that water will drip off. Wall ties are usually placed at intervals of 900 mm horizontally and 450 mm vertically, and are normally staggered

The following figures indicate constructional detail of the cavity wall

The following drawings show the detail through different sections of a cavity wall

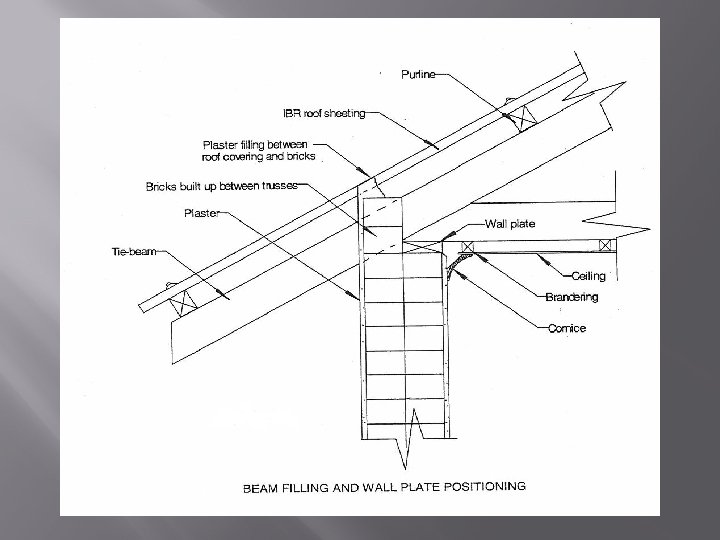
WALL PLATES The wall plate is normally SA pine timber (38 mm x 114 mm) which is fixed on top of the inside of the wall to give support to the end of the tie-beam of the roof truss. The main purpose of the wall plates is to distribute the load of the roof uniformly to the wall below. Beam filling The gap which occurs between the top of the wall and the roof covering must be filled and sealed off to prevent wind, cold and small animals such as cats, mice and birds from entering the ceiling of the building. The filling between the trusses on top of the wall is called beam filling and is normally built up with bricks and finally sealed and finished off with plaster filling from the outside.

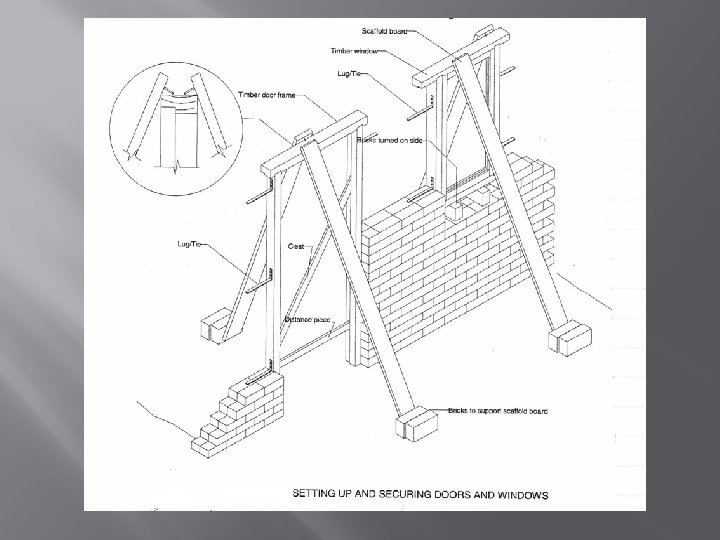
SECURING DOORS AND WINDOWS INTO BRICKWORK • • Before the building commences, ensure that: Timber surfaces that will be directly in contact with walls or concrete should be waterproofed before installation by applying a coat of primer agent. Steel door frames should be treated with oxide to prevent rust. Ensure that door and window frames with prefixed doors and sashes are in a closed and locked position before installation. Door frames must be fixed with distant cleats to keep the frames square. The regular pattern of the brickwork bond should be preserved. Ensure that enough lugs/ties are available. Galvanized hoop iron may be used if lugs/ties are note supplied with the frames. Long nails knocked into the timber frame is also allowed but not preferred. Lugs/ties must be fixed to timber frames with at least two screws.
")
• • • During the building process: Doors and windows (especially timber frames) must be protected against building operations. Frames must be supported to prevent bending of the top rail. The frames must be set up level and square. All frames should be held in position by scaffold boarding which are held in position by bricks at the bottom. The frames should regularly be checked with a spirit level to see whether the frame is level and plumb. Timber door frames should be installed at both sides with at least a lug/tie at the bottom, at lock position and at the top of the frame. Heavy-duty doors require more lugs/ties.
 must be correctly applied")
• • • During the building process: Waterproofing (DPC) must be correctly applied to avoid moisture or dampness from penetrating the building. All openings between walls and timber frames must be sealed off with silicon after installation. Outside window-sills must be built in underneath the bottom of the window and not against it. If possible, timber frames should preferably be built in, in a rebated reveal. The appearance, strength and dampness prevention is better than those of other methods. The top of the window is normally placed at the same level as the top of the door frame. If the door is fixed after the building work has been completed it must be secured absolutely square and firmly with hammer fix nylon anchors (Hilti’s) and properly countersunk so that it cannot be seen easily. These timber windows or door frames should then also be sealed off with silicon after installation.

LINTELS

Purpose of lintels Lintels support a wall or any construction directly above them. • They are positioned horizontally. • A lintel is a horizontal beam that is made of wood, steel, concrete, bricks or stonework. Lintels with bricks laid in soldier, header or stretcher course configurations are generally used for face-brick walls. •

Uses of pre-stressed, prefabricated lintels Doors, sliding doors, garage doors. • Windows • Stone columns/pillars •

• Types of pre-stressed, prefabricated lintels Type of lintel Size Length Lintel for half-brick wall 105 x 75 mm Minimum 900 mm with increases of 300 mm to 6 600 mm Lintel for a building block 140 x 190 mm Minimum 800, 1300, 1 900 and 2 400 mm Lintel for a single-brick wall 105 x 75 mm Minimum 900 mm with increases of 30 mm to 6 600 mm Lintel for a cavity/hollow wall 150 x 75 mm Minimum 900 mm with increases of 300 mm to 6 600 mm

Placing of lintels The length of the lintel will determine the minimum distance along which it will rest on the brickwork as well as the number of days that it will require temporary support. Length of lintel Minimum overhang on Minimum number of each side of the days that it has to be opening supported temporarily 900 to 1 500 mm 150 mm 7 days 1 500 to 3 000 mm 230 mm 7 days 3 30 to 6 000 mm 300 mm 10 days

Advantages and disadvantages of prestressed, prefabricated lintels Advantages Disadvantages • Readily available on the market because • Lintels are only available 28 days after casting of large-scale manufacturing to accommodate curing. • Saving the time and labour that would have • Trained workers are needed to make the lintels. been necessary to construct shuttering. • Shapes have to be strengthened by every • Producing the strongest lintels. available means, e. g. cramps, etc. • Suitable for spanning widths of 900 mmand more. • Restrict cracks from forming in the concrete due to design errors and overloading. • Easier to handle than the conventional prestressed lintels, • Must be designed by a capable designer.

ENGLISH Air bricks Arris Bat Beam filling Bed joint Bond Brick force Building block TERM EXPLANATION Purpose-made bricks built into walls to let air through. They are normally placed above windows and gables. Exterior air bricks are made from baked clay, while interior air bricks are made from gypsum or plastic. The edge of a brick Portion of a brick, larger than a quarter. The brick courses built in between roof trusses to fill the opening which occur when the trusses are placed. The horizontal joint between brick courses. The arrangement of bricks in a particular manner. Any material to build with (stone, concrete, etc. ) of which the length is less than 300 mm or the width less than 130 mm. (Compare with “building block”). A shaped wire net which is paced between brick courses to strengthen the walls. Any material to build with (stone, concrete, etc. ) of which the length is longer than 300 mm or with a width larger than 13 mm. (Compare with “brick”). AFRIKAANS Lugstene Skerprand Passteen Balkvulling Strykvoeg Verband Steenversterking Boublok

Buttering Applying of mortar to the end or side of a brick when laying. Chasing Cutting grooves into brickwork for electrical and plumbing pipes. Course A complete row of bricks with the mortar joints. Door frame ties Steel hooks which hook onto steel door frames to be built into brick courses to keep the frame rigid. (for steel frames) Frame ties (for wooden frames) Steel hooks which are screwed onto wooded door frames to be built into brick courses to keep the frame rigid. Lintel A horizontal beam over an opening, window or door. Mortar (Also called dagha) A mixture of sand, cement and water. Parapet Protective wall; embankment; rail. Raking back When brick courses are note equal in length, but form steps. Bestryking Uitgroef Laag Kosynbinte (vir staalkosyne) Kosynbinte (vir hout kosyne) Latei Dagha Borswering Trumessewerk

Reinforcing Metal bars, brick force or expanded metal which are built in between brick courses to strengthen the brickwork. Also metal bars put into concrete o strengthen the concrete. Wapening Rendering Reveal Finish; floating. The vertical sided of a door or window opening. Beraping Dagwang Roof ties The lengths of hoop-iron or stands of wire built into the wall to secure the roof to the walls. Dakbinte Still The course brickwork directly below a window. Superstructure The brickwork from the floor concrete slab and damp proof course upwards. Threshold Toothing The section of a floor at the doorway. Leaving indents in the wall by leaving out the brick in every second layer. Is normally used when existing walls are to be extended later. Wall ties Short pieced of wire, plate or other material, which are built into walls to keep two wall skins together. Vensterbank Bobou Drumpel Vertanding Muurbinte
- Slides: 41