Developing Tizen Apps with the Tizen SDK This


- Slides: 121

Developing Tizen Apps with the Tizen SDK * This document is based on Tizen 2. 4 SDK

Table of Contents (1/2) Prerequisites for the Tizen SDK 4 System Requirements for Tizen SDK 5 System Requirements for Tizen Emulator 7 JDK Requirements 9 Tizen SDK Installation 12 Downloading the installer 13 Installing the Tizen SDK 14 Installing Additional Packages 18 Confirming and Removing Packages Uninstalling the Tizen SDK 25 26

Table of Contents (2/2) Running Applications on the Emulator 27 Launching the Tizen IDE 28 Creating the Application Project Generating the Author 37 Certificate 42 Creating the 51 Emulator Instance Running the Application on the Emulator Running Applications on the Target Device 55 51

Prerequisites for the Tizen SDK

System Requirements for Tizen SDK Operating Systems The following table lists the operating systems supported by the Tizen SDK. OS Version Bit Ubuntu 14. 04/12. 04 32 and 64 Microsoft Windows® 8/7 32 and 64 Mac OS® X 10. 10 (Yosemite) / 10. 9 (Mavericks) / 10. 8 (Mountain Lion) 64 For more instructions on how to check the system specifications, see Appendix: Checking System Specifications (pages 83 -84). 5

System Requirements for Tizen SDK Processor and Memory The following table lists the processor and memory requirements for the Tizen SDK. Component Minimum Recommended Processor Speed 2 GHz 3 GHz and above Processor Type Intel Dual-Core Intel Core i 5 and above Memory 3 GB 4 GB and above Disk Space 6 GB free 6 GB and above Note The Tizen SDK can be installed on AMD processors, but may not perform properly due to absence of the Intel Hardware Accelerated Execution Manager (HAXM), which accelerates the speed of Tizen application emulation. 6

System Requirements for Tizen Emulator CPU & Screen Resolution The following table lists the CPU and screen resolution requirements for the Tizen Emulator. Component Requirement CPU Recommended: support for Intel VTx* (Virtualization Technology) Screen resolution Recommended: 1280 x 1024 * For more instructions on how to check for Intel VTx support, see Appendix: Checking CPU VTx Support (pages 85 -86). 7

System Requirements for Tizen Emulator Graphics Card The following table lists the Graphic Card requirements for the Tizen Emulator. Brand Product NVIDIA Ge. Force 8300 GS, Ge. Force 8500 GT, Ge. Force GT 220, Ge. Force GT 430, Ge. Force GT 530, Ge. Force GT 330 M, Ge. Force GTX 550 Ti, Quadro NVS 290 and later versions ATI RADEON HD 4850, RADEON HD 5450 and later versions Intel HD Graphics 2000, HD Graphics 2500, HD Graphics 4000 and later versions For more instructions on how to update the graphic card driver, see Appendix: Checking and Updating the Graphic Card Driver (pages 87 -88). 8

JDK Requirements Java Development Kit (JDK) Tizen SDK requires the JDK (Java Development Kit) installation for using the Java Runtime (VM). Java 7 or higher is required for the Tizen SDK to work properly, and as of January 2016, it is recommended to install Oracle JDK 8 for the Tizen. Do not install Open-JDK. Note Tizen SDK is a development tool based on the Eclipse IDE, which essentially requires the JDK installation as well. For instructions on how to check and uninstall the existing JDK in your system, see Appendix: Checking and Uninstalling the JDK (page 89). 9

JDK Requirements Downloading the JDK Download Oracle JDK 8 from http: //www. oracle. com/technetwork/java/ javase/downloads/jdk 8 -downloads-2133151. html. 1. Select Accept License Agreement. 2. Download the installer (. exe file) according to your system environment. Click Choose the right version, 32 bits (x 86) or 64 bits (x 64). 10

JDK Requirements Installing the JDK Install the JDK by following the instructions. Click Do not change the installation folder from the default location. Click 11

Tizen SDK Installation

Tizen SDK Installation Downloading the installer Download Tizen SDK installer from https: //developer. tizen. org/downloads. Choose the Tizen SDK installer (IDE) according to your system environment. Select 32 bits or 64 bits For more information about the IDE and CLI options, see Appendix: Tizen SDK Installation Options – IDE and CLI (page 90). 13

Tizen SDK Installation Installing the Tizen SDK Double-click on the installer (. exe file), and the installer starts verifying the system requirements prior to the installation of Tizen SDK. Double-Click 14

Tizen SDK Installation Installing the Tizen SDK If the JDK is not installed on your computer, the following pop-up appears. Click OK and install the JDK before installing the Tizen SDK. Click For more information about the JDK requirements and how to install JDK, see JDK Requirements (page 7 -9). 15

Tizen SDK Installation Installing the Tizen SDK When the installer window appears, start installation by following the steps: 1. Accept the Software License Agreement. 2. Confirm the Installation Location. The directory must be empty. 3. Click the Install button on the right to continue. (3) Click (1) Click (2) 16

Tizen SDK Installation Installing the Tizen SDK The installer installs the basic packages (IDE for Web application development) for the Tizen SDK. When the installation is completed, click Done. Click 17

Tizen SDK Installation Installing Additional Packages Run the Update Manager to install additional packages required for the development of Tizen applications. Click Yes on the prompt message upon the completion of the SDK installation. Click Later, you can launch the Update Manager-<version> from Windows Start Menu > All Programs > Tizen SDK-<version>. 18

Tizen SDK Installation Installing Additional Packages When the Update Manager is launched, it shows the All Packages tab, which lists all the available packages that can be installed at the moment. Select a specific platform and profile (2. 4 Mobile, 2. 3. 1 Wearable, or 2. 3 Wearable) you want to install. For the purpose of this tutorial, the 2. 3. 1 Wearable package is used. 19

Tizen SDK Installation Installing Additional Packages Click the arrow on the left and expand to view the components of the package. The description of each component is provided at the bottom of the window. 20

Tizen SDK Installation Installing Additional Packages For the purpose of this tutorial, install components of the 2. 3. 1 Wearable package by clicking Install. Click 21

Tizen SDK Installation Installing Additional Packages The update manager automatically detects and installs any dependent packages required. Click Yes to automatically install the required packages. 22

Tizen SDK Installation Installing Additional Packages Do not switch off the update manager while it is downloading and installing packages. Downloading and installing may take a few minutes. Select the Progress tab to view the detailed progress of the installation. 23

Tizen SDK Installation Installing Additional Packages The Install button changes to Installed when the packages are installed. 24

Tizen SDK Installation Confirming and Removing Packages Select the Installed Packages tab to confirm the installed packages. You can also remove a package if you want. 25

Tizen SDK Installation Uninstalling the Tizen SDK To uninstall the entire Tizen SDK, launch the SDK Uninstaller-<version> from Windows Start Menu > All Programs > Tizen SDK-<version>. 26

Running Applications on the Emulator

Running Applications on the Emulator Launching the Tizen IDE Launch Tizen IDE-<version> from Windows Start Menu Tizen SDK-<version>. > All Programs > Click 28

Running Applications on the Emulator Launching the Tizen IDE The Tizen IDE is launched successfully. Tizen IDE is a branded version of the Eclipse IDE. 29

Running Applications on the Emulator Launching the Tizen IDE is composed of the following sections. Toolbar Project Explorer Outline Edit Property Connection Explorer Problem / Console For more information about each section, see the Appendix: Tizen IDE Views (page 99). 30

Running Applications on the Emulator In this tutorial, a Tizen Web application project is created. Go to File > New > Tizen Web Project. Click Creating the Application Project Generating the Author Certificate Creating the Emulator Instance Running the Application on the Emulator 31

Running Applications on the Emulator The New Tizen Web Project pop-up appears, and there are 3 project types you can choose from. For more information about each project type, see Appendix: Tizen SDK Project Types (pages 100 -102). Creating the Application Project Generating the Author Certificate Creating the Emulator Instance Running the Application on the Emulator 32

Running Applications on the Emulator In the New Tizen Web Project pop-up window, (1) select the Template tab, (2) select WEARABLE-2. 3. 1 > Basic template application, (3) enter the project name as “my. First. App”, and (4) click Finish (1) Click (2) Click (3) Enter Name (4) Click Creating the Application Project Generating the Author Certificate Creating the Emulator Instance Running the Application on the Emulator 33

Running Applications on the Emulator The new project is created and shown in the Project Explorer. Creating the Application Project Generating the Author Certificate Creating the Emulator Instance Running the Application on the Emulator 34

Running Applications on the Emulator 1. Click the arrow on the left of the project name to expand view the file structure. 2. Click the arrow on the left of a folder to expand view files inside the folder. Click Creating the Application Project Generating the Author Certificate Creating the Emulator Instance Running the Application on the Emulator 35

Running Applications on the Emulator To install and run applications on devices, you must sign the application package by generating a vendor-specific certificate and registering it in the IDE. (The certificate policy may vary between different vendors and/or models. ) Since an emulator is a pseudo device as well, applications to be installed and run on the emulator must also be signed with certificates generated from the Tizen SDK. Security profile is a tool for managing certificates and it helps generating, registering, and activating certificates in Tizen SDK. Creating the Application Project Generating the Author Certificate Creating the Emulator Instance Running the Application on the Emulator 36

Running Applications on the Emulator Open Window > Preferences to set a security profile for generating certificates. Click Creating the Application Project Generating the Author Certificate Creating the Emulator Instance Running the Application on the Emulator 37

Running Applications on the Emulator Go to Tizen SDK > Security Profiles, and click Add. (3) Click (1) Click (2) Click Creating the Application Project Generating the Author Certificate Creating the Emulator Instance Running the Application on the Emulator 38

Running Applications on the Emulator Enter a profile name and click OK. Click Creating the Application Project Generating the Author Certificate Creating the Emulator Instance Running the Application on the Emulator 39

Running Applications on the Emulator Set the profile active by clicking Set Active. If there is only one profile on the list, the profile is automatically set active. Click Creating the Application Project Generating the Author Certificate Creating the Emulator Instance Running the Application on the Emulator 40

Running Applications on the Emulator Click Generate. Click Creating the Application Project Generating the Author Certificate Creating the Emulator Instance Running the Application on the Emulator 41

Running Applications on the Emulator Fill in the information in the Certificate Generator. Click Creating the Application Project Generating the Author Certificate Creating the Emulator Instance Running the Application on the Emulator 42

Running Applications on the Emulator Click Yes to fill the author certificate information automatically. Click Creating the Application Project Generating the Author Certificate Creating the Emulator Instance Running the Application on the Emulator 43

Running Applications on the Emulator Security profile has been registered successfully. Click OK. Click Creating the Application Project Generating the Author Certificate Creating the Emulator Instance Running the Application on the Emulator 44

Running Applications on the Emulator Launch an Emulator instance. Launch the Emulator Manager by clicking the icon in the Connection Explorer. Click Create New Emulator > Wearable. Click Creating the Application Project Generating the Author Certificate Creating the Emulator Instance Running the Application on the Emulator 45

Running Applications on the Emulator Click Confirm. Click Creating the Application Project Generating the Author Certificate Creating the Emulator Instance Running the Application on the Emulator 46

Running Applications on the Emulator Click the play button to launch the emulator instance. Click Creating the Application Project Generating the Author Certificate Creating the Emulator Instance Running the Application on the Emulator 47

Running Applications on the Emulator The Emulator is launched in its own window, and the structure of the emulator is shown in the Connection Explorer. Creating the Application Project Generating the Author Certificate Creating the Emulator Instance Running the Application on the Emulator 48

Running Applications on the Emulator Right-click on the project title, and select Run As > Tizen Web Application while the Emulator display of the is switched on. Click Creating the Application Project Generating the Author Certificate Creating the Emulator Instance Running the Application on the Emulator 49

Running Applications on the Emulator The application is launched in the Emulator successfully. Creating the Application Project Generating the Author Certificate Creating the Emulator Instance Running the Application on the Emulator 50

Running Applications on the Target Device

Running Applications on a Target Device The Certificate Extension is an extra package of Tizen SDK. It is required for generating an author certificate for commercial devices, such as Samsung Gear S 2, and registering it in the IDE. To install the Certificate Extension, close the IDE, and launch Update Manager<version> from Start > All Programs > Tizen SDK-<version>. Click Installing the Certificate Extension Connecting the Target Device Generating the Author & Distributor Certificates Running the Application on the Emulator 52

Running Applications on a Target Device In All Packages tab, click the arrow on the left of Extra and expand to see the Certificate Extension. Click Installing the Certificate Extension Connecting the Target Device Generating the Author & Distributor Certificates Running the Application on the Emulator 53

Running Applications on a Target Device 1. Click the Accept checkbox to accept the EULA (End User License Agreement). 2. Click Installing the Certificate Extension Connecting the Target Device Generating the Author & Distributor Certificates Running the Application on the Emulator 54

Running Applications on a Target Device If any of the SDK programs are still running on the system, the following pop-up appears. 1. Click OK, and close all the SDK programs. 2. After closing all the programs, click Install. Click Installing the Certificate Extension Connecting the Target Device Generating the Author & Distributor Certificates Running the Application on the Emulator 55

Running Applications on a Target Device Close the Update Manager when the Certificate Extension is installed. Installing the Certificate Extension Connecting the Target Device Generating the Author & Distributor Certificates Running the Application on the Emulator 56

Running Applications on a Target Device For Gear S 2, you must connect the device to the computer using Wi-Fi. For devices that can be connected using USB cable, you can simply connect the device to the computer with an USB cable. For connecting a Gear S 2 device using Wi-Fi: 1. Switch on the Debugging mode in Settings > Gear info. Installing the Certificate Extension Connecting the Target Device Generating the Author & Distributor Certificates Running the Application on the Emulator 57

Running Applications on a Target Device 2. Switch off Bluetooth in Settings > Connections. 3. Switch on Wi-Fi in Settings > Connections and note the IP address. The device and the computer must be connected to the same Wi-Fi network. 172. 20. 13 Installing the Certificate Extension Connecting the Target Device Generating the Author & Distributor Certificates Running the Application on the Emulator 58

Running Applications on a Target Device Launch the Remote Device Manager by clicking the icon in the Connection Explorer and click New. Installing the Certificate Extension Connecting the Target Device Generating the Author & Distributor Certificates Running the Application on the Emulator 59

Running Applications on a Target Device Fill in the information about the device and click Add. Select the device to connect and click Connect button. Installing the Certificate Extension Click. Connecting the Target Device Generating the Author & Distributor Certificates Running the Application on the Emulator 60

Running Applications on a Target Device In the first attempt, the connection can fail. In this case, a pop-up appears in the device. Click the check button to allow Gear to install apps in the device manually. In the Connection Explorer, note that the device is connected successfully. Installing the Certificate Extension Connecting the Target Device Generating the Author & Distributor Certificates Running the Application on the Emulator 61

Running Applications on a Target Device Click the Certificate icon to generate and register a developer certificate. Click Installing the Certificate Extension Connecting the Target Device Generating the Author & Distributor Certificates Running the Application on the Emulator 62

Running Applications on a Target Device Click New to create security profile. Click Installing the Certificate Extension Connecting the Target Device Generating the Author & Distributor Certificates Running the Application on the Emulator 63

Running Applications on a Target Device Name the profile and click OK. Click Installing the Certificate Extension Connecting the Target Device Generating the Author & Distributor Certificates Running the Application on the Emulator 64

Running Applications on a Target Device Select Crete new certificate to create an author certificate. Click Installing the Certificate Extension Connecting the Target Device Generating the Author & Distributor Certificates Running the Application on the Emulator 65

Running Applications on a Target Device Fill in the information and click Request. Click Installing the Certificate Extension Connecting the Target Device Generating the Author & Distributor Certificates Running the Application on the Emulator 66

Running Applications on a Target Device Click OK. Click Installing the Certificate Extension Connecting the Target Device Generating the Author & Distributor Certificates Running the Application on the Emulator 67

Running Applications on a Target Device Sign in with your Samsung account. Click Installing the Certificate Extension Connecting the Target Device Generating the Author & Distributor Certificates Running the Application on the Emulator 68

Running Applications on a Target Device Click OK. Click Installing the Certificate Extension Connecting the Target Device Generating the Author & Distributor Certificates Running the Application on the Emulator 69

Running Applications on a Target Device Select Crete new certificate to create a distributor certificate. Click Installing the Certificate Extension Connecting the Target Device Generating the Author & Distributor Certificates Running the Application on the Emulator 70

Running Applications on a Target Device Enter the Device ID and click Request. You can cope the DUID from the list on the right. Click Installing the Certificate Extension Connecting the Target Device Generating the Author & Distributor Certificates Running the Application on the Emulator 71

Running Applications on a Target Device Click OK. Click Installing the Certificate Extension Connecting the Target Device Generating the Author & Distributor Certificates Running the Application on the Emulator 72

Running Applications on a Target Device Sign in with your Samsung account. Click Installing the Certificate Extension Connecting the Target Device Generating the Author & Distributor Certificates Running the Application on the Emulator 73

Running Applications on a Target Device Click OK when the device has been registered successfully. Click Installing the Certificate Extension Connecting the Target Device Generating the Author & Distributor Certificates Running the Application on the Emulator 74

Running Applications on a Target Device Click OK. Click Installing the Certificate Extension Connecting the Target Device Generating the Author & Distributor Certificates Running the Application on the Emulator 75

Running Applications on a Target Device Right-click on the target device in the Connection Explorer, and go to Permit to install applications. Installing the Certificate Extension Connecting the Target Device Generating the Author & Distributor Certificates Running the Application on the Emulator 76

Running Applications on a Target Device Click OK when the upload is completed. Installing the Certificate Extension Connecting the Target Device Generating the Author & Distributor Certificates Running the Application on the Emulator 77

Running Applications on a Target Device Right-click on the project title, and select Run As > Tizen Web Application while the Emulator display is switched on. Installing the Certificate Extension Connecting the Target Device Generating the Author & Distributor Certificates Running the Application on the Target Device 78

Appendix

Checking System Specifications OS, Processor, and Memory You can view a summary of important information about your computer and operating system by clicking Windows Start Menu , right-clicking Computer, and clicking Properties. OS Processor Memory OS 80

Checking System Specifications Disk Space You can check the available disk space by clicking the Windows Start Menu > Computer. 81

Checking the CPU VTx Support Secur. Able. exe Download the Secur. Able. exe file from http: //securable. en. softonic. com/ and execute the software. VT supported by CPU but locked off by mainboard CPU VT not supported and HAXM NOT available CPU VT supported and HAXM available VT supported but locked on by BIOS (BIOS setup required) 82

Checking the CPU VTx Support VTx Option in BIOS You have to set the VT option to enabled in the BIOS menu. The entrance point of the BIOS menu depends on the type of the PC mainboard. CPU VT supported and controllable in BIOS CPU VT supported but NOT controllable in BIOS 83

Checking and Updating the Graphic Card Driver Windows Update You can check your graphic card driver in your system by clicking Windows Start Menu , right-clicking Control Panel, and clicking Adjust screen resolution > Advanced Settings. 84

Checking and Updating the Graphic Card Driver Windows Update You must update to the latest vendor-provided version of the graphic card driver for Open. GL ES acceleration to use the Tizen Emulator. • For Microsoft Windows® 8/7, check and install the necessary drivers in Control Panel > System and Security > Windows Update. 85

Checking and Uninstalling the JDK Programs and Features Confirm the JDK installation in Control Panel > Programs and Features. 86

Tizen SDK Installation Options IDE and CLI The Tizen IDE (Integrated Development Environments) provides a development tool with based on the Eclipse IDE. • Provides GUI editor and analysis tools with an excellent UX • Easy for general users and developers • Requires relatively high system resources The Tizen CLI (Command Line Interfaces) provides an environment for creating, building, and packaging projects by using commands on a terminal. • Suitable for high-level developers with automated build system • Requires relatively low system resources 87

Tizen SDK Installation Options Advanced Configuration You can change the package server, upload a custom SDK image, change the proxy settings, and add extra repositories in the Advanced Configuration. 88

Tizen SDK Installation Options Advanced Configuration You can install or update the Tizen SDK by using one of the following options. • Configuring the Package Server 1. In the combo box at the top, select Package Server. 2. In the text box, type an available repository address and click Refresh. 3. In the Distribution box, select the distribution you want to download. 4. Click Confirm. 89

Tizen SDK Installation Options Advanced Configuration You can install or update the Tizen SDK by using one of the following options. • Configuring the SDK Image 1. In the combo box at the top, select SDK Image. 2. Click the folder icon, browse to the SDK image file, and click OK. 3. Click Confirm. 90

Tizen SDK Installation Options Advanced Configuration You can configure a proxy to connect to a repository server. 1. Click the Proxy Settings tab. 2. Select the configuration you want to use. 3. If you select Manual Proxy Configuration, enter HTTP Proxy and Port in the fields. 4. Click Confirm. 91

Tizen SDK Installation Options Advanced Configuration The Tizen SDK supports extension packages, called extra repositories, contributed by external developers and companies. To add an extra repository, click the Extra Repository tab and click Add. When the Add Repository dialog appears, enter the Name and Repository in the fields. The repository indicates the external server address. 92

Tizen SDK Installation Options Advanced Configuration To remove an extra repository, click the Trash icon for the repository in the table, and click Confirm. If the external repository is removed, the packages from the external repository are deprecated. 93

Tizen SDK Installation Options Advanced Configuration To modify an extra repository, click the target repository and click Modify in the table. When the Modify Repository dialog box appears, modify the Name and Repository fields. The repository indicates the external server address. You can also click the folder icon on Repository to select a local image file or local server location. 94

Tizen SDK Installation Options Advanced Configuration To activate or deactivate an extra repository, select the check box of the repository to be activated, or clear the check box of the repository to be deactivated. 95

Tizen IDE Views • The Project Explorer view provides a hierarchical view of all resources in the workspace. You can open files for editing, or select resources for operations, such as building, packaging, signing, or validating an application. • The Connection Explorer view shows the devices connected to the system. A list of connected devices is available after connecting a device or launching a Tizen Emulator with a tree view. • The Outline view shows the structure outline and Object hierarchy of C/C++ and Javascript • The Property view shows the property of selected files on Project Explorer, such as file path, size, editability, and name. • The Problem view shows the status of build and packaging error or warning. • The Console view shows the target or emulator log when applications are run. • The Edit view is the code editor area. • The Toolbar provides various shortcut icons for building and debugging. 96

Tizen SDK Project Type Template The Template tab provides a list of templates with basic structure the developers can use to create their own Web application project. 97

Tizen SDK Project Type Online Sample The Online Sample tab provides a list of sample applications demonstrating the usage of various APIs and UI design which developers can refer to. If the list of online samples does not appear properly, see Appendix: Custom Network Settings (pages 103 -104). 98

Tizen SDK Project Type User Template The User Template tab provides a list of user-customized templates that can be used as a basis for creating other projects. 99

Custom Network Settings (for in-campus use only) If the list of online samples does not appear properly, you may have to change the network settings. Go to Window > Preferences > General > Network Connections and change the Active Provider option to Manual. 100

Custom Network Settings (for in-campus use only) Select HTTP and click Edit. Change the proxy setting accordingly For the Seoul R&D campus, the host: 10. 112. 1. 184 and the port is 8080. Do the same for HTTPS and click Apply. 101

Emulator Control Panel Emulator Right-click on the Emulator screen to view more options on the Emulator. Click Control Panel. 102

Emulator Control Panel Emulator In the Emulator Control Panel, developers can create and use any data required during application execution and imitate environmental conditions for the device sensors. 103

Screen Timeout on the Emulator You can adjust the screen timeout of the emulator in Settings > Display > Screen timeout. Swipe-up 104

Troubleshooting Manual Troubleshooting You can troubleshoot your Tizen SDK installation by referring to the installation log file. The log file is located in a different directory based on your operating system: • Windows® 7: %LOCALAPPDATA%. installmanagerinstall-log • Windows® XP: %USERPROFILE%Local SettingsApplication Data. installmanagerinstall-log • Ubuntu, Mac. OS®: $HOME/. installmanager/install-log 105

Troubleshooting Network Connection Failure If the Install Manager fails to connect to the SDK package server: • Check whether you can access the Tizen Web site using the Web browser on the system where you are installing the SDK. • If not, install the SDK using the SDK image. • Check whether you are using a network proxy. If yes, run the Install Manager. Click Settings and select the desired option. If the proxy server needs authentication, an ID and password dialog appears. • The proxy option is not provided anymore. 106

Troubleshooting SDK Image File Dialog Failure When installing the Tizen SDK using the SDK image, you may see the Cannot open SDK image file dialog box. The box is displayed if you are using the JDK 1. 6 updates 26 JDK. To avoid this problem, ensure that you are using the latest version of Java. See JDK Requirements (pages 7 -9) for the JDK installation guide. 107

Troubleshooting Crashing of Java during SDK Installation During the Tizen SDK installation, the Java application can crash unexpectedly, and the following window is displayed. To avoid this problem: • Ensure that you are using the latest version of the error DLL file, such as MSVCR 100. dll. If the error file version is not the latest, upgrade it. • Update your system with all the Windows-related updates using Windows Update. 108

Troubleshooting Install Manager Not Appearing If the Install Manager does not appear, an error may have occurred in the JDK installation. You can check your problem by following these directions: • Run the Install Manager with the -help options. • If you see the following message, the Java libraries are not suitable to Java executables. "Registry key 'SoftwareJava. SoftJava Runtime EnvironmentCurrent. Version' has value 'XXX', but 'XXX' is required. " 109

Troubleshooting Install Manager Not Appearing The cause is that Java files in System 32 do not match the Java Runtime Environment in the registry. To avoid this problem, copy the java. exe file to the System 32 directory. If Tizen Emulator does not appear when you launch it, you may face the same trouble log at <TIZEN-SDK-DATA>/emulator/vms/<Emulator name>/logs/emulator. log file. 110

Troubleshooting HAXM If the Emulator does not work properly, there might be an error in the HAXM. The Intel Hardware Accelerated Execution Manager (Intel HAXM) is a hardware-assisted virtualization engine (hypervisor) that uses Intel Virtualization Technology (VT) to speed up Tizen application emulation on a Windows® or Mac® host machine. HAXM is supposed to be installed automatically as part of the Tizen SDK installation. However, to install HAXM separately, you can download the Windows installer package using the link below: http: //download. tizen. org/sdk/haxm/1. 1. 9/win/intelhaxm-tizen. exe 111

Troubleshooting HAXM supports the following Windows® versions: • Windows® 7 (32/64 -bit) • Windows® Vista (32/64 -bit) • Windows® XP SP 2 or later (32 -bit only) Run the installer and accept the UAC prompt, if you are running the stand-alone installer. 112

Troubleshooting HAXM When the first HAXM install screen is displayed, click Next. You can access the documentation at any time by clicking Intel HAXM Documentation. 113

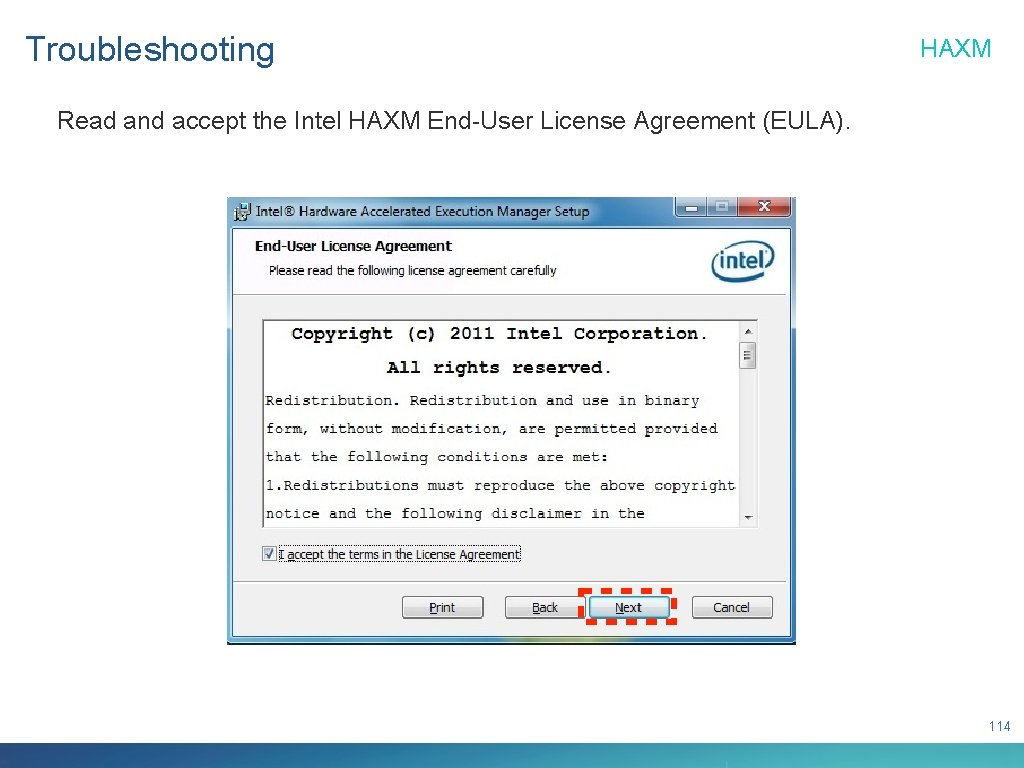
Troubleshooting HAXM Read and accept the Intel HAXM End-User License Agreement (EULA). 114

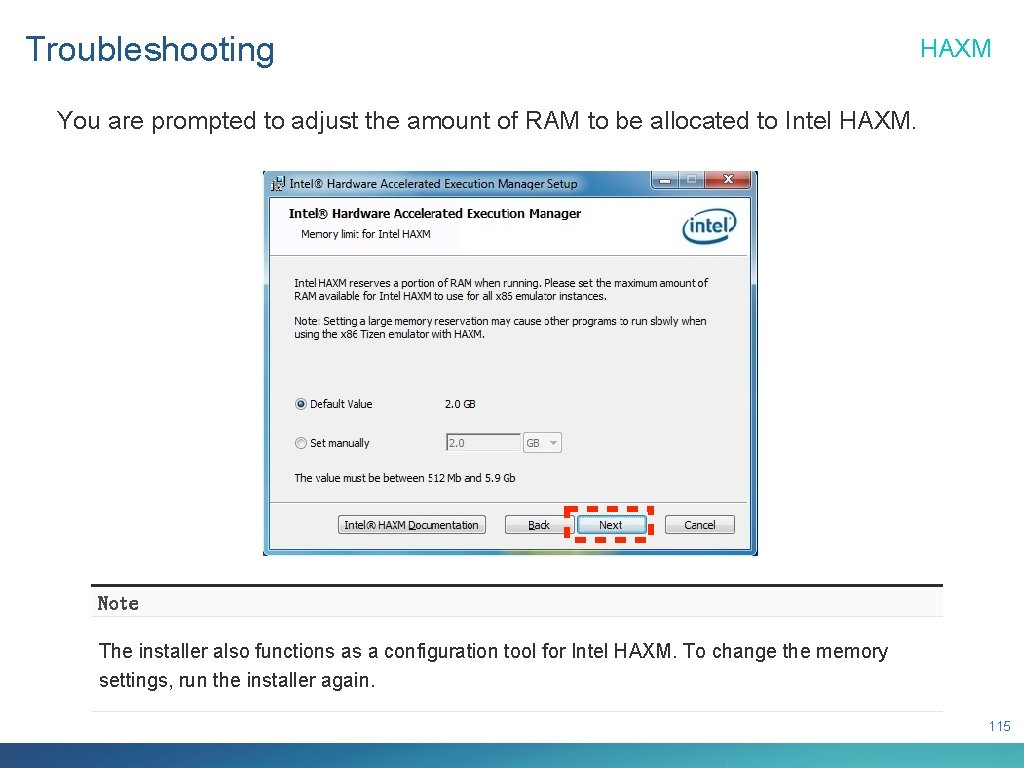
Troubleshooting HAXM You are prompted to adjust the amount of RAM to be allocated to Intel HAXM. Note The installer also functions as a configuration tool for Intel HAXM. To change the memory settings, run the installer again. 115

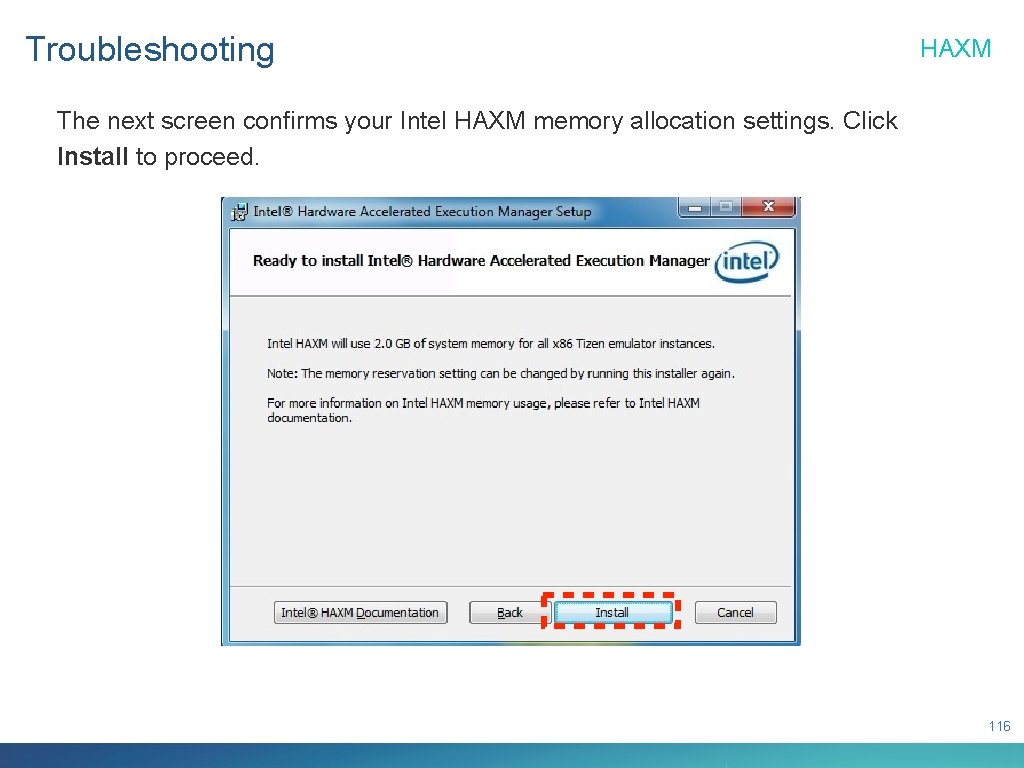
Troubleshooting HAXM The next screen confirms your Intel HAXM memory allocation settings. Click Install to proceed. 116

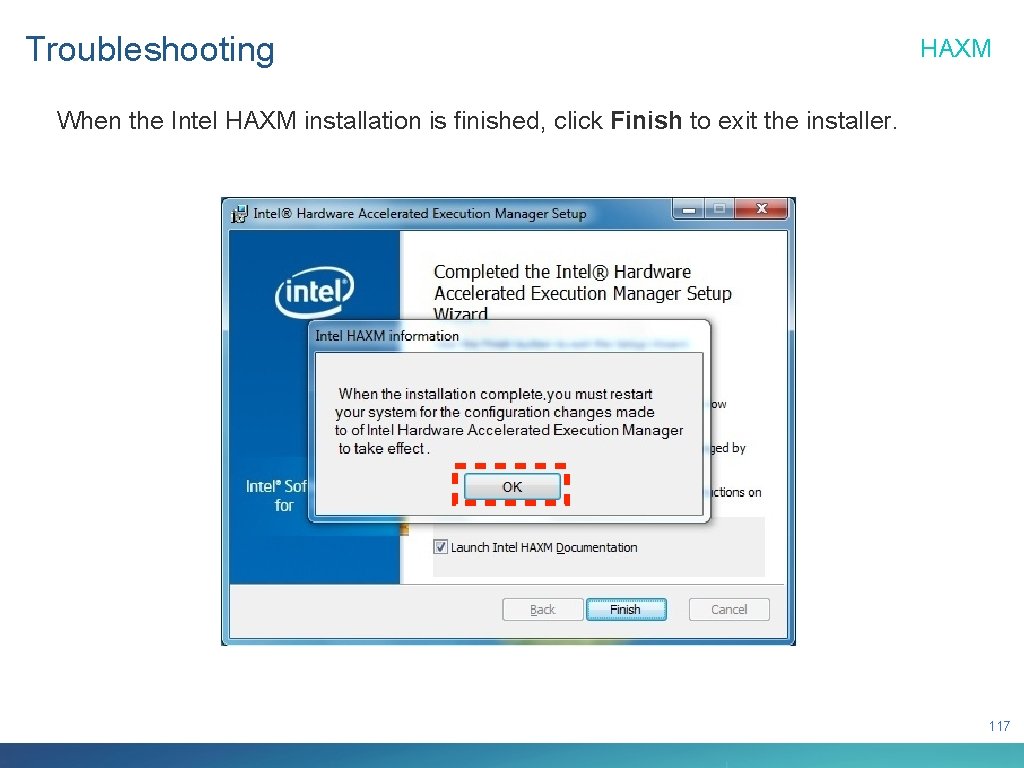
Troubleshooting HAXM When the Intel HAXM installation is finished, click Finish to exit the installer. 117

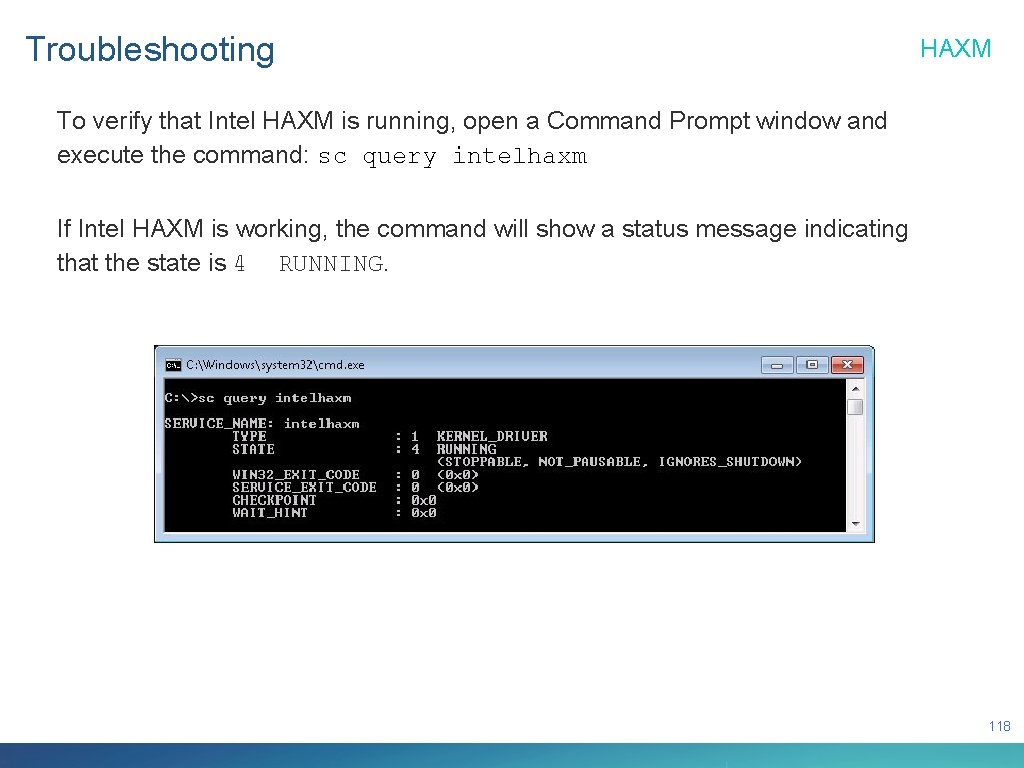
Troubleshooting HAXM To verify that Intel HAXM is running, open a Command Prompt window and execute the command: sc query intelhaxm If Intel HAXM is working, the command will show a status message indicating that the state is 4 RUNNING. 118

Troubleshooting HAXM Starting and Stopping HAXM To stop or start Intel HAXM, open a Command Prompt window with administrator privileges and execute one of the following commands: • Stop HAXM: sc stop intelhaxm • Start HAXM: sc start intelhaxm Adjusting Intel HAXM Memory Allocation To change the amount of memory allocated to Intel HAXM, run the installer again. Note Changes to Intel HAXM memory settings take effect when Intel HAXM is restarted. The currently running emulators continue to use the previous memory setting. 119

Troubleshooting HAXM Removing HAXM Warning Close all instances of the Tizen emulator before removing Intel HAXM. To uninstall Intel HAXM, run the installer again or use the Control Panel. Important Removing Intel HAXM disables the acceleration of all Tizen emulators, but the Tizen emulator still functions. Installing Intel HAXM again re-enables the emulator acceleration. 120

Troubleshooting HAXM (BIOS/OS Setting) Hardware feature required by HAXM may be disabled by BIOS or OS. If your installation fails because of a hardware requirement, please check BIOS/OS as followed suggestion: • Make sure VT is enabled in BIOS. • Make sure Execute Disable Bit is enabled in BIOS. • Make sure Data Execution Prevention is enabled in Windows. On the Windows platform, click Control Panel > System > Advanced system settings > Advanced tab > Performance section, Options (or Settings) button > Data Execution Prevention. Make sure that DEP is enabled. 121