USFD in Rails Welds 1 DEVELOPMENT RAILS OF







- Slides: 144

USFD in Rails & Welds 1

DEVELOPMENT RAILS OF FLAWS IN l Development of flaws in rails is inevitable l Two main reasons are the inherent defects and fatigue of rails due to passage of traffic l Rail stresses are increasing day by day due to which mechanical properties of rail steel are being exceeded with passage of wheels 2

Defects in Rails l SURFACE DEFECTS l INTERNAL DEFECTS 3

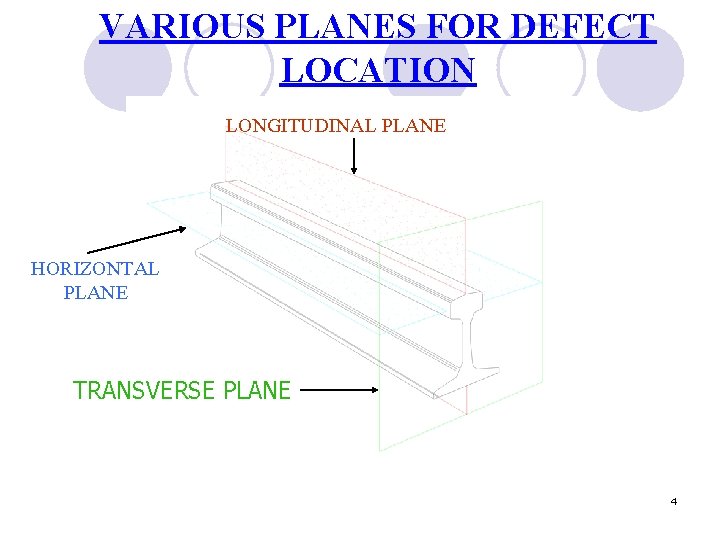
VARIOUS PLANES FOR DEFECT LOCATION LONGITUDINAL PLANE HORIZONTAL PLANE TRANSVERSE PLANE 4

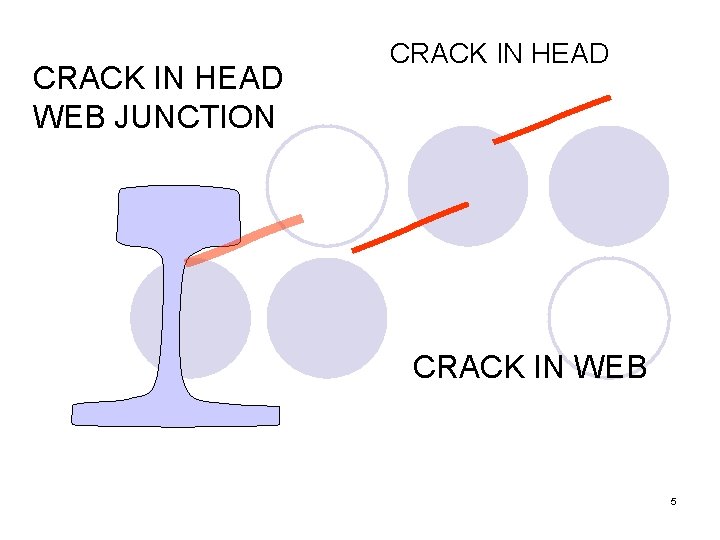
CRACK IN HEAD WEB JUNCTION CRACK IN HEAD CRACK IN WEB 5

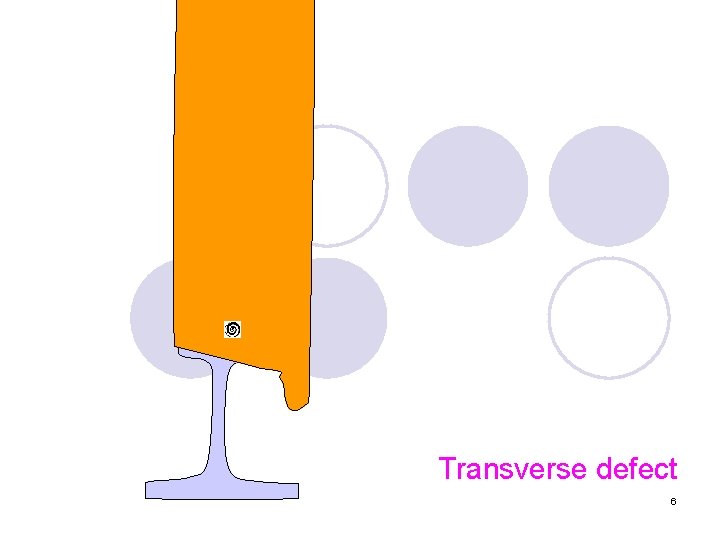
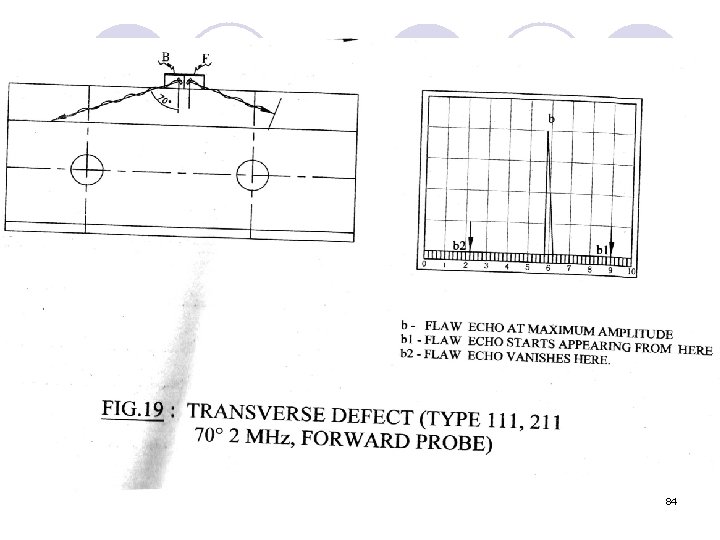
Transverse defect 6

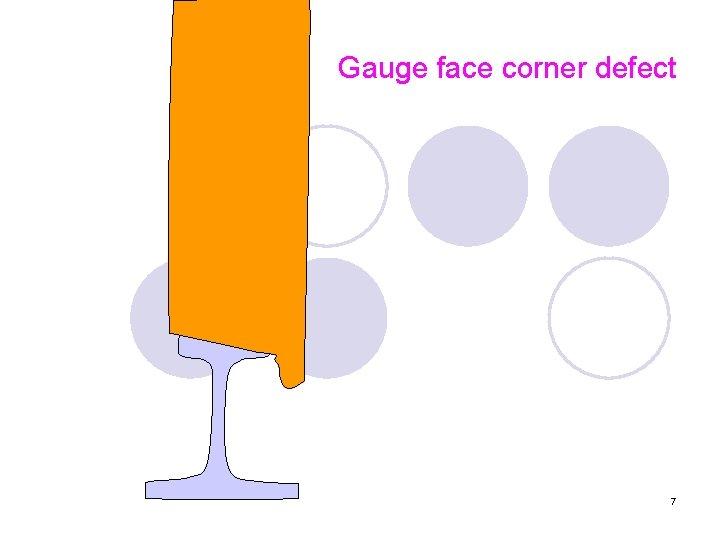
Gauge face corner defect 7

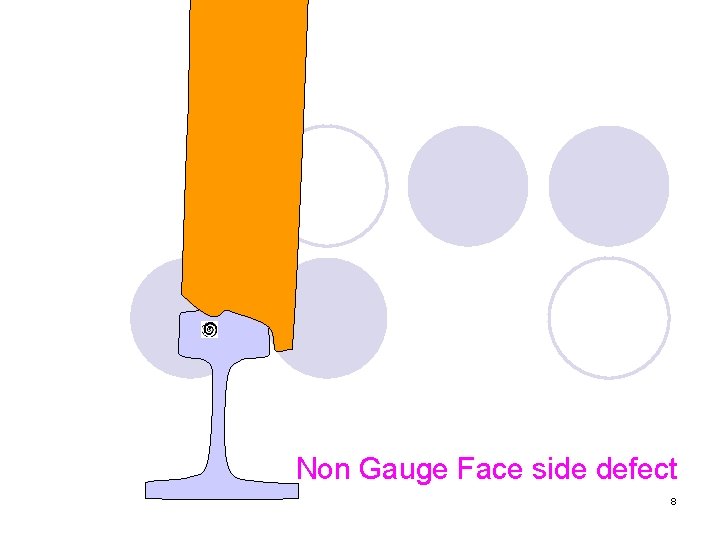
Non Gauge Face side defect 8

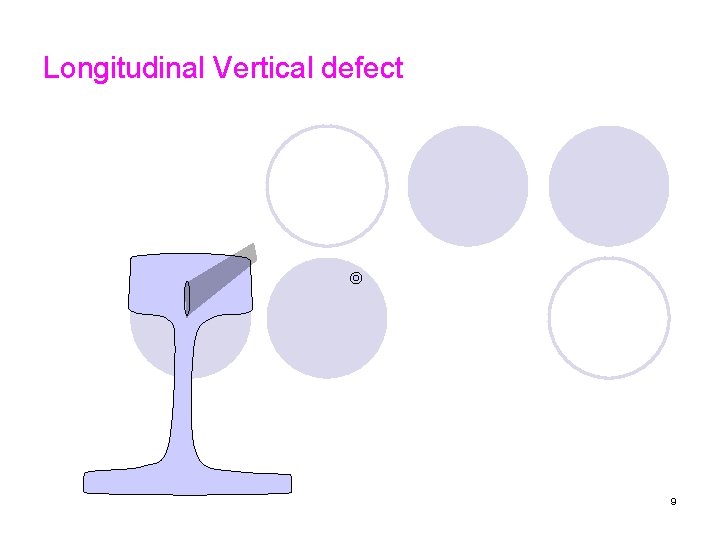
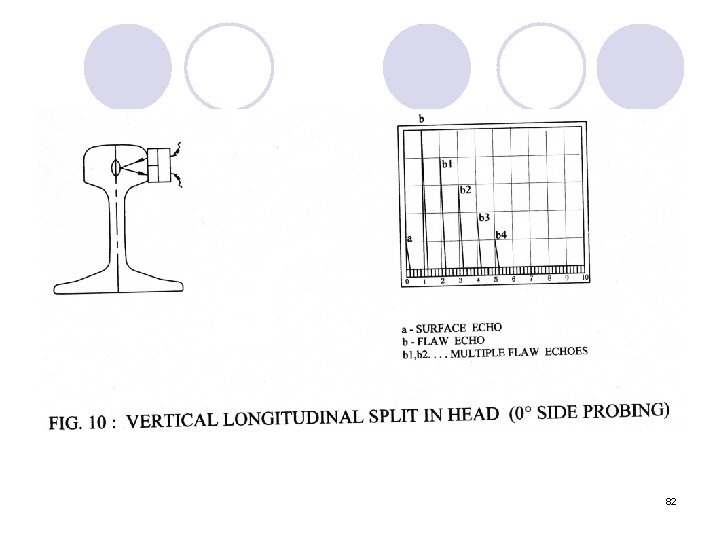
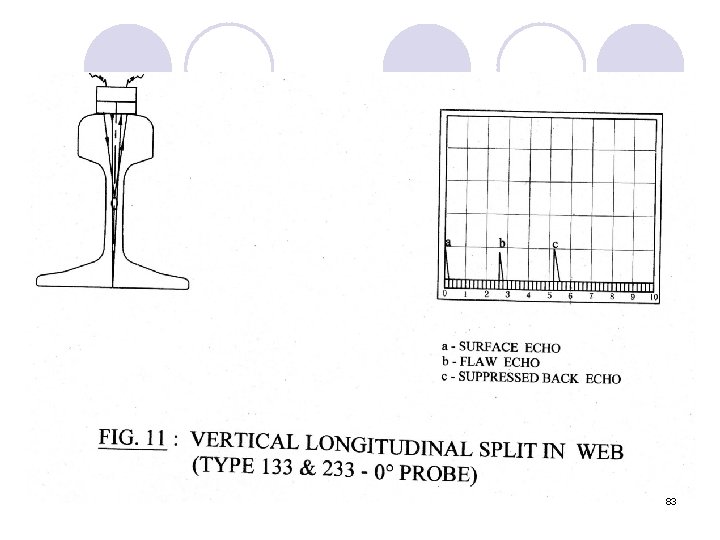
Longitudinal Vertical defect 9

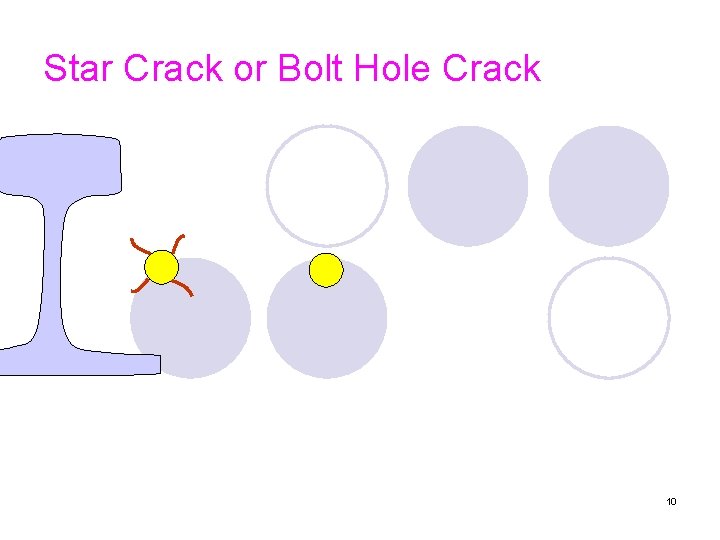
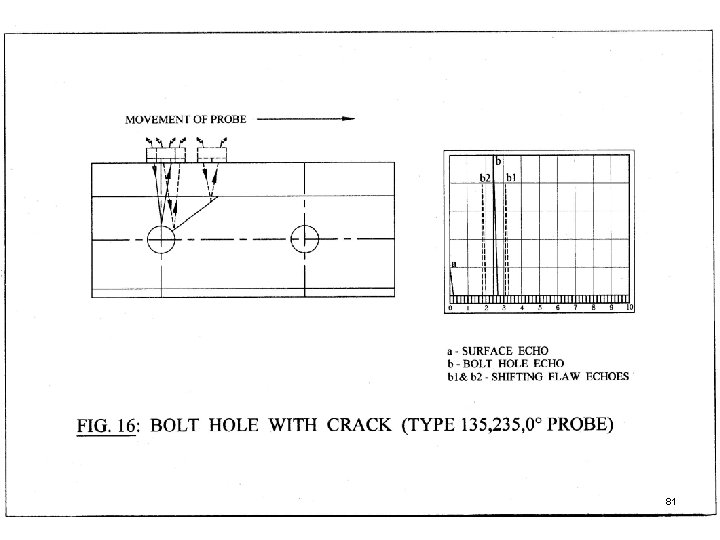
Star Crack or Bolt Hole Crack 10

PROBES 11

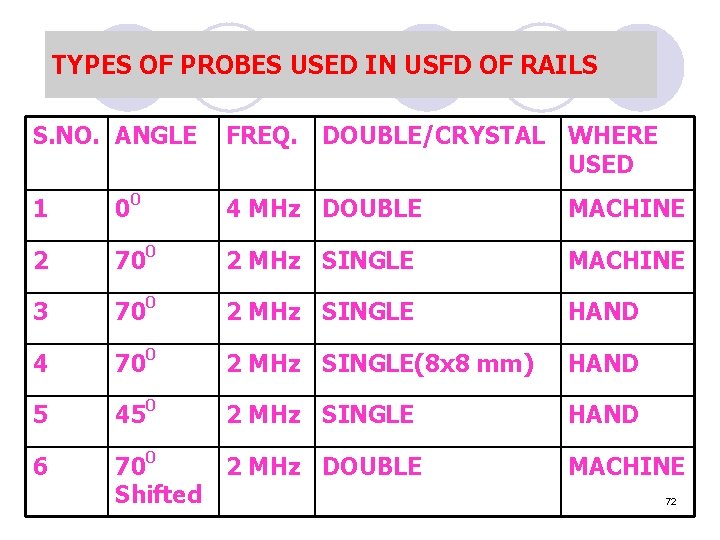
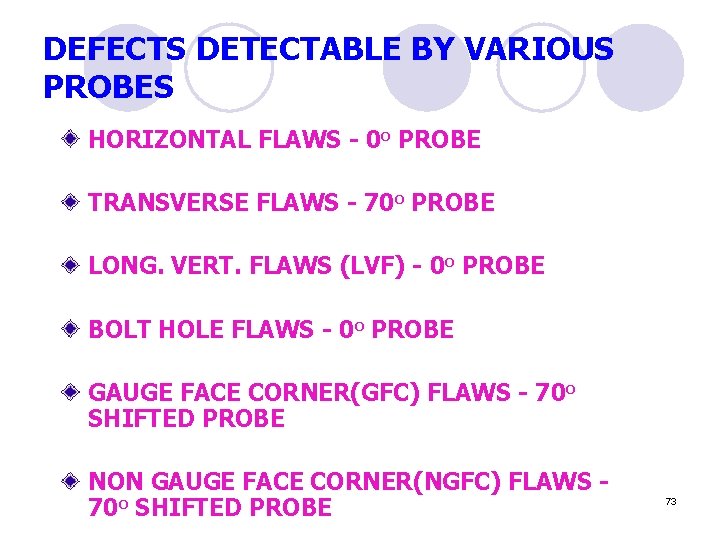
Probes Used for Ultrasonic Testing l 00 or NORMAL Probe (4 MHZ) l 700 Forward Probe (2 MHz) l 700 Backward Probe (2 MHz) l 700 Shifted/Forward Probe (2 MHz) l 700 Shifted/Backward Probe (2 MHz) l 450 Tandem Test Rig (2 MHz) l 700 Miniature Probe (2 MHz) l 00 Probe (2 MHZ) 12

BASIC PRINCIPLES of USFD TESTING 15

16

SONIC & SOUND l Sonic is related to or using sound. l Sound waves are categorized by their frequencies as. . . ¡ Subsonic ( less than 20 Hz) ¡ SONIC ( BETWEEN 20 & 20, 000 Hz) ¡ Ultrasonic ( > 20, 000 Hz) l Sound Waves are Mechanical Waves l Other Waves are Electro Magnetic Waves 17

CLASSIFICATION OF SOUND WAVES l LONGITUDINAL OR COMPRESSION WAVES l TRANSVERSE OR SHEAR WAVES l SURFACE WAVES 18

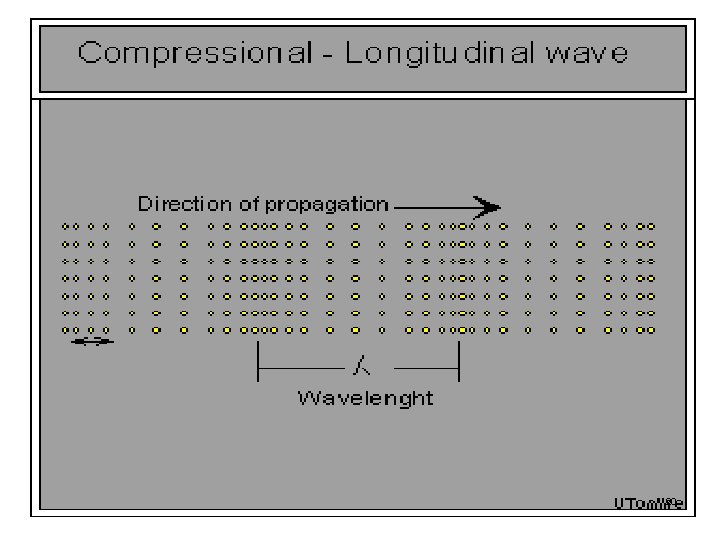
LONGITUDINAL WAVES l Vibration of the particles of the material are in the same direction as that of propagation of the wave l Sound energy is transmitted from one particle to another by alternating compression & hence these are also called compression waves. l These can travel through solids , liquid & gases. l These are the fastest of all wave types. 19

20

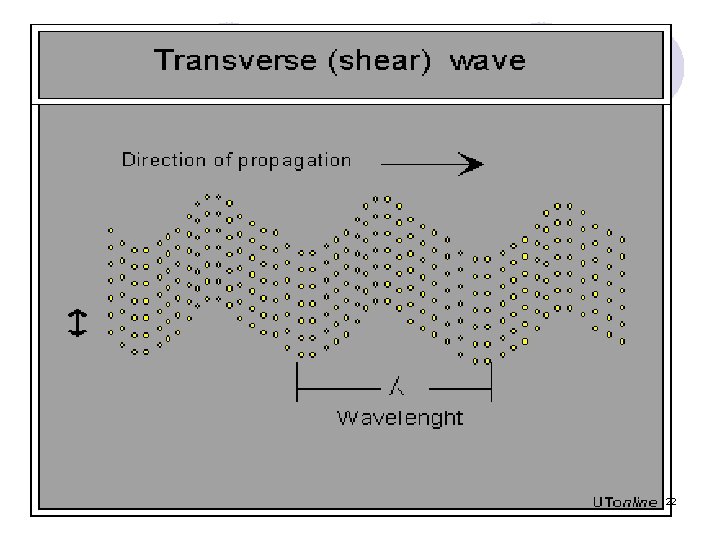
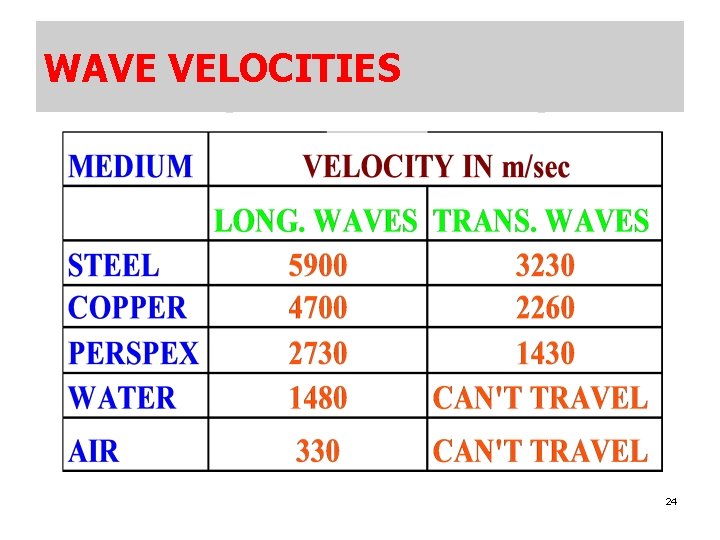
TRANSVERSE WAVES l Vibration of the particles of the material are in a direction perpendicular to the direction of propagation of the wave l Energy is transmitted from one particle to another by shear. Hence also known as shear waves. l These can travel only through solids and on surface of liquids. These can not travel through liquids and gases as they do not have any shear strength. l Their velocity in any given media is approx. half the velocity of longitudinal Waves. 21

22

SURFACE WAVES l These are confined to a very thin layer of material surface and are therefore not important from the point of view of rail flaw detection 23

WAVE VELOCITIES 24

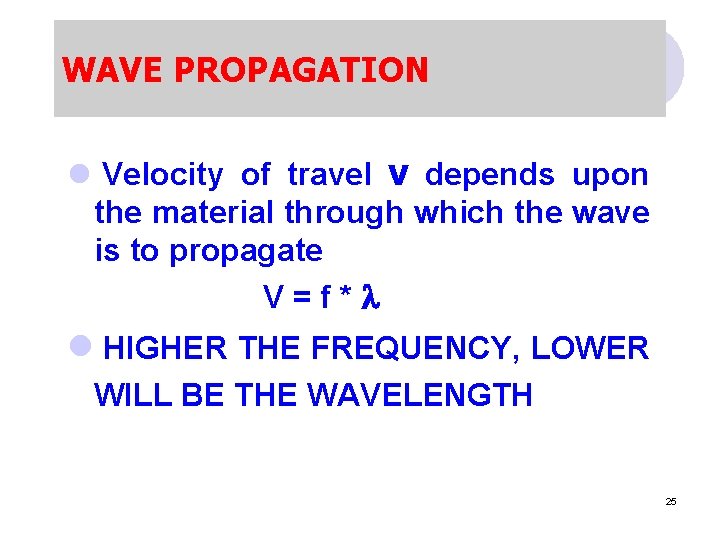
WAVE PROPAGATION l Velocity of travel v depends upon the material through which the wave is to propagate V = f * l HIGHER THE FREQUENCY, LOWER WILL BE THE WAVELENGTH 25

WAVE PROPAGATION l. Reflection l. Refraction l. Transformation l Acoustic Impedance l. Attenuation 26

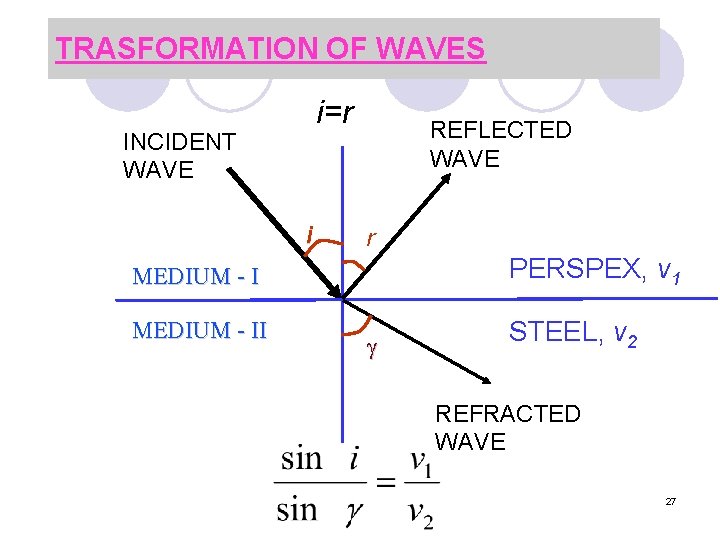
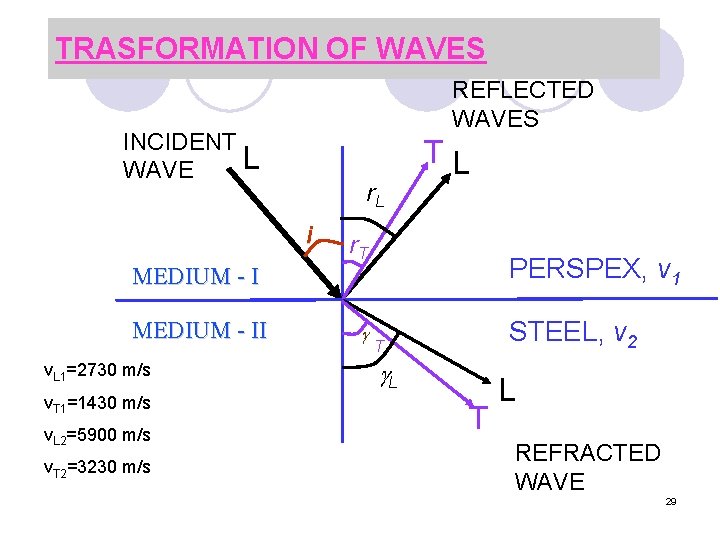
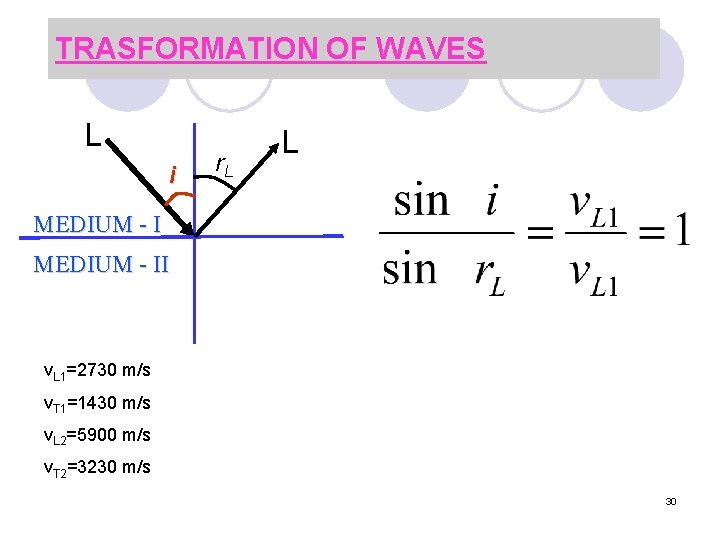
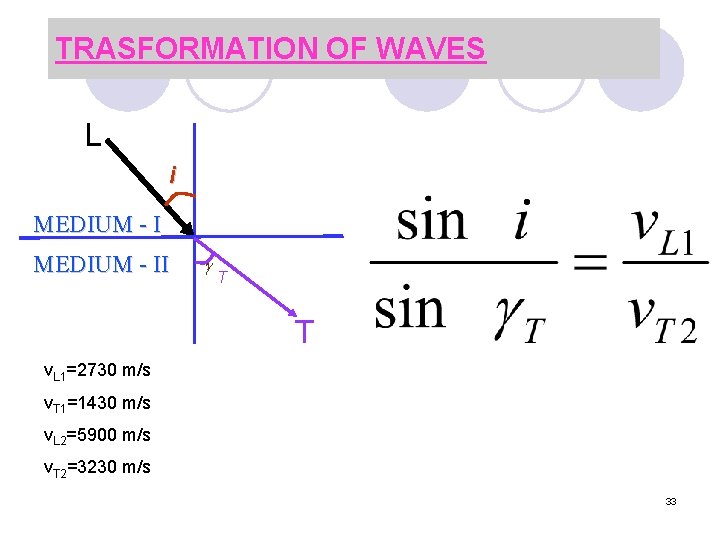
TRASFORMATION OF WAVES i=r INCIDENT WAVE i REFLECTED WAVE r PERSPEX, v 1 MEDIUM - II STEEL, v 2 REFRACTED WAVE 27

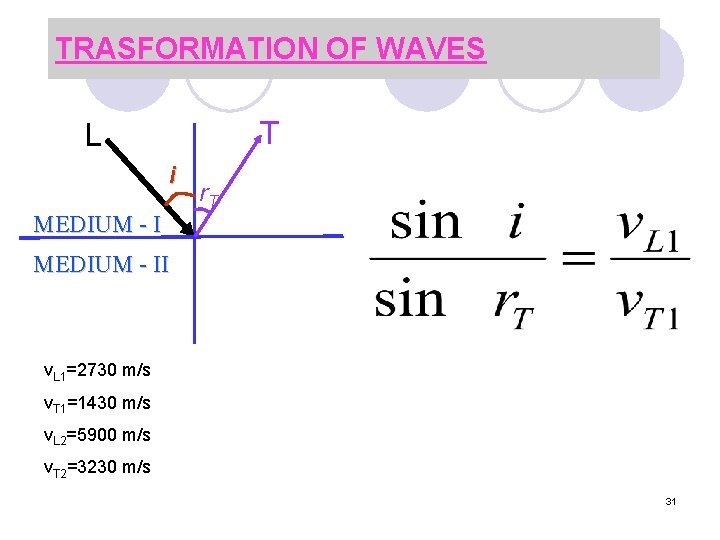
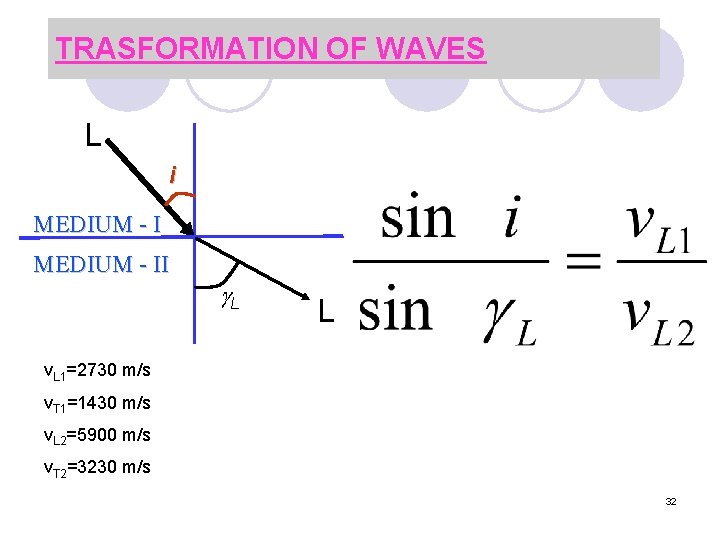
Mode Conversion l When a longitudinal wave hits an interface at an angle, some of the energy can cause particle movement in the transverse direction to start a shear (transverse) wave. l Mode conversion, occurs when a wave encounters an interface between material of different accoustic impedance and the incident angle is not normal to interface. 28

TRASFORMATION OF WAVES REFLECTED WAVES INCIDENT L WAVE r. L i TL r. T PERSPEX, v 1 MEDIUM - II v. L 1=2730 m/s v. T 1=1430 m/s v. L 2=5900 m/s v. T 2=3230 m/s STEEL, v 2 T L T L REFRACTED WAVE 29

TRASFORMATION OF WAVES L i r. L L MEDIUM - II v. L 1=2730 m/s v. T 1=1430 m/s v. L 2=5900 m/s v. T 2=3230 m/s 30

TRASFORMATION OF WAVES T L i r. T MEDIUM - II v. L 1=2730 m/s v. T 1=1430 m/s v. L 2=5900 m/s v. T 2=3230 m/s 31

TRASFORMATION OF WAVES L i MEDIUM - II L L v. L 1=2730 m/s v. T 1=1430 m/s v. L 2=5900 m/s v. T 2=3230 m/s 32

TRASFORMATION OF WAVES L i MEDIUM - II T T v. L 1=2730 m/s v. T 1=1430 m/s v. L 2=5900 m/s v. T 2=3230 m/s 33

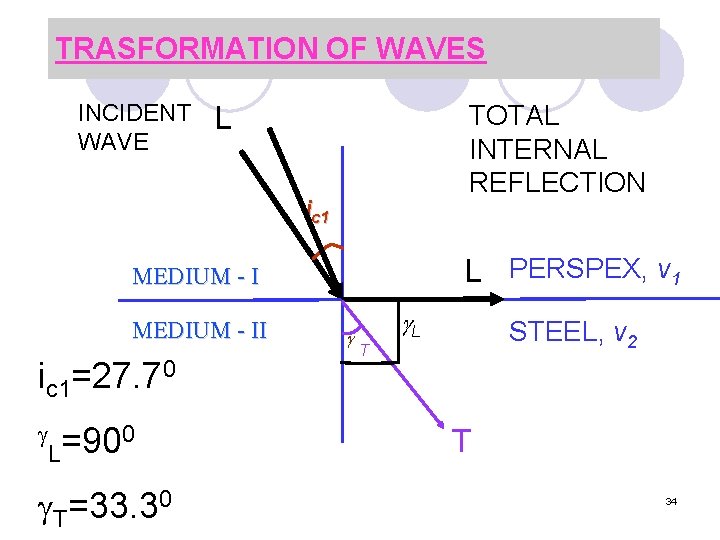
TRASFORMATION OF WAVES INCIDENT WAVE TOTAL INTERNAL REFLECTION L ic 1 L PERSPEX, v 1 MEDIUM - II ic 1=27. 70 0 =90 L T=33. 30 L STEEL, v 2 T T 34

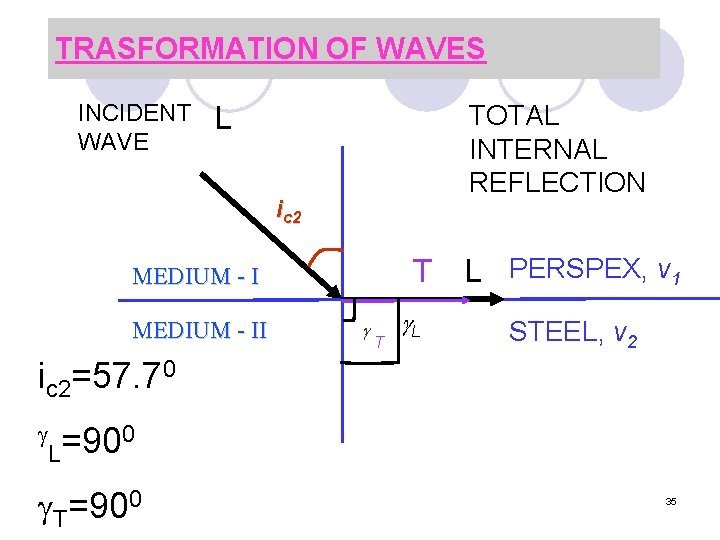
TRASFORMATION OF WAVES INCIDENT WAVE TOTAL INTERNAL REFLECTION L ic 2 T L PERSPEX, v 1 MEDIUM - II T L STEEL, v 2 ic 2=57. 70 0 =90 L T=900 35

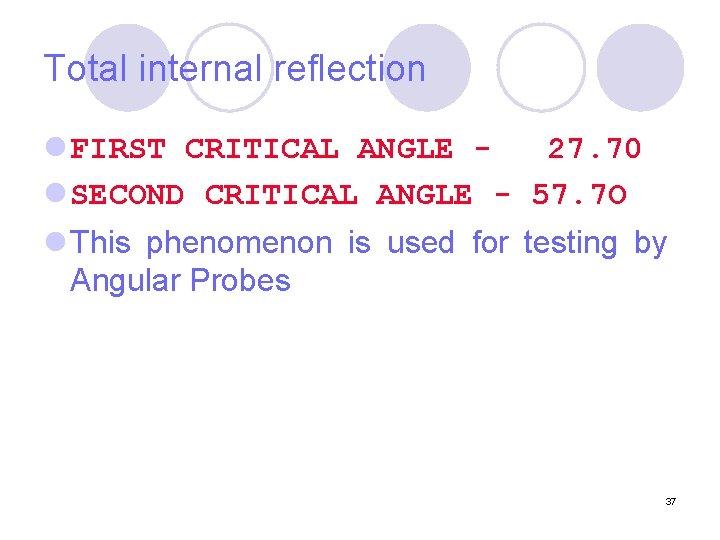
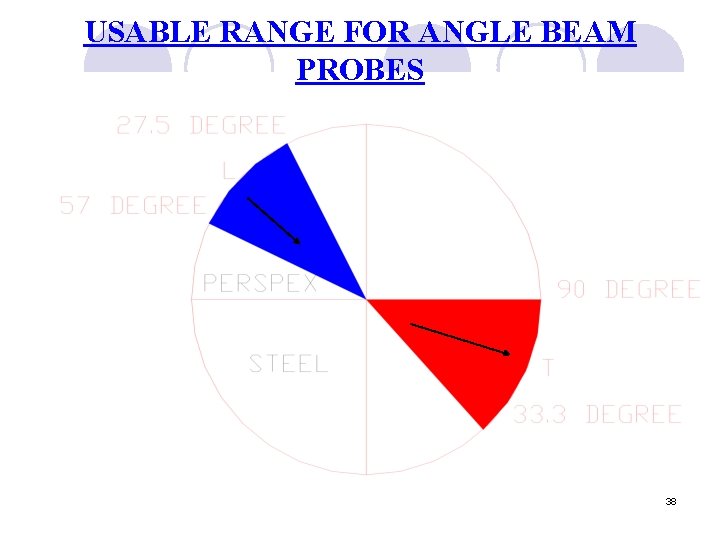
Total internal reflection l FIRST CRITICAL ANGLE 27. 70 l SECOND CRITICAL ANGLE - 57. 7 O l This phenomenon is used for testing by Angular Probes 37

USABLE RANGE FOR ANGLE BEAM PROBES 38

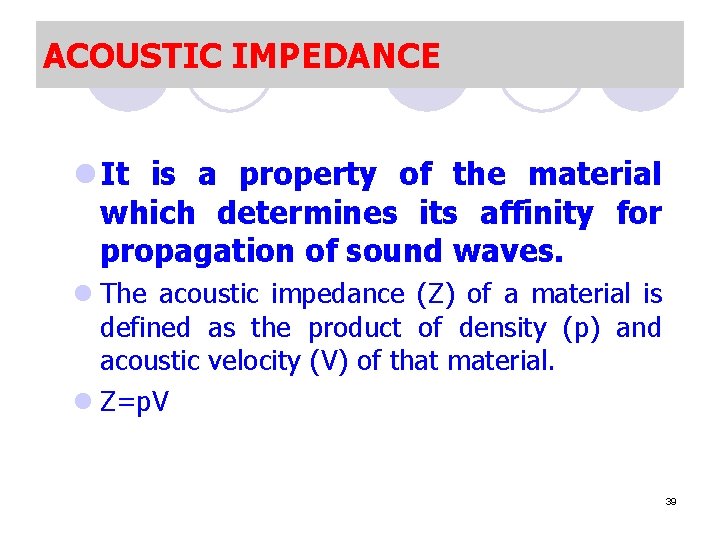
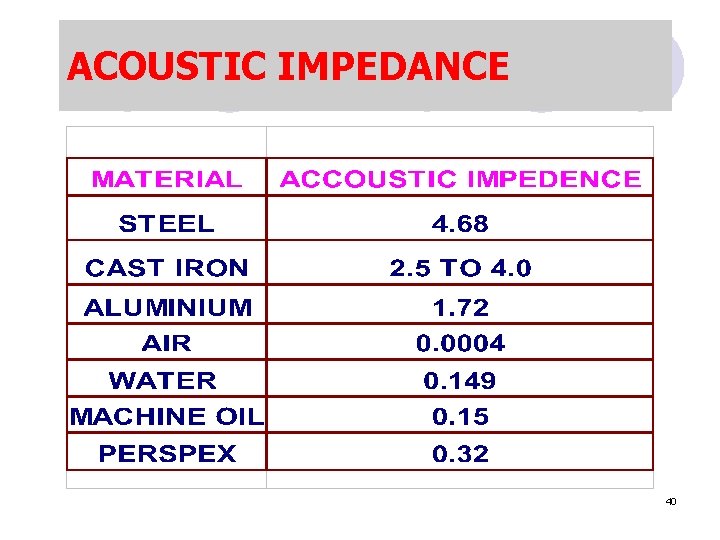
ACOUSTIC IMPEDANCE l It is a property of the material which determines its affinity for propagation of sound waves. l The acoustic impedance (Z) of a material is defined as the product of density (p) and acoustic velocity (V) of that material. l Z=p. V 39

ACOUSTIC IMPEDANCE 40

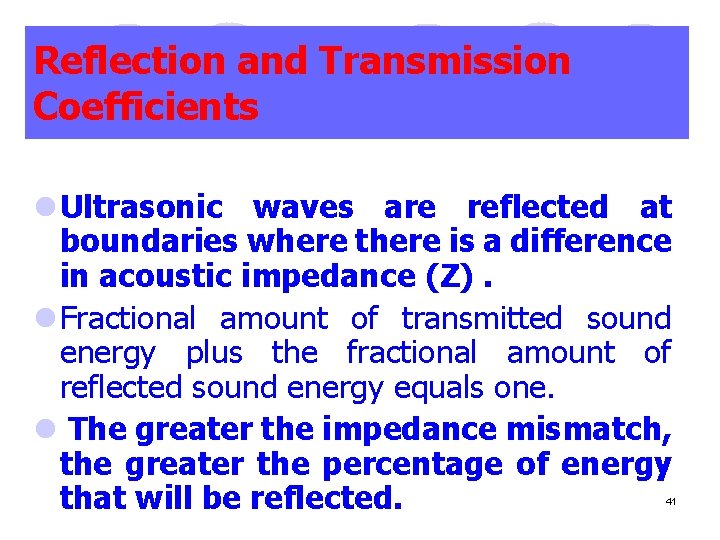
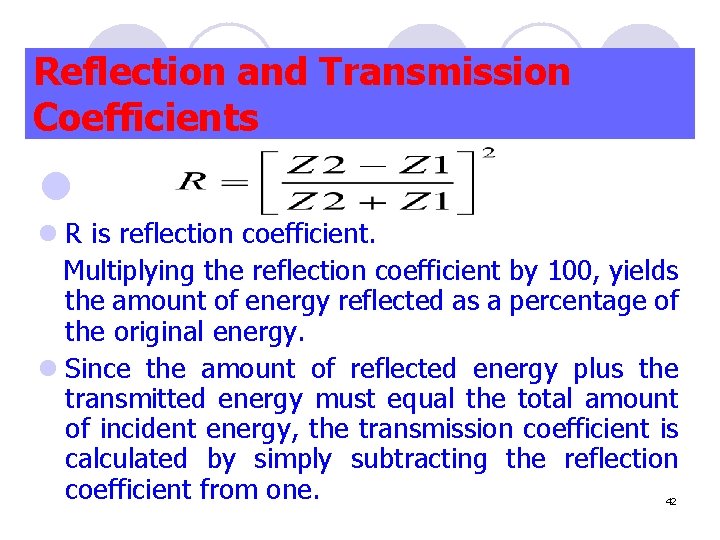
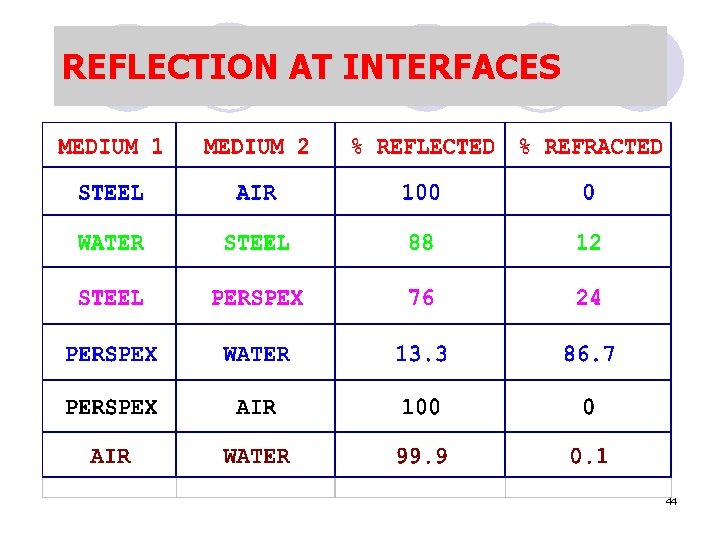
Reflection and Transmission Coefficients l Ultrasonic waves are reflected at boundaries where there is a difference in acoustic impedance (Z). l Fractional amount of transmitted sound energy plus the fractional amount of reflected sound energy equals one. l The greater the impedance mismatch, the greater the percentage of energy that will be reflected. 41

Reflection and Transmission Coefficients l l R is reflection coefficient. Multiplying the reflection coefficient by 100, yields the amount of energy reflected as a percentage of the original energy. l Since the amount of reflected energy plus the transmitted energy must equal the total amount of incident energy, the transmission coefficient is calculated by simply subtracting the reflection coefficient from one. 42

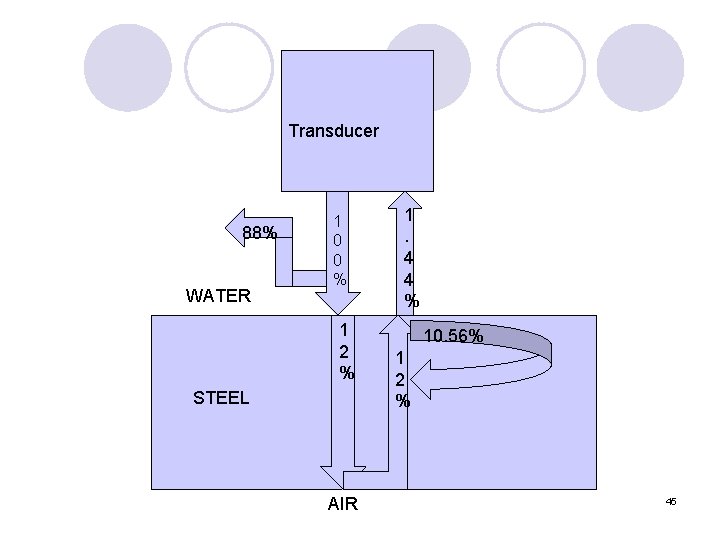
REFLECTION AT INTERFACES 44

Transducer 88% WATER 1 0 0 % 1 2 % STEEL AIR 1. 4 4 % 10. 56% 1 2 % 45

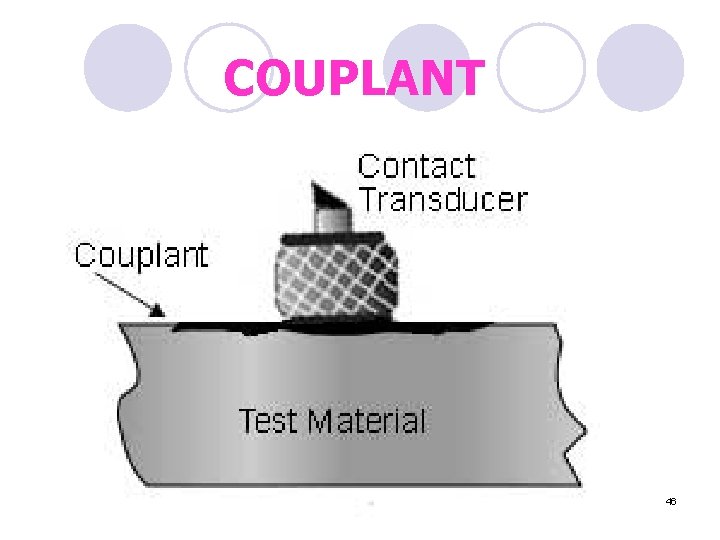
COUPLANT 46

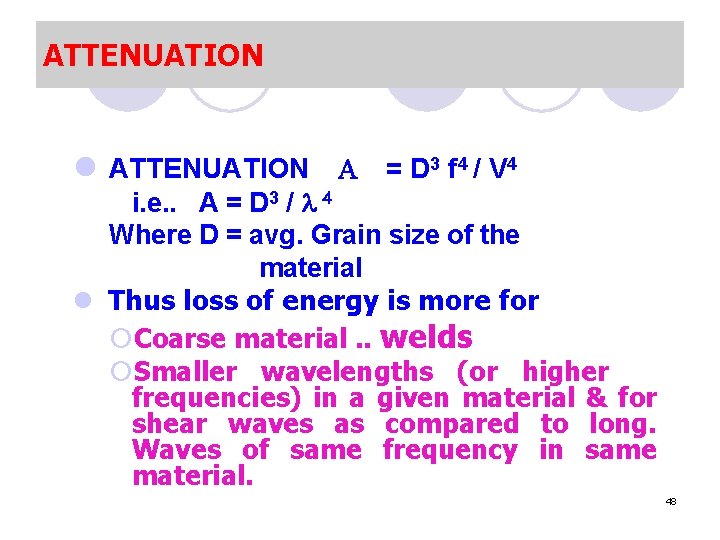
ATTENUATION l When sound travel through a medium, its intensity diminishes with distance. l The combined effect of scattering and absorption is called Attenuation. ¡ Absorption. . is energy consumed in the process of causing vibrations of the particles of matter. ¡ Scattering. . is energy lost by dispersion of waves all over in the material. l Ultrasonic attenuation is, therefore, the rate of decay of the wave as it propagate through material. 47

ATTENUATION l ATTENUATION = D 3 f 4 / V 4 i. e. . A = D 3 / Where D = avg. Grain size of the material l Thus loss of energy is more for ¡Coarse material. . welds ¡Smaller wavelengths (or higher frequencies) in a given material & for shear waves as compared to long. Waves of same frequency in same material. 48

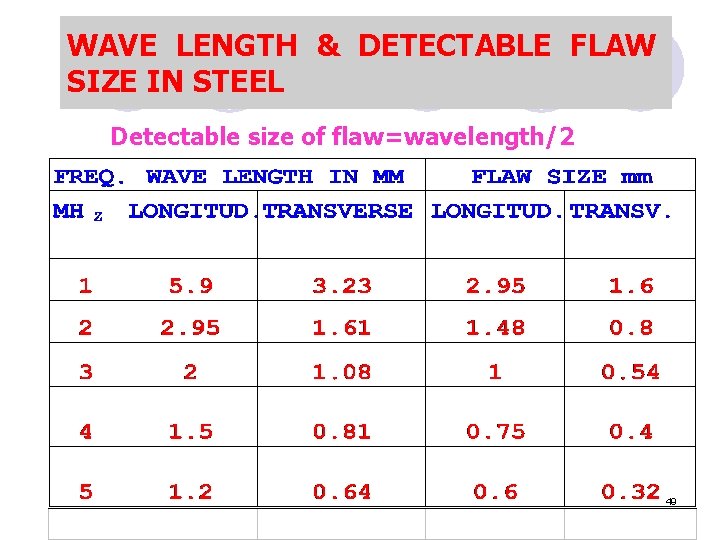
WAVE LENGTH & DETECTABLE FLAW SIZE IN STEEL Detectable size of flaw=wavelength/2 49

FLAW DETECTION 50

FLAW DETECTION l An ultrasonic wave is first introduced into the rail steel l The ultrasonic wave will travel through the rail until it comes across a boundary with a dissimilar medium. l At the boundary the wave will either get reflected or refracted depending upon the acoustic impedance of the two media. 51

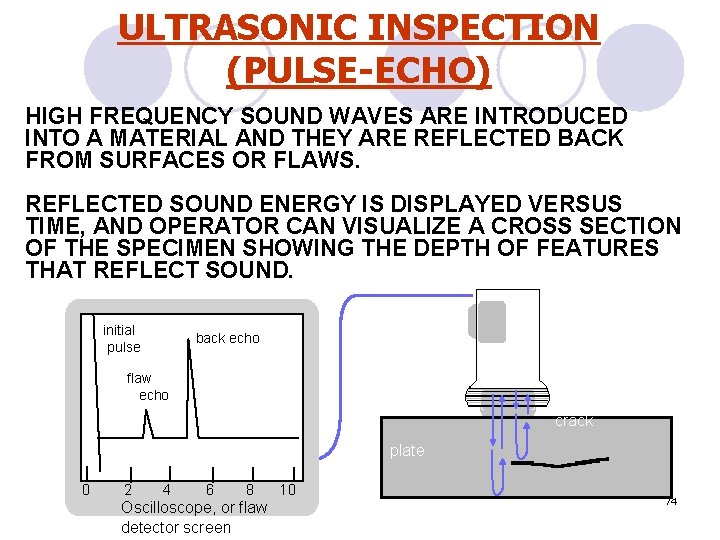
FLAW DETECTION (contd) l The boundary could be the other surface of the rail or an internal flaw. l A flaw in rail is air void /crack or any other material (slag) having acoustic impedance much different from that of steel. l The reflected US wave can be detected and the location & size of the source of reflection can be interpreted. 52

FLAW DETECTION (contd) l This is called “pulse echo” or reflection technique. l Due to the shape & fixity of rail, the transmission & reception of signals has to be done from the same side ( rail head) l The other but less commonly used method is called “transmission technique” 53

FLAW DETECTION (contd) l A plane (two-dimensional) discontinuity (e. g. material separation, crack) OR a volumetric discontinuity (hollow space, foreign material) reflects the ultrasonic waves mostly in a certain direction. l If the reflected portion of the sound wave is not received by the probe then it is unlikely that the discontinuity will be detected. The possibilities of detection only increase when the plane discontinuity is hit normally by the sound beam. 54

GENERATION OF US WAVES l PIEZO ELECTRIC CERAMIC CRYSTALS ¡ A property of material which converts electrical energy into mechanical energy & vice-versa. l NATURAL ¡ QUARTZ ¡ TOURMALINE ¡ RECHELLE SALT l ARTIFICIAL ¡ BARIUM TITANATE (first used) ¡ LEAD ZIRCONATE TITANATE (PZT) ( most commonly used) ¡ LITHIUM SULPHATE 55

GENERATION OF US WAVES l The piezoelectric element, excited by an extremely short electrical discharge, transmits an ultrasonic pulse. l The same element on the other hand generates an electrical signal when it receives an ultrasonic signal thus causing it to oscillate. l The probe is coupled to the surface of the test object with a liquid or coupling paste so that the sound waves from the probe are able to be transmitted into the test object. 56

PROBES 57

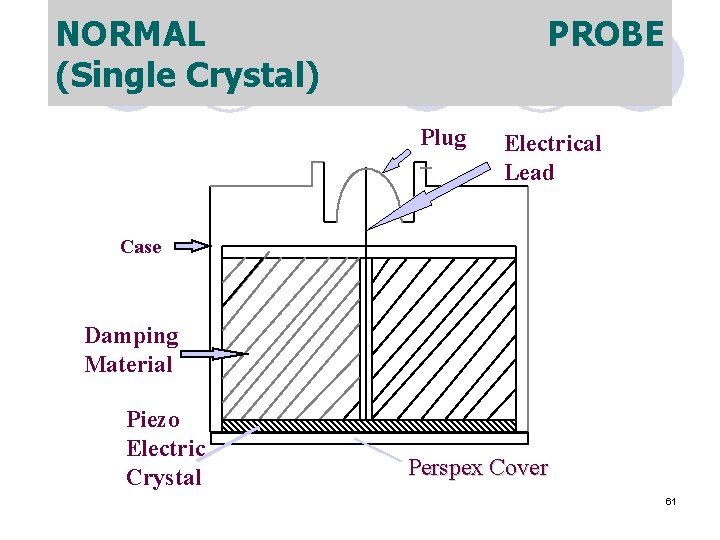
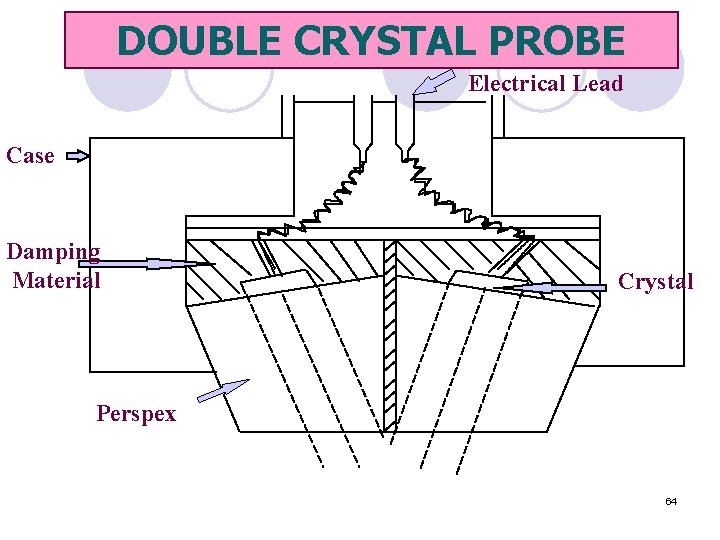
PROBES l It is a metallic housing containing the crystal, damping material, electrical leads & a Perspex face. l Probes can be classified on the basis of ¡ number of crystals as single or double crystal probes ¡ angle of wave transmission as normal or angle probe ¡ frequency 58

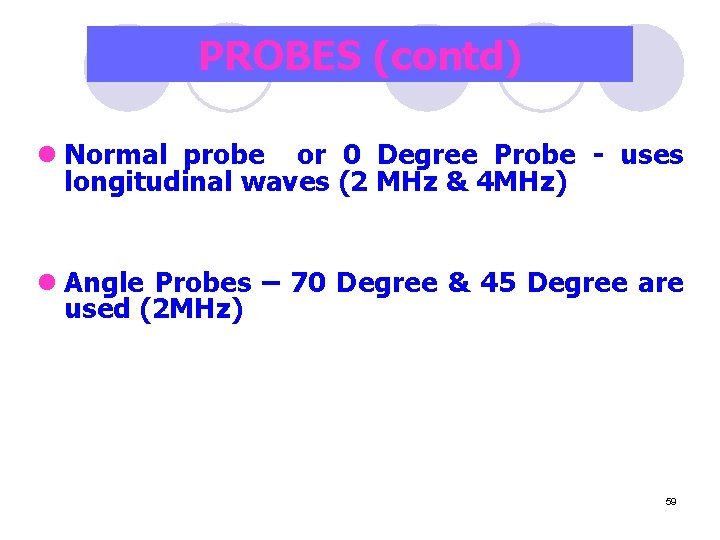
PROBES (contd) l Normal probe or 0 Degree Probe - uses longitudinal waves (2 MHz & 4 MHz) l Angle Probes – 70 Degree & 45 Degree are used (2 MHz) 59

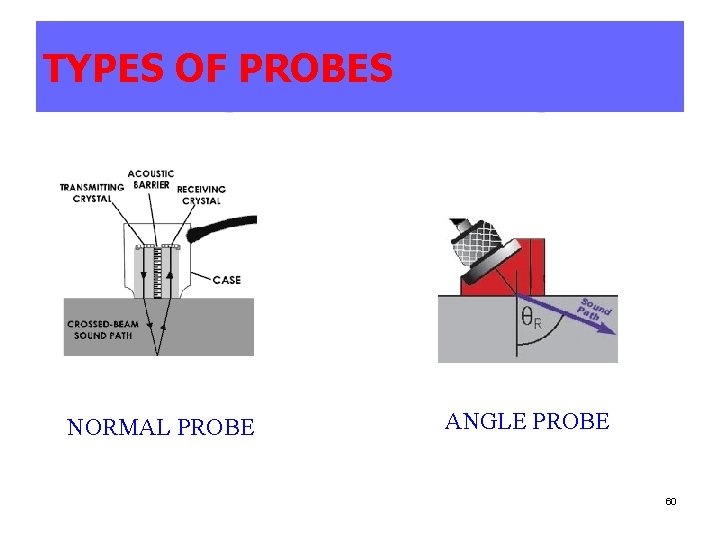
TYPES OF PROBES NORMAL PROBE ANGLE PROBE 60

NORMAL (Single Crystal) PROBE Plug Electrical Lead Case Damping Material Piezo Electric Crystal Perspex Cover 61

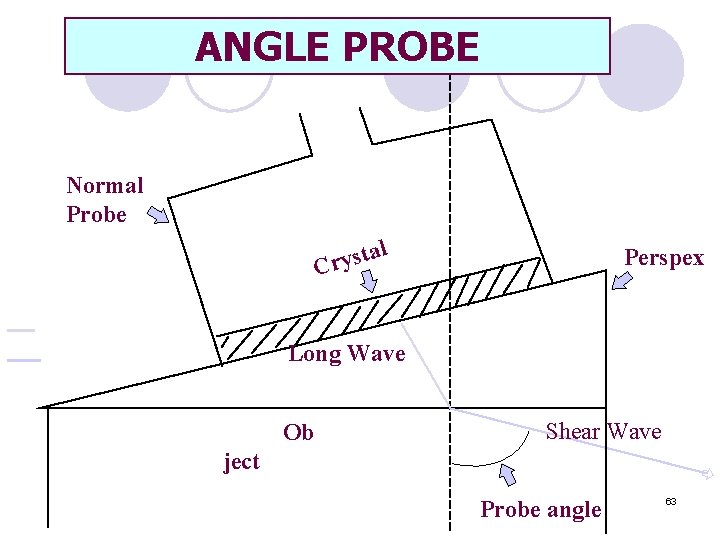
PROBES (contd) l Angle probe uses transverse waves l The transverse waves propagate at around only half the sound velocity of longitudinal waves l The area in which an angle of incidence is present between the 1 st and 2 nd critical angle (27. 3° - 57. 7°) gives us a clear sound wave in the test object (made of steel), namely the transverse wave between 33. 3° and 90° 62

ANGLE PROBE Normal Probe l ta s y r C Perspex Long Wave Ob ject Shear Wave Probe angle 63

DOUBLE CRYSTAL PROBE Electrical Lead Case Damping Material Crystal Perspex 64

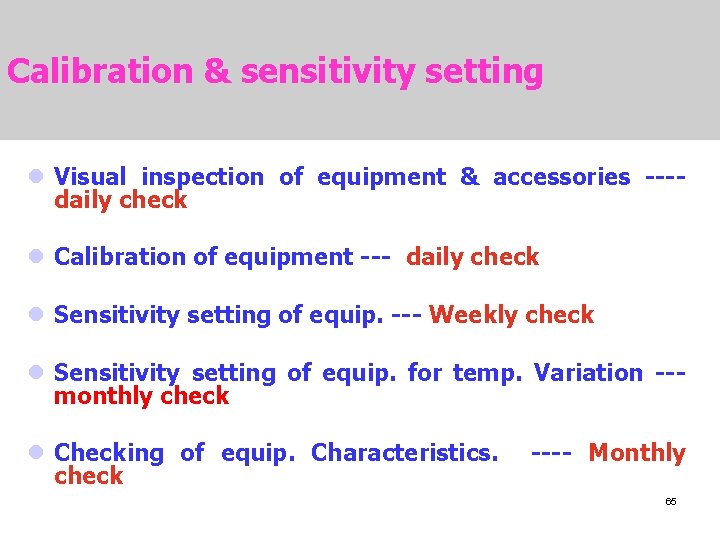
Calibration & sensitivity setting l Visual inspection of equipment & accessories ---daily check l Calibration of equipment --- daily check l Sensitivity setting of equip. --- Weekly check l Sensitivity setting of equip. for temp. Variation --monthly check l Checking of equip. Characteristics. check ---- Monthly 65

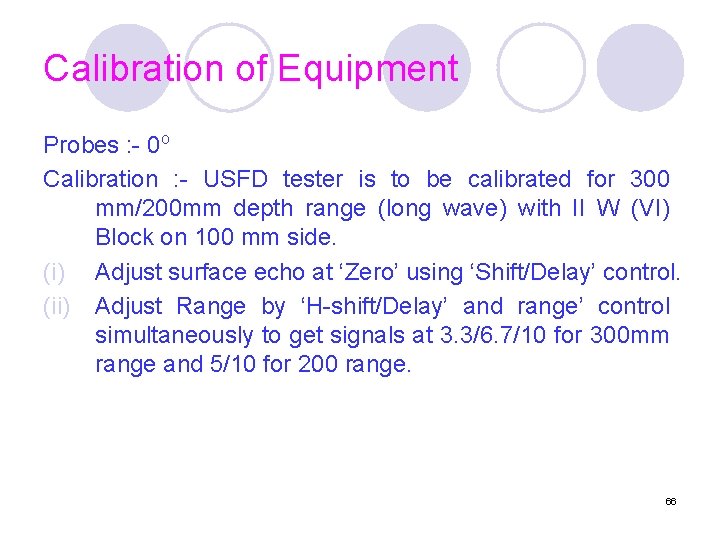
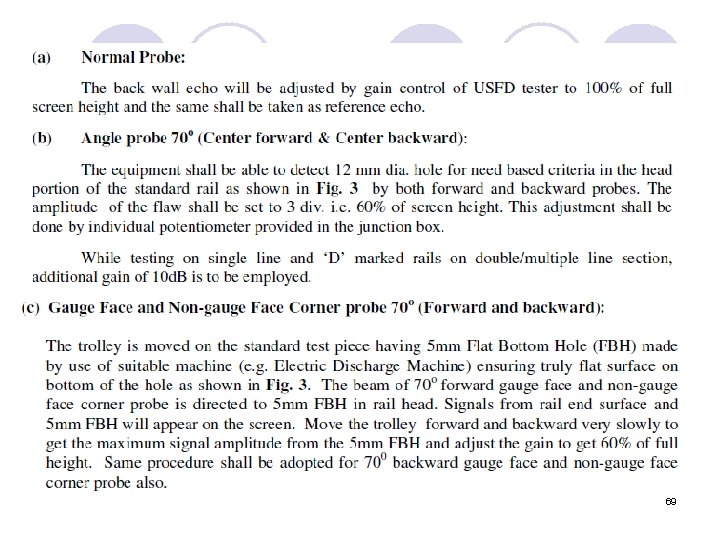
Calibration of Equipment Probes : - 0 o Calibration : - USFD tester is to be calibrated for 300 mm/200 mm depth range (long wave) with II W (VI) Block on 100 mm side. (i) Adjust surface echo at ‘Zero’ using ‘Shift/Delay’ control. (ii) Adjust Range by ‘H-shift/Delay’ and range’ control simultaneously to get signals at 3. 3/6. 7/10 for 300 mm range and 5/10 for 200 range. 66

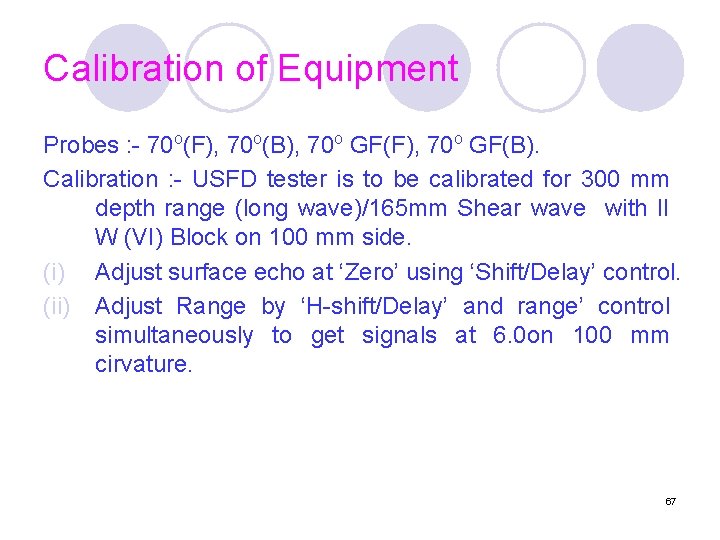
Calibration of Equipment Probes : - 70 o(F), 70 o(B), 70 o GF(F), 70 o GF(B). Calibration : - USFD tester is to be calibrated for 300 mm depth range (long wave)/165 mm Shear wave with II W (VI) Block on 100 mm side. (i) Adjust surface echo at ‘Zero’ using ‘Shift/Delay’ control. (ii) Adjust Range by ‘H-shift/Delay’ and range’ control simultaneously to get signals at 6. 0 on 100 mm cirvature. 67

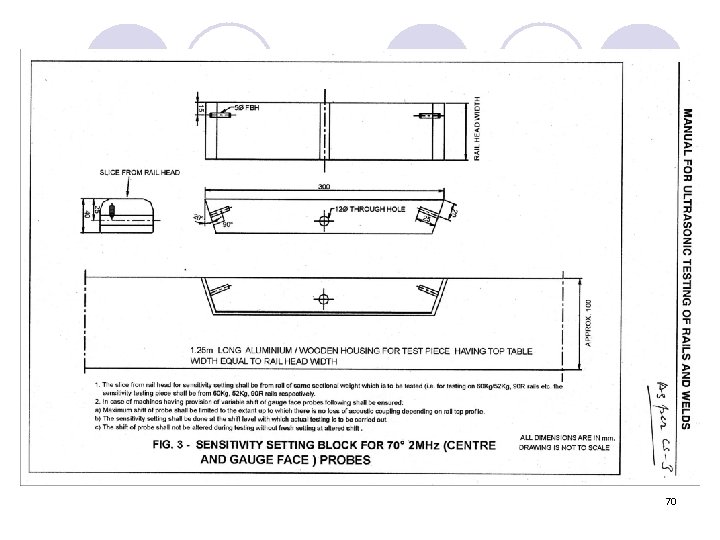
Sensitivity setting 68

69

70

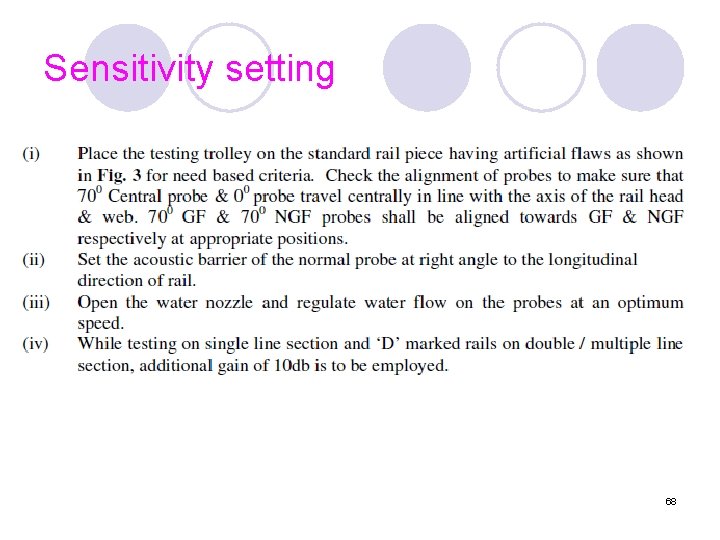
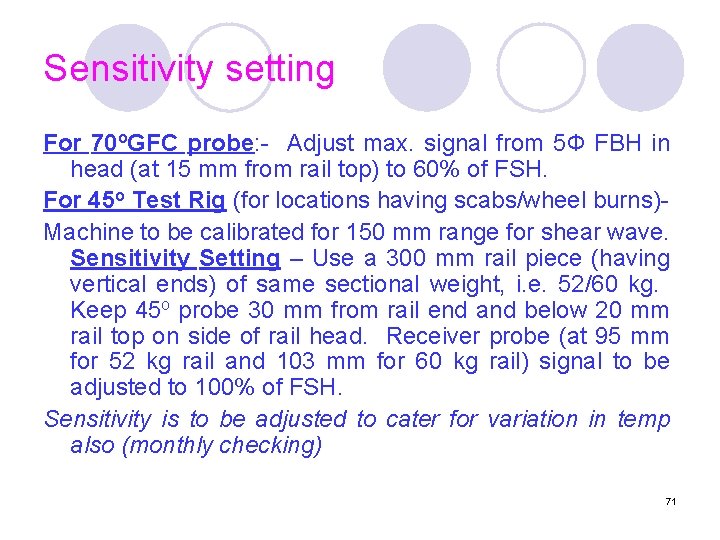
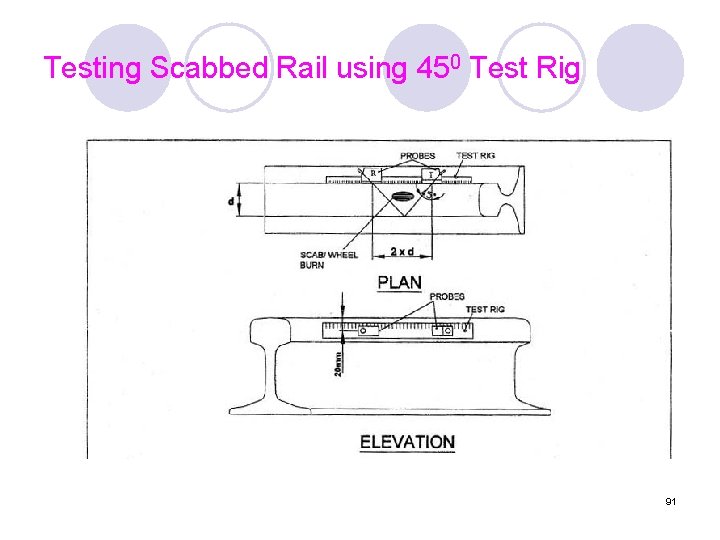
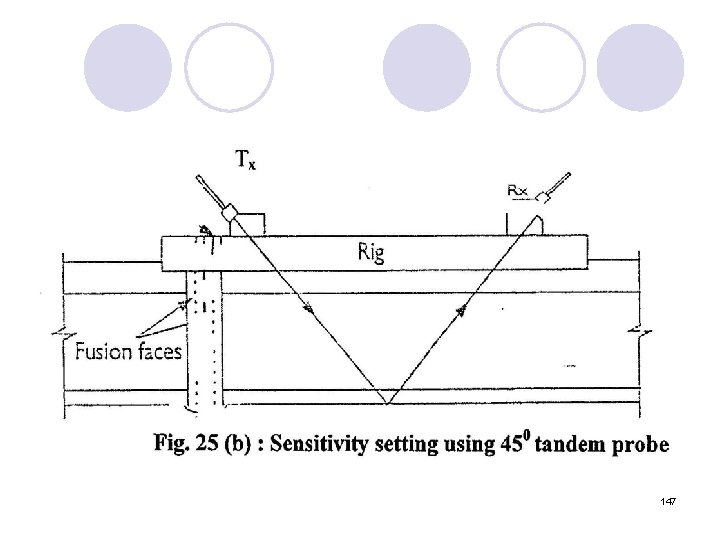
Sensitivity setting For 70 o. GFC probe: - Adjust max. signal from 5 Ф FBH in head (at 15 mm from rail top) to 60% of FSH. For 45 o Test Rig (for locations having scabs/wheel burns)Machine to be calibrated for 150 mm range for shear wave. Sensitivity Setting – Use a 300 mm rail piece (having vertical ends) of same sectional weight, i. e. 52/60 kg. Keep 45 o probe 30 mm from rail end and below 20 mm rail top on side of rail head. Receiver probe (at 95 mm for 52 kg rail and 103 mm for 60 kg rail) signal to be adjusted to 100% of FSH. Sensitivity is to be adjusted to cater for variation in temp also (monthly checking) 71

TYPES OF PROBES USED IN USFD OF RAILS S. NO. ANGLE FREQ. DOUBLE/CRYSTAL WHERE USED 1 00 4 MHz DOUBLE MACHINE 2 700 2 MHz SINGLE MACHINE 3 700 2 MHz SINGLE HAND 4 700 2 MHz SINGLE(8 x 8 mm) HAND 5 450 2 MHz SINGLE HAND 6 700 Shifted 2 MHz DOUBLE MACHINE 72

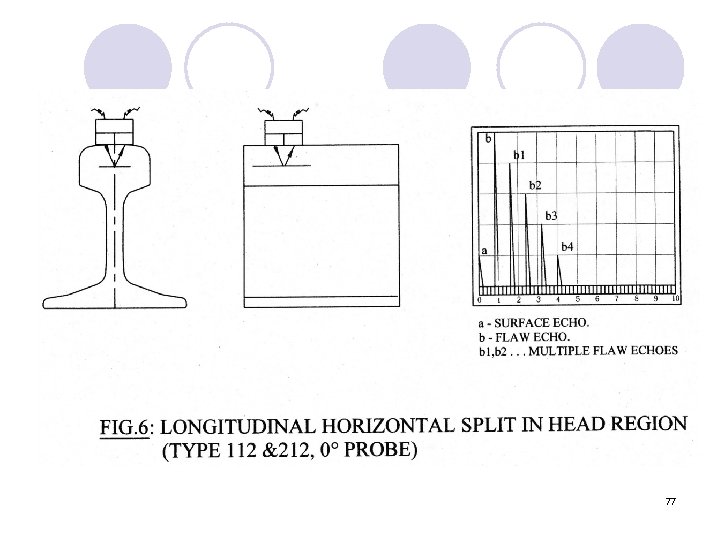
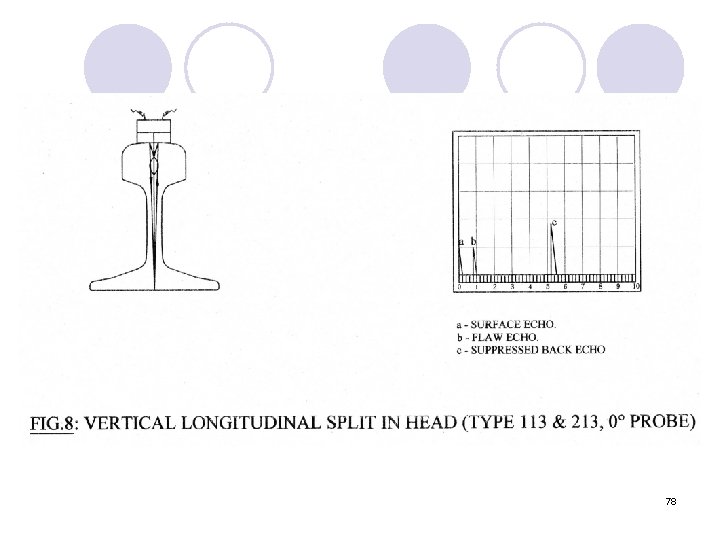
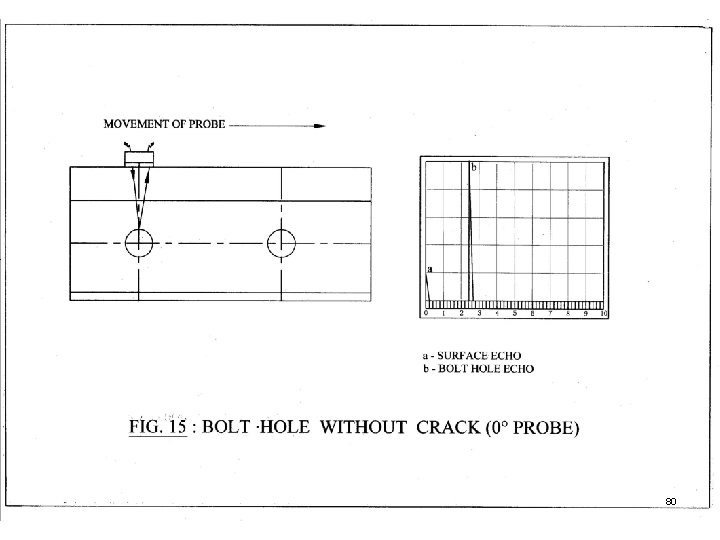
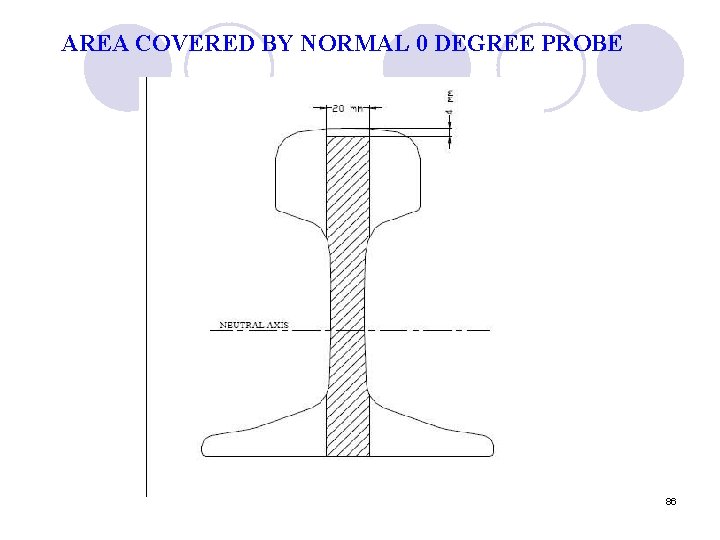
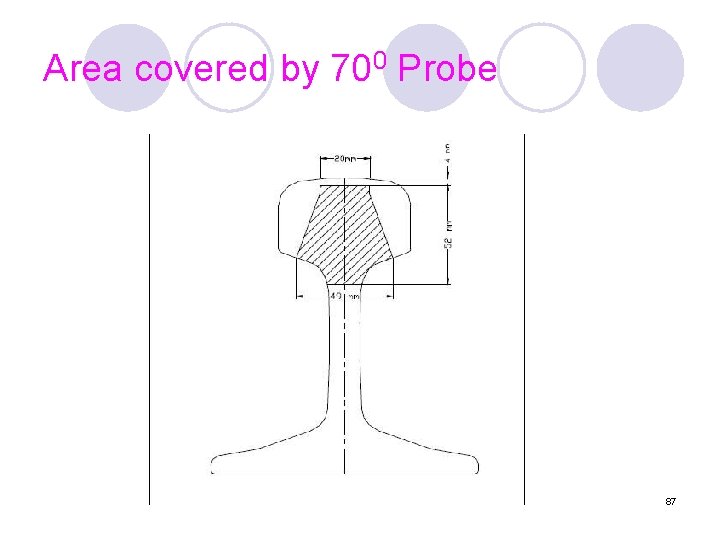
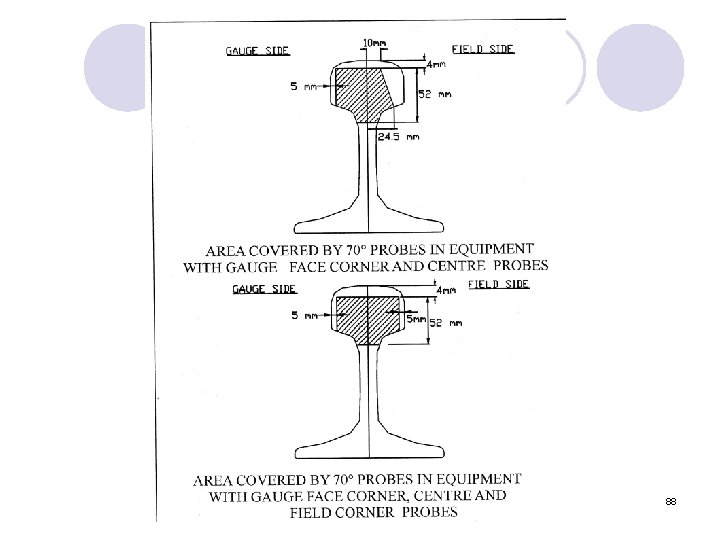
DEFECTS DETECTABLE BY VARIOUS PROBES HORIZONTAL FLAWS - 0 o PROBE TRANSVERSE FLAWS - 70 o PROBE LONG. VERT. FLAWS (LVF) - 0 o PROBE BOLT HOLE FLAWS - 0 o PROBE GAUGE FACE CORNER(GFC) FLAWS - 70 o SHIFTED PROBE NON GAUGE FACE CORNER(NGFC) FLAWS 70 o SHIFTED PROBE 73

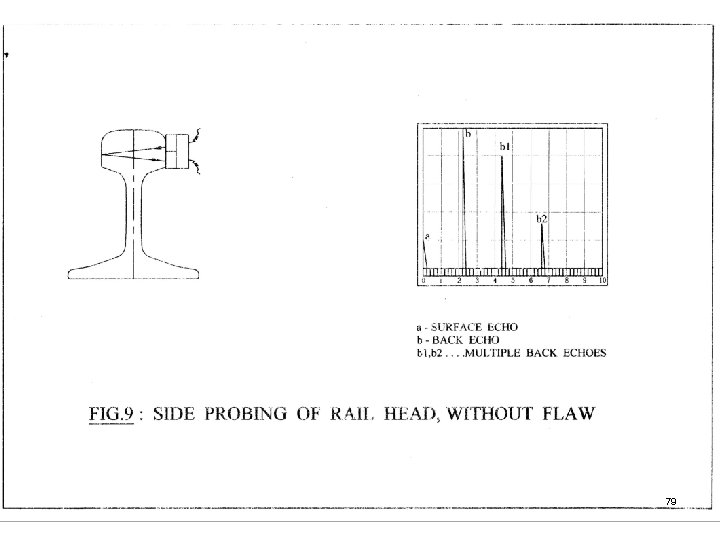
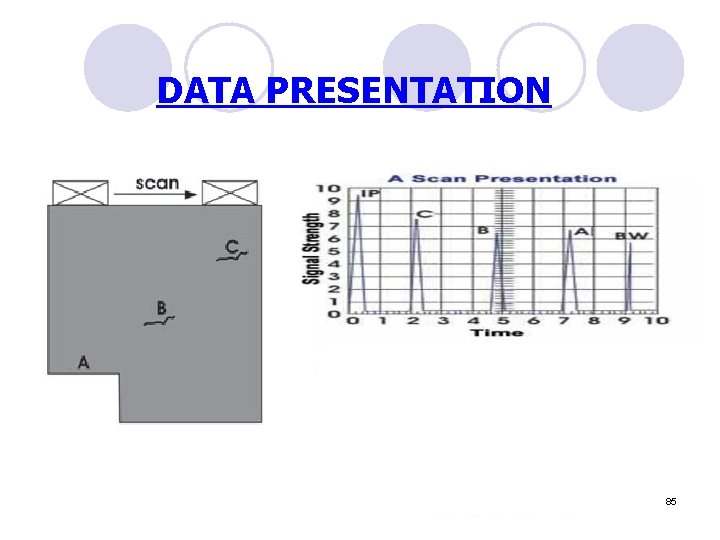
ULTRASONIC INSPECTION (PULSE-ECHO) HIGH FREQUENCY SOUND WAVES ARE INTRODUCED INTO A MATERIAL AND THEY ARE REFLECTED BACK FROM SURFACES OR FLAWS. REFLECTED SOUND ENERGY IS DISPLAYED VERSUS f TIME, AND OPERATOR CAN VISUALIZE A CROSS SECTION OF THE SPECIMEN SHOWING THE DEPTH OF FEATURES THAT REFLECT SOUND. initial pulse back echo flaw echo crack plate 0 2 4 6 8 Oscilloscope, or flaw detector screen 10 74

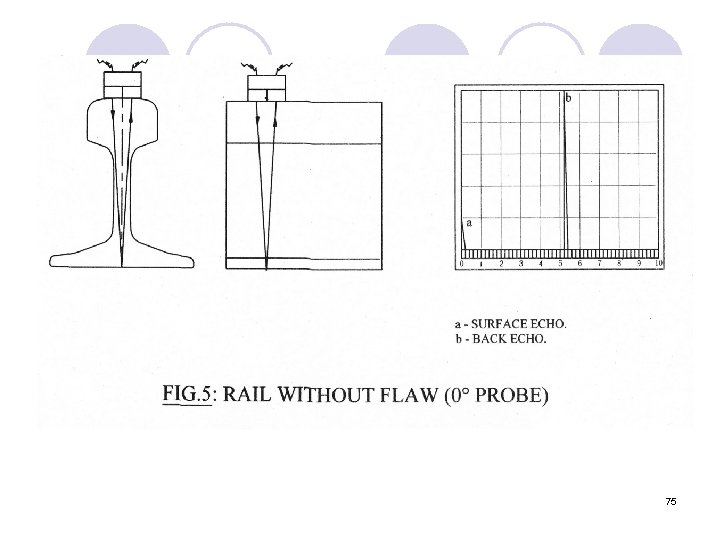
75

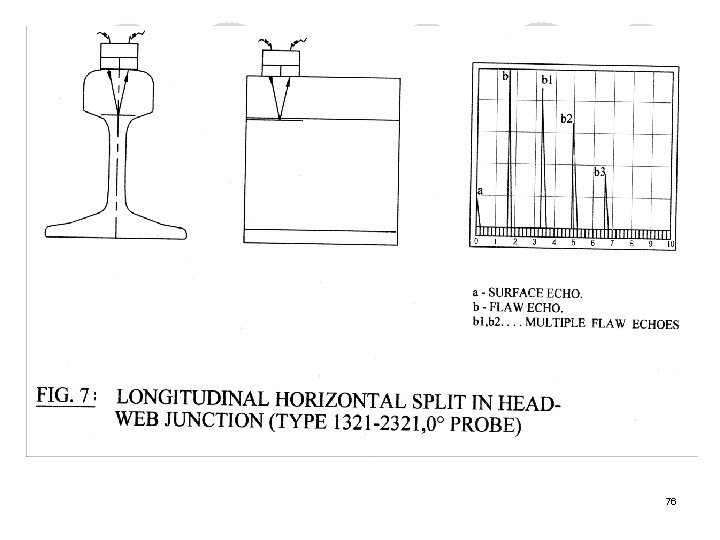
76

77

78

79

80

81

82

83

84

DATA PRESENTATION 85

AREA COVERED BY NORMAL 0 DEGREE PROBE 86

Area covered by 700 Probe 87

88

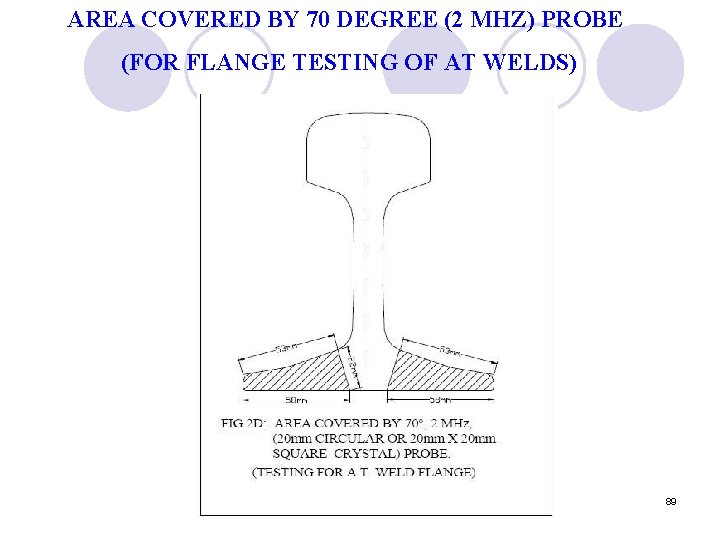
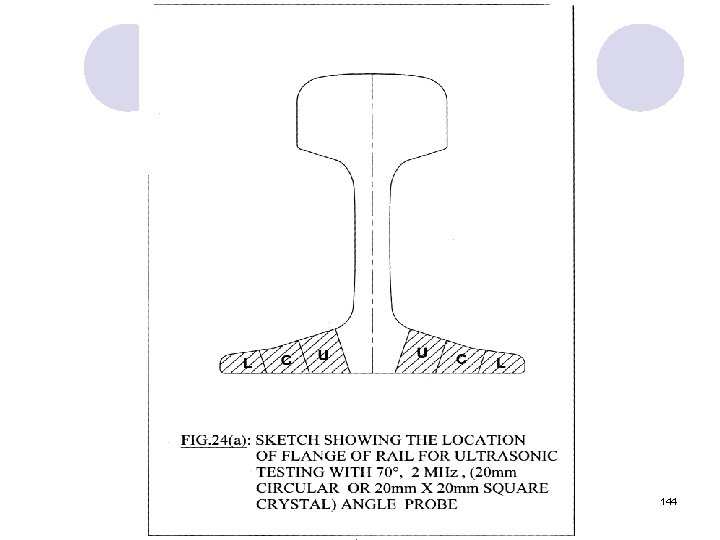
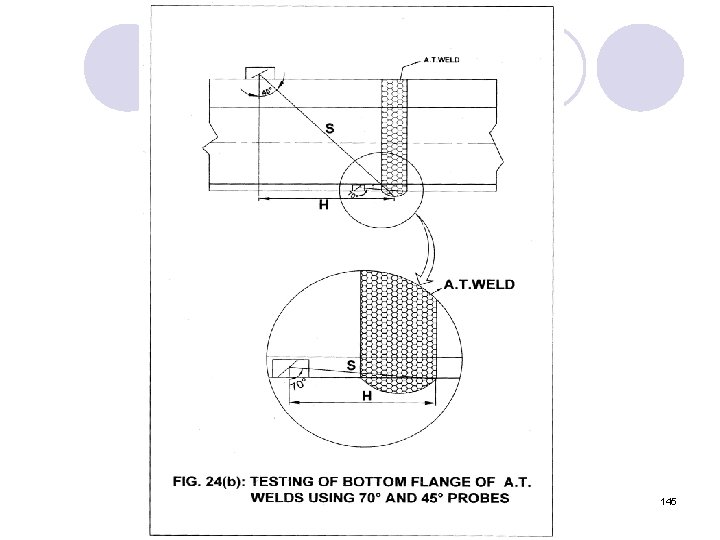
AREA COVERED BY 70 DEGREE (2 MHZ) PROBE (FOR FLANGE TESTING OF AT WELDS) 89

Testing Scabbed Rail using 450 Test Rig 91

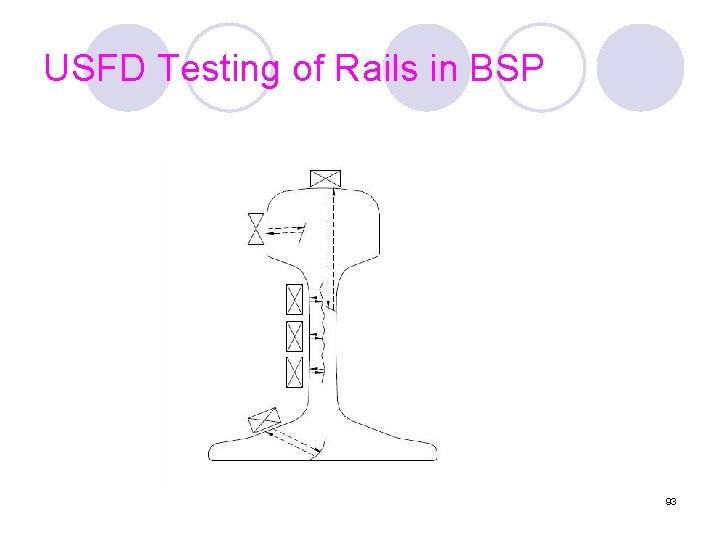
Ultrasonic Testing of Rails in Steel Plant l Most important source of defects is the manufacturing deficiencies l Testing in Steel plant is done by an on line USFD machine having multiple probe covering entire section l In case the initial testing of rails has not been done in the steel plant the rail shall be tested either at FBWP or at site 92

USFD Testing of Rails in BSP 93

Ultrasonic Rail Testing Equipment and accessories l Inspectors carrying out the ultrasonic testing of rails shall be trained by RDSO l USFD is carried out by (a) Single rail tester (SRT) (b) Double Rail Tester (DRT) (c) Hand Testers (d) SPURT Car 94

Ultrasonic Rail Testing Equipment and accessories l Procurement of USFD equipments should be done only from the RDSO approved sources (as per latest list) l Maintenance spares should also be procured along with machine from original equipment manufacturer l Total life of USFD machine is eight years 95

Single Rail Tester l Capable of Testing only one rail at a time l Provided with 7 probes i. e. normal/ 0° (4 MHz), 70°(F) (2 MHz), 70°(B) (2 MHz), 70°(GF/F) (2 MHz), 70 ° (GF/B) (2 MHz), 70°(NGF/F) (2 MHz) and 70 ° (NGF/B) (2 MHz) 96

Contd… Single Rail Tester (Contd) l The signal received from the defects by any of the probes is indicated on the cathode ray tube (CRT) screen l In order to find out the origin of detection, provision for displaying the individual probe operation has been made in the equipment l To be used for testing sections other than LWR / CWR and new AT welds 97

Double Rail Tester l Capable of testing both the rails at a time l Probes are same as for SRT l Provided with multi-channel facility i. e. signal from each probe can be instantaneously distinguished without taking recourse to process of elimination. l Also provided with a threshold arrangement, LED display and audio alarm. 98

Double Rail Tester (contd) l Due to frequent misalignment of probes on the fish plated joints and limitations of detection of bolt hole cracks, it is desirable to deploy on LWR/CWR sections 99

Checking USFD Testing by AEN l AEN should spend at least few hours (min 2 hours) each month during his routine trolley inspection with USFD team and cross check the work incl accuracy, setting, calibration of machine etc. l SE and SSE should also associate themselves occasionally 100

NEED BASED CRITERIA l Safety against failures of rails in track depends upon the inspection frequency and the permissible defect size l The inspection frequency and condemning defect sizes are related parameters l If the inspection frequency is high, the condemning defect size can be suitably in creased. l Increase in condemning defect size also enhances the reliability of inspection as chances of non detection for smaller size defects are high. 101

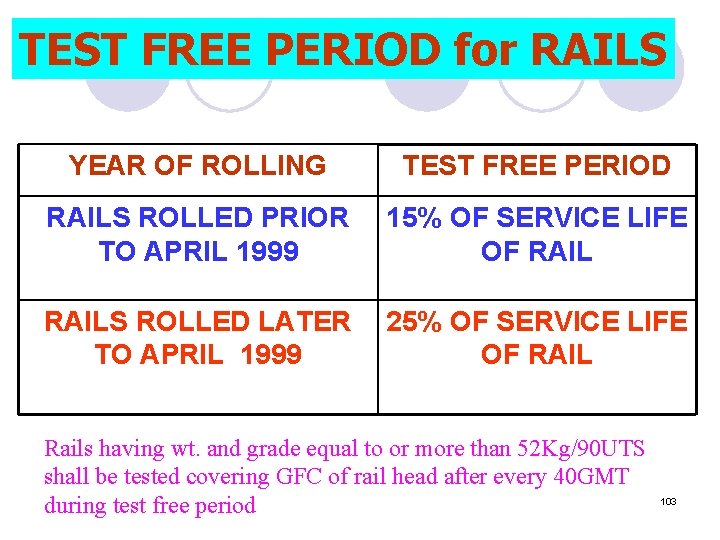
TEST FREE PERIOD After the initial Testing of Rails in Rail manufacturing Plant , the first Retesting need not normally be done before Test Free Period. Whenever Rails are not tested in rail manufacturing plant , the test free period shall not be applicable and the rail testing shall be done as per laid down periodicity right from the day of its laying in field. 102

TEST FREE PERIOD for RAILS YEAR OF ROLLING TEST FREE PERIOD RAILS ROLLED PRIOR TO APRIL 1999 15% OF SERVICE LIFE OF RAILS ROLLED LATER TO APRIL 1999 25% OF SERVICE LIFE OF RAIL Rails having wt. and grade equal to or more than 52 Kg/90 UTS shall be tested covering GFC of rail head after every 40 GMT during test free period 103

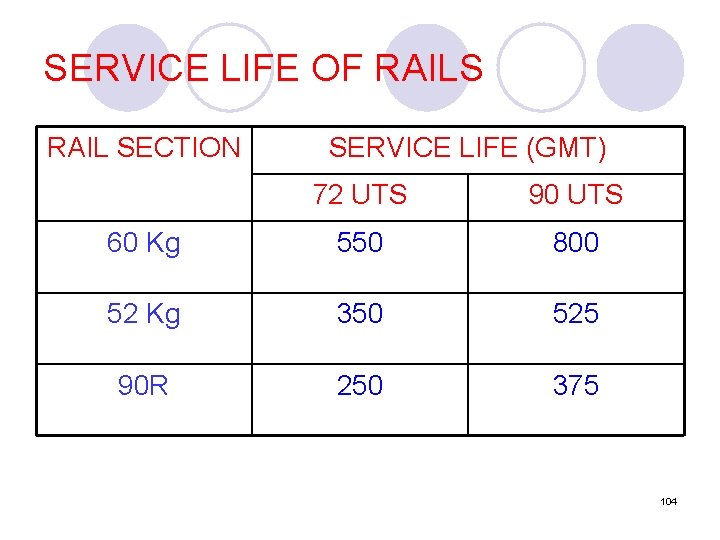
SERVICE LIFE OF RAILS RAIL SECTION SERVICE LIFE (GMT) 72 UTS 90 UTS 60 Kg 550 800 52 Kg 350 525 90 R 250 375 104

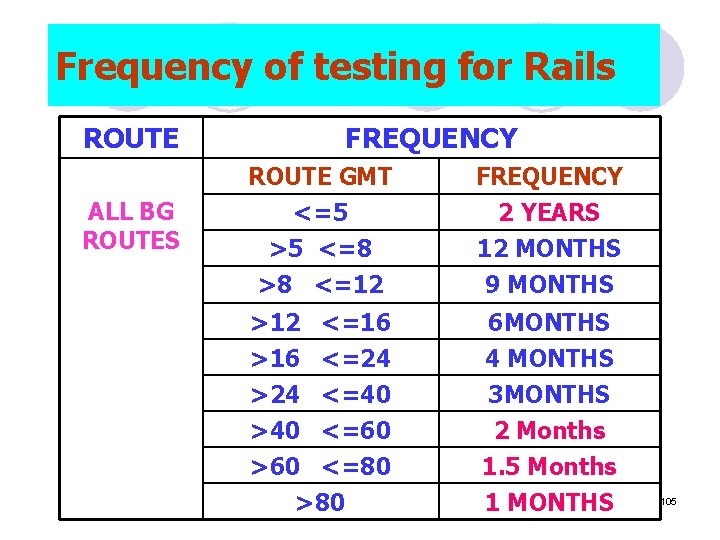
Frequency of testing for Rails ROUTE ALL BG ROUTES FREQUENCY ROUTE GMT <=5 >5 <=8 >8 <=12 FREQUENCY 2 YEARS 12 MONTHS 9 MONTHS >12 <=16 >16 <=24 >24 <=40 >40 <=60 >60 <=80 >80 6 MONTHS 4 MONTHS 3 MONTHS 2 Months 1. 5 Months 1 MONTHS 105

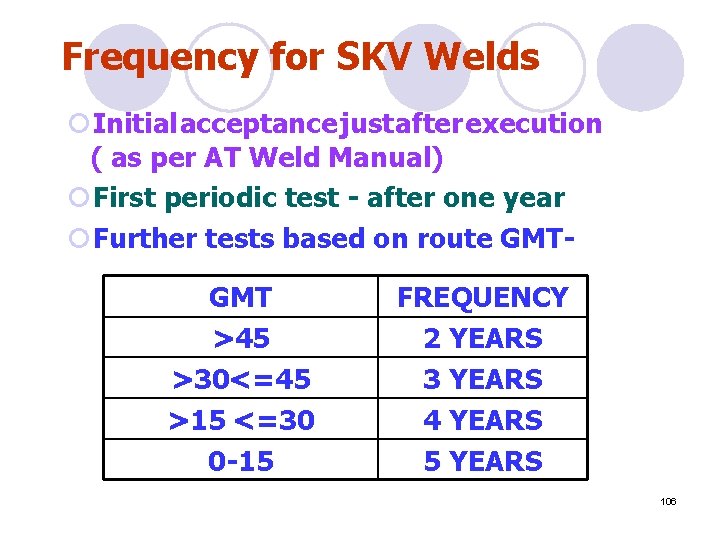
Frequency for SKV Welds ¡Initial acceptance just after execution ( as per AT Weld Manual) ¡First periodic test - after one year ¡Further tests based on route GMTGMT >45 >30<=45 >15 <=30 0 -15 FREQUENCY 2 YEARS 3 YEARS 4 YEARS 5 YEARS 106

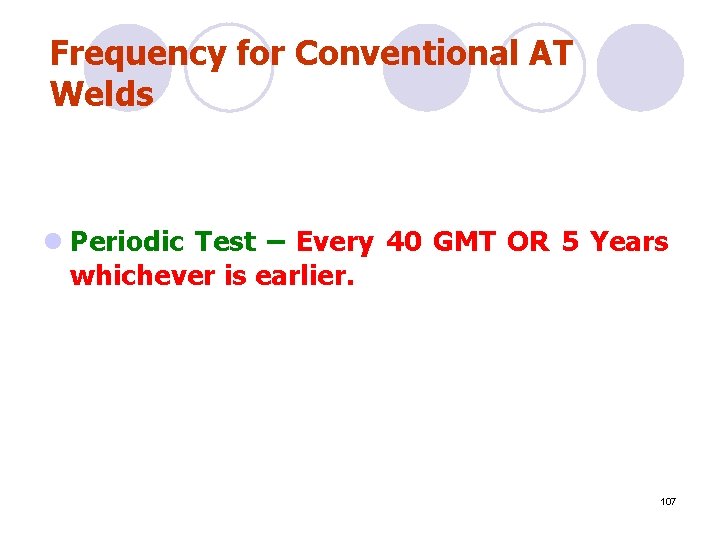
Frequency for Conventional AT Welds l Periodic Test – Every 40 GMT OR 5 Years whichever is earlier. 107

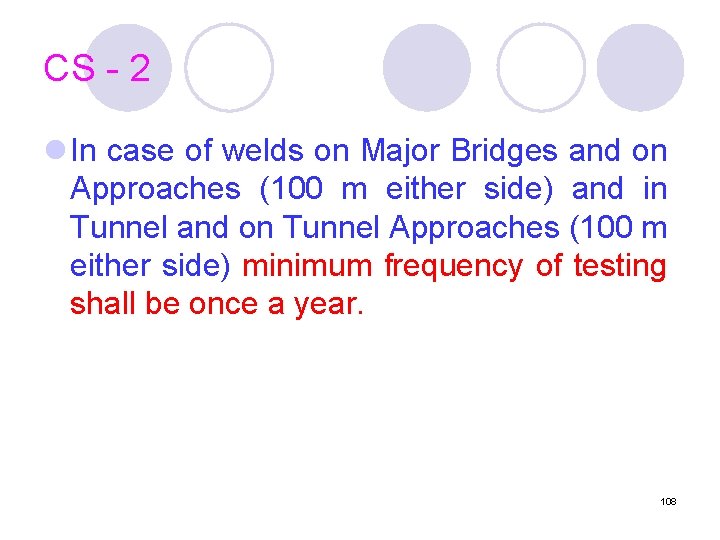
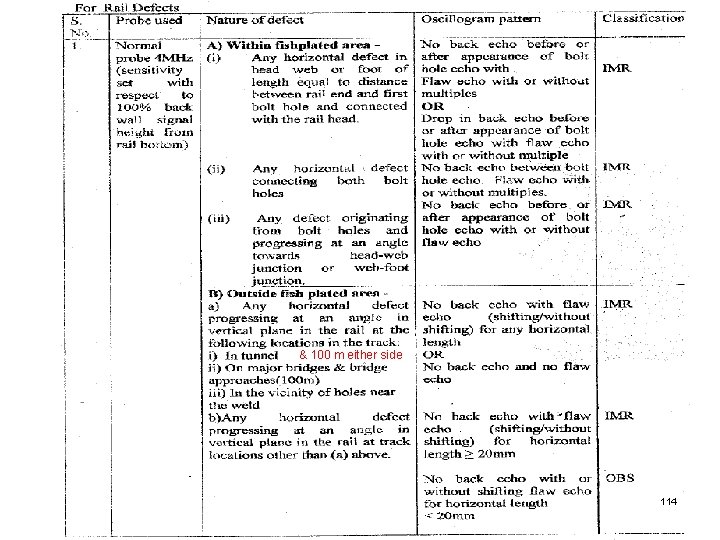
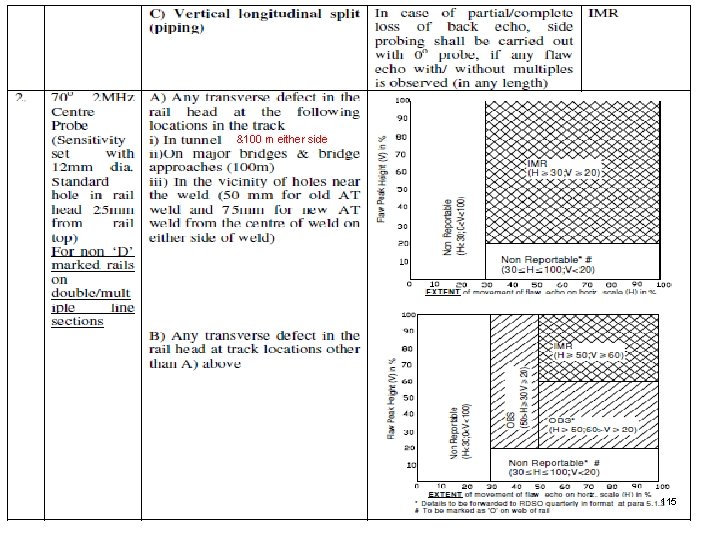
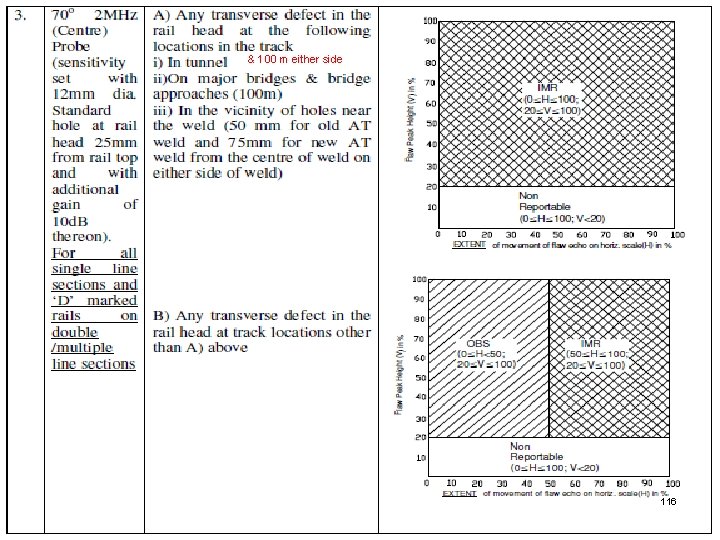
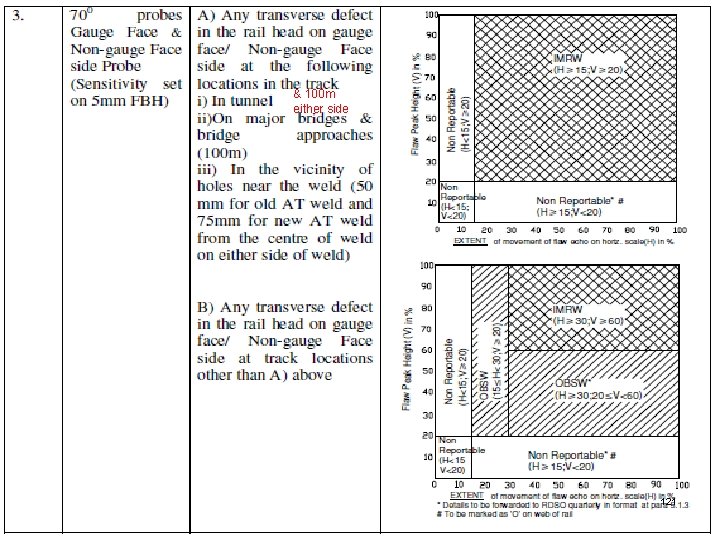
CS - 2 l In case of welds on Major Bridges and on Approaches (100 m either side) and in Tunnel and on Tunnel Approaches (100 m either side) minimum frequency of testing shall be once a year. 108

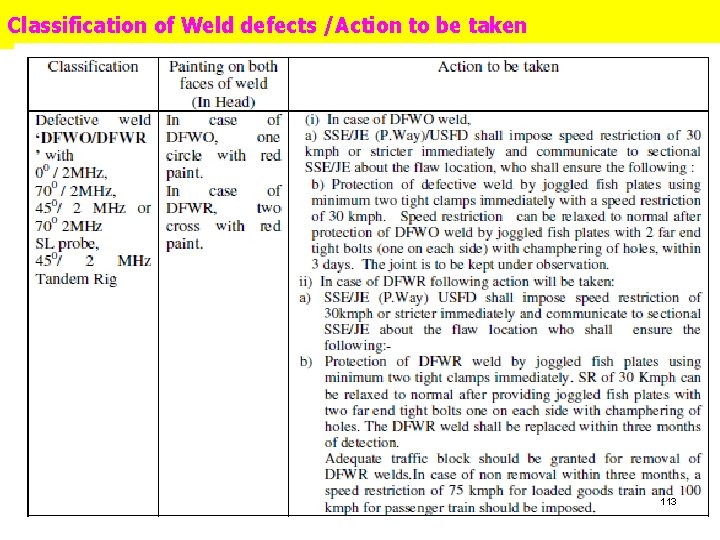
CLASSIFICATION OF DEFECTS n IMR(W) n OBS(W) n DFWR n DFWO 109

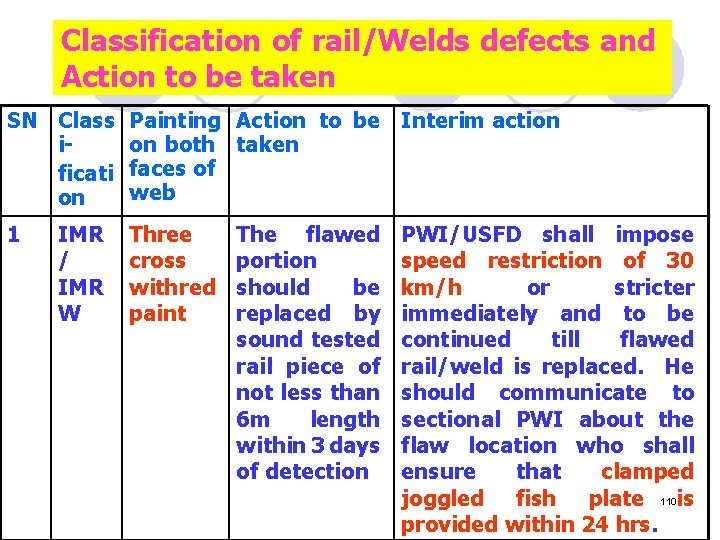
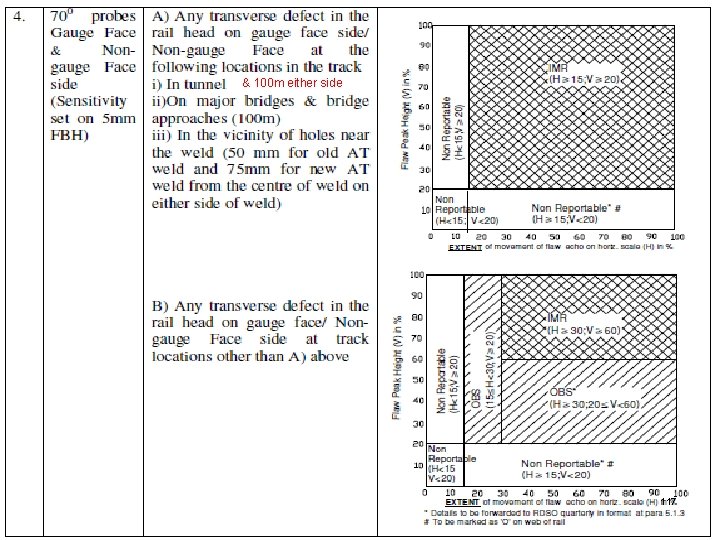
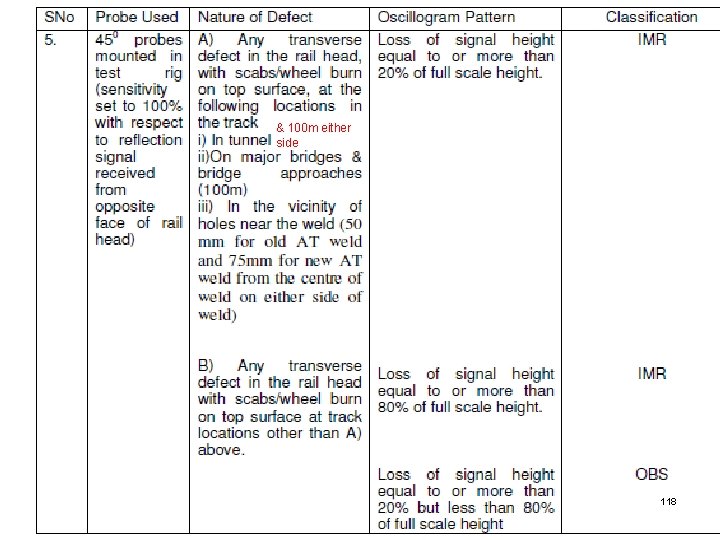
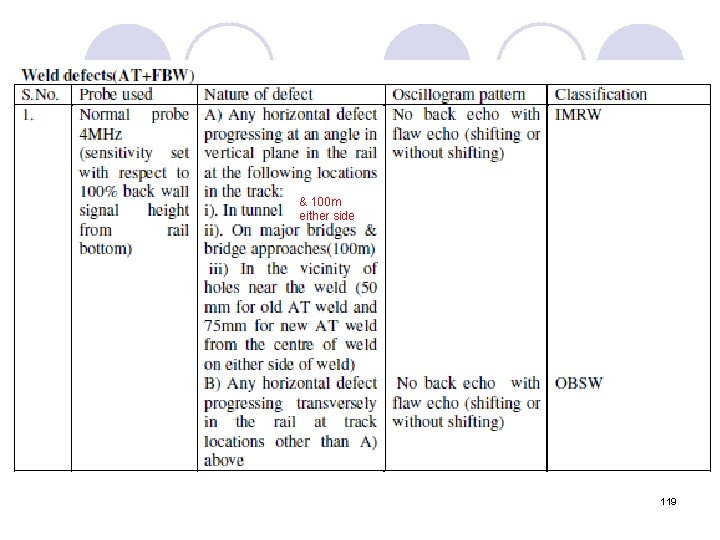
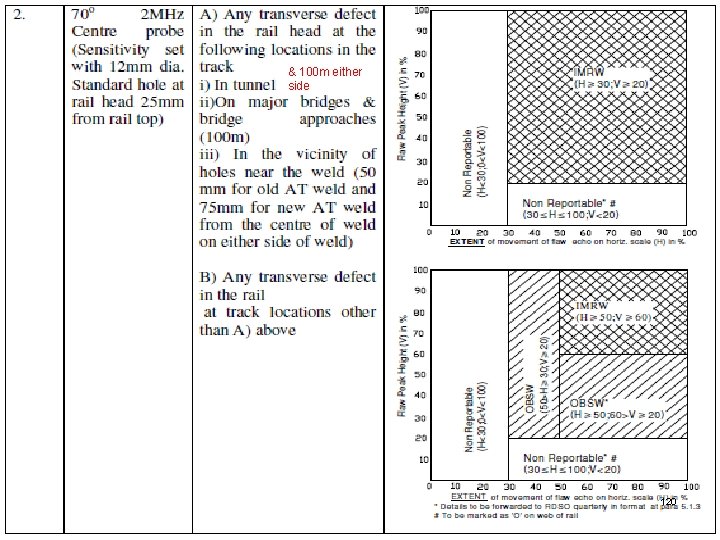
Classification of rail/Welds defects and Action to be taken SN Class ificati on Painting Action to be Interim action on both taken faces of web 1 Three cross withred paint IMR / IMR W The flawed portion should be replaced by sound tested rail piece of not less than 6 m length within 3 days of detection PWI/USFD shall impose speed restriction of 30 km/h or stricter immediately and to be continued till flawed rail/weld is replaced. He should communicate to sectional PWI about the flaw location who shall ensure that clamped joggled fish plate 110 is provided within 24 hrs.

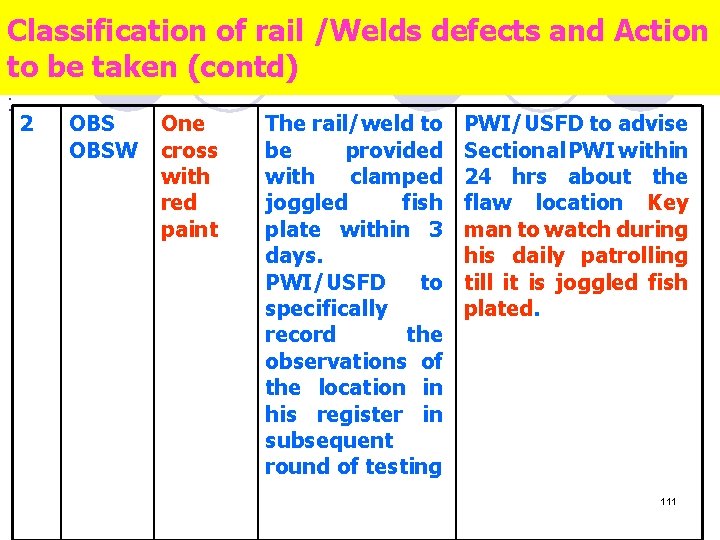
Classification of rail /Welds defects and Action to be taken (contd) : 2 OBSW One cross with red paint The rail/weld to be provided with clamped joggled fish plate within 3 days. PWI/USFD to specifically record the observations of the location in his register in subsequent round of testing PWI/USFD to advise Sectional PWI within 24 hrs about the flaw location Key man to watch during his daily patrolling till it is joggled fish plated. 111

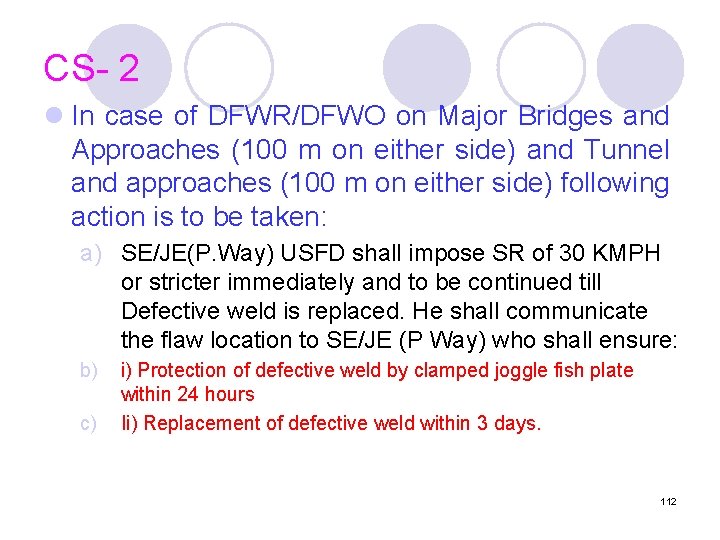
CS- 2 l In case of DFWR/DFWO on Major Bridges and Approaches (100 m on either side) and Tunnel and approaches (100 m on either side) following action is to be taken: a) SE/JE(P. Way) USFD shall impose SR of 30 KMPH or stricter immediately and to be continued till Defective weld is replaced. He shall communicate the flaw location to SE/JE (P Way) who shall ensure: b) c) i) Protection of defective weld by clamped joggle fish plate within 24 hours Ii) Replacement of defective weld within 3 days. 112

Classification of Weld defects /Action to be taken 113

& 100 m either side 114

&100 m either side 115

& 100 m either side 116

& 100 m either side 117

& 100 m either side 118

& 100 m either side 119

& 100 m either side 120

& 100 m either side 121

Limitation of Ultrasonic Flaw Detection of Rails 122

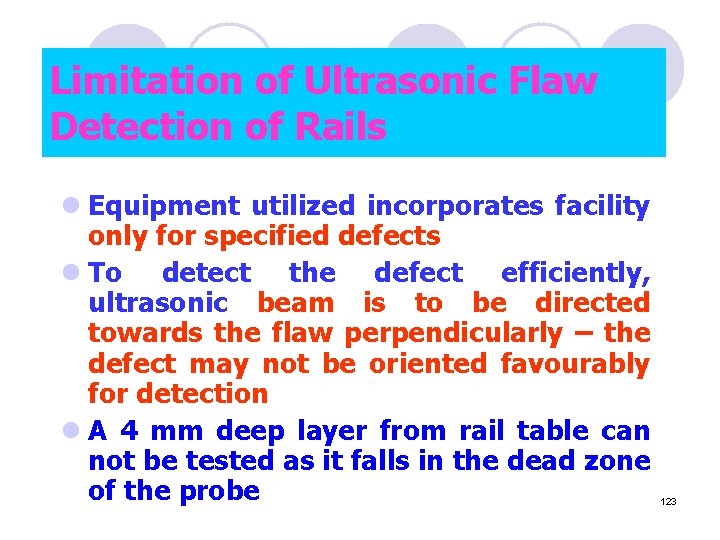
Limitation of Ultrasonic Flaw Detection of Rails l Equipment utilized incorporates facility only for specified defects l To detect the defect efficiently, ultrasonic beam is to be directed towards the flaw perpendicularly – the defect may not be oriented favourably for detection l A 4 mm deep layer from rail table can not be tested as it falls in the dead zone of the probe 123

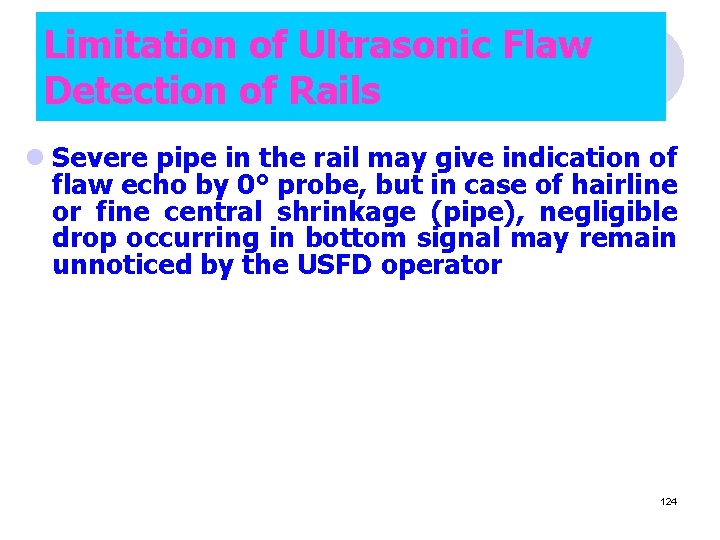
Limitation of Ultrasonic Flaw Detection of Rails l Severe pipe in the rail may give indication of flaw echo by 0° probe, but in case of hairline or fine central shrinkage (pipe), negligible drop occurring in bottom signal may remain unnoticed by the USFD operator 124

Limitation of Ultrasonic Flaw Detection of Rails l Bolt hole cracks can be best detected by 37 deg probe, which is not now available on testing machine. BHF are now detected by 0 deg probe only. At fish plated joint, if the cracks are not favorably oriented or are of smaller size, their detection may be difficult in initial stages. l Similarly, if the cracks are propagating vertically downwards or upwards, detection is not possible. 125

Limitation of Ultrasonic Flaw Detection of Rails l The ultrasonic probes used in the rail tester have a frequency of 4 MHz (longitudinal wave) and 2 MHz (transverse waves). Therefore, cracks lesser than 0. 8 mm size cannot be detected by the present arrangement. 126

Limitation of Ultrasonic Flaw Detection of Rails l Rails having rust, pitting, hogging, battering of rail end, misalignment of joints, scabs, wheel burns and other surface imperfections restrict proper acoustic coupling between probe and rail table and may not permit detection of flaws. Side probing should be done in such cases. l When ever such defects are encountered, loss of back wall echo or an alarm signal is obtained. This indicates that defects if any below these patches may remain undetected. Under such circumstances hand probing may be done. 127

Limitation of Ultrasonic Flaw Detection of Rails l In the Testing of SEJs, CMS crossing, points and crossings, due to specific shape near the nose, it is difficult to move the trolley for testing and achieve acoustic coupling. l Therefore except the stock rail, the balance portion (machined portion) is not amenable for detection by USFD trolley. l Under such circumstances, hand probing is required to be carried out according to the procedure laid down in the manual for points and crossing or in the USFD manual. 128

Limitation of Ultrasonic Flaw Detection of Rails l USFD trolley has been designed to operate under normal conditions of gauge. While testing on sharp curves gradients, slack gauge etc, the problem of proper coupling may arise. l In the event of dimensional variations in the gauge and also at sharp curves it is possible that the probes are not properly contacting the rail surface while testing with DRT. l Testing by hand probing or by single rail tester may be resorted to. l The test result are not reproducible, no documentary record for future is generated. 129

Procedure for Ultrasonic testing of Alumino- Thermic Welded Rail Joints Following tests are prescribed for BG and MG routes. l Testing of Weld Head/Web, which get covered during Through Periodic Rail Testing by SRT/DRT. l As per this test defects are classified as IMRW and OBSW. 130

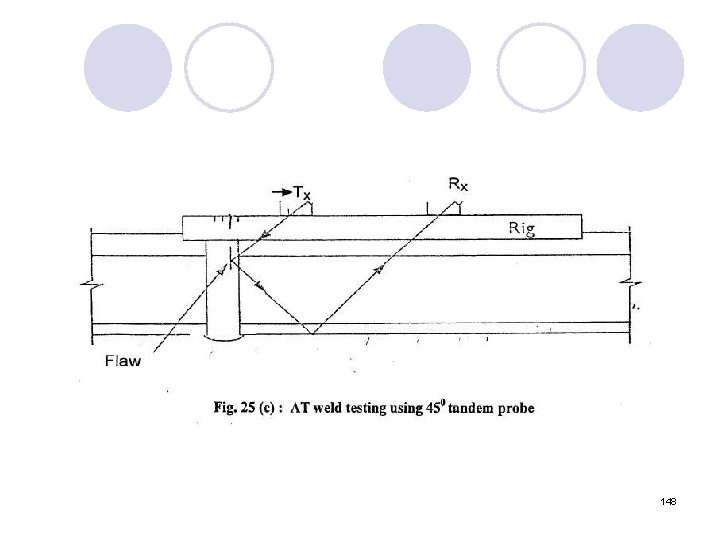
Initial acceptance test of AT weld using 0 ¡ 0 2 MHz DOUBLE CRYSTAL PROBE 0 ¡ 70 2 MHz SINGLE CRYSTAL PROBE 0 ¡ 45 2 MHz SINGLE CRYSTAL PROBE (foot scanning for clustered defect/ micro porosity in web foot region) ¡ 450 2 MHz Tandem Probe for Lack of Fusion ¡AS PER THIS TEST DEFECTS ARE CLASSIFIED AS DFW 131

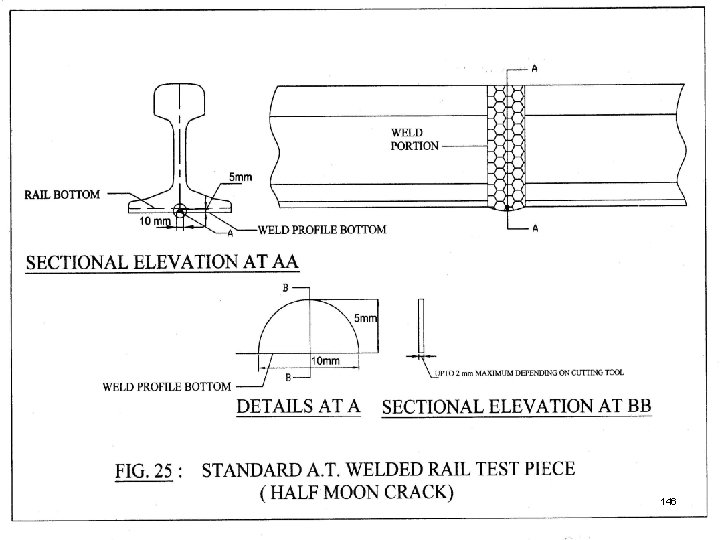
Periodic testing of AT weld using ¡ 00 2 MHz double crystal probe ¡ 700 2 MHz single crystal probe 0 ¡ 45 2 MHz single crystal probe for foot for half moon crack detection and ¡ 700 2 MHz ( 8 x 8 mm) single crystal probe for half moon crack detection 132

Ultrasonic testing of AT Weld Joints l l TWR should be planned after welds have carried 50% of the stipulated GMT of rails. CTE will decide the priority. The USFD Testing can be dispensed with in case of those welds which are >15 years old and protected by joggled fish plate with two far end tight bolts. After execution of AT weld, welded zone shall be dressed properly to facilitate placement of probes and to avoid incidence of spurious signal on the screen. The flange of the weld up to a distance of 200 mm. on either side of the weld collar shall be thoroughly cleaned with a wire brush to ensure freedom from dust, dirt, surface unevenness etc. 133

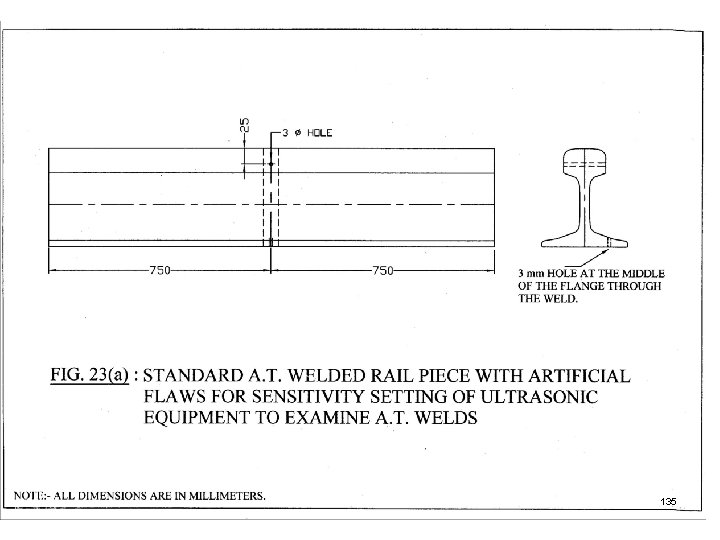
Ultrasonic testing of AT Weld Joints l Sensitivity setting to be done with the help of a standard AT welded rail piece of 1. 5 m length having a simulated flaw at standard locations as shown in USFD manual. 134

135

AT Welds Testing by Hand Probing At the time of execution – using 0 o 2 MHz, 70 o 2 MHz probes, 45 o 2 MHz (foot scanning for clustered defects and micro porosities) and 45 o 2 MHz (Tandem probe scanning for lack of fusion; Periodic Testing : - by 0 o 2 MHz (Dbl crystal 18 mm dia), 70 o 2 MHz, 45 o 2 MHz (foot scanning for half moon defects) and 70 o 2 MHz (8 mm x 8 mm) (single crystal) probes. Couplant : - Soft grease to be used. 136

AT Welds Testing by Hand Probing 0 o 2 MHz Probes : - to detect porosity, blow hole, slag inclusion in head and up to mid-web. Calibration – 300 mm for longitudinal wave. Sensitivity : - Set signal 60% of FSH on 3 Ф through hole in head at 25 mm from weld top Defect marking: - Move on weld area; signal ≥ 40% and up to 60% of FSH in head and ≥ 20% and up to 40% of FSH in web/foot DFWO signal ≥ 60% of FSH in head and ≥ 40% of FSH in web/foot DFWR 137

AT Welds Testing by Hand Probing 70 o 2 MHz Probe: - to detect lack of fusion, porosity, blow hole, slag inclusion, cracks in Head. Calibration – 165 mm for Shear waves. Sensitivity - Set signal 60% of FSH on 3 Ф through hole in head at 25 mm from rail top. Defect marking: - Move towards weld in zig-zag manner; moving signal ≥ 40% and up to 60% of FSH DFWO moving signal ≥ 60% of FSH DFWR A bunch of moving signal ≥ 10% of FSH DFWR 138

AT Welds Testing by Hand Probing 45 o 2 MHz Probe: - to inspect bottom of weld foot for detection of clustered defect, micro porosities and half moon defects. Calibration – 275 mm for shear wave. Sensitivity – adjusted signal from simulated half moon defect (5 Ф semi circle at weld bottom) to 60% of FSH. (Probe moved on rail top at a distance equal to rail ht. ) Defect marking – any signal ≥ 20% of FSH DFWR. 139

AT Welds Testing by Hand Probing 45 o 2 MHz Probe ( Tandem probe scanning): - to detect any vertically oriented defect like lack of fusion in the rail head, web and foot region below the web. Calibration – 275 mm for shear wave. Sensitivity – adjust signal from bottom of rail by the receiving probe to 100% of FSH. Increase the gain further by 10 d. B. Defect marking – any signal ≥ 40% of FSH DFWR. 140

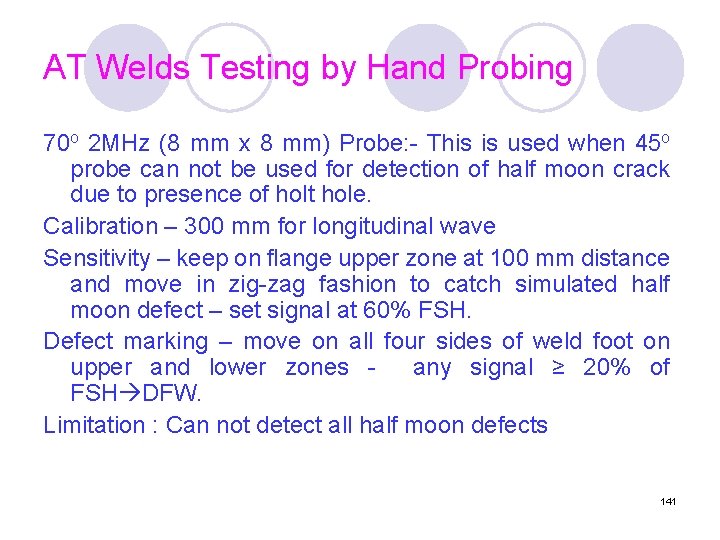
AT Welds Testing by Hand Probing 70 o 2 MHz (8 mm x 8 mm) Probe: - This is used when 45 o probe can not be used for detection of half moon crack due to presence of holt hole. Calibration – 300 mm for longitudinal wave Sensitivity – keep on flange upper zone at 100 mm distance and move in zig-zag fashion to catch simulated half moon defect – set signal at 60% FSH. Defect marking – move on all four sides of weld foot on upper and lower zones any signal ≥ 20% of FSH DFW. Limitation : Can not detect all half moon defects 141

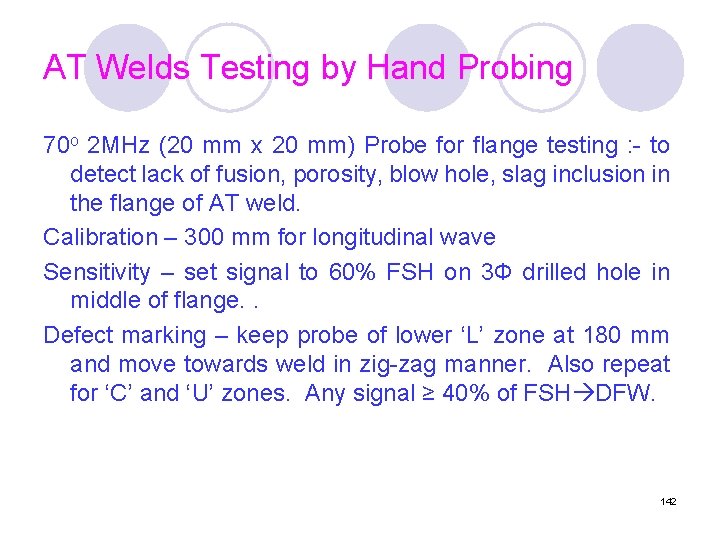
AT Welds Testing by Hand Probing 70 o 2 MHz (20 mm x 20 mm) Probe for flange testing : - to detect lack of fusion, porosity, blow hole, slag inclusion in the flange of AT weld. Calibration – 300 mm for longitudinal wave Sensitivity – set signal to 60% FSH on 3 Ф drilled hole in middle of flange. . Defect marking – keep probe of lower ‘L’ zone at 180 mm and move towards weld in zig-zag manner. Also repeat for ‘C’ and ‘U’ zones. Any signal ≥ 40% of FSH DFW. 142

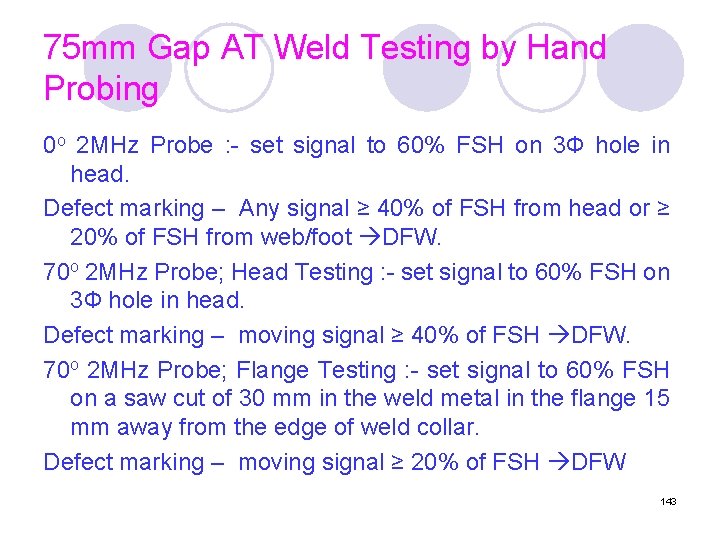
75 mm Gap AT Weld Testing by Hand Probing 0 o 2 MHz Probe : - set signal to 60% FSH on 3 Ф hole in head. Defect marking – Any signal ≥ 40% of FSH from head or ≥ 20% of FSH from web/foot DFW. 70 o 2 MHz Probe; Head Testing : - set signal to 60% FSH on 3 Ф hole in head. Defect marking – moving signal ≥ 40% of FSH DFW. 70 o 2 MHz Probe; Flange Testing : - set signal to 60% FSH on a saw cut of 30 mm in the weld metal in the flange 15 mm away from the edge of weld collar. Defect marking – moving signal ≥ 20% of FSH DFW 143

144

145

146

147

148

l Testing of web and flange of FBW by 450 and 700 2 MHz hand probe ¡ Normally there is No need ¡ However CE may order , if failure rate is high l Due to unusually high Weld Failure or abnormal developments in some section, CE may order, testing of AT welds early as per need. 149