
SMAW Beads Fillet Welds Level 1 chapter 9

SMAW Beads & Fillet Welds Level 1 – chapter 9
Objectives ● When we have completed this chapter, you will be able to: ● Set up SMAW equipment ● Properly strike an arc ● Describe causes of arc blow ● Make stringer, weave, and overlapping beads ● Make fillet welds in the following positions; ● 2 F, 3 F, 4 F
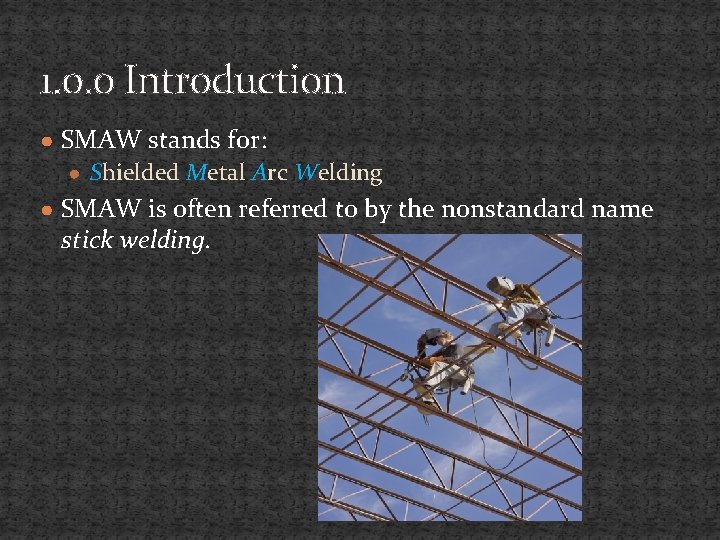
1. 0. 0 Introduction ● SMAW stands for: ● Shielded Metal Arc Welding ● SMAW is often referred to by the nonstandard name stick welding.
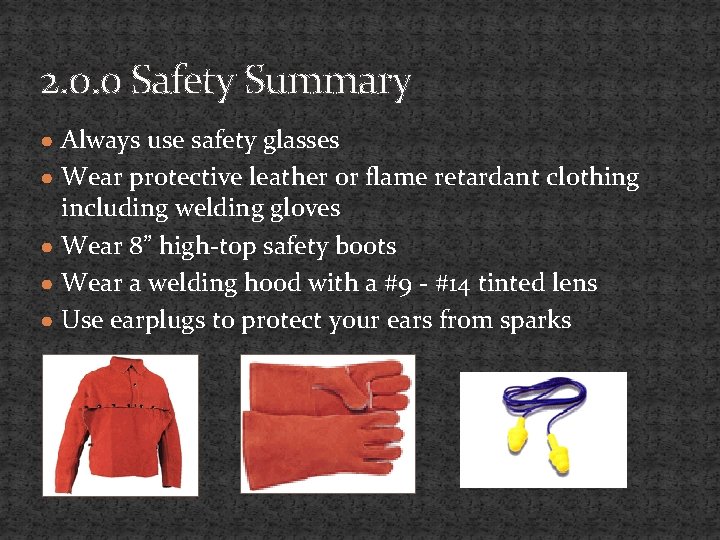
2. 0. 0 Safety Summary ● Always use safety glasses ● Wear protective leather or flame retardant clothing including welding gloves ● Wear 8” high-top safety boots ● Wear a welding hood with a #9 - #14 tinted lens ● Use earplugs to protect your ears from sparks

2. 2. 0 Fire / Explosion Prevention ● Never carry matches of gas-filled lighters in your pockets. Sparks can cause matches to ignite or the lighter to explode, causing a serious injury. ● Make sure that any flammable material in the work area is moved or shielded by a fire-resistant covering. ● Approved fire extinguishers must be in the area before hot work is started. ● As a standard practice, always clean and then fill any tanks or barrels with water or purge them with flow of inert gas such as nitrogen or argon to displace any oxygen.
2. 2. 0 Fire / Explosion Prevention ● Never release any compressed gas into an area, especially ● ● acetylene. Acetylene is lighter than air, but is more dangerous than methane. When mixed with air, acetylene will explode at much lower concentrations than any other fuel. Never release a large amount of oxygen or use compressed oxygen as compressed air. It can cause rapid and uncontrolled combustion Keep oxygen away from oil, grease, and other petroleum products. If pure oxygen comes in contact with oil or grease, an explosion WILL occur.
3. 1. 0 Preparing the Weld Area ● To practice welding, a welding table or stand is needed. ● The welding surface must be steel and provisions must be made for placing weld coupons out of position. ● To set up the area for welding, follow these steps: ● ● ● Check to be sure the area is properly ventilated. Check the area for fire hazards Check the area for the nearest fire extinguisher Position the welding equipment near the weld area Set up flash shields around the weld area

3. 2. 0 Preparing the Weld coupon ● The weld coupon should be carbon steel, ¼ to ¾ thick. ● Use a wire brush or grinder to remove heavy mill scale or corrosion. ● Fillet weld coupons should be 4” x 6” rectangles for the base and 3” x 6” rectangles for the web
3. 2. 0 Preparing the Weld coupon ● Steel for practice welding is expensive and difficult to obtain. ● Reuse weld coupons until all surfaces have been welded on. ● Weld on both sides of the joint and then cut the weld coupon apart and reuse the pieces
3. 3. 0 Electrodes ● Electrodes are some times referred to by the ● ● nonstandard term of rods. Obtain only the electrodes to be used for a particular welding exercise at one time. (10, 20, or 30) Some type of metal container, such as a pail, must be used to discard of the hot electrode stubs. DO NOT throw electrode stubs on the floor. The stubs easily roll, and someone could step on them and slip.
3. 4. 0 Preparing the Welding Machine ● Verify that the welding machine can be used for DC welding ● If an AC welding machine is being used, use E 6011 and E 7018 ● ● ● electrodes Check the area for proper ventilation Set the polarity to DCEP Connect the ground clamp to the work piece Set the amperage for the electrode type and size to be used Check to make sure the electrode holder (stinger) is not touching the workpiece Turn the welding machine on
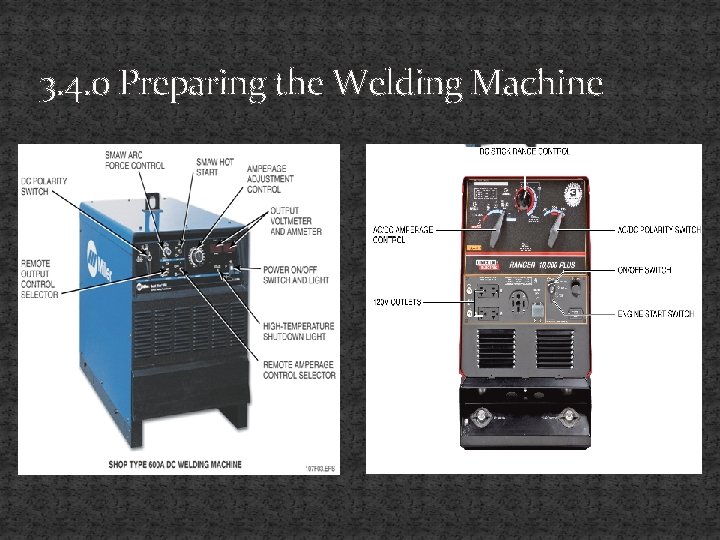
3. 4. 0 Preparing the Welding Machine
4. 0. 0 Striking the Arc ● The first step in starting a weld is striking the arc ● To strike the arc, touch the end of the electrode to the base metal and then quickly raise it to the correct arc length. ● The general rule is that the arc length should be the diameter of the electrode being used. ● The arc length is measured from the end of the electrode core to the base metal. ● There are two ways to strike an arc: the scratch method and the tapping method

4. 1. 0 Scratching Method ● The scratching method is the easiest way to strike an arc. ● It is similar to striking a match ● The end of the electrode is simply scratched along the base metal to establish an arc. ● When the arc has been established, the electrode is raised to established the correct arc length.

4. 1. 0 Scratching Method
4. 2. 0 Tapping Method ● The tapping method is the best method is establishing an arc when using a transformer DC welding machine ● It is more difficult and takes more practice to perfect ● The scratching method leaves arc strikes on the base metal, which are not allowed by the welding codes. ● To strike an arc with the tapping method, move the electrode quickly to the base metal, lightly tap it, and then raise the electrode to establish the correct arc length.

4. 2. 0 Tapping Method
5. 0. 0 Arc Blow ● When current flows, especially DC, strong magnetic ● ● fields may be created. The magnetic fields tend to concentrate in corners, in deep grooves, or in the ends of the base metal. When the arc approaches these concentrated magnetic fields, it is deflected. This is known as arc blow. DC arc blow can cause defects such as excessive weld spatter and porosity.
5. 0. 0 Arc Blow ● If arc blow occurs, try one of these methods to control it: ● Change the position of the ground clamp ● This will change the flow of the welding current ● Shorten the arc length ● The magnetic field will have less effect on a shorter arc ● Change the angle of the electrode ● Raising the electrode angle will compensate for the arc blow
6. 0. 0 Stringer and Weaver Beads ● A stringer bead is a weld bead that is made with very little ● ● or no side-to-side motion of the electrode The width of a stringer bead will vary with the electrode type. A weave bead is a weld bead that is made with a side-toside motion of the electrode. The width of the weave bead is usually specified in the drawings, welding code, or welding procedure specification (WPS). Typically the maximum width of a weave bead is 5 times the electrode diameter.
6. 1. 0 Practicing Stringer Beads with 6010 ● Practice running stringer beads in the flat position using 1/8 – 6010 electrodes ● After striking the arc, the electrode axis should be a 10 to 15 degree drag angle in the direction of travel for the weld and 90 degrees to the base metal. ● The whipping motion, also called a stepping motion, can be used when depositing the stringer bead to control the weld puddle.
6. 1. 0 Practicing Stringer Beads with 6010 ● The whipping motion is performed by moving the ● ● electrode up and forward about ¼”. A short pause at the end of the backward travel deposits the weld metal. By momentarily lengthening and advancing the arc, the molten weld pool is allowed to cool. Lengthening the arc lowers the arc temperature and reduces the transfer from the rod core. Advancing the arc preheats the base metal ahead of the weld and burns off contaminants.
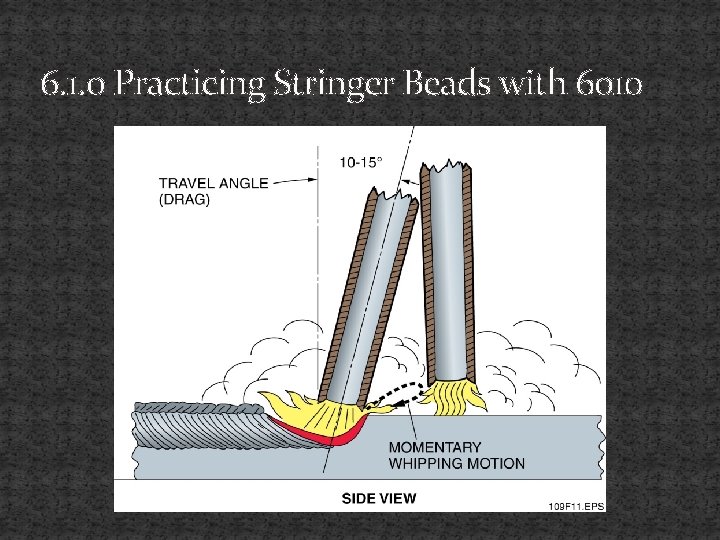
6. 1. 0 Practicing Stringer Beads with 6010
6. 2. 0 Practicing Stringer Beads w/ 7018 ● Use the same electrode angles used with 6010, but do not ● ● whip the electrode. When running low-hydrogen electrodes, the arc should not leave the weld puddle The arc for 7018 will be shorter than that use with 6010 due to the thicker, longer sheath of the flux coating Weld defects, such as porosity or hydrogen embrittlement, can occur if the arc leaves the puddle or if the arc is too long. The arc can be moved within the weld puddle to control bead shape.
6. 3. 0 Restarting a Weld ● A restart is the point where one weld bead stops and ● ● another starts (commonly called start-stops) Restarts are important because an improperly made restart will create a weld defect. 90% of all weld defects are at restarts. A restart must be made so that it blends smoothly into the rest of the weld and does not stand out. The technique for making a restart is the same for stringer and weave beads.
6. 3. 0 Restarting a Weld ● Steps for making a correct restart: ● With a new electrode, restrike the arc in front of the crater of the previous bead and in line with the weld. ● Welding codes do not allow arc strikes outside the weld area ● Move the electrode back onto the previous weld crater and develop the weld puddle with a slight circular motion ● Start the forward motion as the bead achieves the proper width and continue weld ● If the restart has under cut, not enough time was spent to fill the crater. ● If the restart has a hump, or overfill, too much time spent before moving forward.
6. 4. 0 Terminating a Weld ● Terminations are made at the end of a weld ● A termination leaves a crater ● When making a termination, the welding code requires that the crater be filled to the full cross section of the weld. ● Steps to terminate a weld: ● As you approach the end of the weld, start to stand the electrode up to 90 degrees ● Stop the forward motion and slowly angle the rod toward the start of the weld ● Move back toward the weld 1/8” and pause to fill the crater
6. 5. 0 Practicing Weave Beads - 6010 ● The weave bead is made by moving the electrode back and forth. ● Many different patterns can be used to make a weave bead, including: ● Circles, crescents, figure-eights, and zigzags ● To ensure proper tie-in at the toes, slow down or pause slightly at the edges. ● The pause at the edges will also flatten out the weld, giving is the proper profile.
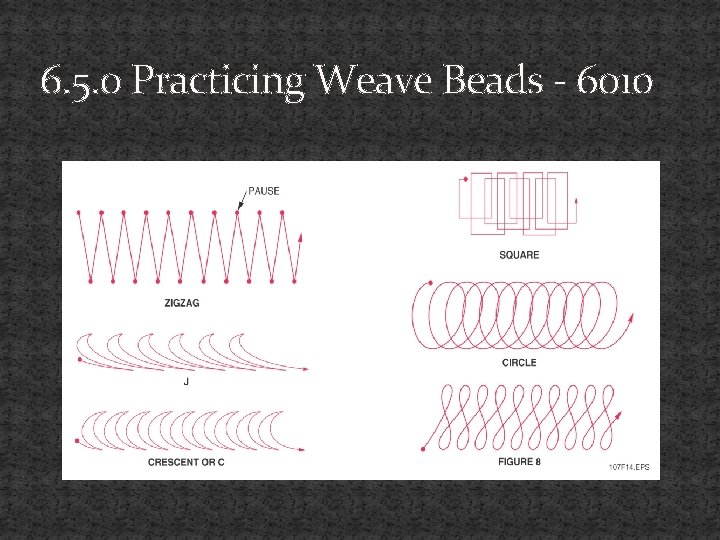
6. 5. 0 Practicing Weave Beads - 6010
Break Time ● Take 15 min. break
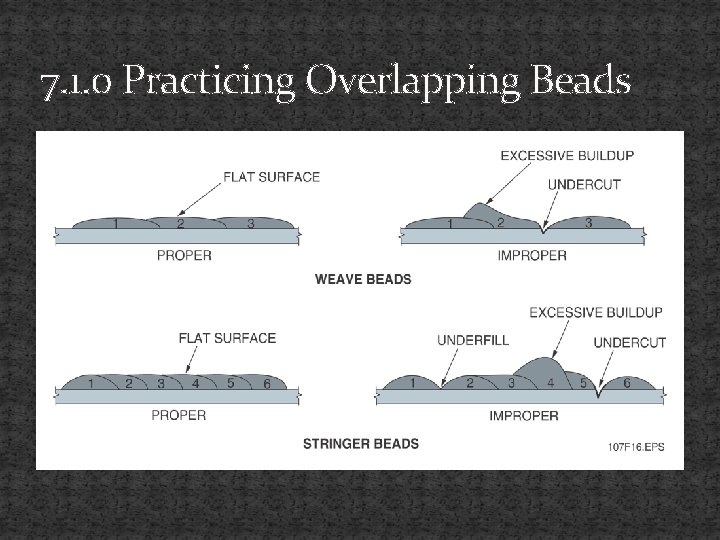
7. 0. 0 Overlapping Beads ● Overlapping beads are made by depositing connective ● ● weld beads parallel to one another. The parallel beads overlap, forming a flat surface. This is also called padding Overlapping beads are used to build up a surface and to make multi-pass welds. Both stringer and weave beads can be overlapped
7. 1. 0 Practicing Overlapping Beads ● Weld a stringer bead along one edge of the steel plate ● Clean the weld ● After striking the arc for the next stringer bead, and with the proper travel angle, position the electrode at a work angle of 10 to 15 degrees to the side of the previous bead to obtain proper tie-in.
7. 1. 0 Practicing Overlapping Beads
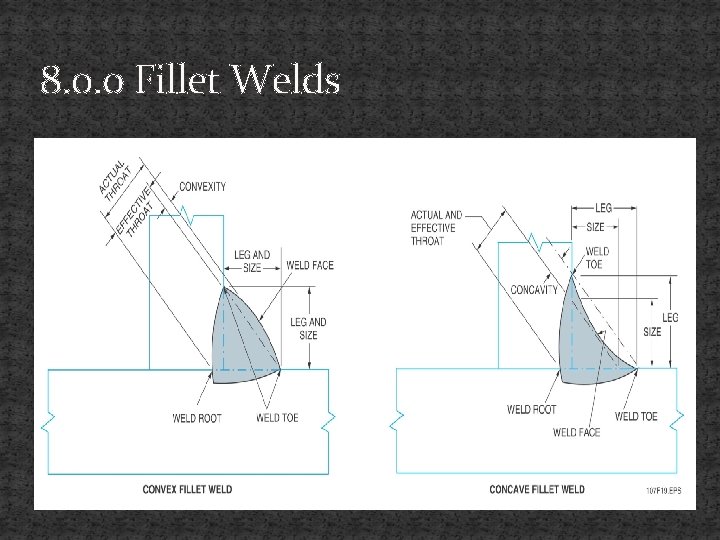
8. 0. 0 Fillet Welds ● A fillet weld is a weld that is approximately triangular in cross section and is used with T-, lap and corner joints. ● The size and locations of the fillet welds are given as welding symbols. ● The two types of fillet welds are: convex and concave ● Convex fillet welds has its surface bowed out ● Concave fillet weld has its surface bowed in
8. 0. 0 Fillet Welds ● The following terms are used with fillet welds: ● Weld face – the exposed surface of the weld ● Leg – the distance from the root of the joint to the toe of the weld ● Weld toe – the junction between the face of a weld and the base metal ● Weld root – the point shown in cross section in which the weld metal intersects with the base metal and extends furthest into the weld joint ● Size – the leg lengths of the largest right triangle that can be drawn within the cross section of the fillet weld
8. 0. 0 Fillet Welds
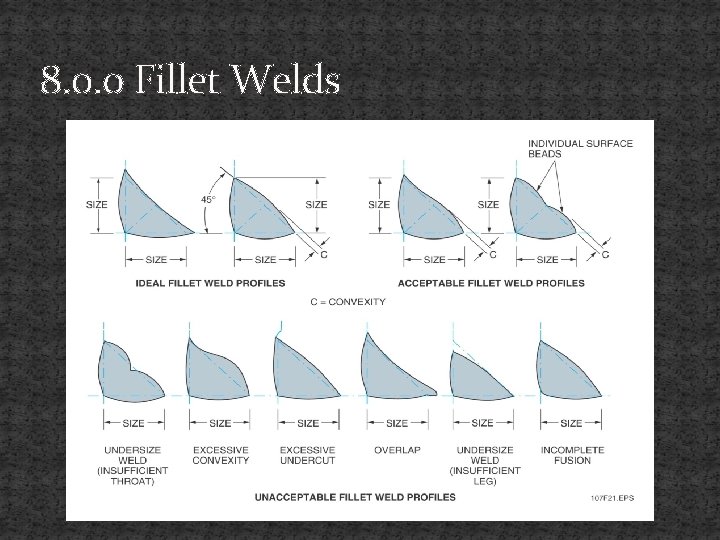
8. 0. 0 Fillet Welds ● The face of a fillet weld may be slightly convex, flat, or slightly concave. ● Welding codes require that fillet welds have a uniform concave or convex face, although a slightly non-uniform face is acceptable. ● A fillet weld is unacceptable and must be repaired if: ● ● ● The profile has insufficient throat Excessive convexity Excessive undercut Overlap (cold-lap) Insufficient leg Incomplete fusion
8. 0. 0 Fillet Welds
8. 1. 0 Fillet Weld Positions ● The most common fillet welds are made in lap and T- joints ● The positions for fillet welds are: ● 1 F – flat ● 2 F – horizontal ● 3 F – vertical ● 4 F – overhead ● The F stands for fillet
8. 2. 0 Practicing 2 F Fillet Welds ● Practice horizontal fillet (2 F) welding by placing multi● ● pass fillet welds in a T joint using 1/8” electrodes When making 2 F fillet welds, pay close attention to the electrode angles and travel speed For the first bead the work angle is 45 degrees The work angle is adjusted for all other beads Increase or decrease the travel speed to control the amount of weld metal build up.
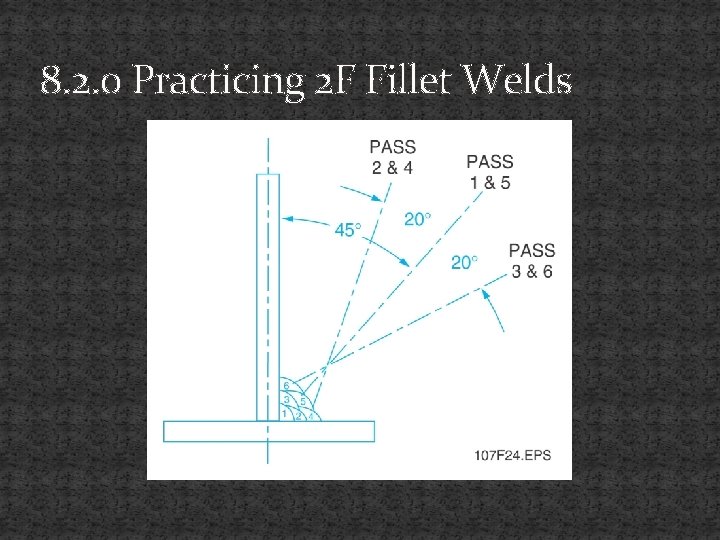
8. 2. 0 Practicing 2 F Fillet Welds
8. 4. 0 Practicing 3 F Fillet Welds ● Normally, vertical welds are accomplished by welding uphill from the bottom to the top using an electrode push angle (up-angle). ● When vertical welding, either stringer or weave beads can be used. ● The WPS will specify if stringer or weave beads are to be used.
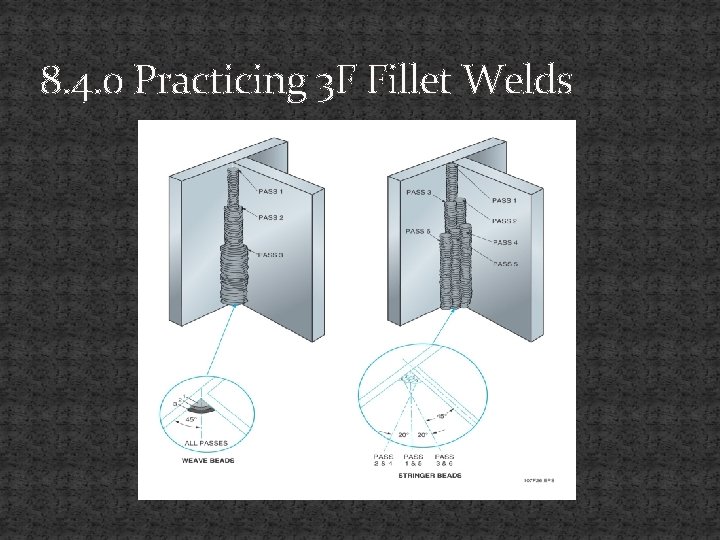
8. 4. 0 Practicing 3 F Fillet Welds
8. 6. 0 Practicing Overhead Fillet Welds ● When making overhead fillet welds, pay close attention to the electrode angles and travel speed. ● For the first bead, the electrode work angle is approximately 45 degrees. ● The work angle is adjusted for all other welds ● Increase or decrease the travel speed to control the amount of weld metal build up.
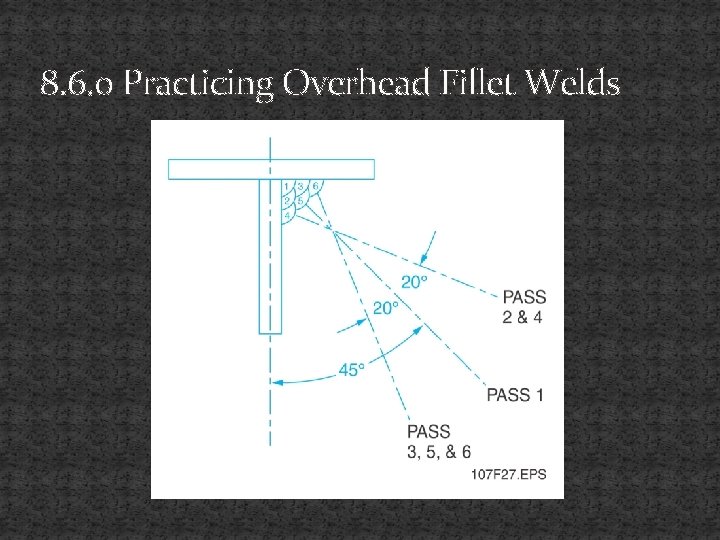
8. 6. 0 Practicing Overhead Fillet Welds
Summary ● Striking an arc, running stringer and weave beads, and making filler welds are essential skills a welder must have to perform basic welding jobs. ● Welds can be performed in different positions: ● Flat, vertical, horizontal, and overhead ● It is necessary to use various types of electrodes when welding in positions and different metals

Review Questions ● Answer review questions 1 -10 ● Answer trade terms 1 -12
- Slides: 47