EPT 218 CHAPTER 5 Forming and shaping process
- Slides: 120

EPT 218 CHAPTER 5 Forming and shaping process -Metal forming Fundamentals-Bulk Deformation Processes-

Metal Forming Fundamentals 1. 2. 3. 4. Overview of Metal Forming Material Behavior in Metal Forming Temperature in Metal Forming Friction and Lubrication in Metal Forming © 2007 John Wiley & Sons, Inc. M P Groover, Fundamentals of Modern Manufacturing 3/e

Metalworking and Bulk Deformation Processes 1. Rolling 2. Other Deformation Processes Related to Rolling 3. Forging 4. Other Deformation Processes Related to Forging 5. Extrusion 6. Wire and Bar Drawing © 2007 John Wiley & Sons, Inc. M P Groover, Fundamentals of Modern Manufacturing 3/e

Metal Forming Large group of manufacturing processes in which plastic deformation is used to change the shape of metal workpieces § The tool, usually called a die, applies stresses that exceed the yield strength of the metal § The metal takes a shape determined by the geometry of the die Forming, or metal forming, is the metalworking process of fashioning metal parts and objects through mechanical deformation; the workpiece is reshaped without adding or removing material, and its massonremains unchanged Forming operates the materials science principle of plastic deformation, where the physical shape of a material is permanently deformed. © 2007 John Wiley & Sons, Inc. M P Groover, Fundamentals of Modern Manufacturing 3/e

Stresses in Metal Forming § Stresses to plastically deform the metal are usually compressive § Examples: rolling, forging, extrusion § However, some forming processes § Stretch the metal (tensile stresses) § Others bend the metal (tensile and compressive) § Still others apply shear stresses © 2007 John Wiley & Sons, Inc. M P Groover, Fundamentals of Modern Manufacturing 3/e

Material Properties in Metal Forming § Desirable material properties: § Low yield strength § High ductility § These properties are affected by temperature: § Ductility increases and yield strength decreases when work temperature is raised § Plastic region of stress-strain curve is primary interest because material is plastically deformed © 2007 John Wiley & Sons, Inc. M P Groover, Fundamentals of Modern Manufacturing 3/e

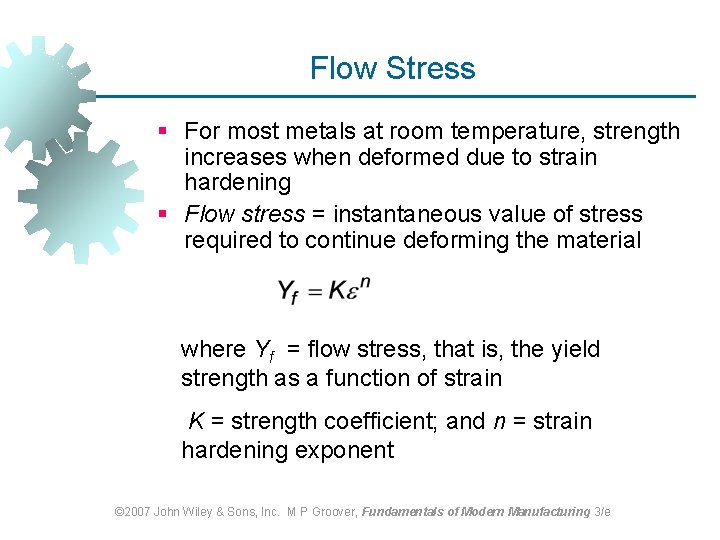
Flow Stress § For most metals at room temperature, strength increases when deformed due to strain hardening § Flow stress = instantaneous value of stress required to continue deforming the material where Yf = flow stress, that is, the yield strength as a function of strain K = strength coefficient; and n = strain hardening exponent © 2007 John Wiley & Sons, Inc. M P Groover, Fundamentals of Modern Manufacturing 3/e

Temperature in Metal Forming § Any deformation operation can be accomplished with lower forces and power at elevated temperature § Three temperature ranges in metal forming: § Cold working § Warm working § Hot working © 2007 John Wiley & Sons, Inc. M P Groover, Fundamentals of Modern Manufacturing 3/e

Cold Working § Performed at room temperature or slightly above § Many cold forming processes are important mass production operations § Minimum or no machining usually required § These operations are near net shape or net shape processes © 2007 John Wiley & Sons, Inc. M P Groover, Fundamentals of Modern Manufacturing 3/e

Advantages of Cold Forming § § Better accuracy, closer tolerances Better surface finish No heating of work required Strain hardening increases strength and hardness § Grain flow during deformation cause desirable directional properties in product © 2007 John Wiley & Sons, Inc. M P Groover, Fundamentals of Modern Manufacturing 3/e

Disadvantages of Cold Forming § Higher forces and power required in the deformation operation § Surfaces of starting workpiece must be free of scale and dirt § Ductility and strain hardening limit the amount of forming that can be done § In some cases, metal must be annealed to allow further deformation § In other cases, metal is simply not ductile enough to be cold worked © 2007 John Wiley & Sons, Inc. M P Groover, Fundamentals of Modern Manufacturing 3/e

Warm Working § Performed at temperatures above room temperature but below recrystallization temperature § Dividing line between cold working and warm working often expressed in terms of melting point: § 0. 3 Tm, where Tm = melting point (absolute temperature) for metal Advantages of Warm Working § Lower forces and power than in cold working § More intricate work geometries possible § Need for annealing may be reduced or eliminated

Hot Working § Deformation at temperatures above the recrystallization temperature § Recrystallization temperature = about one‑half of melting point on absolute scale § In practice, hot working usually performed somewhat above 0. 5 Tm § Metal continues to soften as temperature increases above 0. 5 Tm, enhancing advantage of hot working above this level © 2007 John Wiley & Sons, Inc. M P Groover, Fundamentals of Modern Manufacturing 3/e

Why Hot Working? Capability for substantial plastic deformation of the metal ‑ far more than possible with cold working or warm working § Why? § Strength coefficient (K) is substantially less than at room temperature § Strain hardening exponent (n) is zero (theoretically) § Ductility is significantly increased © 2007 John Wiley & Sons, Inc. M P Groover, Fundamentals of Modern Manufacturing 3/e

Advantages of Hot Working § Workpart shape can be significantly altered § Lower forces and power required § Metals that usually fracture in cold working can be hot formed § Strength properties of product are generally isotropic § No strengthening of part occurs from work hardening § Advantageous in cases when part is to be subsequently processed by cold forming © 2007 John Wiley & Sons, Inc. M P Groover, Fundamentals of Modern Manufacturing 3/e

Disadvantages of Hot Working § Lower dimensional accuracy § Higher total energy required (due to thermal energy to heat the workpiece) § Work surface oxidation (scale), poorer surface finish § Shorter tool life © 2007 John Wiley & Sons, Inc. M P Groover, Fundamentals of Modern Manufacturing 3/e

Friction in Metal Forming § In most metal forming processes, friction is undesirable: § Metal flow is retarded / slow down § Forces and power are increased § Tooling wears faster § Friction and tool wear are more severe/ critical in hot working © 2007 John Wiley & Sons, Inc. M P Groover, Fundamentals of Modern Manufacturing 3/e

Lubrication in Metal Forming § Metalworking lubricants are applied to tool‑work interface in many forming operations to reduce harmful effects of friction § Benefits: § Reduced sticking, forces, power, tool wear § Better surface finish § Removes heat from the tooling © 2007 John Wiley & Sons, Inc. M P Groover, Fundamentals of Modern Manufacturing 3/e

Considerations in Choosing a Lubricant § Type of forming process (rolling, forging, sheet metal drawing, etc. ) § Hot working or cold working § Work material § Chemical reactivity with tool and work metals § Ease of application § Cost © 2007 John Wiley & Sons, Inc. M P Groover, Fundamentals of Modern Manufacturing 3/e

Basic Types of Deformation Processes 1. Bulk deformation § Rolling § Forging § Extrusion § Wire and bar drawing 2. Sheet metalworking § Bending § Deep drawing § Cutting © 2007 John Wiley & Sons, Inc. M P Groover, Fundamentals of Modern Manufacturing 3/e

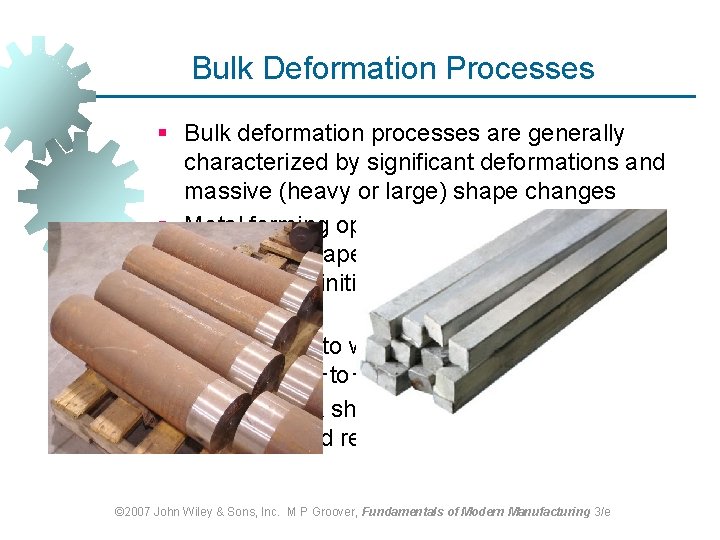
Bulk Deformation Processes § Bulk deformation processes are generally characterized by significant deformations and massive (heavy or large) shape changes § Metal forming operations which cause significant shape change by deforming metal parts whose initial form is bulk rather than sheet § "Bulk" refers to work parts with relatively low surface area‑to‑volume ratios § Starting work shapes include cylindrical bar/billets and rectangular bars © 2007 John Wiley & Sons, Inc. M P Groover, Fundamentals of Modern Manufacturing 3/e

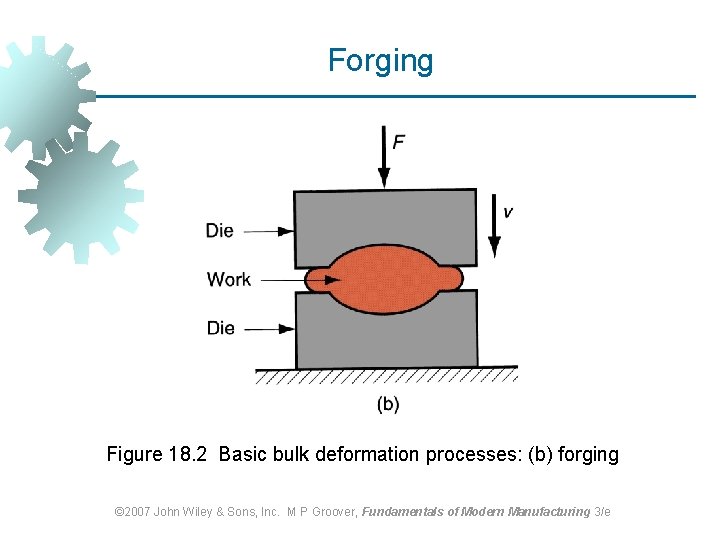
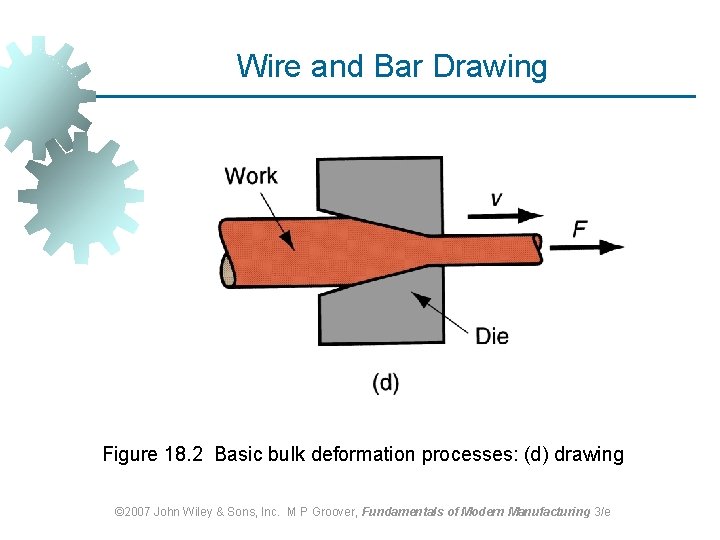
Four Basic Bulk Deformation Processes 1. Rolling – slab or plate is squeezed between opposing rolls 2. Forging – work is squeezed and shaped between opposing dies 3. Extrusion – work is squeezed through a die opening, thereby taking the shape of the opening 4. Wire and bar drawing – diameter of wire or bar is reduced by pulling it through a die opening © 2007 John Wiley & Sons, Inc. M P Groover, Fundamentals of Modern Manufacturing 3/e

ROLLING © 2007 John Wiley & Sons, Inc. M P Groover, Fundamentals of Modern Manufacturing 3/e

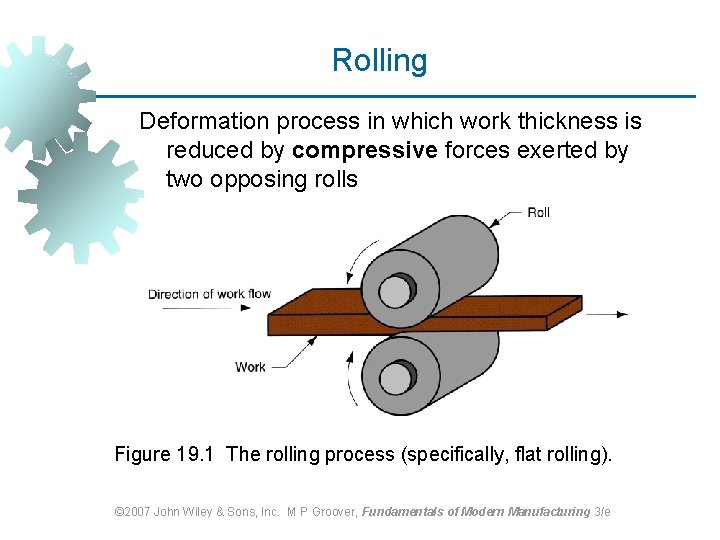
Rolling Deformation process in which work thickness is reduced by compressive forces exerted by two opposing rolls Figure 19. 1 The rolling process (specifically, flat rolling). © 2007 John Wiley & Sons, Inc. M P Groover, Fundamentals of Modern Manufacturing 3/e

The Rolls Rotating rolls perform two main functions: § Pull the work into the gap between them by friction between workpart and rolls § Simultaneously squeeze the work to reduce its cross section © 2007 John Wiley & Sons, Inc. M P Groover, Fundamentals of Modern Manufacturing 3/e

Types of Rolling § Based on workpiece geometry : § Flat rolling - used to reduce thickness of a rectangular cross section § Shape rolling - square cross section is formed into a shape such as an I‑beam § Based on work temperature : § Hot Rolling – most common due to the large amount of deformation required § Cold rolling – produces finished sheet and plate stock © 2007 John Wiley & Sons, Inc. M P Groover, Fundamentals of Modern Manufacturing 3/e

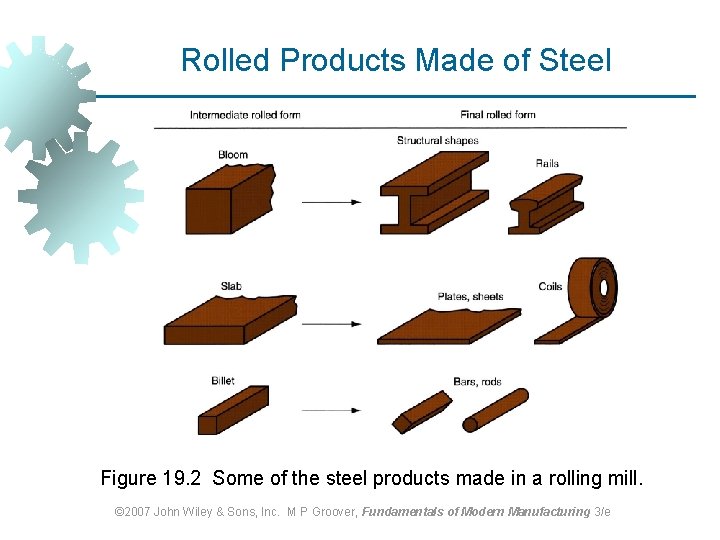
Rolled Products Made of Steel Figure 19. 2 Some of the steel products made in a rolling mill. © 2007 John Wiley & Sons, Inc. M P Groover, Fundamentals of Modern Manufacturing 3/e

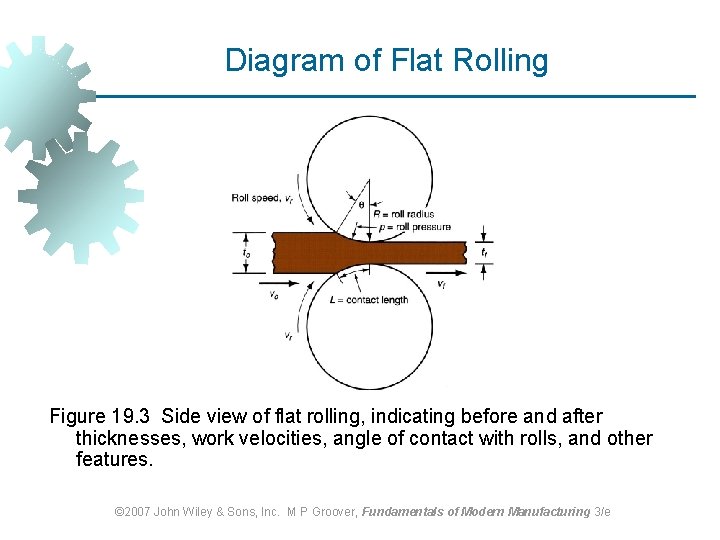
Diagram of Flat Rolling Figure 19. 3 Side view of flat rolling, indicating before and after thicknesses, work velocities, angle of contact with rolls, and other features. © 2007 John Wiley & Sons, Inc. M P Groover, Fundamentals of Modern Manufacturing 3/e

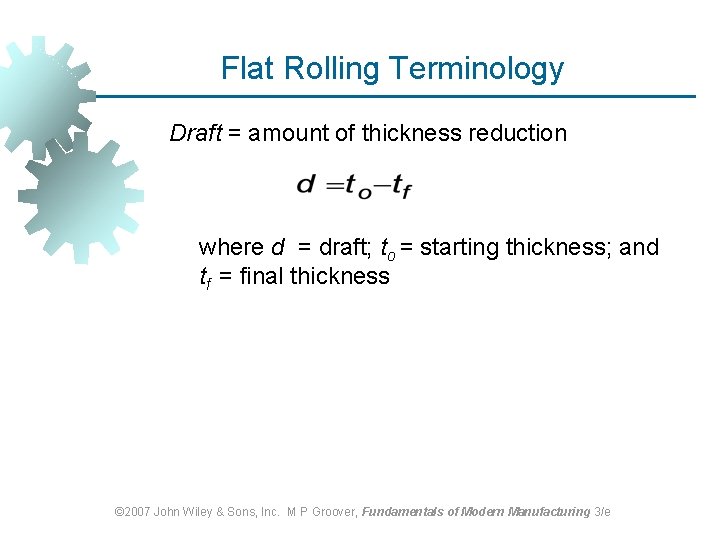
Flat Rolling Terminology Draft = amount of thickness reduction where d = draft; to = starting thickness; and tf = final thickness © 2007 John Wiley & Sons, Inc. M P Groover, Fundamentals of Modern Manufacturing 3/e

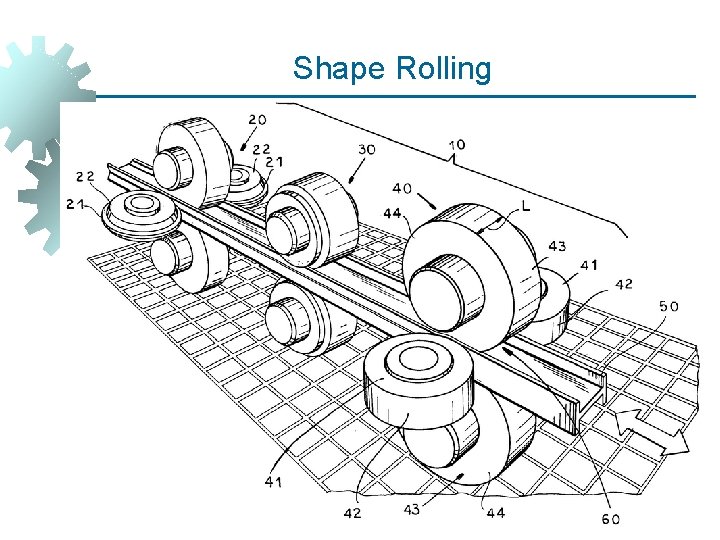
Shape Rolling Work is deformed into a contoured cross section rather than flat (rectangular) § Accomplished by passing work through rolls that have the reverse of desired shape § Products include: § Construction shapes such as I‑beams, L‑beams, and U‑channels § Rails for railroad tracks § Round and square bars and rods © 2007 John Wiley & Sons, Inc. M P Groover, Fundamentals of Modern Manufacturing 3/e

Shape Rolling © 2007 John Wiley & Sons, Inc. M P Groover, Fundamentals of Modern Manufacturing 3/e

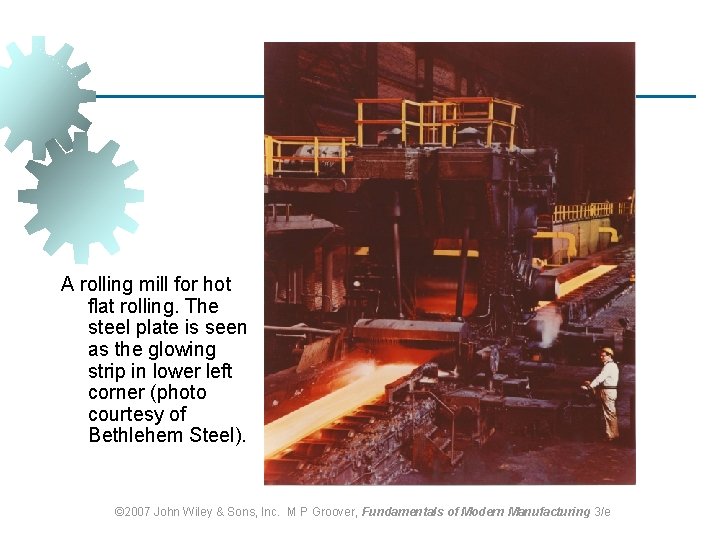
A rolling mill for hot flat rolling. The steel plate is seen as the glowing strip in lower left corner (photo courtesy of Bethlehem Steel). © 2007 John Wiley & Sons, Inc. M P Groover, Fundamentals of Modern Manufacturing 3/e

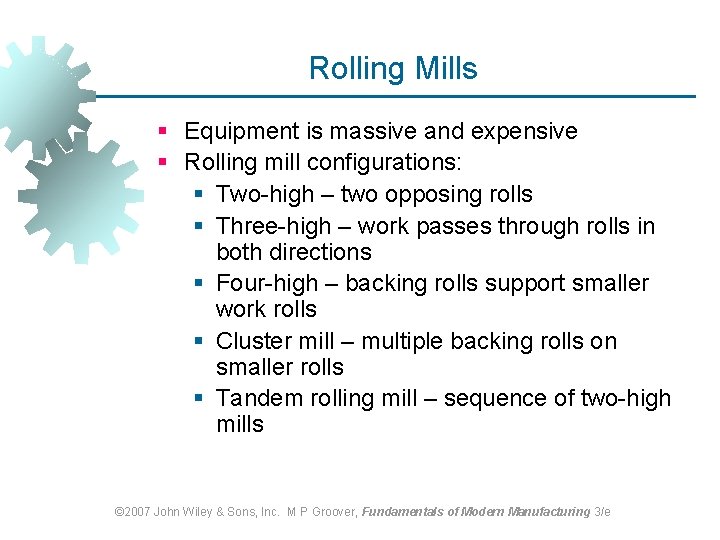
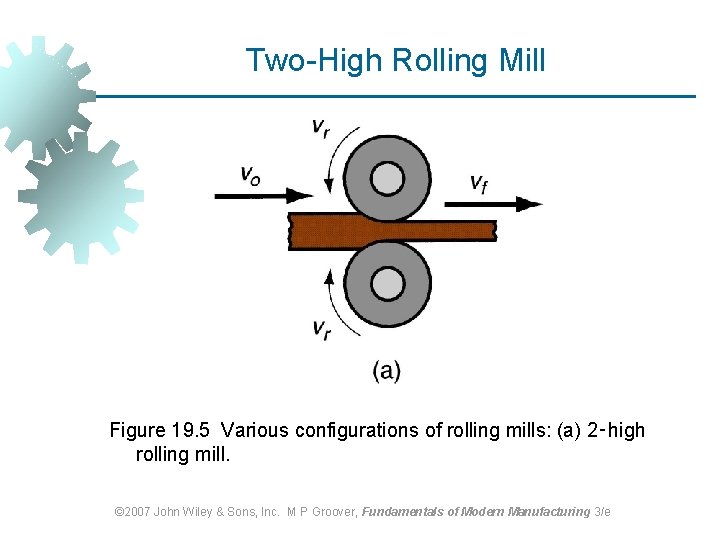
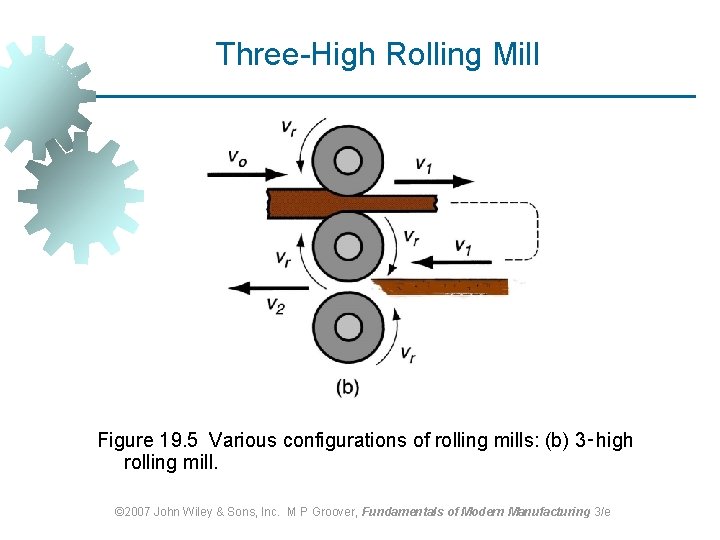
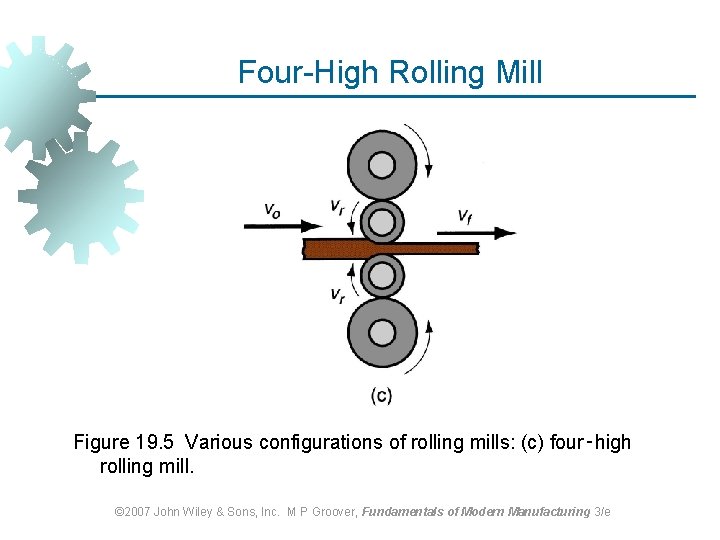
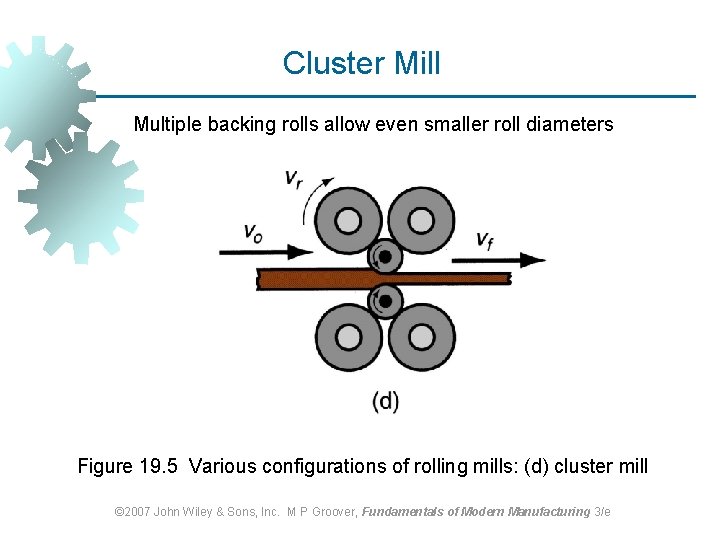
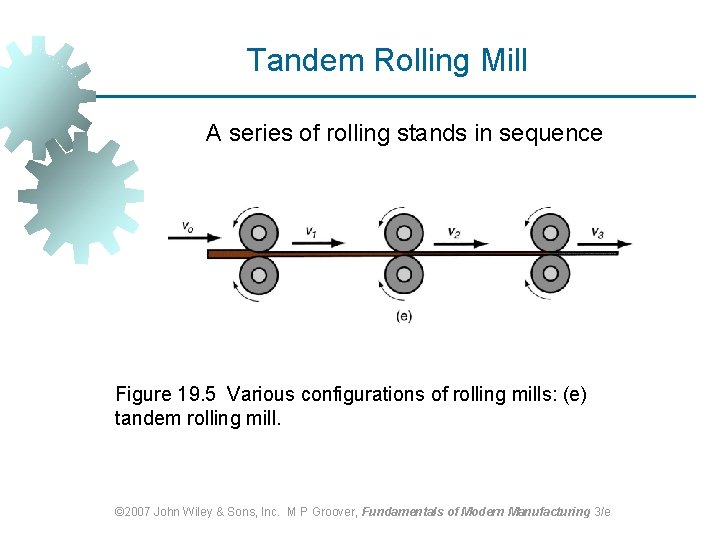
Rolling Mills § Equipment is massive and expensive § Rolling mill configurations: § Two-high – two opposing rolls § Three-high – work passes through rolls in both directions § Four-high – backing rolls support smaller work rolls § Cluster mill – multiple backing rolls on smaller rolls § Tandem rolling mill – sequence of two-high mills © 2007 John Wiley & Sons, Inc. M P Groover, Fundamentals of Modern Manufacturing 3/e

Two-High Rolling Mill Figure 19. 5 Various configurations of rolling mills: (a) 2‑high rolling mill. © 2007 John Wiley & Sons, Inc. M P Groover, Fundamentals of Modern Manufacturing 3/e

Three-High Rolling Mill Figure 19. 5 Various configurations of rolling mills: (b) 3‑high rolling mill. © 2007 John Wiley & Sons, Inc. M P Groover, Fundamentals of Modern Manufacturing 3/e

Four-High Rolling Mill Figure 19. 5 Various configurations of rolling mills: (c) four‑high rolling mill. © 2007 John Wiley & Sons, Inc. M P Groover, Fundamentals of Modern Manufacturing 3/e

Cluster Mill Multiple backing rolls allow even smaller roll diameters Figure 19. 5 Various configurations of rolling mills: (d) cluster mill © 2007 John Wiley & Sons, Inc. M P Groover, Fundamentals of Modern Manufacturing 3/e

Tandem Rolling Mill A series of rolling stands in sequence Figure 19. 5 Various configurations of rolling mills: (e) tandem rolling mill. © 2007 John Wiley & Sons, Inc. M P Groover, Fundamentals of Modern Manufacturing 3/e

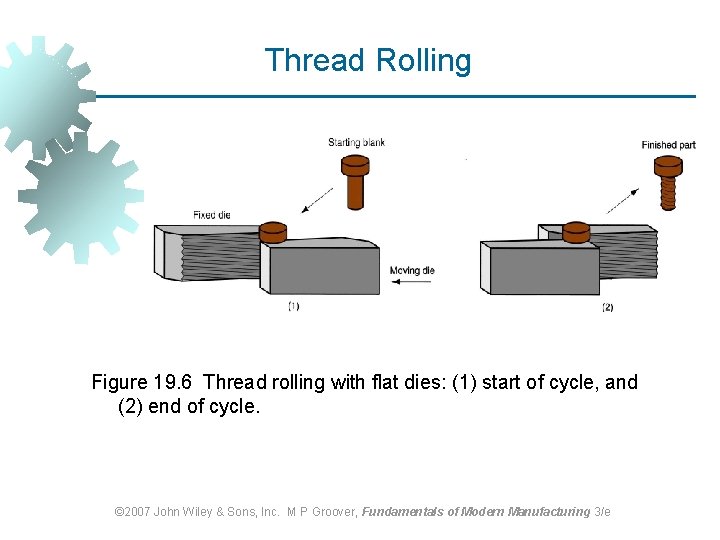
Thread Rolling (line/filament) Bulk deformation process used to form threads on cylindrical parts by rolling them between two dies § Important commercial process for mass producing bolts and screws § Performed by cold working in thread rolling machines § Advantages over thread cutting (machining): § Higher production rates § Better material utilization § Stronger threads and better fatigue resistance due to work hardening © 2007 John Wiley & Sons, Inc. M P Groover, Fundamentals of Modern Manufacturing 3/e

Thread Rolling Figure 19. 6 Thread rolling with flat dies: (1) start of cycle, and (2) end of cycle. © 2007 John Wiley & Sons, Inc. M P Groover, Fundamentals of Modern Manufacturing 3/e

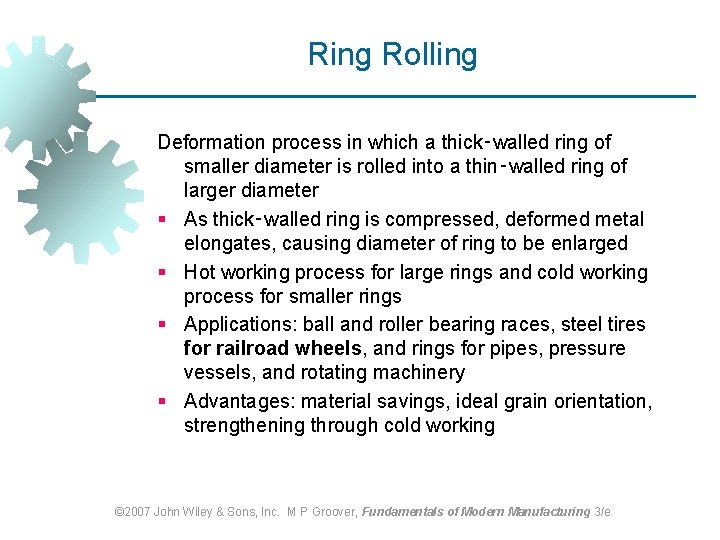
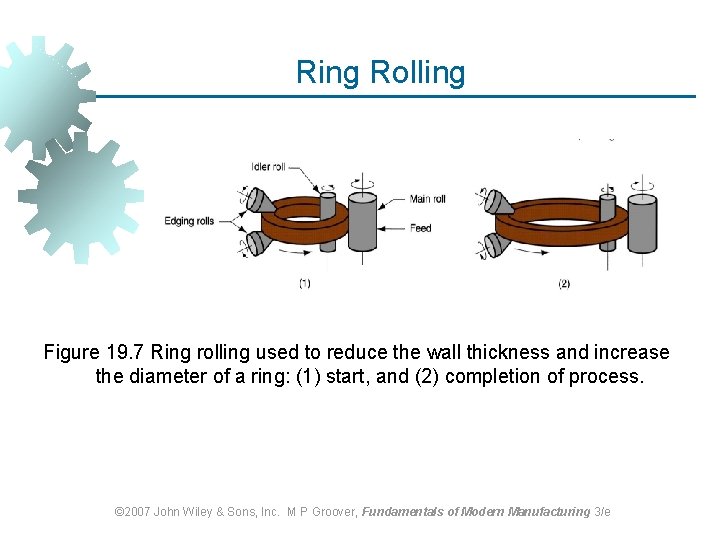
Ring Rolling Deformation process in which a thick‑walled ring of smaller diameter is rolled into a thin‑walled ring of larger diameter § As thick‑walled ring is compressed, deformed metal elongates, causing diameter of ring to be enlarged § Hot working process for large rings and cold working process for smaller rings § Applications: ball and roller bearing races, steel tires for railroad wheels, and rings for pipes, pressure vessels, and rotating machinery § Advantages: material savings, ideal grain orientation, strengthening through cold working © 2007 John Wiley & Sons, Inc. M P Groover, Fundamentals of Modern Manufacturing 3/e

Ring Rolling Figure 19. 7 Ring rolling used to reduce the wall thickness and increase the diameter of a ring: (1) start, and (2) completion of process. © 2007 John Wiley & Sons, Inc. M P Groover, Fundamentals of Modern Manufacturing 3/e

FORGING © 2007 John Wiley & Sons, Inc. M P Groover, Fundamentals of Modern Manufacturing 3/e

Forging Figure 18. 2 Basic bulk deformation processes: (b) forging © 2007 John Wiley & Sons, Inc. M P Groover, Fundamentals of Modern Manufacturing 3/e

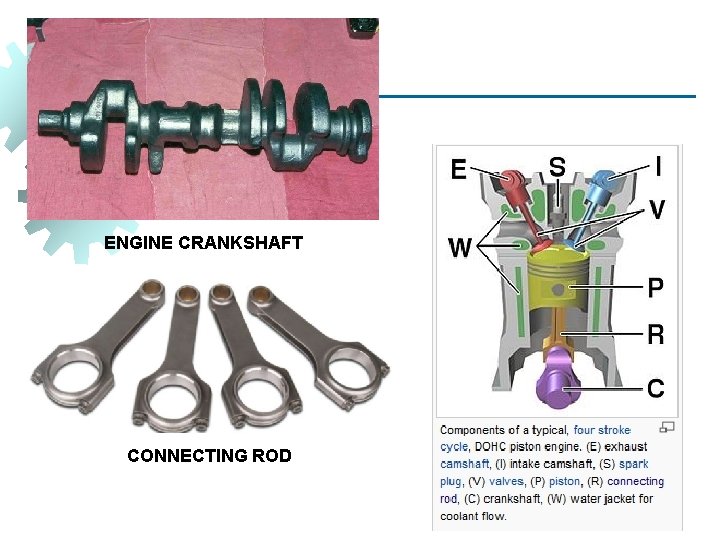
Forging Deformation process in which work is compressed between two dies § Oldest of the metal forming operations, dating from about 5000 B C § Components: engine crankshafts, connecting rods, gears, aircraft structural components, jet engine turbine parts § Also, basic metals industries use forging to establish basic form of large parts that are subsequently machined to final shape and size © 2007 John Wiley & Sons, Inc. M P Groover, Fundamentals of Modern Manufacturing 3/e

ENGINE CRANKSHAFT CONNECTING ROD

Classification of Forging Operations § Cold vs. hot forging: § Hot or warm forging – most common, due to the significant deformation and the need to reduce strength and increase ductility of work metal § Cold forging – advantage: increased strength that results from strain hardening § Impact vs. press forging: § Forge hammer - applies an impact load § Forge press - applies gradual pressure © 2007 John Wiley & Sons, Inc. M P Groover, Fundamentals of Modern Manufacturing 3/e

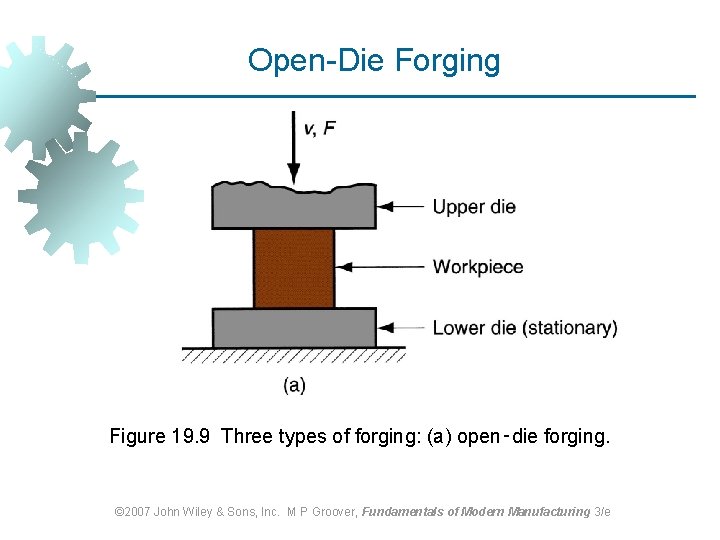
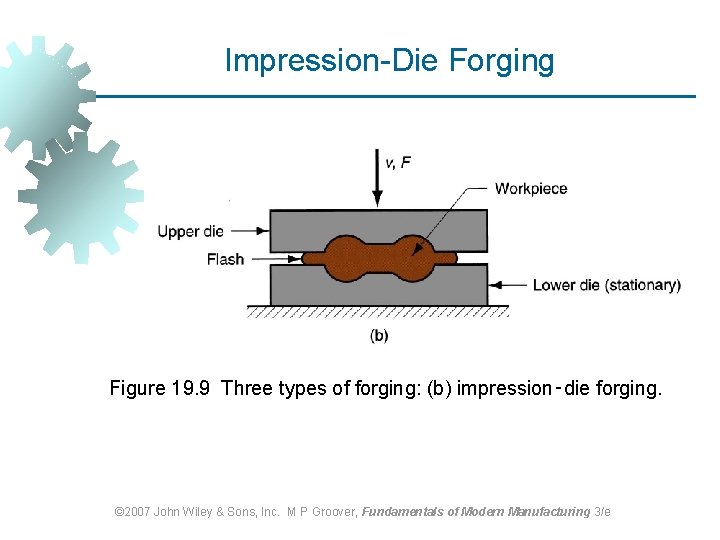
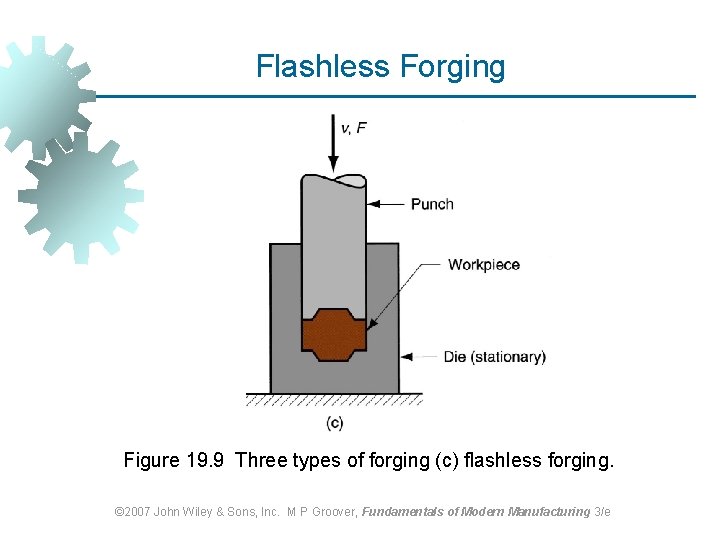
Types of Forging Dies § Open‑die forging - work is compressed between two flat dies, allowing metal to flow laterally with minimum constraint § Impression‑die forging - die contains cavity or impression that is imparted to workpart § Metal flow is constrained so that flash is created § Flashless forging - workpart is completely constrained in die § No excess flash is created © 2007 John Wiley & Sons, Inc. M P Groover, Fundamentals of Modern Manufacturing 3/e

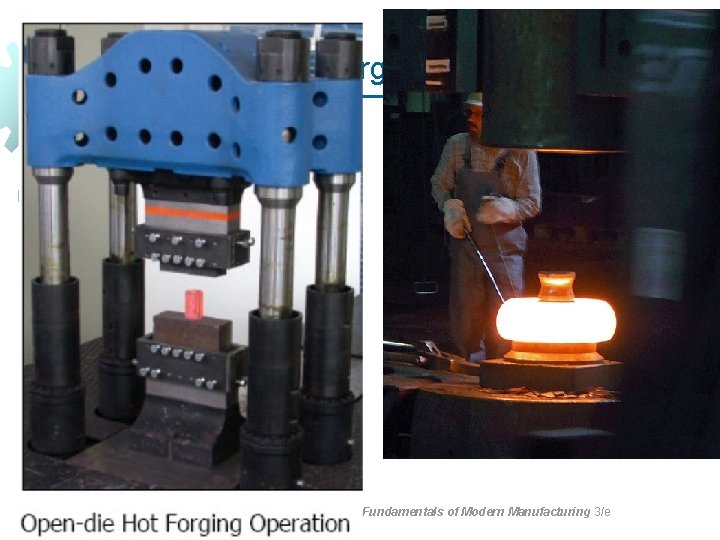
Open-Die Forging Figure 19. 9 Three types of forging: (a) open‑die forging. © 2007 John Wiley & Sons, Inc. M P Groover, Fundamentals of Modern Manufacturing 3/e

Impression-Die Forging Figure 19. 9 Three types of forging: (b) impression‑die forging. © 2007 John Wiley & Sons, Inc. M P Groover, Fundamentals of Modern Manufacturing 3/e

Flashless Forging Figure 19. 9 Three types of forging (c) flashless forging. © 2007 John Wiley & Sons, Inc. M P Groover, Fundamentals of Modern Manufacturing 3/e

Open‑Die Forging Compression of workpart between two flat dies § Similar to compression test when workpart has cylindrical cross section and is compressed along its axis § Deformation operation reduces height and increases diameter of work § Common names include upsetting or upset forging © 2007 John Wiley & Sons, Inc. M P Groover, Fundamentals of Modern Manufacturing 3/e

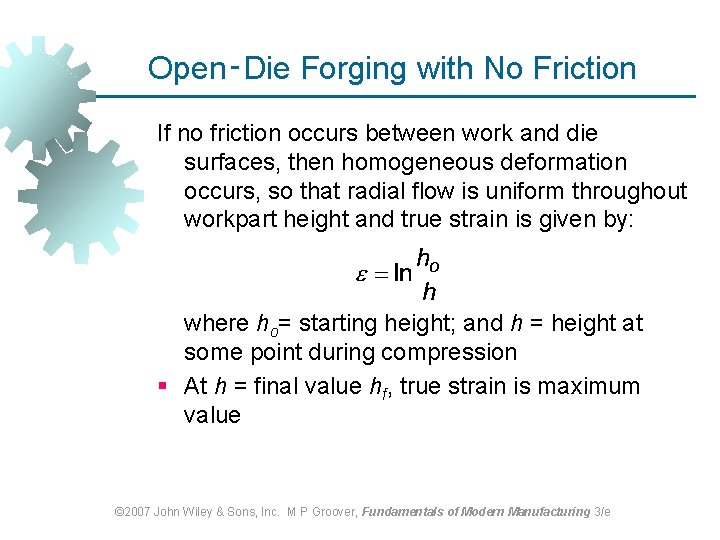
Open‑Die Forging with No Friction If no friction occurs between work and die surfaces, then homogeneous deformation occurs, so that radial flow is uniform throughout workpart height and true strain is given by: where ho= starting height; and h = height at some point during compression § At h = final value hf, true strain is maximum value © 2007 John Wiley & Sons, Inc. M P Groover, Fundamentals of Modern Manufacturing 3/e

Open-Die Forging with Friction © 2007 John Wiley & Sons, Inc. M P Groover, Fundamentals of Modern Manufacturing 3/e

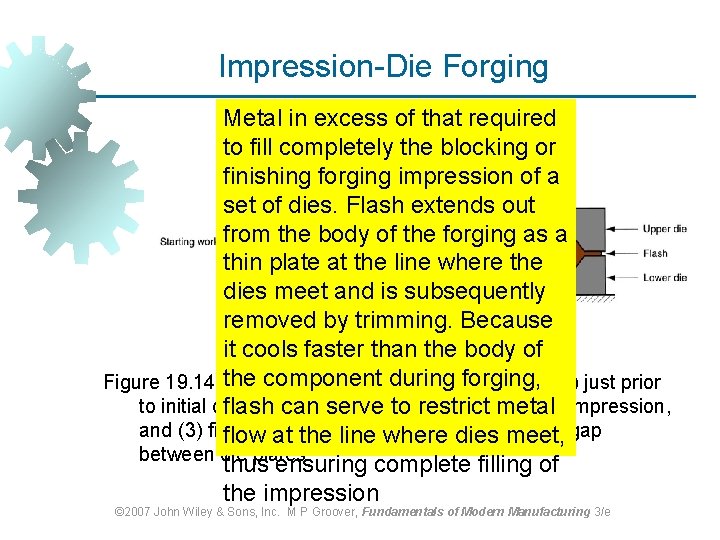
Impression‑Die Forging Compression of workpart by dies with inverse of desired part shape § Flash is formed by metal that flows beyond die cavity into small gap between die plates § Flash must be later trimmed, but it serves an important function during compression: § As flash forms, friction resists continued metal flow into gap, constraining material to fill die cavity § In hot forging, metal flow is further restricted by cooling against die plates © 2007 John Wiley & Sons, Inc. M P Groover, Fundamentals of Modern Manufacturing 3/e

Impression-Die Forging Metal in excess of that required to fill completely the blocking or finishing forging impression of a set of dies. Flash extends out from the body of the forging as a thin plate at the line where the dies meet and is subsequently removed by trimming. Because it cools faster than the body of component during forging, Figure 19. 14 the Sequence in impression‑die forging: (1) just prior to initial contact with raw workpiece, (2) partial flash can serve to restrict metalcompression, and (3) final dieatclosure, causing flash to form in gap flow the line where dies meet, between die plates. thus ensuring complete filling of the impression © 2007 John Wiley & Sons, Inc. M P Groover, Fundamentals of Modern Manufacturing 3/e

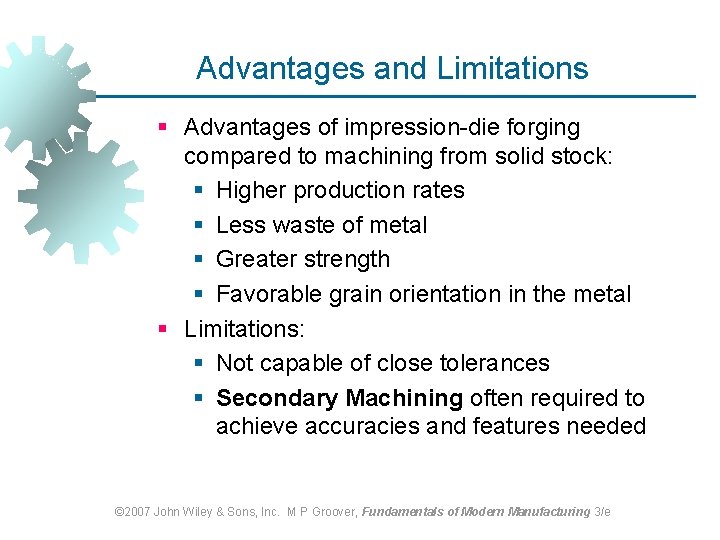
Advantages and Limitations § Advantages of impression-die forging compared to machining from solid stock: § Higher production rates § Less waste of metal § Greater strength § Favorable grain orientation in the metal § Limitations: § Not capable of close tolerances § Secondary Machining often required to achieve accuracies and features needed © 2007 John Wiley & Sons, Inc. M P Groover, Fundamentals of Modern Manufacturing 3/e

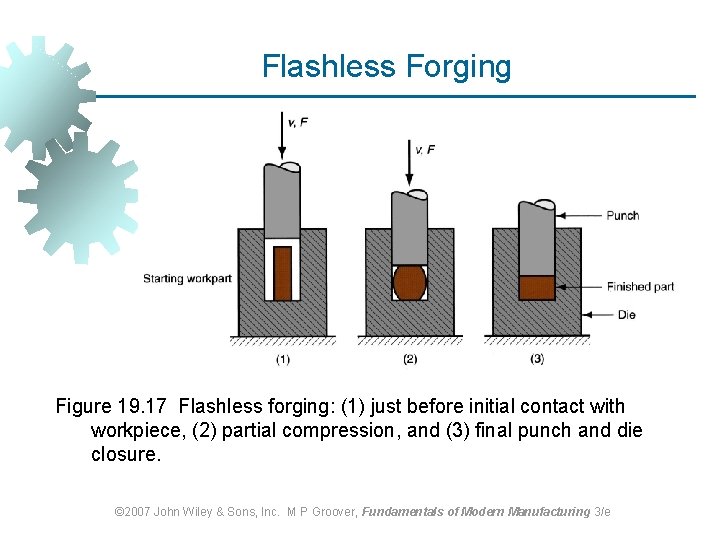
Flashless Forging Compression of work in punch and die tooling whose cavity does not allow for flash § Starting workpart volume must equal die cavity volume within very close tolerance § Process control more demanding than impression‑die forging § Best suited to part geometries that are simple and symmetrical § Often classified as a precision forging process © 2007 John Wiley & Sons, Inc. M P Groover, Fundamentals of Modern Manufacturing 3/e

Flashless Forging Figure 19. 17 Flashless forging: (1) just before initial contact with workpiece, (2) partial compression, and (3) final punch and die closure. © 2007 John Wiley & Sons, Inc. M P Groover, Fundamentals of Modern Manufacturing 3/e

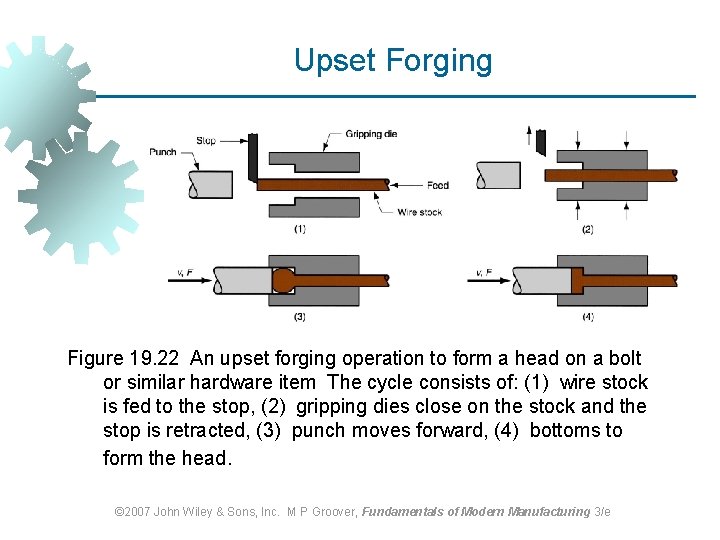
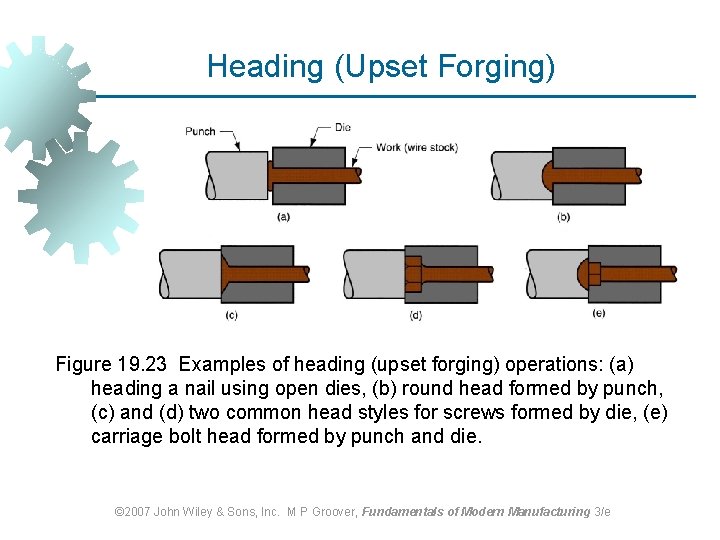
Upsetting and Heading Forging process used to form heads on nails, bolts, and similar hardware products § Performed cold, warm, or hot on machines called headers or formers § Wire or bar stock is fed into machine, end is headed, then piece is cut to length § For bolts and screws, thread rolling is then used to form threads © 2007 John Wiley & Sons, Inc. M P Groover, Fundamentals of Modern Manufacturing 3/e

Upset Forging Figure 19. 22 An upset forging operation to form a head on a bolt or similar hardware item The cycle consists of: (1) wire stock is fed to the stop, (2) gripping dies close on the stock and the stop is retracted, (3) punch moves forward, (4) bottoms to form the head. © 2007 John Wiley & Sons, Inc. M P Groover, Fundamentals of Modern Manufacturing 3/e

Heading (Upset Forging) Figure 19. 23 Examples of heading (upset forging) operations: (a) heading a nail using open dies, (b) round head formed by punch, (c) and (d) two common head styles for screws formed by die, (e) carriage bolt head formed by punch and die. © 2007 John Wiley & Sons, Inc. M P Groover, Fundamentals of Modern Manufacturing 3/e

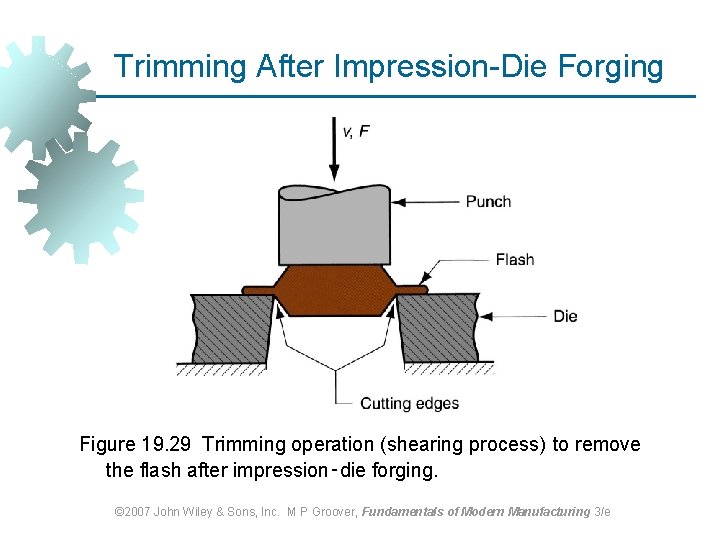
Trimming Cutting operation to remove flash from workpart in impression‑die forging § Usually done while work is still hot, so a separate trimming press is included at the forging station § Trimming can also be done by alternative methods, such as grinding or sawing © 2007 John Wiley & Sons, Inc. M P Groover, Fundamentals of Modern Manufacturing 3/e

Trimming After Impression-Die Forging Figure 19. 29 Trimming operation (shearing process) to remove the flash after impression‑die forging. © 2007 John Wiley & Sons, Inc. M P Groover, Fundamentals of Modern Manufacturing 3/e

EXTRUSION © 2007 John Wiley & Sons, Inc. M P Groover, Fundamentals of Modern Manufacturing 3/e

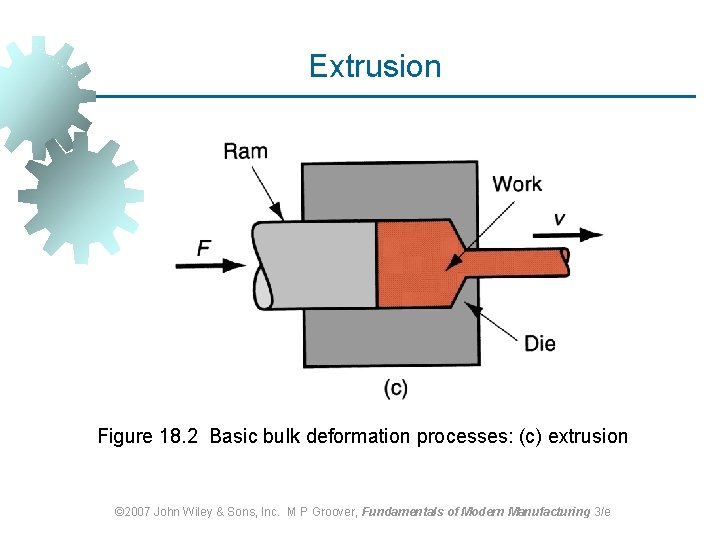
Extrusion Compression forming process in which work metal is forced to flow through a die opening to produce a desired cross‑sectional shape § Process is similar to squeezing toothpaste out of a toothpaste tube § In general, extrusion is used to produce long parts of uniform cross sections § Two basic types: § Direct extrusion § Indirect extrusion © 2007 John Wiley & Sons, Inc. M P Groover, Fundamentals of Modern Manufacturing 3/e

Extrusion Figure 18. 2 Basic bulk deformation processes: (c) extrusion © 2007 John Wiley & Sons, Inc. M P Groover, Fundamentals of Modern Manufacturing 3/e

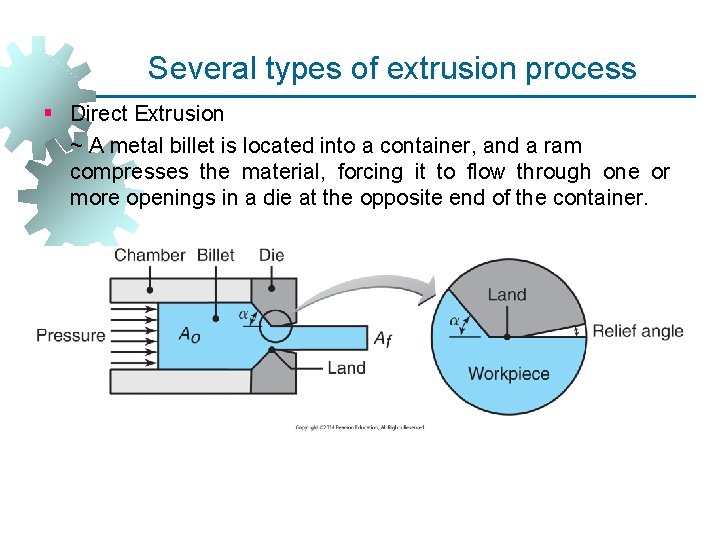
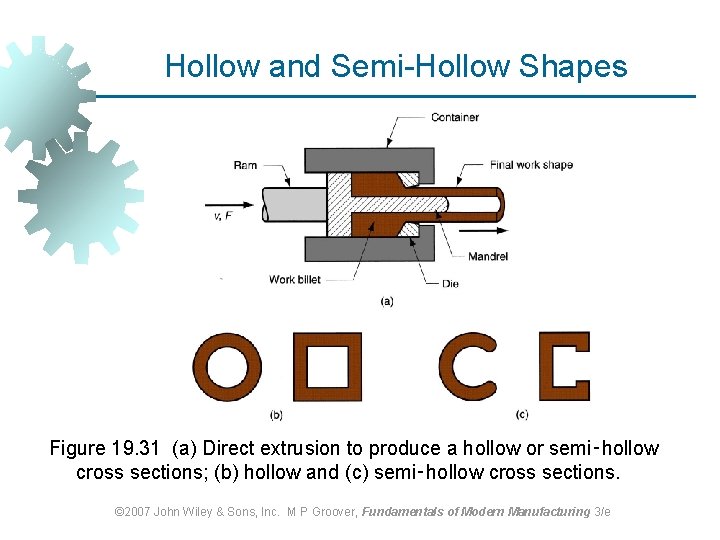
Several types of extrusion process § Direct Extrusion ~ A metal billet is located into a container, and a ram compresses the material, forcing it to flow through one or more openings in a die at the opposite end of the container.

Hollow and Semi-Hollow Shapes Figure 19. 31 (a) Direct extrusion to produce a hollow or semi‑hollow cross sections; (b) hollow and (c) semi‑hollow cross sections. © 2007 John Wiley & Sons, Inc. M P Groover, Fundamentals of Modern Manufacturing 3/e

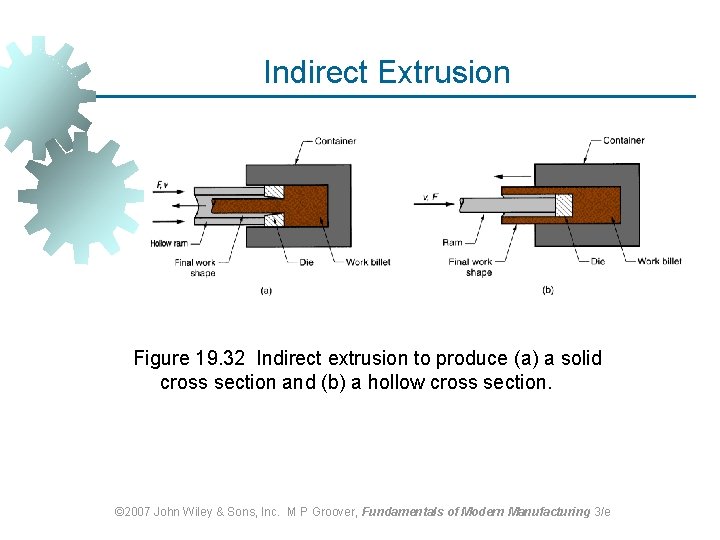
Indirect Extrusion Figure 19. 32 Indirect extrusion to produce (a) a solid cross section and (b) a hollow cross section. © 2007 John Wiley & Sons, Inc. M P Groover, Fundamentals of Modern Manufacturing 3/e

Comments on Indirect Extrusion § Also called backward extrusion and reverse extrusion § One advantage of the indirect extrusion process is that there is no friction, during the process, between the billet and the container liner. § Limitations of indirect extrusion are imposed by § Lower rigidity of hollow ram § Difficulty in supporting extruded product as it exits die © 2007 John Wiley & Sons, Inc. M P Groover, Fundamentals of Modern Manufacturing 3/e

Advantages of Extrusion § Variety of shapes possible, especially in hot extrusion § Limitation: part cross section must be uniform throughout length § Grain structure and strength enhanced in cold and warm extrusion § Close tolerances possible, especially in cold extrusion § In some operations, little or no waste of material © 2007 John Wiley & Sons, Inc. M P Groover, Fundamentals of Modern Manufacturing 3/e

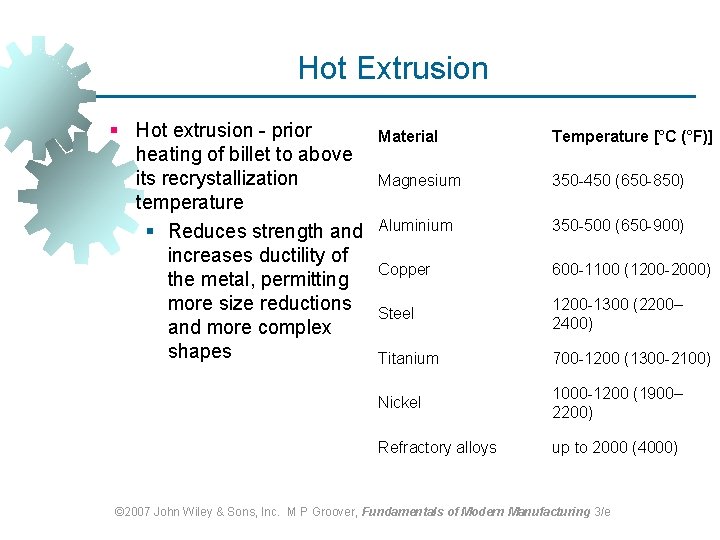
Hot Extrusion § Hot extrusion - prior heating of billet to above its recrystallization temperature § Reduces strength and increases ductility of the metal, permitting more size reductions and more complex shapes Material Temperature [°C (°F)] Magnesium 350 -450 (650 -850) Aluminium 350 -500 (650 -900) Copper 600 -1100 (1200 -2000) Steel 1200 -1300 (2200– 2400) Titanium 700 -1200 (1300 -2100) Nickel 1000 -1200 (1900– 2200) Refractory alloys up to 2000 (4000) © 2007 John Wiley & Sons, Inc. M P Groover, Fundamentals of Modern Manufacturing 3/e

Warm and Cold Extrusion § Warm extrusion is done above room temperature, but below the recrystallization temperature of the material the temperatures § Cold extrusion is done at room temperature or near room temperature. © 2007 John Wiley & Sons, Inc. M P Groover, Fundamentals of Modern Manufacturing 3/e

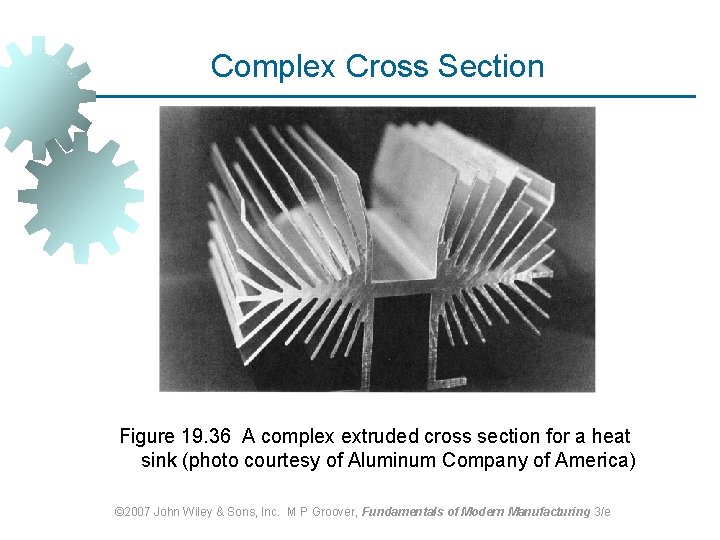
Complex Cross Section Figure 19. 36 A complex extruded cross section for a heat sink (photo courtesy of Aluminum Company of America) © 2007 John Wiley & Sons, Inc. M P Groover, Fundamentals of Modern Manufacturing 3/e

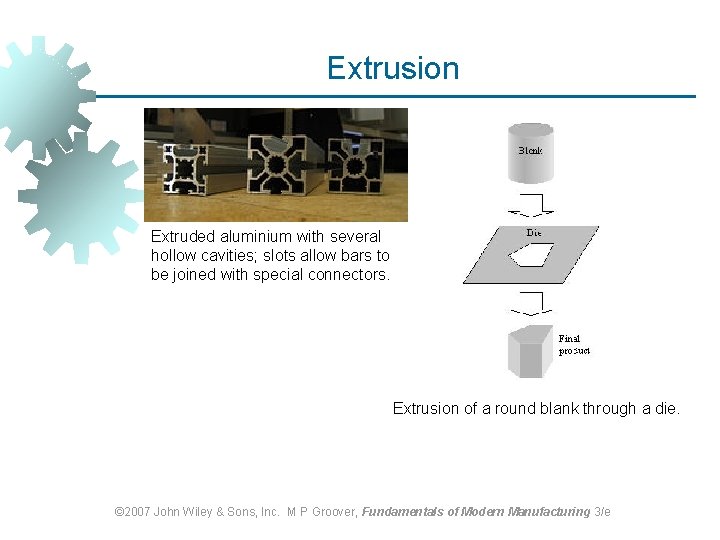
Extrusion Extruded aluminium with several hollow cavities; slots allow bars to be joined with special connectors. Extrusion of a round blank through a die. © 2007 John Wiley & Sons, Inc. M P Groover, Fundamentals of Modern Manufacturing 3/e

WIRE AND BAR DRAWING © 2007 John Wiley & Sons, Inc. M P Groover, Fundamentals of Modern Manufacturing 3/e

Wire and Bar Drawing Figure 18. 2 Basic bulk deformation processes: (d) drawing © 2007 John Wiley & Sons, Inc. M P Groover, Fundamentals of Modern Manufacturing 3/e

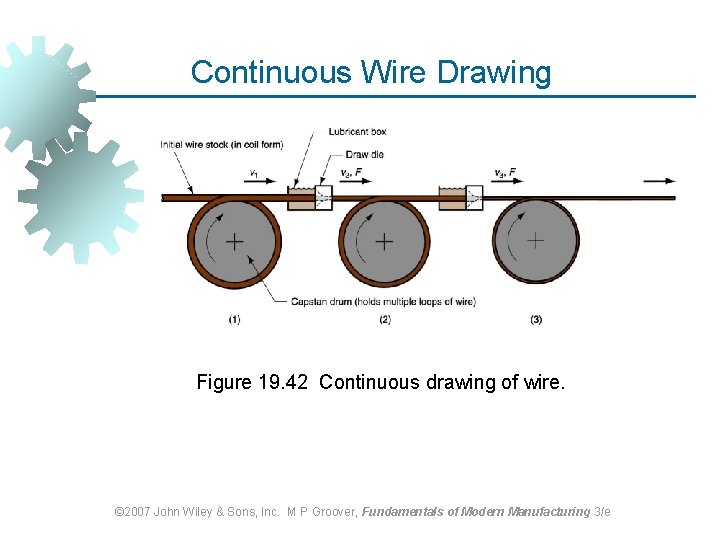
Wire Drawing § Continuous drawing machines consisting of multiple draw dies (typically 4 to 12) separated by accumulating drums § Each drum (capstan) provides proper force to draw wire stock through upstream die § Each die provides a small reduction, so desired total reduction is achieved by the series § Annealing sometimes required between dies to relieve work hardening © 2007 John Wiley & Sons, Inc. M P Groover, Fundamentals of Modern Manufacturing 3/e

Continuous Wire Drawing Figure 19. 42 Continuous drawing of wire. © 2007 John Wiley & Sons, Inc. M P Groover, Fundamentals of Modern Manufacturing 3/e

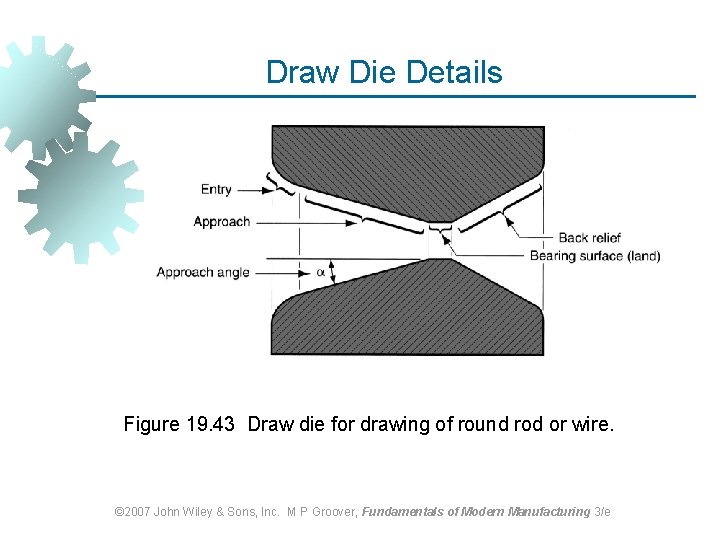
Draw Die Details Figure 19. 43 Draw die for drawing of round rod or wire. © 2007 John Wiley & Sons, Inc. M P Groover, Fundamentals of Modern Manufacturing 3/e

5. 1 CUTTING OPERATIONS 5. 2 BENDING OPERATIONS 82

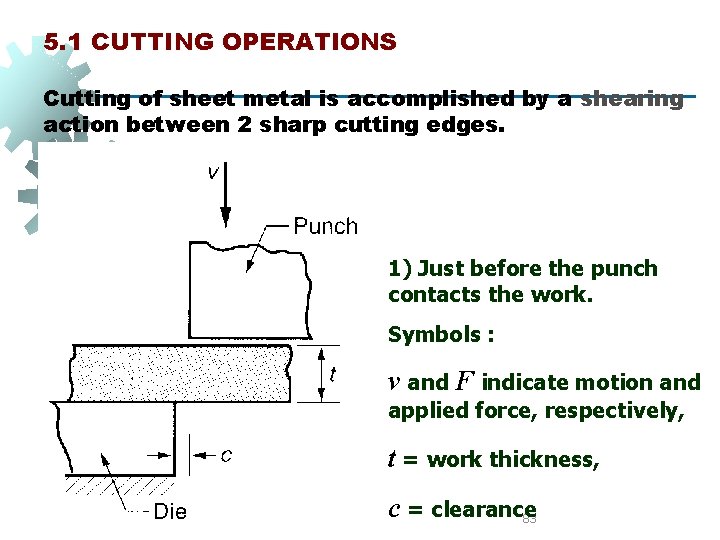
5. 1 CUTTING OPERATIONS Cutting of sheet metal is accomplished by a shearing action between 2 sharp cutting edges. 1) Just before the punch contacts the work. Symbols : v and F indicate motion and applied force, respectively, t = work thickness, c = clearance 83

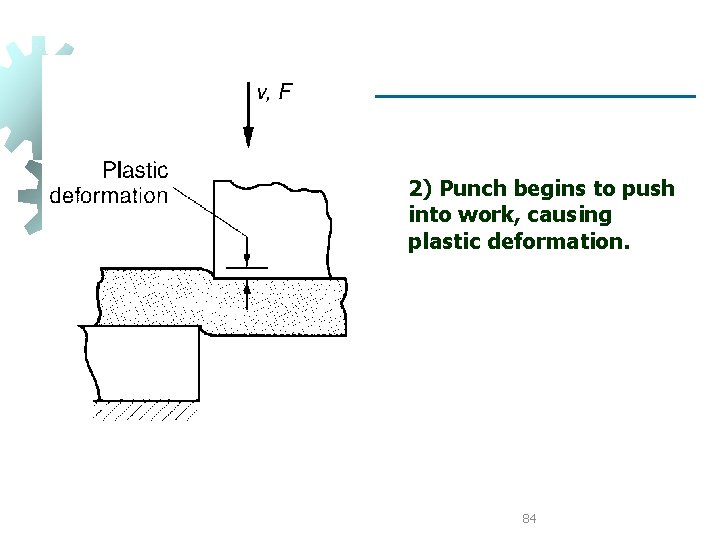
2) Punch begins to push into work, causing plastic deformation. 84

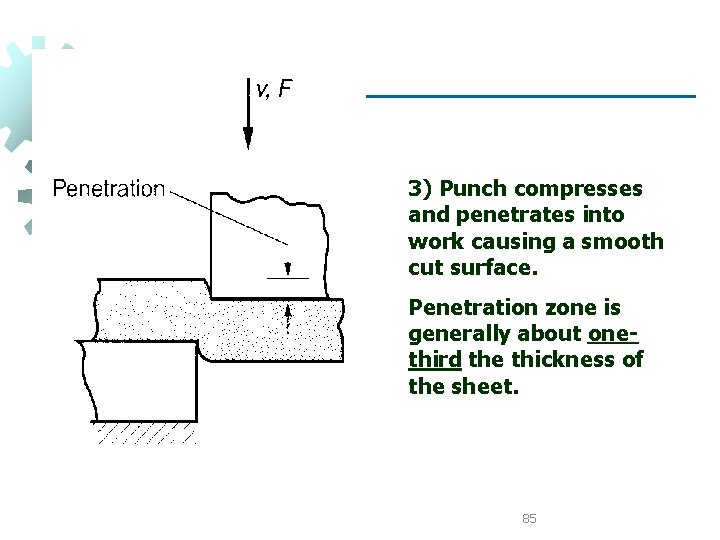
3) Punch compresses and penetrates into work causing a smooth cut surface. Penetration zone is generally about onethird the thickness of the sheet. 85

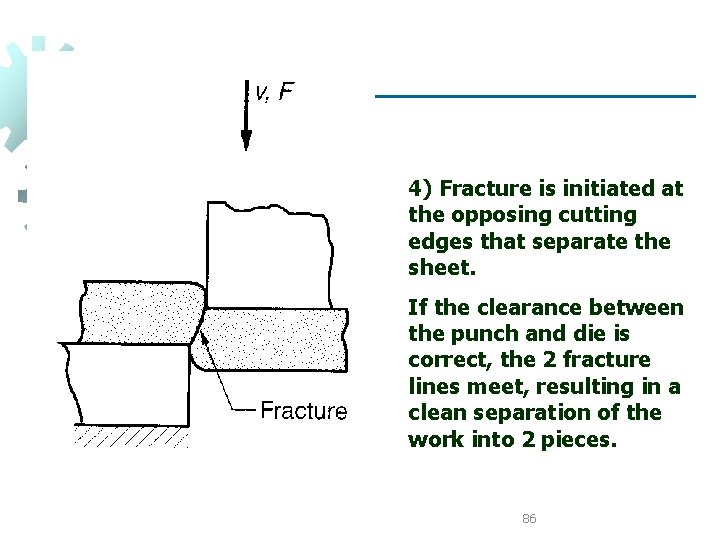
4) Fracture is initiated at the opposing cutting edges that separate the sheet. If the clearance between the punch and die is correct, the 2 fracture lines meet, resulting in a clean separation of the work into 2 pieces. 86

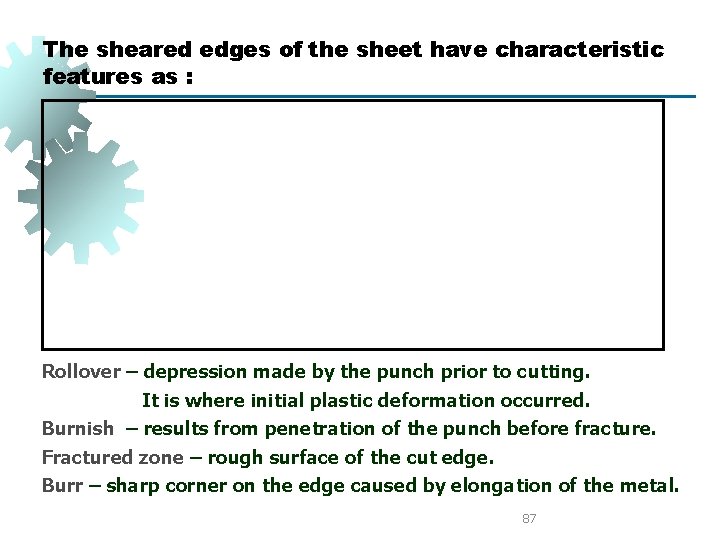
The sheared edges of the sheet have characteristic features as : Rollover – depression made by the punch prior to cutting. It is where initial plastic deformation occurred. Burnish – results from penetration of the punch before fracture. Fractured zone – rough surface of the cut edge. Burr – sharp corner on the edge caused by elongation of the metal. 87

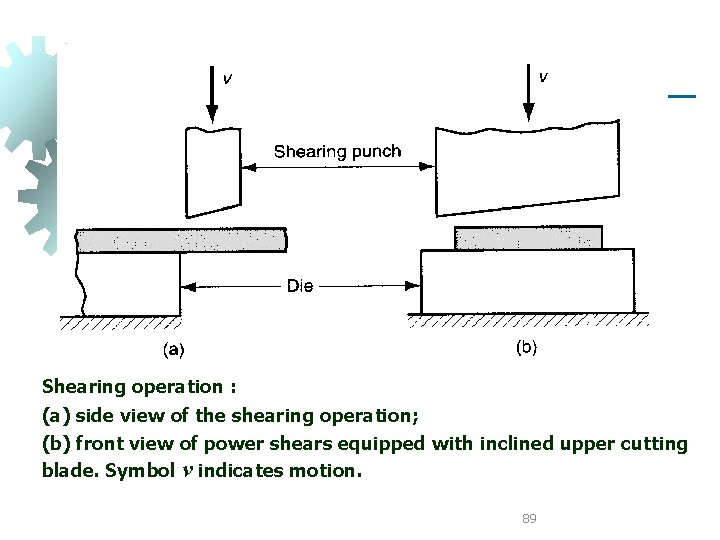
5. 1. 1 Shearing, Blanking, and Punching 3 principal operations in pressworking that cut metal by the shearing mechanism just described : shearing blanking punching Shearing is a sheet-metal cutting operation along a straight line between 2 cutting edges – typically used to cut large sheets into smaller sections for subsequent pressworking operations. A machine used to perform this operation is called a power shears, or squaring shears. The upper blade of the power shears is often inclined in order to reduce the required cutting force. 88

Shearing operation : (a) side view of the shearing operation; (b) front view of power shears equipped with inclined upper cutting blade. Symbol v indicates motion. 89

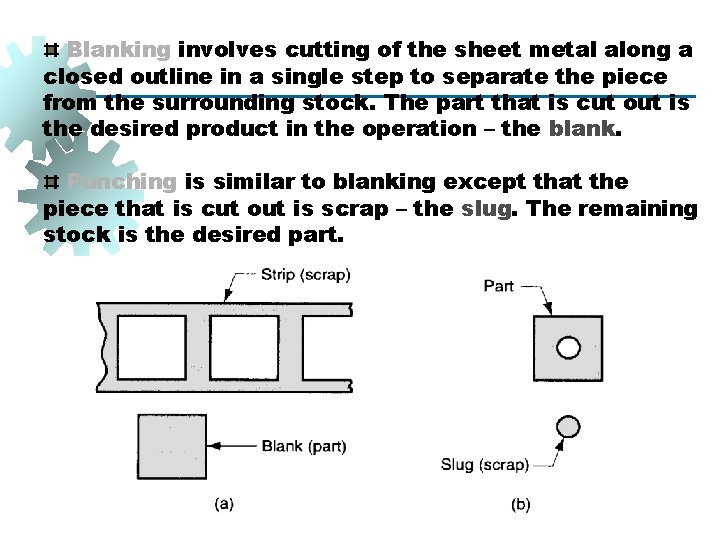
Blanking involves cutting of the sheet metal along a closed outline in a single step to separate the piece from the surrounding stock. The part that is cut out is the desired product in the operation – the blank. Punching is similar to blanking except that the piece that is cut out is scrap – the slug. The remaining stock is the desired part. 90

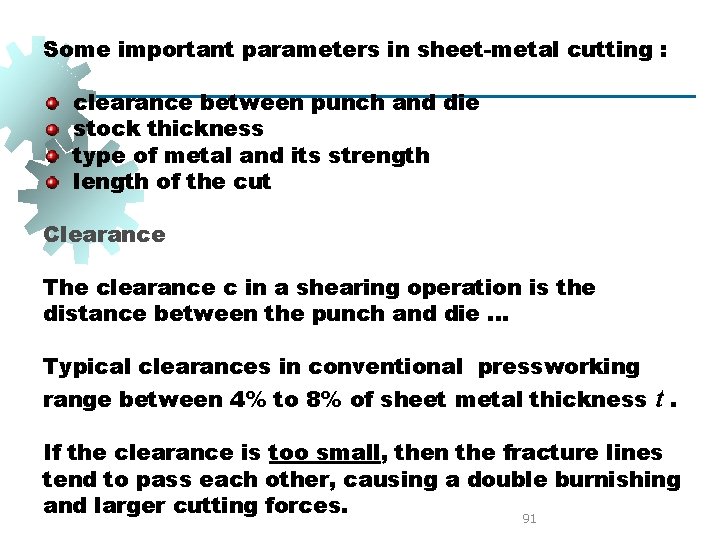
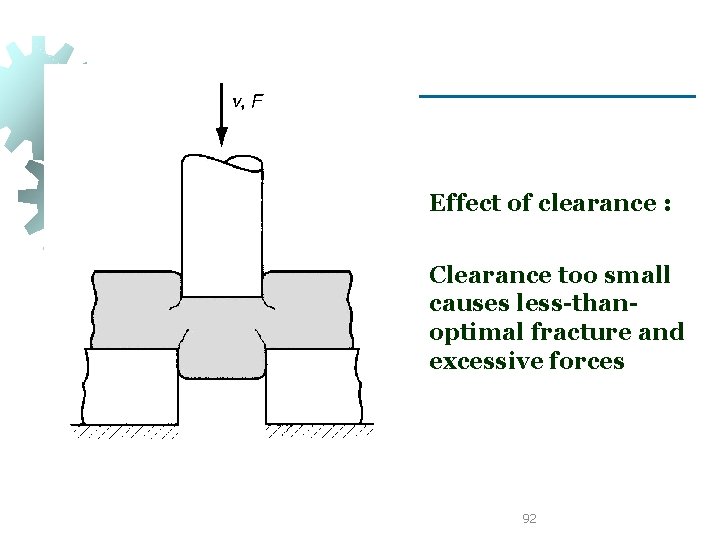
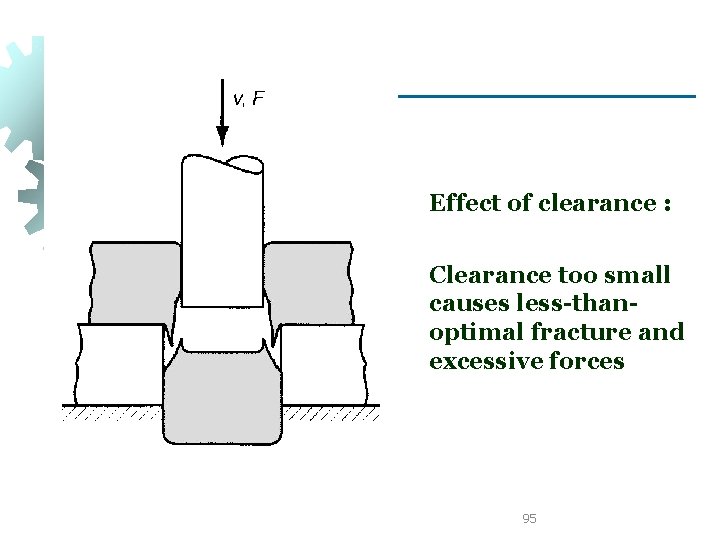
Some important parameters in sheet-metal cutting : clearance between punch and die stock thickness type of metal and its strength length of the cut Clearance The clearance c in a shearing operation is the distance between the punch and die. . . Typical clearances in conventional pressworking range between 4% to 8% of sheet metal thickness t. If the clearance is too small, then the fracture lines tend to pass each other, causing a double burnishing and larger cutting forces. 91

Effect of clearance : Clearance too small causes less-thanoptimal fracture and excessive forces 92

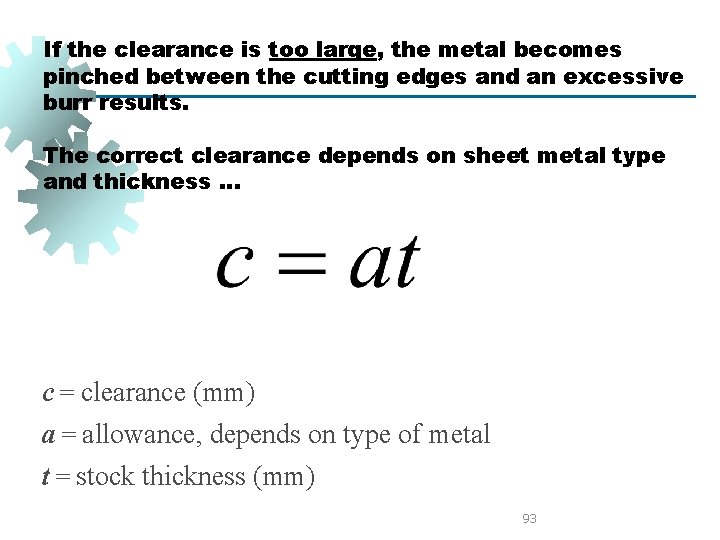
If the clearance is too large, the metal becomes pinched between the cutting edges and an excessive burr results. The correct clearance depends on sheet metal type and thickness. . . c = clearance (mm) a = allowance, depends on type of metal t = stock thickness (mm) 93

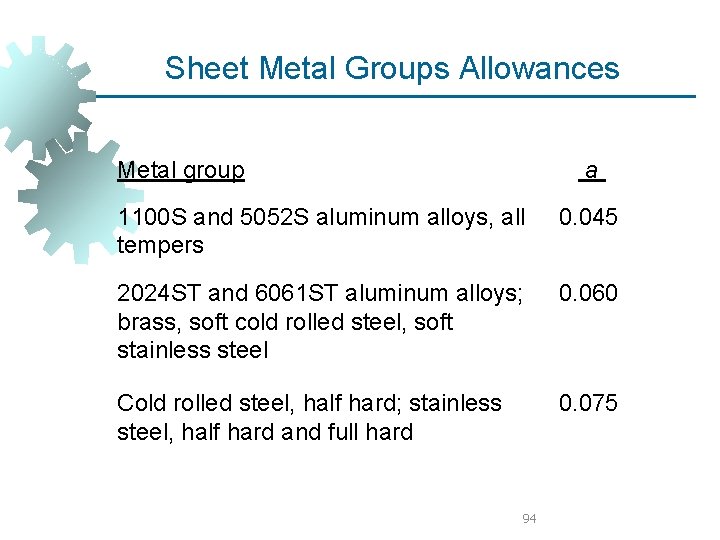
Sheet Metal Groups Allowances Metal group a 1100 S and 5052 S aluminum alloys, all tempers 0. 045 2024 ST and 6061 ST aluminum alloys; brass, soft cold rolled steel, soft stainless steel 0. 060 Cold rolled steel, half hard; stainless steel, half hard and full hard 0. 075 94

Effect of clearance : Clearance too small causes less-thanoptimal fracture and excessive forces 95

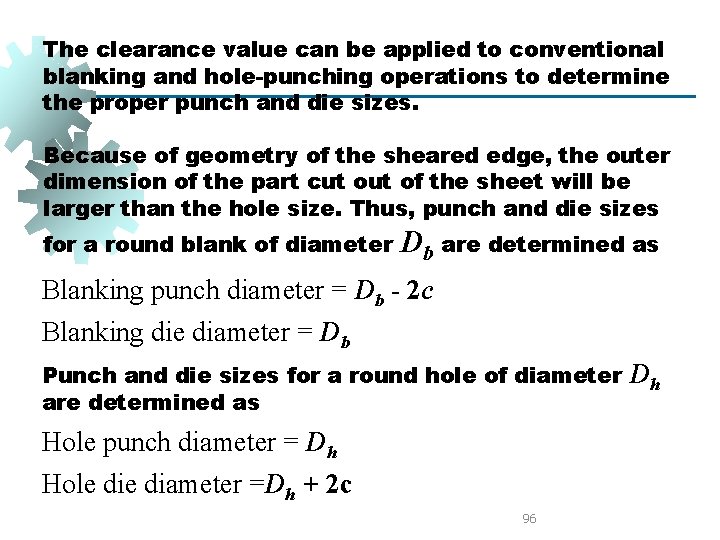
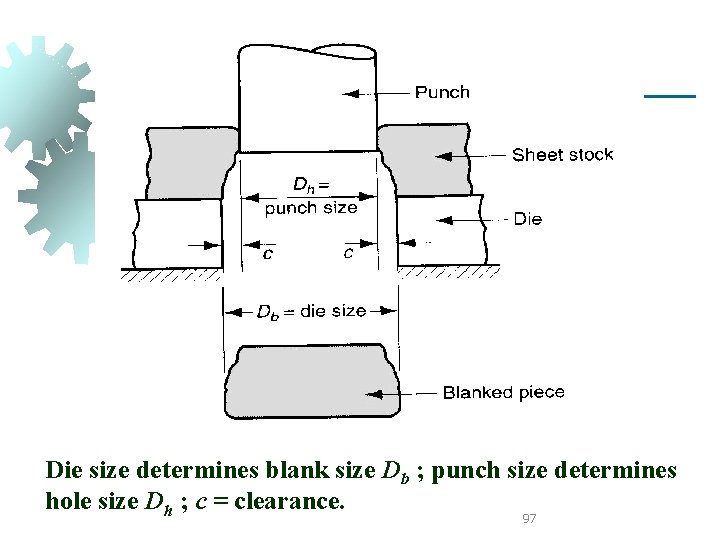
The clearance value can be applied to conventional blanking and hole-punching operations to determine the proper punch and die sizes. Because of geometry of the sheared edge, the outer dimension of the part cut of the sheet will be larger than the hole size. Thus, punch and die sizes for a round blank of diameter Db are determined as Blanking punch diameter = Db - 2 c Blanking die diameter = Db Punch and die sizes for a round hole of diameter are determined as Hole punch diameter = Dh Hole diameter =Dh + 2 c 96 Dh

Die size determines blank size Db ; punch size determines hole size Dh ; c = clearance. 97

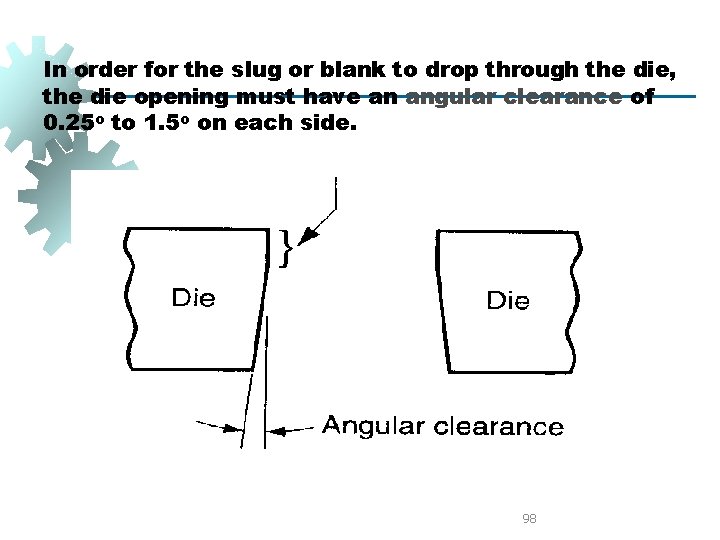
In order for the slug or blank to drop through the die, the die opening must have an angular clearance of 0. 25 o to 1. 5 o on each side. 98

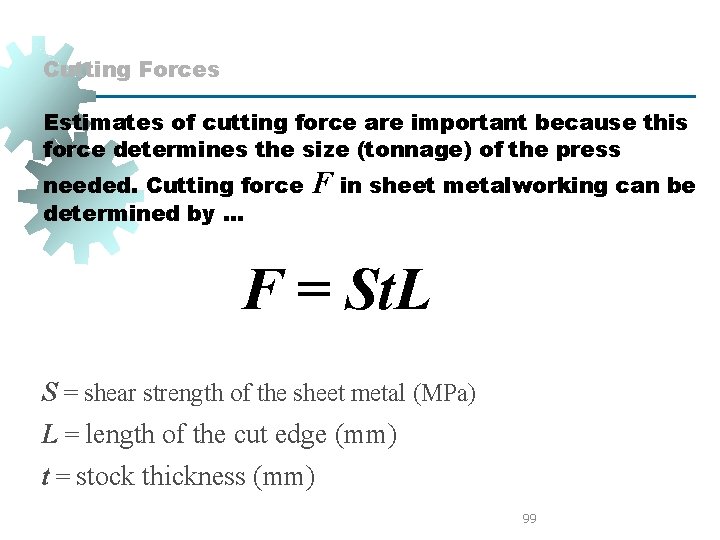
Cutting Forces Estimates of cutting force are important because this force determines the size (tonnage) of the press needed. Cutting force determined by. . . F in sheet metalworking can be F = St. L S = shear strength of the sheet metal (MPa) L = length of the cut edge (mm) t = stock thickness (mm) 99

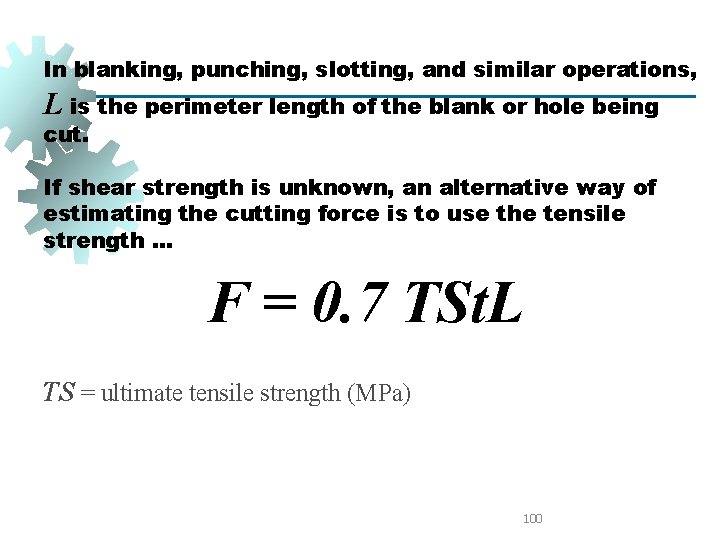
In blanking, punching, slotting, and similar operations, L is the perimeter length of the blank or hole being cut. If shear strength is unknown, an alternative way of estimating the cutting force is to use the tensile strength. . . F = 0. 7 TSt. L TS = ultimate tensile strength (MPa) 100

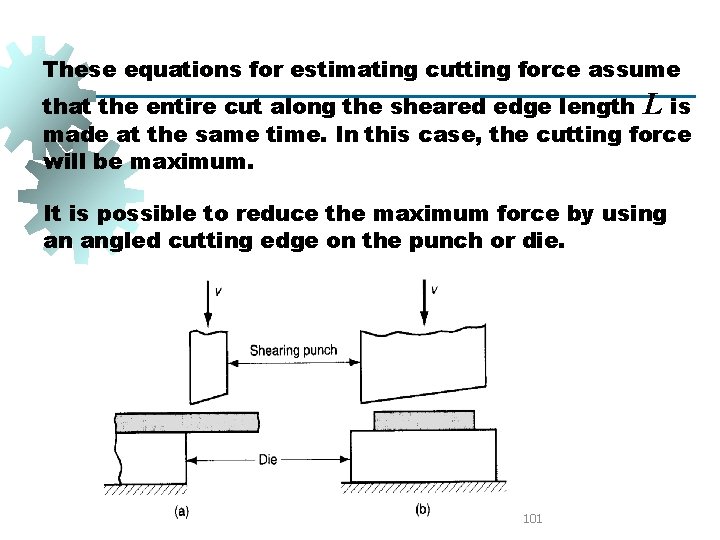
These equations for estimating cutting force assume that the entire cut along the sheared edge length L is made at the same time. In this case, the cutting force will be maximum. It is possible to reduce the maximum force by using an angled cutting edge on the punch or die. 101

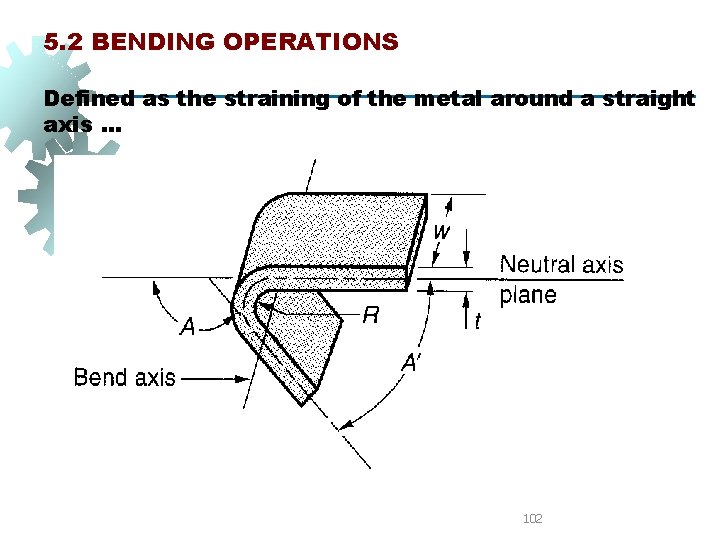
5. 2 BENDING OPERATIONS Defined as the straining of the metal around a straight axis. . . 102

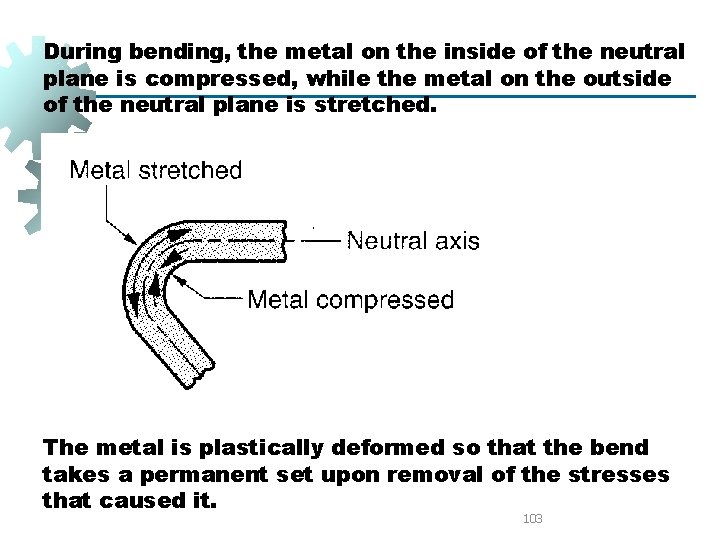
During bending, the metal on the inside of the neutral plane is compressed, while the metal on the outside of the neutral plane is stretched. The metal is plastically deformed so that the bend takes a permanent set upon removal of the stresses that caused it. 103

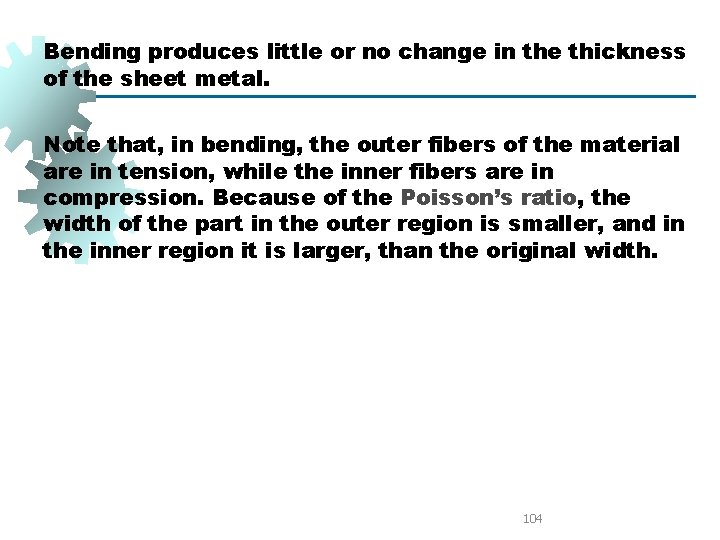
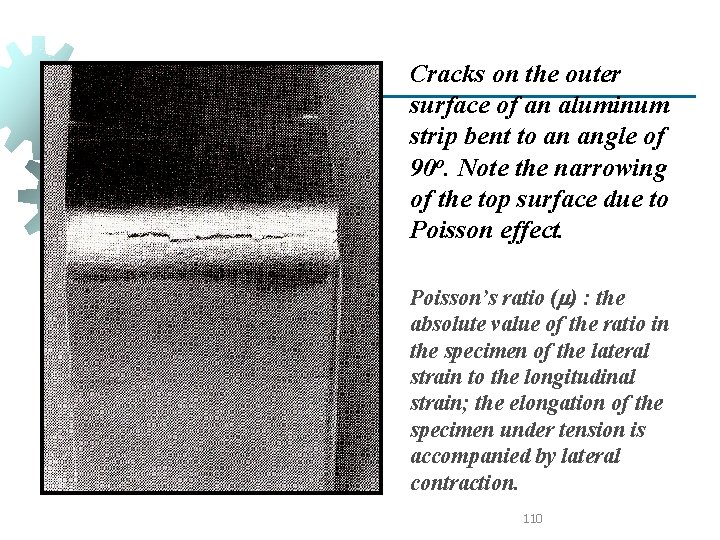
Bending produces little or no change in the thickness of the sheet metal. Note that, in bending, the outer fibers of the material are in tension, while the inner fibers are in compression. Because of the Poisson’s ratio, the width of the part in the outer region is smaller, and in the inner region it is larger, than the original width. 104

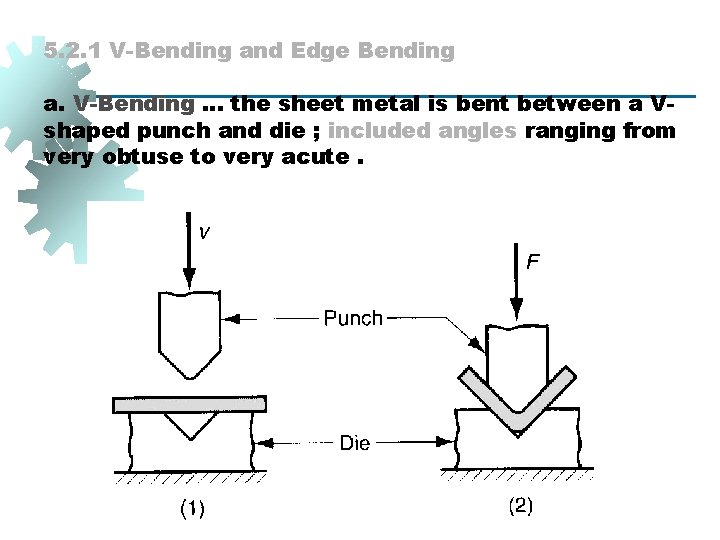
5. 2. 1 V-Bending and Edge Bending a. V-Bending. . . the sheet metal is bent between a Vshaped punch and die ; included angles ranging from very obtuse to very acute. 105

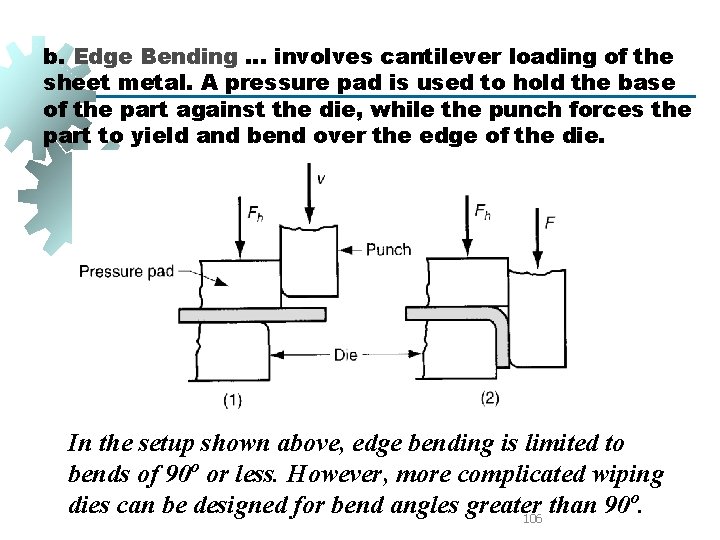
b. Edge Bending. . . involves cantilever loading of the sheet metal. A pressure pad is used to hold the base of the part against the die, while the punch forces the part to yield and bend over the edge of the die. In the setup shown above, edge bending is limited to bends of 90 o or less. However, more complicated wiping o dies can be designed for bend angles greater than 90. 106

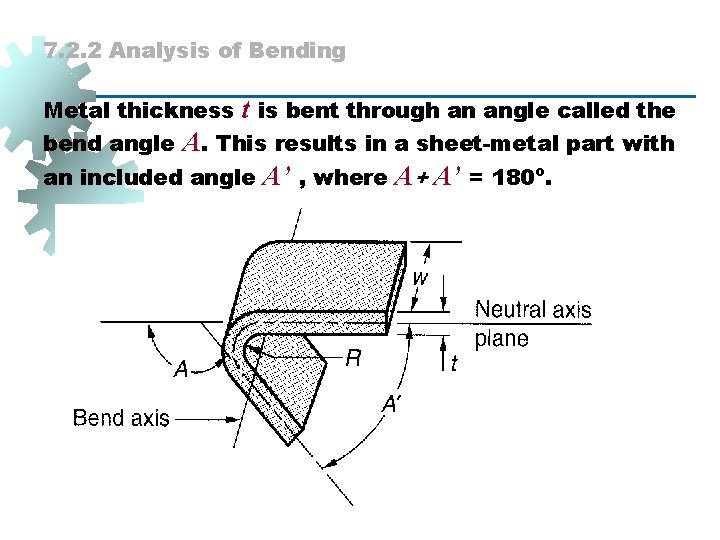
7. 2. 2 Analysis of Bending Metal thickness t is bent through an angle called the A. This results in a sheet-metal part with an included angle A’ , where A+ A’ = 180 o. bend angle 107

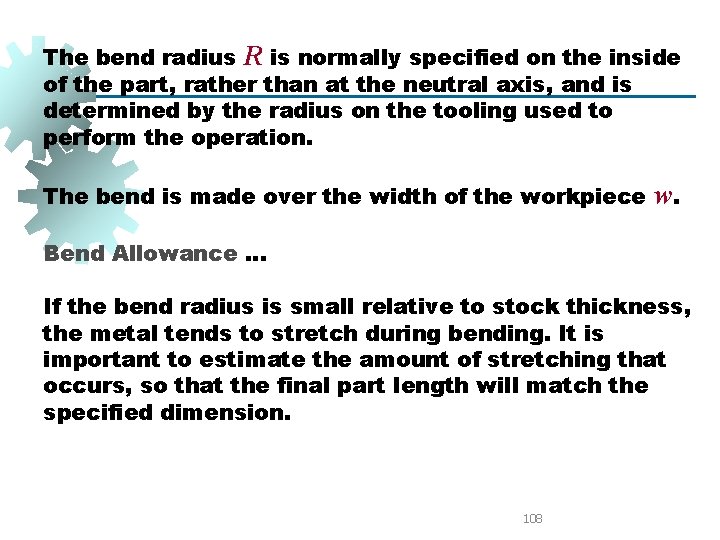
The bend radius R is normally specified on the inside of the part, rather than at the neutral axis, and is determined by the radius on the tooling used to perform the operation. The bend is made over the width of the workpiece w. Bend Allowance. . . If the bend radius is small relative to stock thickness, the metal tends to stretch during bending. It is important to estimate the amount of stretching that occurs, so that the final part length will match the specified dimension. 108

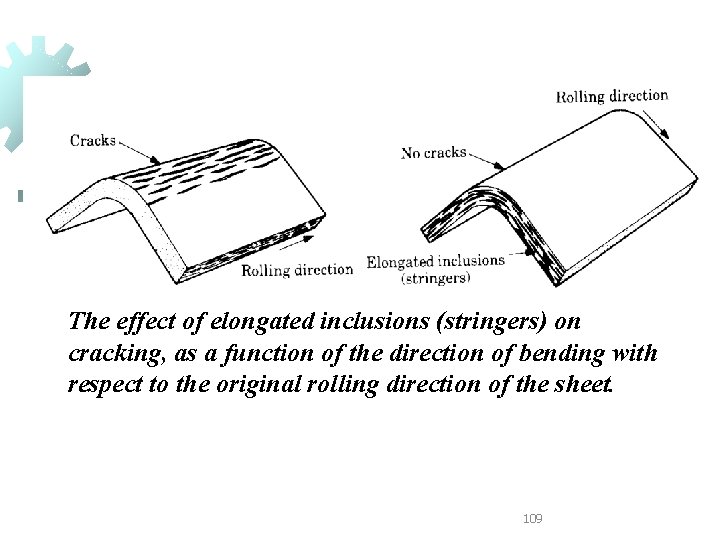
The effect of elongated inclusions (stringers) on cracking, as a function of the direction of bending with respect to the original rolling direction of the sheet. 109

Cracks on the outer surface of an aluminum strip bent to an angle of 90 o. Note the narrowing of the top surface due to Poisson effect. Poisson’s ratio (m) : the absolute value of the ratio in the specimen of the lateral strain to the longitudinal strain; the elongation of the specimen under tension is accompanied by lateral contraction. 110

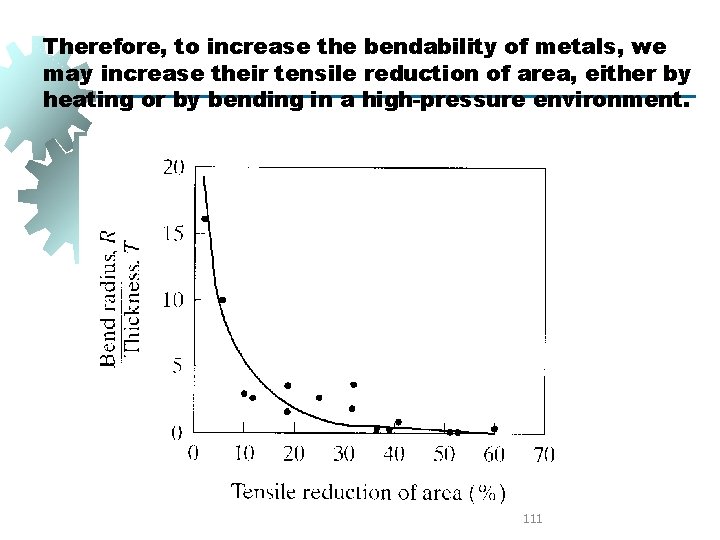
Therefore, to increase the bendability of metals, we may increase their tensile reduction of area, either by heating or by bending in a high-pressure environment. 111

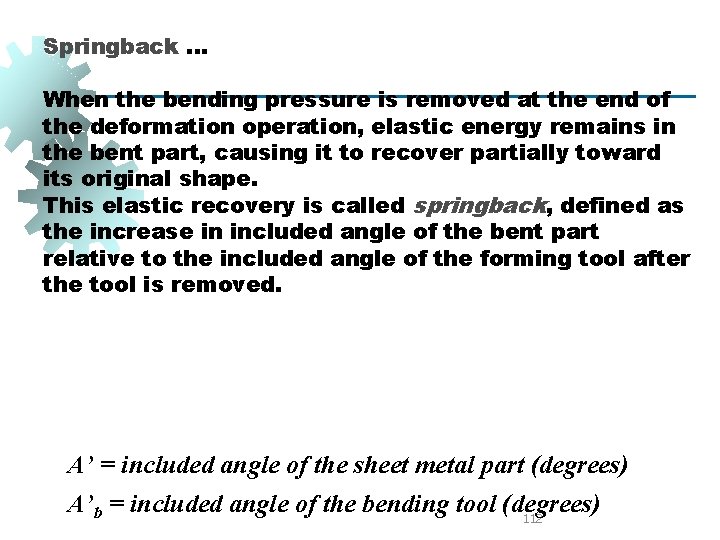
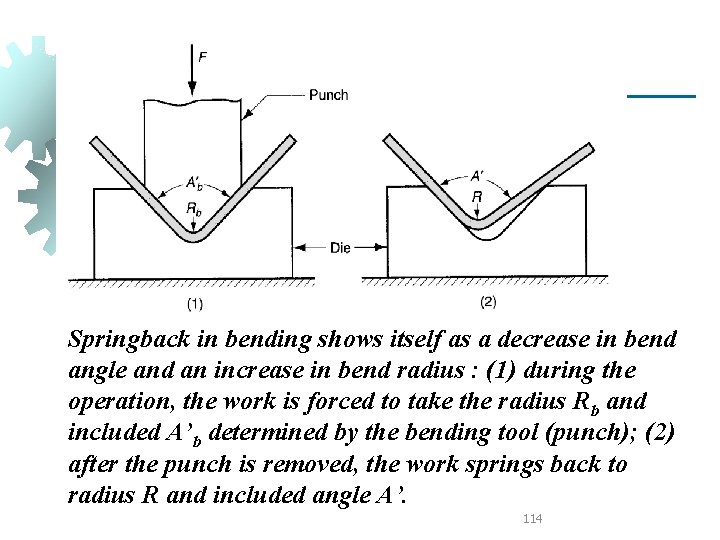
Springback. . . When the bending pressure is removed at the end of the deformation operation, elastic energy remains in the bent part, causing it to recover partially toward its original shape. This elastic recovery is called springback, defined as the increase in included angle of the bent part relative to the included angle of the forming tool after the tool is removed. A’ = included angle of the sheet metal part (degrees) A’b = included angle of the bending tool (degrees) 112

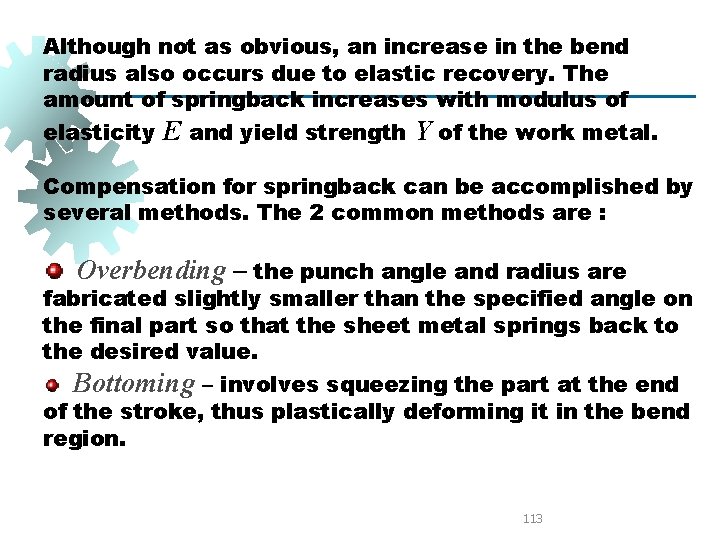
Although not as obvious, an increase in the bend radius also occurs due to elastic recovery. The amount of springback increases with modulus of elasticity E and yield strength Y of the work metal. Compensation for springback can be accomplished by several methods. The 2 common methods are : Overbending – the punch angle and radius are fabricated slightly smaller than the specified angle on the final part so that the sheet metal springs back to the desired value. Bottoming – involves squeezing the part at the end of the stroke, thus plastically deforming it in the bend region. 113

Springback in bending shows itself as a decrease in bend angle and an increase in bend radius : (1) during the operation, the work is forced to take the radius Rb and included A’b determined by the bending tool (punch); (2) after the punch is removed, the work springs back to radius R and included angle A’. 114

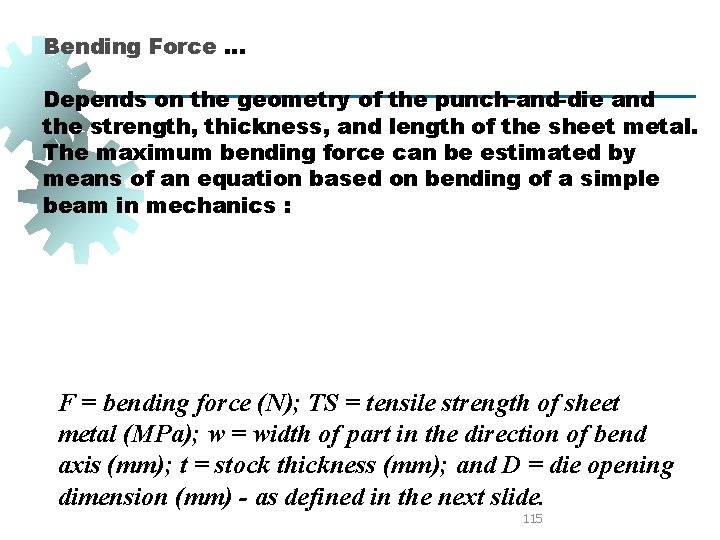
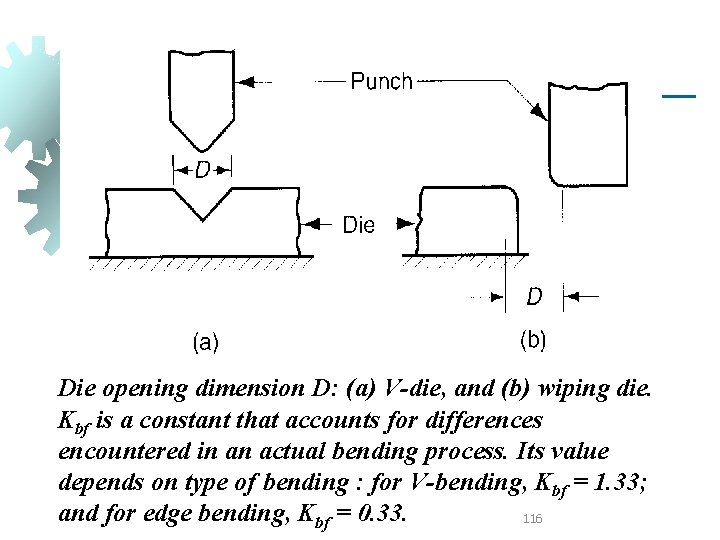
Bending Force. . . Depends on the geometry of the punch-and-die and the strength, thickness, and length of the sheet metal. The maximum bending force can be estimated by means of an equation based on bending of a simple beam in mechanics : F = bending force (N); TS = tensile strength of sheet metal (MPa); w = width of part in the direction of bend axis (mm); t = stock thickness (mm); and D = die opening dimension (mm) - as defined in the next slide. 115

Die opening dimension D: (a) V-die, and (b) wiping die. Kbf is a constant that accounts for differences encountered in an actual bending process. Its value depends on type of bending : for V-bending, Kbf = 1. 33; and for edge bending, Kbf = 0. 33. 116

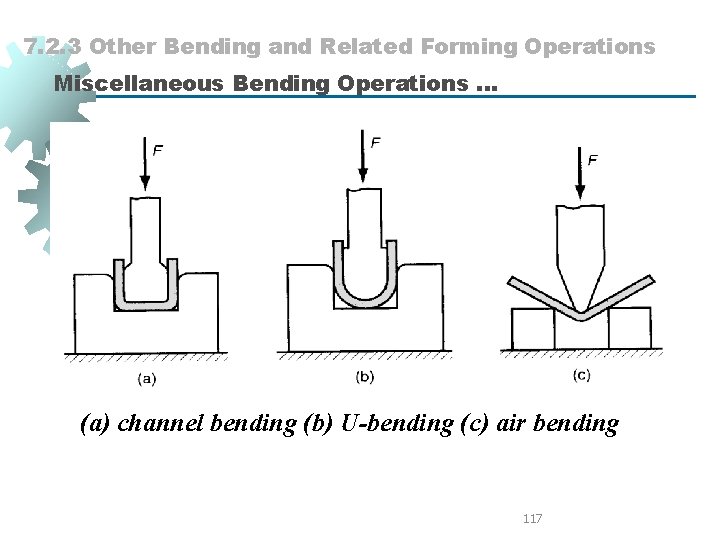
7. 2. 3 Other Bending and Related Forming Operations Miscellaneous Bending Operations. . . (a) channel bending (b) U-bending (c) air bending 117

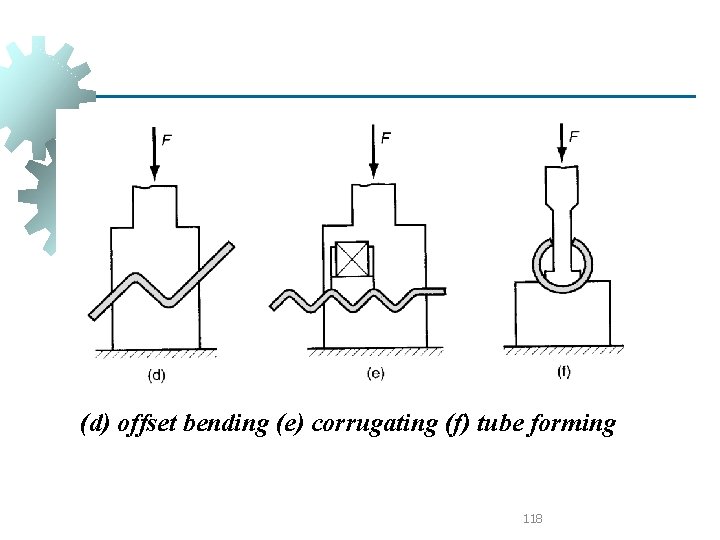
(d) offset bending (e) corrugating (f) tube forming 118

****The sides of the punch and die are separated by a clearance c. This clearance in drawing is about 10% greater than the stock thickness : The punch applies a downward force F to accomplish the deformation of the metal, and a downward holding force Fh is applied by the blankholder. 119

120