SESSION 4 FRAMING SHEAR CONNECTIONS CONTINUED 1 SEMINAR



- Slides: 106

SESSION 4 FRAMING (SHEAR) CONNECTIONS CONTINUED 1

SEMINAR OUTLINE Session 4 Framing Connections Continued Session 5 Moment Connections Session 6 End-Plate Moment Connections/ Bracing Connections Closure 2

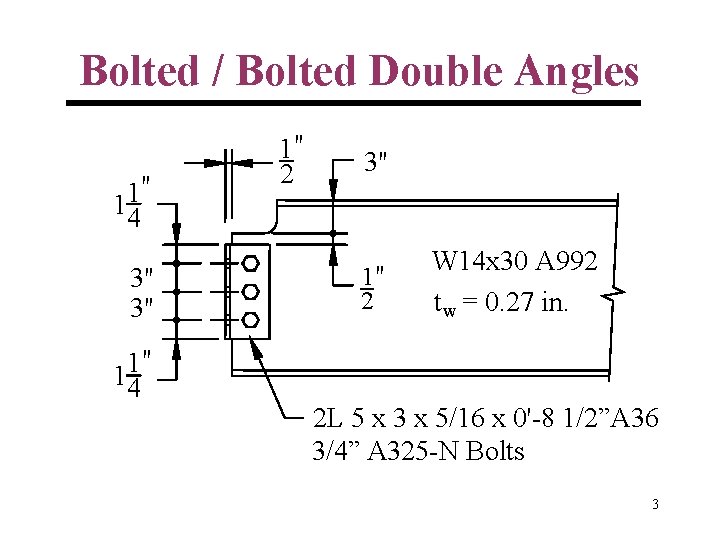
Bolted / Bolted Double Angles " 1 14 3" 3" " 1 14 1" 2 3" 1" 2 W 14 x 30 A 992 tw = 0. 27 in. 2 L 5 x 3 x 5/16 x 0'-8 1/2”A 36 3/4” A 325 -N Bolts 3

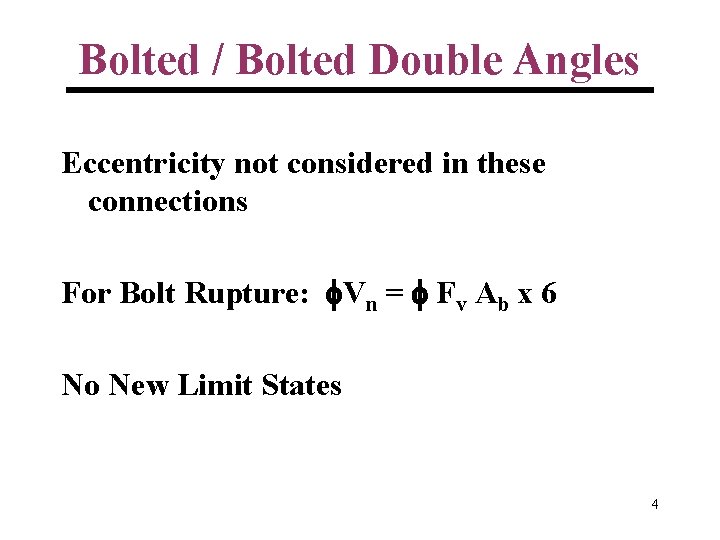
Bolted / Bolted Double Angles Eccentricity not considered in these connections For Bolt Rupture: Vn = Fv Ab x 6 No New Limit States 4

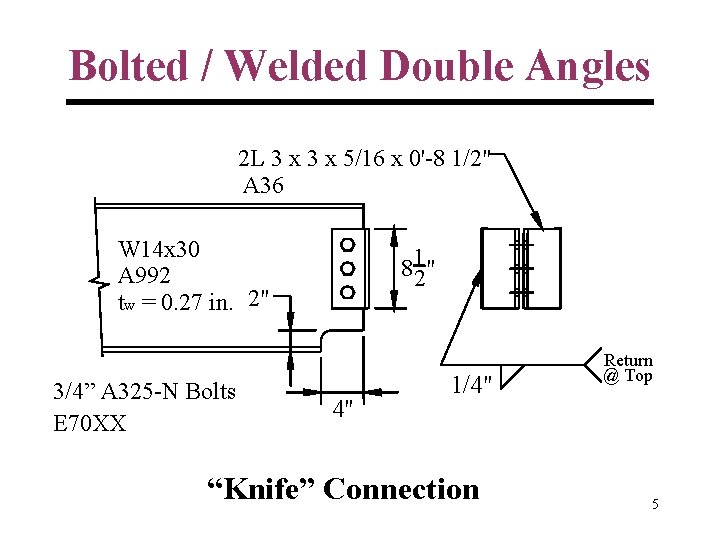
Bolted / Welded Double Angles 2 L 3 x 5/16 x 0'-8 1/2" A 36 W 14 x 30 A 992 tw = 0. 27 in. 2" 3/4” A 325 -N Bolts E 70 XX 812" 4" 1/4" “Knife” Connection Return @ Top 5

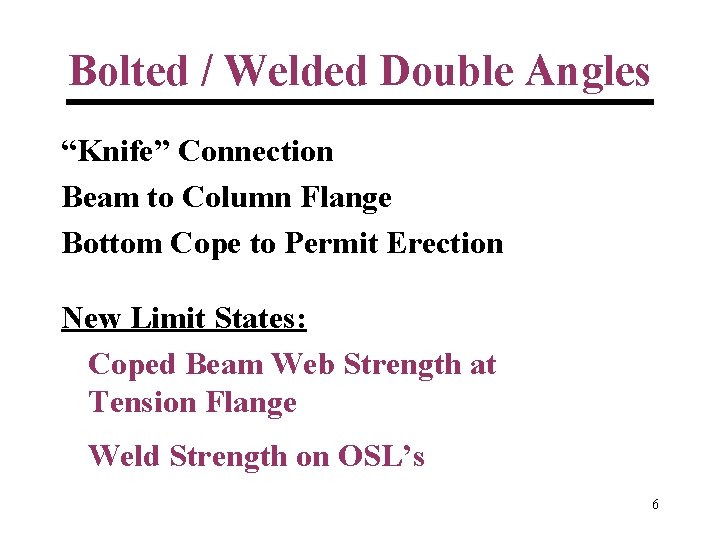
Bolted / Welded Double Angles “Knife” Connection Beam to Column Flange Bottom Cope to Permit Erection New Limit States: Coped Beam Web Strength at Tension Flange Weld Strength on OSL’s 6

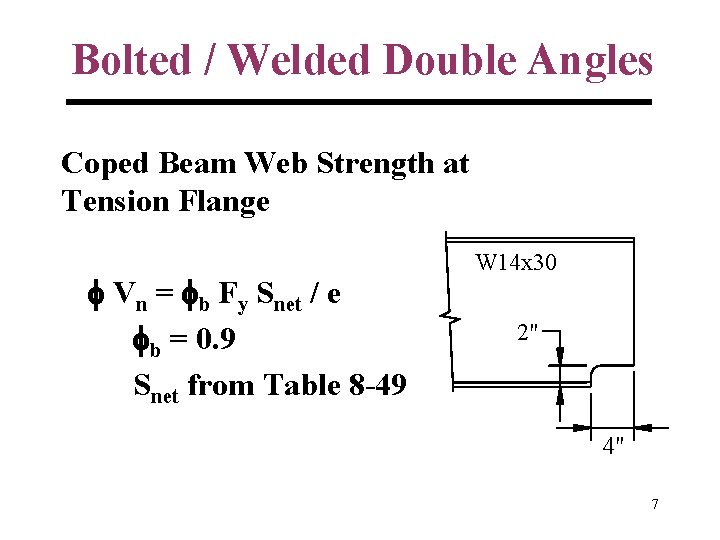
Bolted / Welded Double Angles Coped Beam Web Strength at Tension Flange Vn = b Fy Snet / e b = 0. 9 Snet from Table 8 -49 W 14 x 30 2" 4" 7

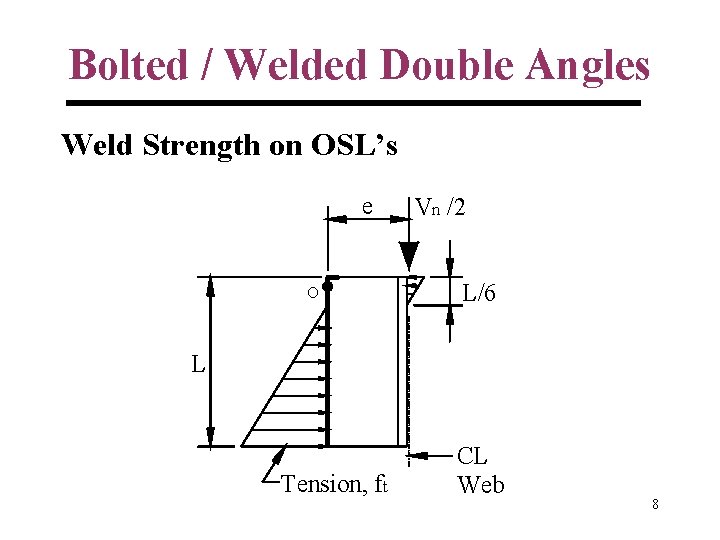
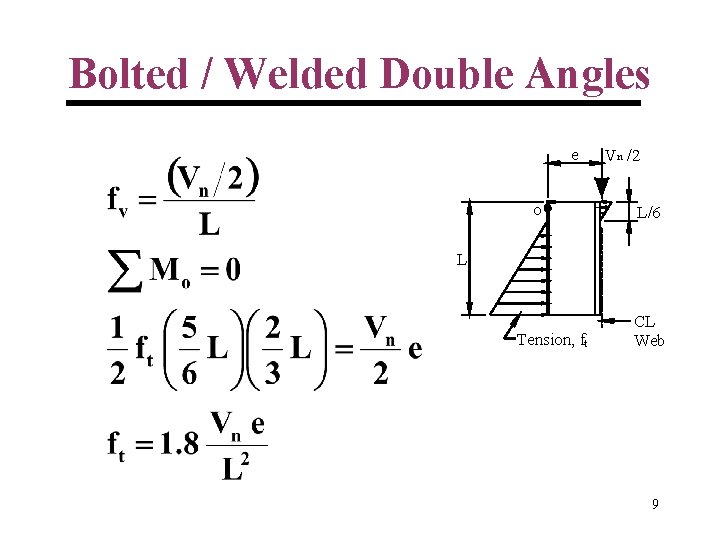
Bolted / Welded Double Angles Weld Strength on OSL’s e O Vn /2 L/6 L Tension, ft CL Web 8

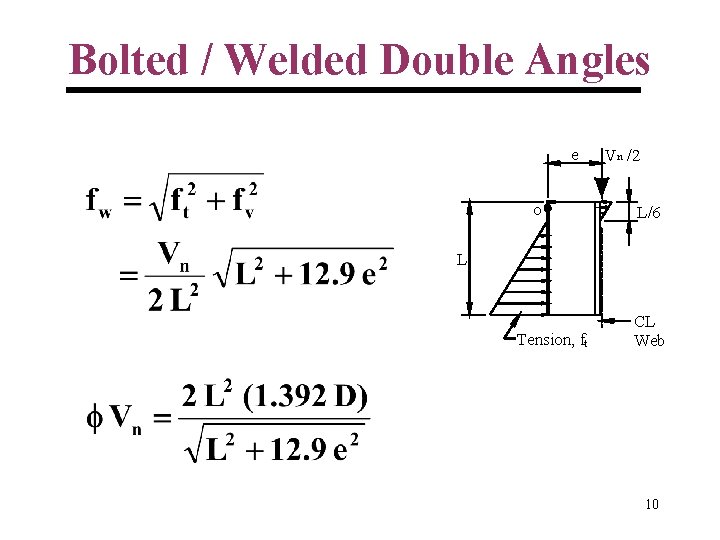
Bolted / Welded Double Angles e O Vn /2 L/6 L Tension, ft CL Web 9

Bolted / Welded Double Angles e O Vn /2 L/6 L Tension, ft CL Web 10

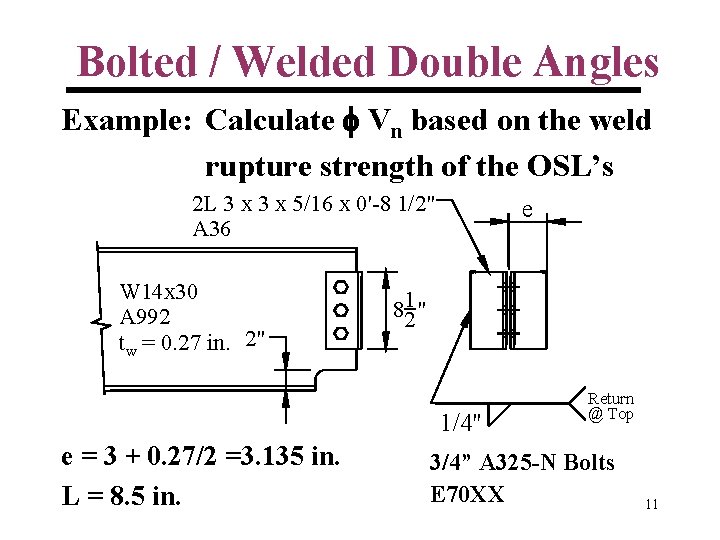
Bolted / Welded Double Angles Example: Calculate Vn based on the weld rupture strength of the OSL’s 2 L 3 x 5/16 x 0'-8 1/2" A 36 W 14 x 30 A 992 tw = 0. 27 in. 2" e 812" 1/4" e = 3 + 0. 27/2 =3. 135 in. L = 8. 5 in. Return @ Top 3/4” A 325 -N Bolts E 70 XX 11

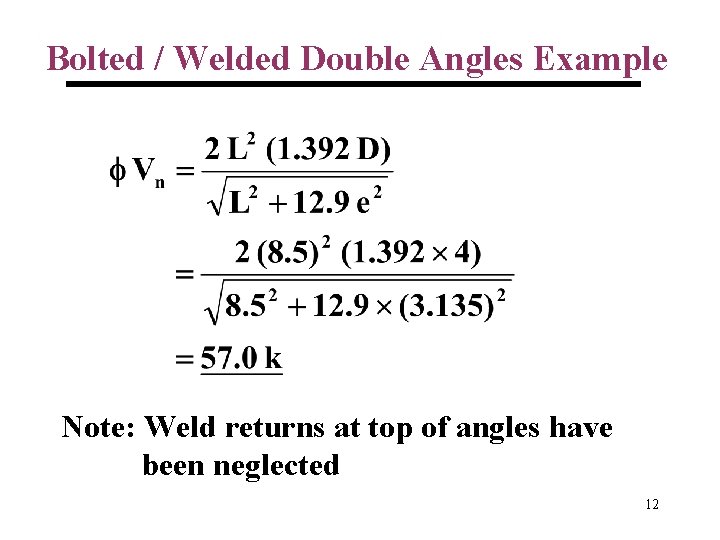
Bolted / Welded Double Angles Example Note: Weld returns at top of angles have been neglected 12

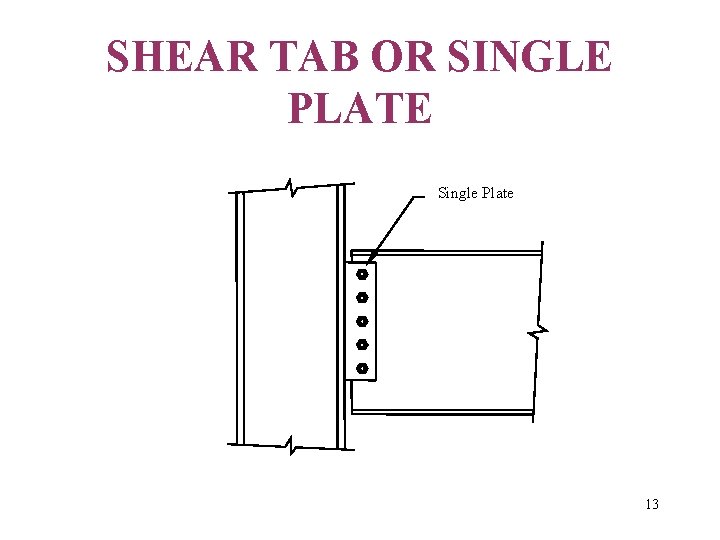
SHEAR TAB OR SINGLE PLATE Single Plate 13

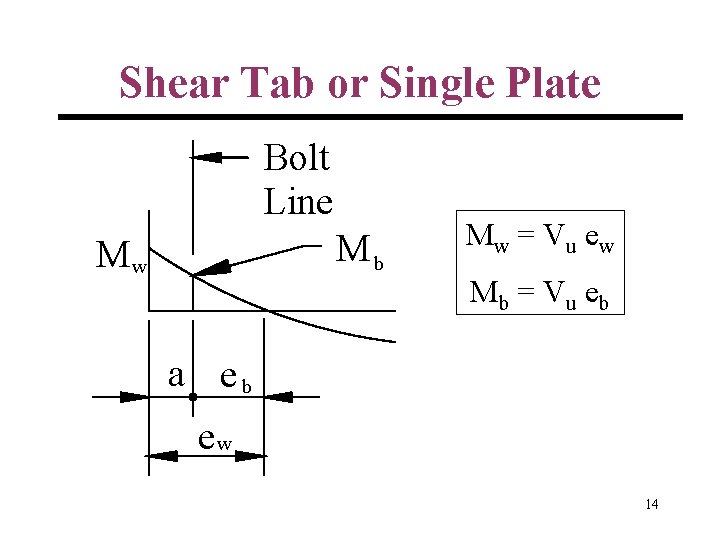
Shear Tab or Single Plate Bolt Line Mb Mw Mw = V u e w Mb = V u e b a eb ew 14

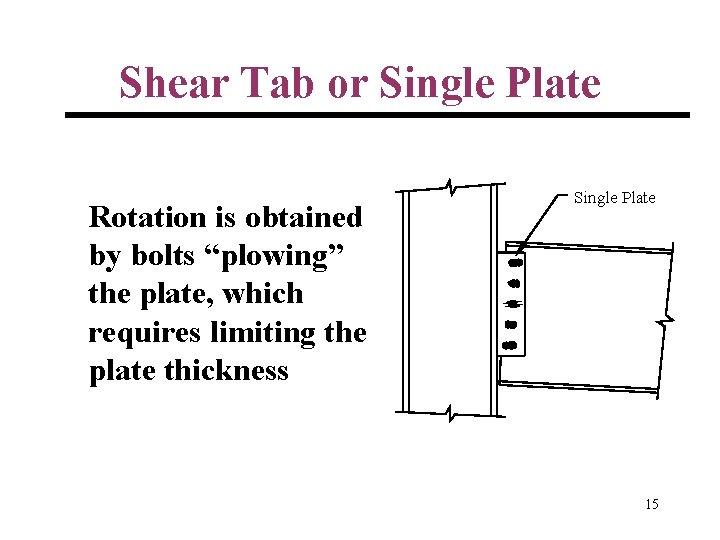
Shear Tab or Single Plate Rotation is obtained by bolts “plowing” the plate, which requires limiting the plate thickness Single Plate 15

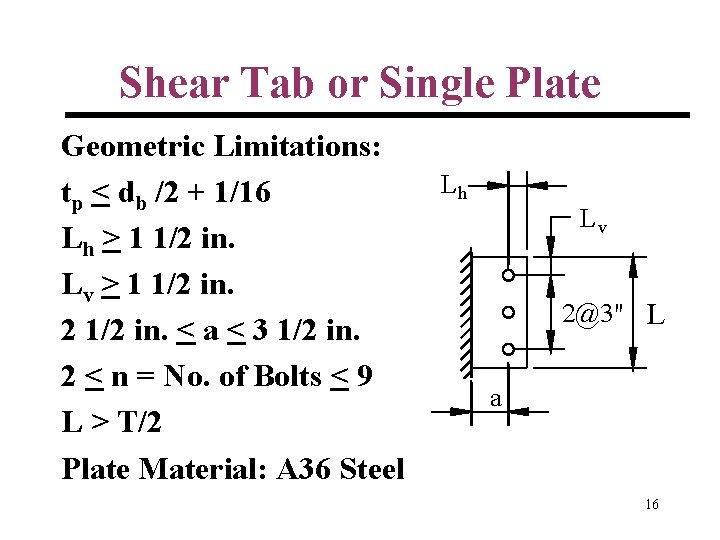
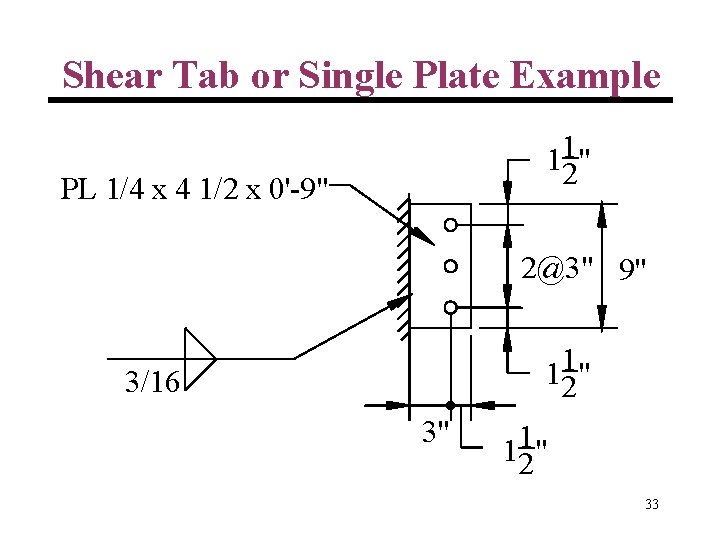
Shear Tab or Single Plate Geometric Limitations: tp < db /2 + 1/16 Lh > 1 1/2 in. Lv > 1 1/2 in. 2 1/2 in. < a < 3 1/2 in. 2 < n = No. of Bolts < 9 L > T/2 Plate Material: A 36 Steel Lh Lv 2@3" L a 16

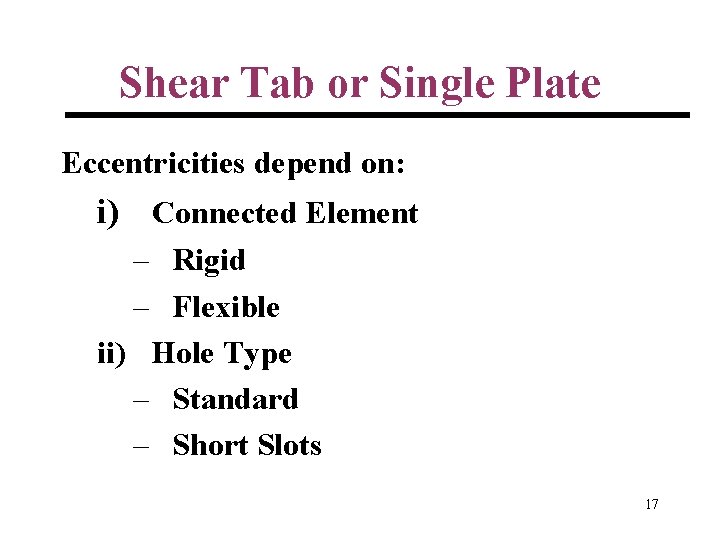
Shear Tab or Single Plate Eccentricities depend on: i) Connected Element – Rigid – Flexible ii) Hole Type – Standard – Short Slots 17

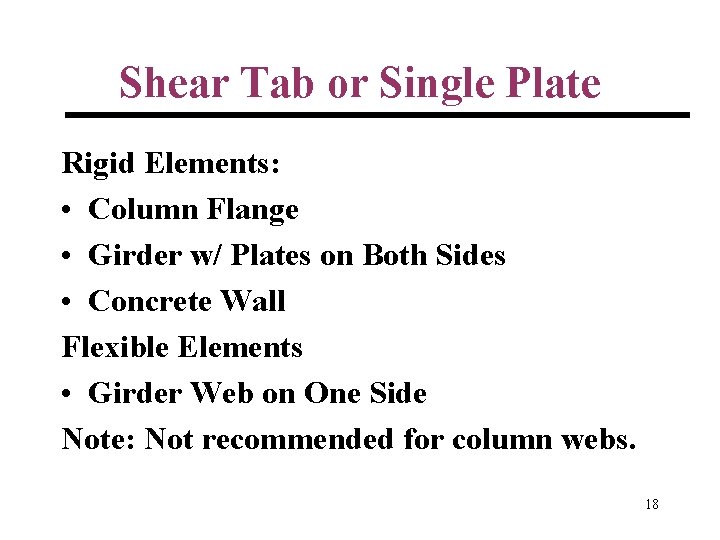
Shear Tab or Single Plate Rigid Elements: • Column Flange • Girder w/ Plates on Both Sides • Concrete Wall Flexible Elements • Girder Web on One Side Note: Not recommended for column webs. 18

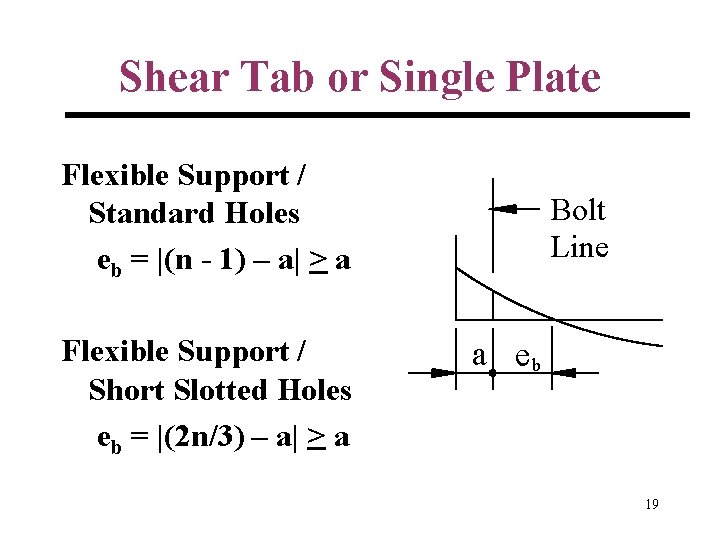
Shear Tab or Single Plate Flexible Support / Standard Holes eb = |(n - 1) – a| > a Flexible Support / Short Slotted Holes eb = |(2 n/3) – a| > a Bolt Line a eb 19

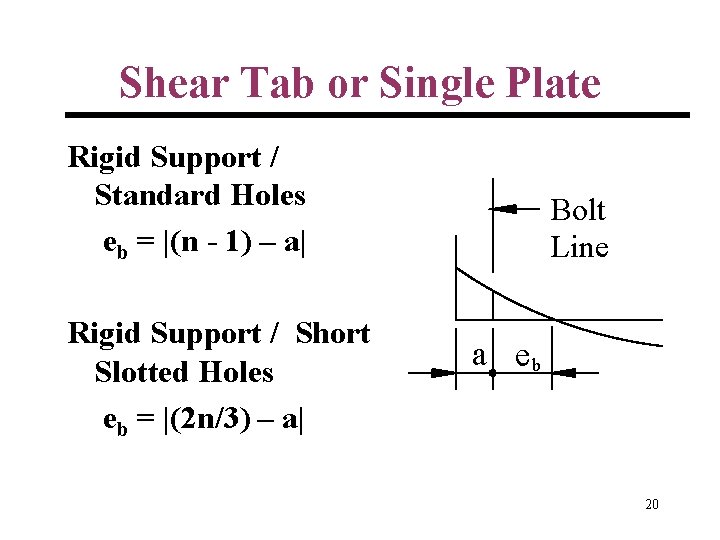
Shear Tab or Single Plate Rigid Support / Standard Holes eb = |(n - 1) – a| Rigid Support / Short Slotted Holes eb = |(2 n/3) – a| Bolt Line a eb 20

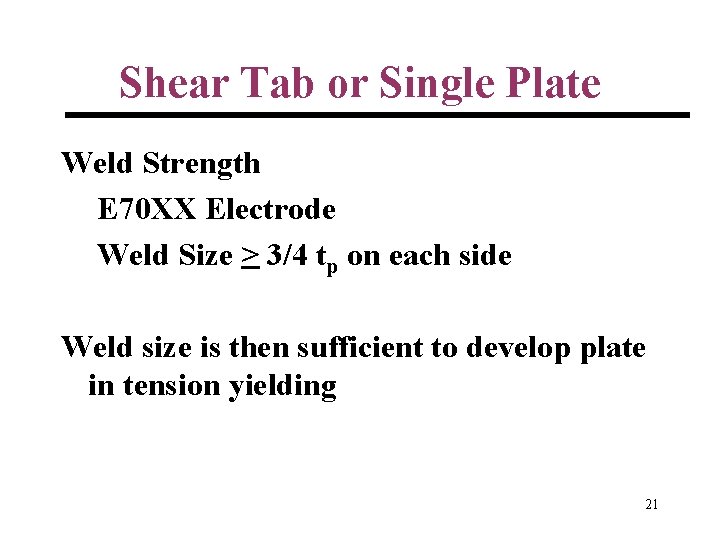
Shear Tab or Single Plate Weld Strength E 70 XX Electrode Weld Size > 3/4 tp on each side Weld size is then sufficient to develop plate in tension yielding 21

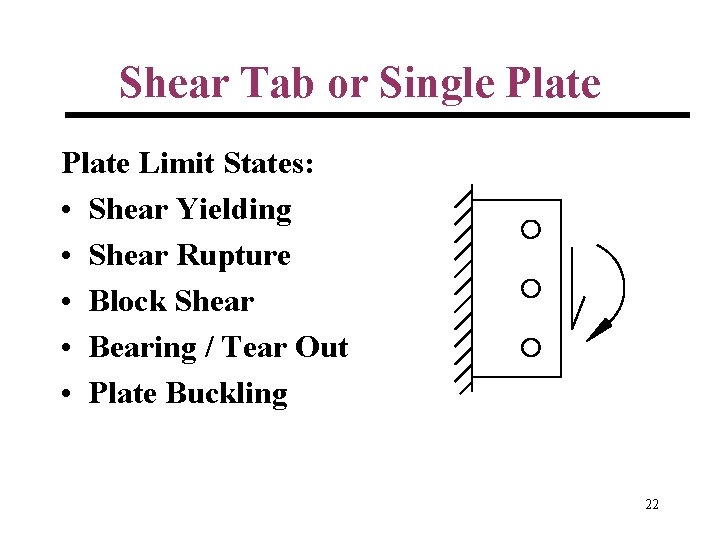
Shear Tab or Single Plate Limit States: • Shear Yielding • Shear Rupture • Block Shear • Bearing / Tear Out • Plate Buckling 22

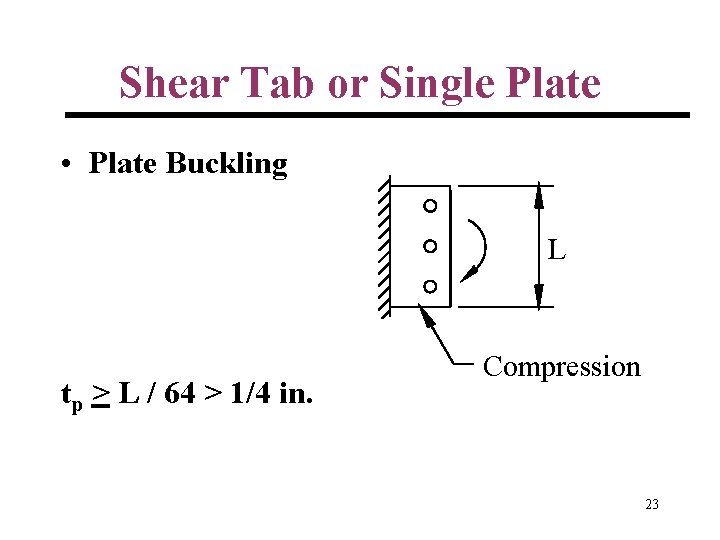
Shear Tab or Single Plate • Plate Buckling L tp > L / 64 > 1/4 in. Compression 23

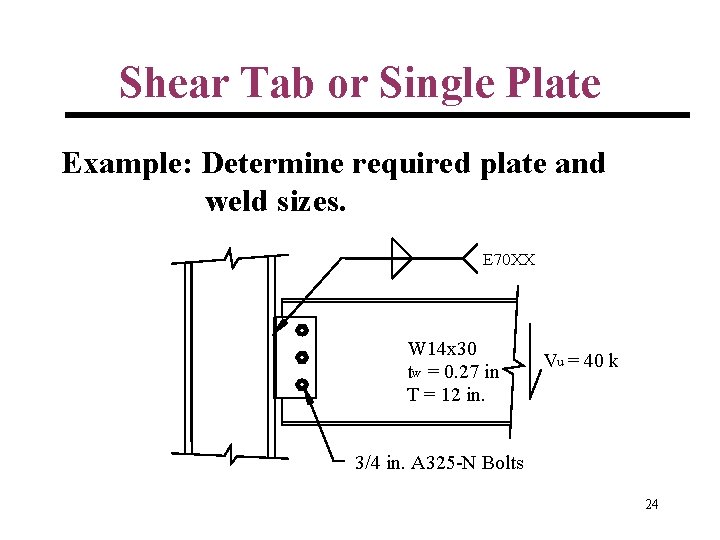
Shear Tab or Single Plate Example: Determine required plate and weld sizes. E 70 XX W 14 x 30 tw = 0. 27 in T = 12 in. Vu = 40 k 3/4 in. A 325 -N Bolts 24

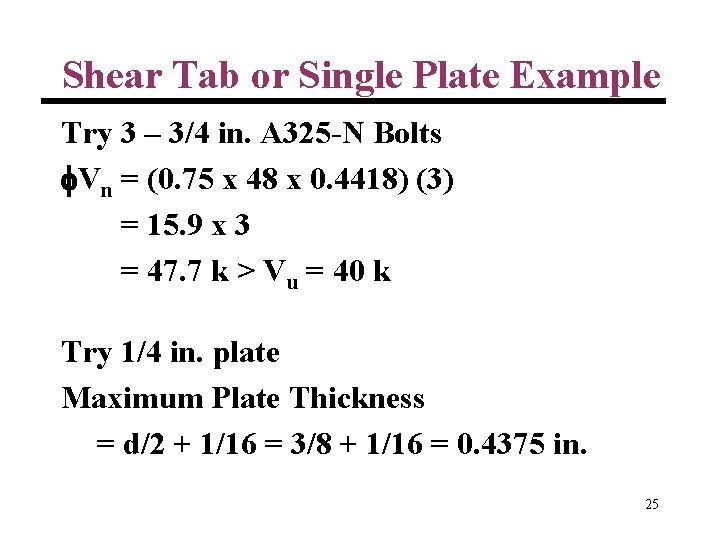
Shear Tab or Single Plate Example Try 3 – 3/4 in. A 325 -N Bolts Vn = (0. 75 x 48 x 0. 4418) (3) = 15. 9 x 3 = 47. 7 k > Vu = 40 k Try 1/4 in. plate Maximum Plate Thickness = d/2 + 1/16 = 3/8 + 1/16 = 0. 4375 in. 25

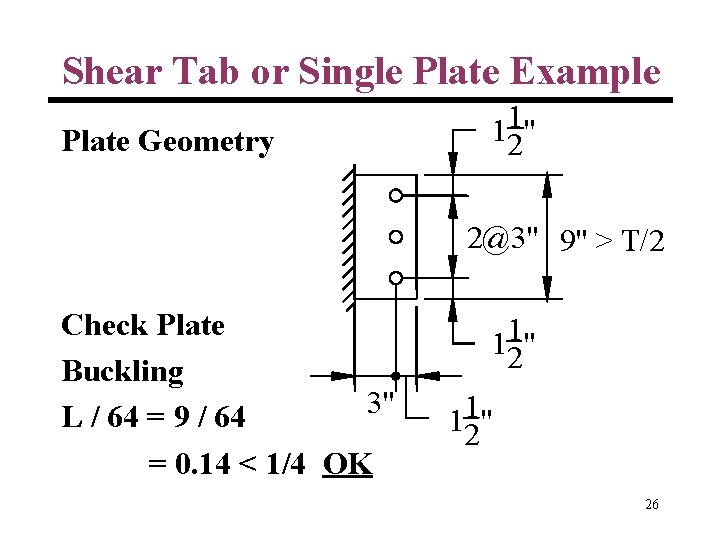
Shear Tab or Single Plate Example Plate Geometry 1 12" 2@3" 9" > T/2 Check Plate Buckling 3" L / 64 = 9 / 64 = 0. 14 < 1/4 OK 112" 26

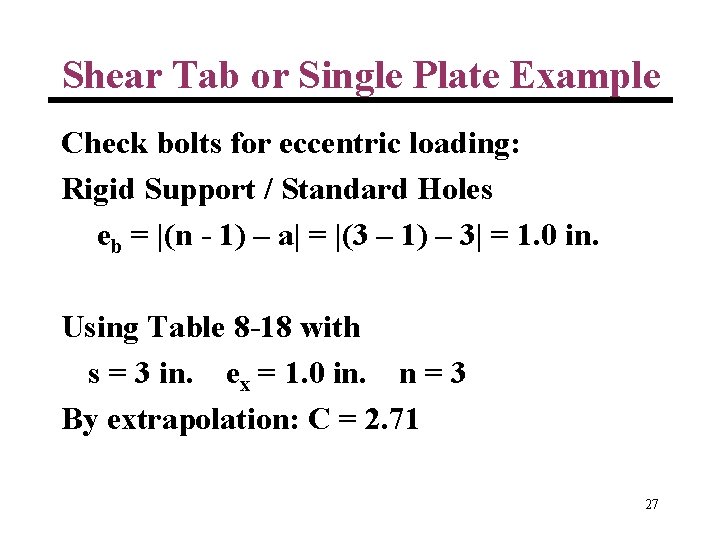
Shear Tab or Single Plate Example Check bolts for eccentric loading: Rigid Support / Standard Holes eb = |(n - 1) – a| = |(3 – 1) – 3| = 1. 0 in. Using Table 8 -18 with s = 3 in. ex = 1. 0 in. n = 3 By extrapolation: C = 2. 71 27

28

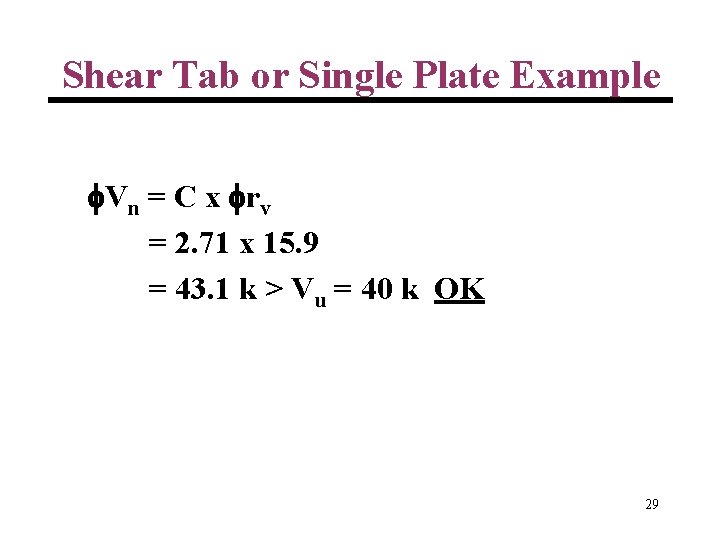
Shear Tab or Single Plate Example Vn = C x rv = 2. 71 x 15. 9 = 43. 1 k > Vu = 40 k OK 29

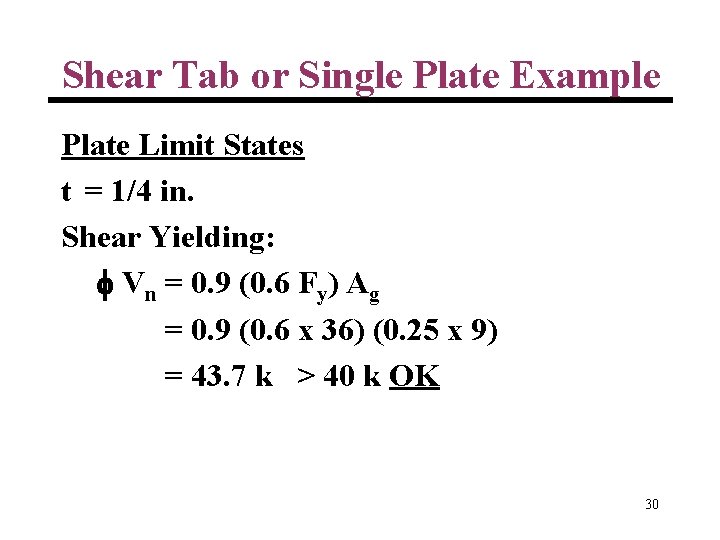
Shear Tab or Single Plate Example Plate Limit States t = 1/4 in. Shear Yielding: Vn = 0. 9 (0. 6 Fy) Ag = 0. 9 (0. 6 x 36) (0. 25 x 9) = 43. 7 k > 40 k OK 30

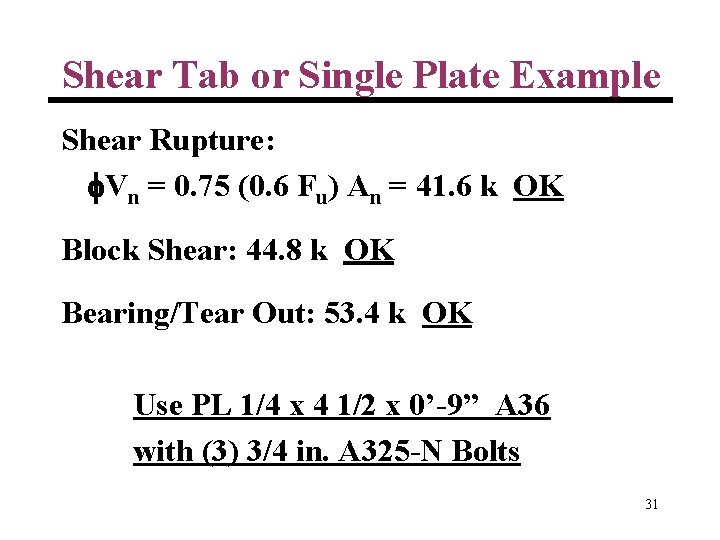
Shear Tab or Single Plate Example Shear Rupture: Vn = 0. 75 (0. 6 Fu) An = 41. 6 k OK Block Shear: 44. 8 k OK Bearing/Tear Out: 53. 4 k OK Use PL 1/4 x 4 1/2 x 0’-9” A 36 with (3) 3/4 in. A 325 -N Bolts 31

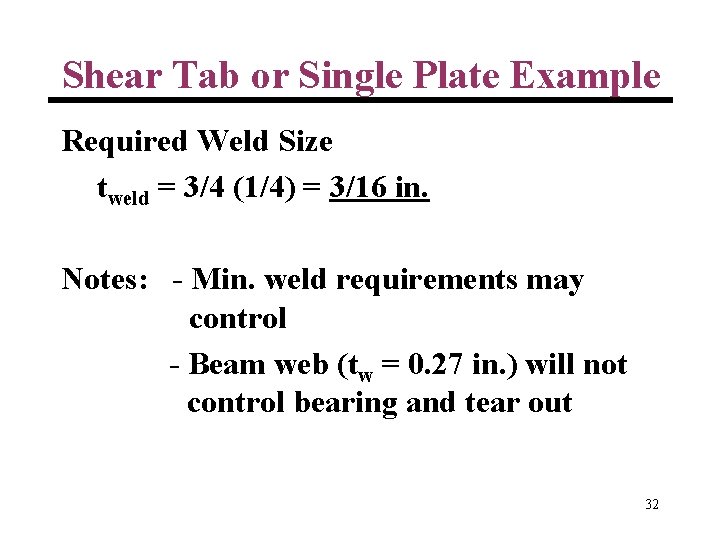
Shear Tab or Single Plate Example Required Weld Size tweld = 3/4 (1/4) = 3/16 in. Notes: - Min. weld requirements may control - Beam web (tw = 0. 27 in. ) will not control bearing and tear out 32

Shear Tab or Single Plate Example 112" PL 1/4 x 4 1/2 x 0'-9" 2@3" 9" 112" 3/16 3" 1 12 " 33

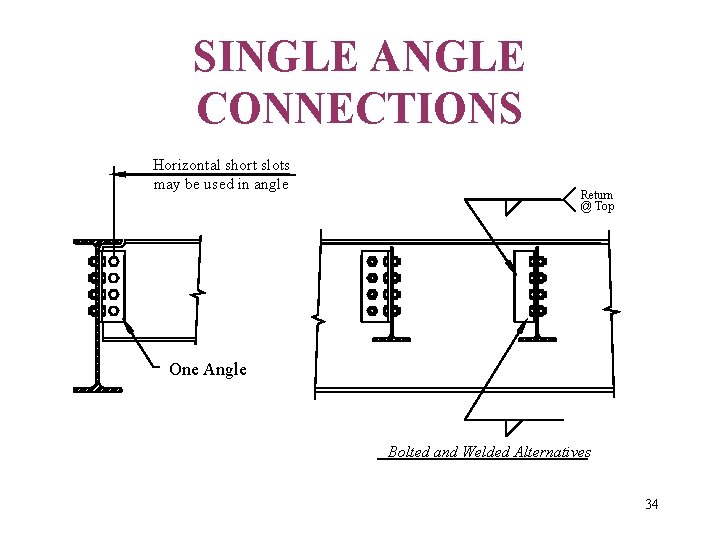
SINGLE ANGLE CONNECTIONS Horizontal short slots may be used in angle Return @ Top One Angle Bolted and Welded Alternatives 34

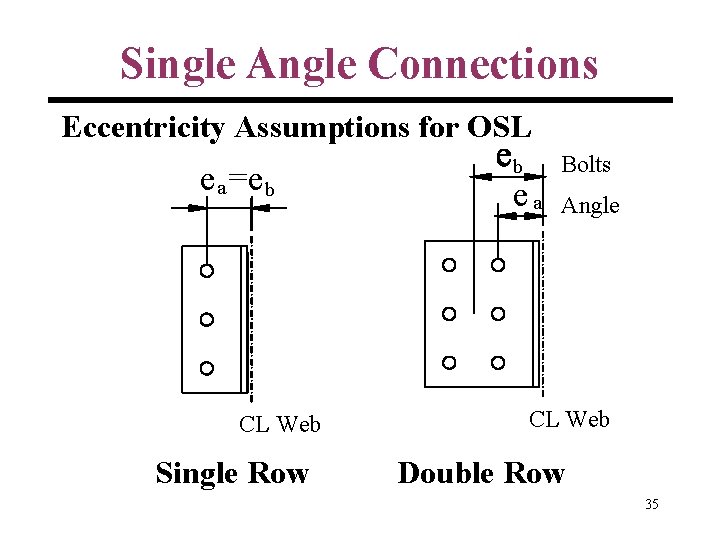
Single Angle Connections Eccentricity Assumptions for OSL e a =e b CL Web Single Row b ea Bolts Angle CL Web Double Row 35

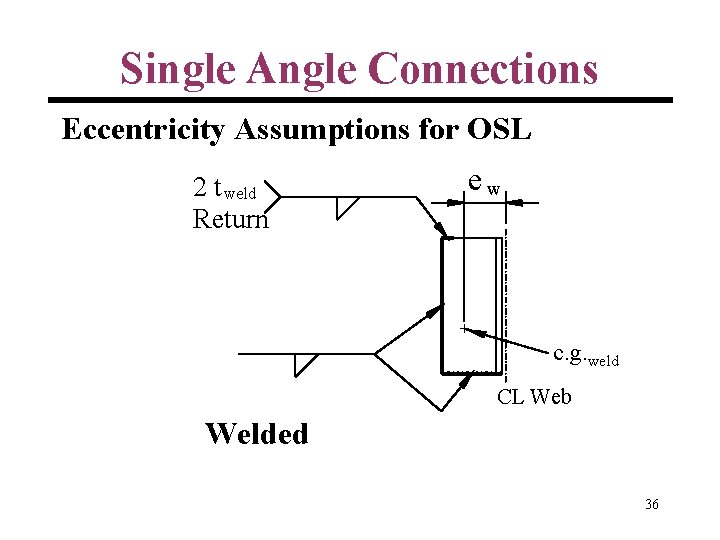
Single Angle Connections Eccentricity Assumptions for OSL 2 t weld Return ew + c. g. weld CL Web Welded 36

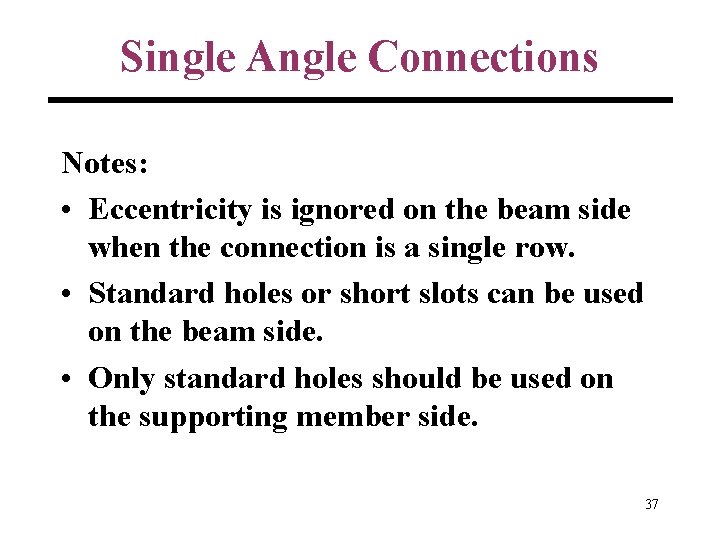
Single Angle Connections Notes: • Eccentricity is ignored on the beam side when the connection is a single row. • Standard holes or short slots can be used on the beam side. • Only standard holes should be used on the supporting member side. 37

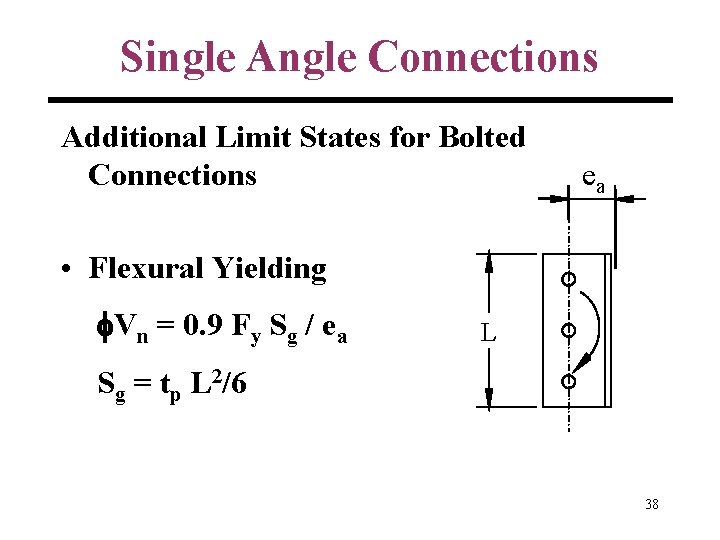
Single Angle Connections Additional Limit States for Bolted Connections ea • Flexural Yielding Vn = 0. 9 Fy Sg / ea L Sg = tp L 2/6 38

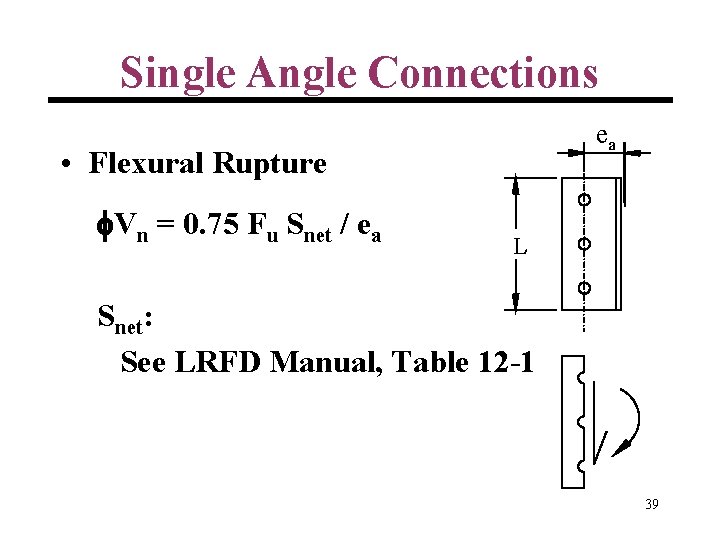
Single Angle Connections ea • Flexural Rupture Vn = 0. 75 Fu Snet / ea L Snet: See LRFD Manual, Table 12 -1 39

40

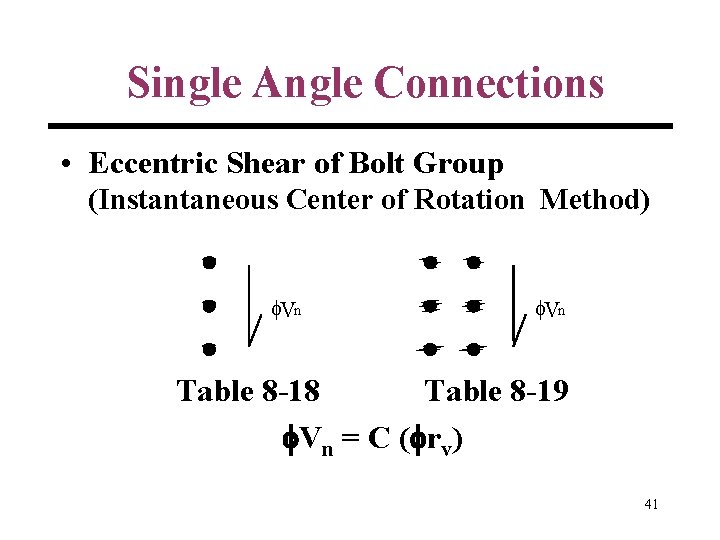
Single Angle Connections • Eccentric Shear of Bolt Group (Instantaneous Center of Rotation Method) f. Vn Table 8 -18 Table 8 -19 Vn = C ( rv) 41

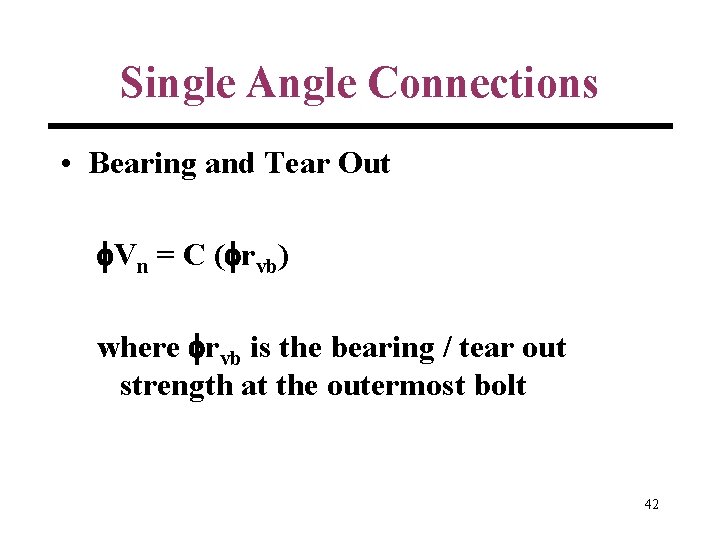
Single Angle Connections • Bearing and Tear Out Vn = C ( rvb) where rvb is the bearing / tear out strength at the outermost bolt 42

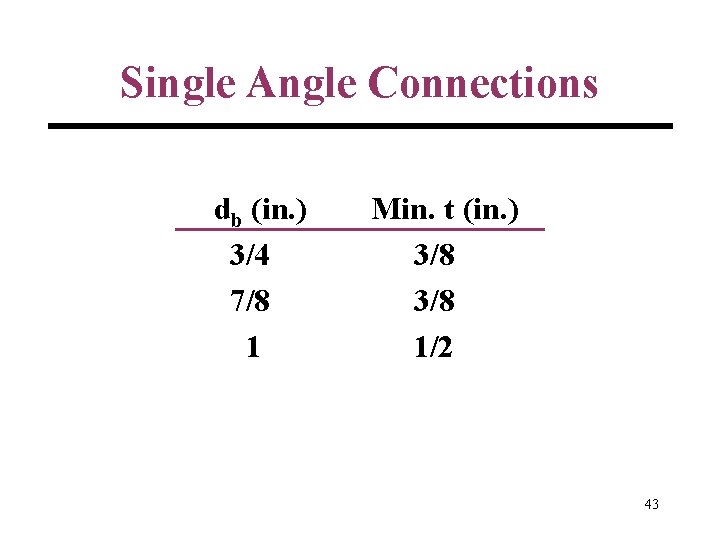
Single Angle Connections db (in. ) 3/4 7/8 1 Min. t (in. ) 3/8 1/2 43

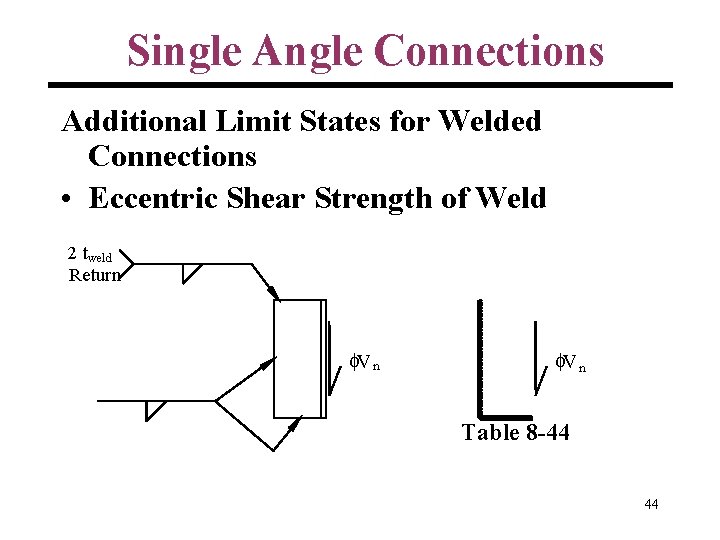
Single Angle Connections Additional Limit States for Welded Connections • Eccentric Shear Strength of Weld 2 tweld Return f. V n Table 8 -44 44

45

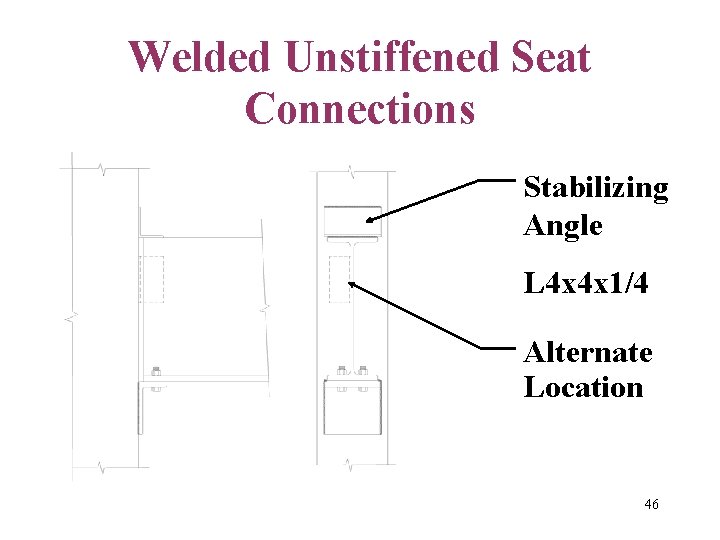
Welded Unstiffened Seat Connections Stabilizing Angle L 4 x 4 x 1/4 Alternate Location 46

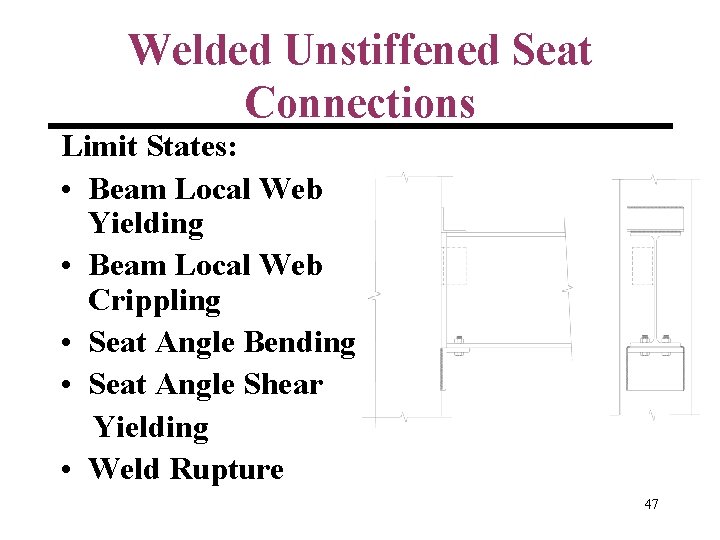
Welded Unstiffened Seat Connections Limit States: • Beam Local Web Yielding • Beam Local Web Crippling • Seat Angle Bending • Seat Angle Shear Yielding • Weld Rupture 47

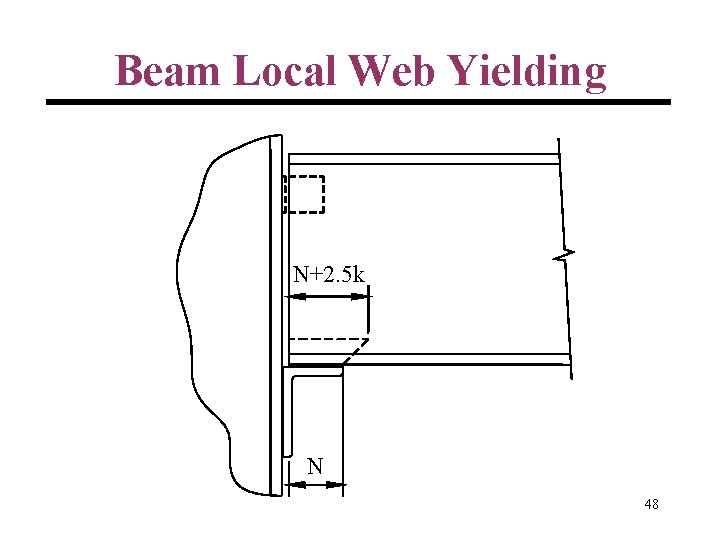
Beam Local Web Yielding N+2. 5 k N 48

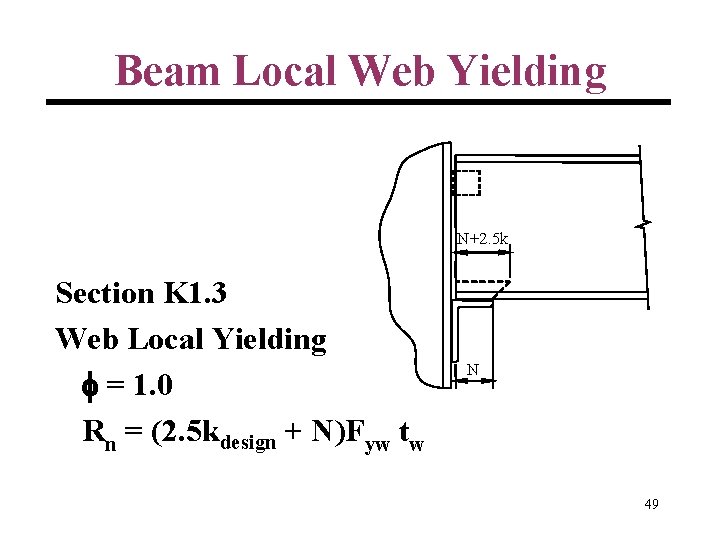
Beam Local Web Yielding N+2. 5 k Section K 1. 3 Web Local Yielding = 1. 0 Rn = (2. 5 kdesign + N)Fyw tw N 49

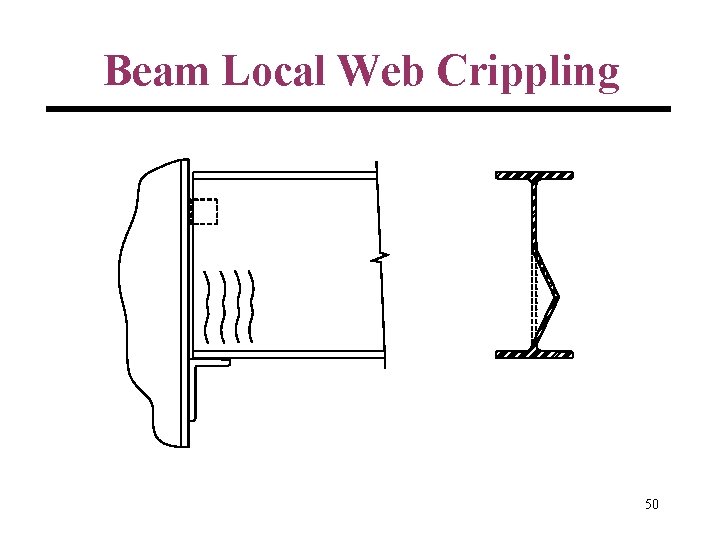
Beam Local Web Crippling 50

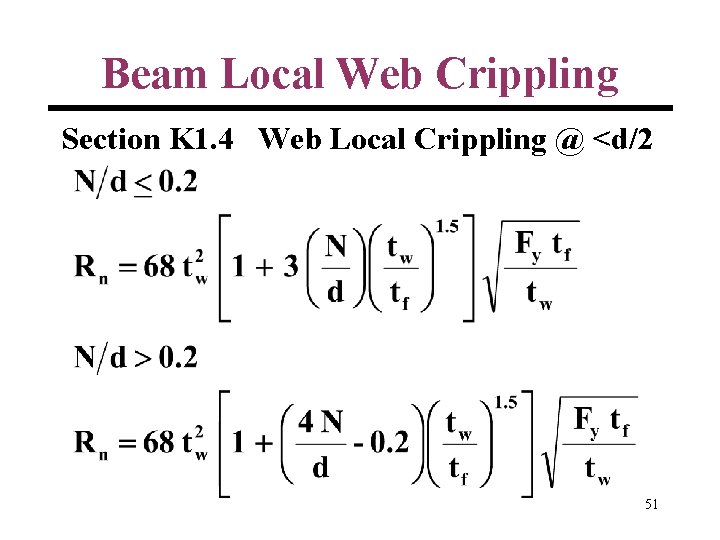
Beam Local Web Crippling Section K 1. 4 Web Local Crippling @ <d/2 51

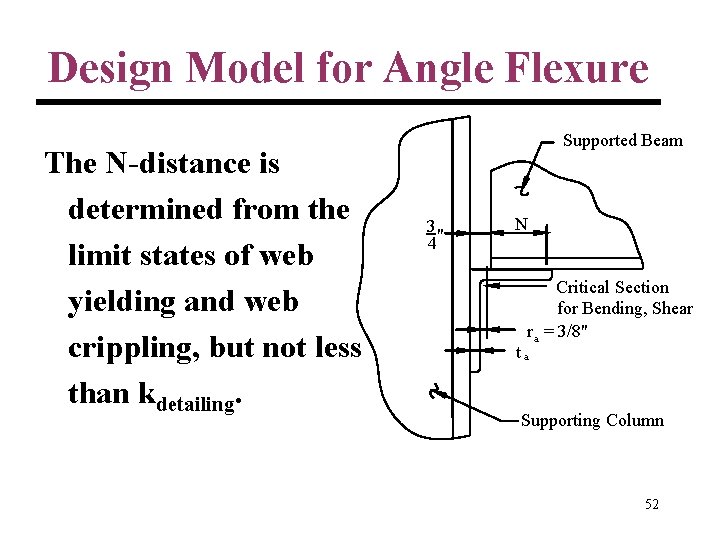
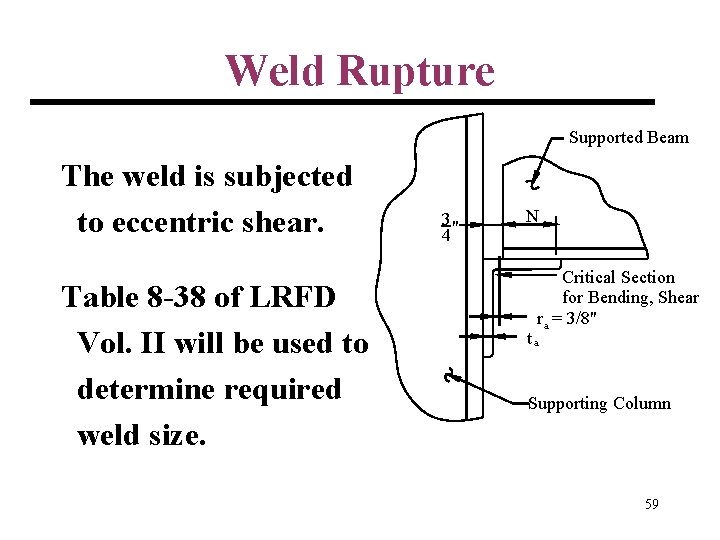
Design Model for Angle Flexure The N-distance is determined from the limit states of web yielding and web crippling, but not less than kdetailing. Supported Beam 3" 4 N Critical Section for Bending, Shear r a = 3/8" ta Supporting Column 52

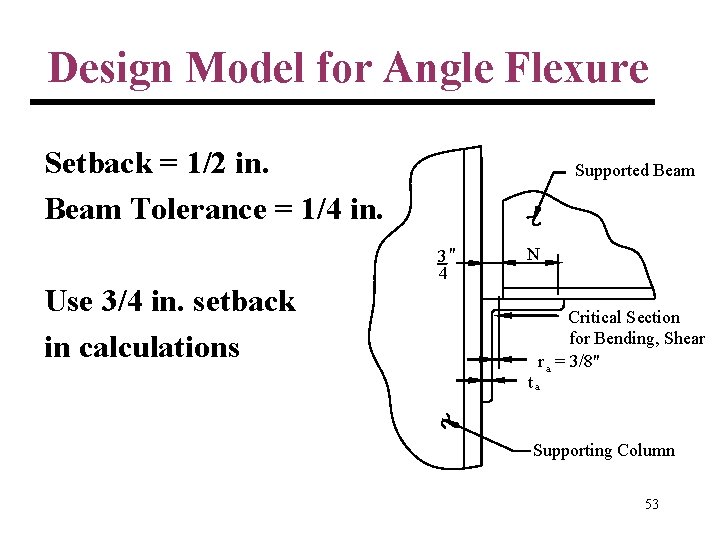
Design Model for Angle Flexure Setback = 1/2 in. Beam Tolerance = 1/4 in. Use 3/4 in. setback in calculations Supported Beam 3" 4 N Critical Section for Bending, Shear r a = 3/8" ta Supporting Column 53

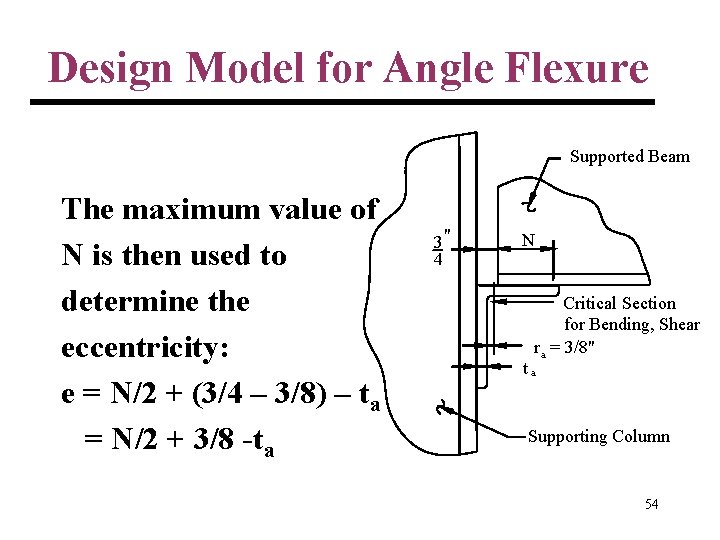
Design Model for Angle Flexure Supported Beam The maximum value of N is then used to determine the eccentricity: e = N/2 + (3/4 – 3/8) – ta = N/2 + 3/8 -ta 3" 4 N Critical Section for Bending, Shear r a = 3/8" ta Supporting Column 54

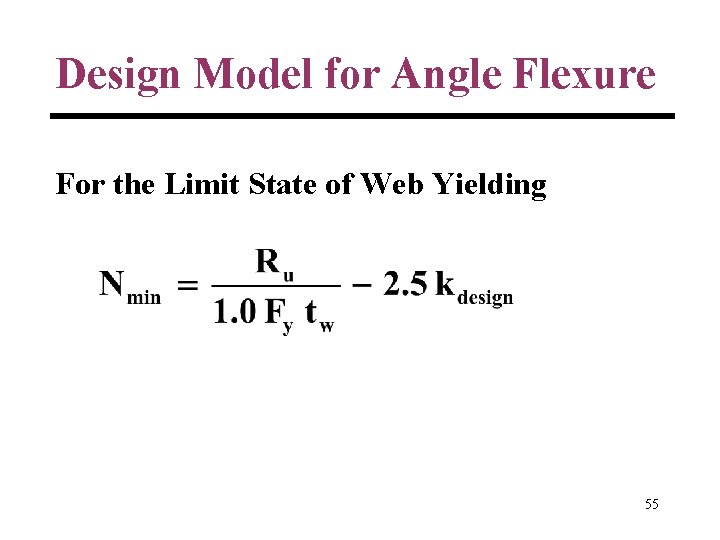
Design Model for Angle Flexure For the Limit State of Web Yielding 55

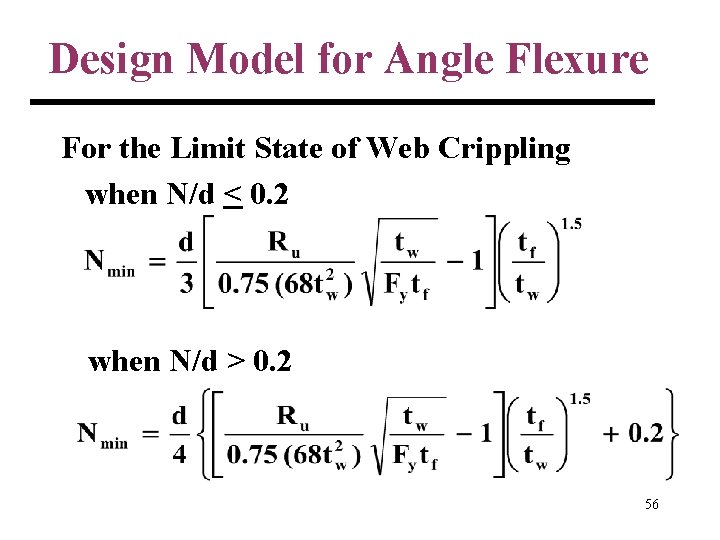
Design Model for Angle Flexure For the Limit State of Web Crippling when N/d < 0. 2 when N/d > 0. 2 56

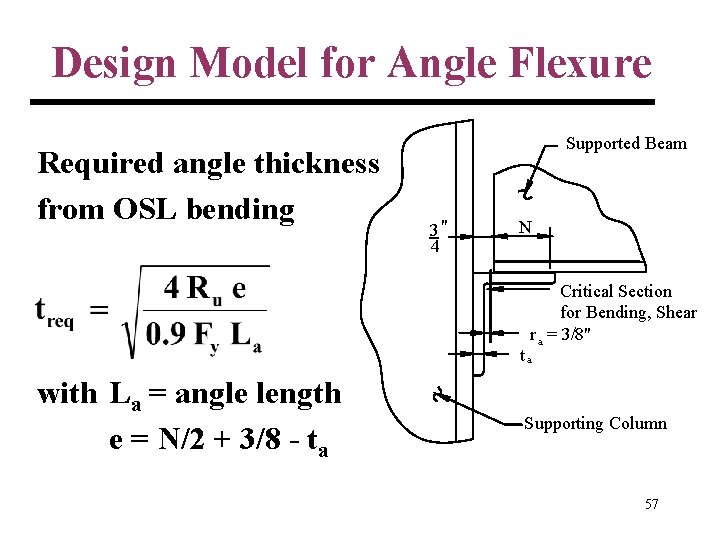
Design Model for Angle Flexure Required angle thickness from OSL bending Supported Beam 3" 4 N Critical Section for Bending, Shear r a = 3/8" ta with La = angle length e = N/2 + 3/8 - ta Supporting Column 57

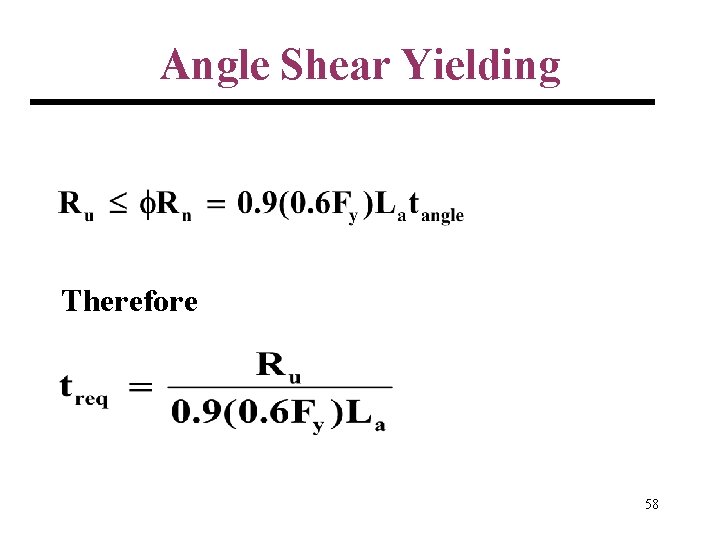
Angle Shear Yielding Therefore 58

Weld Rupture Supported Beam The weld is subjected to eccentric shear. Table 8 -38 of LRFD Vol. II will be used to determine required weld size. 3" 4 N Critical Section for Bending, Shear r a = 3/8" ta Supporting Column 59

Weld Rupture 60

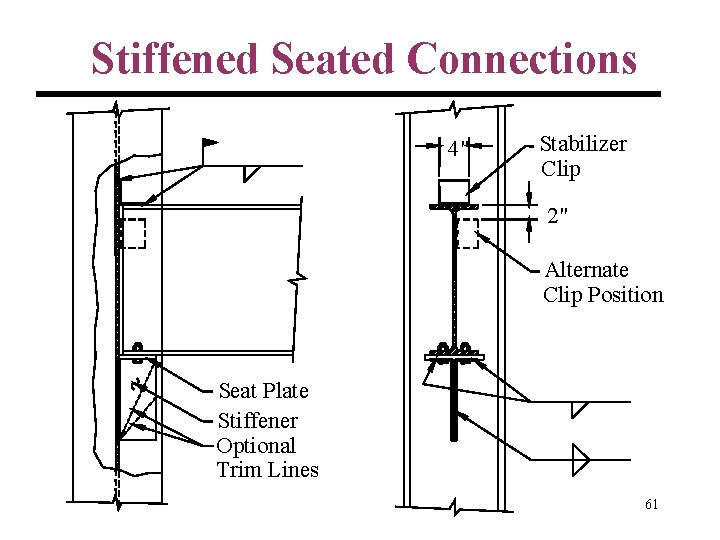
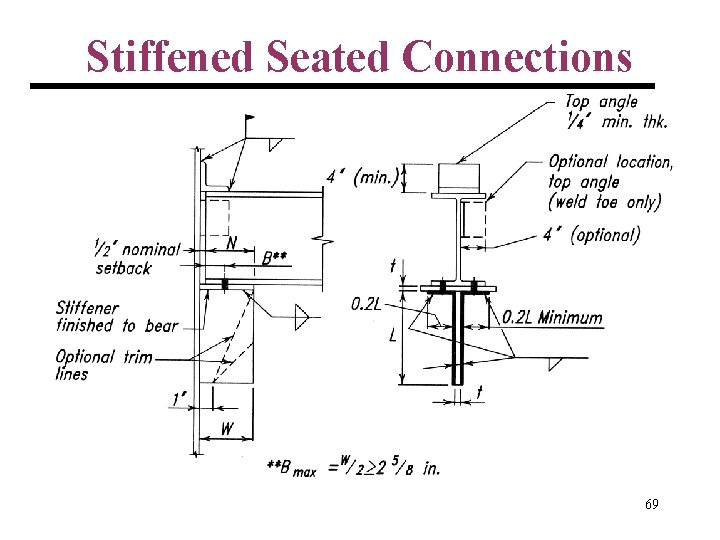
Stiffened Seated Connections 4" Stabilizer Clip 2" Alternate Clip Position Seat Plate Stiffener Optional Trim Lines 61

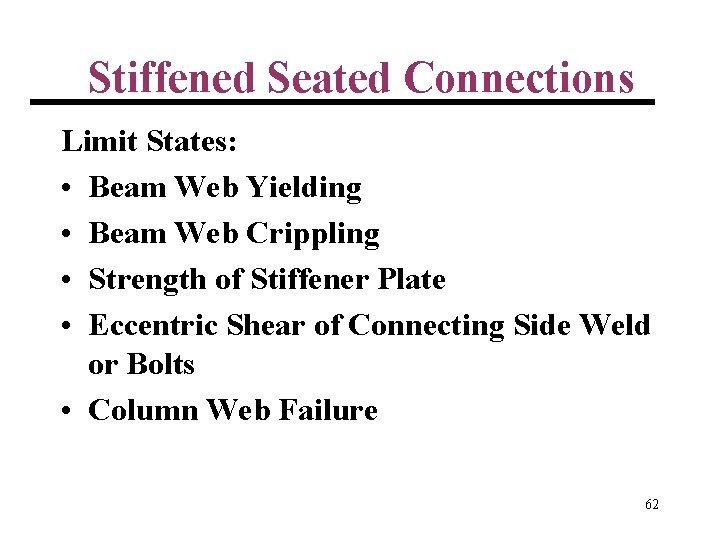
Stiffened Seated Connections Limit States: • Beam Web Yielding • Beam Web Crippling • Strength of Stiffener Plate • Eccentric Shear of Connecting Side Weld or Bolts • Column Web Failure 62

Stiffened Seated Connections Notes: • 1/2 in. setback but 3/4 in. for calculations • Seat plate > 3/8 in. • For unstiffened beam webs, the seat stiffener thickness is a function of the beam and seat stiffener yield stresses and the weld size. 63

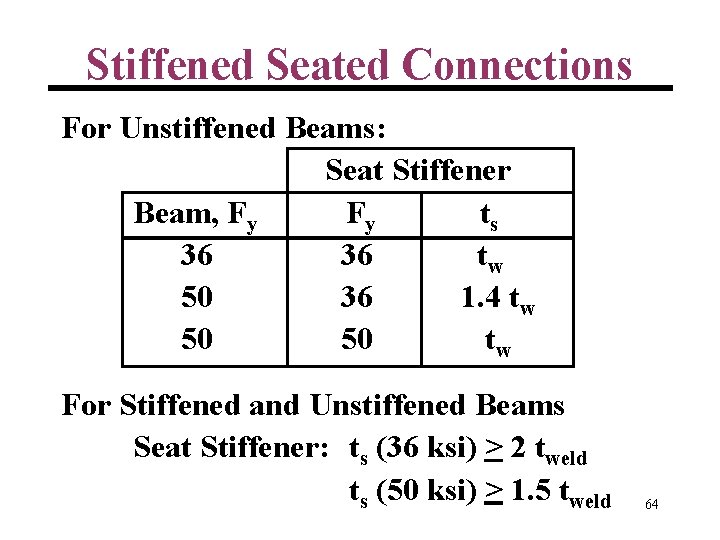
Stiffened Seated Connections For Unstiffened Beams: Seat Stiffener Beam, Fy Fy ts 36 36 tw 50 36 1. 4 tw 50 50 tw For Stiffened and Unstiffened Beams Seat Stiffener: ts (36 ksi) > 2 tweld ts (50 ksi) > 1. 5 tweld 64

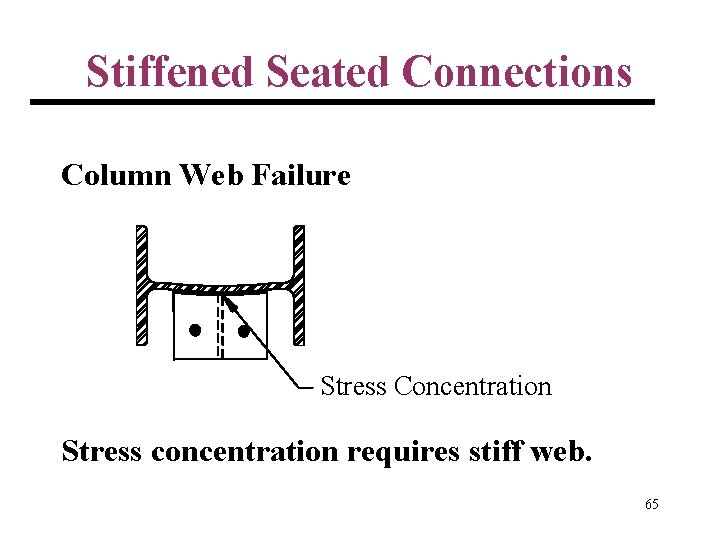
Stiffened Seated Connections Column Web Failure Stress Concentration Stress concentration requires stiff web. 65

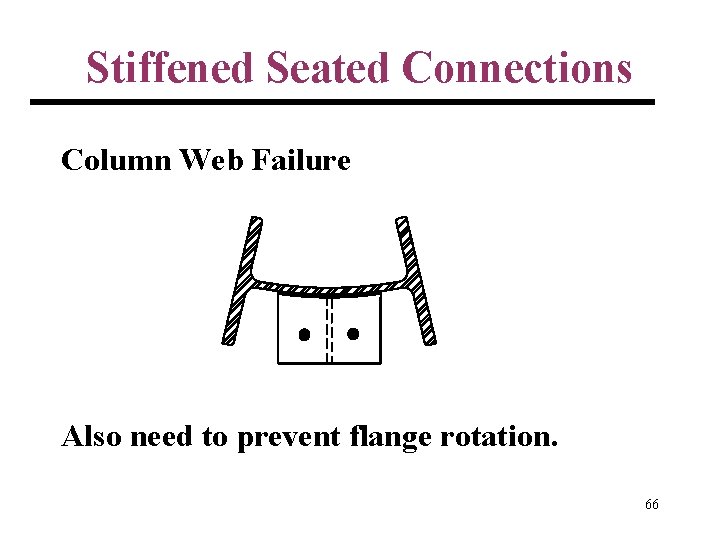
Stiffened Seated Connections Column Web Failure Also need to prevent flange rotation. 66

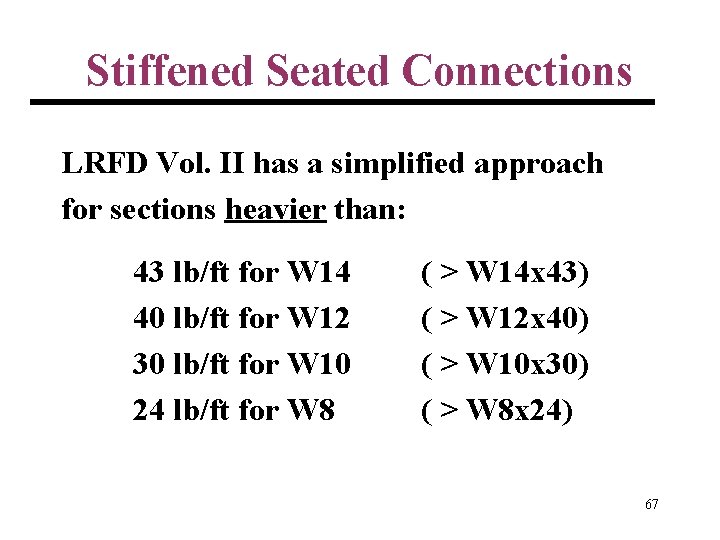
Stiffened Seated Connections LRFD Vol. II has a simplified approach for sections heavier than: 43 lb/ft for W 14 40 lb/ft for W 12 30 lb/ft for W 10 24 lb/ft for W 8 ( > W 14 x 43) ( > W 12 x 40) ( > W 10 x 30) ( > W 8 x 24) 67

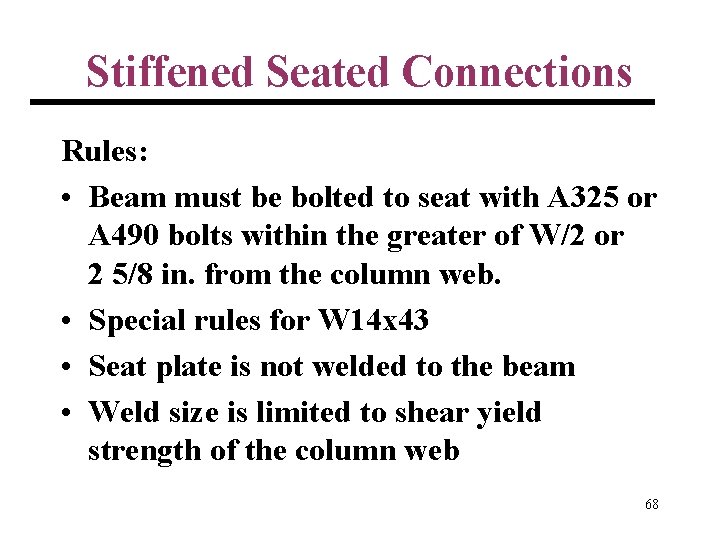
Stiffened Seated Connections Rules: • Beam must be bolted to seat with A 325 or A 490 bolts within the greater of W/2 or 2 5/8 in. from the column web. • Special rules for W 14 x 43 • Seat plate is not welded to the beam • Weld size is limited to shear yield strength of the column web 68

Stiffened Seated Connections 69

END OF SESSION 4 Design Examples (For Home Study) 70

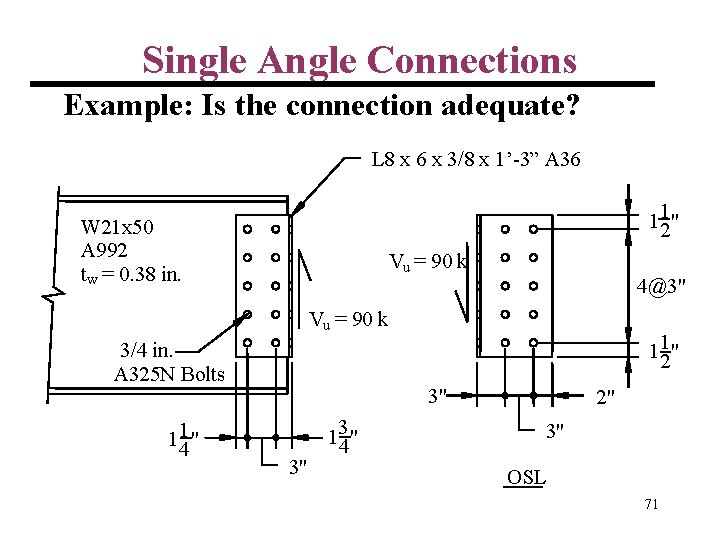
Single Angle Connections Example: Is the connection adequate? L 8 x 6 x 3/8 x 1’-3” A 36 112 " W 21 x 50 A 992 t w = 0. 38 in. Vu = 90 k 4@3" Vu = 90 k 3/4 in. A 325 N Bolts 114 " 112 " 3" 3" 134 " 2" 3" OSL 71

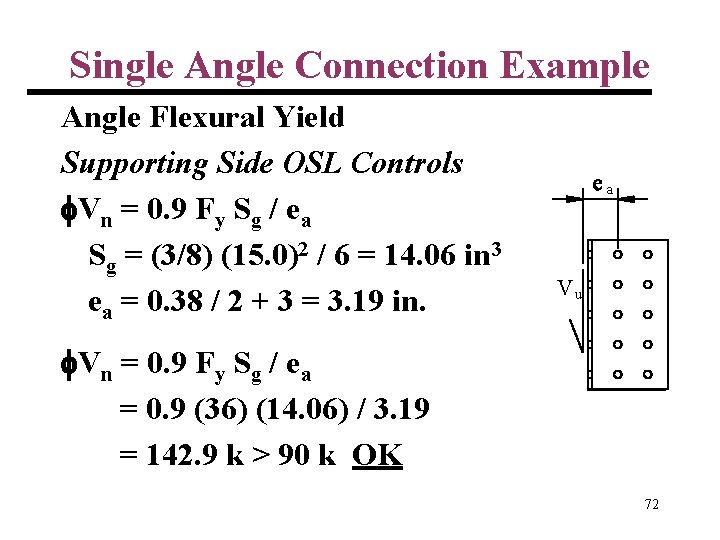
Single Angle Connection Example Angle Flexural Yield Supporting Side OSL Controls Vn = 0. 9 Fy Sg / ea Sg = (3/8) (15. 0)2 / 6 = 14. 06 in 3 ea = 0. 38 / 2 + 3 = 3. 19 in. a Vu Vn = 0. 9 Fy Sg / ea = 0. 9 (36) (14. 06) / 3. 19 = 142. 9 k > 90 k OK 72

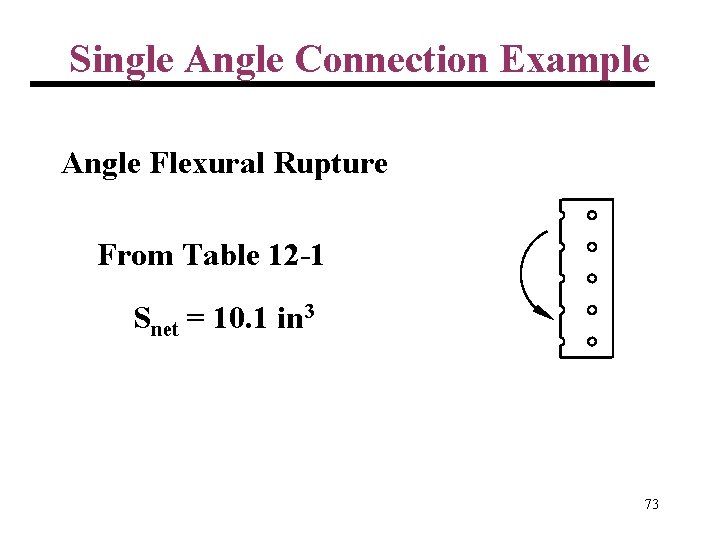
Single Angle Connection Example Angle Flexural Rupture From Table 12 -1 Snet = 10. 1 in 3 73

74

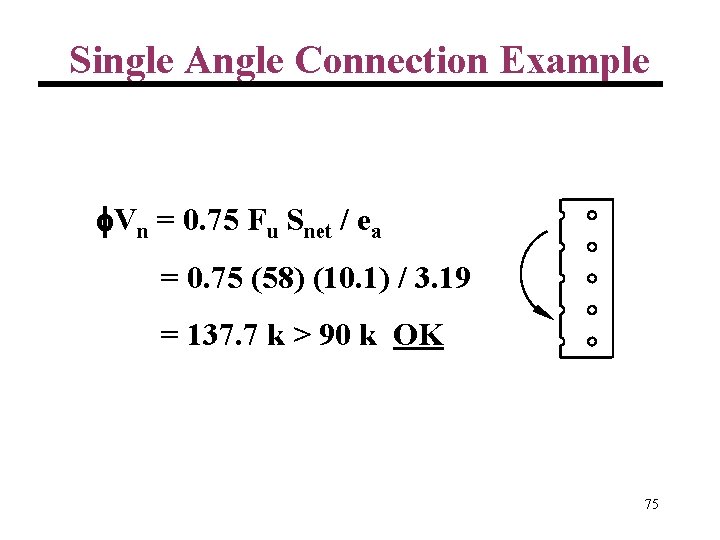
Single Angle Connection Example Vn = 0. 75 Fu Snet / ea = 0. 75 (58) (10. 1) / 3. 19 = 137. 7 k > 90 k OK 75

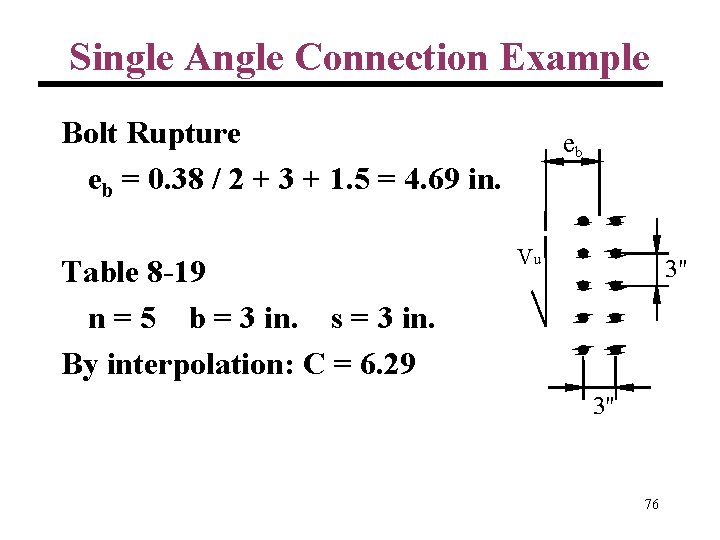
Single Angle Connection Example Bolt Rupture eb = 0. 38 / 2 + 3 + 1. 5 = 4. 69 in. Table 8 -19 n = 5 b = 3 in. s = 3 in. By interpolation: C = 6. 29 eb Vu 3" 3" 76

77

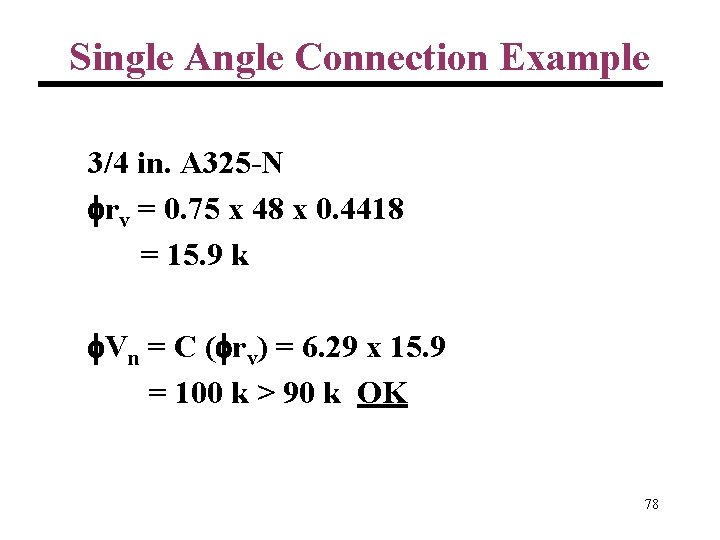
Single Angle Connection Example 3/4 in. A 325 -N rv = 0. 75 x 48 x 0. 4418 = 15. 9 k Vn = C ( rv) = 6. 29 x 15. 9 = 100 k > 90 k OK 78

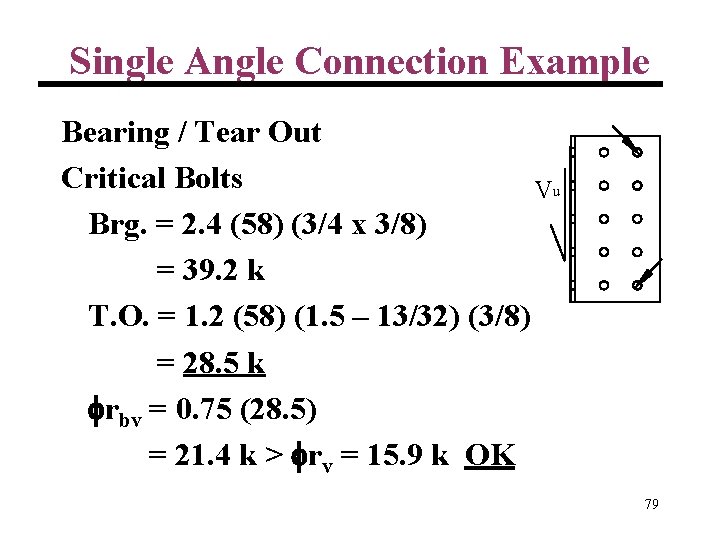
Single Angle Connection Example Bearing / Tear Out Critical Bolts Vu Brg. = 2. 4 (58) (3/4 x 3/8) = 39. 2 k T. O. = 1. 2 (58) (1. 5 – 13/32) (3/8) = 28. 5 k rbv = 0. 75 (28. 5) = 21. 4 k > rv = 15. 9 k OK 79

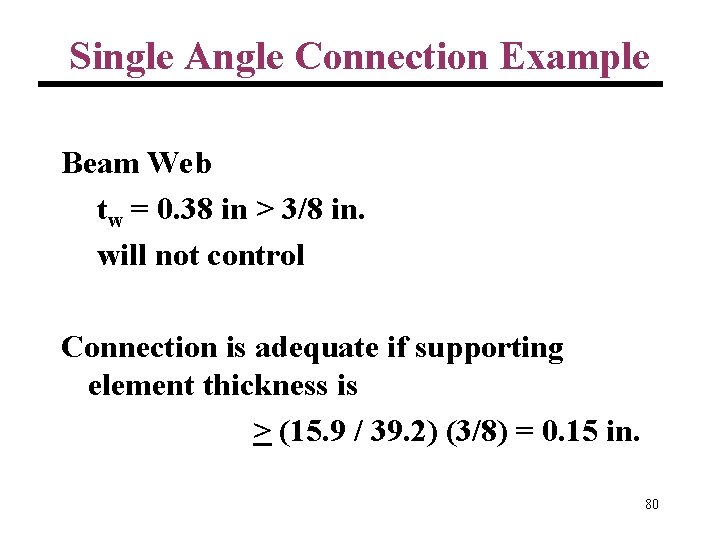
Single Angle Connection Example Beam Web tw = 0. 38 in > 3/8 in. will not control Connection is adequate if supporting element thickness is > (15. 9 / 39. 2) (3/8) = 0. 15 in. 80

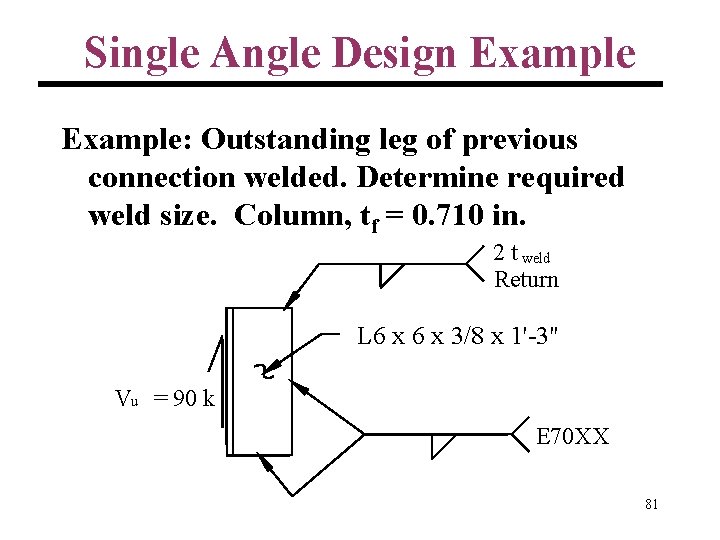
Single Angle Design Example: Outstanding leg of previous connection welded. Determine required weld size. Column, tf = 0. 710 in. 2 t weld Return L 6 x 3/8 x 1'-3" Vu = 90 k E 70 XX 81

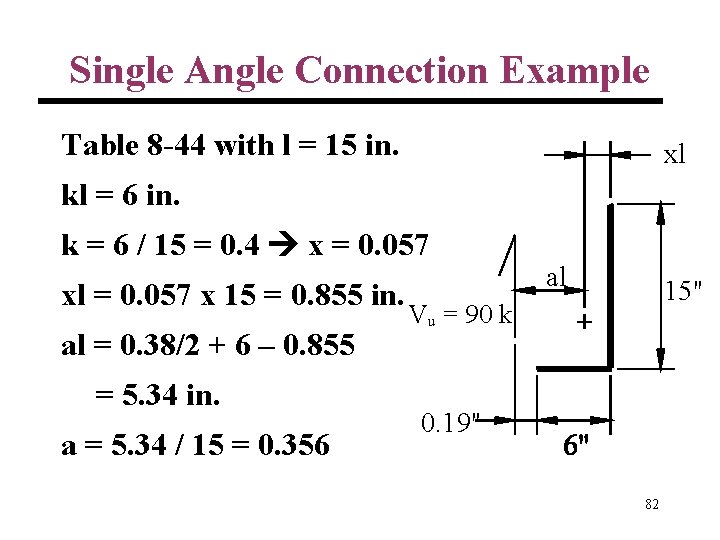
Single Angle Connection Example Table 8 -44 with l = 15 in. xl kl = 6 in. k = 6 / 15 = 0. 4 x = 0. 057 xl = 0. 057 x 15 = 0. 855 in. al = 0. 38/2 + 6 – 0. 855 = 5. 34 in. a = 5. 34 / 15 = 0. 356 al 15" Vu = 90 k 0. 19" 82

83

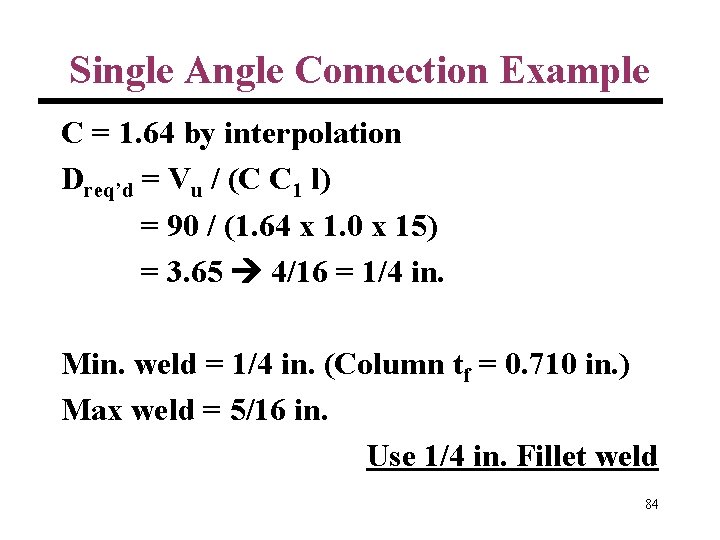
Single Angle Connection Example C = 1. 64 by interpolation Dreq’d = Vu / (C C 1 l) = 90 / (1. 64 x 1. 0 x 15) = 3. 65 4/16 = 1/4 in. Min. weld = 1/4 in. (Column tf = 0. 710 in. ) Max weld = 5/16 in. Use 1/4 in. Fillet weld 84

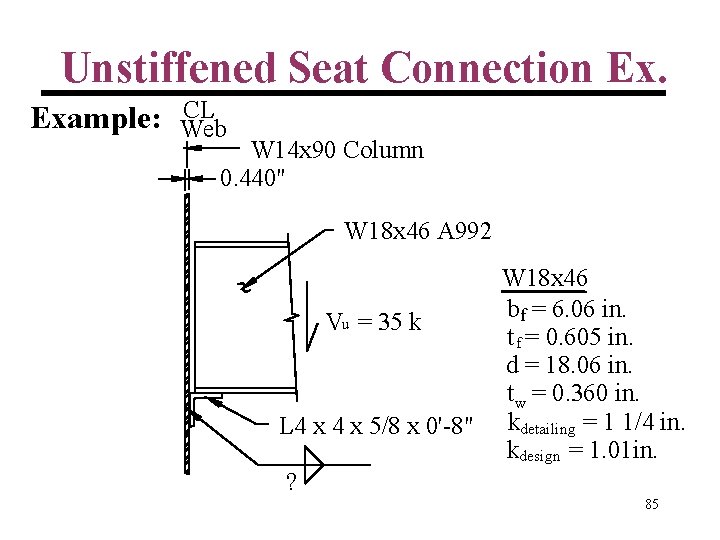
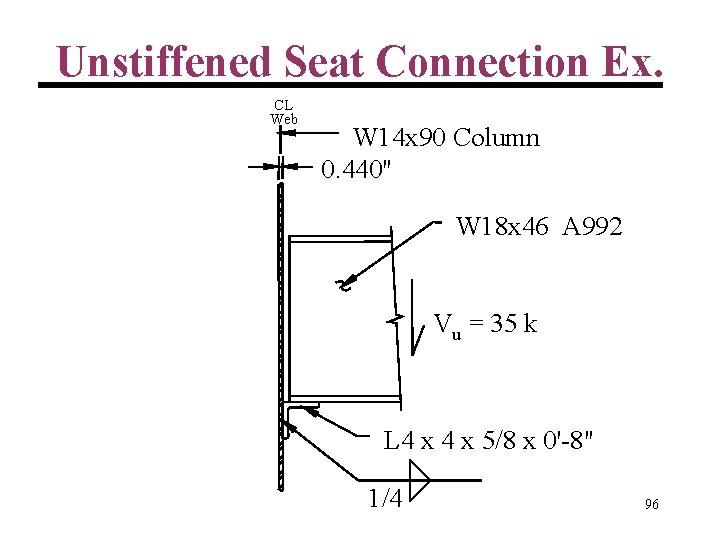
Unstiffened Seat Connection Ex. Example: CL Web W 14 x 90 Column 0. 440" W 18 x 46 A 992 Vu = 35 k L 4 x 5/8 x 0'-8" W 18 x 46 bf = 6. 06 in. t f = 0. 605 in. d = 18. 06 in. t w = 0. 360 in. kdetailing = 1 1/4 in. kdesign = 1. 01 in. ? 85

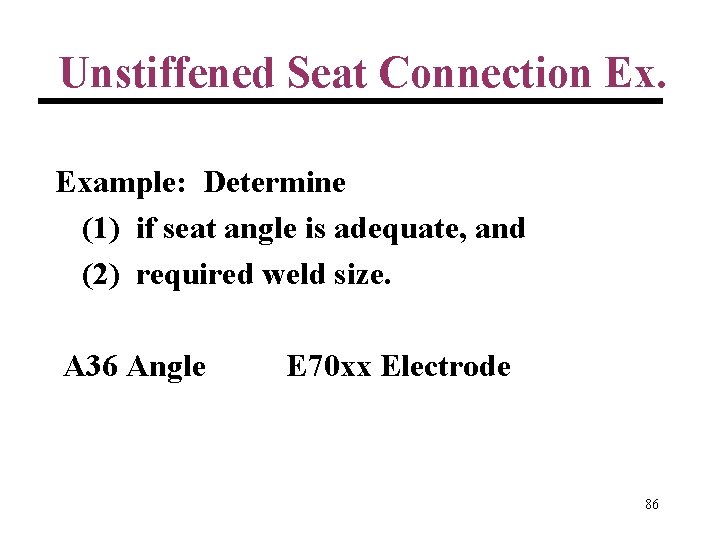
Unstiffened Seat Connection Ex. Example: Determine (1) if seat angle is adequate, and (2) required weld size. A 36 Angle E 70 xx Electrode 86

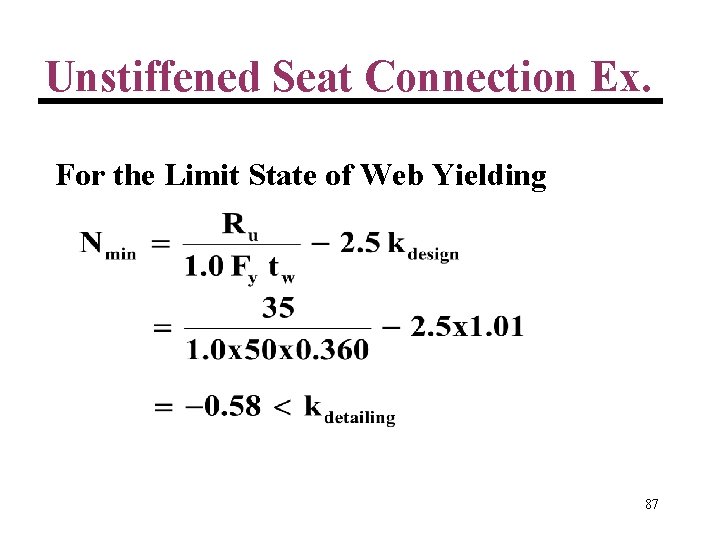
Unstiffened Seat Connection Ex. For the Limit State of Web Yielding 87

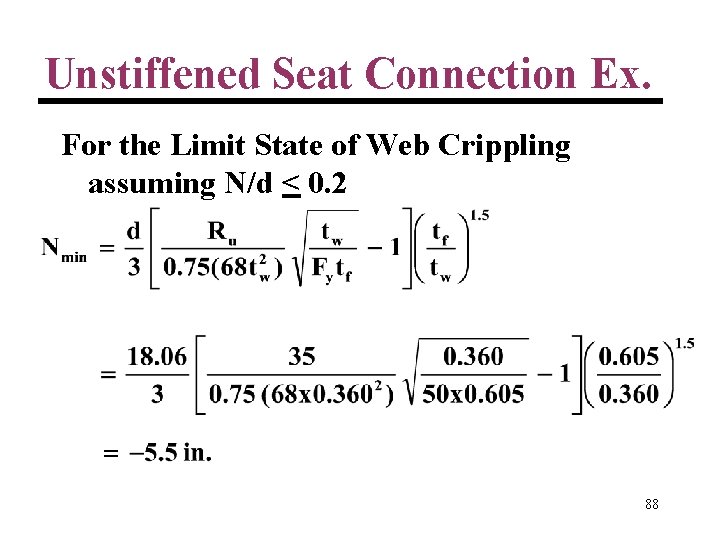
Unstiffened Seat Connection Ex. For the Limit State of Web Crippling assuming N/d < 0. 2 88

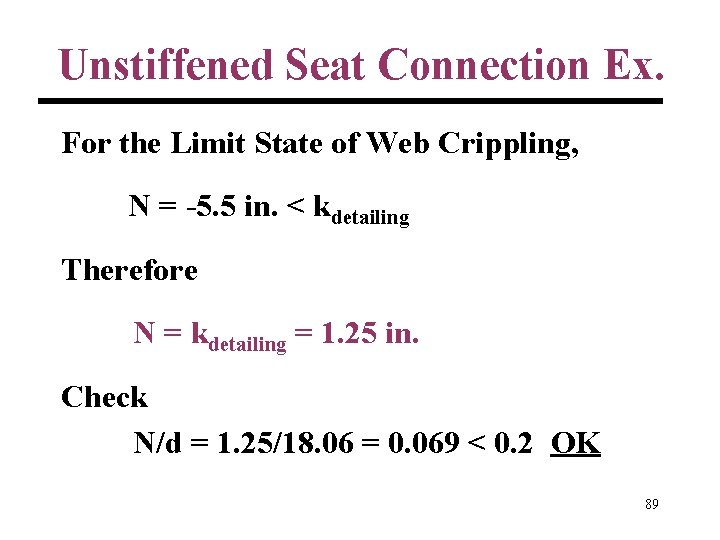
Unstiffened Seat Connection Ex. For the Limit State of Web Crippling, N = -5. 5 in. < kdetailing Therefore N = kdetailing = 1. 25 in. Check N/d = 1. 25/18. 06 = 0. 069 < 0. 2 OK 89

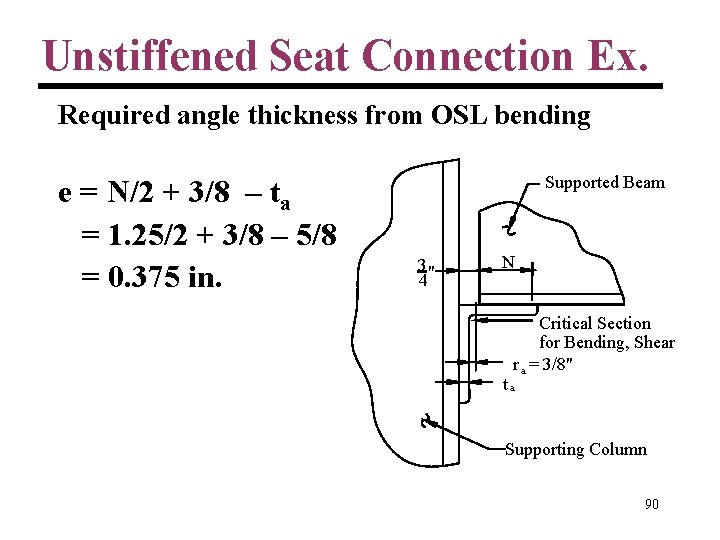
Unstiffened Seat Connection Ex. Required angle thickness from OSL bending e = N/2 + 3/8 – ta = 1. 25/2 + 3/8 – 5/8 = 0. 375 in. Supported Beam 3" 4 N Critical Section for Bending, Shear r a = 3/8" ta Supporting Column 90

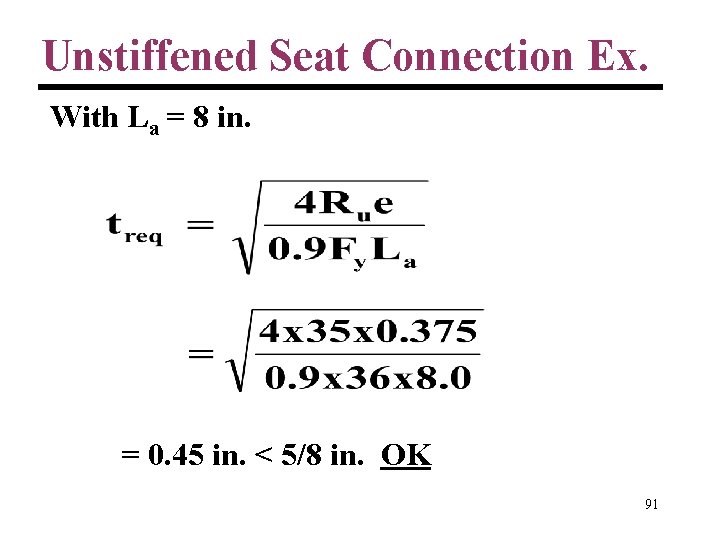
Unstiffened Seat Connection Ex. With La = 8 in. = 0. 45 in. < 5/8 in. OK 91

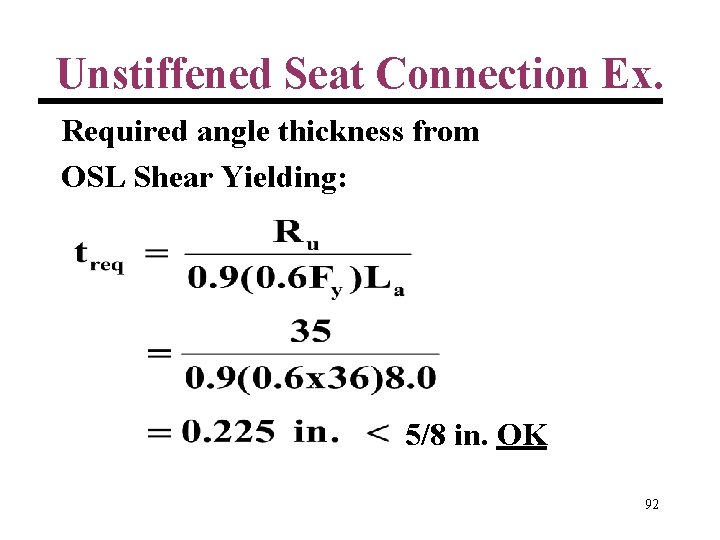
Unstiffened Seat Connection Ex. Required angle thickness from OSL Shear Yielding: 5/8 in. OK 92

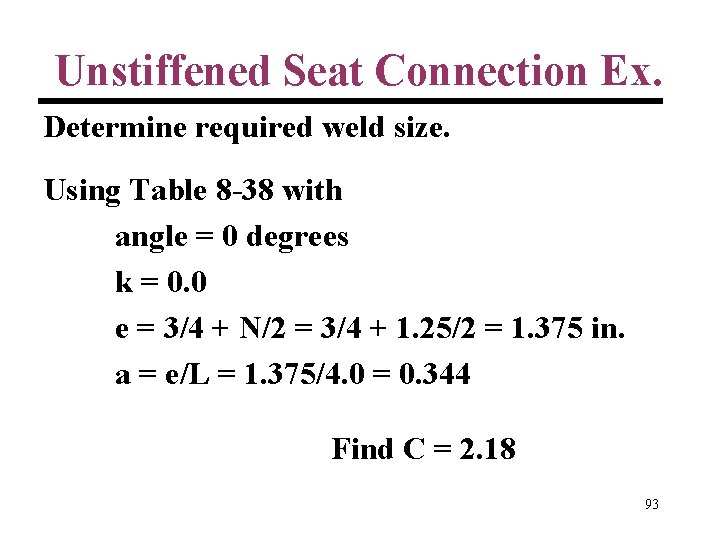
Unstiffened Seat Connection Ex. Determine required weld size. Using Table 8 -38 with angle = 0 degrees k = 0. 0 e = 3/4 + N/2 = 3/4 + 1. 25/2 = 1. 375 in. a = e/L = 1. 375/4. 0 = 0. 344 Find C = 2. 18 93

Unstiffened Seat Connection Ex. 94

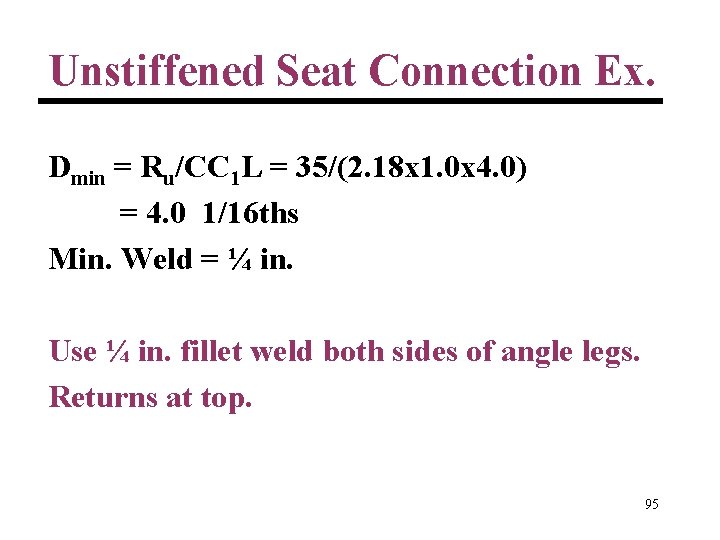
Unstiffened Seat Connection Ex. Dmin = Ru/CC 1 L = 35/(2. 18 x 1. 0 x 4. 0) = 4. 0 1/16 ths Min. Weld = ¼ in. Use ¼ in. fillet weld both sides of angle legs. Returns at top. 95

Unstiffened Seat Connection Ex. CL Web W 14 x 90 Column 0. 440" W 18 x 46 A 992 Vu = 35 k L 4 x 5/8 x 0'-8" 1/4 96

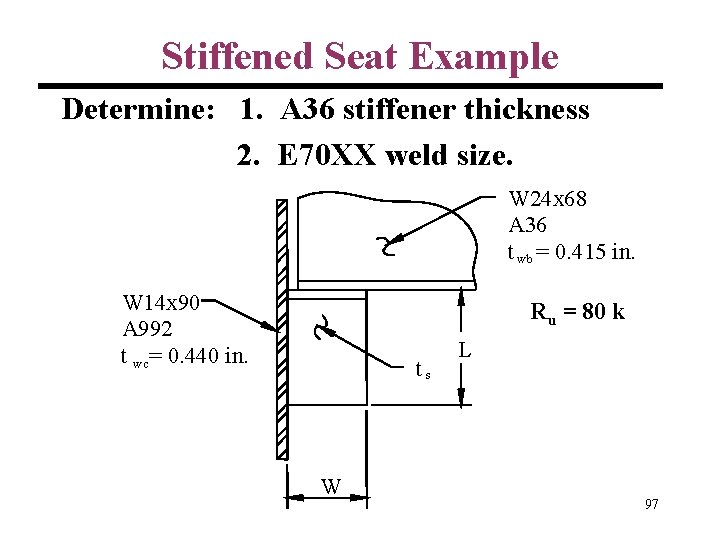
Stiffened Seat Example Determine: 1. A 36 stiffener thickness 2. E 70 XX weld size. W 24 x 68 A 36 t wb = 0. 415 in. W 14 x 90 A 992 t wc= 0. 440 in. Ru = 80 k ts W L 97

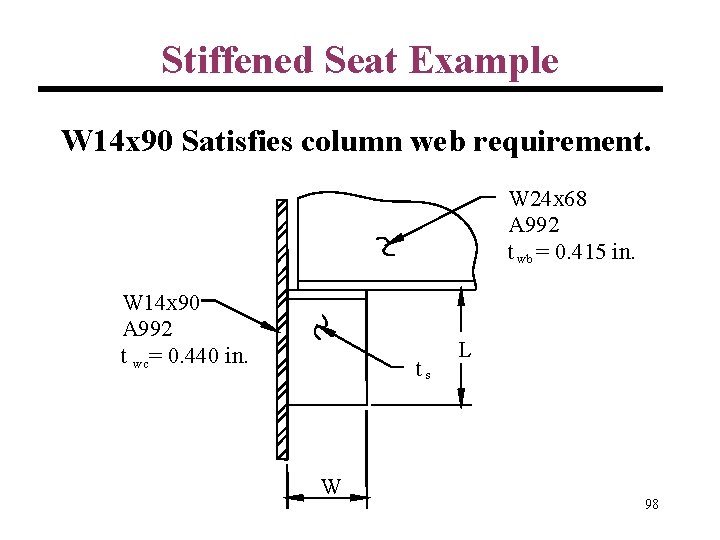
Stiffened Seat Example W 14 x 90 Satisfies column web requirement. W 24 x 68 A 992 t wb = 0. 415 in. W 14 x 90 A 992 t wc= 0. 440 in. ts W L 98

99

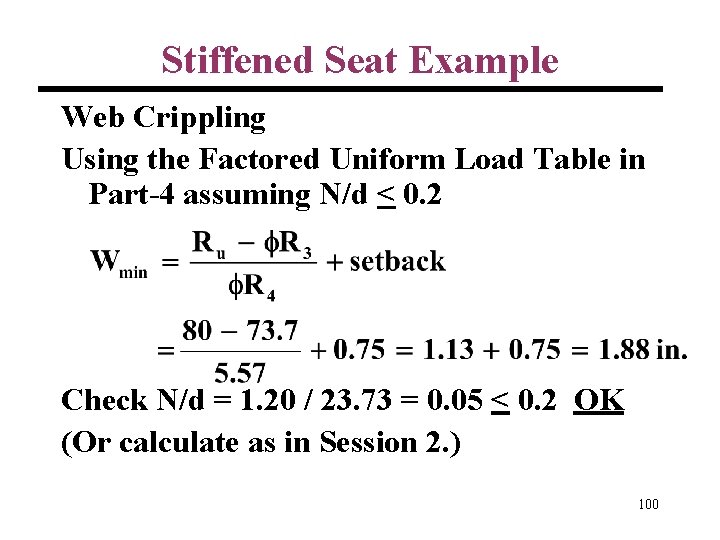
Stiffened Seat Example Web Crippling Using the Factored Uniform Load Table in Part-4 assuming N/d < 0. 2 Check N/d = 1. 20 / 23. 73 = 0. 05 < 0. 2 OK (Or calculate as in Session 2. ) 100

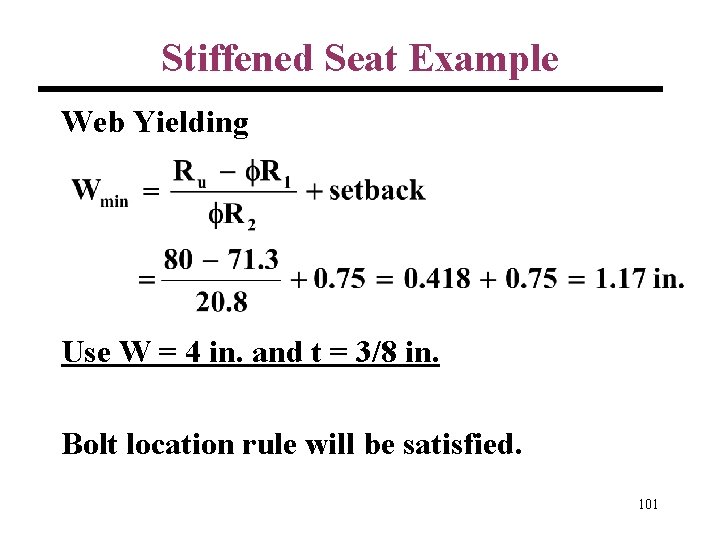
Stiffened Seat Example Web Yielding Use W = 4 in. and t = 3/8 in. Bolt location rule will be satisfied. 101

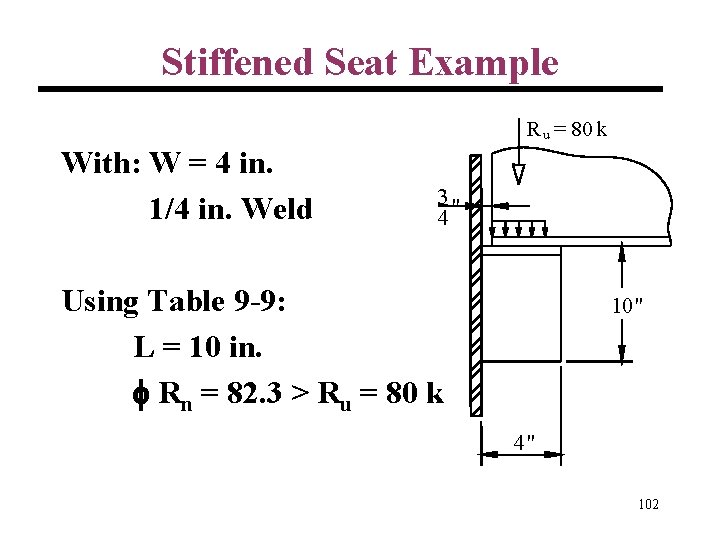
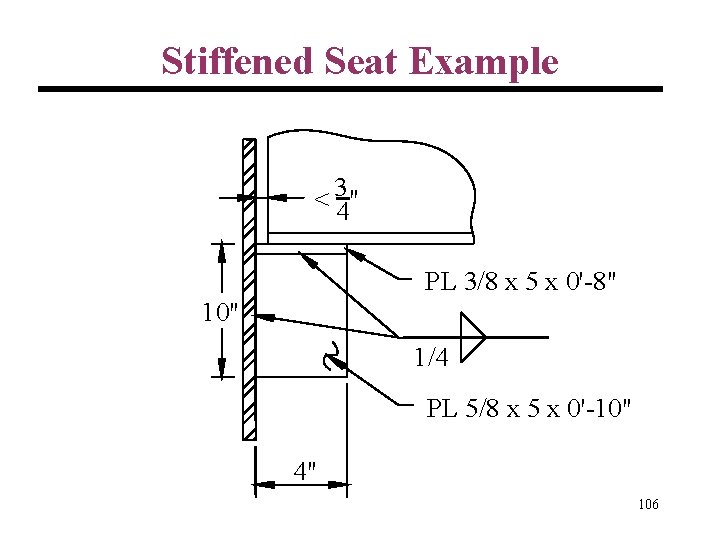
Stiffened Seat Example R u = 80 k With: W = 4 in. 1/4 in. Weld 3" 4 Using Table 9 -9: L = 10 in. Rn = 82. 3 > Ru = 80 k 10" 4" 102

Stiffened Seat Example 103

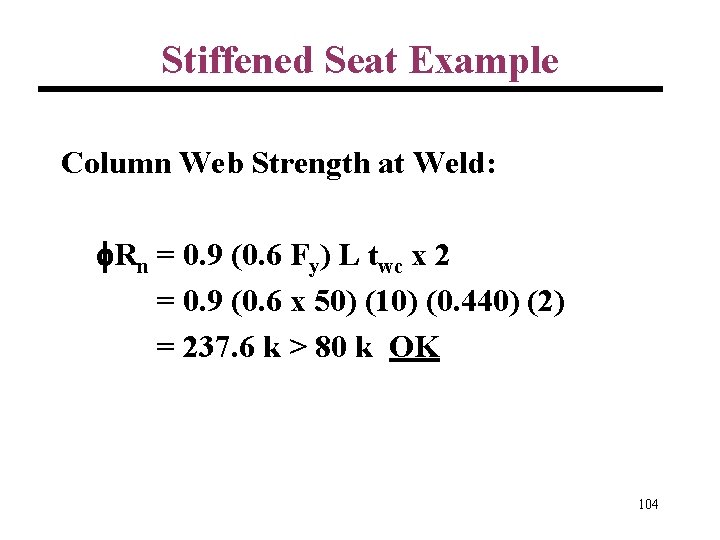
Stiffened Seat Example Column Web Strength at Weld: Rn = 0. 9 (0. 6 Fy) L twc x 2 = 0. 9 (0. 6 x 50) (10) (0. 440) (2) = 237. 6 k > 80 k OK 104

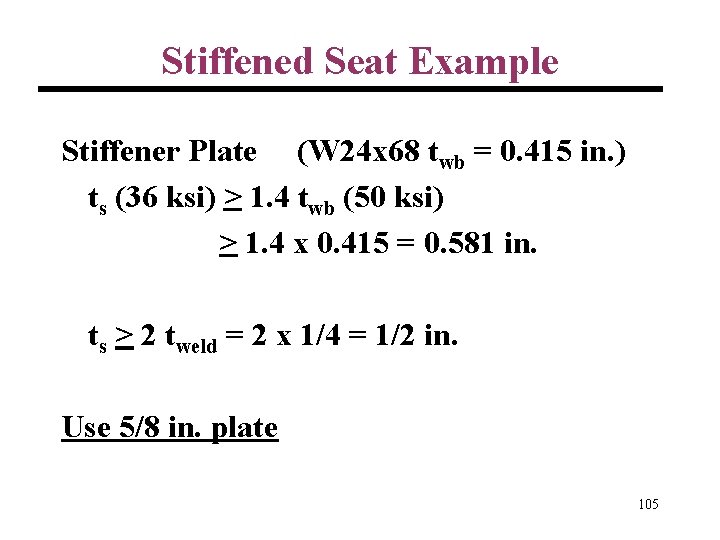
Stiffened Seat Example Stiffener Plate (W 24 x 68 twb = 0. 415 in. ) ts (36 ksi) > 1. 4 twb (50 ksi) > 1. 4 x 0. 415 = 0. 581 in. ts > 2 tweld = 2 x 1/4 = 1/2 in. Use 5/8 in. plate 105

Stiffened Seat Example < 34" PL 3/8 x 5 x 0'-8" 10" 1/4 PL 5/8 x 5 x 0'-10" 4" 106