MCE 476 Nondestructive Testing Methods Instructor Dr Mostafa














- Slides: 120

MCE 476 - Nondestructive Testing Methods Instructor: Dr. Mostafa Ranjbar BSc, MSc, Ph. D. (Dr. -Ing. ) from Technical University of Dresden, Germany

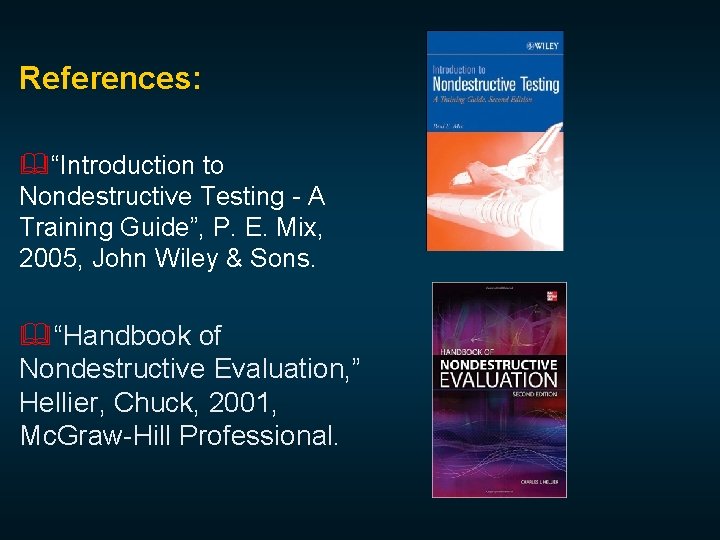
References: &“Introduction to Nondestructive Testing - A Training Guide”, P. E. Mix, 2005, John Wiley & Sons. &“Handbook of Nondestructive Evaluation, ” Hellier, Chuck, 2001, Mc. Graw-Hill Professional.

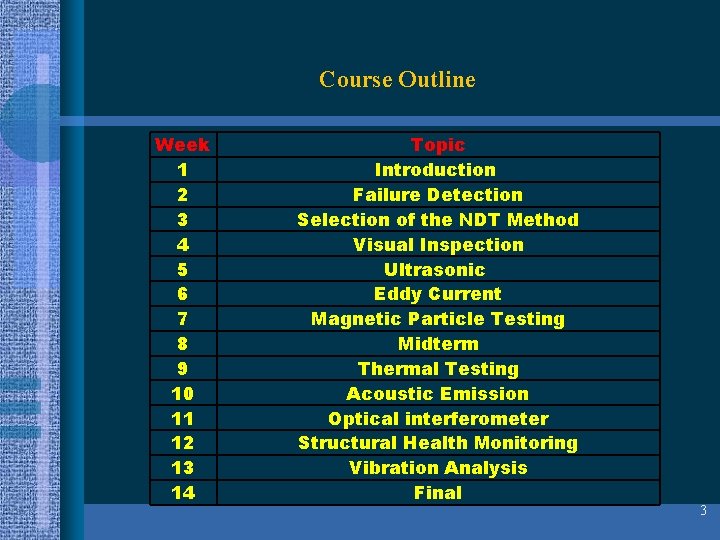
Course Outline Week 1 2 3 4 5 6 7 8 9 10 11 12 13 14 Topic Introduction Failure Detection Selection of the NDT Method Visual Inspection Ultrasonic Eddy Current Magnetic Particle Testing Midterm Thermal Testing Acoustic Emission Optical interferometer Structural Health Monitoring Vibration Analysis Final 3

Percentage (%) Midterm exams 30 Homework and Projects 20 Final exam 50 Assessment criteria 4

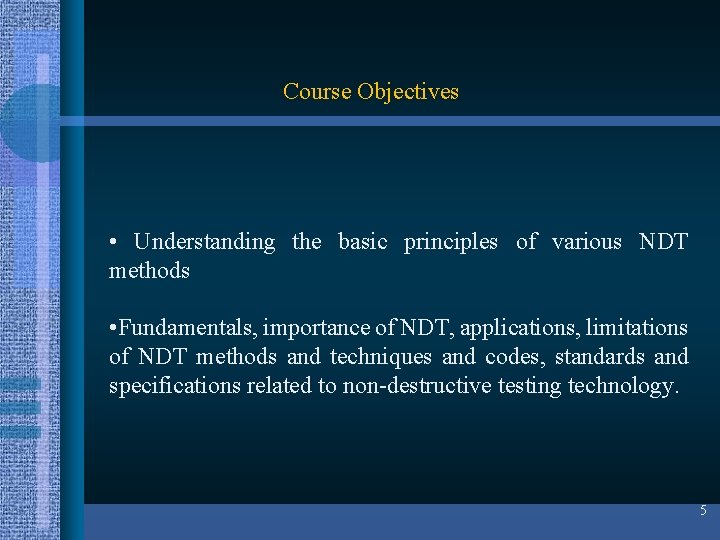
Course Objectives • Understanding the basic principles of various NDT methods • Fundamentals, importance of NDT, applications, limitations of NDT methods and techniques and codes, standards and specifications related to non-destructive testing technology. 5

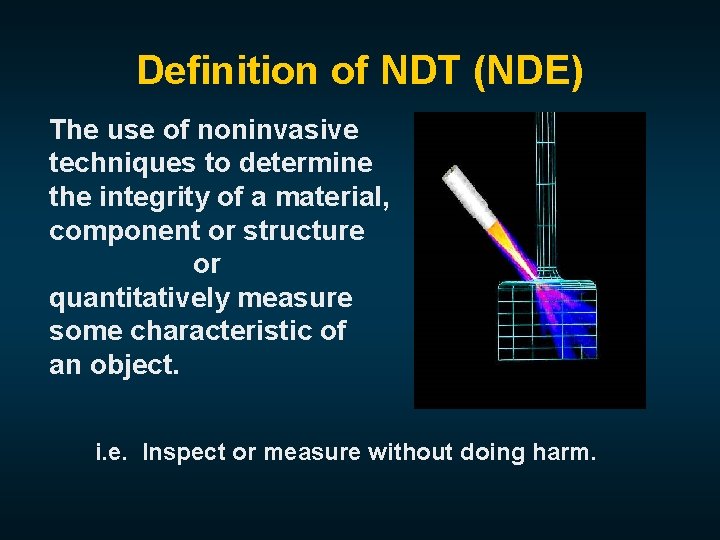
Definition of NDT (NDE) The use of noninvasive techniques to determine the integrity of a material, component or structure or quantitatively measure some characteristic of an object. i. e. Inspect or measure without doing harm.

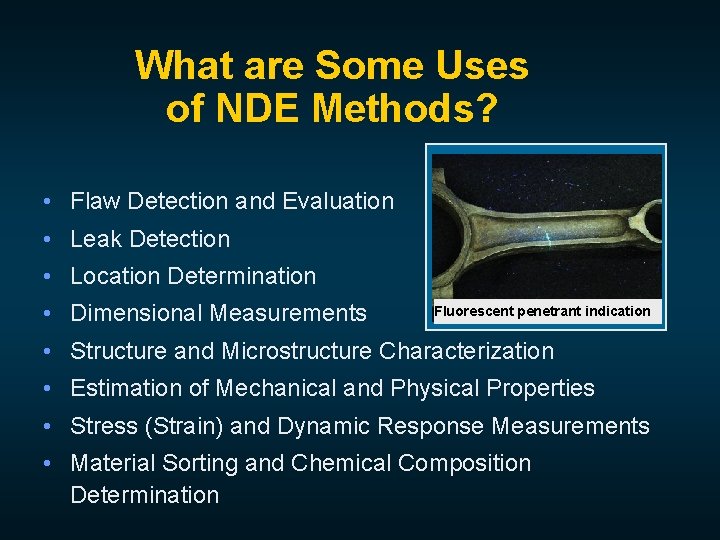
What are Some Uses of NDE Methods? • Flaw Detection and Evaluation • Leak Detection • Location Determination • Dimensional Measurements Fluorescent penetrant indication • Structure and Microstructure Characterization • Estimation of Mechanical and Physical Properties • Stress (Strain) and Dynamic Response Measurements • Material Sorting and Chemical Composition Determination

Why Nondestructive? • • • Test piece too precious to be destroyed Test piece to be reuse after inspection Test piece is in service For quality control purpose Something you simply cannot do harm to, e. g. fetus in mother’s uterus

When are NDE Methods Used? There are NDE application at almost any stage in the production or life cycle of a component. – To assist in product development – To screen or sort incoming materials – To monitor, improve or control manufacturing processes – To verify proper processing such as heat treating – To verify proper assembly – To inspect for in-service damage

Major types of NDT • Detection of surface flaws PVisual PMagnetic Particle Inspection PFluorescent Dye Penetrant Inspection • Detection of internal flaws ORadiography OUltrasonic Testing OEddy current Testing

What is Nondestructive Testing? • Nondestructive Testing (NDT) refers to technology that allows a component to be inspected for serviceability, without impairing its usefulness

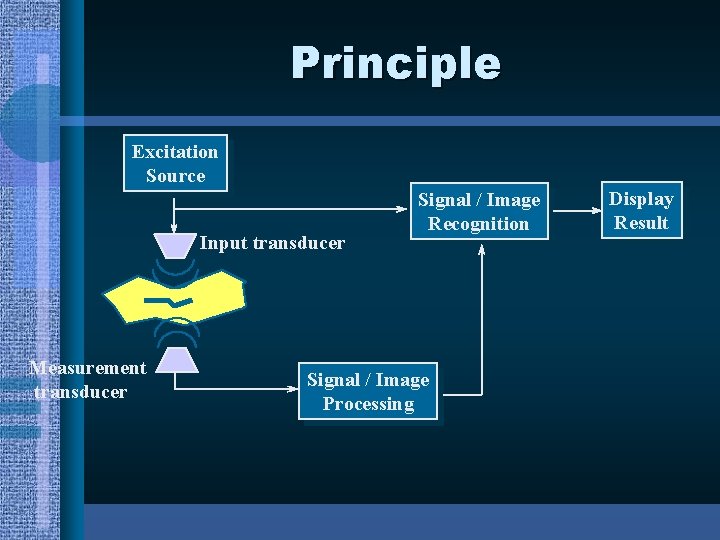
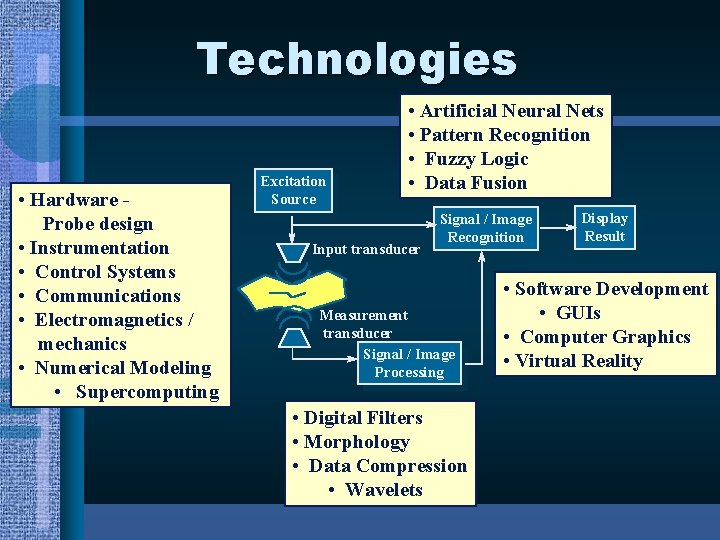
Principle Excitation Source Input transducer Measurement transducer Signal / Image Recognition Signal / Image Processing Display Result

Technologies • Hardware - Probe design • Instrumentation • Control Systems • Communications • Electromagnetics / mechanics • Numerical Modeling • Supercomputing Excitation Source • Artificial Neural Nets • Pattern Recognition • Fuzzy Logic • Data Fusion Input transducer Signal / Image Recognition Measurement transducer Signal / Image Processing • Digital Filters • Morphology • Data Compression • Wavelets Display Result • Software Development • GUIs • Computer Graphics • Virtual Reality

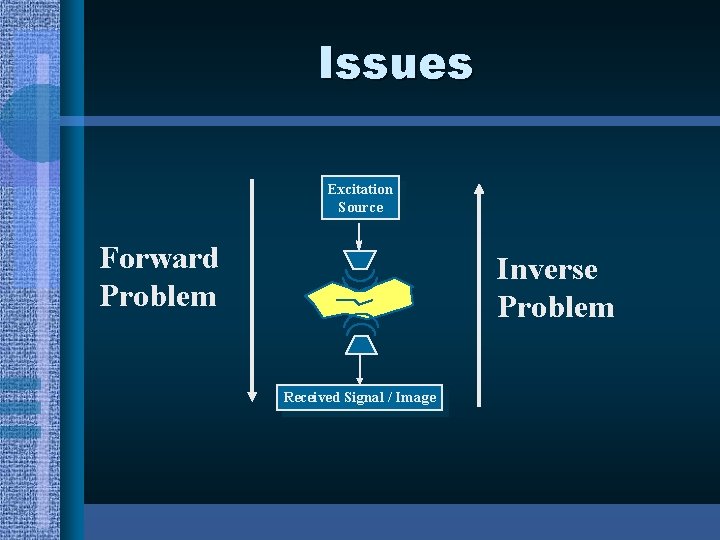
Issues Excitation Source Forward Problem Inverse Problem Received Signal / Image

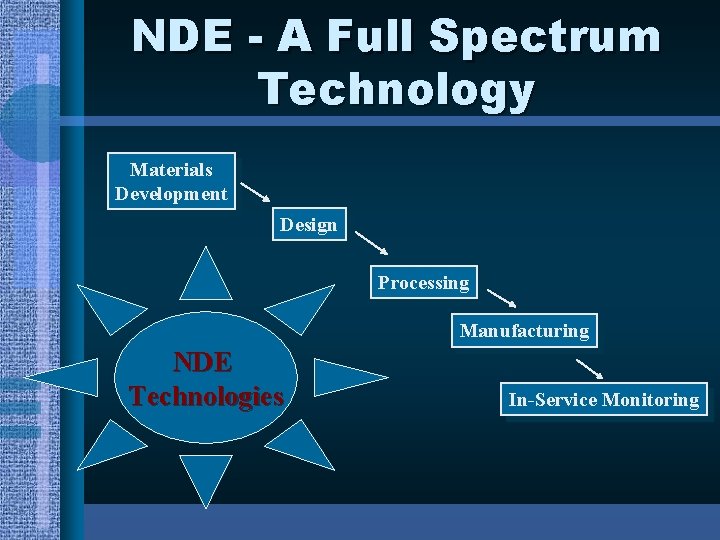
NDE - A Full Spectrum Technology Materials Development Design Processing Manufacturing NDE Technologies In-Service Monitoring

Intelligent Synthesis Environment • NASA concept for engineering design of aerospace systems in the 21 st century • Technology benefit estimator – NDE simulation in cost estimating – NDE in simulated manufacturing – NDE in repair simulation

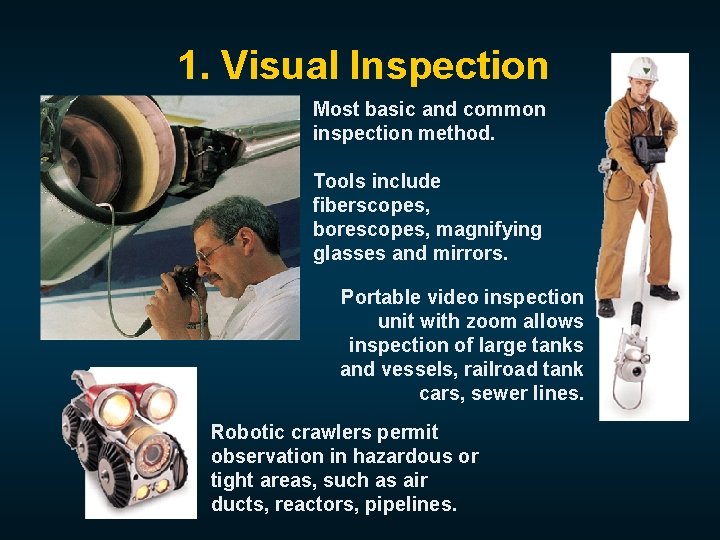
1. Visual Inspection Most basic and common inspection method. Tools include fiberscopes, borescopes, magnifying glasses and mirrors. Portable video inspection unit with zoom allows inspection of large tanks and vessels, railroad tank cars, sewer lines. Robotic crawlers permit observation in hazardous or tight areas, such as air ducts, reactors, pipelines.

2. Magnetic Particle Inspection (MPI) 2. 1 Introduction • A nondestructive testing method used for defect detection. Fast and relatively easy to apply and part surface preparation is not as critical as for some other NDT methods. – MPI one of the most widely utilized nondestructive testing methods. • MPI uses magnetic fields and small magnetic particles, such as iron filings to detect flaws in components. The only requirement from an inspectability standpoint is that the component being inspected must be made of a ferromagnetic material such as iron, nickel, cobalt, or some of their alloys. Ferromagnetic materials are materials that can be magnetized to a level that will allow the inspection to be affective. • The method is used to inspect a variety of product forms such as castings, forgings, and weldments. Many different industries use magnetic particle inspection for determining a component's fitness-foruse. Some examples of industries that use magnetic particle inspection are the structural steel, automotive, petrochemical, power generation, and aerospace industries. Underwater inspection is another area where magnetic particle inspection may be used to test such things as offshore structures and underwater pipelines.

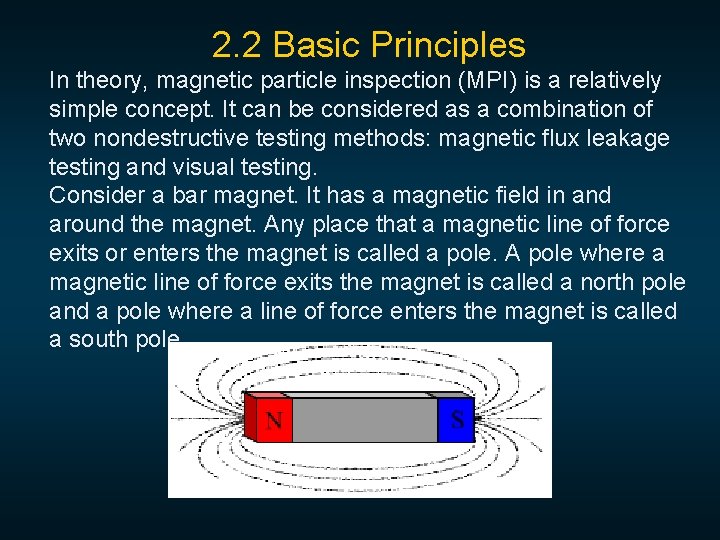
2. 2 Basic Principles In theory, magnetic particle inspection (MPI) is a relatively simple concept. It can be considered as a combination of two nondestructive testing methods: magnetic flux leakage testing and visual testing. Consider a bar magnet. It has a magnetic field in and around the magnet. Any place that a magnetic line of force exits or enters the magnet is called a pole. A pole where a magnetic line of force exits the magnet is called a north pole and a pole where a line of force enters the magnet is called a south pole.

Interaction of materials with an external magnetic field When a material is placed within a magnetic field, the magnetic forces of the material's electrons will be affected. This effect is known as Faraday's Law of Magnetic Induction. However, materials can react quite differently to the presence of an external magnetic field. This reaction is dependent on a number of factors such as the atomic and molecular structure of the material, and the net magnetic field associated with the atoms. The magnetic moments associated with atoms have three origins. These are the electron orbital motion, the change in orbital motion caused by an external magnetic field, and the spin of the electrons.

Diamagnetic, Paramagnetic, and Ferromagnetic Materials Diamagnetic metals: very weak and negative susceptibility to magnetic fields. Diamagnetic materials are slightly repelled by a magnetic field and the material does not retain the magnetic properties when the external field is removed. Paramagnetic metals: small and positive susceptibility to magnetic fields. These materials are slightly attracted by a magnetic field and the material does not retain the magnetic properties when the external field is removed. Ferromagnetic materials: large and positive susceptibility to an external magnetic field. They exhibit a strong attraction to magnetic fields and are able to retain their magnetic properties after the external field has been removed.

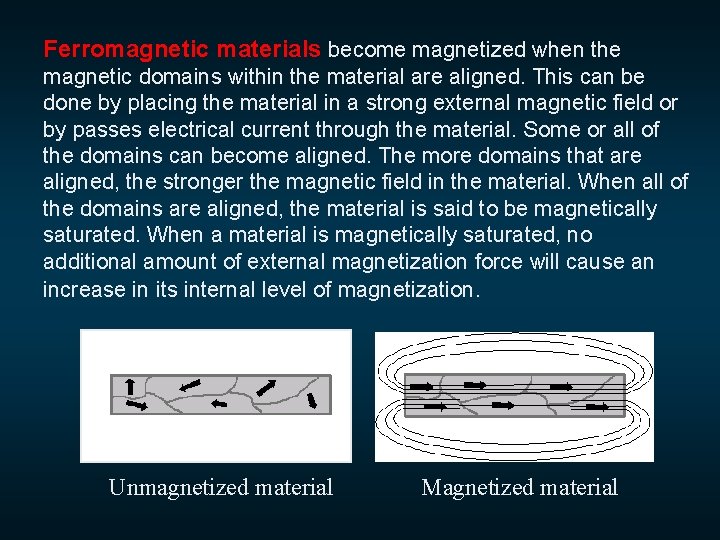
Ferromagnetic materials become magnetized when the magnetic domains within the material are aligned. This can be done by placing the material in a strong external magnetic field or by passes electrical current through the material. Some or all of the domains can become aligned. The more domains that are aligned, the stronger the magnetic field in the material. When all of the domains are aligned, the material is said to be magnetically saturated. When a material is magnetically saturated, no additional amount of external magnetization force will cause an increase in its internal level of magnetization. Unmagnetized material Magnetized material

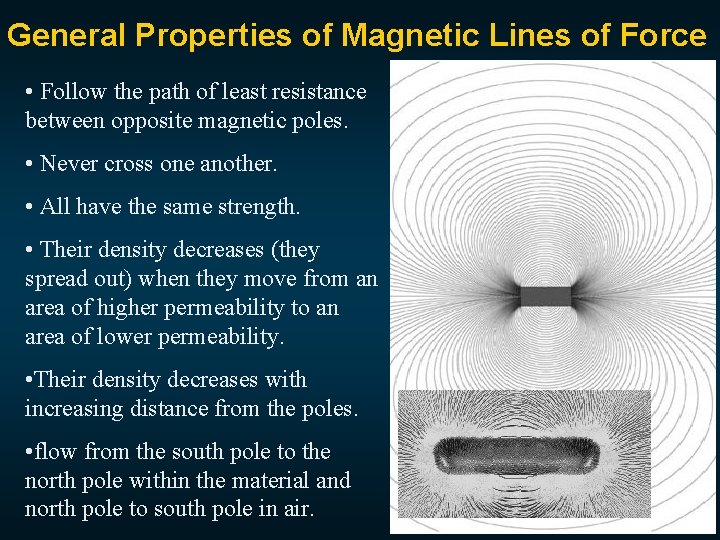
General Properties of Magnetic Lines of Force • Follow the path of least resistance between opposite magnetic poles. • Never cross one another. • All have the same strength. • Their density decreases (they spread out) when they move from an area of higher permeability to an area of lower permeability. • Their density decreases with increasing distance from the poles. • flow from the south pole to the north pole within the material and north pole to south pole in air.

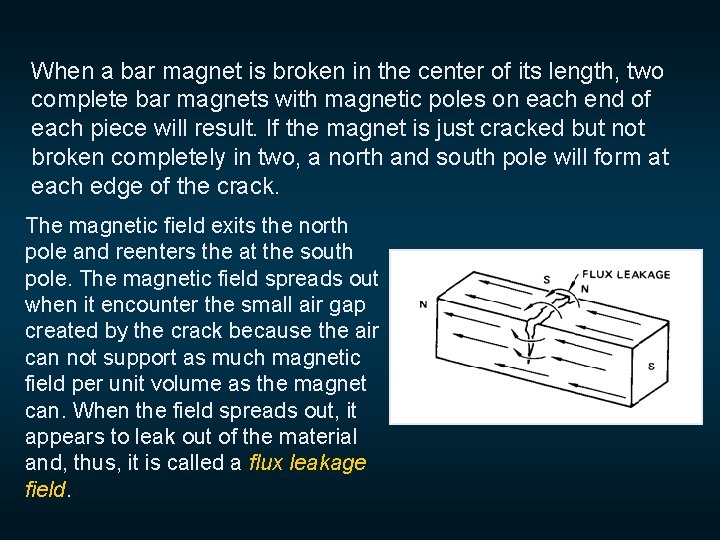
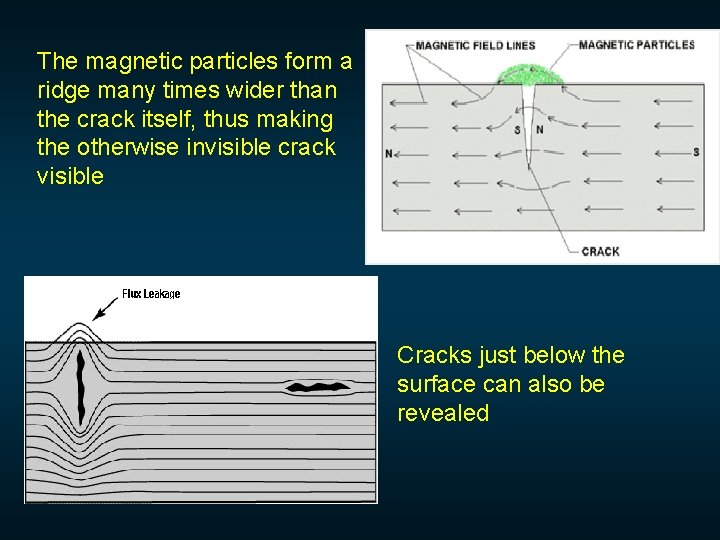
When a bar magnet is broken in the center of its length, two complete bar magnets with magnetic poles on each end of each piece will result. If the magnet is just cracked but not broken completely in two, a north and south pole will form at each edge of the crack. The magnetic field exits the north pole and reenters the at the south pole. The magnetic field spreads out when it encounter the small air gap created by the crack because the air can not support as much magnetic field per unit volume as the magnet can. When the field spreads out, it appears to leak out of the material and, thus, it is called a flux leakage field.

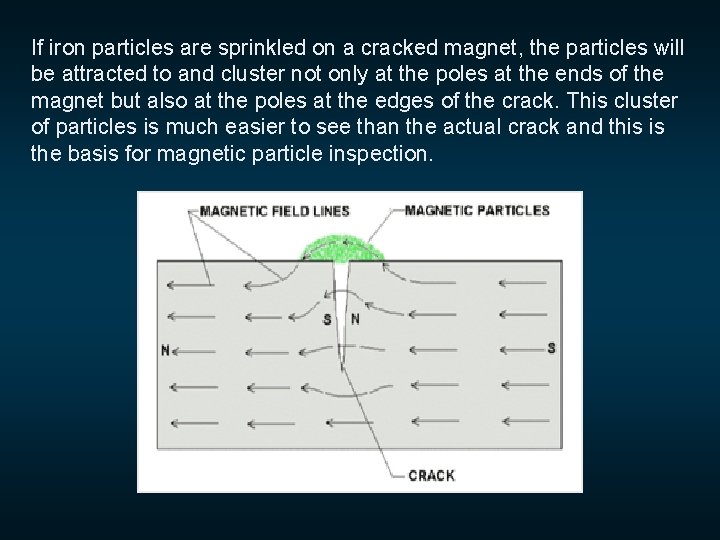
If iron particles are sprinkled on a cracked magnet, the particles will be attracted to and cluster not only at the poles at the ends of the magnet but also at the poles at the edges of the crack. This cluster of particles is much easier to see than the actual crack and this is the basis for magnetic particle inspection.

Magnetic Particle Inspection • The magnetic flux line close to the surface of a ferromagnetic material tends to follow the surface profile of the material • Discontinuities (cracks or voids) of the material perpendicular to the flux lines cause fringing of the magnetic flux lines, i. e. flux leakage • The leakage field can attract other ferromagnetic particles

The magnetic particles form a ridge many times wider than the crack itself, thus making the otherwise invisible crack visible Cracks just below the surface can also be revealed

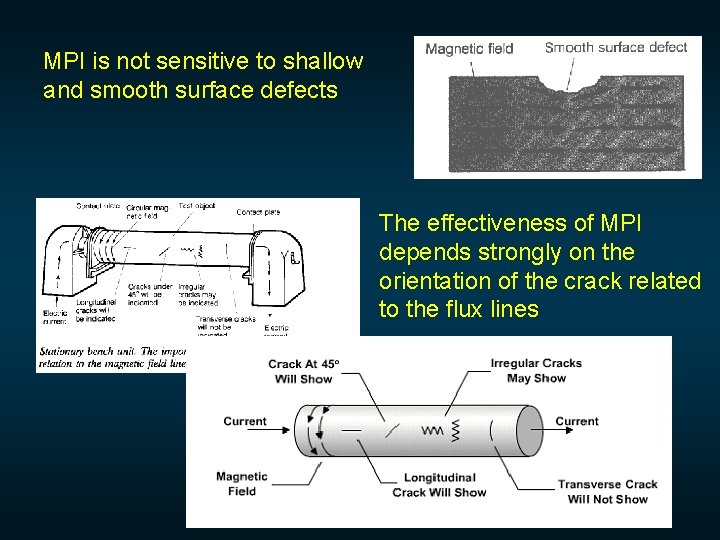
MPI is not sensitive to shallow and smooth surface defects The effectiveness of MPI depends strongly on the orientation of the crack related to the flux lines

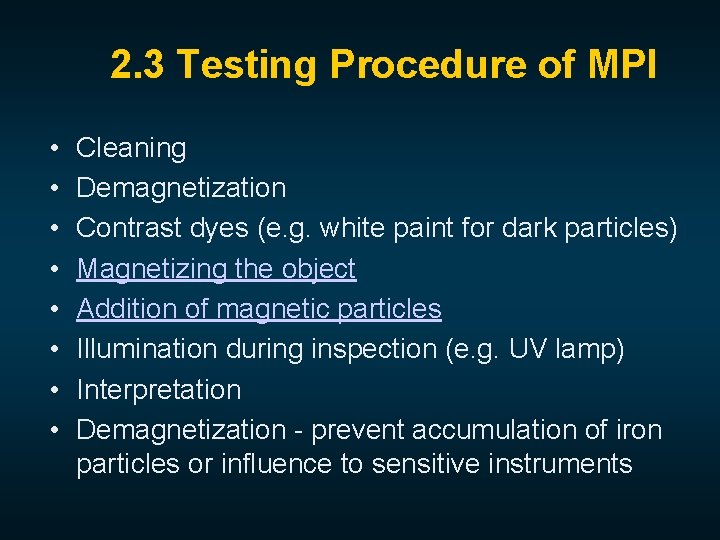
2. 3 Testing Procedure of MPI • • Cleaning Demagnetization Contrast dyes (e. g. white paint for dark particles) Magnetizing the object Addition of magnetic particles Illumination during inspection (e. g. UV lamp) Interpretation Demagnetization - prevent accumulation of iron particles or influence to sensitive instruments

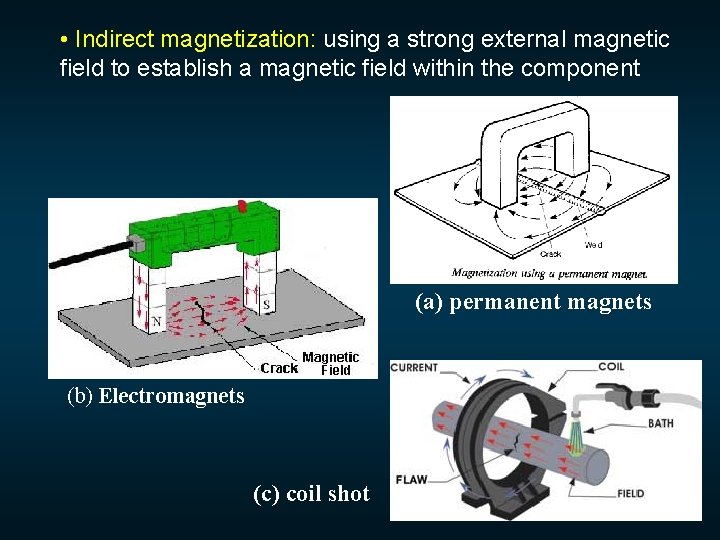
• Indirect magnetization: using a strong external magnetic field to establish a magnetic field within the component (a) permanent magnets (b) Electromagnets (c) coil shot

Some Standards for MPI Procedure • British Standards – BS M. 35: Aerospace Series: Magnetic Particle Flaw Detection of Materials and Components – BS 4397: Methods for magnetic particle testing of welds • ASTM Standards – ASTM E 709 -80: Standard Practice for Magnetic Particle Examination – ASTM E 125 -63: Standard reference photographs for magnetic particle indications on ferrous castings • etc….

2. 4 Advantages of MPI • One of the most dependable and sensitive methods for surface defects • fast, simple and inexpensive • direct, visible indication on surface • unaffected by possible deposits, e. g. oil, grease or other metals chips, in the cracks • can be used on painted objects • surface preparation not required • results readily documented with photo or tape impression

2. 5 Limitations of MPI • Only good for ferromagnetic materials • sub-surface defects will not always be indicated • relative direction between the magnetic field and the defect line is important • objects must be demagnetized before and after the examination • the current magnetization may cause burn scars on the item examined

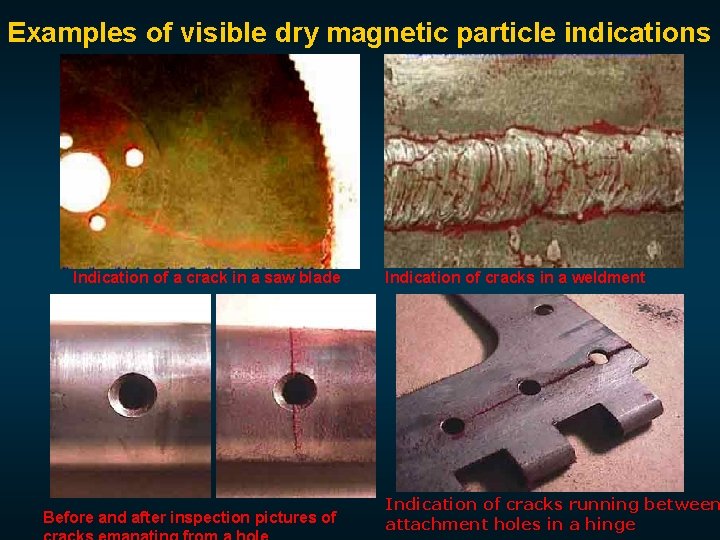
Examples of visible dry magnetic particle indications Indication of a crack in a saw blade Before and after inspection pictures of Indication of cracks in a weldment Indication of cracks running between attachment holes in a hinge

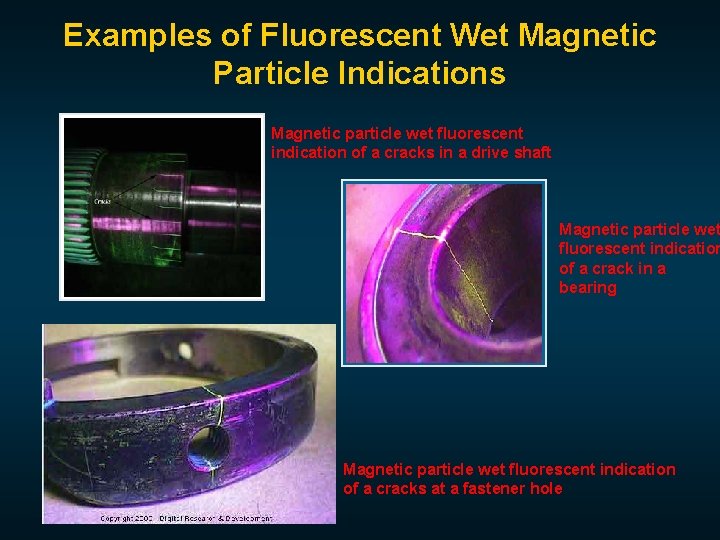
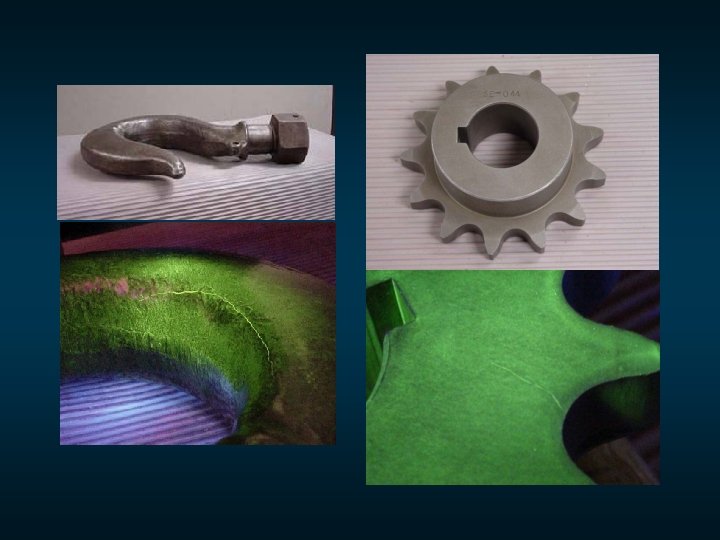
Examples of Fluorescent Wet Magnetic Particle Indications Magnetic particle wet fluorescent indication of a cracks in a drive shaft Magnetic particle wet fluorescent indication of a crack in a bearing Magnetic particle wet fluorescent indication of a cracks at a fastener hole


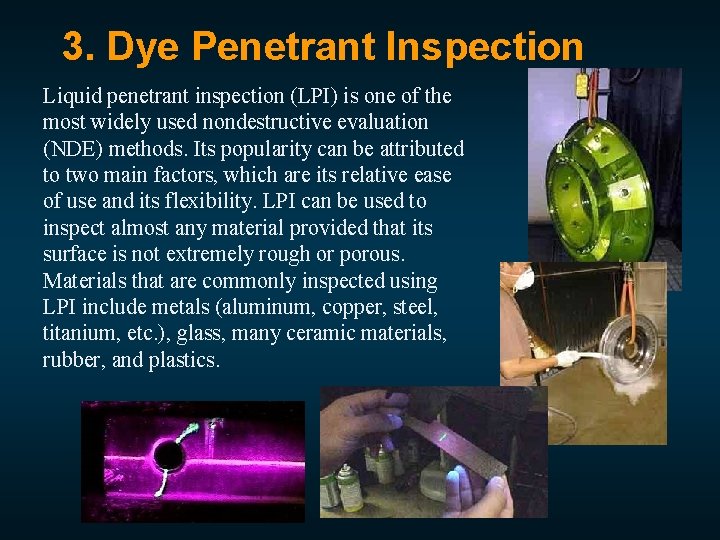
3. Dye Penetrant Inspection Liquid penetrant inspection (LPI) is one of the most widely used nondestructive evaluation (NDE) methods. Its popularity can be attributed to two main factors, which are its relative ease of use and its flexibility. LPI can be used to inspect almost any material provided that its surface is not extremely rough or porous. Materials that are commonly inspected using LPI include metals (aluminum, copper, steel, titanium, etc. ), glass, many ceramic materials, rubber, and plastics.

3. 1 Introduction • Liquid penetration inspection is a method that is used to reveal surface breaking flaws by bleedout of a colored or fluorescent dye from the flaw. • The technique is based on the ability of a liquid to be drawn into a "clean" surface breaking flaw by capillary action. • After a period of time called the "dwell, " excess surface penetrant is removed and a developer applied. This acts as a "blotter. " It draws the penetrant from the flaw to reveal its presence. • Colored (contrast) penetrants require good white light while fluorescent penetrants need to be used in darkened conditions with an ultraviolet "black light". Unlike MPI, this method can be used in non-ferromagnetic materials and even non-metals • Modern methods can reveal cracks 2 m wide • Standard: ASTM E 165 -80 Liquid Penetrant Inspection Method

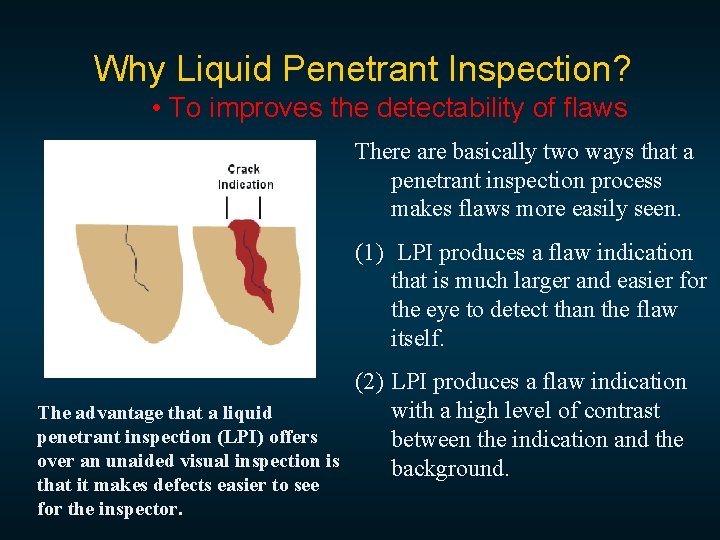
Why Liquid Penetrant Inspection? • To improves the detectability of flaws There are basically two ways that a penetrant inspection process makes flaws more easily seen. (1) LPI produces a flaw indication that is much larger and easier for the eye to detect than the flaw itself. (2) LPI produces a flaw indication with a high level of contrast The advantage that a liquid penetrant inspection (LPI) offers between the indication and the over an unaided visual inspection is background. that it makes defects easier to see for the inspector.

3. 2 Basic processing steps of LPI 1. Surface Preparation: One of the most critical steps of a liquid penetrant inspection is the surface preparation. The surface must be free of oil, grease, water, or other contaminants that may prevent penetrant from entering flaws. The sample may also require etching if mechanical operations such as machining, sanding, or grit blasting have been performed. These and other mechanical operations can smear the surface of the sample, thus closing the defects. 2. Penetrant Application: Once the surface has been thoroughly cleaned and dried, the penetrant material is applied by spraying, brushing, or immersing the parts in a penetrant bath. 3. Penetrant Dwell: The penetrant is left on the surface for a sufficient time to allow as much penetrant as possible to be drawn from or to seep into a defect. The times vary depending on the application, penetrant materials used, the material, the form of the material being inspected, and the type of defect being inspected. Generally, there is no harm in using a longer penetrant dwell time as long as the penetrant is not allowed to dry.

4. Excess Penetrant Removal: This is the most delicate part of the inspection procedure because the excess penetrant must be removed from the surface of the sample while removing as little penetrant as possible from defects. Depending on the penetrant system used, this step may involve cleaning with a solvent, direct rinsing with water, or first treated with an emulsifier and then rinsing with water. 5. Developer Application: A thin layer of developer is then applied to the sample to draw penetrant trapped in flaws back to the surface where it will be visible. Developers come in a variety of forms that may be applied by dusting (dry powdered), dipping, or spraying (wet developers). 6. Indication Development: The developer is allowed to stand on the part surface for a period of time sufficient to permit the extraction of the trapped penetrant out of any surface flaws. This development time is usually a minimum of 10 minutes and significantly longer times may be necessary for tight cracks.

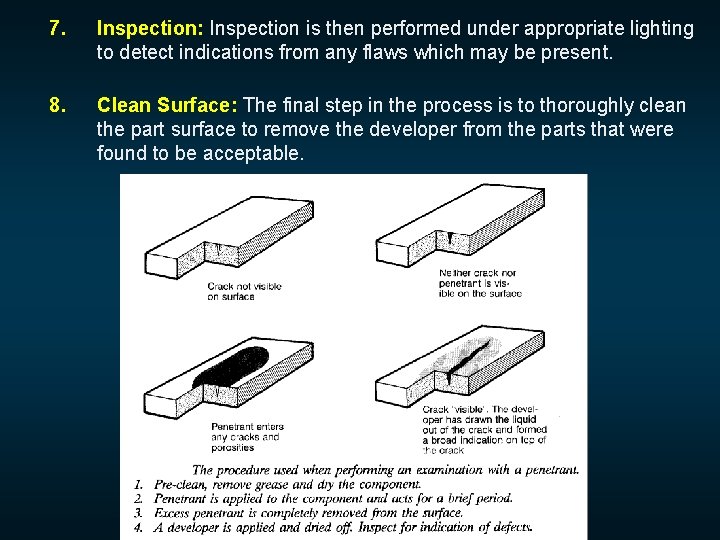
7. Inspection: Inspection is then performed under appropriate lighting to detect indications from any flaws which may be present. 8. Clean Surface: The final step in the process is to thoroughly clean the part surface to remove the developer from the parts that were found to be acceptable.

Penetrant testing materials A penetrant must possess a number of important characteristics. A penetrant must • spread easily over the surface of the material being inspected to provide complete and even coverage. • be drawn into surface breaking defects by capillary action. • remain in the defect but remove easily from the surface of the part. • remain fluid so it can be drawn back to the surface of the part through the drying and developing steps. • be highly visible or fluoresce brightly to produce easy to see indications. • must not be harmful to the material being tested or the inspector.

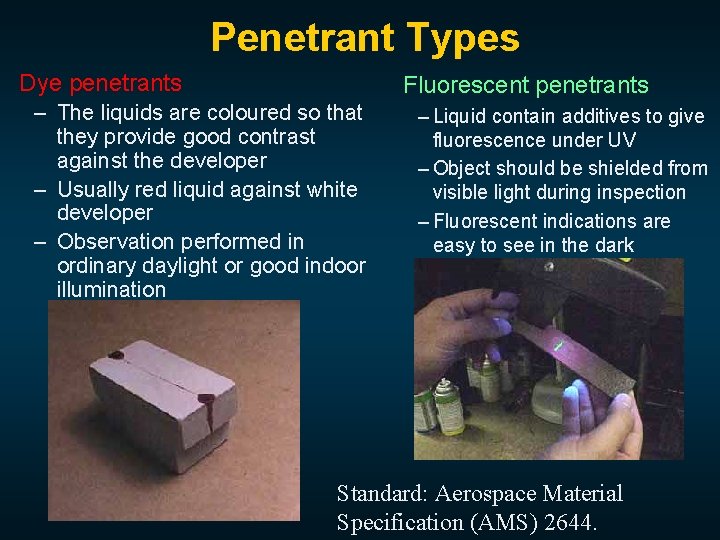
Penetrant Types Dye penetrants Fluorescent penetrants – The liquids are coloured so that they provide good contrast against the developer – Usually red liquid against white developer – Observation performed in ordinary daylight or good indoor illumination – Liquid contain additives to give fluorescence under UV – Object should be shielded from visible light during inspection – Fluorescent indications are easy to see in the dark Standard: Aerospace Material Specification (AMS) 2644.

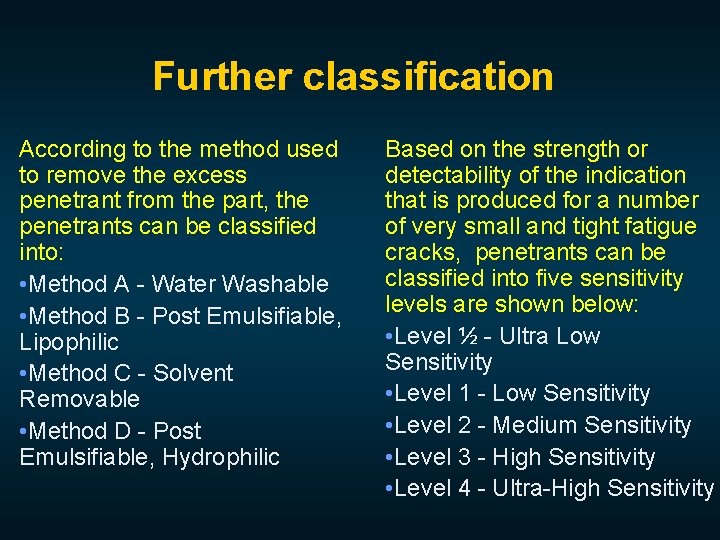
Further classification According to the method used to remove the excess penetrant from the part, the penetrants can be classified into: • Method A - Water Washable • Method B - Post Emulsifiable, Lipophilic • Method C - Solvent Removable • Method D - Post Emulsifiable, Hydrophilic Based on the strength or detectability of the indication that is produced for a number of very small and tight fatigue cracks, penetrants can be classified into five sensitivity levels are shown below: • Level ½ - Ultra Low Sensitivity • Level 1 - Low Sensitivity • Level 2 - Medium Sensitivity • Level 3 - High Sensitivity • Level 4 - Ultra-High Sensitivity

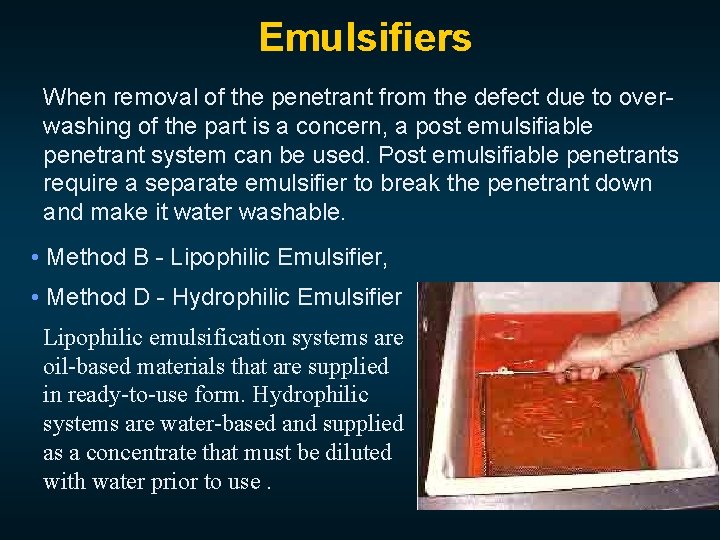
Emulsifiers When removal of the penetrant from the defect due to overwashing of the part is a concern, a post emulsifiable penetrant system can be used. Post emulsifiable penetrants require a separate emulsifier to break the penetrant down and make it water washable. • Method B - Lipophilic Emulsifier, • Method D - Hydrophilic Emulsifier Lipophilic emulsification systems are oil-based materials that are supplied in ready-to-use form. Hydrophilic systems are water-based and supplied as a concentrate that must be diluted with water prior to use.

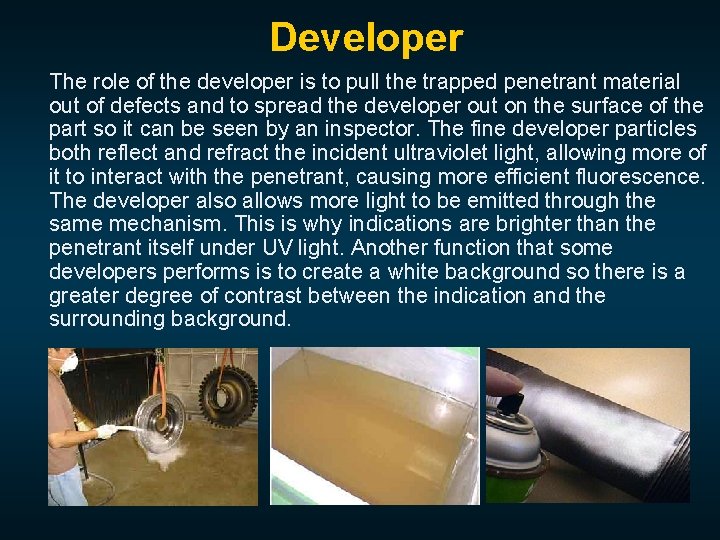
Developer The role of the developer is to pull the trapped penetrant material out of defects and to spread the developer out on the surface of the part so it can be seen by an inspector. The fine developer particles both reflect and refract the incident ultraviolet light, allowing more of it to interact with the penetrant, causing more efficient fluorescence. The developer also allows more light to be emitted through the same mechanism. This is why indications are brighter than the penetrant itself under UV light. Another function that some developers performs is to create a white background so there is a greater degree of contrast between the indication and the surrounding background.

Developer Types • Dry powder developer –the least sensitive but inexpensive • Water soluble – consist of a group of chemicals that are dissolved in water and form a developer layer when the water is evaporated away. • Water suspendible – consist of insoluble developer particles suspended in water. • Nonaqueous – suspend the developer in a volatile solvent and are typically applied with a spray gun. Using dye and developer from different manufacturers should be avoided.

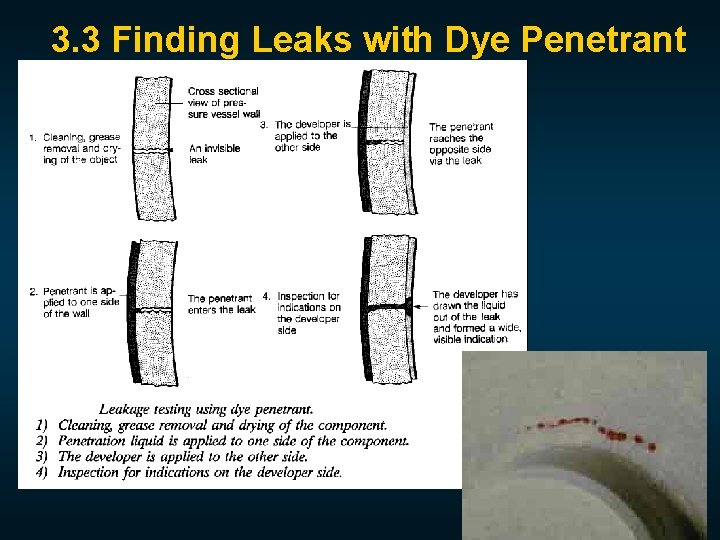
3. 3 Finding Leaks with Dye Penetrant

3. 4 Primary Advantages • The method has high sensitive to small surface discontinuities. • The method has few material limitations, i. e. metallic and nonmetallic, magnetic and nonmagnetic, and conductive and nonconductive materials may be inspected. • Large areas and large volumes of parts/materials can be inspected rapidly and at low cost. • Parts with complex geometric shapes are routinely inspected. • Indications are produced directly on the surface of the part and constitute a visual representation of the flaw. • Aerosol spray cans make penetrant materials very portable. • Penetrant materials and associated equipment are relatively inexpensive.

3. 5 Primary Disadvantages • Only surface breaking defects can be detected. • Only materials with a relative nonporous surface can be inspected. • Precleaning is critical as contaminants can mask defects. • Metal smearing from machining, grinding, and grit or vapor blasting must be removed prior to LPI. • The inspector must have direct access to the surface being inspected. • Surface finish and roughness can affect inspection sensitivity. • Multiple process operations must be performed and controlled. • Post cleaning of acceptable parts or materials is required. • Chemical handling and proper disposal is required.

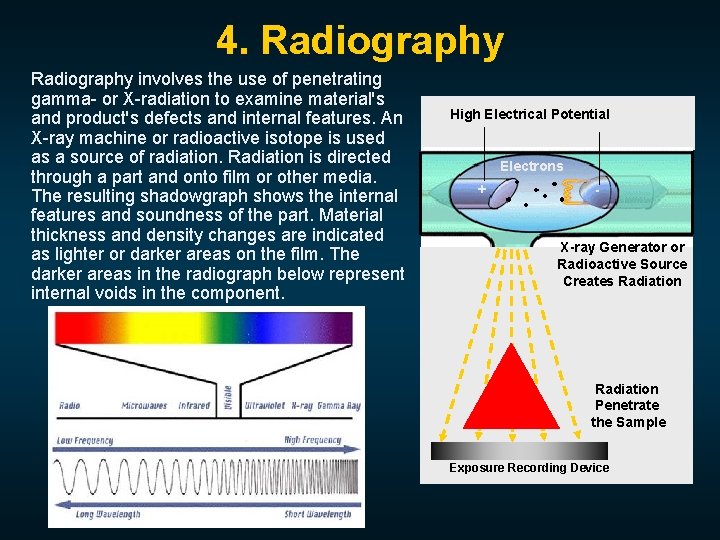
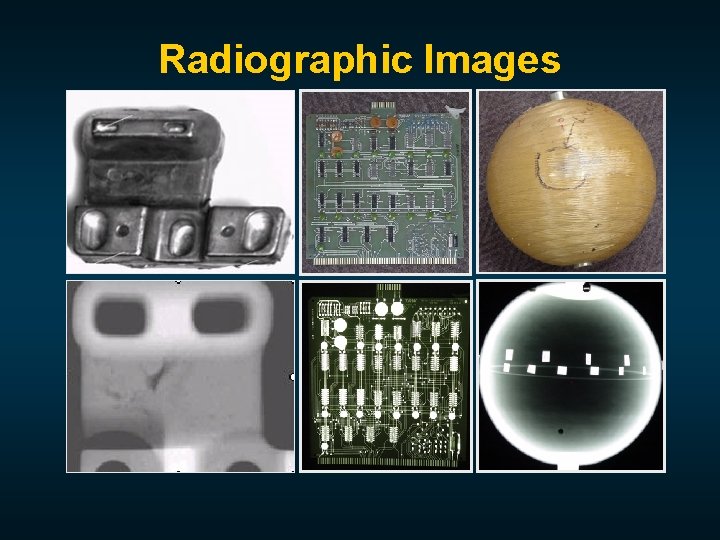
4. Radiography involves the use of penetrating gamma- or X-radiation to examine material's and product's defects and internal features. An X-ray machine or radioactive isotope is used as a source of radiation. Radiation is directed through a part and onto film or other media. The resulting shadowgraph shows the internal features and soundness of the part. Material thickness and density changes are indicated as lighter or darker areas on the film. The darker areas in the radiograph below represent internal voids in the component. High Electrical Potential Electrons + - X-ray Generator or Radioactive Source Creates Radiation Penetrate the Sample Exposure Recording Device

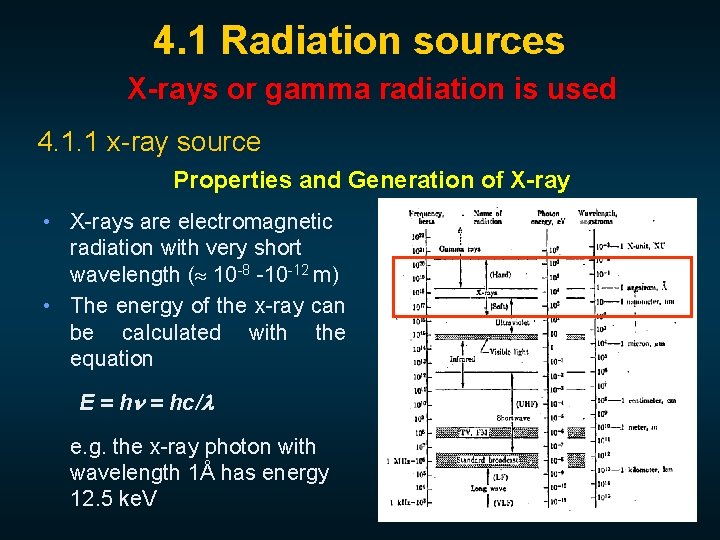
4. 1 Radiation sources X-rays or gamma radiation is used 4. 1. 1 x-ray source Properties and Generation of X-ray • X-rays are electromagnetic radiation with very short wavelength ( 10 -8 -10 -12 m) • The energy of the x-ray can be calculated with the equation E = hc/ e. g. the x-ray photon with wavelength 1Å has energy 12. 5 ke. V

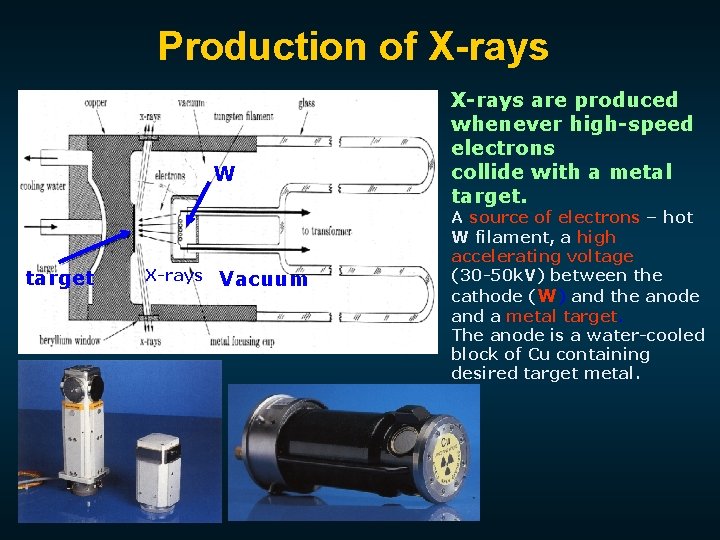
Production of X-rays W target X-rays Vacuum X-rays are produced whenever high-speed electrons collide with a metal target. A source of electrons – hot W filament, a high accelerating voltage (30 -50 k. V) between the cathode (W) and the anode and a metal target. The anode is a water-cooled block of Cu containing desired target metal.

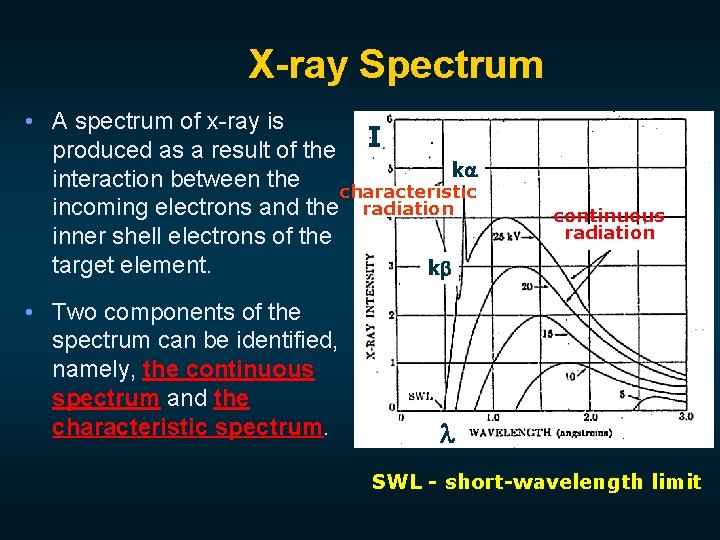
X-ray Spectrum • A spectrum of x-ray is produced as a result of the I k interaction between the characteristic incoming electrons and the radiation inner shell electrons of the target element. k • Two components of the spectrum can be identified, namely, the continuous spectrum and the characteristic spectrum. continuous radiation SWL - short-wavelength limit

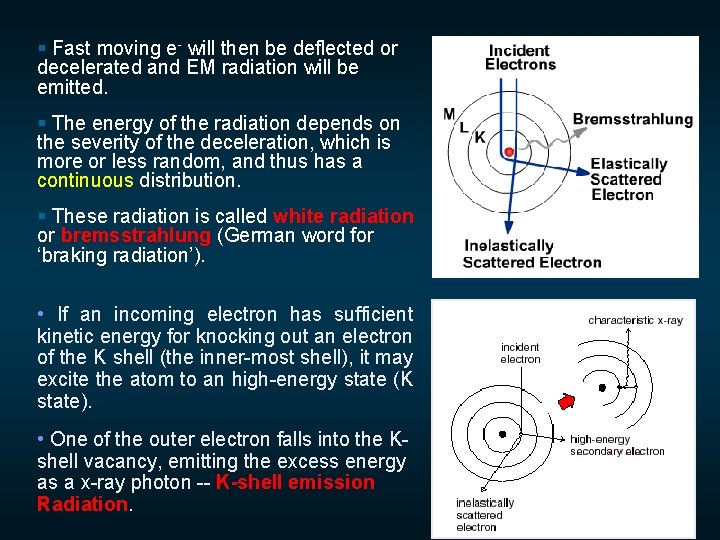
§ Fast moving e- will then be deflected or decelerated and EM radiation will be emitted. § The energy of the radiation depends on the severity of the deceleration, which is more or less random, and thus has a continuous distribution. § These radiation is called white radiation or bremsstrahlung (German word for ‘braking radiation’). • If an incoming electron has sufficient kinetic energy for knocking out an electron of the K shell (the inner-most shell), it may excite the atom to an high-energy state (K state). • One of the outer electron falls into the Kshell vacancy, emitting the excess energy as a x-ray photon -- K-shell emission Radiation.

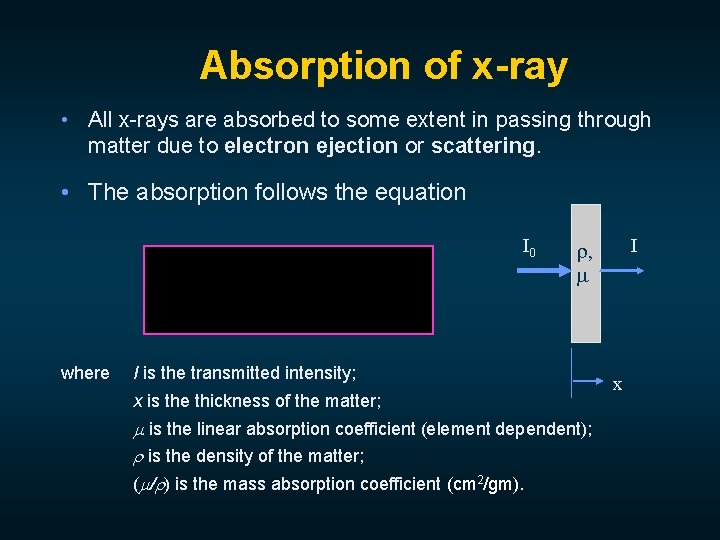
Absorption of x-ray • All x-rays are absorbed to some extent in passing through matter due to electron ejection or scattering. • The absorption follows the equation I 0 where I , I is the transmitted intensity; x is the thickness of the matter; is the linear absorption coefficient (element dependent); is the density of the matter; ( / ) is the mass absorption coefficient (cm 2/gm). x

4. 1. 2 Radio Isotope (Gamma) Sources Emitted gamma radiation is one of the three types of natural radioactivity. It is the most energetic form of electromagnetic radiation, with a very short wavelength of less than one-tenth of a nano-meter. Gamma rays are essentially very energetic x-rays emitted by excited nuclei. They often accompany alpha or beta particles, because a nucleus emitting those particles may be left in an excited (higher-energy) state. Man made sources are produced by introducing an extra neutron to atoms of the source material. As the material rids itself of the neutron, energy is released in the form of gamma rays. Two of the more common industrial Gamma-ray sources are Iridium-192 and Colbalt-60. These isotopes emit radiation in two or three discreet wavelengths. Cobalt 60 will emit a 1. 33 and a 1. 17 Me. V gamma ray, and iridium-192 will emit 0. 31, 0. 47, and 0. 60 Me. V gamma rays. Advantages of gamma ray sources include portability and the ability to penetrate thick materials in a relativity short time. Disadvantages include shielding requirements and safety considerations.

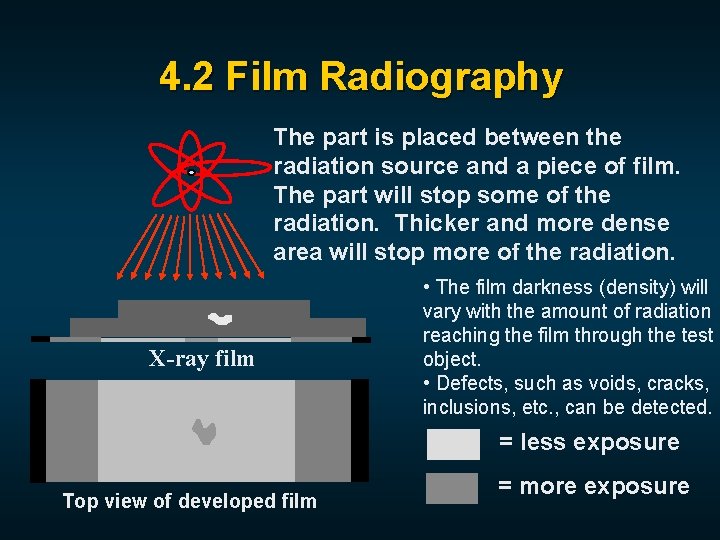
4. 2 Film Radiography The part is placed between the radiation source and a piece of film. The part will stop some of the radiation. Thicker and more dense area will stop more of the radiation. X-ray film • The film darkness (density) will vary with the amount of radiation reaching the film through the test object. • Defects, such as voids, cracks, inclusions, etc. , can be detected. = less exposure Top view of developed film = more exposure

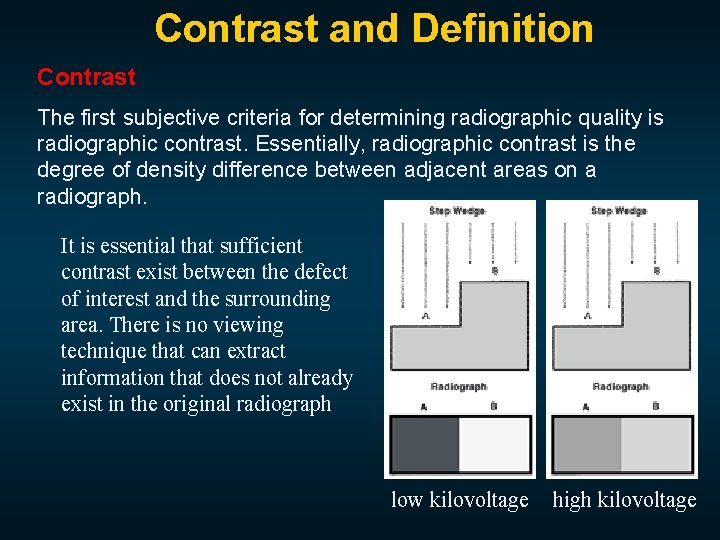
Contrast and Definition Contrast The first subjective criteria for determining radiographic quality is radiographic contrast. Essentially, radiographic contrast is the degree of density difference between adjacent areas on a radiograph. It is essential that sufficient contrast exist between the defect of interest and the surrounding area. There is no viewing technique that can extract information that does not already exist in the original radiograph low kilovoltage high kilovoltage

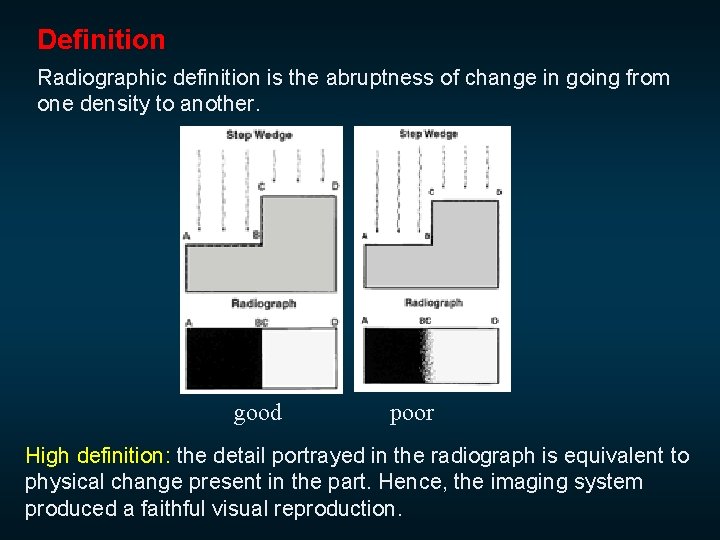
Definition Radiographic definition is the abruptness of change in going from one density to another. good poor High definition: the detail portrayed in the radiograph is equivalent to physical change present in the part. Hence, the imaging system produced a faithful visual reproduction.

4. 3 Areas of Application • Can be used in any situation when one wishes to view the interior of an object • To check for internal faults and construction defects, e. g. faulty welding • To ‘see’ through what is inside an object • To perform measurements of size, e. g. thickness measurements of pipes Standard: ASTM – ASTM E 94 -84 a Radiographic Testing – ASTM E 1032 -85 Radiographic Examination of Weldments – ASTM E 1030 -84 Radiographic Testing of Metallic Castings

Radiographic Images

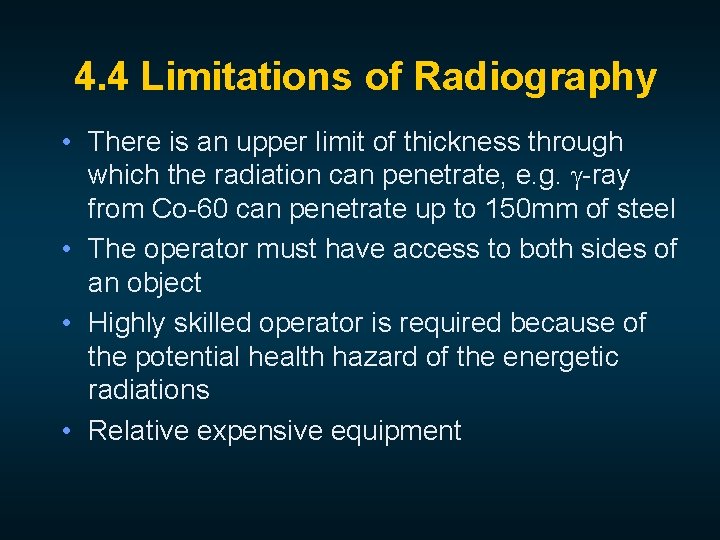
4. 4 Limitations of Radiography • There is an upper limit of thickness through which the radiation can penetrate, e. g. -ray from Co-60 can penetrate up to 150 mm of steel • The operator must have access to both sides of an object • Highly skilled operator is required because of the potential health hazard of the energetic radiations • Relative expensive equipment

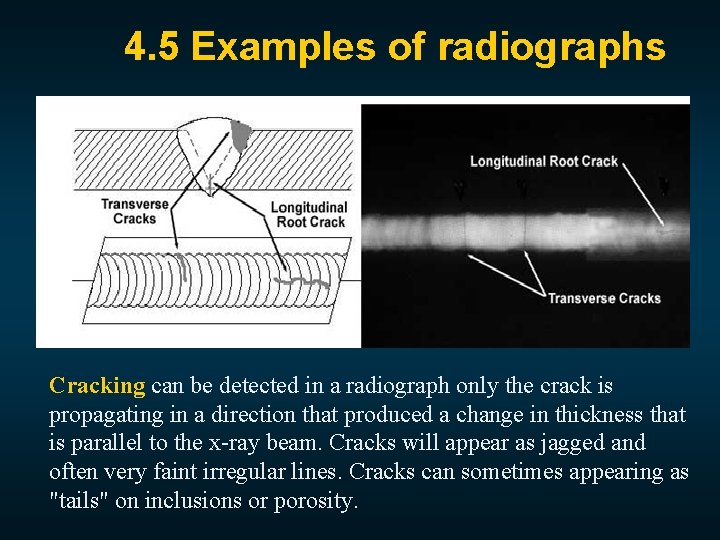
4. 5 Examples of radiographs Cracking can be detected in a radiograph only the crack is propagating in a direction that produced a change in thickness that is parallel to the x-ray beam. Cracks will appear as jagged and often very faint irregular lines. Cracks can sometimes appearing as "tails" on inclusions or porosity.

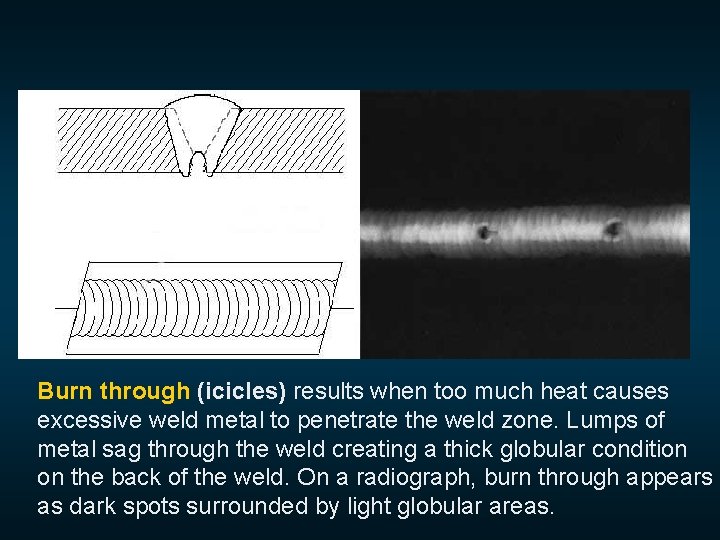
Burn through (icicles) results when too much heat causes excessive weld metal to penetrate the weld zone. Lumps of metal sag through the weld creating a thick globular condition on the back of the weld. On a radiograph, burn through appears as dark spots surrounded by light globular areas.

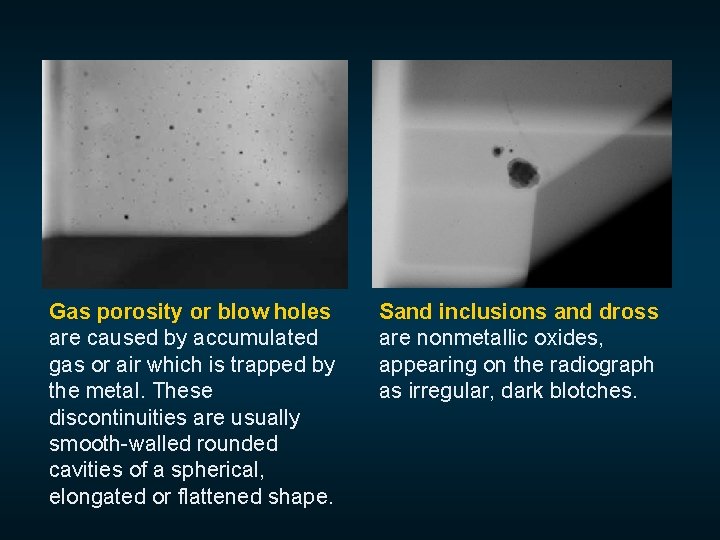
Gas porosity or blow holes are caused by accumulated gas or air which is trapped by the metal. These discontinuities are usually smooth-walled rounded cavities of a spherical, elongated or flattened shape. Sand inclusions and dross are nonmetallic oxides, appearing on the radiograph as irregular, dark blotches.

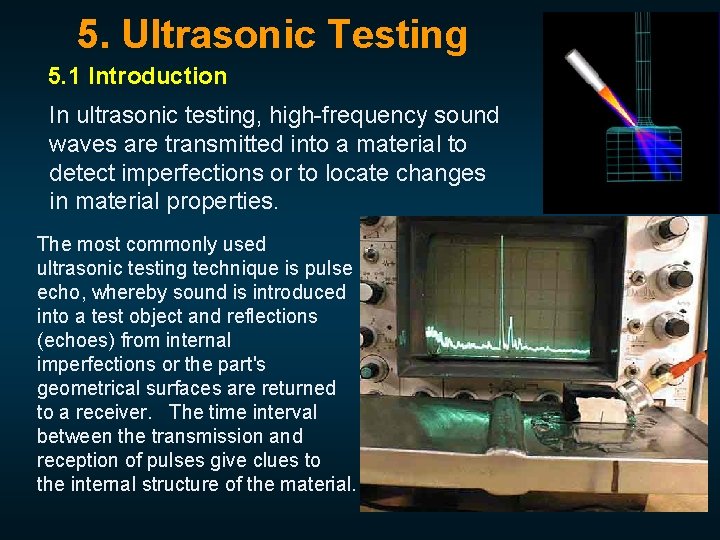
5. Ultrasonic Testing 5. 1 Introduction In ultrasonic testing, high-frequency sound waves are transmitted into a material to detect imperfections or to locate changes in material properties. The most commonly used ultrasonic testing technique is pulse echo, whereby sound is introduced into a test object and reflections (echoes) from internal imperfections or the part's geometrical surfaces are returned to a receiver. The time interval between the transmission and reception of pulses give clues to the internal structure of the material.

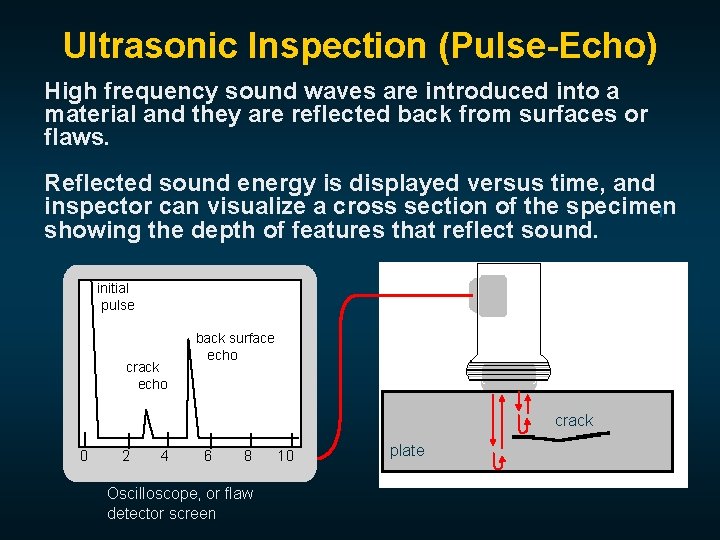
Ultrasonic Inspection (Pulse-Echo) High frequency sound waves are introduced into a material and they are reflected back from surfaces or flaws. Reflected sound energy is displayed versus time, and inspector can visualize a cross section of the specimen f showing the depth of features that reflect sound. initial pulse crack echo back surface echo crack 0 2 4 6 8 Oscilloscope, or flaw detector screen 10 plate

Generation of Ultrasonic Waves • Piezoelectric transducers are used for converting electrical pulses to mechanical vibrations and vice versa • Commonly used piezoelectric materials are quartz, Li 2 SO 4, and polarized ceramics such as Ba. Ti. O 3 and Pb. Zr. O 3. • Usually the transducers generate ultrasonic waves with frequencies in the range 2. 25 to 5. 0 MHz

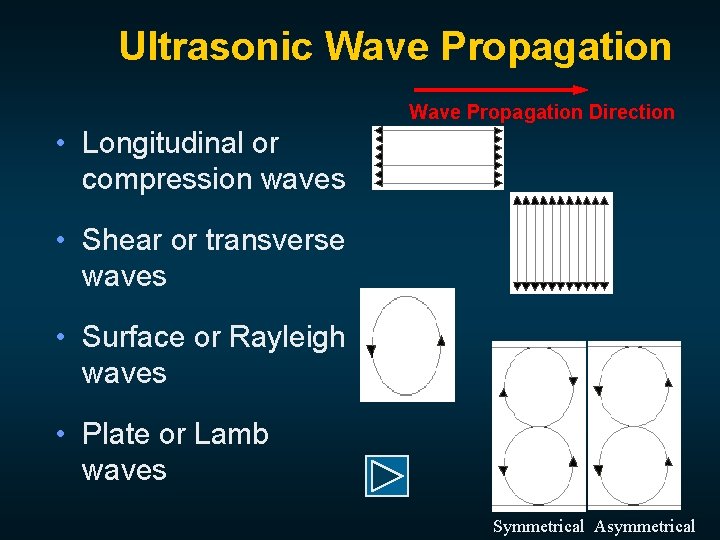
Ultrasonic Wave Propagation Direction • Longitudinal or compression waves • Shear or transverse waves • Surface or Rayleigh waves • Plate or Lamb waves Symmetrical Asymmetrical

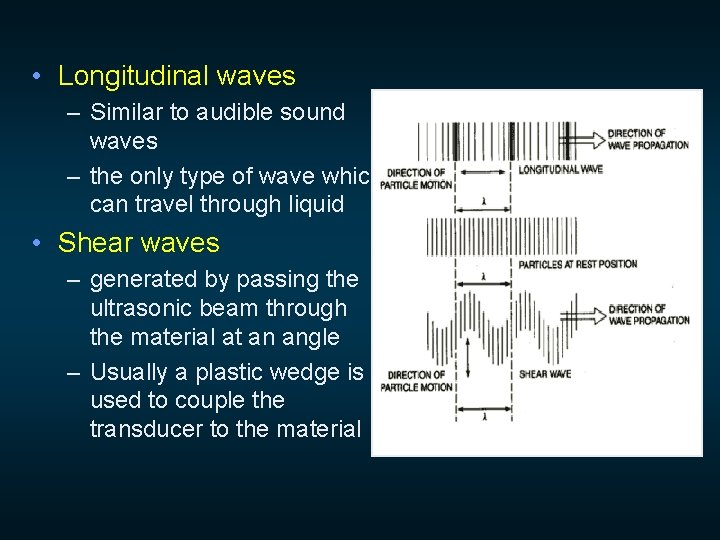
• Longitudinal waves – Similar to audible sound waves – the only type of wave which can travel through liquid • Shear waves – generated by passing the ultrasonic beam through the material at an angle – Usually a plastic wedge is used to couple the transducer to the material

• Surface waves – travel with little attenuation in the direction of propagation but weaken rapidly as the wave penetrates below the material surface – particle displacement follows an elliptical orbit • Lamb waves – observed in relatively thin plates only – velocity depends on the thickness of the material and frequency

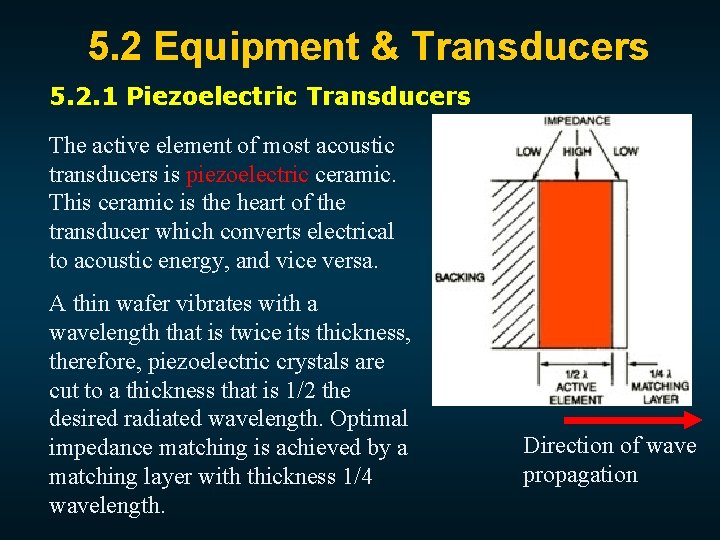
5. 2 Equipment & Transducers 5. 2. 1 Piezoelectric Transducers The active element of most acoustic transducers is piezoelectric ceramic. This ceramic is the heart of the transducer which converts electrical to acoustic energy, and vice versa. A thin wafer vibrates with a wavelength that is twice its thickness, therefore, piezoelectric crystals are cut to a thickness that is 1/2 the desired radiated wavelength. Optimal impedance matching is achieved by a matching layer with thickness 1/4 wavelength. Direction of wave propagation

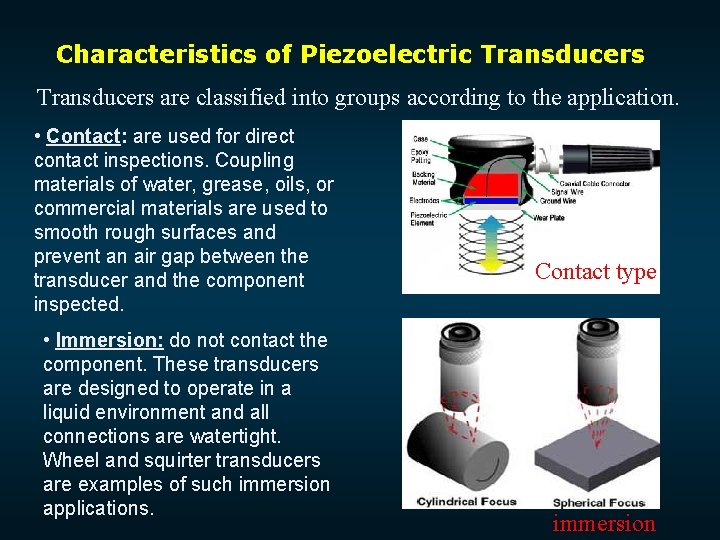
Characteristics of Piezoelectric Transducers are classified into groups according to the application. • Contact: are used for direct contact inspections. Coupling materials of water, grease, oils, or commercial materials are used to smooth rough surfaces and prevent an air gap between the transducer and the component inspected. • Immersion: do not contact the component. These transducers are designed to operate in a liquid environment and all connections are watertight. Wheel and squirter transducers are examples of such immersion applications. Contact type immersion

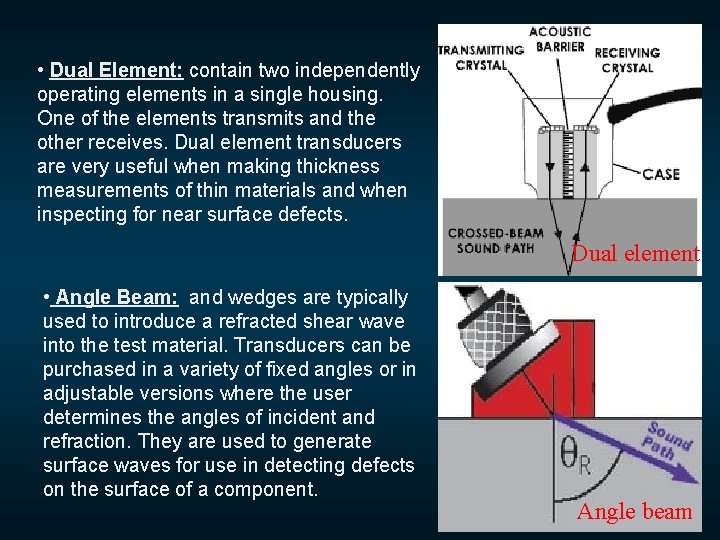
• Dual Element: contain two independently operating elements in a single housing. One of the elements transmits and the other receives. Dual element transducers are very useful when making thickness measurements of thin materials and when inspecting for near surface defects. Dual element • Angle Beam: and wedges are typically used to introduce a refracted shear wave into the test material. Transducers can be purchased in a variety of fixed angles or in adjustable versions where the user determines the angles of incident and refraction. They are used to generate surface waves for use in detecting defects on the surface of a component. Angle beam

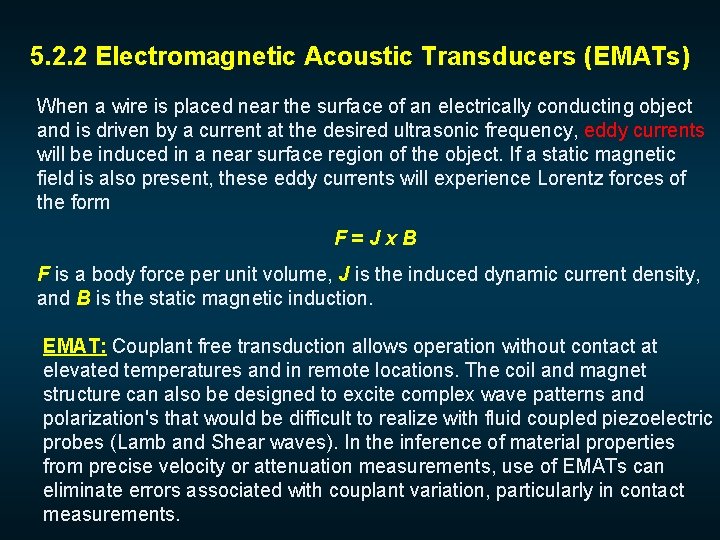
5. 2. 2 Electromagnetic Acoustic Transducers (EMATs) When a wire is placed near the surface of an electrically conducting object and is driven by a current at the desired ultrasonic frequency, eddy currents will be induced in a near surface region of the object. If a static magnetic field is also present, these eddy currents will experience Lorentz forces of the form F=Jx. B F is a body force per unit volume, J is the induced dynamic current density, and B is the static magnetic induction. EMAT: Couplant free transduction allows operation without contact at elevated temperatures and in remote locations. The coil and magnet structure can also be designed to excite complex wave patterns and polarization's that would be difficult to realize with fluid coupled piezoelectric probes (Lamb and Shear waves). In the inference of material properties from precise velocity or attenuation measurements, use of EMATs can eliminate errors associated with couplant variation, particularly in contact measurements.

5. 3 Ultrasonic Test Methods • Fluid couplant or a fluid bath is needed for effective transmission of ultrasonic from the transducer to the material • Straight beam contact search unit project a beam of ultrasonic vibrations perpendicular to the surface • Angle beam contact units send ultrasonic beam into the test material at a predetermined angle to the surface

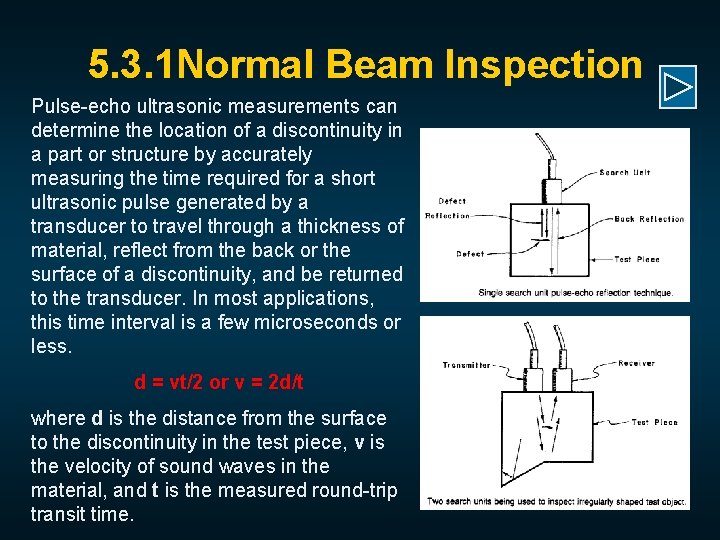
5. 3. 1 Normal Beam Inspection Pulse-echo ultrasonic measurements can determine the location of a discontinuity in a part or structure by accurately measuring the time required for a short ultrasonic pulse generated by a transducer to travel through a thickness of material, reflect from the back or the surface of a discontinuity, and be returned to the transducer. In most applications, this time interval is a few microseconds or less. d = vt/2 or v = 2 d/t where d is the distance from the surface to the discontinuity in the test piece, v is the velocity of sound waves in the material, and t is the measured round-trip transit time.

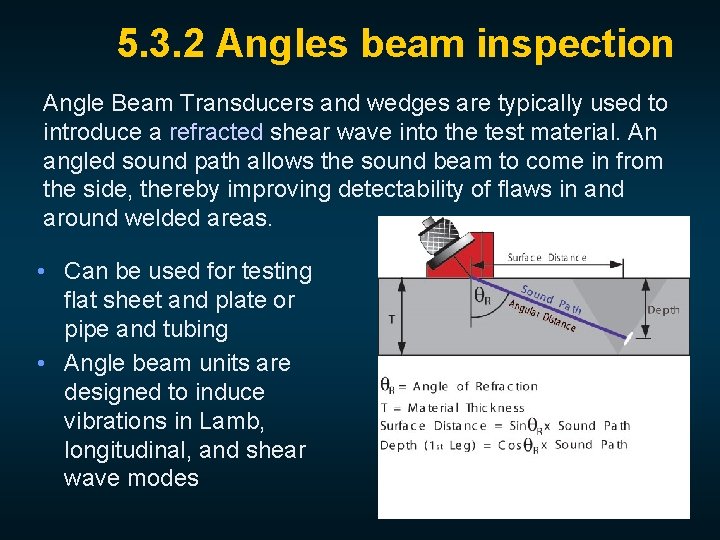
5. 3. 2 Angles beam inspection Angle Beam Transducers and wedges are typically used to introduce a refracted shear wave into the test material. An angled sound path allows the sound beam to come in from the side, thereby improving detectability of flaws in and around welded areas. • Can be used for testing flat sheet and plate or pipe and tubing • Angle beam units are designed to induce vibrations in Lamb, longitudinal, and shear wave modes

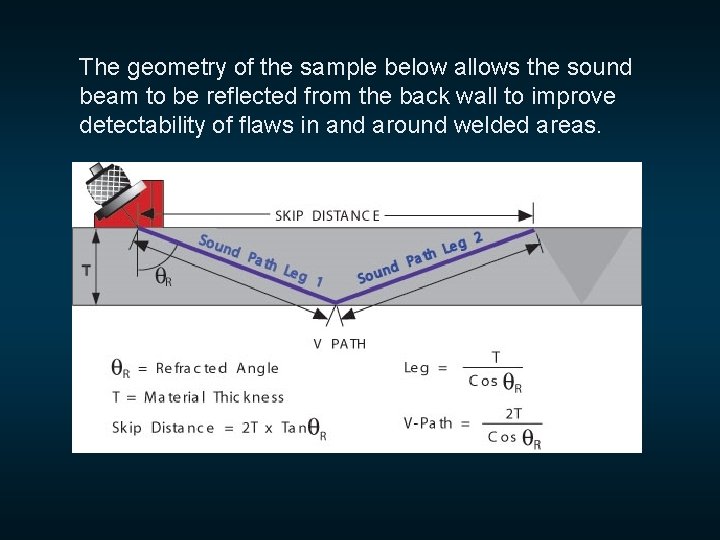
The geometry of the sample below allows the sound beam to be reflected from the back wall to improve detectability of flaws in and around welded areas.

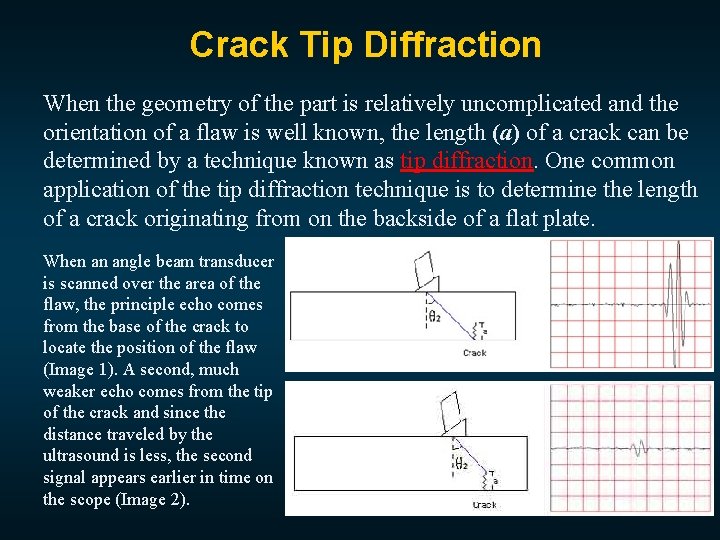
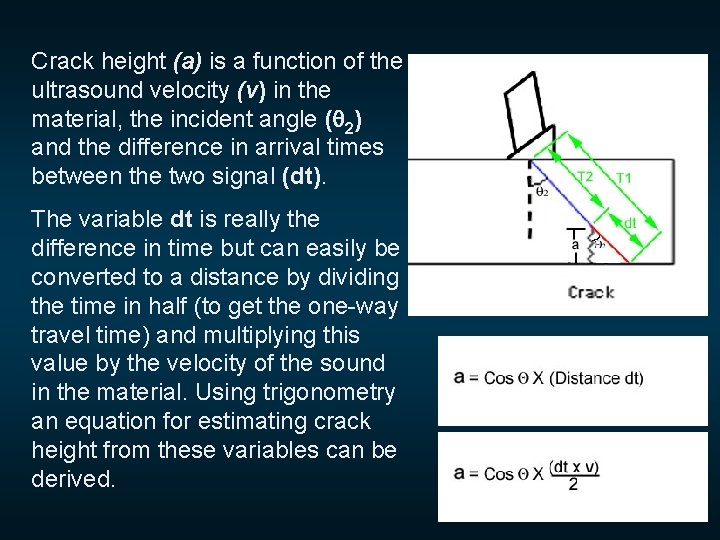
Crack Tip Diffraction When the geometry of the part is relatively uncomplicated and the orientation of a flaw is well known, the length (a) of a crack can be determined by a technique known as tip diffraction. One common application of the tip diffraction technique is to determine the length of a crack originating from on the backside of a flat plate. When an angle beam transducer is scanned over the area of the flaw, the principle echo comes from the base of the crack to locate the position of the flaw (Image 1). A second, much weaker echo comes from the tip of the crack and since the distance traveled by the ultrasound is less, the second signal appears earlier in time on the scope (Image 2).

Crack height (a) is a function of the ultrasound velocity (v) in the material, the incident angle ( 2) and the difference in arrival times between the two signal (dt). The variable dt is really the difference in time but can easily be converted to a distance by dividing the time in half (to get the one-way travel time) and multiplying this value by the velocity of the sound in the material. Using trigonometry an equation for estimating crack height from these variables can be derived.

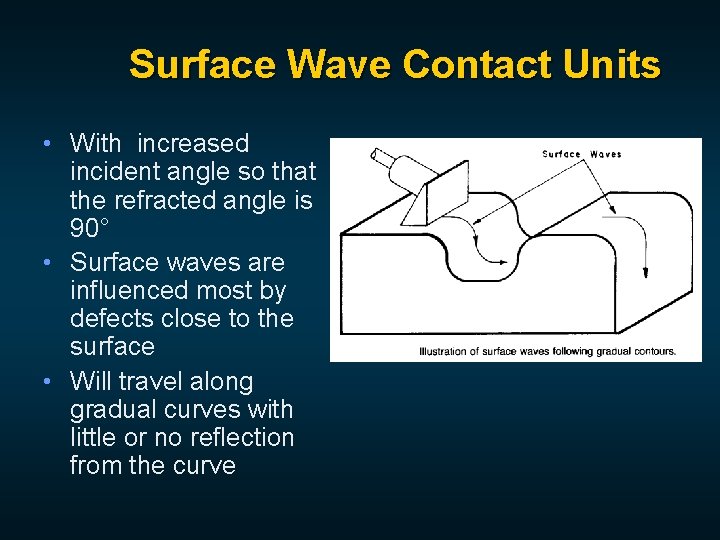
Surface Wave Contact Units • With increased incident angle so that the refracted angle is 90° • Surface waves are influenced most by defects close to the surface • Will travel along gradual curves with little or no reflection from the curve

5. 4 Data Presentation Ultrasonic data can be collected and displayed in a number of different formats. The three most common formats are know in the NDT world as A-scan, B-scan and C-scan presentations. Each presentation mode provides a different way of looking at and evaluating the region of material being inspected. Modern computerized ultrasonic scanning systems can display data in all three presentation forms simultaneously

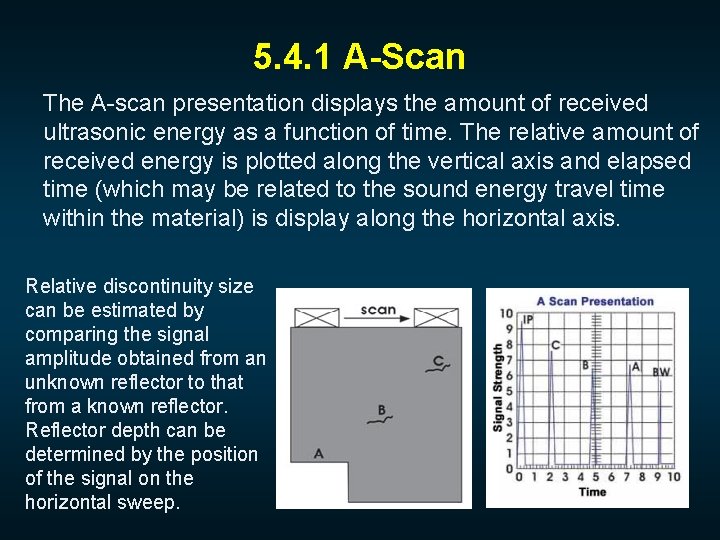
5. 4. 1 A-Scan The A-scan presentation displays the amount of received ultrasonic energy as a function of time. The relative amount of received energy is plotted along the vertical axis and elapsed time (which may be related to the sound energy travel time within the material) is display along the horizontal axis. Relative discontinuity size can be estimated by comparing the signal amplitude obtained from an unknown reflector to that from a known reflector. Reflector depth can be determined by the position of the signal on the horizontal sweep.

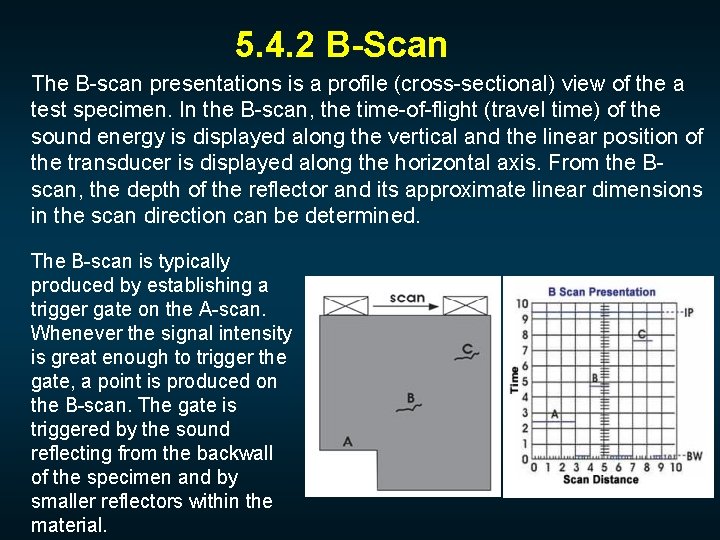
5. 4. 2 B-Scan The B-scan presentations is a profile (cross-sectional) view of the a test specimen. In the B-scan, the time-of-flight (travel time) of the sound energy is displayed along the vertical and the linear position of the transducer is displayed along the horizontal axis. From the Bscan, the depth of the reflector and its approximate linear dimensions in the scan direction can be determined. The B-scan is typically produced by establishing a trigger gate on the A-scan. Whenever the signal intensity is great enough to trigger the gate, a point is produced on the B-scan. The gate is triggered by the sound reflecting from the backwall of the specimen and by smaller reflectors within the material.

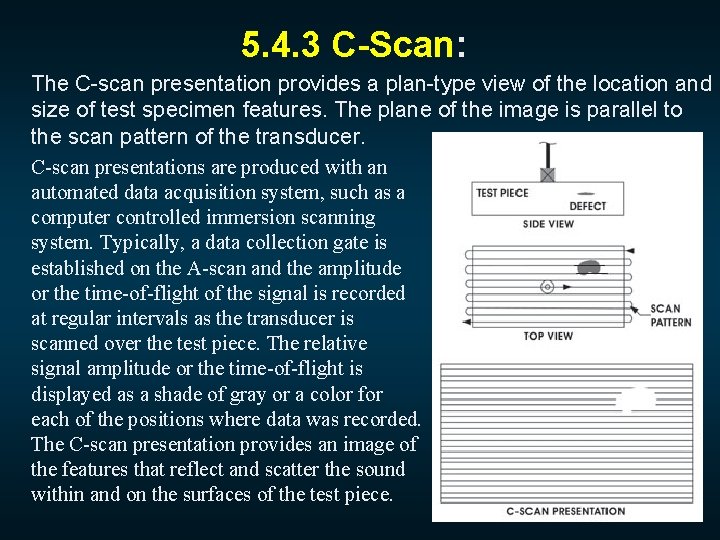
5. 4. 3 C-Scan: The C-scan presentation provides a plan-type view of the location and size of test specimen features. The plane of the image is parallel to the scan pattern of the transducer. C-scan presentations are produced with an automated data acquisition system, such as a computer controlled immersion scanning system. Typically, a data collection gate is established on the A-scan and the amplitude or the time-of-flight of the signal is recorded at regular intervals as the transducer is scanned over the test piece. The relative signal amplitude or the time-of-flight is displayed as a shade of gray or a color for each of the positions where data was recorded. The C-scan presentation provides an image of the features that reflect and scatter the sound within and on the surfaces of the test piece.

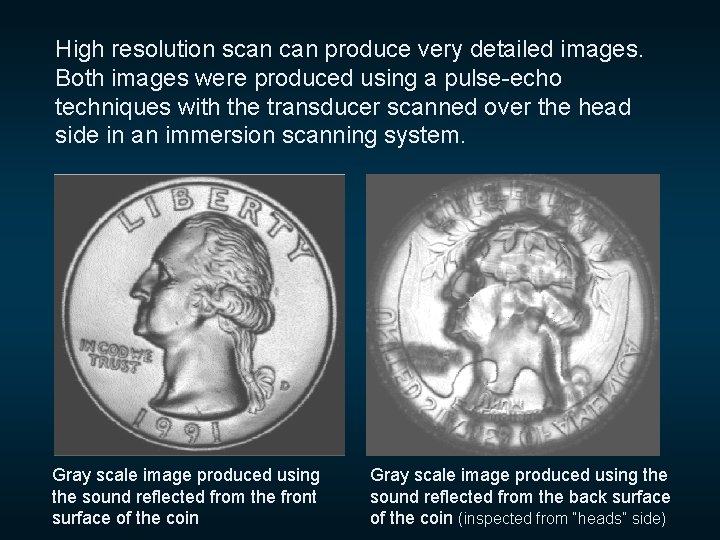
High resolution scan produce very detailed images. Both images were produced using a pulse-echo techniques with the transducer scanned over the head side in an immersion scanning system. Gray scale image produced using the sound reflected from the front surface of the coin Gray scale image produced using the sound reflected from the back surface of the coin (inspected from “heads” side)

6. Eddy Current Testing Electrical currents are generated in a conductive material by an induced alternating magnetic field. The electrical currents are called eddy currents because the flow in circles at and just below the surface of the material. Interruptions in the flow of eddy currents, caused by imperfections, dimensional changes, or changes in the material's conductive and permeability properties, can be detected with the proper equipment. • Eddy current testing can be used on all electrically conducting materials with a reasonably smooth surface. • The test equipment consists of a generator (AC power supply), a test coil and recording equipment, e. g. a galvanometer or an oscilloscope • Used for crack detection, material thickness measurement (corrosion detection), sorting materials, coating thickness measurement, metal detection, etc.

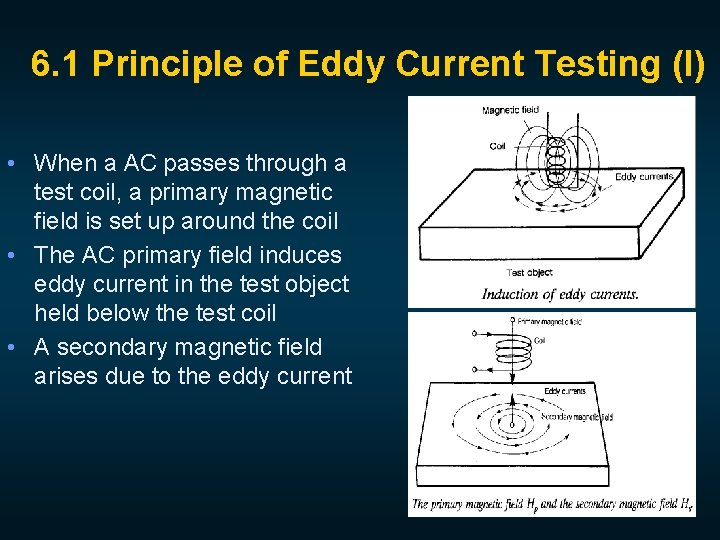
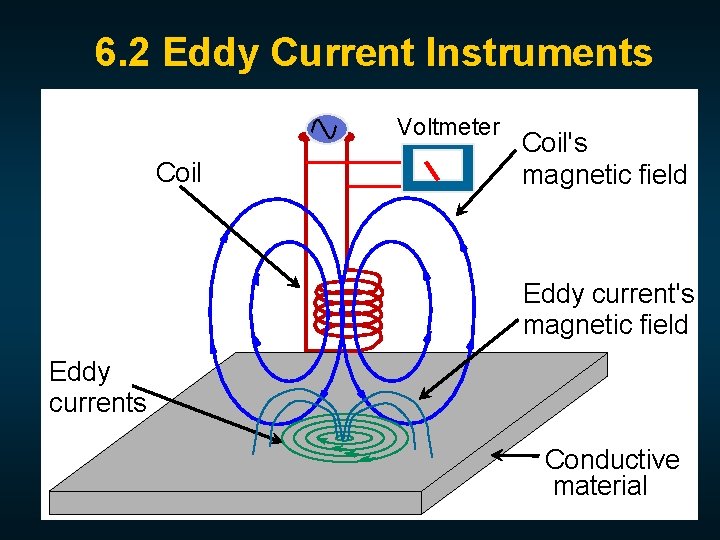
6. 1 Principle of Eddy Current Testing (I) • When a AC passes through a test coil, a primary magnetic field is set up around the coil • The AC primary field induces eddy current in the test object held below the test coil • A secondary magnetic field arises due to the eddy current

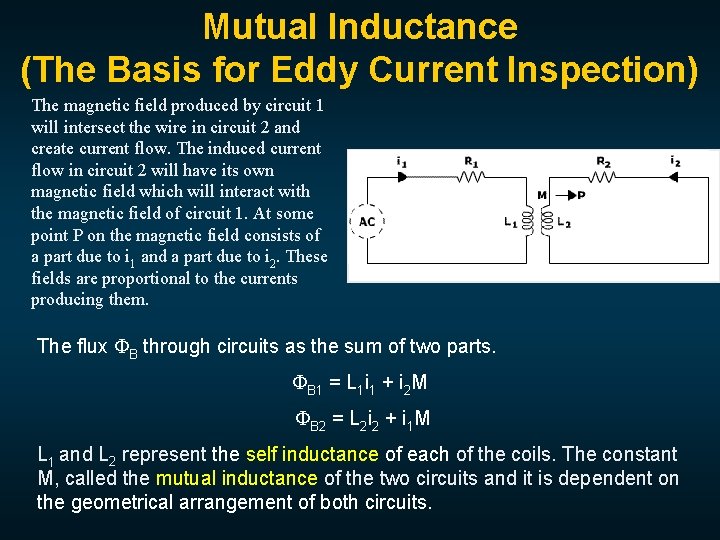
Mutual Inductance (The Basis for Eddy Current Inspection) The magnetic field produced by circuit 1 will intersect the wire in circuit 2 and create current flow. The induced current flow in circuit 2 will have its own magnetic field which will interact with the magnetic field of circuit 1. At some point P on the magnetic field consists of a part due to i 1 and a part due to i 2. These fields are proportional to the currents producing them. The flux B through circuits as the sum of two parts. B 1 = L 1 i 1 + i 2 M B 2 = L 2 i 2 + i 1 M L 1 and L 2 represent the self inductance of each of the coils. The constant M, called the mutual inductance of the two circuits and it is dependent on the geometrical arrangement of both circuits.

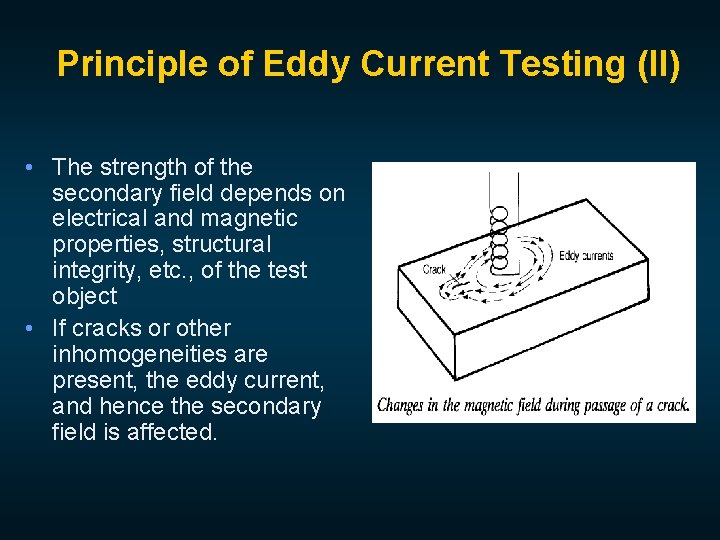
Principle of Eddy Current Testing (II) • The strength of the secondary field depends on electrical and magnetic properties, structural integrity, etc. , of the test object • If cracks or other inhomogeneities are present, the eddy current, and hence the secondary field is affected.

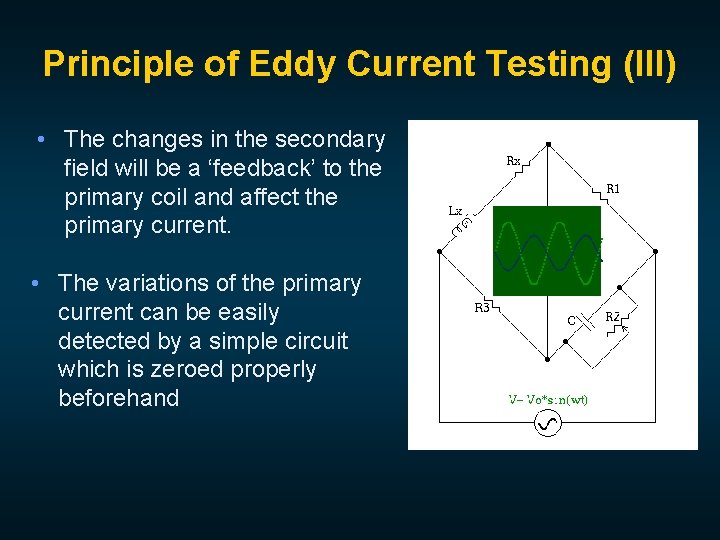
Principle of Eddy Current Testing (III) • The changes in the secondary field will be a ‘feedback’ to the primary coil and affect the primary current. • The variations of the primary current can be easily detected by a simple circuit which is zeroed properly beforehand

6. 2 Eddy Current Instruments Voltmeter Coil's magnetic field Eddy currents Conductive material

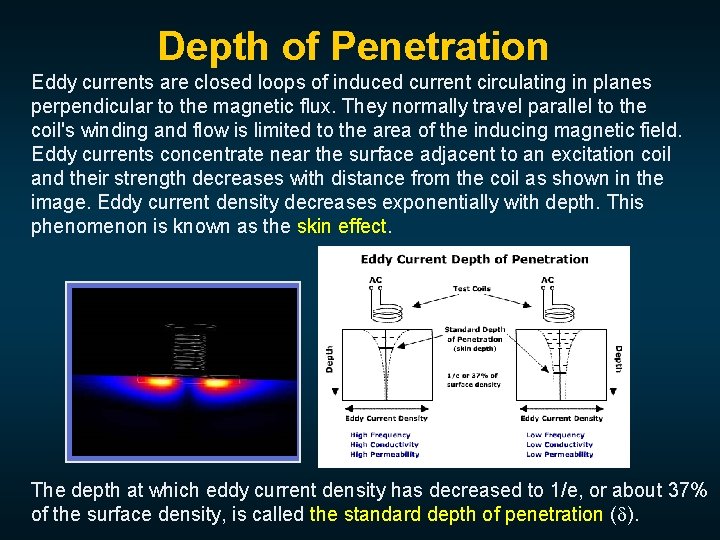
Depth of Penetration Eddy currents are closed loops of induced current circulating in planes perpendicular to the magnetic flux. They normally travel parallel to the coil's winding and flow is limited to the area of the inducing magnetic field. Eddy currents concentrate near the surface adjacent to an excitation coil and their strength decreases with distance from the coil as shown in the image. Eddy current density decreases exponentially with depth. This phenomenon is known as the skin effect. The depth at which eddy current density has decreased to 1/e, or about 37% of the surface density, is called the standard depth of penetration ( ).

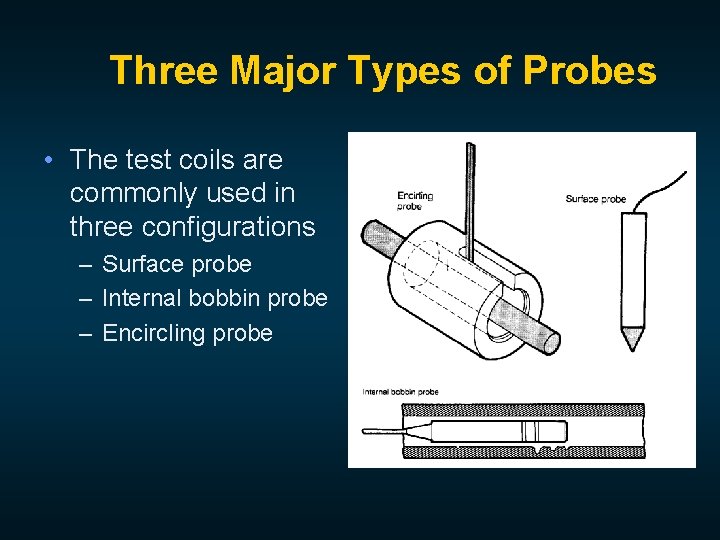
Three Major Types of Probes • The test coils are commonly used in three configurations – Surface probe – Internal bobbin probe – Encircling probe

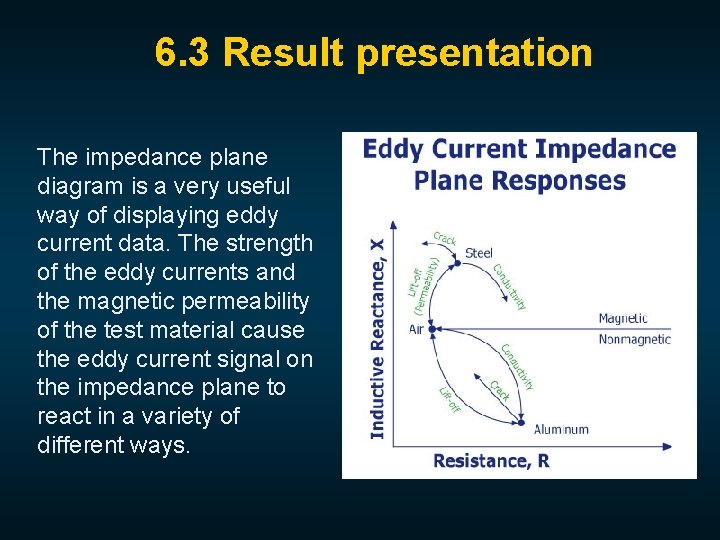
6. 3 Result presentation The impedance plane diagram is a very useful way of displaying eddy current data. The strength of the eddy currents and the magnetic permeability of the test material cause the eddy current signal on the impedance plane to react in a variety of different ways.

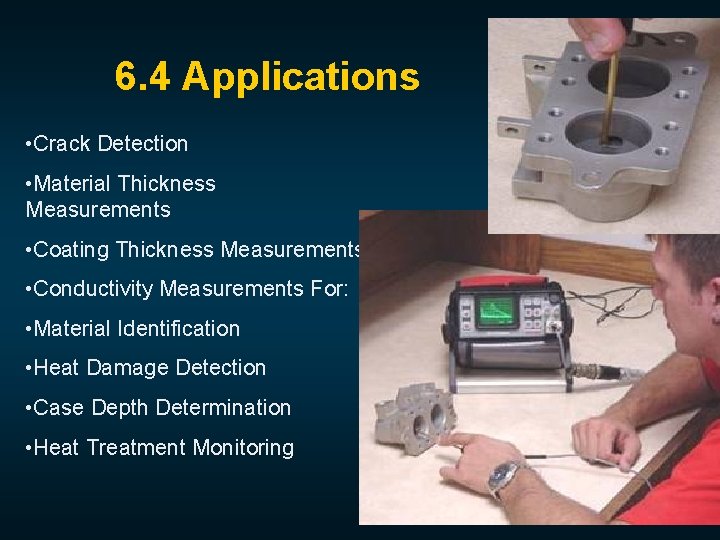
6. 4 Applications • Crack Detection • Material Thickness Measurements • Coating Thickness Measurements • Conductivity Measurements For: • Material Identification • Heat Damage Detection • Case Depth Determination • Heat Treatment Monitoring

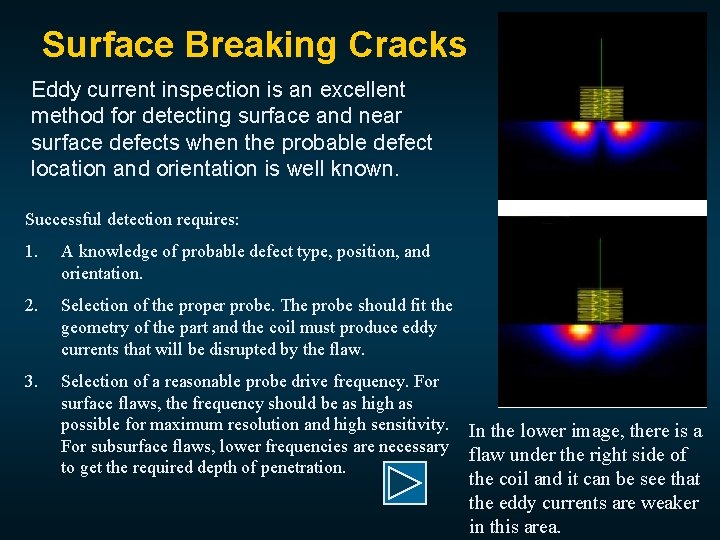
Surface Breaking Cracks Eddy current inspection is an excellent method for detecting surface and near surface defects when the probable defect location and orientation is well known. Successful detection requires: 1. A knowledge of probable defect type, position, and orientation. 2. Selection of the proper probe. The probe should fit the geometry of the part and the coil must produce eddy currents that will be disrupted by the flaw. 3. Selection of a reasonable probe drive frequency. For surface flaws, the frequency should be as high as possible for maximum resolution and high sensitivity. In the lower image, there is a For subsurface flaws, lower frequencies are necessary flaw under the right side of to get the required depth of penetration. the coil and it can be see that the eddy currents are weaker in this area.

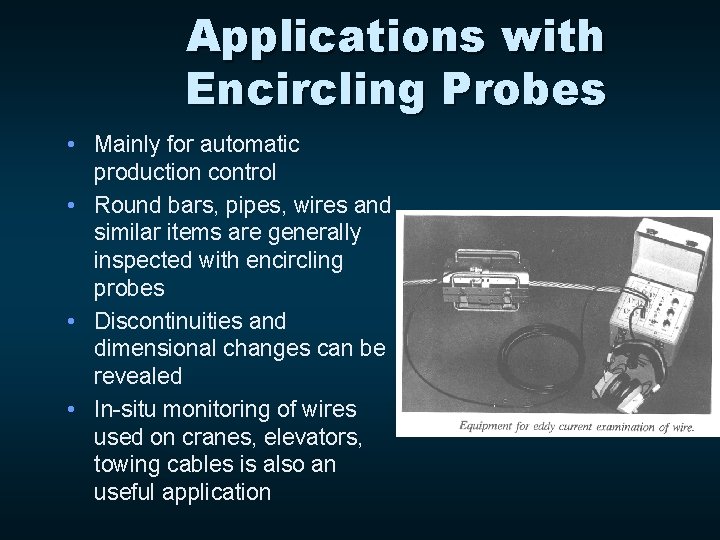
Applications with Encircling Probes • Mainly for automatic production control • Round bars, pipes, wires and similar items are generally inspected with encircling probes • Discontinuities and dimensional changes can be revealed • In-situ monitoring of wires used on cranes, elevators, towing cables is also an useful application

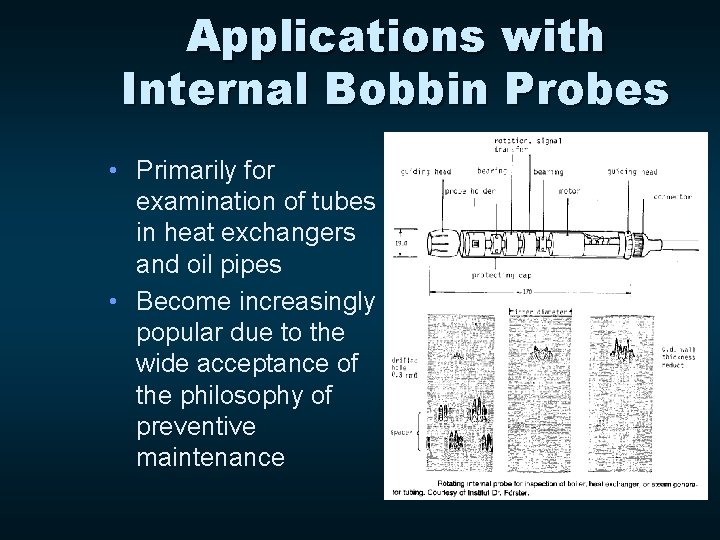
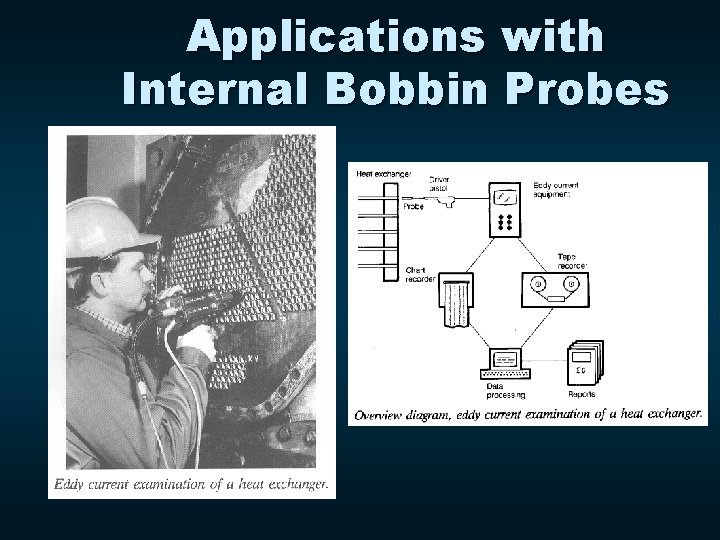
Applications with Internal Bobbin Probes • Primarily for examination of tubes in heat exchangers and oil pipes • Become increasingly popular due to the wide acceptance of the philosophy of preventive maintenance

Applications with Internal Bobbin Probes

6. 5 Advantages of ET • Sensitive to small cracks and other defects • Detects surface and near surface defects • Inspection gives immediate results • Equipment is very portable • Method can be used for much more than flaw detection • Minimum part preparation is required • Test probe does not need to contact the part • Inspects complex shapes and sizes of conductive materials

Limitations of ET • Only conductive materials can be inspected • Surface must be accessible to the probe • Skill and training required is more extensive than other techniques • Surface finish and roughness may interfere • Reference standards needed for setup • Depth of penetration is limited • Flaws such as delaminations that lie parallel to the probe coil winding and probe scan direction are undetectable

7. Common Application of NDT • Inspection of Raw Products • Inspection Following Secondary Processing • In-Services Damage Inspection

Inspection of Raw Products • Forgings, • Castings, • Extrusions, • etc.

Inspection Following Secondary Processing • Machining • Welding • Grinding • Heat treating • Plating • etc.

Inspection For In-Service Damage • Cracking • Corrosion • Erosion/Wear • Heat Damage • etc.

Power Plant Inspection Periodically, power plants are shutdown for inspection. Inspectors feed eddy current probes into heat exchanger tubes to check for corrosion damage. Pipe with damage Probe Signals produced by various amounts of corrosion thinning.

Wire Rope Inspection Electromagnetic devices and visual inspections are used to find broken wires and other damage to the wire rope that is used in chairlifts, cranes and other lifting devices.

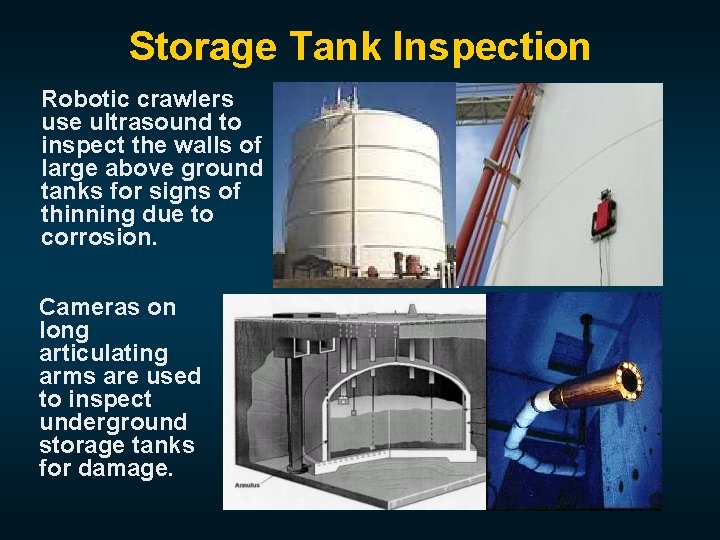
Storage Tank Inspection Robotic crawlers use ultrasound to inspect the walls of large above ground tanks for signs of thinning due to corrosion. Cameras on long articulating arms are used to inspect underground storage tanks for damage.

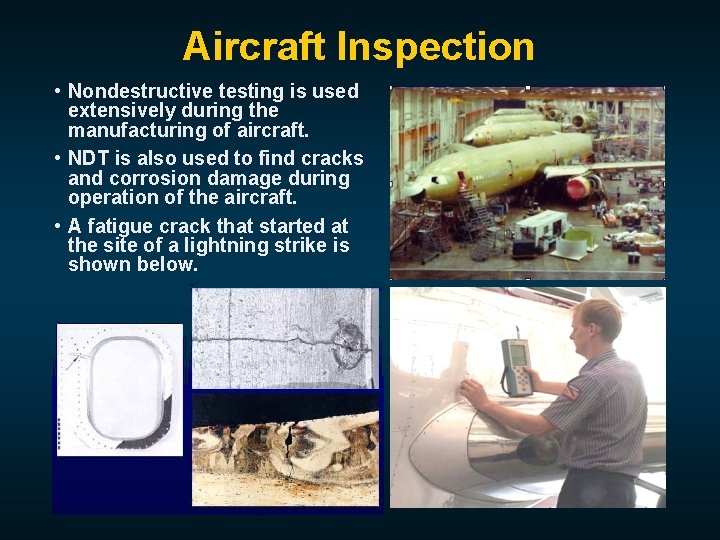
Aircraft Inspection • Nondestructive testing is used extensively during the manufacturing of aircraft. • NDT is also used to find cracks and corrosion damage during operation of the aircraft. • A fatigue crack that started at the site of a lightning strike is shown below.

Jet Engine Inspection • Aircraft engines are overhauled after being in service for a period of time. • They are completely disassembled, cleaned, inspected and then reassembled. • Fluorescent penetrant inspection is used to check many of the parts for cracking.

Crash of United Flight 232 Sioux City, Iowa, July 19, 1989 A defect that went undetected in an engine disk was responsible for the crash of United Flight 232.

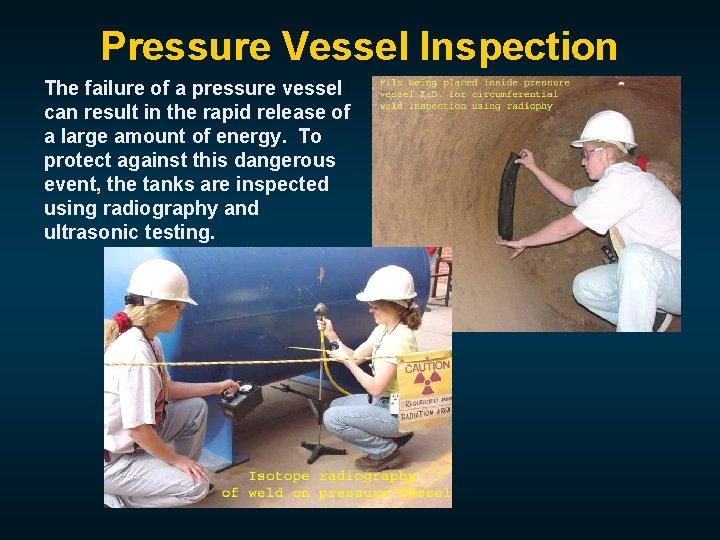
Pressure Vessel Inspection The failure of a pressure vessel can result in the rapid release of a large amount of energy. To protect against this dangerous event, the tanks are inspected using radiography and ultrasonic testing.

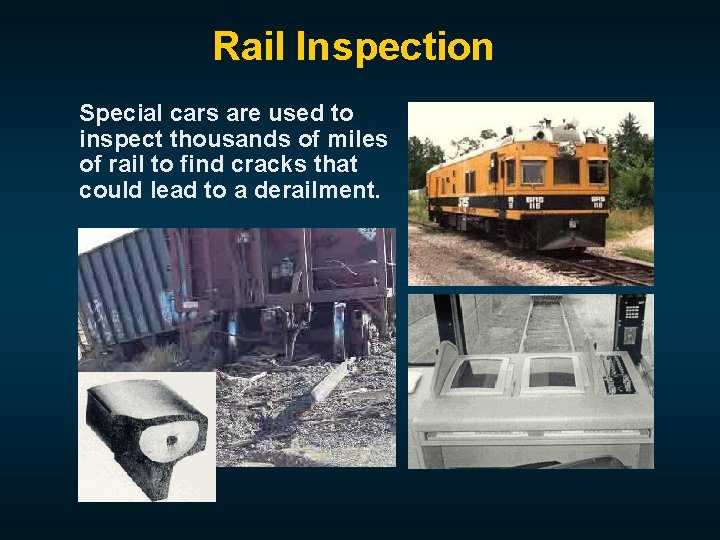
Rail Inspection Special cars are used to inspect thousands of miles of rail to find cracks that could lead to a derailment.

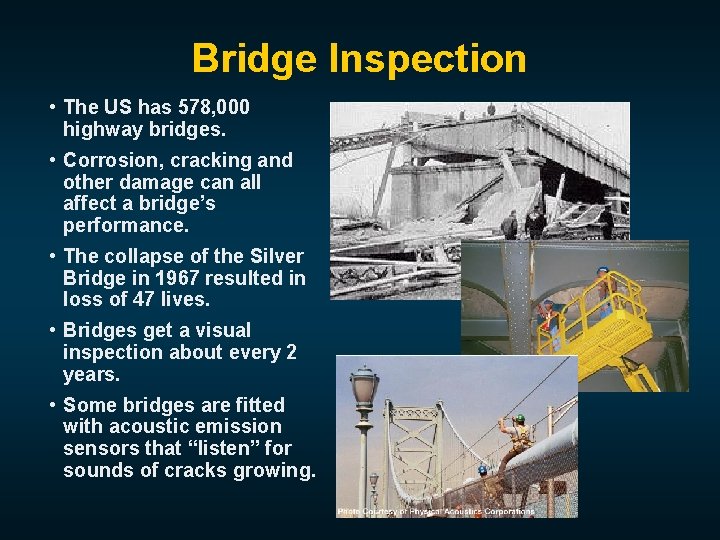
Bridge Inspection • The US has 578, 000 highway bridges. • Corrosion, cracking and other damage can all affect a bridge’s performance. • The collapse of the Silver Bridge in 1967 resulted in loss of 47 lives. • Bridges get a visual inspection about every 2 years. • Some bridges are fitted with acoustic emission sensors that “listen” for sounds of cracks growing.

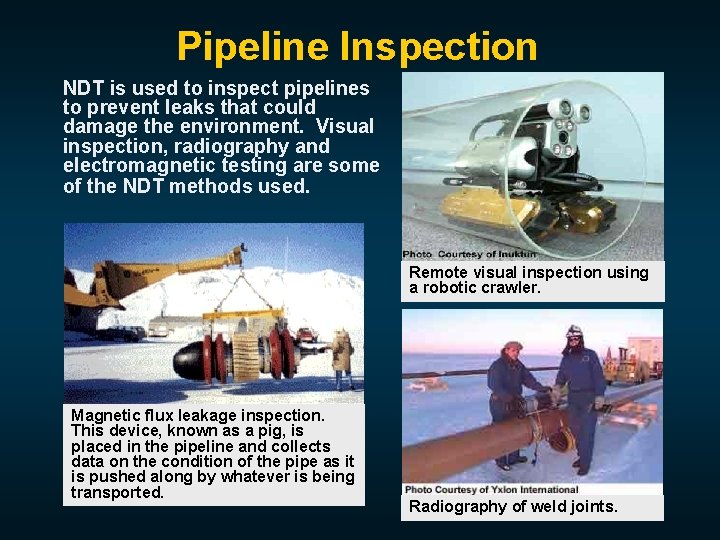
Pipeline Inspection NDT is used to inspect pipelines to prevent leaks that could damage the environment. Visual inspection, radiography and electromagnetic testing are some of the NDT methods used. Remote visual inspection using a robotic crawler. Magnetic flux leakage inspection. This device, known as a pig, is placed in the pipeline and collects data on the condition of the pipe as it is pushed along by whatever is being transported. Radiography of weld joints.

Special Measurements Boeing employees in Philadelphia were given the privilege of evaluating the Liberty Bell for damage using NDT techniques. Eddy current methods were used to measure the electrical conductivity of the Bell's bronze casing at a various points to evaluate its uniformity.