Logic Gates Part II Universal Logic Gates A







- Slides: 78

Logic Gates Part – II : Universal Logic Gates A universal gate is a gate which can implement any Boolean function without using any other gate type. NAND and NOR are the universal logic gates Course Name: Digital Logic Design Author(s) : Phani Swathi Chitta Mentor: Aruna Adil, Prof. C. Amarnath Level(UG/PG): UG *The contents in this ppt are licensed under Creative Commons Attribution-Non. Commercial-Share. Alike 2. 5 India license

Learning Objectives After interacting with this Learning Object, the learner will be able to: • Explain operations and applications of universal logic gates

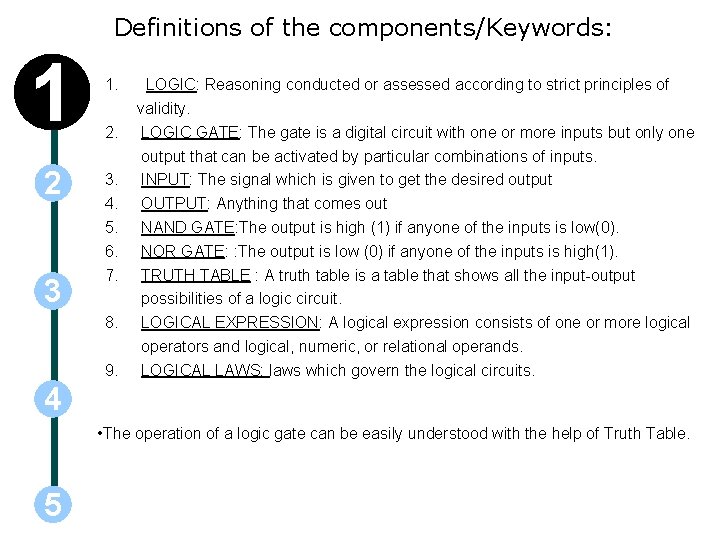
Definitions of the components/Keywords: 1 2 3 1. 2. 3. 4. 5. 6. 7. 8. 9. LOGIC: Reasoning conducted or assessed according to strict principles of validity. LOGIC GATE: The gate is a digital circuit with one or more inputs but only one output that can be activated by particular combinations of inputs. INPUT: The signal which is given to get the desired output OUTPUT: Anything that comes out NAND GATE: The output is high (1) if anyone of the inputs is low(0). NOR GATE: : The output is low (0) if anyone of the inputs is high(1). TRUTH TABLE : A truth table is a table that shows all the input-output possibilities of a logic circuit. LOGICAL EXPRESSION: A logical expression consists of one or more logical operators and logical, numeric, or relational operands. LOGICAL LAWS: laws which govern the logical circuits. 4 • The operation of a logic gate can be easily understood with the help of Truth Table. 5

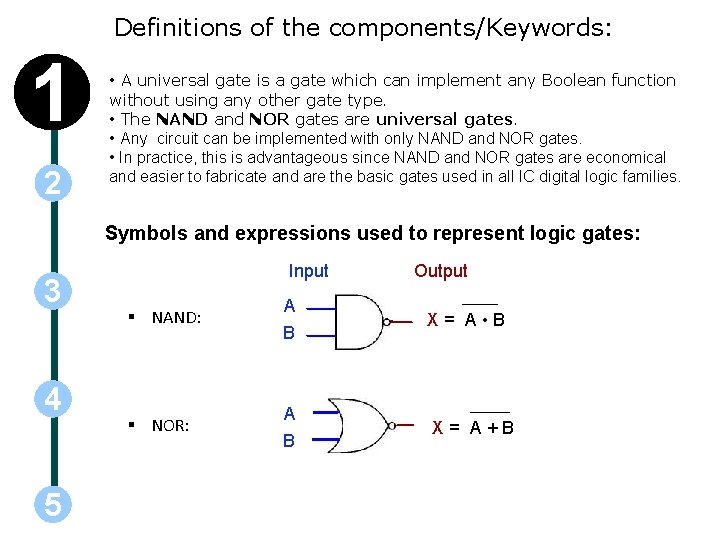
Definitions of the components/Keywords: 1 2 • A universal gate is a gate which can implement any Boolean function without using any other gate type. • The NAND and NOR gates are universal gates. • Any circuit can be implemented with only NAND and NOR gates. • In practice, this is advantageous since NAND and NOR gates are economical and easier to fabricate and are the basic gates used in all IC digital logic families. Symbols and expressions used to represent logic gates: 3 4 5 Input Output § NAND: A B X= A • B § NOR: A B X= A+B

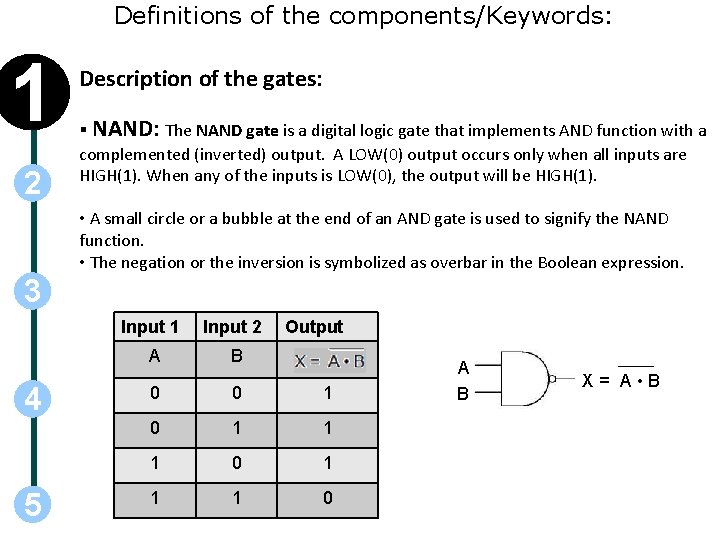
Definitions of the components/Keywords: 1 2 Description of the gates: § NAND: The NAND gate is a digital logic gate that implements AND function with a complemented (inverted) output. A LOW(0) output occurs only when all inputs are HIGH(1). When any of the inputs is LOW(0), the output will be HIGH(1). • A small circle or a bubble at the end of an AND gate is used to signify the NAND function. • The negation or the inversion is symbolized as overbar in the Boolean expression. 3 4 5 Input 1 Input 2 Output A B 0 0 1 1 1 0 A B X= A • B

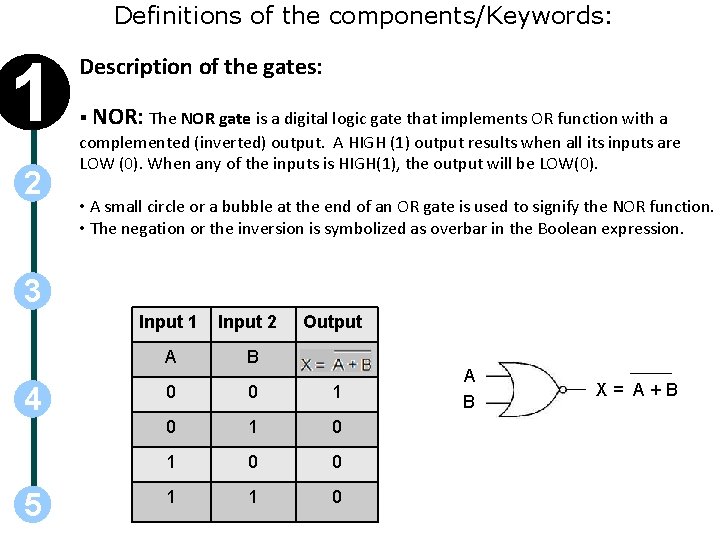
Definitions of the components/Keywords: 1 2 Description of the gates: § NOR: The NOR gate is a digital logic gate that implements OR function with a complemented (inverted) output. A HIGH (1) output results when all its inputs are LOW (0). When any of the inputs is HIGH(1), the output will be LOW(0). • A small circle or a bubble at the end of an OR gate is used to signify the NOR function. • The negation or the inversion is symbolized as overbar in the Boolean expression. 3 Input 1 4 5 Input 2 Output A B 0 0 1 0 1 0 0 1 1 0 A B X= A+B

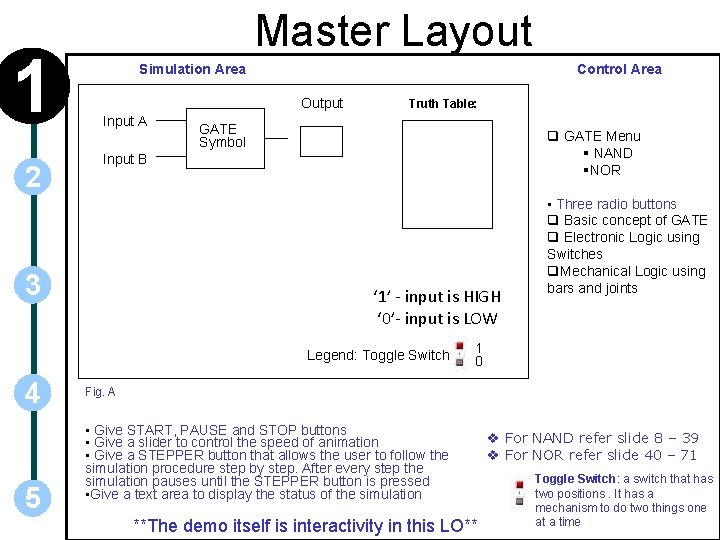
1 2 Master Layout Simulation Area Control Area Output Input A Truth Table: GATE Symbol q GATE Menu § NAND §NOR Input B 3 ‘ 1’ - input is HIGH ‘ 0’- input is LOW Legend: Toggle Switch 4 5 • Three radio buttons q Basic concept of GATE q Electronic Logic using Switches q. Mechanical Logic using bars and joints 1 0 Fig. A • Give START, PAUSE and STOP buttons • Give a slider to control the speed of animation • Give a STEPPER button that allows the user to follow the simulation procedure step by step. After every step the simulation pauses until the STEPPER button is pressed • Give a text area to display the status of the simulation **The demo itself is interactivity in this LO** v For NAND refer slide 8 – 39 v For NOR refer slide 40 – 71 Toggle Switch: a switch that has two positions. It has a mechanism to do two things one at a time

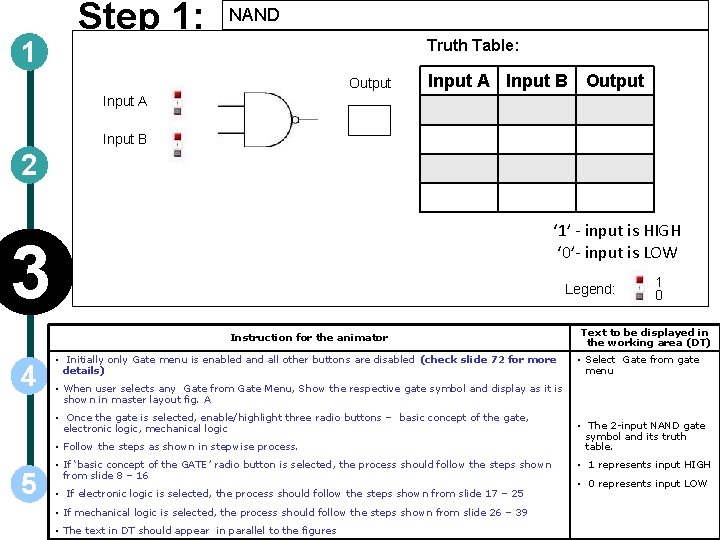
1 Step 1: NAND Truth Table: Output Input A Input B 2 ‘ 1’ - input is HIGH ‘ 0’- input is LOW 3 Legend: Instruction for the animator 4 • Initially only Gate menu is enabled and all other buttons are disabled (check slide 72 for more details) Text to be displayed in the working area (DT) • Select Gate from gate menu • When user selects any Gate from Gate Menu, Show the respective gate symbol and display as it is shown in master layout fig. A • Once the gate is selected, enable/highlight three radio buttons – basic concept of the gate, electronic logic, mechanical logic • Follow the steps as shown in stepwise process. 5 1 0 • If ‘basic concept of the GATE’ radio button is selected, the process should follow the steps shown from slide 8 – 16 • If electronic logic is selected, the process should follow the steps shown from slide 17 – 25 • If mechanical logic is selected, the process should follow the steps shown from slide 26 – 39 • The text in DT should appear in parallel to the figures • The 2 -input NAND gate symbol and its truth table. • 1 represents input HIGH • 0 represents input LOW

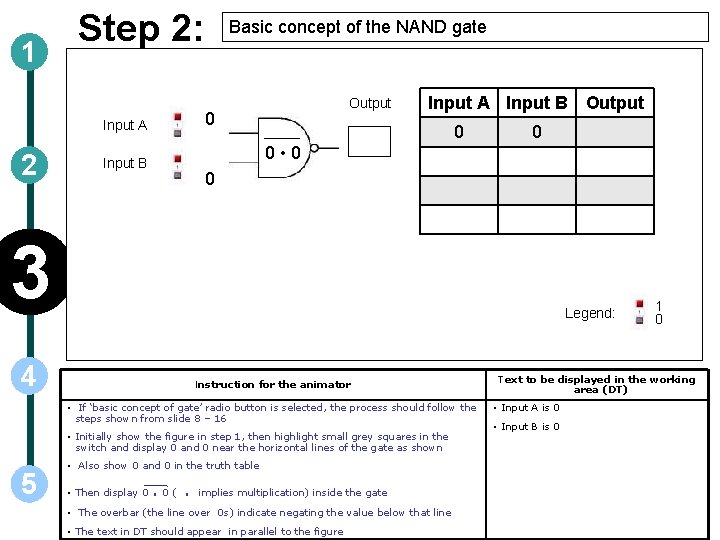
1 Step 2: Output 0 Input A 2 Basic concept of the NAND gate Input A Input B Output 0 0 0 • 0 Input B 0 3 Legend: 4 Instruction for the animator • If ‘basic concept of gate’ radio button is selected, the process should follow the steps shown from slide 8 – 16 • Initially show the figure in step 1, then highlight small grey squares in the switch and display 0 and 0 near the horizontal lines of the gate as shown 5 • Also show 0 and 0 in the truth table • Then display 0 . 0(. implies multiplication) inside the gate • The overbar (the line over 0 s) indicate negating the value below that line • The text in DT should appear in parallel to the figure 1 0 Text to be displayed in the working area (DT) • Input A is 0 • Input B is 0

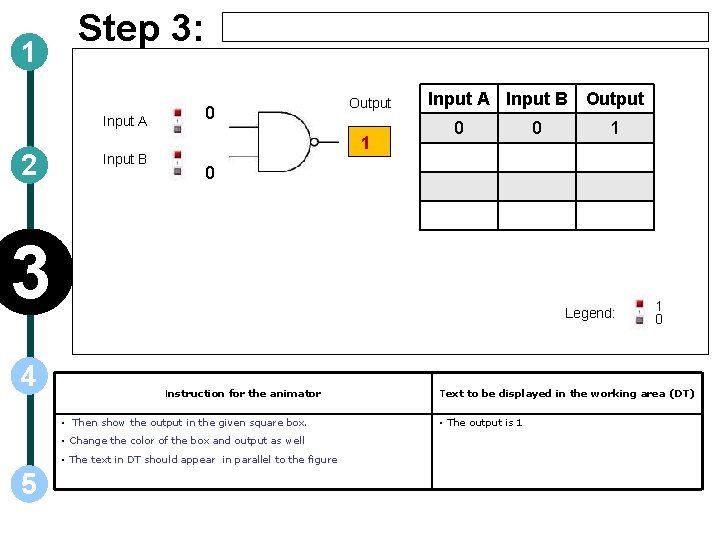
1 Step 3: Input A 2 Input B 0 Output 1 Input A Input B Output 0 Legend: Instruction for the animator • Then show the output in the given square box. • Change the color of the box and output as well • The text in DT should appear in parallel to the figure 5 1 0 3 4 0 1 0 Text to be displayed in the working area (DT) • The output is 1

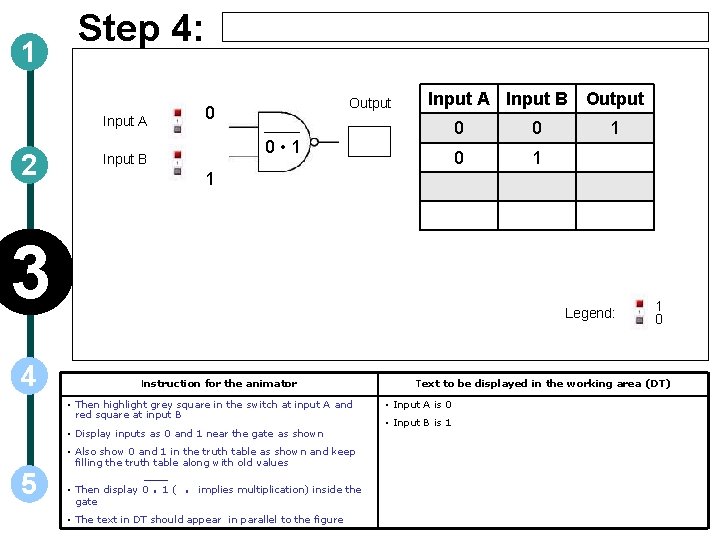
1 Step 4: Input A 2 Output 0 Input A Input B Output 0 • 1 Input B 0 1 1 Legend: Instruction for the animator • Then highlight grey square in the switch at input A and red square at input B • Display inputs as 0 and 1 near the gate as shown • Also show 0 and 1 in the truth table as shown and keep filling the truth table along with old values 5 0 1 3 4 0 • Then display 0 gate . 1(. implies multiplication) inside the • The text in DT should appear in parallel to the figure 1 0 Text to be displayed in the working area (DT) • Input A is 0 • Input B is 1

1 Step 5: Input A 2 0 Output 1 Input B Input A Input B Output 0 0 1 1 1 3 Legend: 1 0 4 Instruction for the animator • Then show the output in the given square box. 5 • Change the color of the box and output as well • The text in DT should appear in parallel to the figure Text to be displayed in the working area (DT) • The output is 1

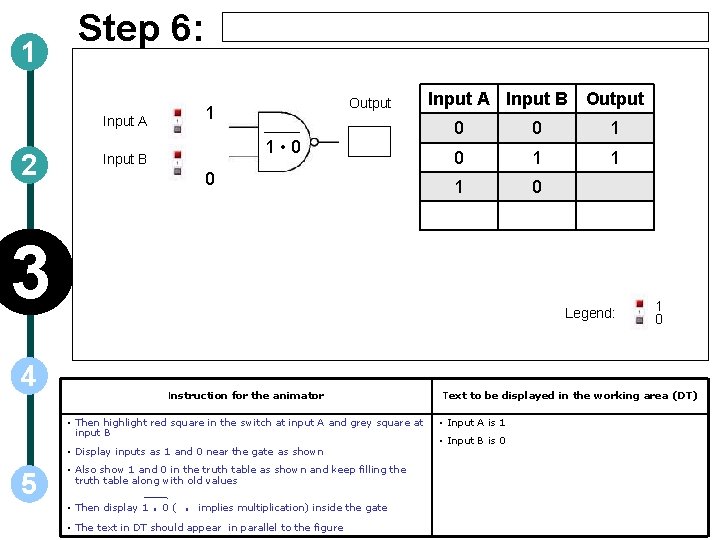
1 Step 6: Input A 2 Output 1 1 • 0 Input B 0 Input A Input B Output 0 0 1 1 1 0 3 Legend: 4 Instruction for the animator • Then highlight red square in the switch at input A and grey square at input B • Display inputs as 1 and 0 near the gate as shown 5 • Also show 1 and 0 in the truth table as shown and keep filling the truth table along with old values • Then display 1 . 0(. implies multiplication) inside the gate • The text in DT should appear in parallel to the figure 1 0 Text to be displayed in the working area (DT) • Input A is 1 • Input B is 0

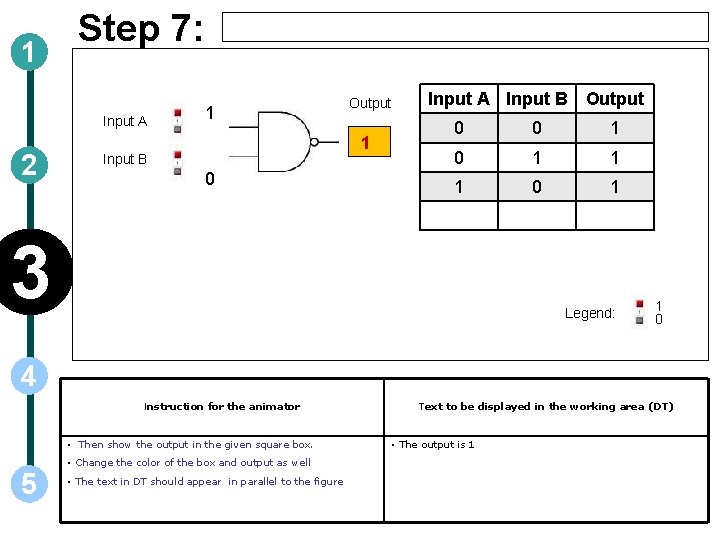
1 Step 7: Input A 2 1 Output 1 Input B 0 Input A Input B Output 0 0 1 1 1 0 1 3 Legend: 1 0 4 Instruction for the animator • Then show the output in the given square box. 5 • Change the color of the box and output as well • The text in DT should appear in parallel to the figure Text to be displayed in the working area (DT) • The output is 1

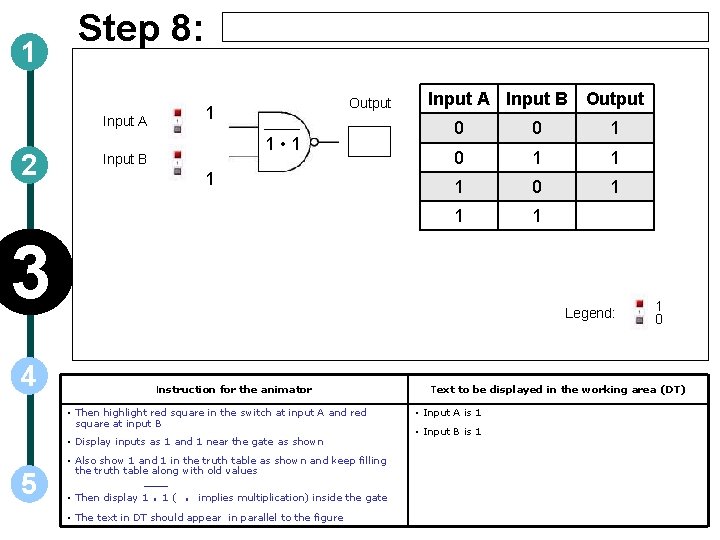
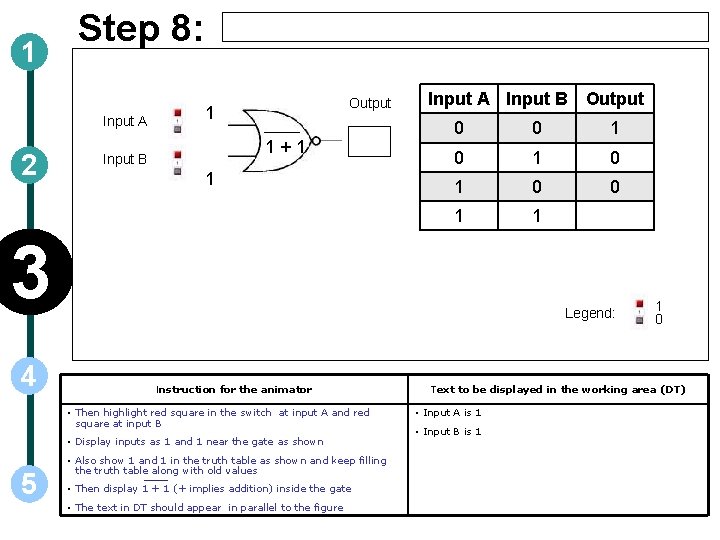
1 Step 8: Input A 2 Output 1 1 • 1 Input B 1 Input A Input B Output 0 0 1 1 1 3 Legend: 4 Instruction for the animator • Then highlight red square in the switch at input A and red square at input B • Display inputs as 1 and 1 near the gate as shown 5 • Also show 1 and 1 in the truth table as shown and keep filling the truth table along with old values • Then display 1 . 1(. implies multiplication) inside the gate • The text in DT should appear in parallel to the figure 1 0 Text to be displayed in the working area (DT) • Input A is 1 • Input B is 1

1 Step 9: Input A 2 1 Output 0 Input B 1 Input A Input B Output 0 0 1 1 1 0 3 Legend: 1 0 4 Instruction for the animator • Then show the output in the given square box. Text to be displayed in the working area (DT) • The output is 0 • Change the color of the box and output as well 5 • The text in DT should appear in parallel to the figure • Select any radio button to view different ways of implementing NAND logic

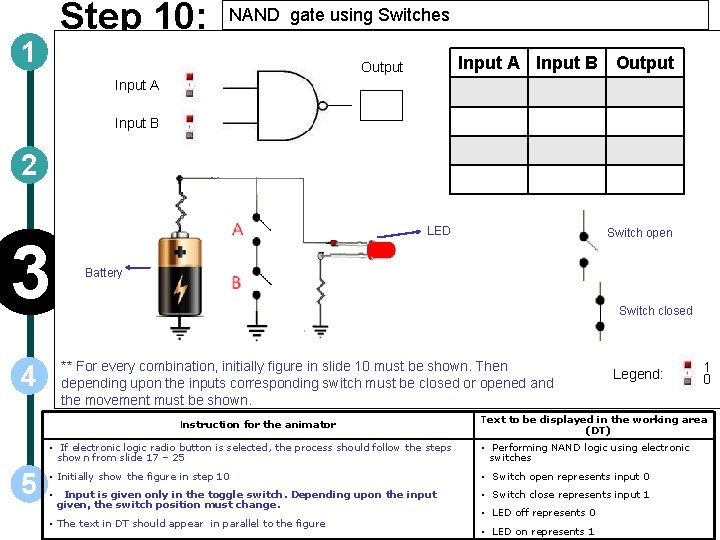
Step 10: 1 NAND gate using Switches Input A Input B Output Input A Input B 2 3 LED Battery Switch closed ** For every combination, initially figure in slide 10 must be shown. Then depending upon the inputs corresponding switch must be closed or opened and the movement must be shown. 4 Instruction for the animator 5 Switch open Legend: Text to be displayed in the working area (DT) • If electronic logic radio button is selected, the process should follow the steps shown from slide 17 – 25 • Performing NAND logic using electronic switches • Initially show the figure in step 10 • Switch open represents input 0 • Input is given only in the toggle switch. Depending upon the input given, the switch position must change. • The text in DT should appear in parallel to the figure 1 0 • Switch close represents input 1 • LED off represents 0 • LED on represents 1

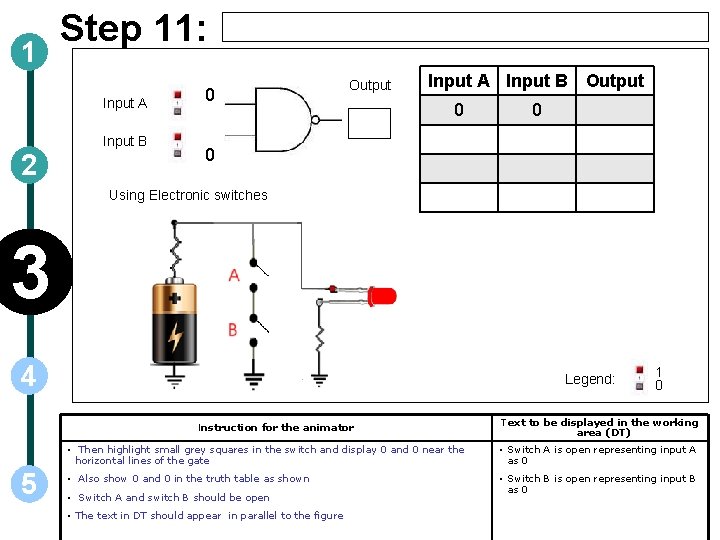
1 Step 11: Input A Input B 2 0 Output Input A Input B Output 0 0 0 Using Electronic switches 3 4 Legend: Instruction for the animator 5 1 0 Text to be displayed in the working area (DT) • Then highlight small grey squares in the switch and display 0 and 0 near the horizontal lines of the gate • Switch A is open representing input A as 0 • Also show 0 and 0 in the truth table as shown • Switch B is open representing input B as 0 • Switch A and switch B should be open • The text in DT should appear in parallel to the figure

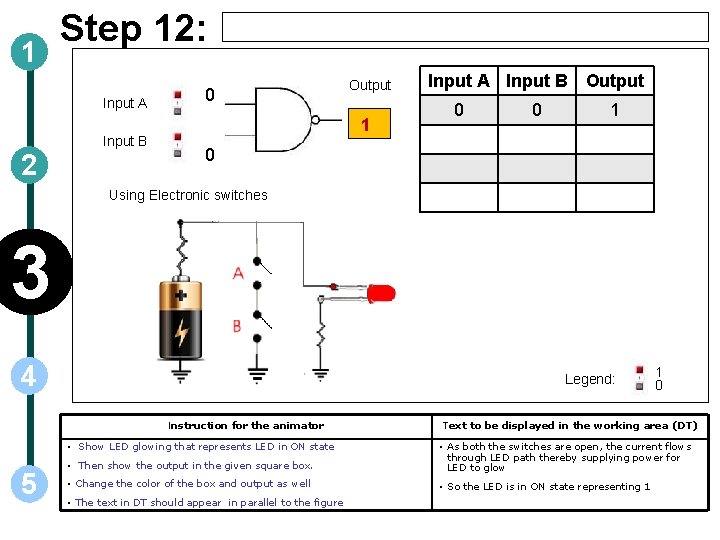
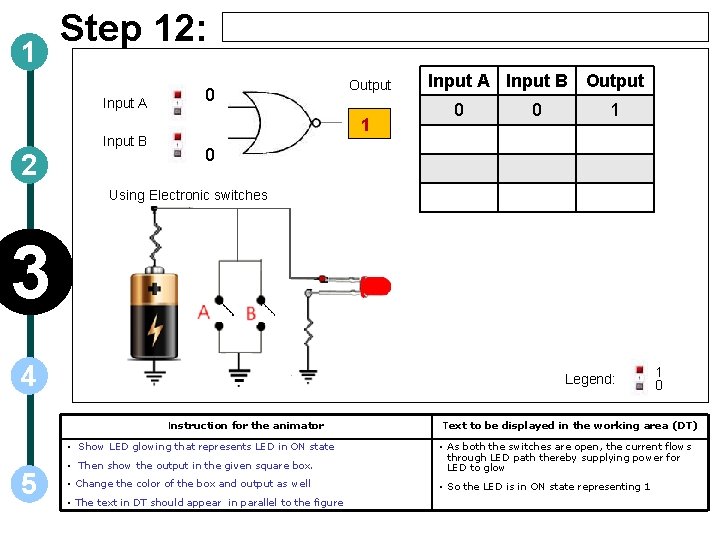
1 Step 12: Input A Input B 2 0 Output 1 Input A Input B Output 0 0 1 0 Using Electronic switches 3 4 Legend: Instruction for the animator • Show LED glowing that represents LED in ON state 5 1 0 Text to be displayed in the working area (DT) • Then show the output in the given square box. • As both the switches are open, the current flows through LED path thereby supplying power for LED to glow • Change the color of the box and output as well • So the LED is in ON state representing 1 • The text in DT should appear in parallel to the figure

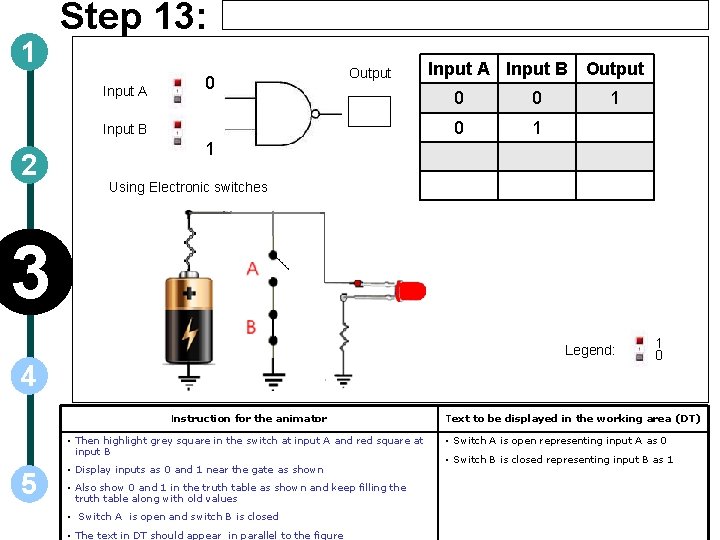
1 Step 13: Input A 0 Output Input B 2 Input A Input B Output 0 0 0 1 1 1 Using Electronic switches 3 Legend: 4 Instruction for the animator • Then highlight grey square in the switch at input A and red square at input B 5 • Display inputs as 0 and 1 near the gate as shown • Also show 0 and 1 in the truth table as shown and keep filling the truth table along with old values • Switch A is open and switch B is closed • The text in DT should appear in parallel to the figure 1 0 Text to be displayed in the working area (DT) • Switch A is open representing input A as 0 • Switch B is closed representing input B as 1

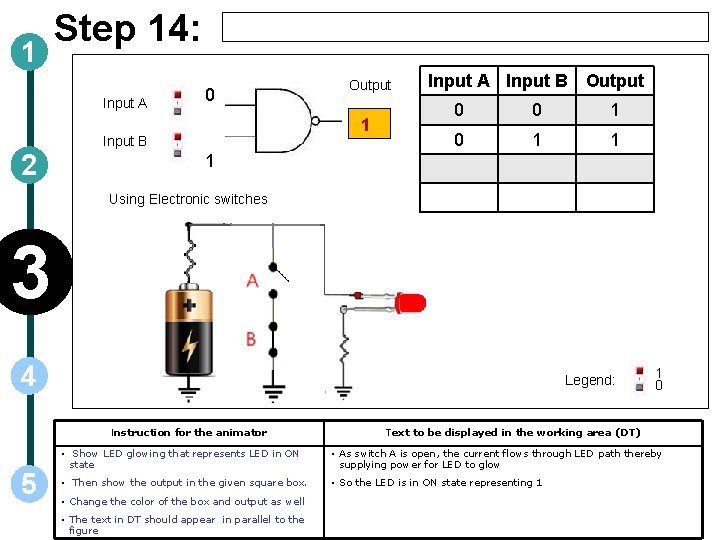
1 Step 14: Input A 0 1 Input B 2 Output Input A Input B Output 0 0 1 1 1 Using Electronic switches 3 4 Legend: Instruction for the animator 5 1 0 Text to be displayed in the working area (DT) • Show LED glowing that represents LED in ON state • As switch A is open, the current flows through LED path thereby supplying power for LED to glow • Then show the output in the given square box. • So the LED is in ON state representing 1 • Change the color of the box and output as well • The text in DT should appear in parallel to the figure

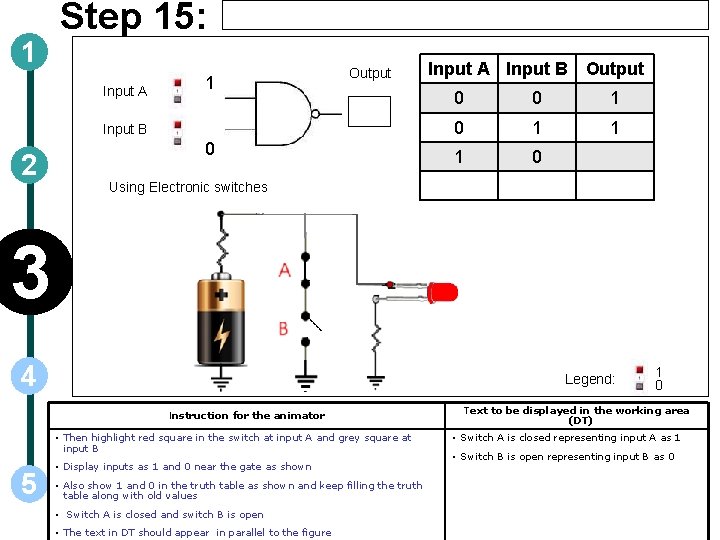
1 Step 15: Input A 1 Output Input B 2 0 Input A Input B Output 0 0 1 1 1 0 Using Electronic switches 3 4 Legend: Instruction for the animator • Then highlight red square in the switch at input A and grey square at input B 5 • Display inputs as 1 and 0 near the gate as shown • Also show 1 and 0 in the truth table as shown and keep filling the truth table along with old values • Switch A is closed and switch B is open • The text in DT should appear in parallel to the figure 1 0 Text to be displayed in the working area (DT) • Switch A is closed representing input A as 1 • Switch B is open representing input B as 0

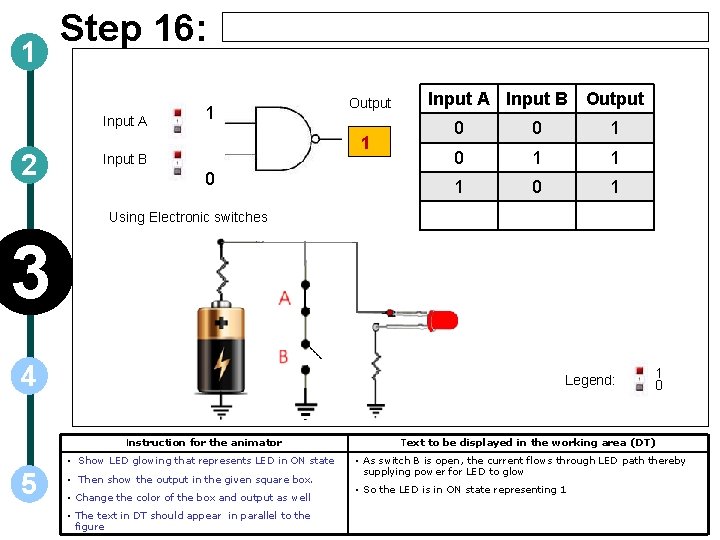
1 Step 16: Input A 2 1 Output 1 Input B 0 Input A Input B Output 0 0 1 1 1 0 1 Using Electronic switches 3 4 Legend: Instruction for the animator • Show LED glowing that represents LED in ON state 5 • Then show the output in the given square box. • Change the color of the box and output as well • The text in DT should appear in parallel to the figure 1 0 Text to be displayed in the working area (DT) • As switch B is open, the current flows through LED path thereby supplying power for LED to glow • So the LED is in ON state representing 1

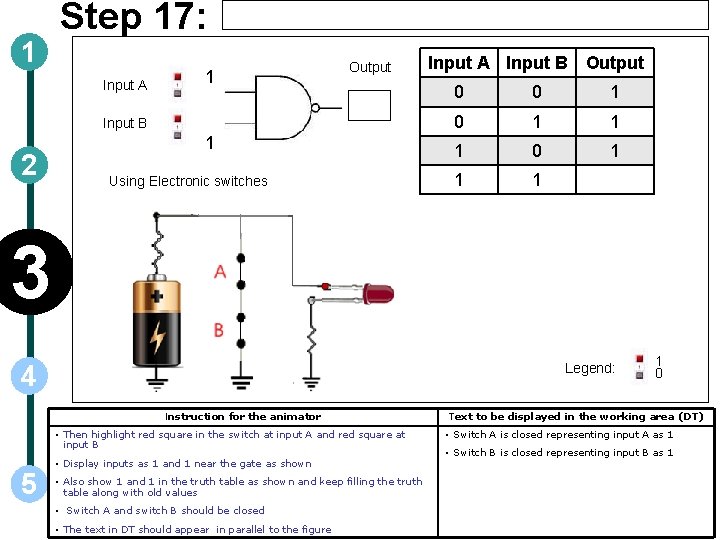
1 Step 17: Input A 1 Output Input B 2 1 Using Electronic switches Input A Input B Output 0 0 1 1 1 3 Legend: 4 Instruction for the animator • Then highlight red square in the switch at input A and red square at input B 5 • Display inputs as 1 and 1 near the gate as shown • Also show 1 and 1 in the truth table as shown and keep filling the truth table along with old values • Switch A and switch B should be closed • The text in DT should appear in parallel to the figure 1 0 Text to be displayed in the working area (DT) • Switch A is closed representing input A as 1 • Switch B is closed representing input B as 1

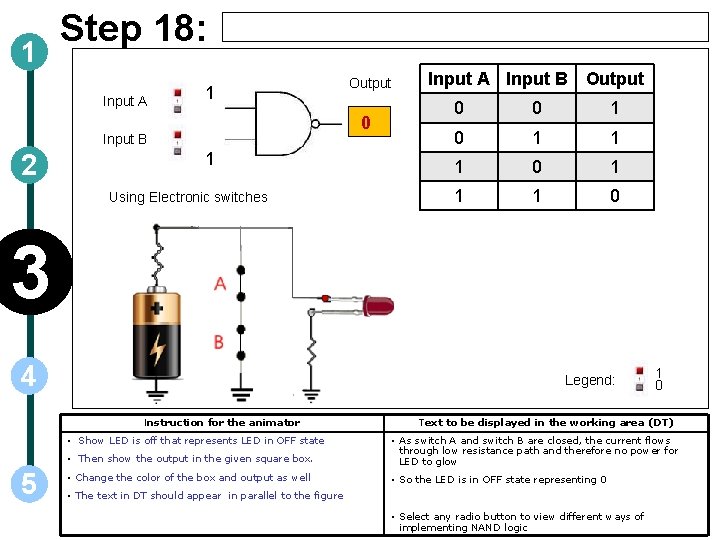
1 Step 18: Input A 1 0 Input B 2 Output 1 Using Electronic switches Input A Input B Output 0 0 1 1 1 0 3 4 Legend: Instruction for the animator • Show LED is off that represents LED in OFF state 5 1 0 Text to be displayed in the working area (DT) • Then show the output in the given square box. • As switch A and switch B are closed, the current flows through low resistance path and therefore no power for LED to glow • Change the color of the box and output as well • So the LED is in OFF state representing 0 • The text in DT should appear in parallel to the figure • Select any radio button to view different ways of implementing NAND logic

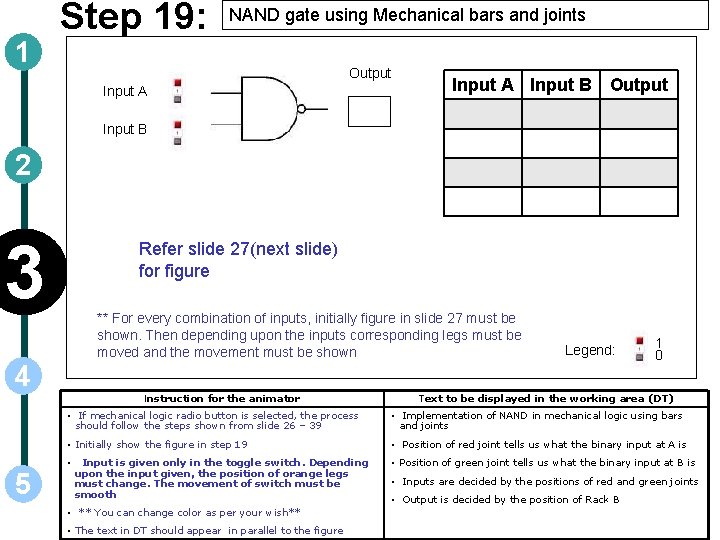
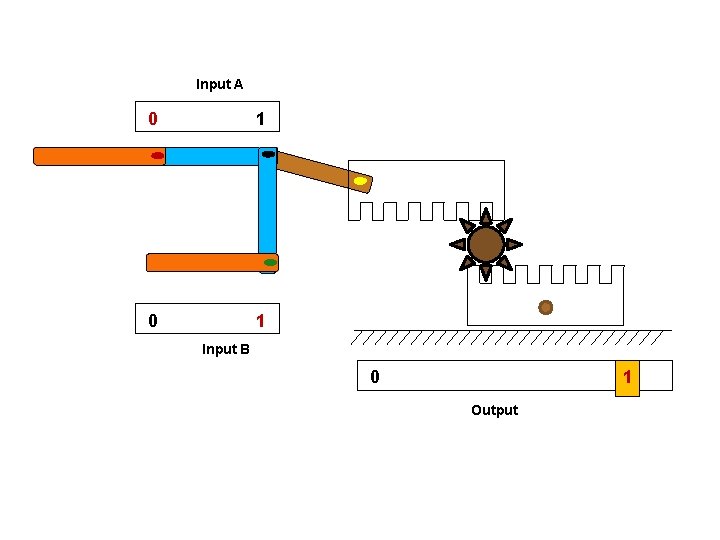
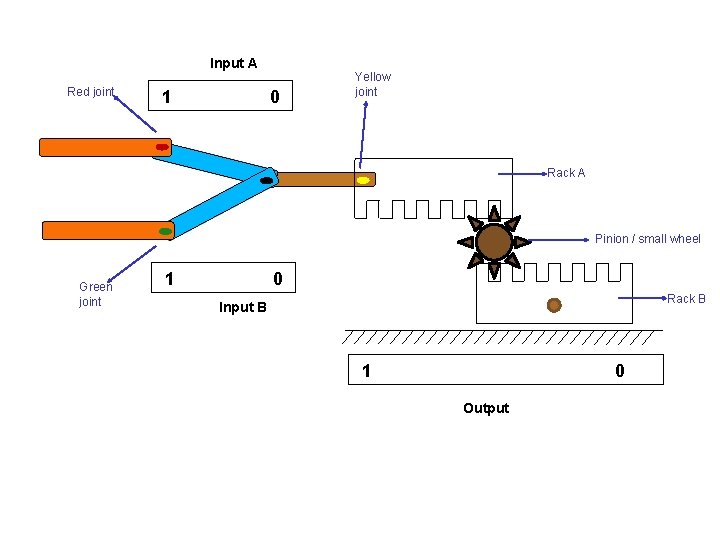
1 Step 19: NAND gate using Mechanical bars and joints Output Input A Input B Output Input B 2 3 Refer slide 27(next slide) for figure ** For every combination of inputs, initially figure in slide 27 must be shown. Then depending upon the inputs corresponding legs must be moved and the movement must be shown 4 5 Instruction for the animator Legend: 1 0 Text to be displayed in the working area (DT) • If mechanical logic radio button is selected, the process should follow the steps shown from slide 26 – 39 • Implementation of NAND in mechanical logic using bars and joints • Initially show the figure in step 19 • Position of red joint tells us what the binary input at A is • Input is given only in the toggle switch. Depending upon the input given, the position of orange legs must change. The movement of switch must be smooth • ** You can change color as per your wish** • The text in DT should appear in parallel to the figure • Position of green joint tells us what the binary input at B is • Inputs are decided by the positions of red and green joints • Output is decided by the position of Rack B

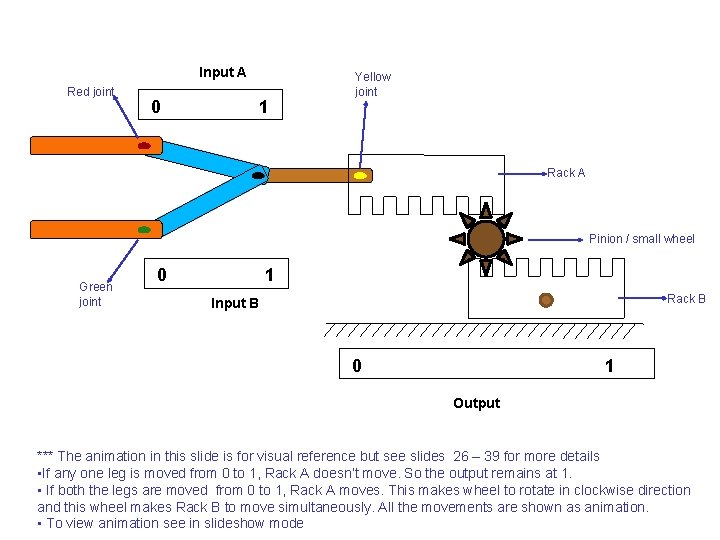
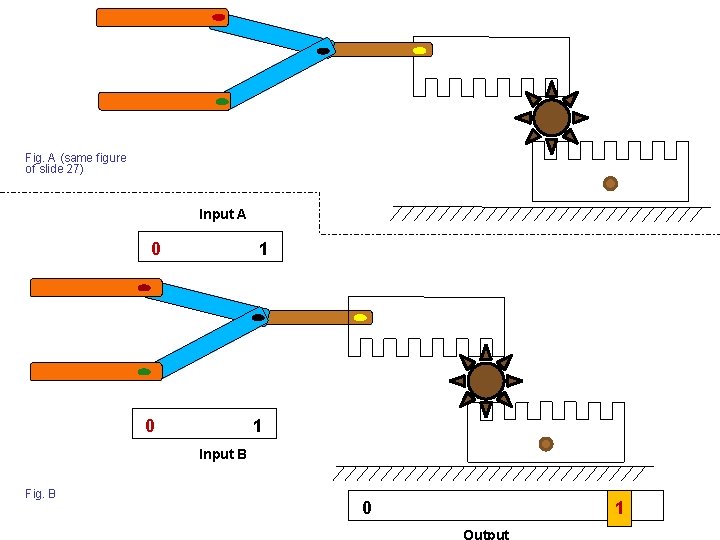
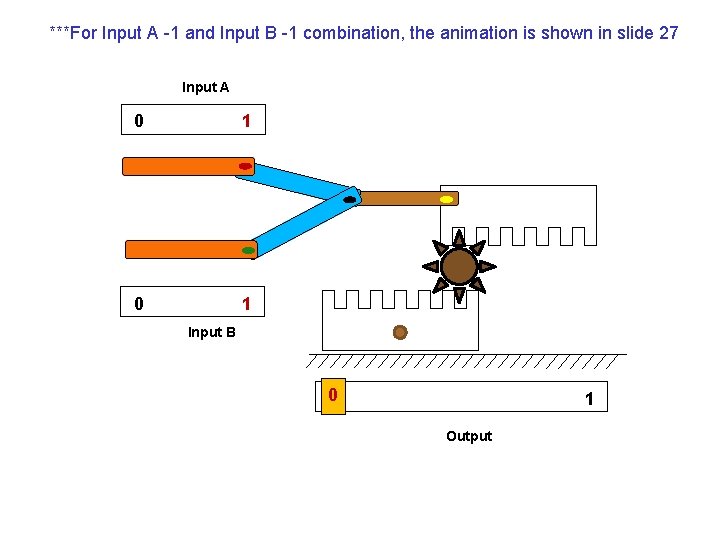
Input A Red joint 0 1 Yellow joint Rack A Pinion / small wheel Green joint 0 1 Rack B Input B 0 1 Output *** The animation in this slide is for visual reference but see slides 26 – 39 for more details • If any one leg is moved from 0 to 1, Rack A doesn’t move. So the output remains at 1. • If both the legs are moved from 0 to 1, Rack A moves. This makes wheel to rotate in clockwise direction and this wheel makes Rack B to move simultaneously. All the movements are shown as animation. • To view animation see in slideshow mode

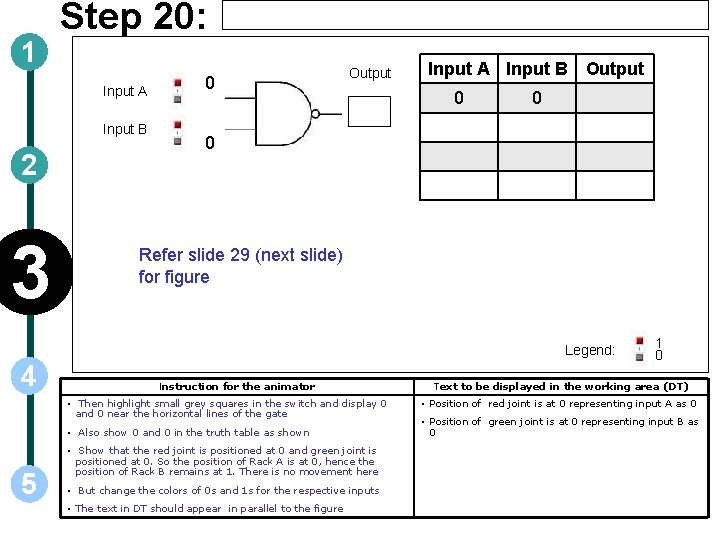
1 Step 20: Input A Input B 2 3 0 Output Input A Input B Output 0 0 0 Refer slide 29 (next slide) for figure Legend: 4 Instruction for the animator • Then highlight small grey squares in the switch and display 0 and 0 near the horizontal lines of the gate • Also show 0 and 0 in the truth table as shown 5 • Show that the red joint is positioned at 0 and green joint is positioned at 0. So the position of Rack A is at 0, hence the position of Rack B remains at 1. There is no movement here • But change the colors of 0 s and 1 s for the respective inputs • The text in DT should appear in parallel to the figure 1 0 Text to be displayed in the working area (DT) • Position of red joint is at 0 representing input A as 0 • Position of green joint is at 0 representing input B as 0

Fig. A (same figure of slide 27) Input A 0 1 Input B Fig. B 0 1 Output

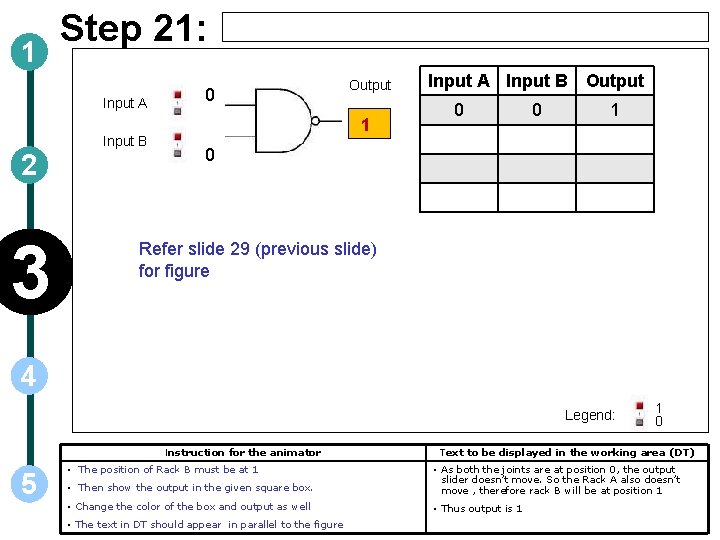
1 Step 21: Input A Input B 2 3 0 Output 1 Input A Input B Output 0 0 1 0 Refer slide 29 (previous slide) for figure 4 Legend: Instruction for the animator 5 • The position of Rack B must be at 1 1 0 Text to be displayed in the working area (DT) • Then show the output in the given square box. • As both the joints are at position 0, the output slider doesn’t move. So the Rack A also doesn’t move , therefore rack B will be at position 1 • Change the color of the box and output as well • Thus output is 1 • The text in DT should appear in parallel to the figure

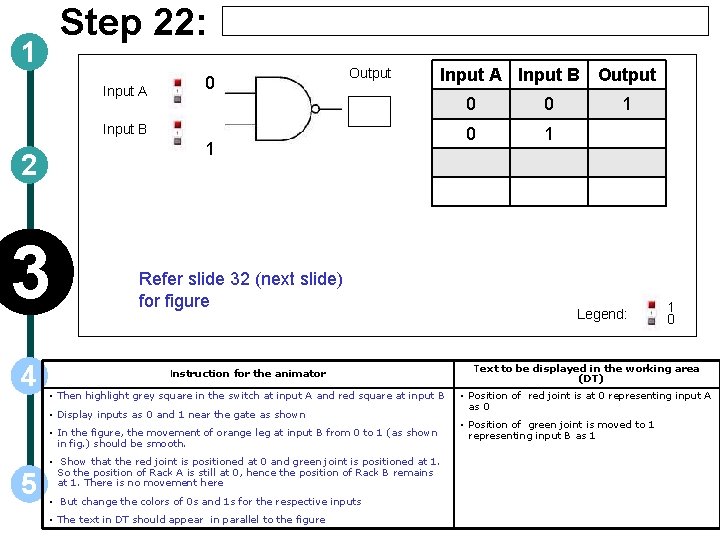
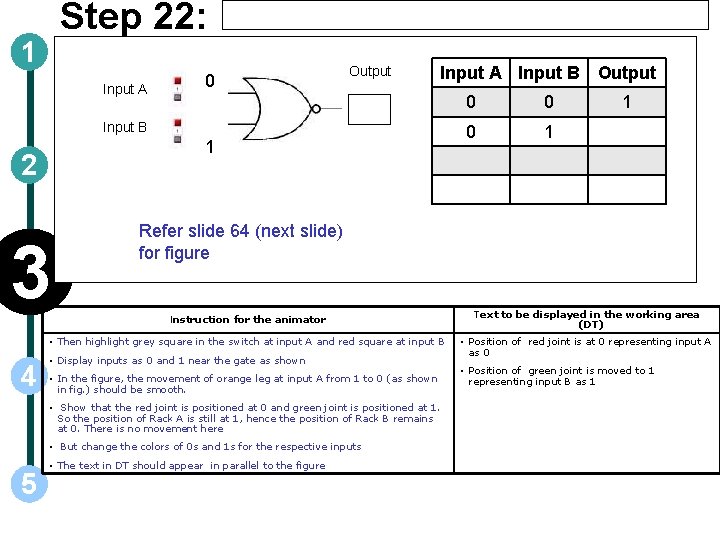
Step 22: 1 Input A 0 Output Input A Input B Output Input B 1 2 3 4 Refer slide 32 (next slide) for figure Instruction for the animator • Then highlight grey square in the switch at input A and red square at input B • Display inputs as 0 and 1 near the gate as shown • In the figure, the movement of orange leg at input B from 0 to 1 (as shown in fig. ) should be smooth. 5 • Show that the red joint is positioned at 0 and green joint is positioned at 1. So the position of Rack A is still at 0, hence the position of Rack B remains at 1. There is no movement here • But change the colors of 0 s and 1 s for the respective inputs • The text in DT should appear in parallel to the figure 0 0 0 1 1 Legend: 1 0 Text to be displayed in the working area (DT) • Position of red joint is at 0 representing input A as 0 • Position of green joint is moved to 1 representing input B as 1

Input A 0 1 Input B 0 1 Output

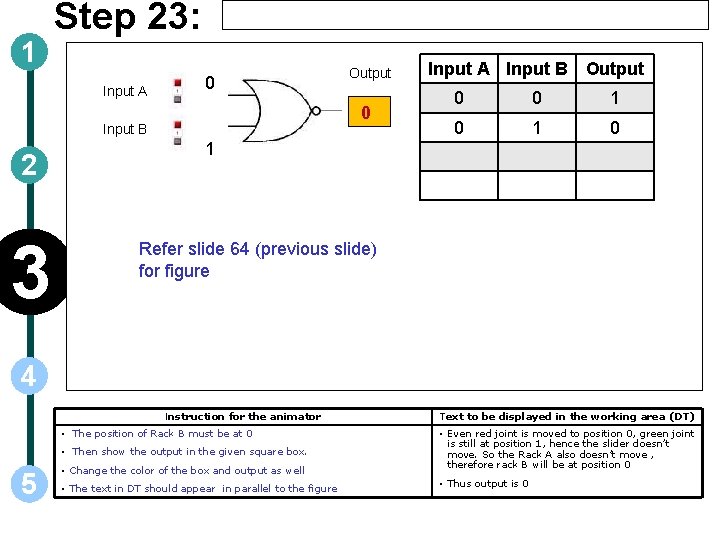
1 Step 23: Input A 0 1 Input B 2 3 Output Input A Input B Output 0 0 1 1 1 Refer slide 32 (previous slide) for figure Legend: 1 0 4 Instruction for the animator • The position of Rack B must be at 1 • Then show the output in the given square box. • Change the color of the box and output as well 5 • The text in DT should appear in parallel to the figure Text to be displayed in the working area (DT) • Red joint is at position 0 and even green joint is moved to position 1, the slider doesn’t move. So the Rack A also doesn’t move , therefore rack B will be at position 1 • Thus output is 1

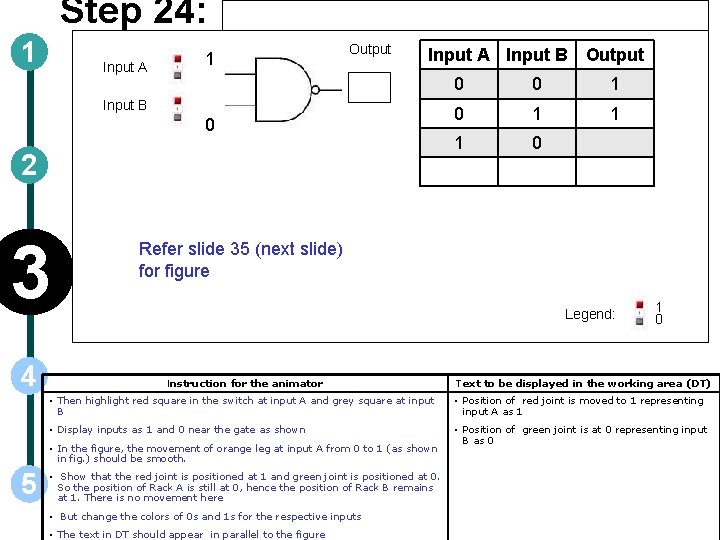
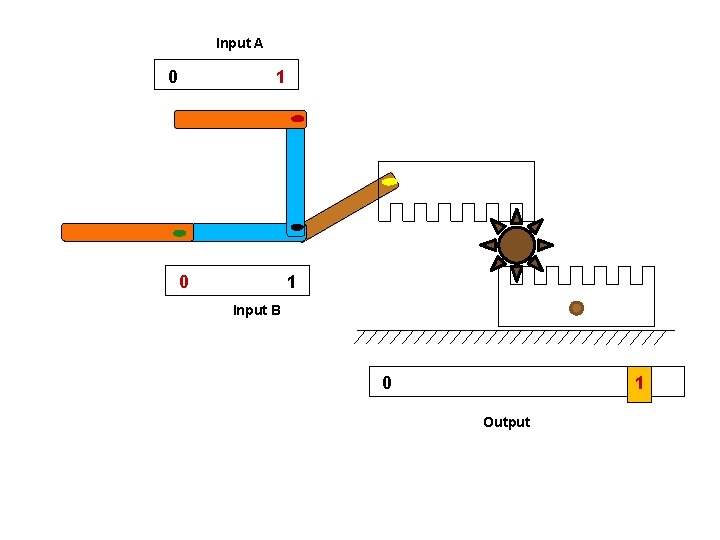
Step 24: 1 Input A 1 Output Input A Input B Output Input B 0 2 3 4 0 1 1 1 0 Refer slide 35 (next slide) for figure Legend: Instruction for the animator 1 0 Text to be displayed in the working area (DT) • Then highlight red square in the switch at input A and grey square at input B • Position of red joint is moved to 1 representing input A as 1 • Display inputs as 1 and 0 near the gate as shown • Position of green joint is at 0 representing input B as 0 • In the figure, the movement of orange leg at input A from 0 to 1 (as shown in fig. ) should be smooth. 5 0 • Show that the red joint is positioned at 1 and green joint is positioned at 0. So the position of Rack A is still at 0, hence the position of Rack B remains at 1. There is no movement here • But change the colors of 0 s and 1 s for the respective inputs • The text in DT should appear in parallel to the figure

Input A 0 1 Input B 0 1 Output

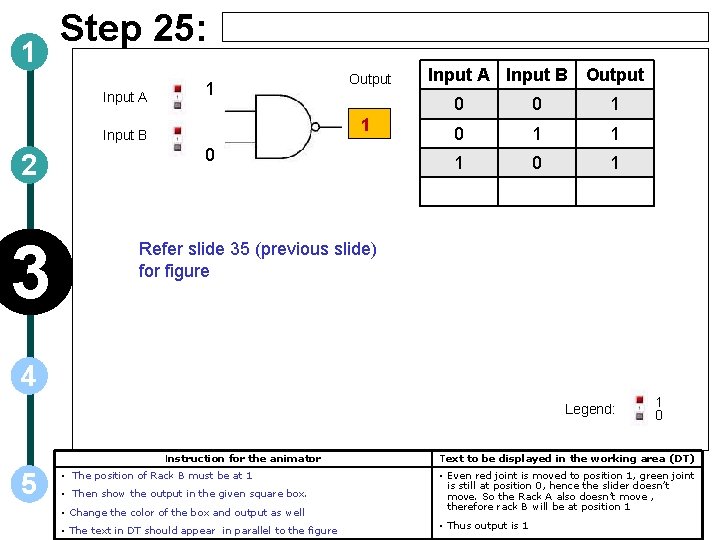
1 Step 25: Input A 1 1 Input B 2 3 Output 0 Input A Input B Output 0 0 1 1 1 0 1 Refer slide 35 (previous slide) for figure 4 Legend: Instruction for the animator 5 • The position of Rack B must be at 1 • Then show the output in the given square box. • Change the color of the box and output as well • The text in DT should appear in parallel to the figure 1 0 Text to be displayed in the working area (DT) • Even red joint is moved to position 1, green joint is still at position 0, hence the slider doesn’t move. So the Rack A also doesn’t move , therefore rack B will be at position 1 • Thus output is 1

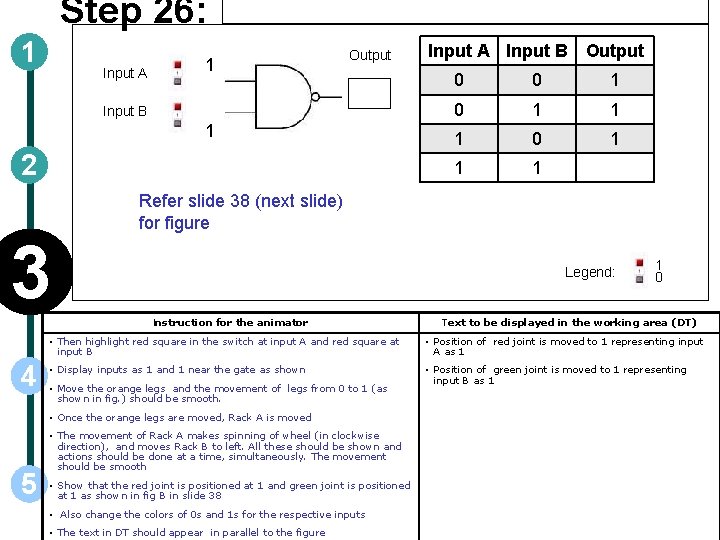
Step 26: 1 Input A 1 Output Input B 1 2 3 0 1 1 1 Legend: 1 0 Text to be displayed in the working area (DT) • Then highlight red square in the switch at input A and red square at input B • Position of red joint is moved to 1 representing input A as 1 • Display inputs as 1 and 1 near the gate as shown • Position of green joint is moved to 1 representing input B as 1 • Move the orange legs and the movement of legs from 0 to 1 (as shown in fig. ) should be smooth. • Once the orange legs are moved, Rack A is moved 5 0 Refer slide 38 (next slide) for figure Instruction for the animator 4 Input A Input B Output • The movement of Rack A makes spinning of wheel (in clockwise direction), and moves Rack B to left. All these should be shown and actions should be done at a time, simultaneously. The movement should be smooth • Show that the red joint is positioned at 1 and green joint is positioned at 1 as shown in fig B in slide 38 • Also change the colors of 0 s and 1 s for the respective inputs • The text in DT should appear in parallel to the figure

***For Input A -1 and Input B -1 combination, the animation is shown in slide 27 Input A 0 1 Input B 0 1 Output

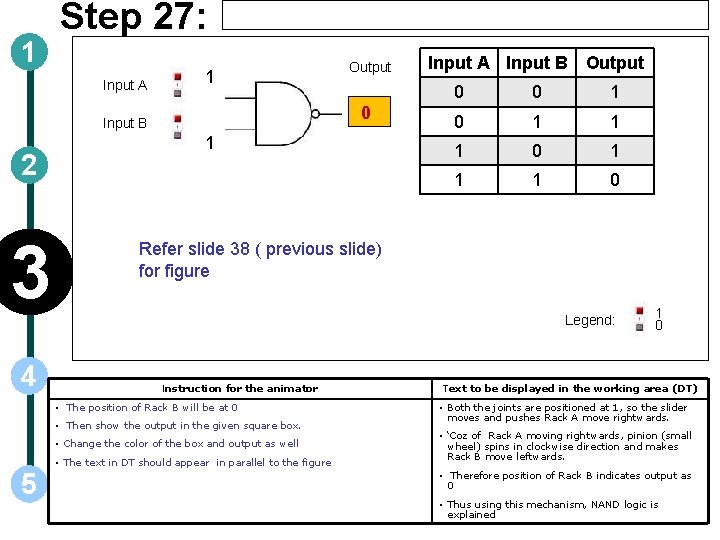
1 Step 27: Input A 1 0 Input B 2 3 4 1 Input A Input B Output 0 0 1 1 1 0 Refer slide 38 ( previous slide) for figure Legend: Instruction for the animator • The position of Rack B will be at 0 • Then show the output in the given square box. • Change the color of the box and output as well 5 Output • The text in DT should appear in parallel to the figure 1 0 Text to be displayed in the working area (DT) • Both the joints are positioned at 1, so the slider moves and pushes Rack A move rightwards. • ‘Coz of Rack A moving rightwards, pinion (small wheel) spins in clockwise direction and makes Rack B move leftwards. • Therefore position of Rack B indicates output as 0 • Thus using this mechanism, NAND logic is explained

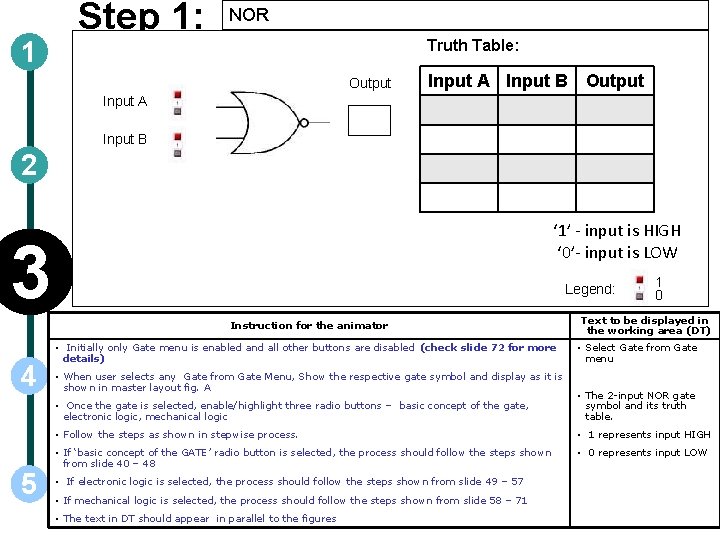
1 Step 1: NOR Truth Table: Output Input A Input B 2 ‘ 1’ - input is HIGH ‘ 0’- input is LOW 3 Legend: Instruction for the animator 4 5 • Initially only Gate menu is enabled and all other buttons are disabled (check slide 72 for more details) • When user selects any Gate from Gate Menu, Show the respective gate symbol and display as it is shown in master layout fig. A 1 0 Text to be displayed in the working area (DT) • Select Gate from Gate menu • Once the gate is selected, enable/highlight three radio buttons – basic concept of the gate, electronic logic, mechanical logic • The 2 -input NOR gate symbol and its truth table. • Follow the steps as shown in stepwise process. • 1 represents input HIGH • If ‘basic concept of the GATE’ radio button is selected, the process should follow the steps shown from slide 40 – 48 • 0 represents input LOW • If electronic logic is selected, the process should follow the steps shown from slide 49 – 57 • If mechanical logic is selected, the process should follow the steps shown from slide 58 – 71 • The text in DT should appear in parallel to the figures

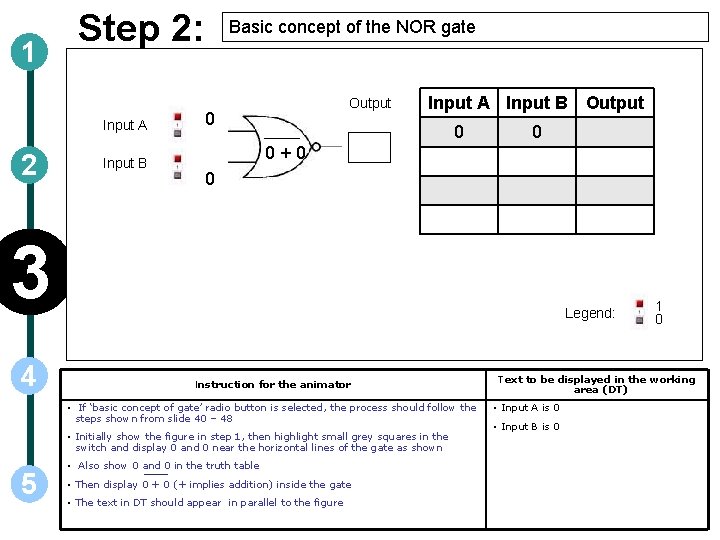
1 Step 2: Input A 2 Input B Basic concept of the NOR gate Output 0 Input A Input B Output 0 0 0+0 0 3 4 Legend: Instruction for the animator • If ‘basic concept of gate’ radio button is selected, the process should follow the steps shown from slide 40 – 48 • Initially show the figure in step 1, then highlight small grey squares in the switch and display 0 and 0 near the horizontal lines of the gate as shown 5 • Also show 0 and 0 in the truth table • Then display 0 + 0 (+ implies addition) inside the gate • The text in DT should appear in parallel to the figure 1 0 Text to be displayed in the working area (DT) • Input A is 0 • Input B is 0

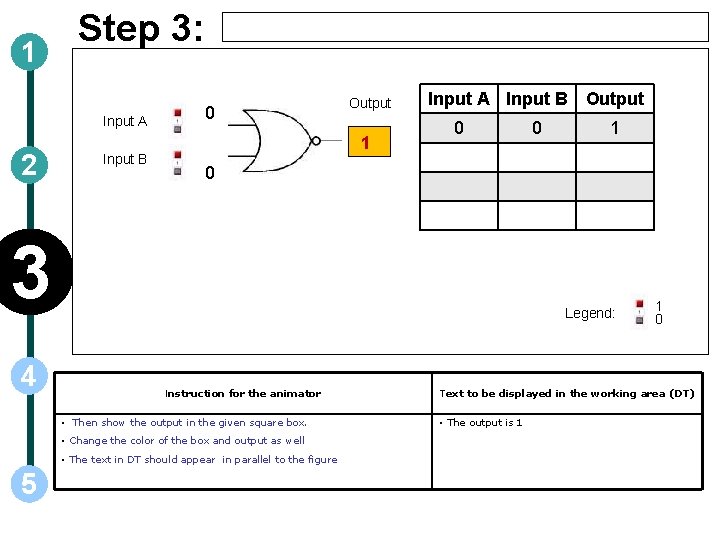
1 Step 3: Input A 2 Input B 0 Output 1 Input A Input B Output 0 Legend: Instruction for the animator • Then show the output in the given square box. • Change the color of the box and output as well • The text in DT should appear in parallel to the figure 5 1 0 3 4 0 1 0 Text to be displayed in the working area (DT) • The output is 1

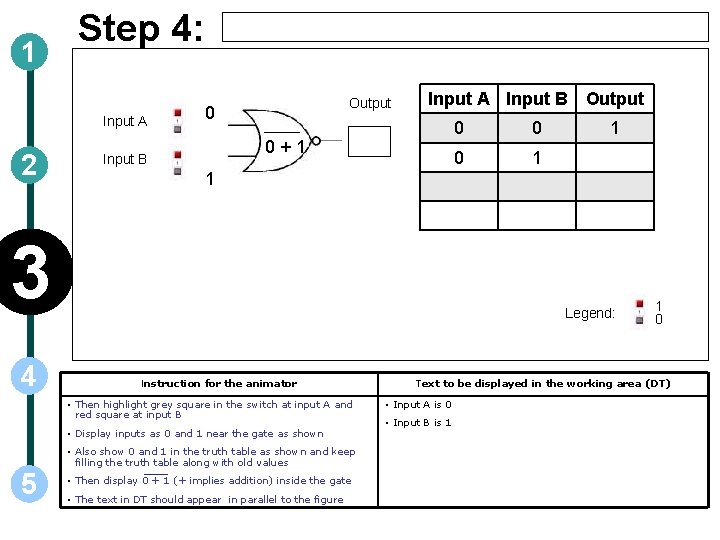
1 Step 4: Input A 2 Output 0 Input A Input B Output 0+1 Input B 0 1 1 Legend: Instruction for the animator • Then highlight grey square in the switch at input A and red square at input B • Display inputs as 0 and 1 near the gate as shown • Also show 0 and 1 in the truth table as shown and keep filling the truth table along with old values 5 0 1 3 4 0 • Then display 0 + 1 (+ implies addition) inside the gate • The text in DT should appear in parallel to the figure 1 0 Text to be displayed in the working area (DT) • Input A is 0 • Input B is 1

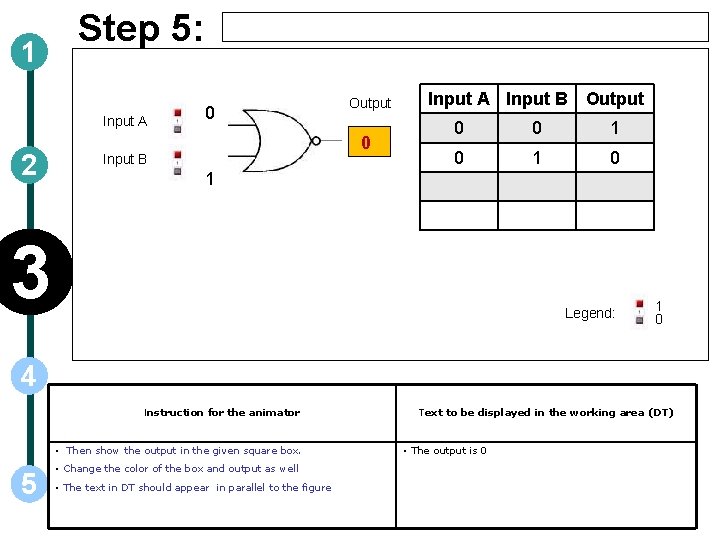
1 Step 5: Input A 2 0 Output 0 Input B Input A Input B Output 0 0 1 0 1 3 Legend: 1 0 4 Instruction for the animator • Then show the output in the given square box. 5 • Change the color of the box and output as well • The text in DT should appear in parallel to the figure Text to be displayed in the working area (DT) • The output is 0

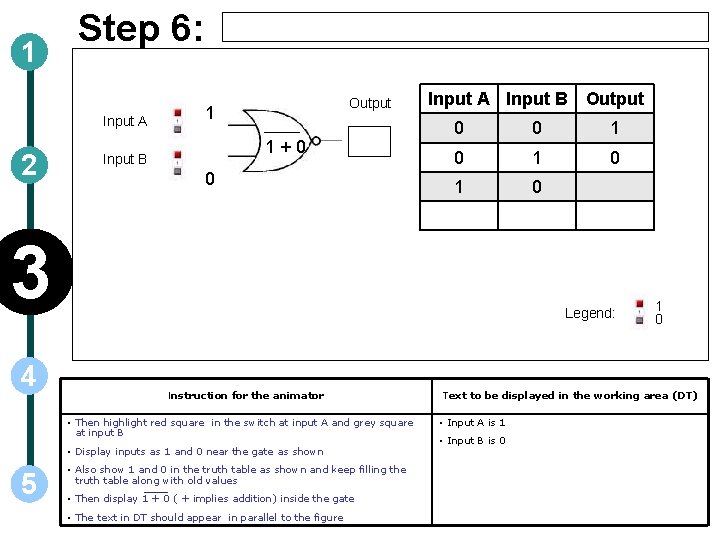
1 Step 6: Input A 2 Output 1 1+0 Input B 0 Input A Input B Output 0 0 1 0 1 0 3 4 Legend: Instruction for the animator • Then highlight red square in the switch at input A and grey square at input B • Display inputs as 1 and 0 near the gate as shown 5 • Also show 1 and 0 in the truth table as shown and keep filling the truth table along with old values • Then display 1 + 0 ( + implies addition) inside the gate • The text in DT should appear in parallel to the figure 1 0 Text to be displayed in the working area (DT) • Input A is 1 • Input B is 0

1 Step 7: Input A 2 1 Output 0 Input B 0 Input A Input B Output 0 0 1 0 1 0 0 3 Legend: 1 0 4 Instruction for the animator • Then show the output in the given square box. 5 • Change the color of the box and output as well • The text in DT should appear in parallel to the figure Text to be displayed in the working area (DT) • The output is 0

1 Step 8: Input A 2 Output 1 1+1 Input B 1 Input A Input B Output 0 0 1 0 1 0 0 1 1 3 4 Legend: Instruction for the animator • Then highlight red square in the switch at input A and red square at input B • Display inputs as 1 and 1 near the gate as shown 5 • Also show 1 and 1 in the truth table as shown and keep filling the truth table along with old values • Then display 1 + 1 (+ implies addition) inside the gate • The text in DT should appear in parallel to the figure 1 0 Text to be displayed in the working area (DT) • Input A is 1 • Input B is 1

1 Step 9: Input A 2 1 Output 0 Input B 1 Input A Input B Output 0 0 1 0 1 0 0 1 1 0 3 Legend: 1 0 4 Instruction for the animator • Then show the output in the given square box. Text to be displayed in the working area (DT) • The output is 0 • Change the color of the box and output as well 5 • The text in DT should appear in parallel to the figure • Select any radio button to view different ways of implementing NOR logic

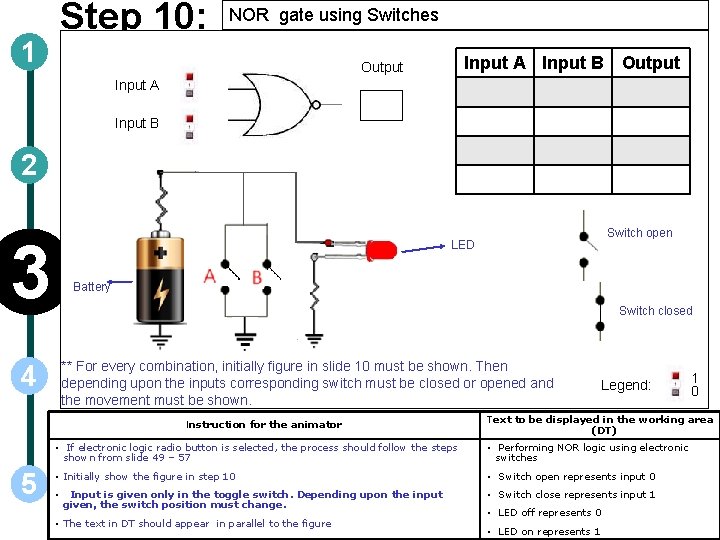
Step 10: 1 NOR gate using Switches Input A Input B Output Input A Input B 2 3 Battery Switch closed ** For every combination, initially figure in slide 10 must be shown. Then depending upon the inputs corresponding switch must be closed or opened and the movement must be shown. 4 Instruction for the animator 5 Switch open LED Legend: Text to be displayed in the working area (DT) • If electronic logic radio button is selected, the process should follow the steps shown from slide 49 – 57 • Performing NOR logic using electronic switches • Initially show the figure in step 10 • Switch open represents input 0 • Input is given only in the toggle switch. Depending upon the input given, the switch position must change. • The text in DT should appear in parallel to the figure 1 0 • Switch close represents input 1 • LED off represents 0 • LED on represents 1

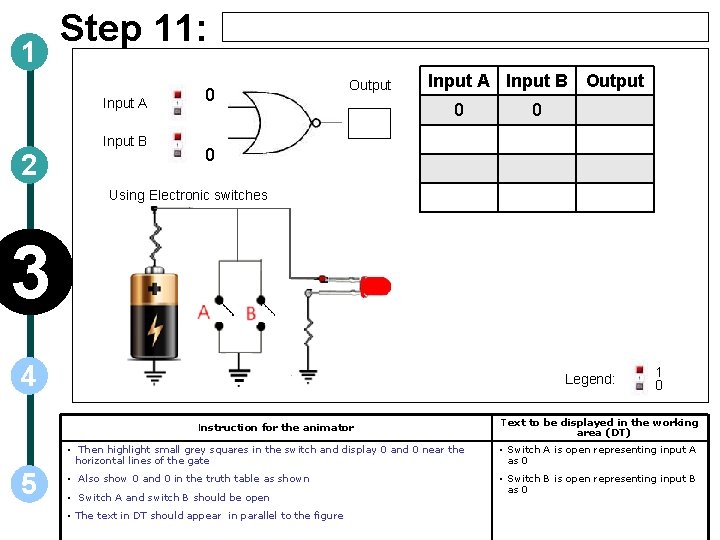
1 Step 11: Input A Input B 2 0 Output Input A Input B Output 0 0 0 Using Electronic switches 3 4 Legend: Instruction for the animator 5 1 0 Text to be displayed in the working area (DT) • Then highlight small grey squares in the switch and display 0 and 0 near the horizontal lines of the gate • Switch A is open representing input A as 0 • Also show 0 and 0 in the truth table as shown • Switch B is open representing input B as 0 • Switch A and switch B should be open • The text in DT should appear in parallel to the figure

1 Step 12: Input A Input B 2 0 Output 1 Input A Input B Output 0 0 1 0 Using Electronic switches 3 4 Legend: Instruction for the animator • Show LED glowing that represents LED in ON state 5 1 0 Text to be displayed in the working area (DT) • Then show the output in the given square box. • As both the switches are open, the current flows through LED path thereby supplying power for LED to glow • Change the color of the box and output as well • So the LED is in ON state representing 1 • The text in DT should appear in parallel to the figure

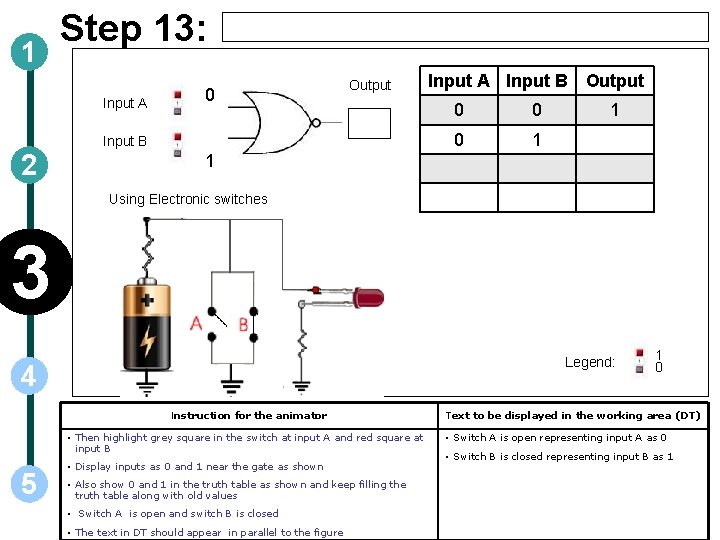
1 Step 13: Input A 0 Output Input B 2 Input A Input B Output 0 0 0 1 1 1 Using Electronic switches 3 Legend: 4 Instruction for the animator • Then highlight grey square in the switch at input A and red square at input B 5 • Display inputs as 0 and 1 near the gate as shown • Also show 0 and 1 in the truth table as shown and keep filling the truth table along with old values • Switch A is open and switch B is closed • The text in DT should appear in parallel to the figure 1 0 Text to be displayed in the working area (DT) • Switch A is open representing input A as 0 • Switch B is closed representing input B as 1

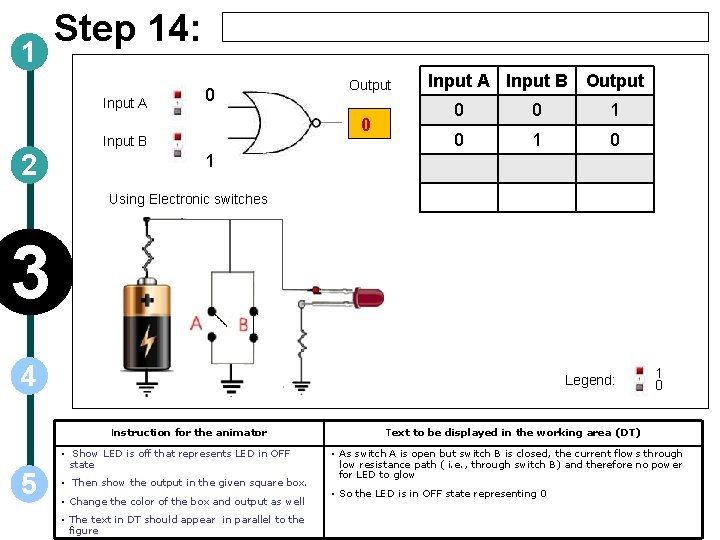
1 Step 14: Input A 0 0 Input B 2 Output Input A Input B Output 0 0 1 0 1 Using Electronic switches 3 4 Legend: Instruction for the animator 5 • Show LED is off that represents LED in OFF state • Then show the output in the given square box. • Change the color of the box and output as well • The text in DT should appear in parallel to the figure 1 0 Text to be displayed in the working area (DT) • As switch A is open but switch B is closed, the current flows through low resistance path ( i. e. , through switch B) and therefore no power for LED to glow • So the LED is in OFF state representing 0

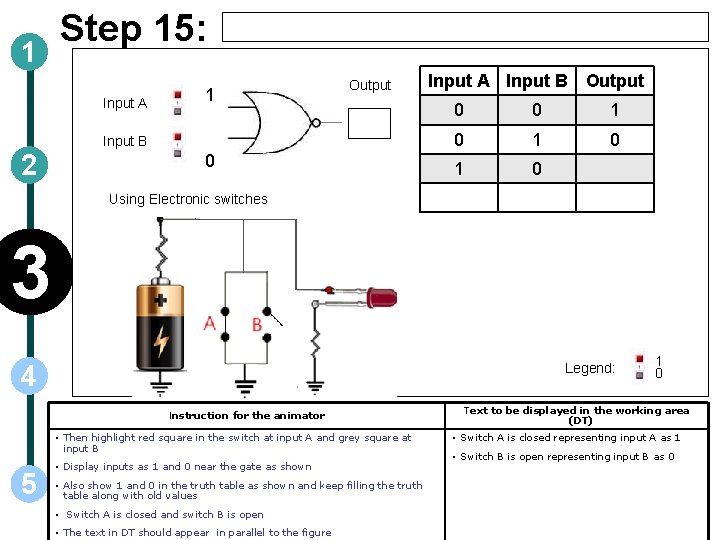
1 Step 15: Input A 1 Output Input B 2 0 Input A Input B Output 0 0 1 0 1 0 Using Electronic switches 3 Legend: 4 Instruction for the animator • Then highlight red square in the switch at input A and grey square at input B 5 • Display inputs as 1 and 0 near the gate as shown • Also show 1 and 0 in the truth table as shown and keep filling the truth table along with old values • Switch A is closed and switch B is open • The text in DT should appear in parallel to the figure 1 0 Text to be displayed in the working area (DT) • Switch A is closed representing input A as 1 • Switch B is open representing input B as 0

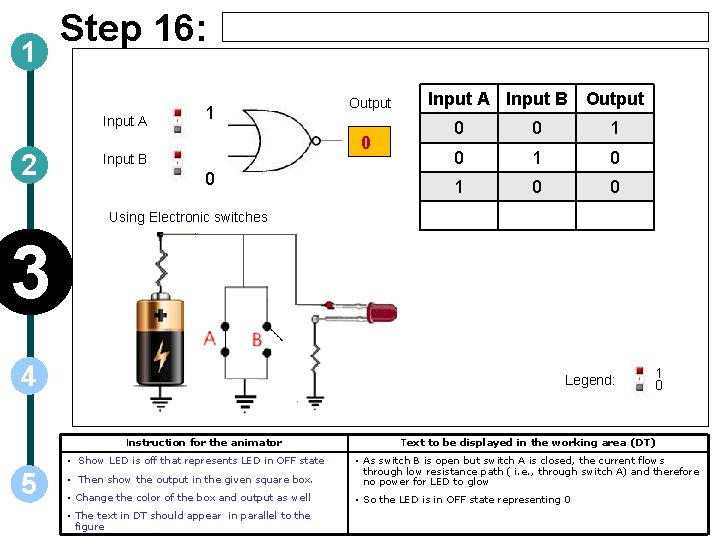
1 Step 16: Input A 2 1 Output 0 Input B 0 Input A Input B Output 0 0 1 0 1 0 0 Using Electronic switches 3 4 Legend: Instruction for the animator • Show LED is off that represents LED in OFF state 5 1 0 Text to be displayed in the working area (DT) • Then show the output in the given square box. • As switch B is open but switch A is closed, the current flows through low resistance path ( i. e. , through switch A) and therefore no power for LED to glow • Change the color of the box and output as well • So the LED is in OFF state representing 0 • The text in DT should appear in parallel to the figure

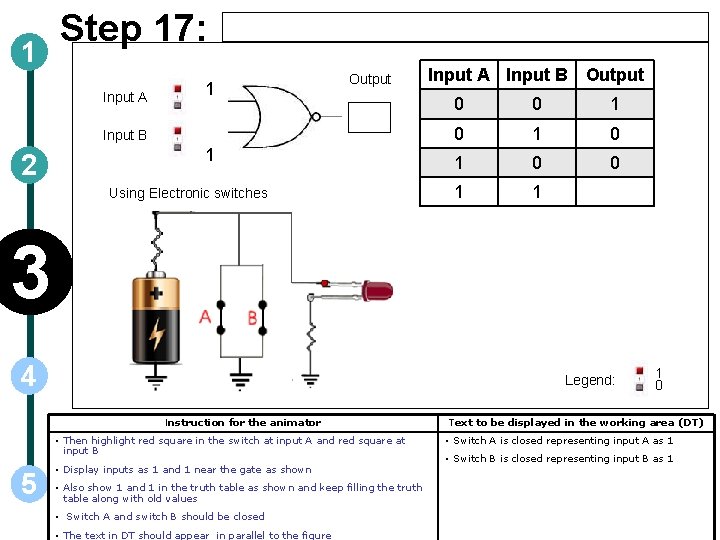
1 Step 17: Input A 1 Output Input B 2 1 Using Electronic switches Input A Input B Output 0 0 1 0 1 0 0 1 1 3 4 Legend: Instruction for the animator • Then highlight red square in the switch at input A and red square at input B 5 • Display inputs as 1 and 1 near the gate as shown • Also show 1 and 1 in the truth table as shown and keep filling the truth table along with old values • Switch A and switch B should be closed • The text in DT should appear in parallel to the figure 1 0 Text to be displayed in the working area (DT) • Switch A is closed representing input A as 1 • Switch B is closed representing input B as 1

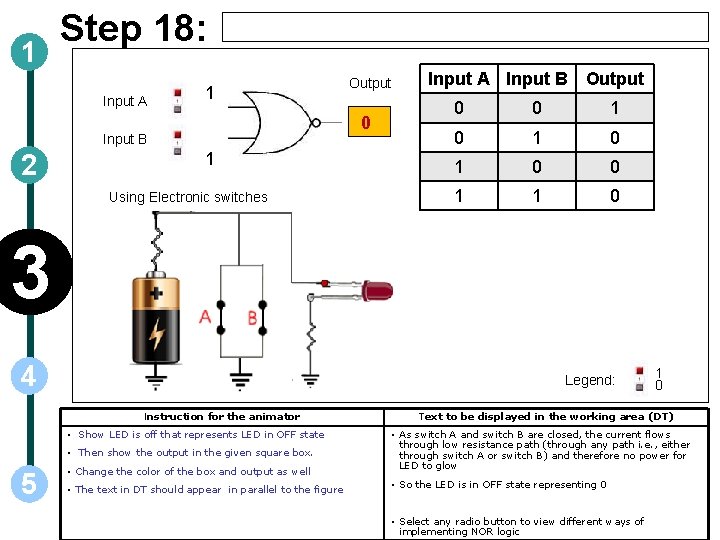
1 Step 18: Input A 1 0 Input B 2 Output 1 Using Electronic switches Input A Input B Output 0 0 1 0 1 0 0 1 1 0 3 4 Legend: Instruction for the animator • Show LED is off that represents LED in OFF state • Then show the output in the given square box. 5 • Change the color of the box and output as well • The text in DT should appear in parallel to the figure 1 0 Text to be displayed in the working area (DT) • As switch A and switch B are closed, the current flows through low resistance path (through any path i. e. , either through switch A or switch B) and therefore no power for LED to glow • So the LED is in OFF state representing 0 • Select any radio button to view different ways of implementing NOR logic

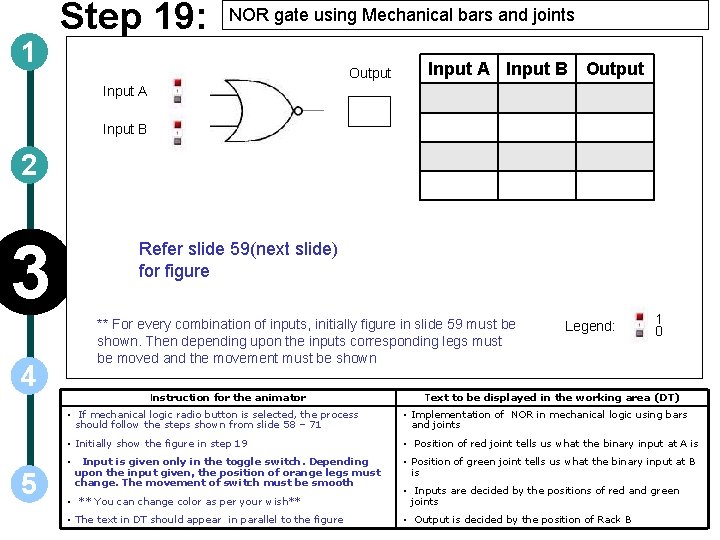
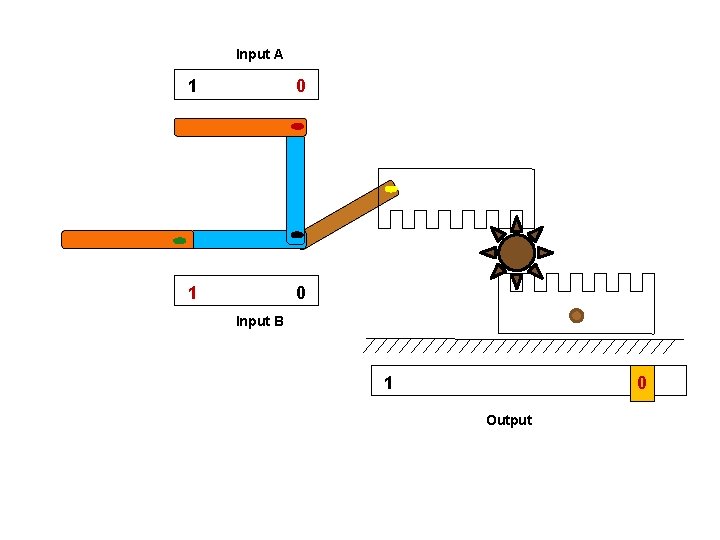
1 Step 19: NOR gate using Mechanical bars and joints Output Input A Input B 2 3 Refer slide 59(next slide) for figure ** For every combination of inputs, initially figure in slide 59 must be shown. Then depending upon the inputs corresponding legs must be moved and the movement must be shown 4 Instruction for the animator 1 0 Text to be displayed in the working area (DT) • If mechanical logic radio button is selected, the process should follow the steps shown from slide 58 – 71 • Implementation of NOR in mechanical logic using bars and joints • Initially show the figure in step 19 • Position of red joint tells us what the binary input at A is • 5 Legend: Input is given only in the toggle switch. Depending upon the input given, the position of orange legs must change. The movement of switch must be smooth • Position of green joint tells us what the binary input at B is • ** You can change color as per your wish** • Inputs are decided by the positions of red and green joints • The text in DT should appear in parallel to the figure • Output is decided by the position of Rack B

Input A Red joint 1 0 Yellow joint Rack A Pinion / small wheel Green joint 1 0 Rack B Input B 1 0 Output

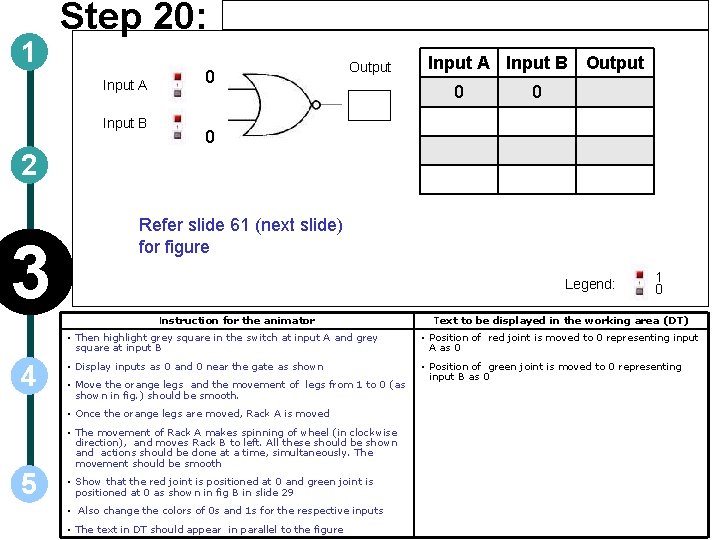
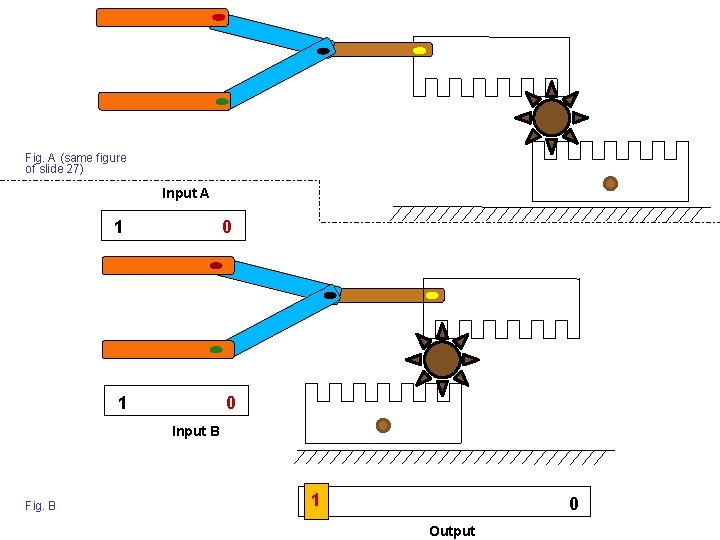
1 Step 20: Input A Input B 0 Output Input A Input B Output 0 0 0 2 3 Refer slide 61 (next slide) for figure Legend: Instruction for the animator 4 Text to be displayed in the working area (DT) • Then highlight grey square in the switch at input A and grey square at input B • Position of red joint is moved to 0 representing input A as 0 • Display inputs as 0 and 0 near the gate as shown • Position of green joint is moved to 0 representing input B as 0 • Move the orange legs and the movement of legs from 1 to 0 (as shown in fig. ) should be smooth. • Once the orange legs are moved, Rack A is moved 5 1 0 • The movement of Rack A makes spinning of wheel (in clockwise direction), and moves Rack B to left. All these should be shown and actions should be done at a time, simultaneously. The movement should be smooth • Show that the red joint is positioned at 0 and green joint is positioned at 0 as shown in fig B in slide 29 • Also change the colors of 0 s and 1 s for the respective inputs • The text in DT should appear in parallel to the figure

Fig. A (same figure of slide 27) Input A 1 0 Input B Fig. B 1 0 Output

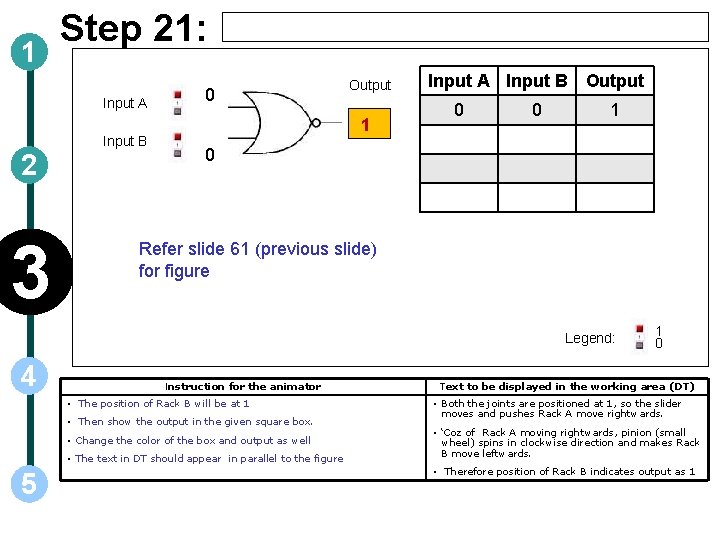
1 Step 21: Input A Input B 2 3 0 Output 1 Input A Input B Output 0 0 1 0 Refer slide 61 (previous slide) for figure Legend: 4 Instruction for the animator • The position of Rack B will be at 1 • Then show the output in the given square box. • Change the color of the box and output as well • The text in DT should appear in parallel to the figure 5 1 0 Text to be displayed in the working area (DT) • Both the joints are positioned at 1, so the slider moves and pushes Rack A move rightwards. • ‘Coz of Rack A moving rightwards, pinion (small wheel) spins in clockwise direction and makes Rack B move leftwards. • Therefore position of Rack B indicates output as 1

Step 22: 1 Input A 0 Output Input A Input B Output Input B 1 2 3 Instruction for the animator • Display inputs as 0 and 1 near the gate as shown • In the figure, the movement of orange leg at input A from 1 to 0 (as shown in fig. ) should be smooth. • Show that the red joint is positioned at 0 and green joint is positioned at 1. So the position of Rack A is still at 1, hence the position of Rack B remains at 0. There is no movement here • But change the colors of 0 s and 1 s for the respective inputs 5 0 0 1 1 Refer slide 64 (next slide) for figure • Then highlight grey square in the switch at input A and red square at input B 4 0 • The text in DT should appear in parallel to the figure Text to be displayed in the working area (DT) • Position of red joint is at 0 representing input A as 0 • Position of green joint is moved to 1 representing input B as 1

Input A 1 0 Input B 1 0 Output

1 Step 23: Input A 0 0 Input B 2 3 Output Input A Input B Output 0 0 1 0 1 Refer slide 64 (previous slide) for figure 4 Instruction for the animator • The position of Rack B must be at 0 • Then show the output in the given square box. 5 • Change the color of the box and output as well • The text in DT should appear in parallel to the figure Text to be displayed in the working area (DT) • Even red joint is moved to position 0, green joint is still at position 1, hence the slider doesn’t move. So the Rack A also doesn’t move , therefore rack B will be at position 0 • Thus output is 0

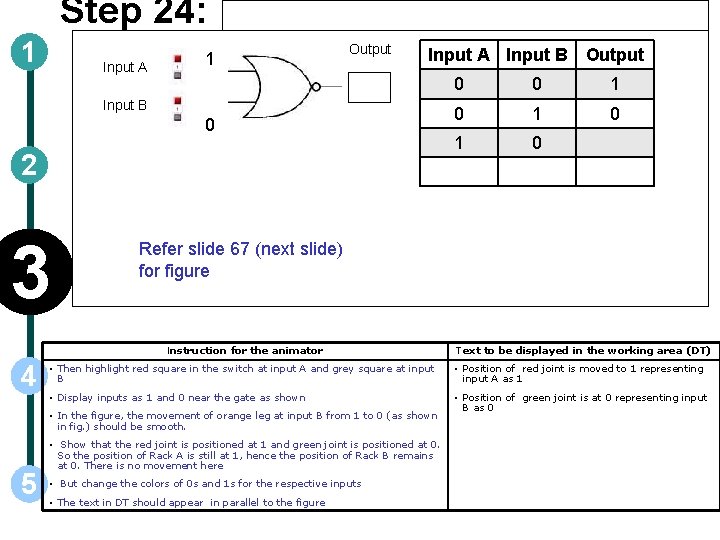
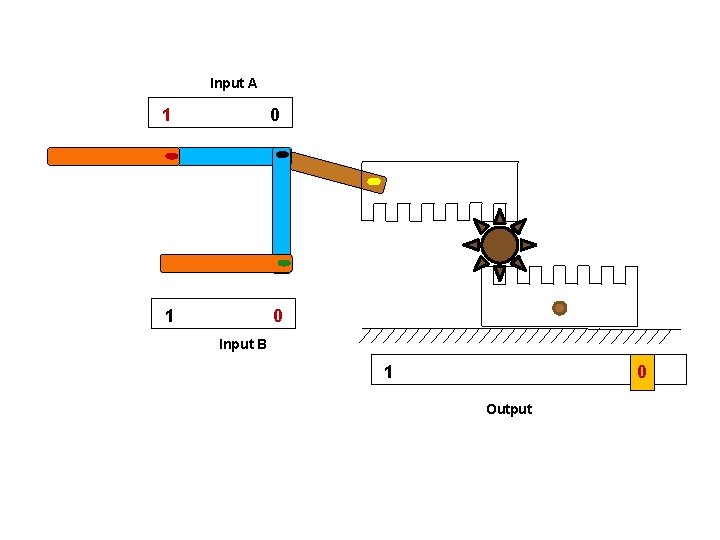
Step 24: 1 Input A 1 Output Input A Input B Output Input B 0 2 3 1 0 1 0 Text to be displayed in the working area (DT) • Then highlight red square in the switch at input A and grey square at input B • Position of red joint is moved to 1 representing input A as 1 • Display inputs as 1 and 0 near the gate as shown • Position of green joint is at 0 representing input B as 0 • In the figure, the movement of orange leg at input B from 1 to 0 (as shown in fig. ) should be smooth. 5 0 Refer slide 67 (next slide) for figure Instruction for the animator 4 0 • Show that the red joint is positioned at 1 and green joint is positioned at 0. So the position of Rack A is still at 1, hence the position of Rack B remains at 0. There is no movement here • But change the colors of 0 s and 1 s for the respective inputs • The text in DT should appear in parallel to the figure

Input A 1 0 Input B 1 0 Output

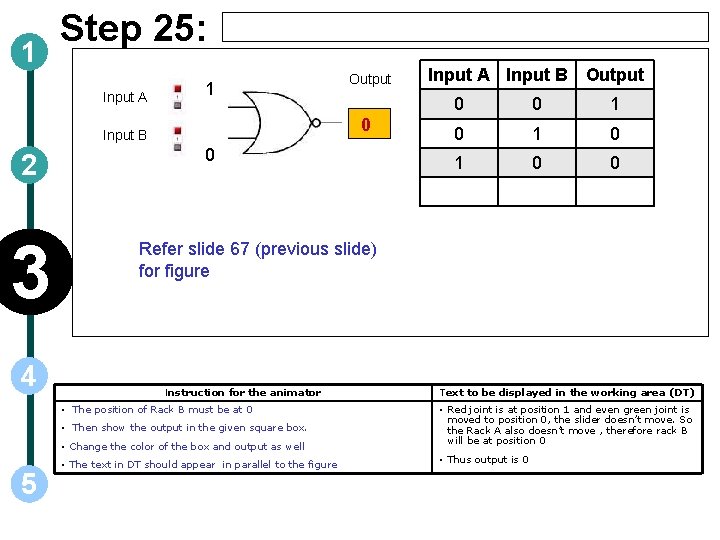
1 Step 25: Input A 1 0 Input B 2 3 4 0 Input A Input B Output 0 0 1 0 1 0 0 Refer slide 67 (previous slide) for figure Instruction for the animator • The position of Rack B must be at 0 • Then show the output in the given square box. • Change the color of the box and output as well 5 Output • The text in DT should appear in parallel to the figure Text to be displayed in the working area (DT) • Red joint is at position 1 and even green joint is moved to position 0, the slider doesn’t move. So the Rack A also doesn’t move , therefore rack B will be at position 0 • Thus output is 0

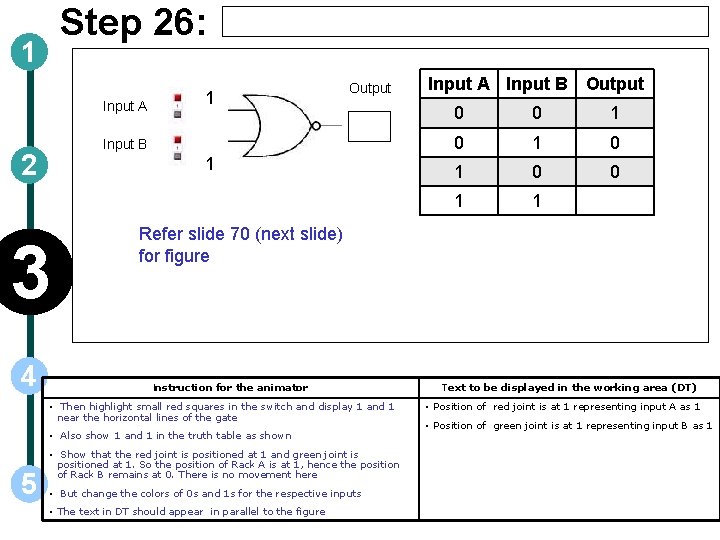
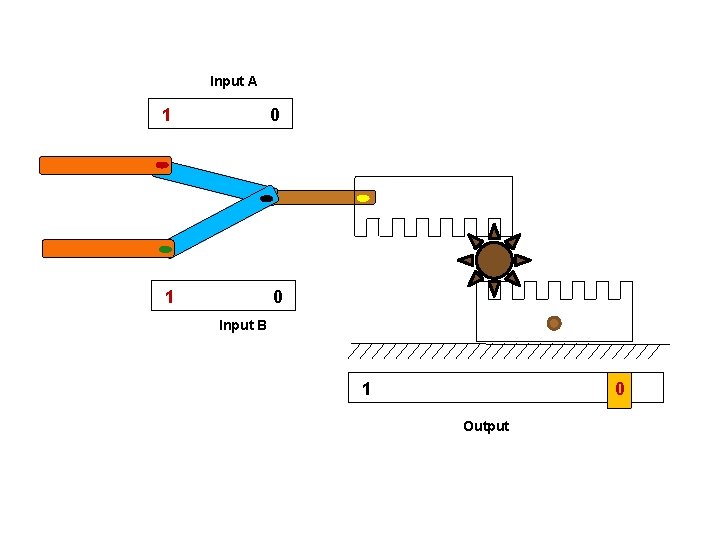
Step 26: 1 Input A Input B 2 1 3 4 1 Output 0 0 1 0 1 0 0 1 1 Refer slide 70 (next slide) for figure Instruction for the animator • Then highlight small red squares in the switch and display 1 and 1 near the horizontal lines of the gate • Also show 1 and 1 in the truth table as shown 5 Input A Input B Output • Show that the red joint is positioned at 1 and green joint is positioned at 1. So the position of Rack A is at 1, hence the position of Rack B remains at 0. There is no movement here • But change the colors of 0 s and 1 s for the respective inputs • The text in DT should appear in parallel to the figure Text to be displayed in the working area (DT) • Position of red joint is at 1 representing input A as 1 • Position of green joint is at 1 representing input B as 1

Input A 1 0 Input B 1 0 Output

1 Step 27: Input A 1 0 Input B 2 3 4 1 Input A Input B Output 0 0 1 0 1 0 0 1 1 0 Refer slide 70 ( previous slide) for figure Instruction for the animator • The position of Rack B must be at 0 5 Output Text to be displayed in the working area (DT) • Then show the output in the given square box. • As both the joints are at position 1, the output slider doesn’t move. So the Rack A also doesn’t move , therefore rack B will be at position 0 • Change the color of the box and output as well • Thus output is 0 • The text in DT should appear in parallel to the figure • Thus using this mechanism, NOR logic is explained

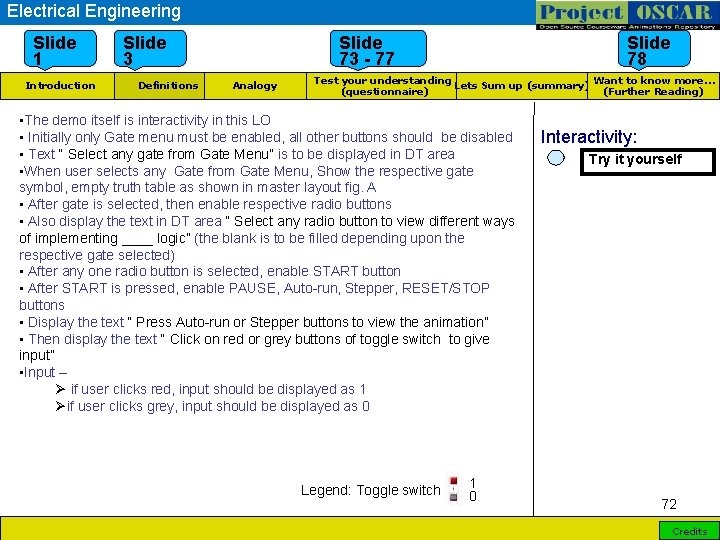
Electrical Engineering Slide 1 Introduction Slide 3 Definitions Slide 73 - 77 Analogy Slide 78 Want to know more… Test your understanding Lets Sum up (summary) (Further Reading) (questionnaire) • The demo itself is interactivity in this LO • Initially only Gate menu must be enabled, all other buttons should be disabled • Text “ Select any gate from Gate Menu” is to be displayed in DT area • When user selects any Gate from Gate Menu, Show the respective gate symbol, empty truth table as shown in master layout fig. A • After gate is selected, then enable respective radio buttons • Also display the text in DT area “ Select any radio button to view different ways of implementing ____ logic” (the blank is to be filled depending upon the respective gate selected) • After any one radio button is selected, enable START button • After START is pressed, enable PAUSE, Auto-run, Stepper, RESET/STOP buttons • Display the text “ Press Auto-run or Stepper buttons to view the animation” • Then display the text “ Click on red or grey buttons of toggle switch to give input” • Input – Ø if user clicks red, input should be displayed as 1 Øif user clicks grey, input should be displayed as 0 Legend: Toggle switch 1 0 Interactivity: Try it yourself 72 Credits

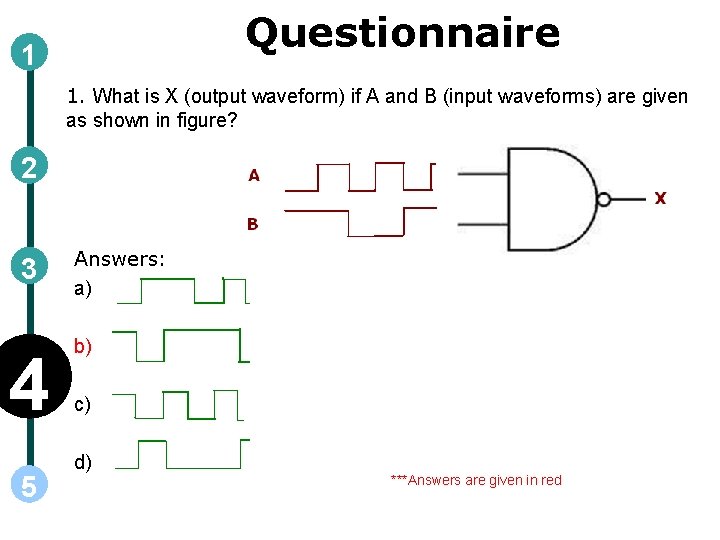
Questionnaire 1 1. What is X (output waveform) if A and B (input waveforms) are given as shown in figure? 2 3 4 5 Answers: a) b) c) d) ***Answers are given in red

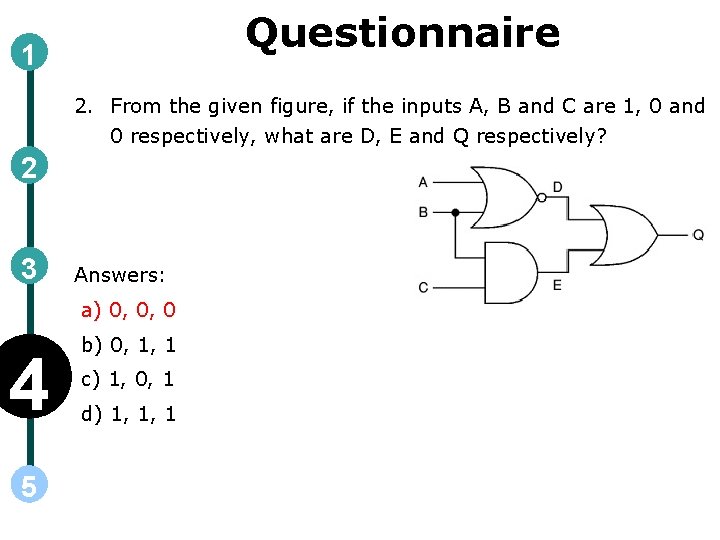
Questionnaire 1 2. From the given figure, if the inputs A, B and C are 1, 0 and 0 respectively, what are D, E and Q respectively? 2 3 Answers: a) 0, 0, 0 4 5 b) 0, 1, 1 c) 1, 0, 1 d) 1, 1, 1

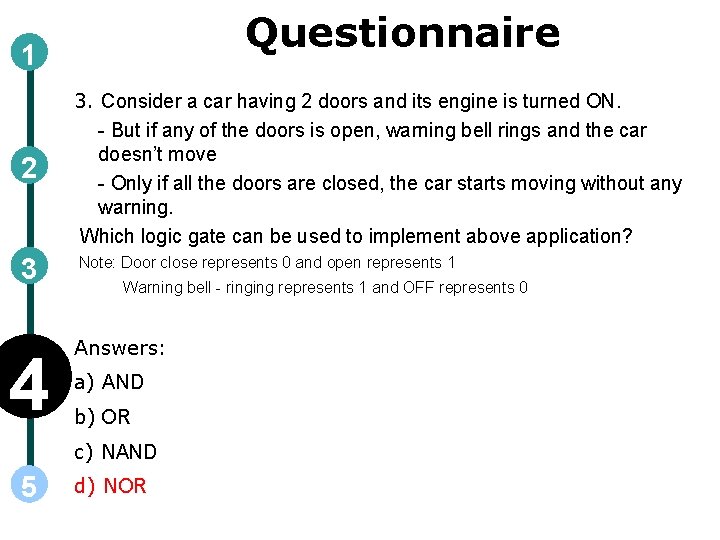
Questionnaire 1 2 3. Consider a car having 2 doors and its engine is turned ON. - But if any of the doors is open, warning bell rings and the car doesn’t move - Only if all the doors are closed, the car starts moving without any warning. Which logic gate can be used to implement above application? 3 Note: Door close represents 0 and open represents 1 4 Warning bell - ringing represents 1 and OFF represents 0 Answers: a) AND b) OR c) NAND 5 d) NOR

Questionnaire 1 2 4. Suppose a car has 2 doors. - If any of the doors is open, the light inside the car glows indicating at least one door is open - If all the doors are closed, the light will be OFF Which logic gate can be used to implement above application? Note: Door close represents 1 and open represents 0 Light- ON represents 1 and OFF represents 0 3 4 5 Answers: a) AND b) OR c) NAND d) NOR

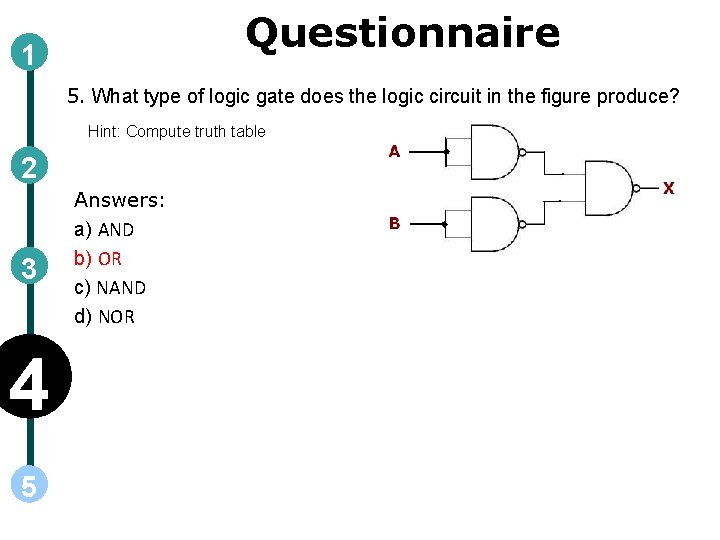
Questionnaire 1 5. What type of logic gate does the logic circuit in the figure produce? Hint: Compute truth table 2 3 4 5 Answers: a) AND b) OR c) NAND d) NOR

Links for further reading Reference websites: http: //en. wikipedia. org/wiki/Logic_gate http: //www. wisc-online. com/Objects/View. Object. aspx? ID=dig 1302 http: //www. mekanizmalar. com/logic_gates. html http: //www. williamson-labs. com/480_logic. htm http: //isweb. redwoods. cc. ca. us/instruct/calderwoodd/diglogic/ http: //www. w 3 professors. com/Pages/Courses/DCLD/Digital-Circuits-and-Logic. Designs. html http: //homepages. inf. ed. ac. uk/rbf/HIPR 2/arthops. htm Books: Digital Systems: Principles and Applications by Ronald-J. -Tocci