Mechanical Engineering Drawing MECH 211M Lecture 7 Chapter
- Slides: 52

Mechanical Engineering Drawing MECH 211/M • Lecture #7, Chapter 11 • Dr. John Cheung

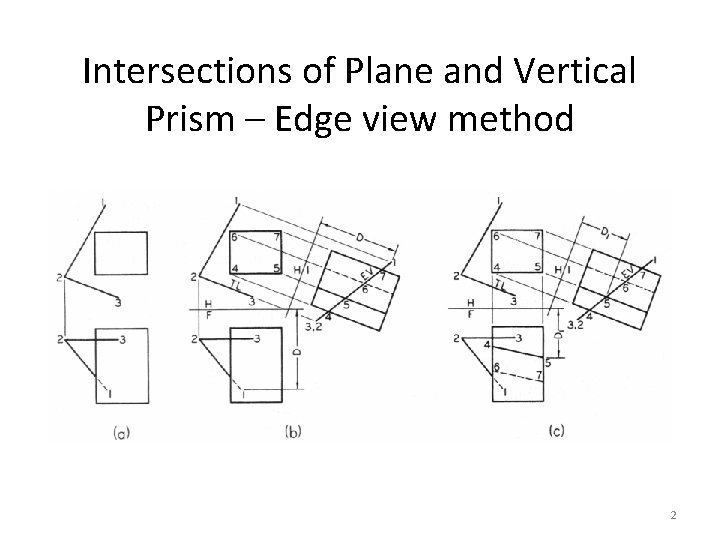
Intersections of Plane and Vertical Prism – Edge view method 2

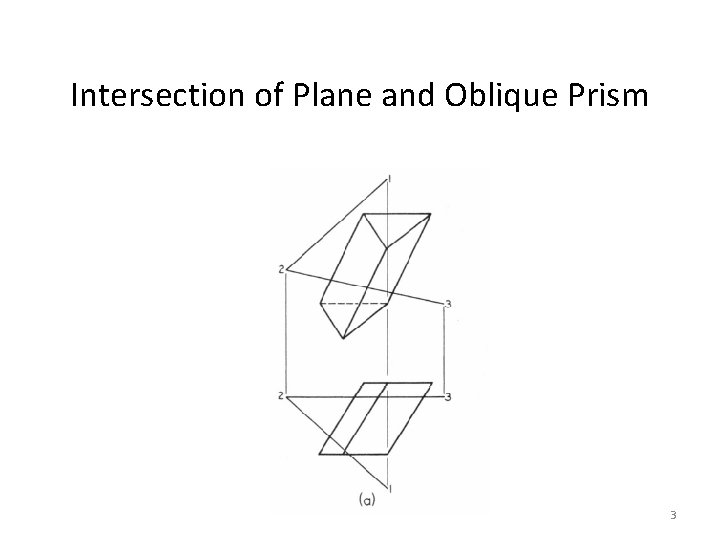
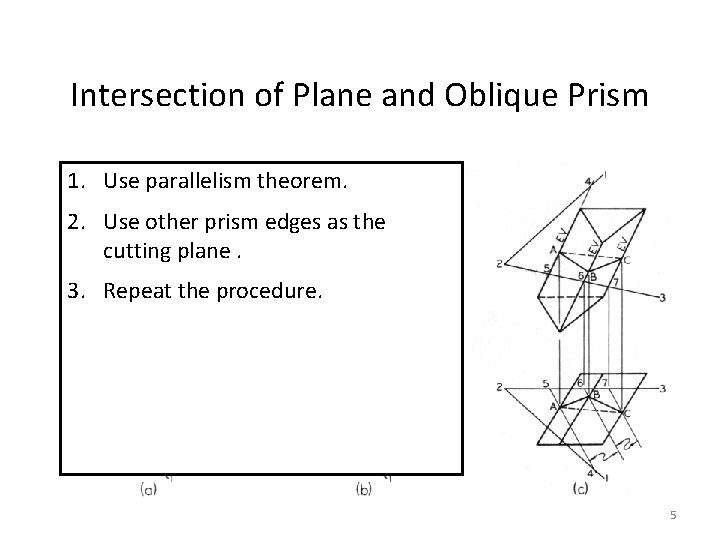
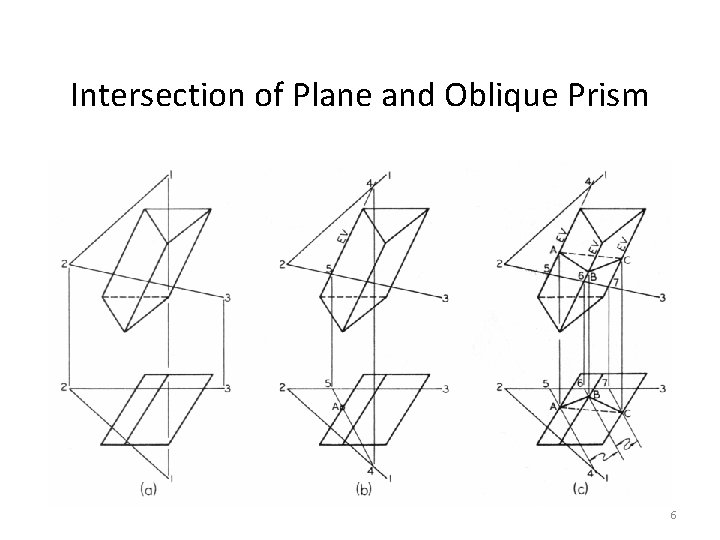
Intersection of Plane and Oblique Prism 3

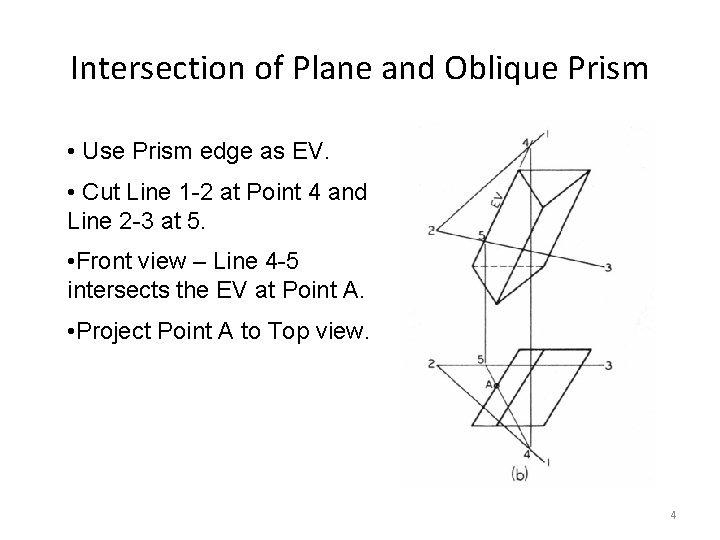
Intersection of Plane and Oblique Prism • Use Prism edge as EV. • Cut Line 1 -2 at Point 4 and Line 2 -3 at 5. • Front view – Line 4 -5 intersects the EV at Point A. • Project Point A to Top view. 4

Intersection of Plane and Oblique Prism 1. Use parallelism theorem. 2. Use other prism edges as the cutting plane. 3. Repeat the procedure. 5

Intersection of Plane and Oblique Prism 6

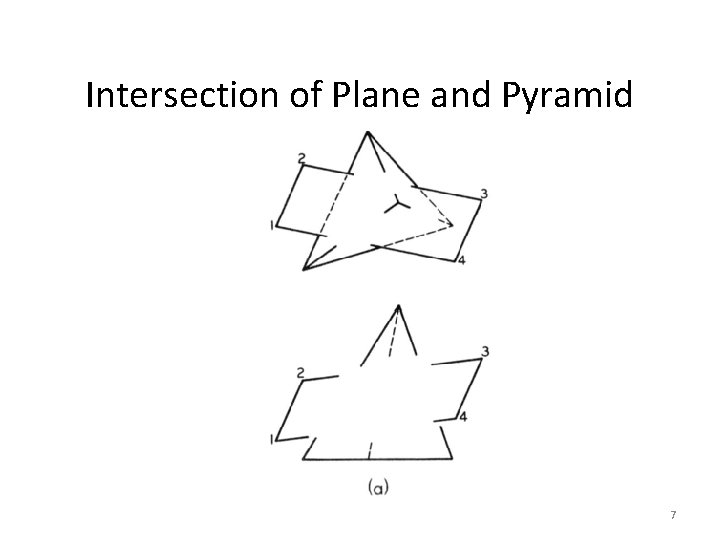
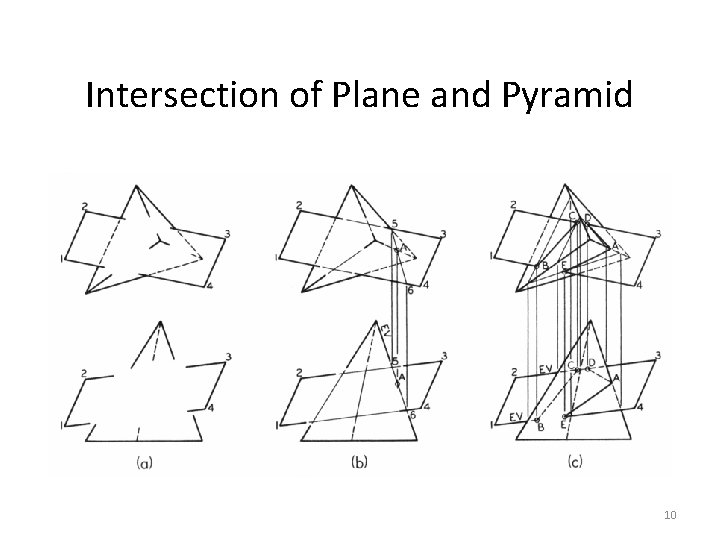
Intersection of Plane and Pyramid 7

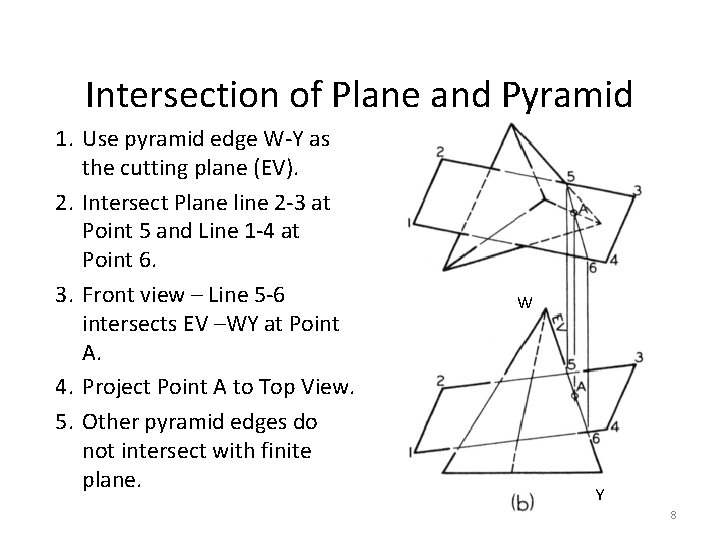
Intersection of Plane and Pyramid 1. Use pyramid edge W-Y as the cutting plane (EV). 2. Intersect Plane line 2 -3 at Point 5 and Line 1 -4 at Point 6. 3. Front view – Line 5 -6 intersects EV –WY at Point A. 4. Project Point A to Top View. 5. Other pyramid edges do not intersect with finite plane. W Y 8

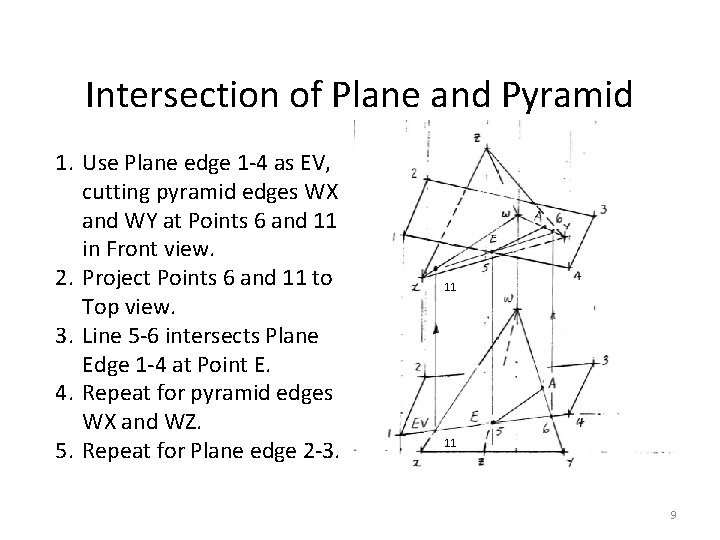
Intersection of Plane and Pyramid 1. Use Plane edge 1 -4 as EV, cutting pyramid edges WX and WY at Points 6 and 11 in Front view. 2. Project Points 6 and 11 to Top view. 3. Line 5 -6 intersects Plane Edge 1 -4 at Point E. 4. Repeat for pyramid edges WX and WZ. 5. Repeat for Plane edge 2 -3. 11 11 9

Intersection of Plane and Pyramid 10

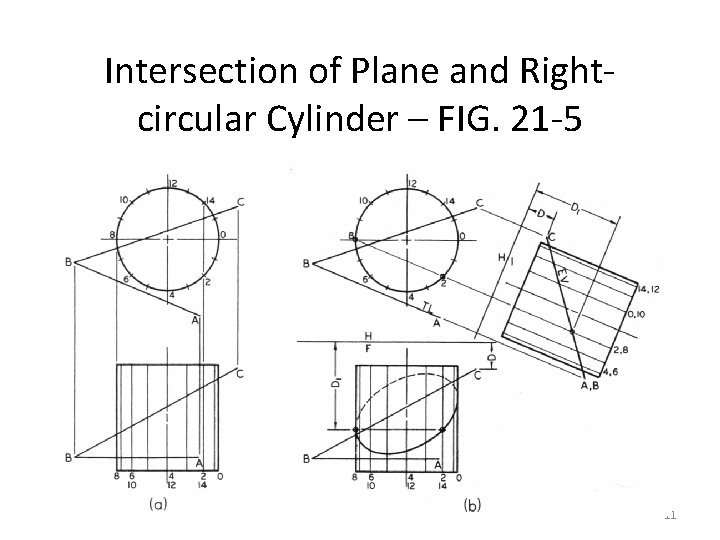
Intersection of Plane and Rightcircular Cylinder – FIG. 21 -5 11

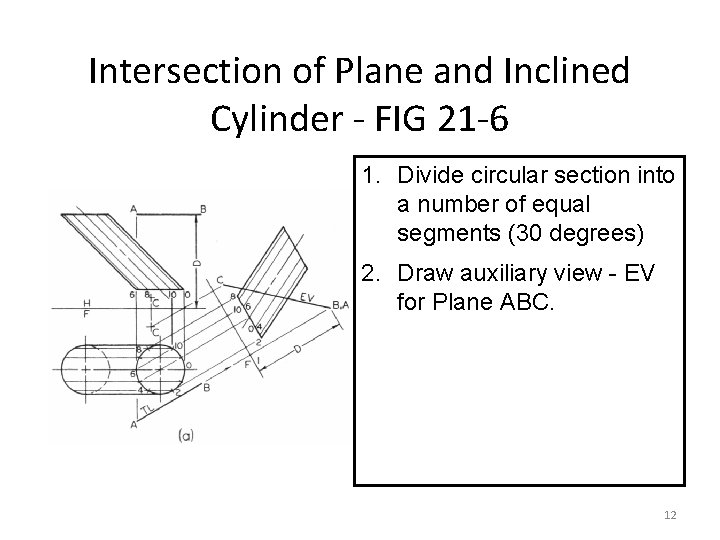
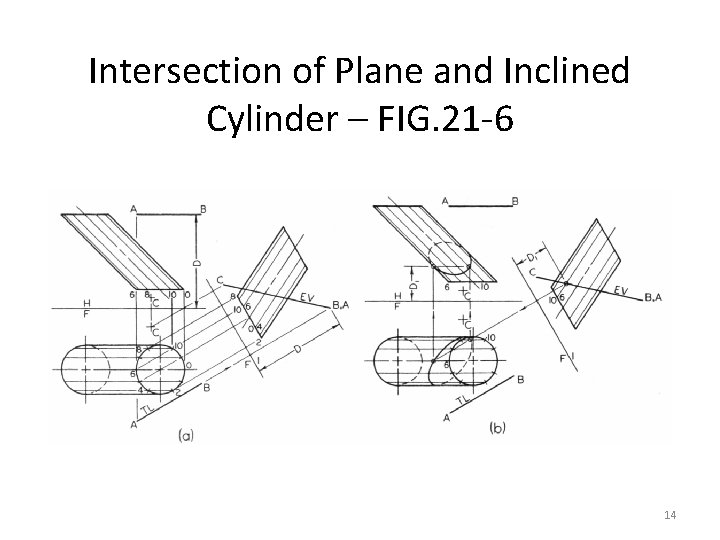
Intersection of Plane and Inclined Cylinder - FIG 21 -6 1. Divide circular section into a number of equal segments (30 degrees) 2. Draw auxiliary view - EV for Plane ABC. 12

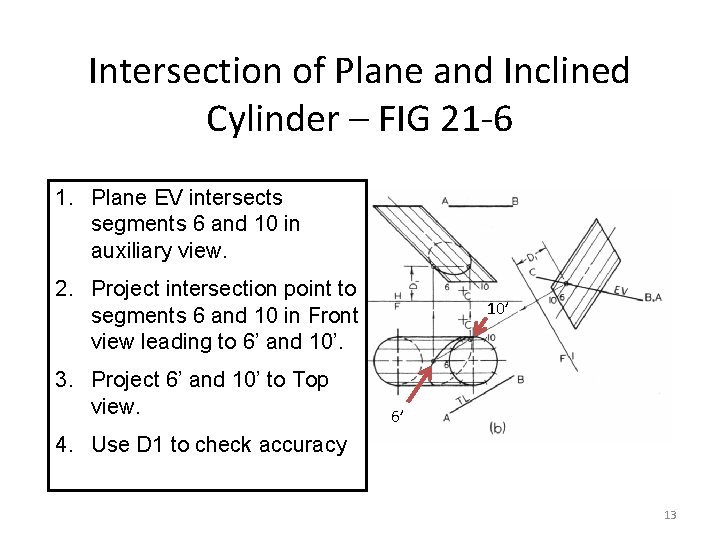
Intersection of Plane and Inclined Cylinder – FIG 21 -6 1. Plane EV intersects segments 6 and 10 in auxiliary view. 2. Project intersection point to segments 6 and 10 in Front view leading to 6’ and 10’. 3. Project 6’ and 10’ to Top view. 10’ 6’ 4. Use D 1 to check accuracy 13

Intersection of Plane and Inclined Cylinder – FIG. 21 -6 14

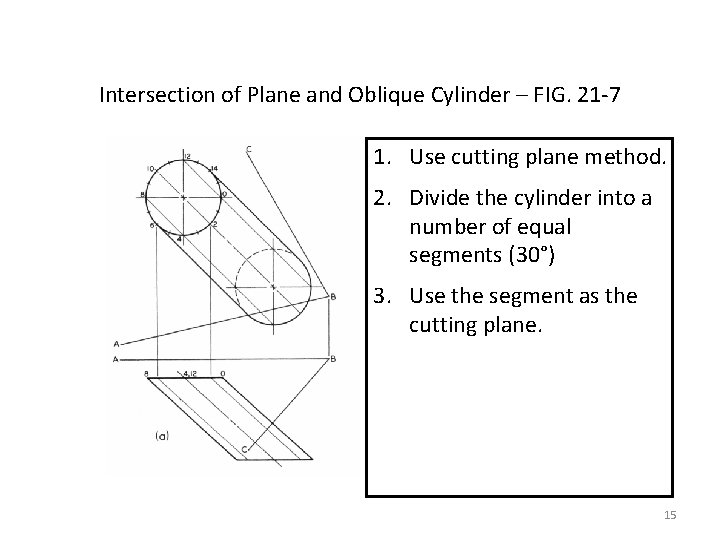
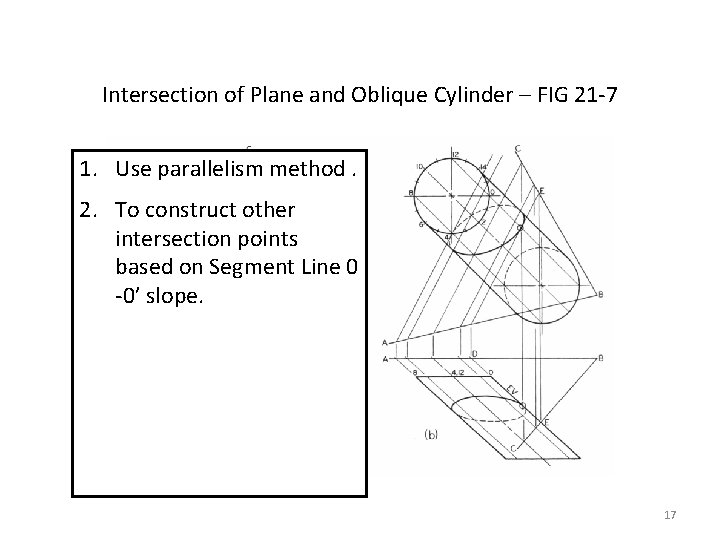
Intersection of Plane and Oblique Cylinder – FIG. 21 -7 1. Use cutting plane method. 2. Divide the cylinder into a number of equal segments (30°) 3. Use the segment as the cutting plane. 15

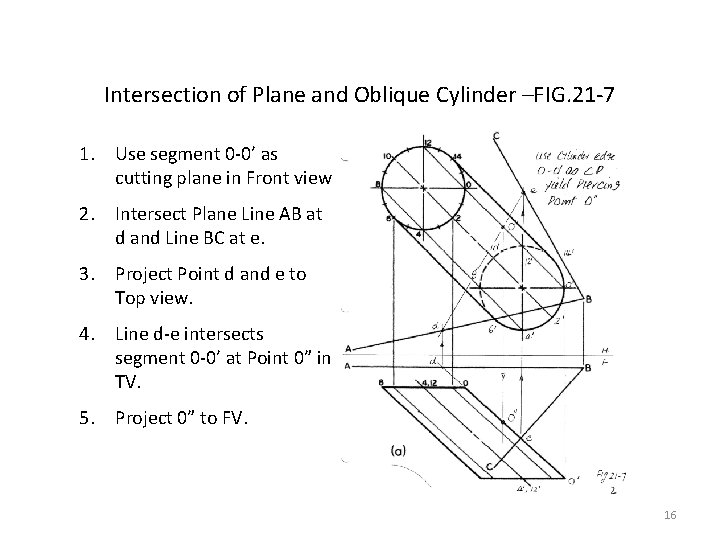
Intersection of Plane and Oblique Cylinder –FIG. 21 -7 1. Use segment 0 -0’ as cutting plane in Front view 2. Intersect Plane Line AB at d and Line BC at e. 3. Project Point d and e to Top view. 4. Line d-e intersects segment 0 -0’ at Point 0” in TV. 5. Project 0” to FV. 16

Intersection of Plane and Oblique Cylinder – FIG 21 -7 1. Use parallelism method. 2. To construct other intersection points based on Segment Line 0 -0’ slope. 17

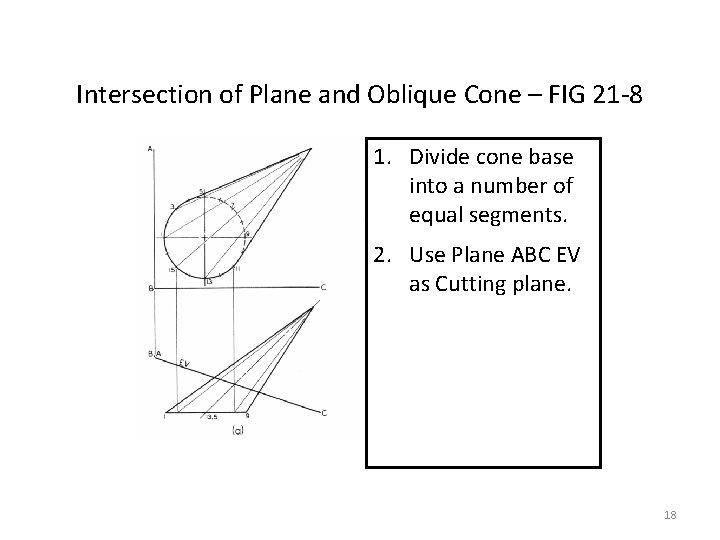
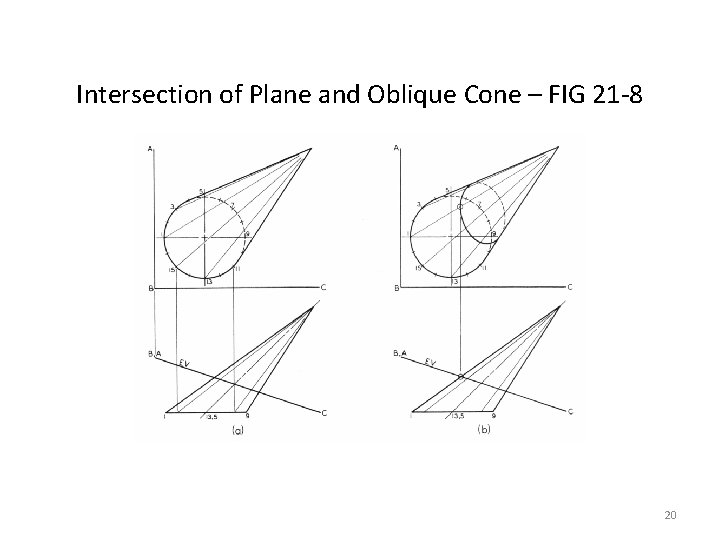
Intersection of Plane and Oblique Cone – FIG 21 -8 1. Divide cone base into a number of equal segments. 2. Use Plane ABC EV as Cutting plane. 18

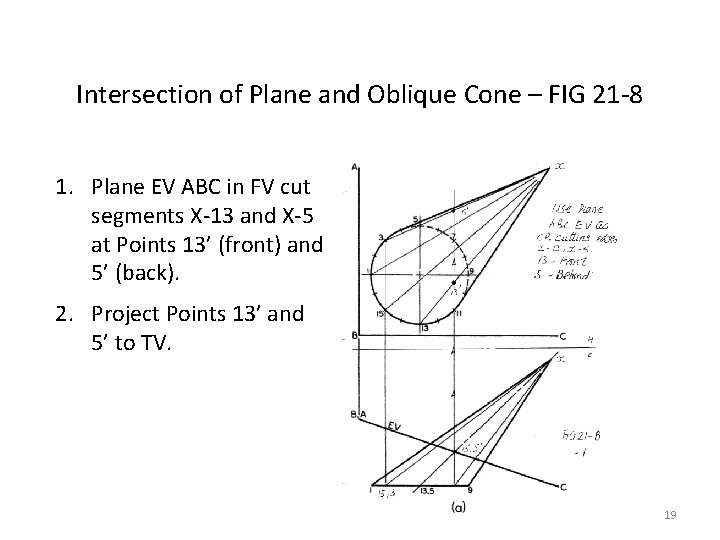
Intersection of Plane and Oblique Cone – FIG 21 -8 1. Plane EV ABC in FV cut segments X-13 and X-5 at Points 13’ (front) and 5’ (back). 2. Project Points 13’ and 5’ to TV. 19

Intersection of Plane and Oblique Cone – FIG 21 -8 20

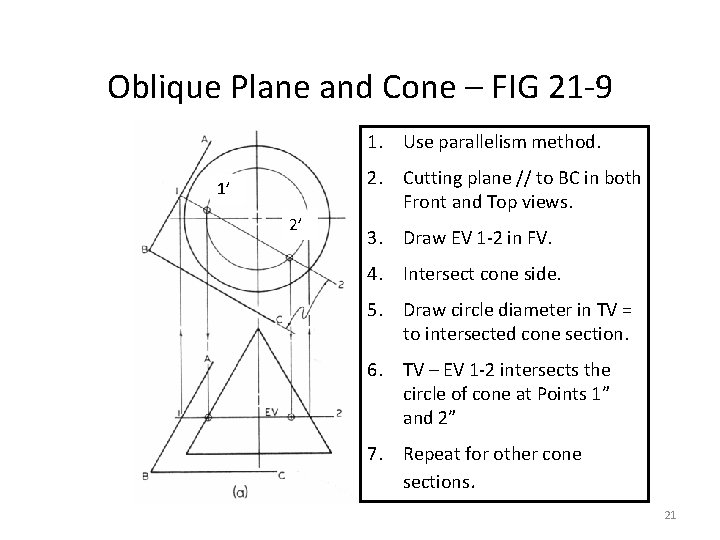
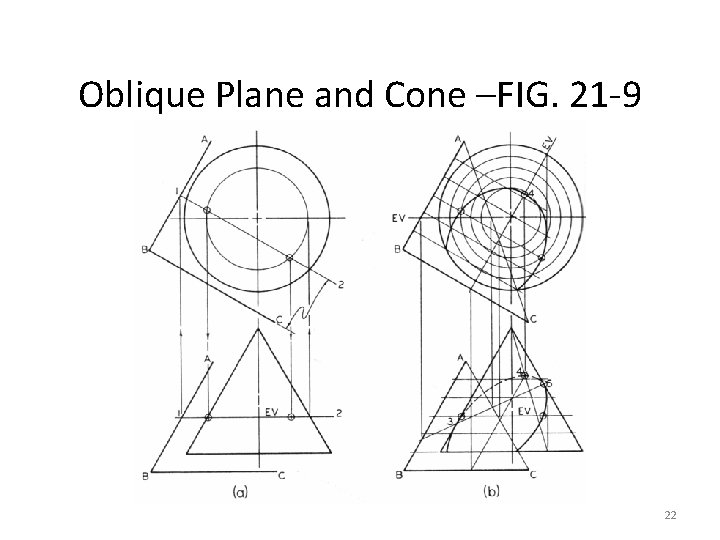
Oblique Plane and Cone – FIG 21 -9 1. Use parallelism method. 1’ 2’ 2. Cutting plane // to BC in both Front and Top views. 3. Draw EV 1 -2 in FV. 4. Intersect cone side. 5. Draw circle diameter in TV = to intersected cone section. 6. TV – EV 1 -2 intersects the circle of cone at Points 1” and 2” 7. Repeat for other cone sections. 21

Oblique Plane and Cone –FIG. 21 -9 22

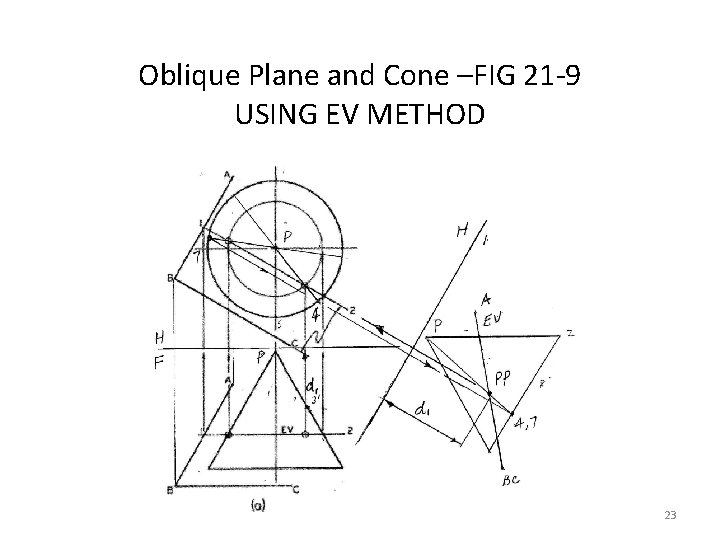
Oblique Plane and Cone –FIG 21 -9 USING EV METHOD 23

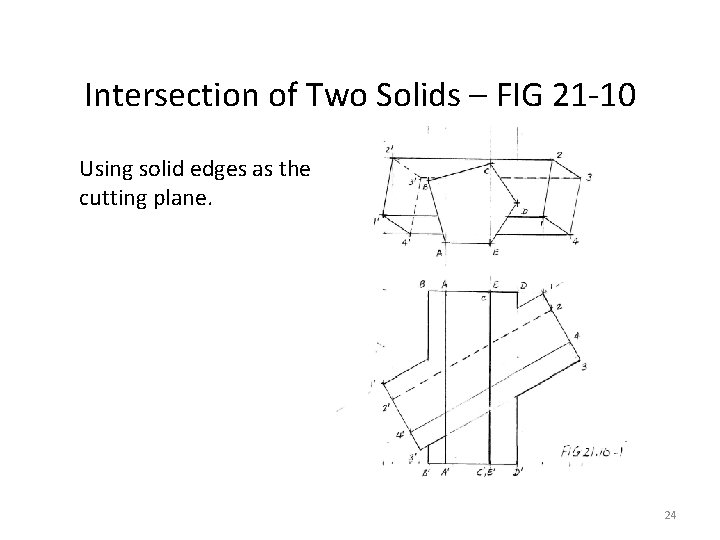
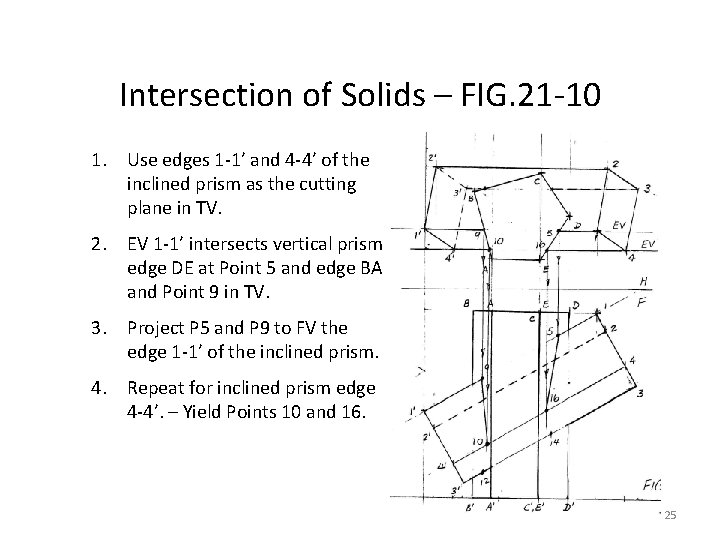
Intersection of Two Solids – FIG 21 -10 Using solid edges as the cutting plane. 24

Intersection of Solids – FIG. 21 -10 1. Use edges 1 -1’ and 4 -4’ of the inclined prism as the cutting plane in TV. 2. EV 1 -1’ intersects vertical prism edge DE at Point 5 and edge BA and Point 9 in TV. 3. Project P 5 and P 9 to FV the edge 1 -1’ of the inclined prism. 4. Repeat for inclined prism edge 4 -4’. – Yield Points 10 and 16. 25

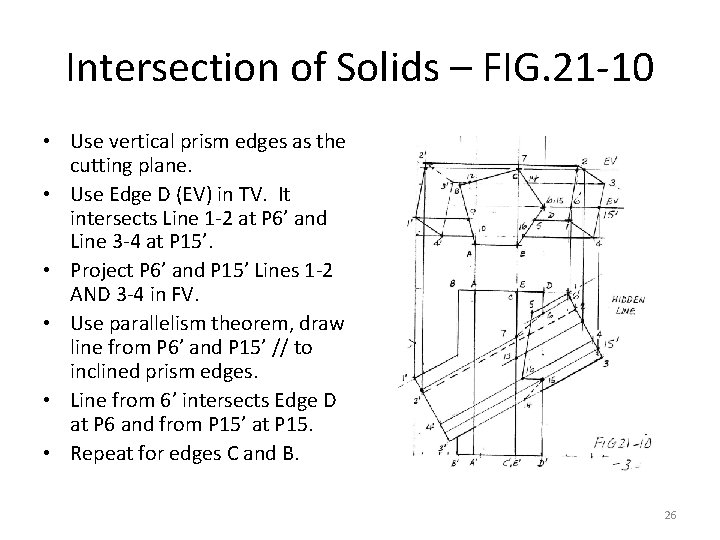
Intersection of Solids – FIG. 21 -10 • Use vertical prism edges as the cutting plane. • Use Edge D (EV) in TV. It intersects Line 1 -2 at P 6’ and Line 3 -4 at P 15’. • Project P 6’ and P 15’ Lines 1 -2 AND 3 -4 in FV. • Use parallelism theorem, draw line from P 6’ and P 15’ // to inclined prism edges. • Line from 6’ intersects Edge D at P 6 and from P 15’ at P 15. • Repeat for edges C and B. 26

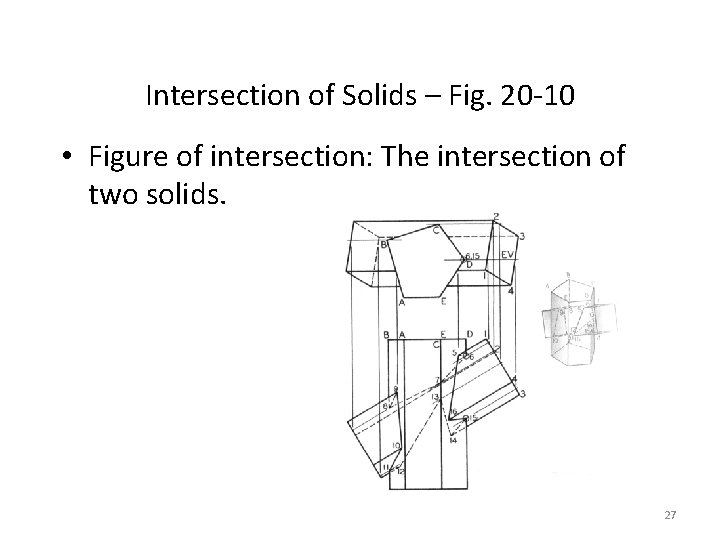
Intersection of Solids – Fig. 20 -10 • Figure of intersection: The intersection of two solids. 27

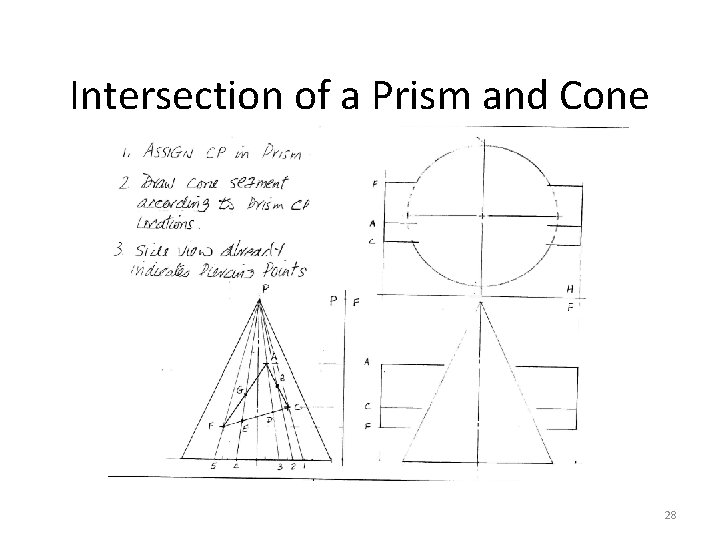
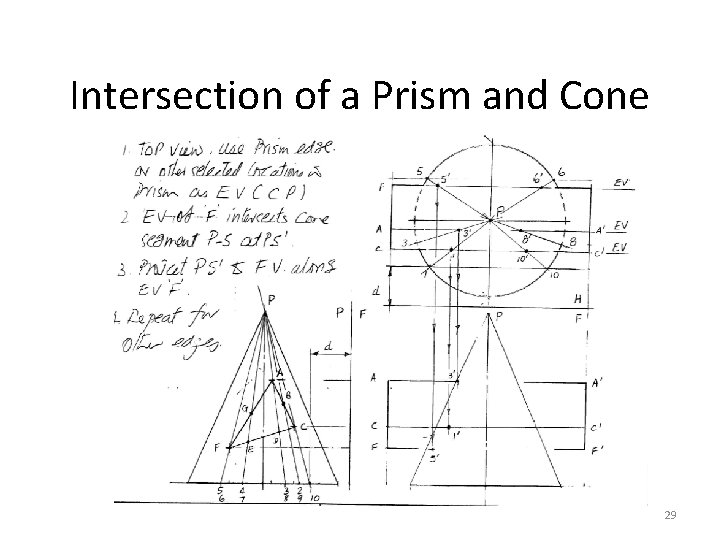
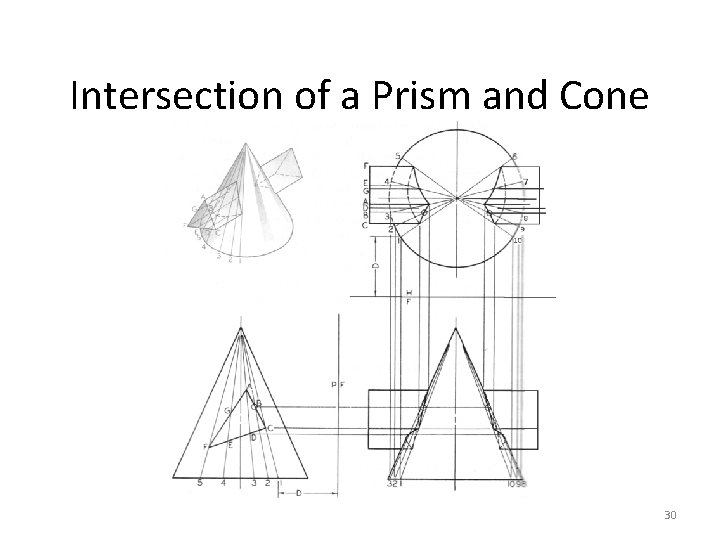
Intersection of a Prism and Cone 28

Intersection of a Prism and Cone 29

Intersection of a Prism and Cone 30

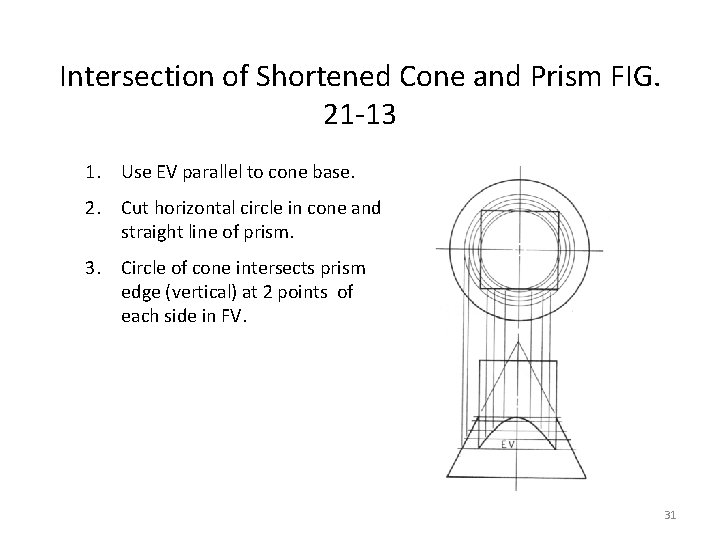
Intersection of Shortened Cone and Prism FIG. 21 -13 1. Use EV parallel to cone base. 2. Cut horizontal circle in cone and straight line of prism. 3. Circle of cone intersects prism edge (vertical) at 2 points of each side in FV. 31

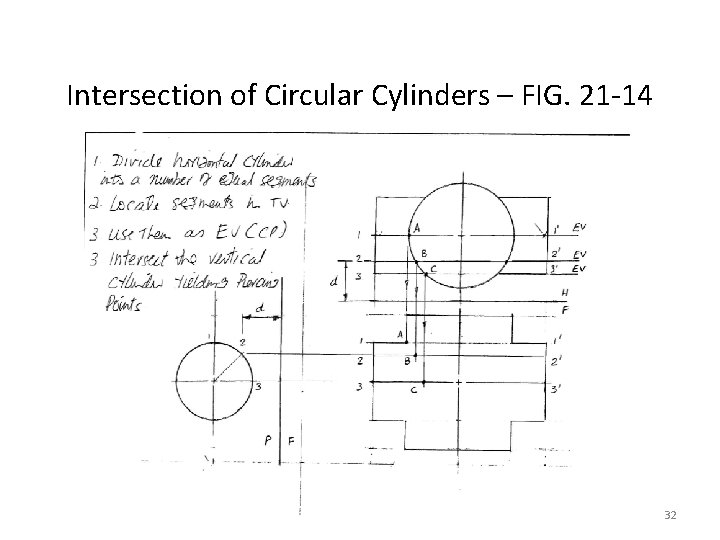
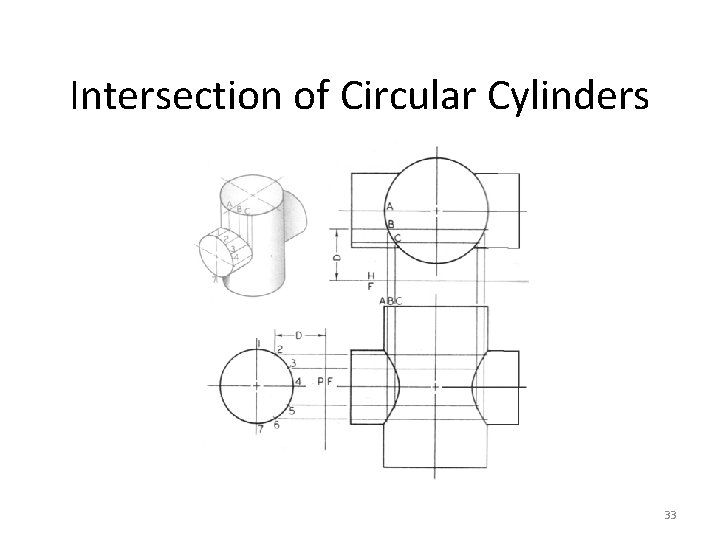
Intersection of Circular Cylinders – FIG. 21 -14 32

Intersection of Circular Cylinders 33

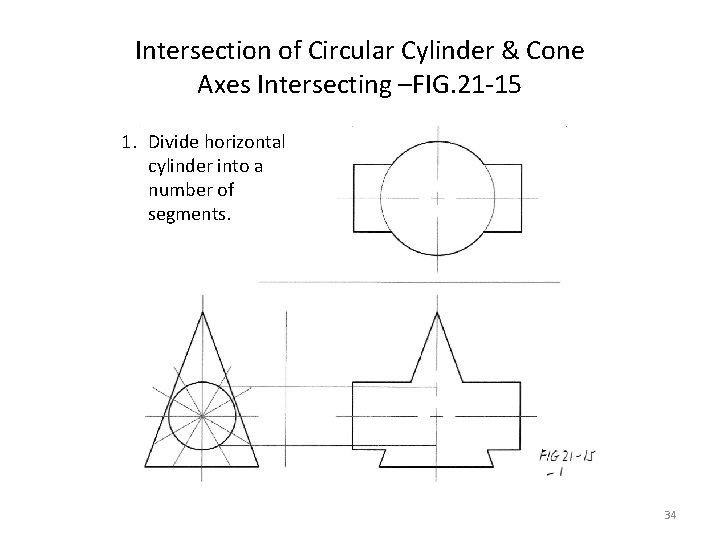
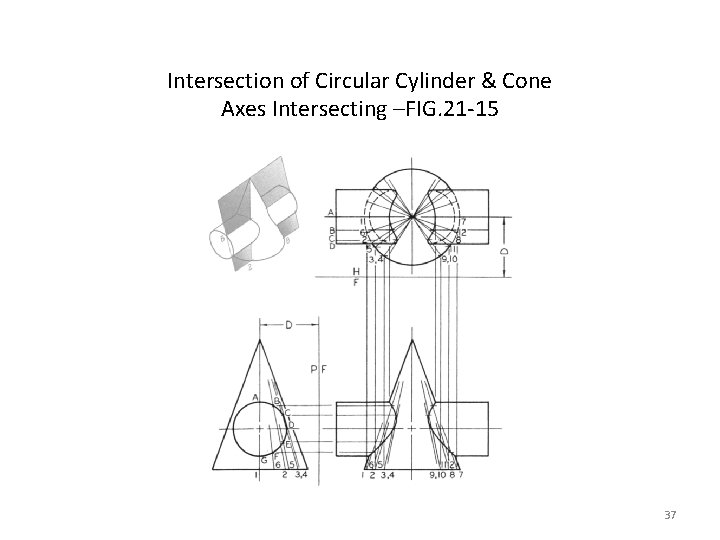
Intersection of Circular Cylinder & Cone Axes Intersecting –FIG. 21 -15 1. Divide horizontal cylinder into a number of segments. 34

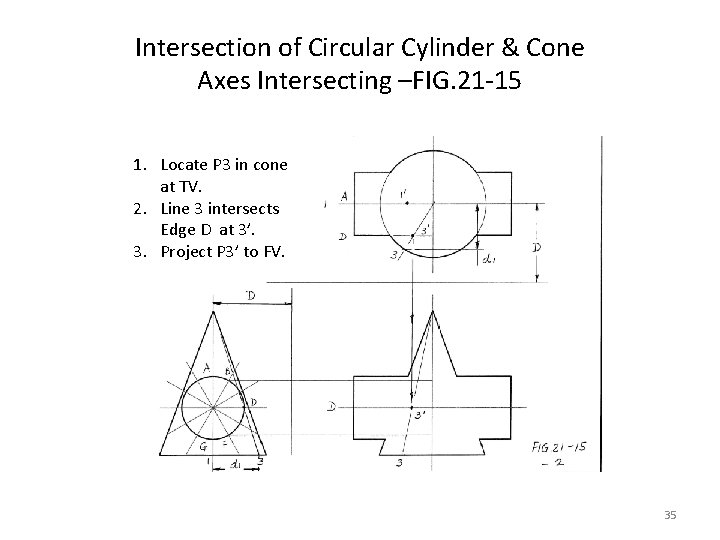
Intersection of Circular Cylinder & Cone Axes Intersecting –FIG. 21 -15 1. Locate P 3 in cone at TV. 2. Line 3 intersects Edge D at 3’. 3. Project P 3’ to FV. 35

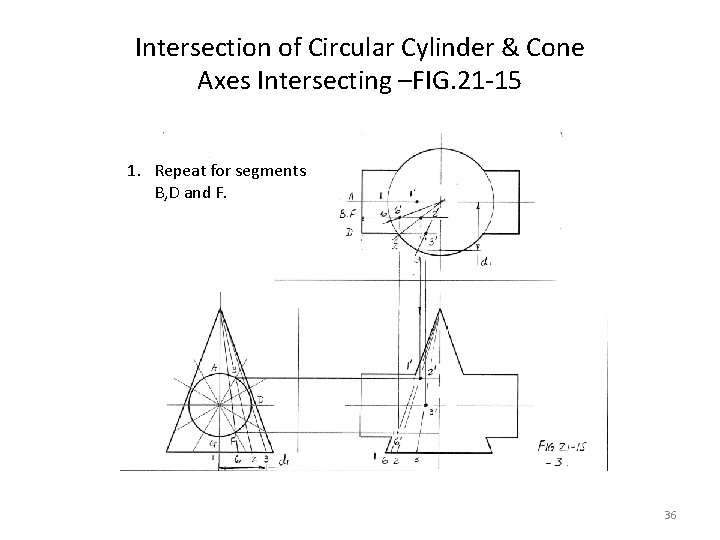
Intersection of Circular Cylinder & Cone Axes Intersecting –FIG. 21 -15 1. Repeat for segments B, D and F. 36

Intersection of Circular Cylinder & Cone Axes Intersecting –FIG. 21 -15 37

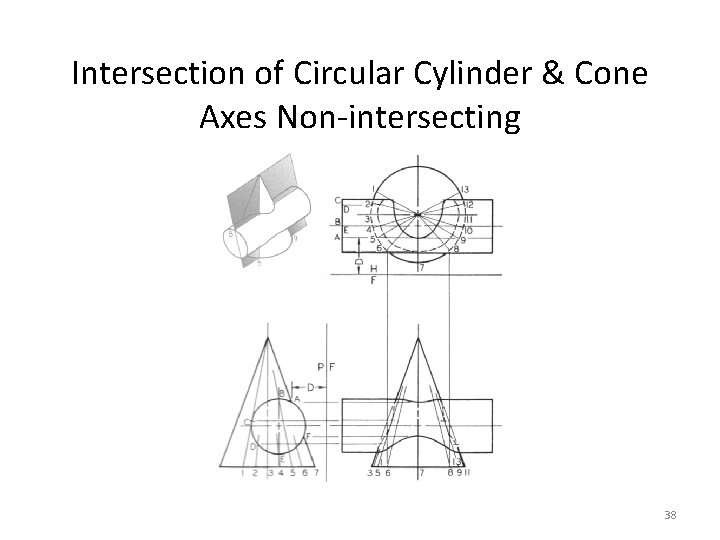
Intersection of Circular Cylinder & Cone Axes Non-intersecting 38

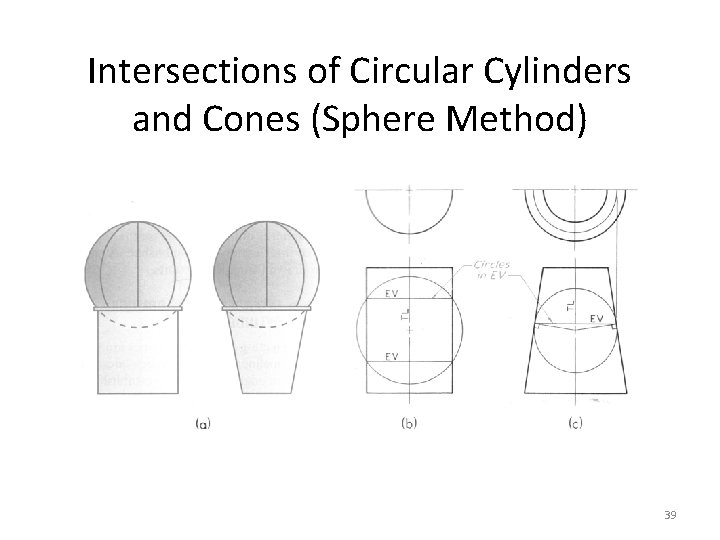
Intersections of Circular Cylinders and Cones (Sphere Method) 39

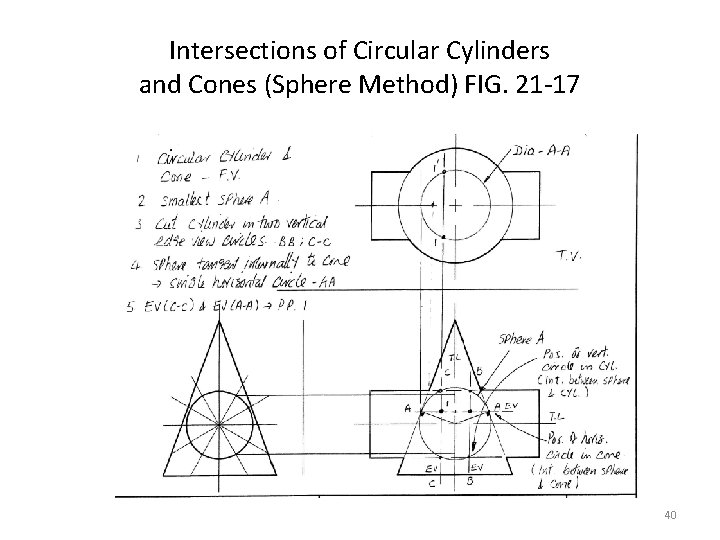
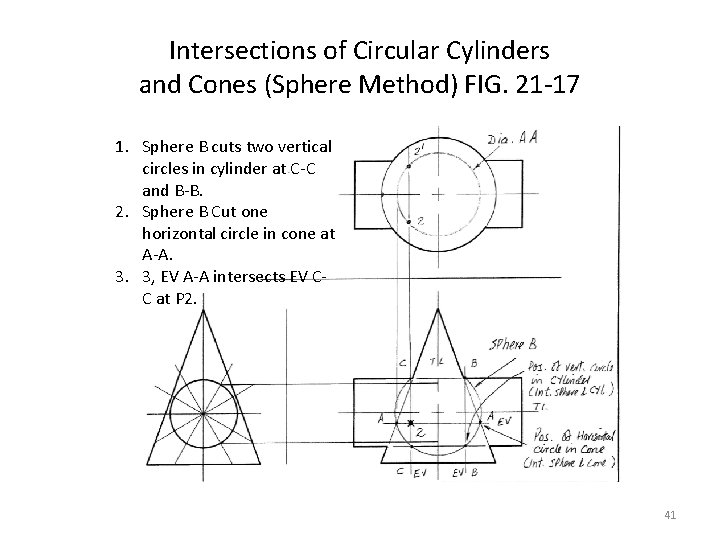
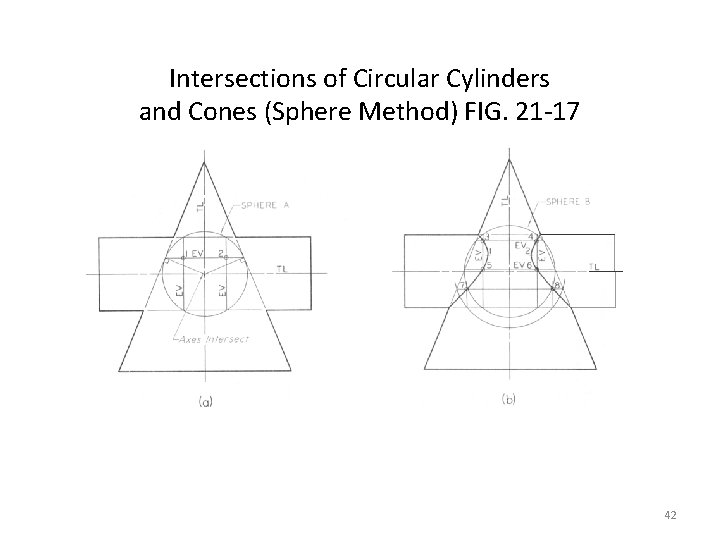
Intersections of Circular Cylinders and Cones (Sphere Method) FIG. 21 -17 40

Intersections of Circular Cylinders and Cones (Sphere Method) FIG. 21 -17 1. Sphere B cuts two vertical circles in cylinder at C-C and B-B. 2. Sphere B Cut one horizontal circle in cone at A-A. 3. 3, EV A-A intersects EV CC at P 2. 41

Intersections of Circular Cylinders and Cones (Sphere Method) FIG. 21 -17 42

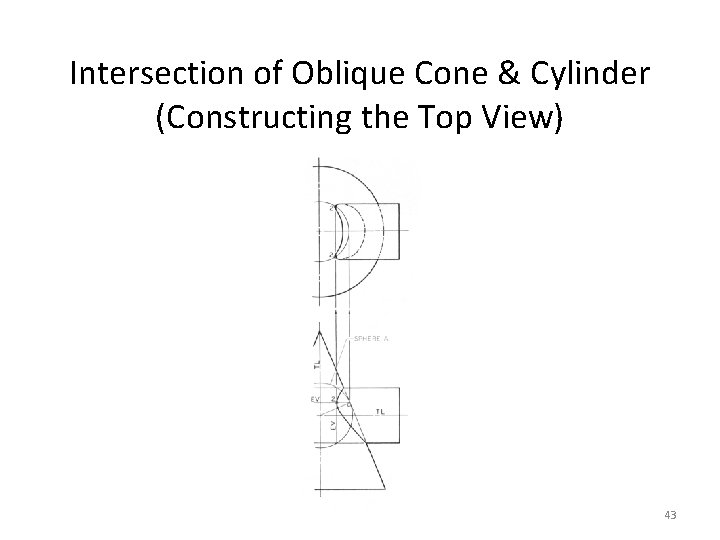
Intersection of Oblique Cone & Cylinder (Constructing the Top View) 43

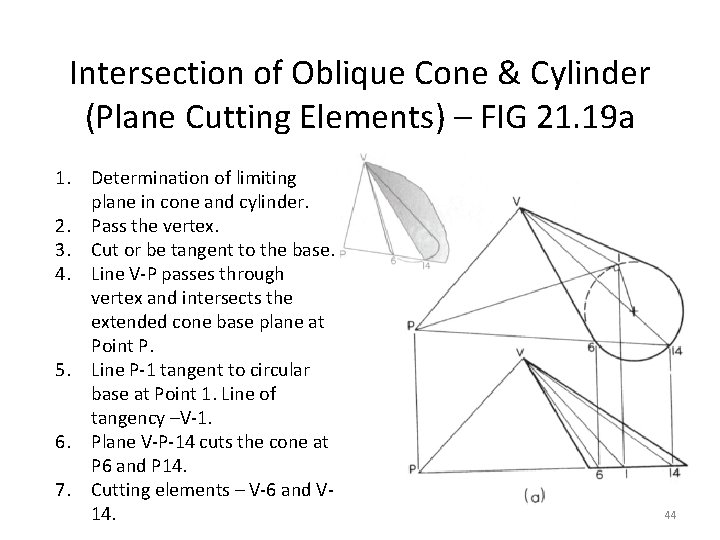
Intersection of Oblique Cone & Cylinder (Plane Cutting Elements) – FIG 21. 19 a 1. Determination of limiting plane in cone and cylinder. 2. Pass the vertex. 3. Cut or be tangent to the base. 4. Line V-P passes through vertex and intersects the extended cone base plane at Point P. 5. Line P-1 tangent to circular base at Point 1. Line of tangency –V-1. 6. Plane V-P-14 cuts the cone at P 6 and P 14. 7. Cutting elements – V-6 and V 14. 44

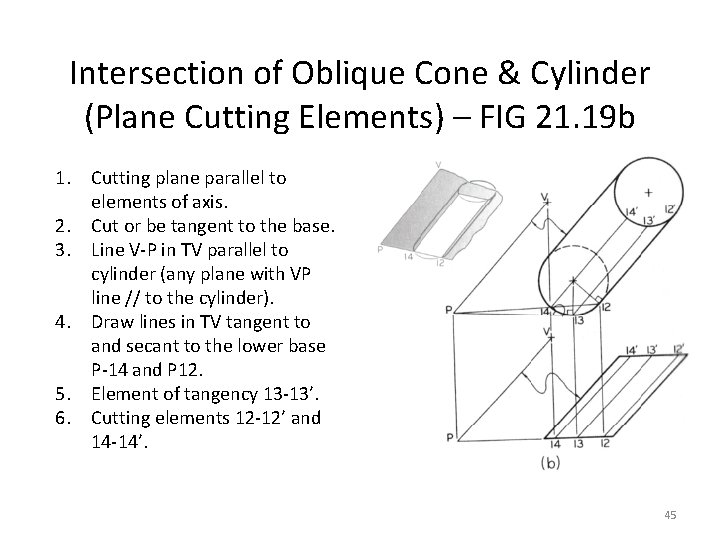
Intersection of Oblique Cone & Cylinder (Plane Cutting Elements) – FIG 21. 19 b 1. Cutting plane parallel to elements of axis. 2. Cut or be tangent to the base. 3. Line V-P in TV parallel to cylinder (any plane with VP line // to the cylinder). 4. Draw lines in TV tangent to and secant to the lower base P-14 and P 12. 5. Element of tangency 13 -13’. 6. Cutting elements 12 -12’ and 14 -14’. 45

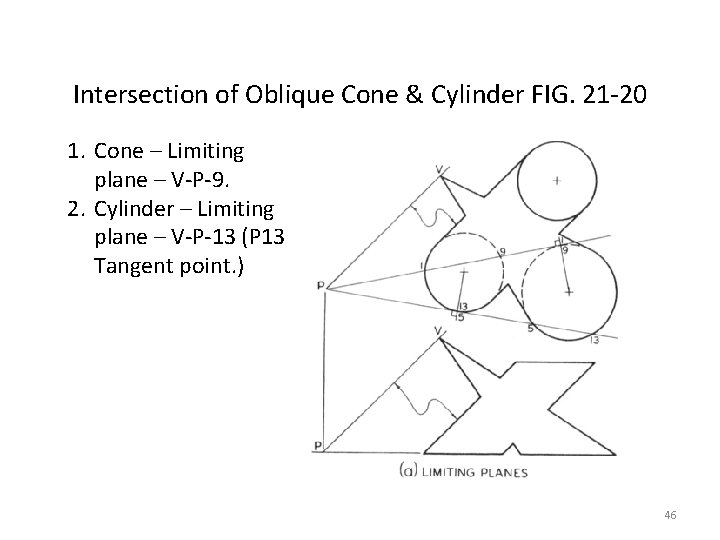
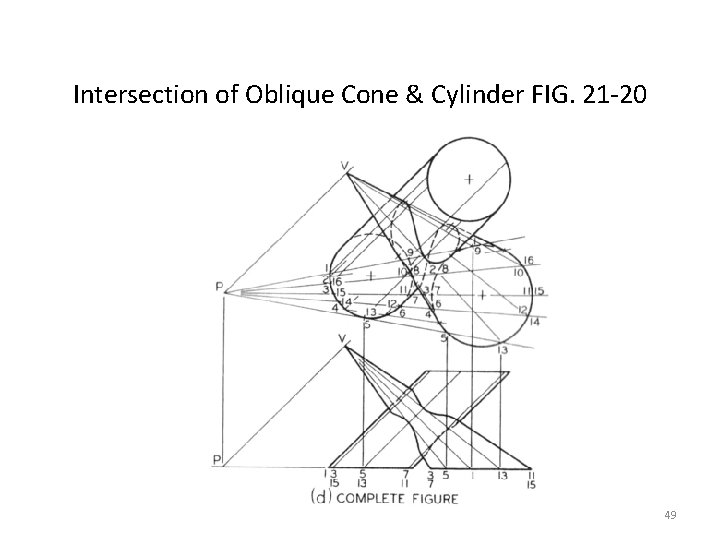
Intersection of Oblique Cone & Cylinder FIG. 21 -20 1. Cone – Limiting plane – V-P-9. 2. Cylinder – Limiting plane – V-P-13 (P 13 Tangent point. ) 46

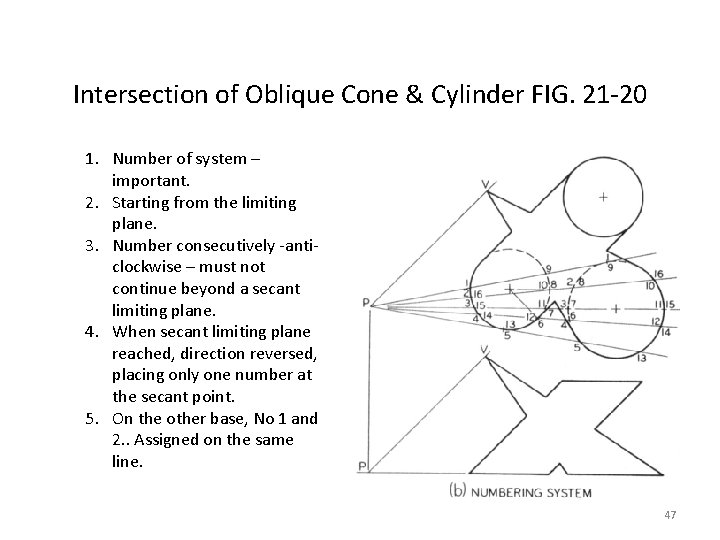
Intersection of Oblique Cone & Cylinder FIG. 21 -20 1. Number of system – important. 2. Starting from the limiting plane. 3. Number consecutively -anticlockwise – must not continue beyond a secant limiting plane. 4. When secant limiting plane reached, direction reversed, placing only one number at the secant point. 5. On the other base, No 1 and 2. . Assigned on the same line. 47

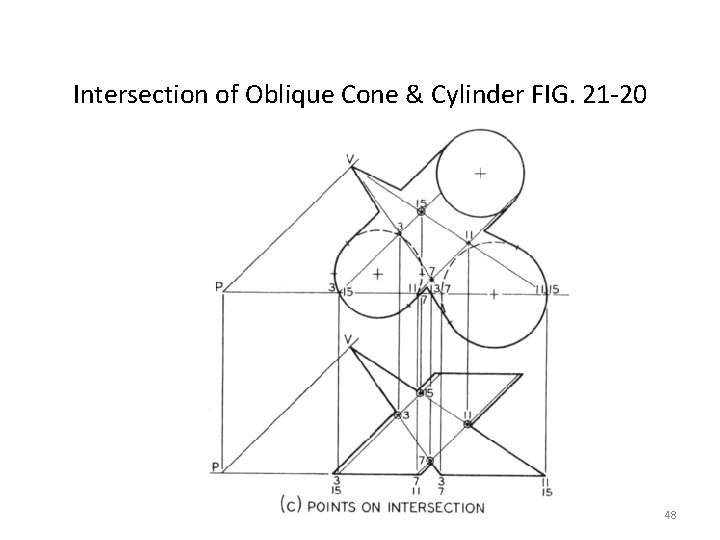
Intersection of Oblique Cone & Cylinder FIG. 21 -20 48

Intersection of Oblique Cone & Cylinder FIG. 21 -20 49

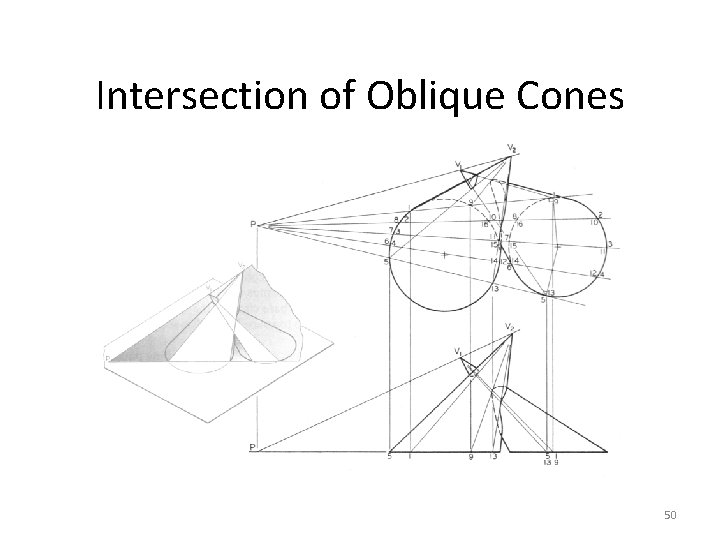
Intersection of Oblique Cones 50

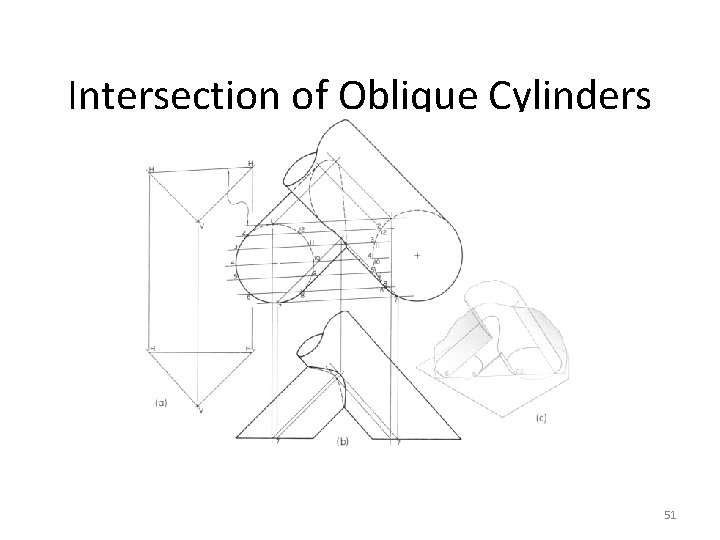
Intersection of Oblique Cylinders 51

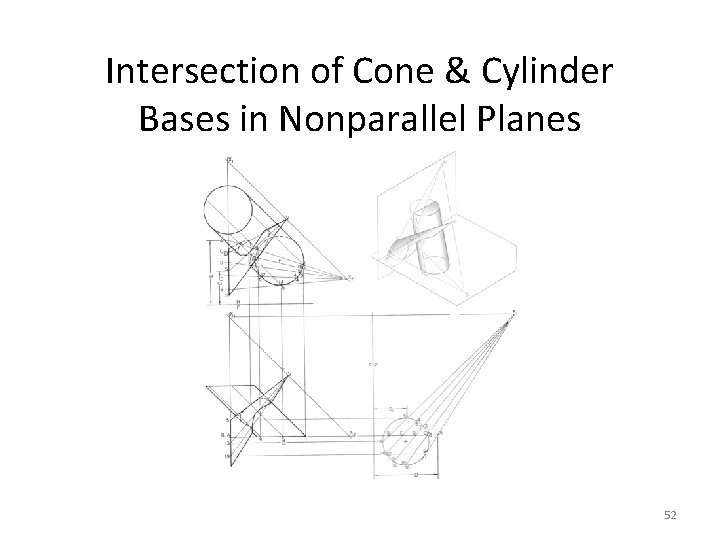
Intersection of Cone & Cylinder Bases in Nonparallel Planes 52