MECH 313 Engineering Drawing Design Lectures 3 and
- Slides: 56

MECH 313 Engineering Drawing & Design Lectures 3 and 4 Lecturer: Dr. John Cheung 1

Outline n Basic dimensioning n Dimensioning circular features n Dimensioning common features n Dimensioning methods 2

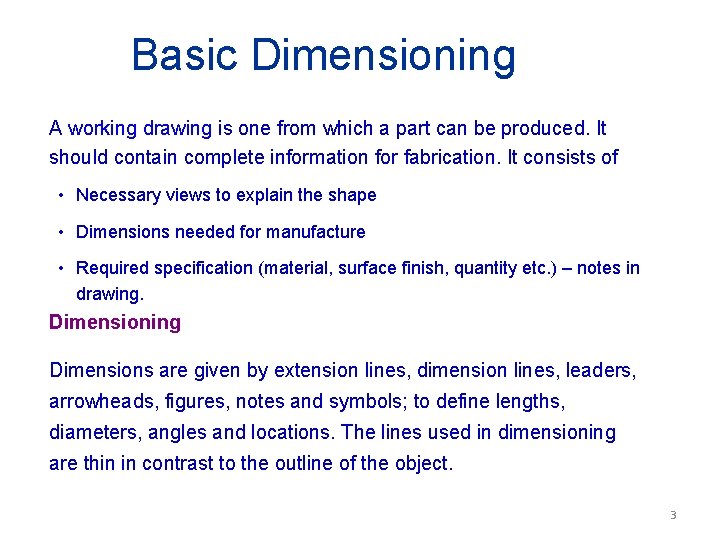
Basic Dimensioning A working drawing is one from which a part can be produced. It should contain complete information for fabrication. It consists of • Necessary views to explain the shape • Dimensions needed for manufacture • Required specification (material, surface finish, quantity etc. ) – notes in drawing. Dimensioning Dimensions are given by extension lines, dimension lines, leaders, arrowheads, figures, notes and symbols; to define lengths, diameters, angles and locations. The lines used in dimensioning are thin in contrast to the outline of the object. 3

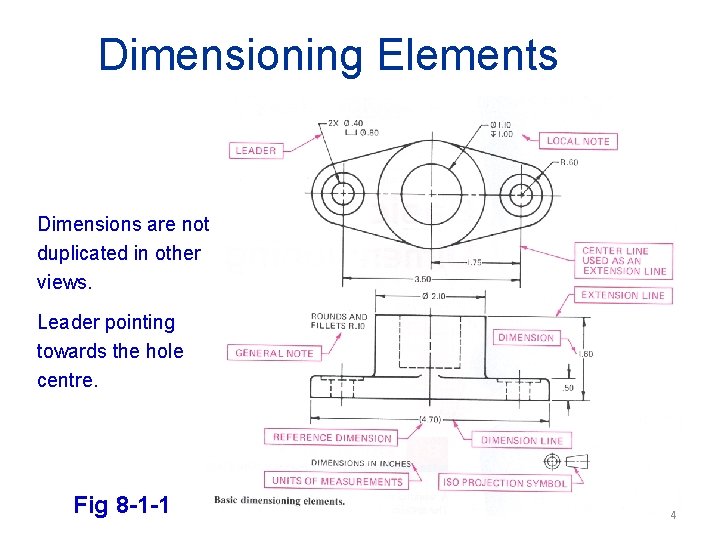
Dimensioning Elements Dimensions are not duplicated in other views. Leader pointing towards the hole centre. Fig 8 -1 -1 4

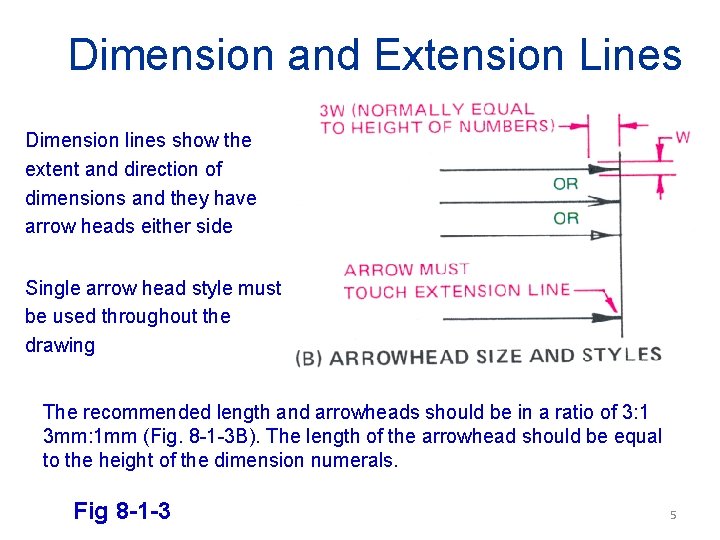
Dimension and Extension Lines Dimension lines show the extent and direction of dimensions and they have arrow heads either side Single arrow head style must be used throughout the drawing The recommended length and arrowheads should be in a ratio of 3: 1 3 mm: 1 mm (Fig. 8 -1 -3 B). The length of the arrowhead should be equal to the height of the dimension numerals. Fig 8 -1 -3 5

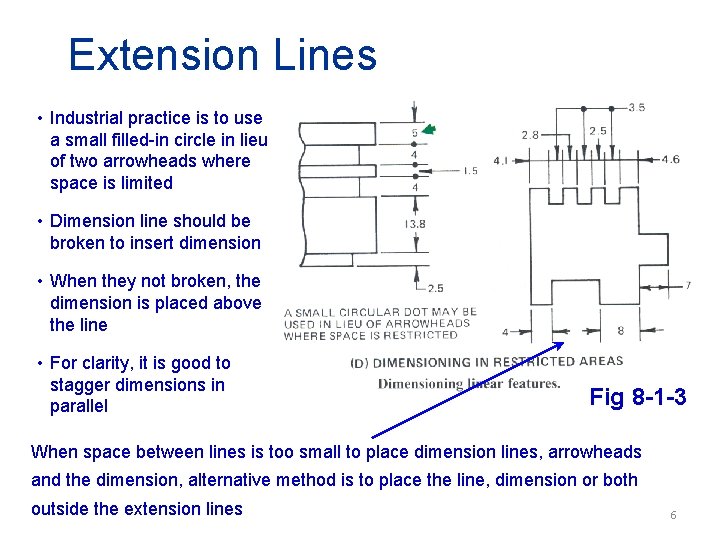
Extension Lines • Industrial practice is to use a small filled-in circle in lieu of two arrowheads where space is limited • Dimension line should be broken to insert dimension • When they not broken, the dimension is placed above the line • For clarity, it is good to stagger dimensions in parallel Fig 8 -1 -3 When space between lines is too small to place dimension lines, arrowheads and the dimension, alternative method is to place the line, dimension or both outside the extension lines 6

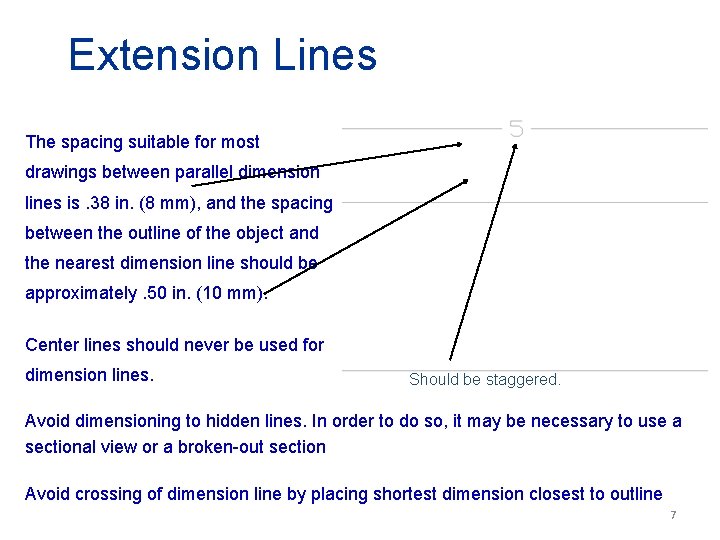
Extension Lines The spacing suitable for most drawings between parallel dimension lines is. 38 in. (8 mm), and the spacing between the outline of the object and the nearest dimension line should be approximately. 50 in. (10 mm). Center lines should never be used for dimension lines. Should be staggered. Avoid dimensioning to hidden lines. In order to do so, it may be necessary to use a sectional view or a broken-out section Avoid crossing of dimension line by placing shortest dimension closest to outline 7

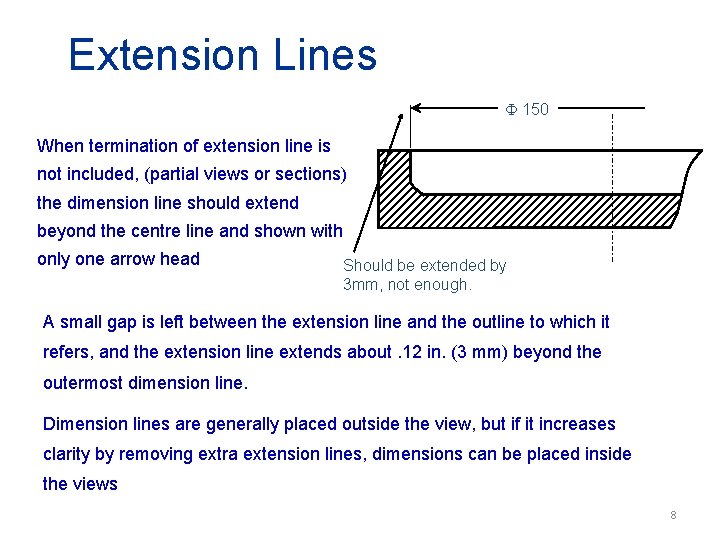
Extension Lines 150 When termination of extension line is not included, (partial views or sections) the dimension line should extend beyond the centre line and shown with only one arrow head Should be extended by 3 mm, not enough. A small gap is left between the extension line and the outline to which it refers, and the extension line extends about. 12 in. (3 mm) beyond the outermost dimension line. Dimension lines are generally placed outside the view, but if it increases clarity by removing extra extension lines, dimensions can be placed inside the views 8

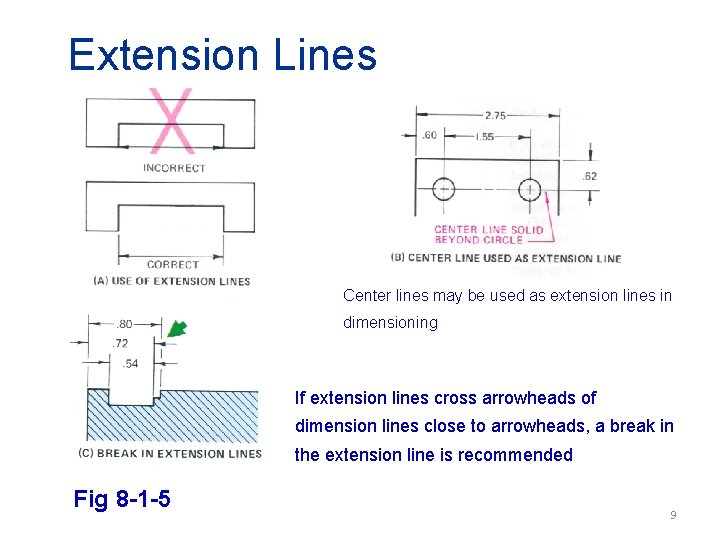
Extension Lines Center lines may be used as extension lines in dimensioning If extension lines cross arrowheads of dimension lines close to arrowheads, a break in the extension line is recommended Fig 8 -1 -5 9

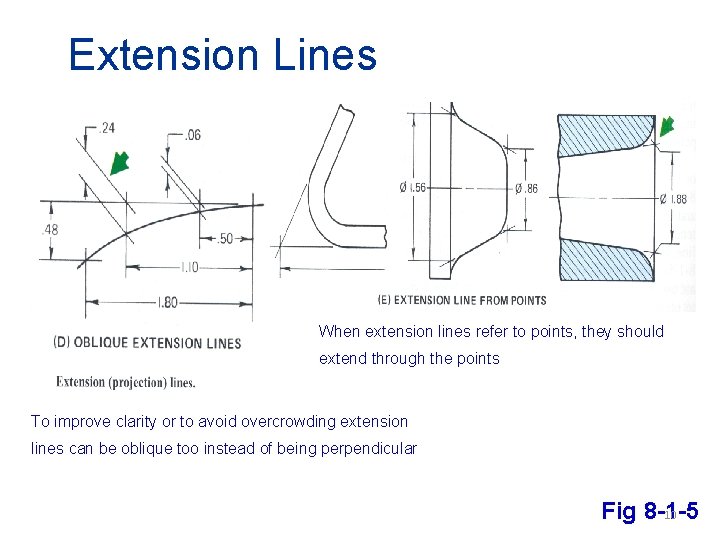
Extension Lines When extension lines refer to points, they should extend through the points To improve clarity or to avoid overcrowding extension lines can be oblique too instead of being perpendicular 10 Fig 8 -1 -5

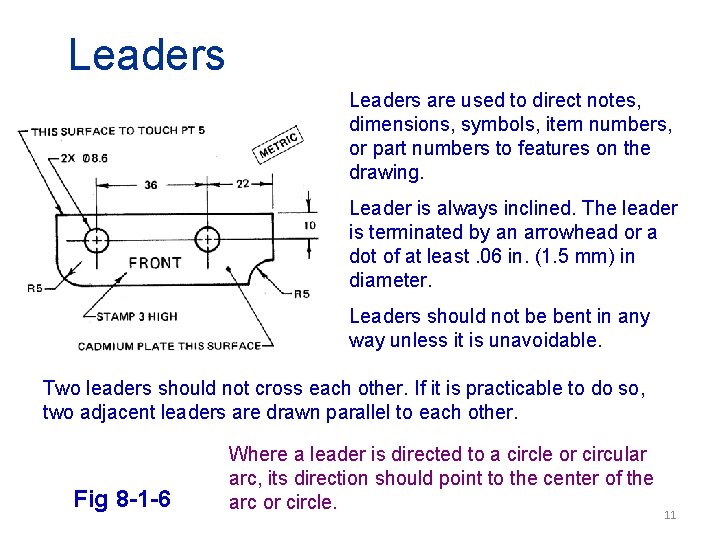
Leaders are used to direct notes, dimensions, symbols, item numbers, or part numbers to features on the drawing. Leader is always inclined. The leader is terminated by an arrowhead or a dot of at least. 06 in. (1. 5 mm) in diameter. Leaders should not be bent in any way unless it is unavoidable. Two leaders should not cross each other. If it is practicable to do so, two adjacent leaders are drawn parallel to each other. Fig 8 -1 -6 Where a leader is directed to a circle or circular arc, its direction should point to the center of the arc or circle. 11

Notes - are used to simplify or complement dimensioning by giving information on a drawing in a condensed and systematic manner. They may be general or local notes, and should be in the present or future tense ? ? ? . General Notes - refer to the part or the drawing as a whole. They should be shown in a central position below the view to which they apply or placed in a general note column. Typical examples of this type of note are: • FINISH ALL OVER • ROUNDS AND FILLETS R. 06 • REMOVE ALL SHARP EDGES 12

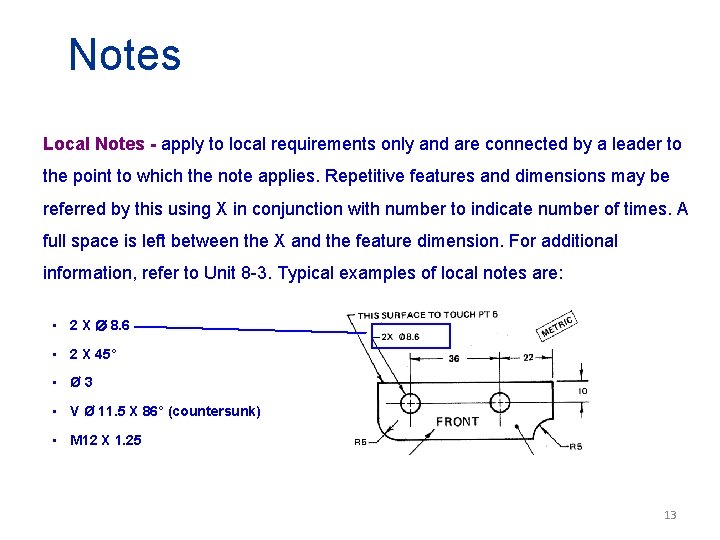
Notes Local Notes - apply to local requirements only and are connected by a leader to the point to which the note applies. Repetitive features and dimensions may be referred by this using X in conjunction with number to indicate number of times. A full space is left between the X and the feature dimension. For additional information, refer to Unit 8 -3. Typical examples of local notes are: • 2 X 8. 6 • 2 X 45° • Ø 3 • V Ø 11. 5 X 86° (countersunk) • M 12 X 1. 25 13

Units of Measurement g Although the metric system of dimensioning is becoming the official international standard of measurement, most drawings in the United States are still dimensioned in inches or feet and inches. g If in a drawing all units are in mm or in inches, there is no need to put a suffix in every dimension. However, the drawing should contain a note stating the units of measurement. g Where some inch dimensions, such as nominal pipe sizes, are shown on a millimeter-dimensioned drawing, the abbreviation IN. must follow the inch values, e. g. 4 in – 8 NPT 14

Units of Measurement Decimal-Inch System g Parts are designed in basic increments of. 02 in and expressed with 2 figures to the right of decimal point. g When greater accuracy is required 3 or 4 placed decimals can be used (1. 875 in etc) g Whole numbers are shown with minimum of 2 zeros after decimal 24. 00 g 24 An inch value of less than one is shown without 0. 44 g not 0. 44 If parts need to be aligned with existing parts dimensioned in fraction, it may be needed to use decimal equivalent of the fraction 15

Units of Measurement Fractional-Inch System g The system of dimensioning has not been recommended for use by ANSI for many years. (shown here only for reference or when changing some old drawings are required) g Basic unit is 1/64 th of an inch, finer divisions or intermediate values are marked in decimals (like. 30 or. 2575 in) g A note such as DIMENSIONS ARE IN INCHES Should be clearly shown on the drawing g The inch marks (“) are not shown with dimensions. The exception is when the dimension ‘ 1 inch’ is shown on the drawing 1” not 1 16

Units of Measurement Foot and Inch System g Used in large drawings, floor plans. g All dimensions 12 in or greater are specified in feet or feet and inches 24” is specified as 2’-0, and 27” as 2’-3 g Parts of an inch are usually shown as common fraction rather than decimal points g The inch marks (“) are not shown with dimensions. The drawing should carry a note such as DIMENSIONS ARE IN FEET AND INCHES UNLESS OTHERWISE SPECIFIED. A dash should be placed between the foot and inch values 1’-3 not 1’ 3 17

Units of Measurement SI Metric Units Of Measurement g Standard metric units in Engineering drawing or mm for length and m for surface finish. g For architectural drawings, meters and millimeters are used g Whole numbers are shown without a 0 after decimal point 2 g 02 or 2. 0 Millimeter value less than 1 is shown with a 0 before decimal point 0. 26 g not not . 2 or. 20. 26 Decimal points to be clearly visible and placed in line with the bottom and digits are not grouped by commas or spaces 32456 g not 32 456 or 32, 456 The drawing should carry a note such as UNLESS OTHERWISE SPECIFIED DIMENSIONS ARE IN MILIMETERS. METRIC is identified near title block. 18

Units of Measurement Units common to either system g Mainly tapers. 006 in per inch or . 006 mm per mm is specified as 0. 006: 1 g Angular units are also same in both metric and inch system Standard Items Fasteners and threads • Either inch or metric fasteners and threads may be used (appendix) Holes Sizes • Same for hole (drill) sizes refer to appendix 19

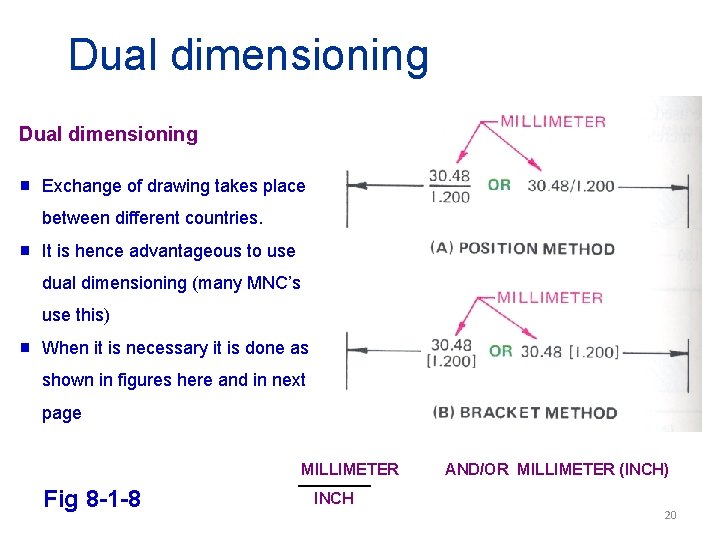
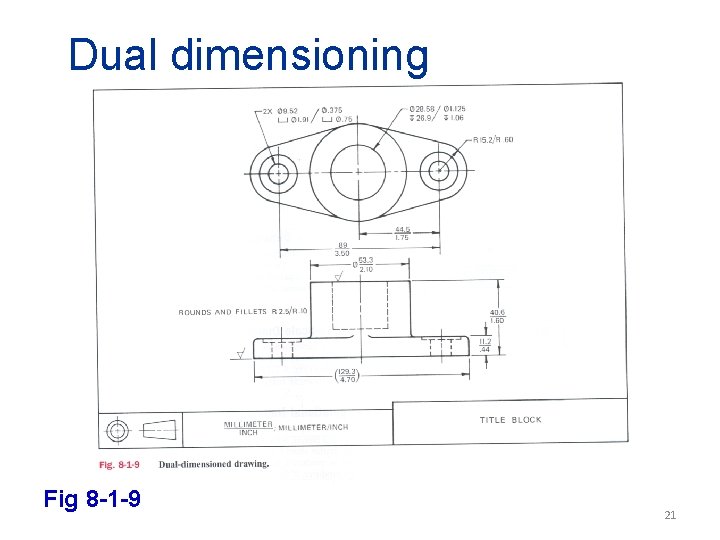
Dual dimensioning g Exchange of drawing takes place between different countries. g It is hence advantageous to use dual dimensioning (many MNC’s use this) g When it is necessary it is done as shown in figures here and in next page MILLIMETER Fig 8 -1 -8 AND/OR MILLIMETER (INCH) INCH 20

Dual dimensioning Fig 8 -1 -9 21

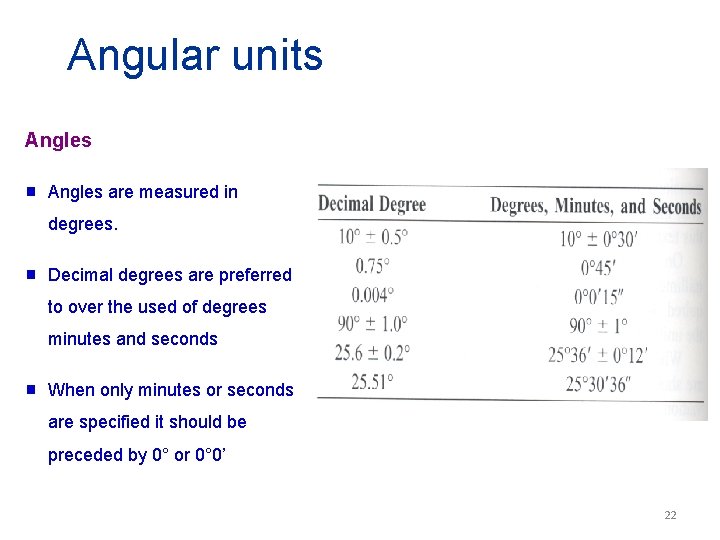
Angular units Angles g Angles are measured in degrees. g Decimal degrees are preferred to over the used of degrees minutes and seconds g When only minutes or seconds are specified it should be preceded by 0° or 0° 0’ 22

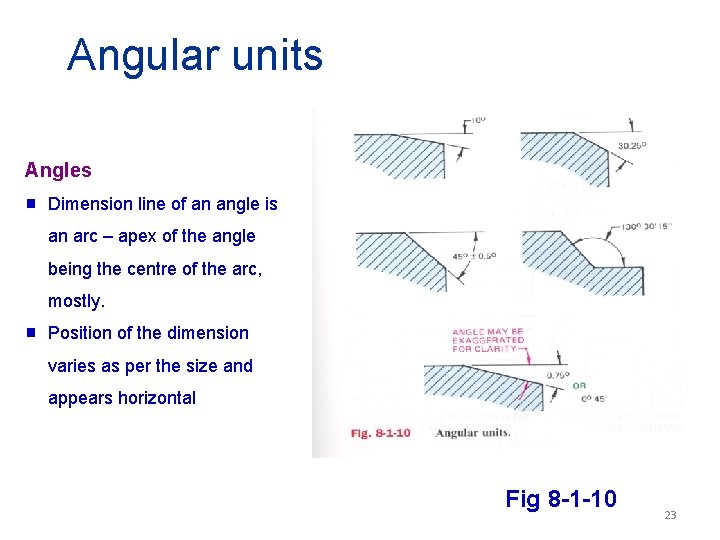
Angular units Angles g Dimension line of an angle is an arc – apex of the angle being the centre of the arc, mostly. g Position of the dimension varies as per the size and appears horizontal Fig 8 -1 -10 23

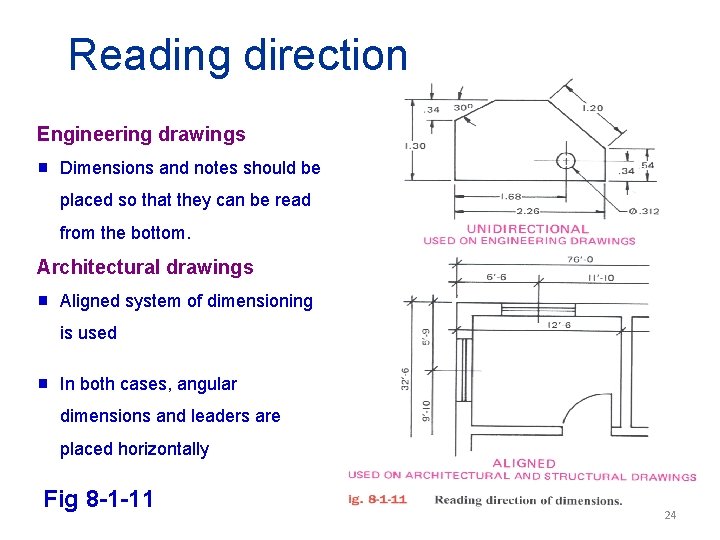
Reading direction Engineering drawings g Dimensions and notes should be placed so that they can be read from the bottom. Architectural drawings g Aligned system of dimensioning is used g In both cases, angular dimensions and leaders are placed horizontally Fig 8 -1 -11 24

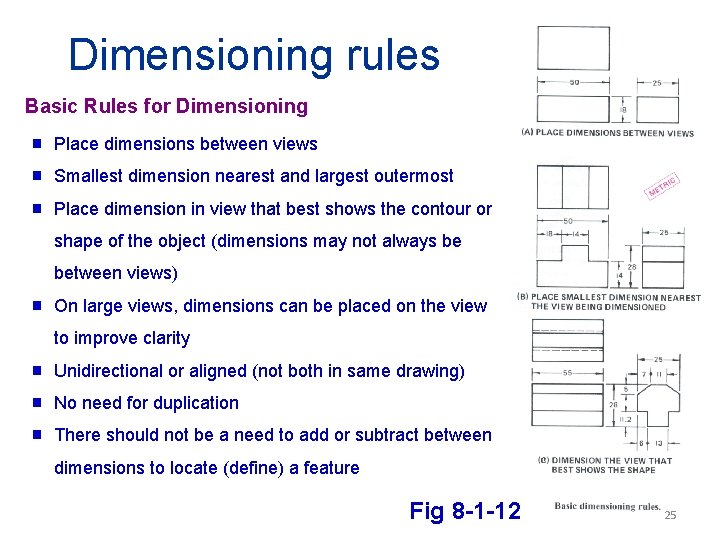
Dimensioning rules Basic Rules for Dimensioning g Place dimensions between views g Smallest dimension nearest and largest outermost g Place dimension in view that best shows the contour or shape of the object (dimensions may not always be between views) g On large views, dimensions can be placed on the view to improve clarity g Unidirectional or aligned (not both in same drawing) g No need for duplication g There should not be a need to add or subtract between dimensions to locate (define) a feature Fig 8 -1 -12 25

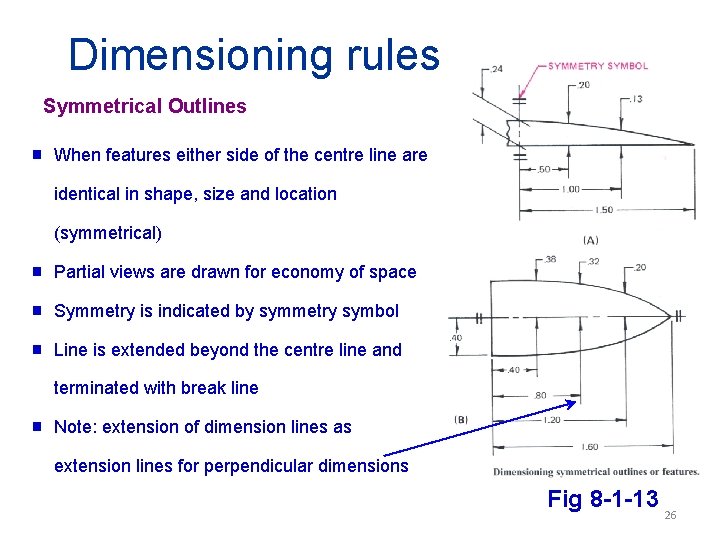
Dimensioning rules Symmetrical Outlines g When features either side of the centre line are identical in shape, size and location (symmetrical) g Partial views are drawn for economy of space g Symmetry is indicated by symmetry symbol g Line is extended beyond the centre line and terminated with break line g Note: extension of dimension lines as extension lines for perpendicular dimensions Fig 8 -1 -13 26

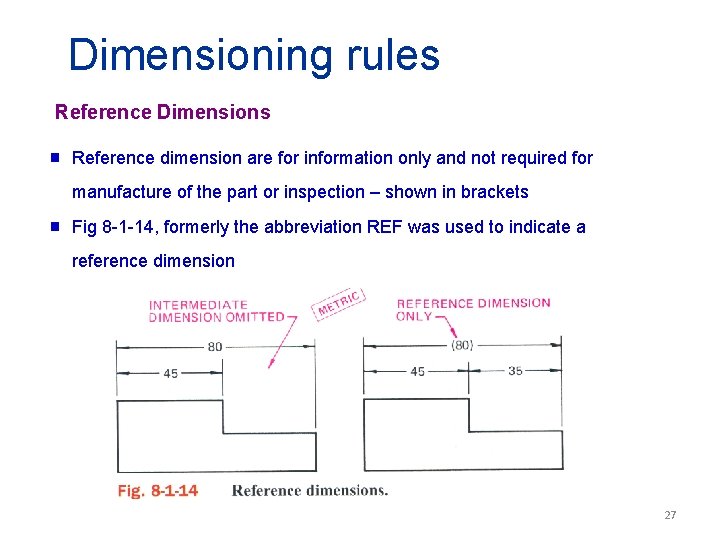
Dimensioning rules Reference Dimensions g Reference dimension are for information only and not required for manufacture of the part or inspection – shown in brackets g Fig 8 -1 -14, formerly the abbreviation REF was used to indicate a reference dimension 27

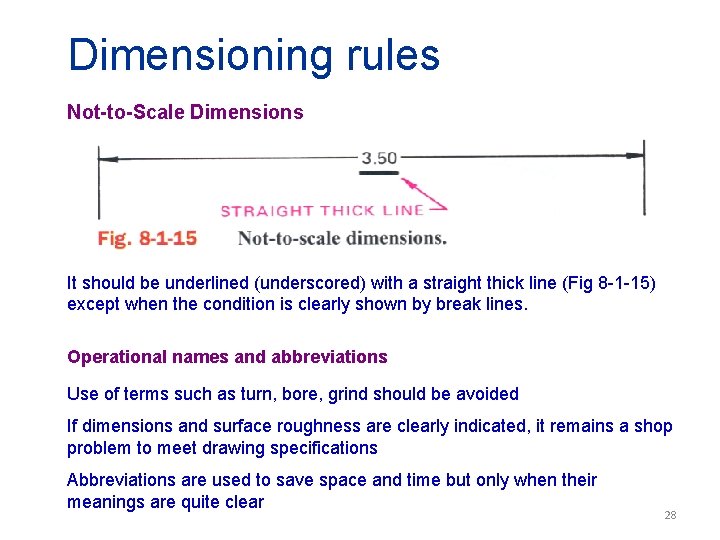
Dimensioning rules Not-to-Scale Dimensions It should be underlined (underscored) with a straight thick line (Fig 8 -1 -15) except when the condition is clearly shown by break lines. Operational names and abbreviations Use of terms such as turn, bore, grind should be avoided If dimensions and surface roughness are clearly indicated, it remains a shop problem to meet drawing specifications Abbreviations are used to save space and time but only when their meanings are quite clear 28

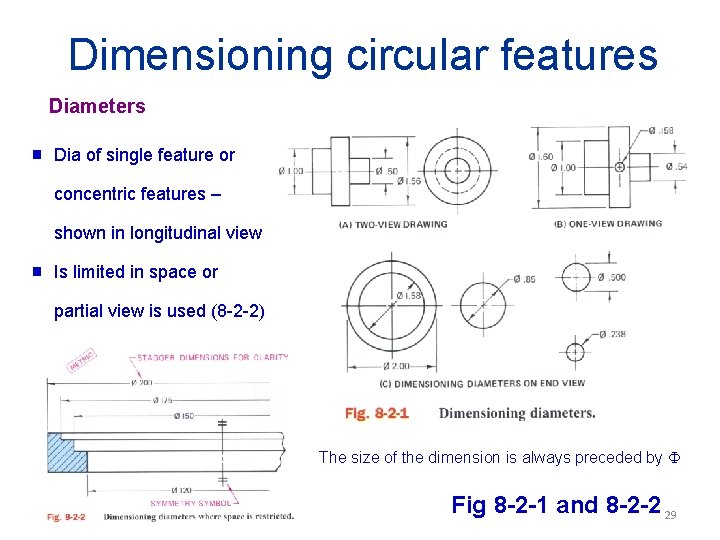
Dimensioning circular features Diameters g Dia of single feature or concentric features – shown in longitudinal view g Is limited in space or partial view is used (8 -2 -2) The size of the dimension is always preceded by Fig 8 -2 -1 and 8 -2 -2 29

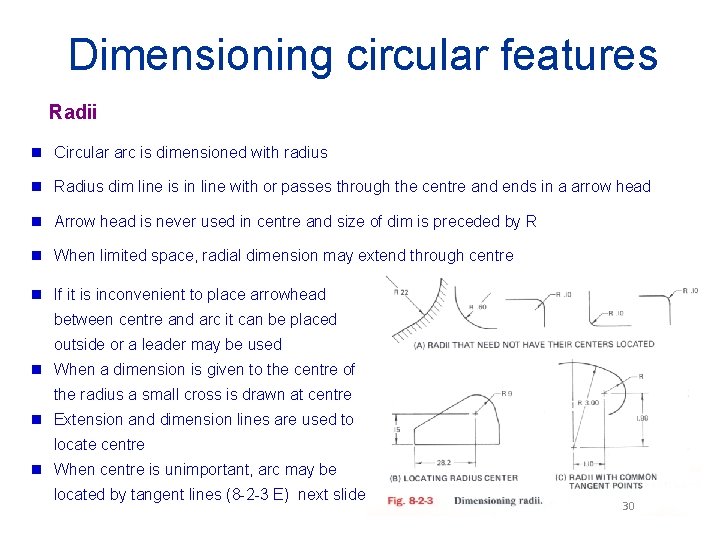
Dimensioning circular features Radii g Circular arc is dimensioned with radius g Radius dim line is in line with or passes through the centre and ends in a arrow head g Arrow head is never used in centre and size of dim is preceded by R g When limited space, radial dimension may extend through centre g If it is inconvenient to place arrowhead between centre and arc it can be placed outside or a leader may be used g When a dimension is given to the centre of the radius a small cross is drawn at centre g Extension and dimension lines are used to locate centre g When centre is unimportant, arc may be located by tangent lines (8 -2 -3 E) next slide 30

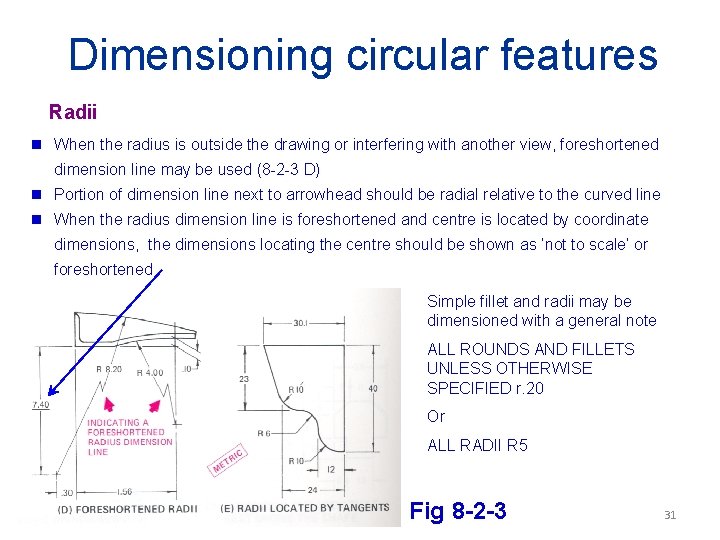
Dimensioning circular features Radii g When the radius is outside the drawing or interfering with another view, foreshortened dimension line may be used (8 -2 -3 D) g Portion of dimension line next to arrowhead should be radial relative to the curved line g When the radius dimension line is foreshortened and centre is located by coordinate dimensions, the dimensions locating the centre should be shown as ‘not to scale’ or foreshortened Simple fillet and radii may be dimensioned with a general note ALL ROUNDS AND FILLETS UNLESS OTHERWISE SPECIFIED r. 20 Or ALL RADII R 5 Fig 8 -2 -3 31

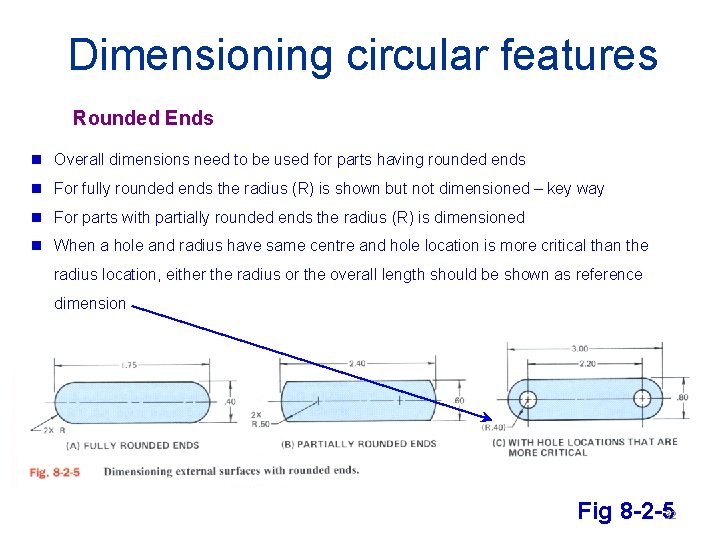
Dimensioning circular features Rounded Ends g Overall dimensions need to be used for parts having rounded ends g For fully rounded ends the radius (R) is shown but not dimensioned – key way g For parts with partially rounded ends the radius (R) is dimensioned g When a hole and radius have same centre and hole location is more critical than the radius location, either the radius or the overall length should be shown as reference dimension Fig 8 -2 -532

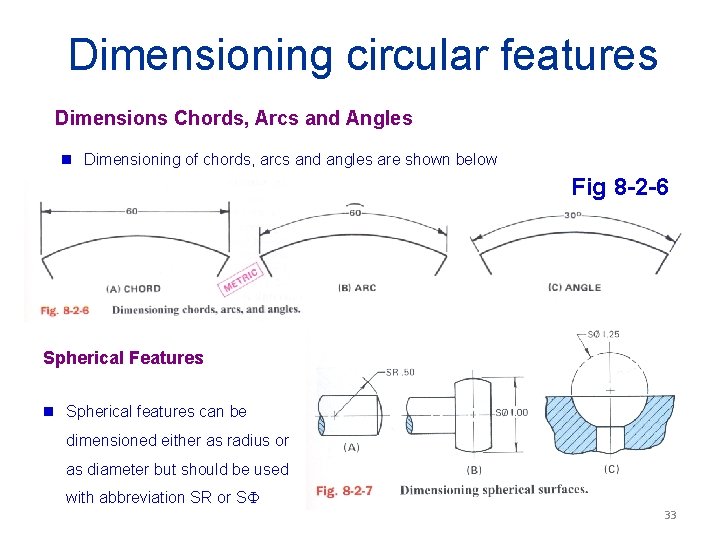
Dimensioning circular features Dimensions Chords, Arcs and Angles g Dimensioning of chords, arcs and angles are shown below Fig 8 -2 -6 Spherical Features g Spherical features can be dimensioned either as radius or as diameter but should be used with abbreviation SR or S 33

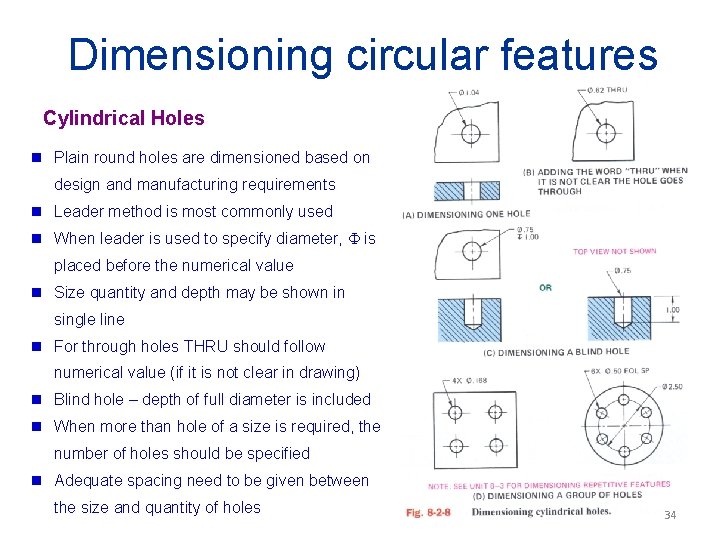
Dimensioning circular features Cylindrical Holes g Plain round holes are dimensioned based on design and manufacturing requirements g Leader method is most commonly used g When leader is used to specify diameter, is placed before the numerical value g Size quantity and depth may be shown in single line g For through holes THRU should follow numerical value (if it is not clear in drawing) g Blind hole – depth of full diameter is included g When more than hole of a size is required, the number of holes should be specified g Adequate spacing need to be given between the size and quantity of holes 34

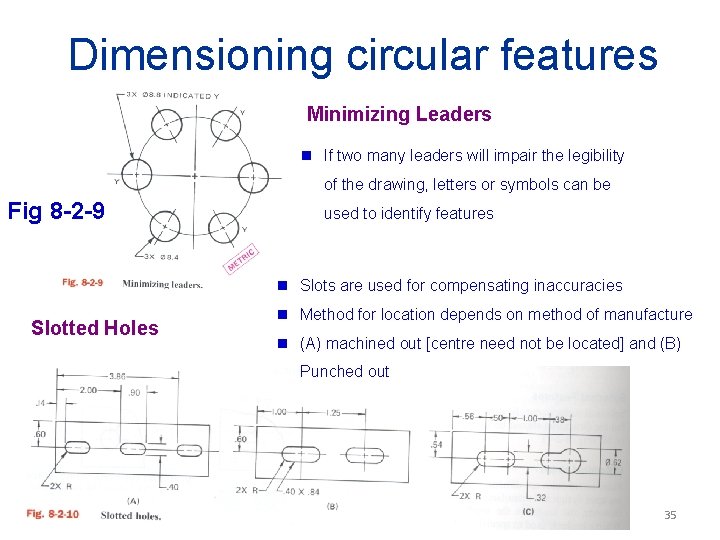
Dimensioning circular features Minimizing Leaders g If two many leaders will impair the legibility of the drawing, letters or symbols can be Fig 8 -2 -9 Slotted Holes used to identify features g Slots are used for compensating inaccuracies g Method for location depends on method of manufacture g (A) machined out [centre need not be located] and (B) Punched out 35

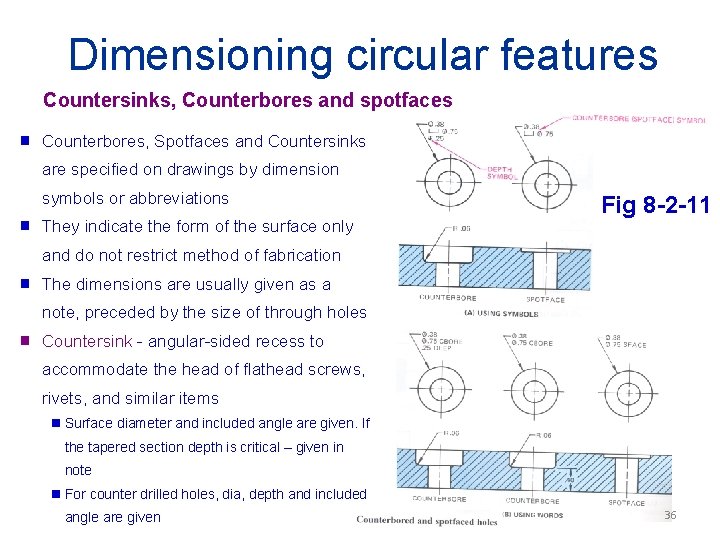
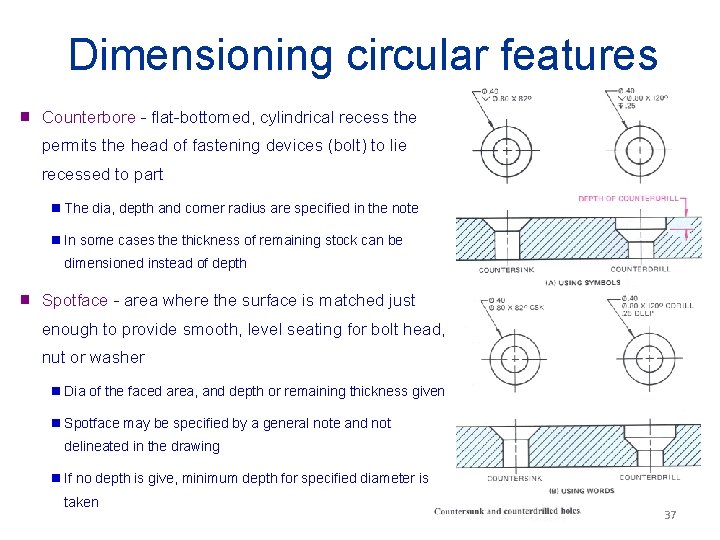
Dimensioning circular features Countersinks, Counterbores and spotfaces g Counterbores, Spotfaces and Countersinks are specified on drawings by dimension symbols or abbreviations g They indicate the form of the surface only Fig 8 -2 -11 and do not restrict method of fabrication g The dimensions are usually given as a note, preceded by the size of through holes g Countersink - angular-sided recess to accommodate the head of flathead screws, rivets, and similar items g Surface diameter and included angle are given. If the tapered section depth is critical – given in note g For counter drilled holes, dia, depth and included angle are given 36

Dimensioning circular features g Counterbore - flat-bottomed, cylindrical recess the permits the head of fastening devices (bolt) to lie recessed to part g The dia, depth and corner radius are specified in the note g In some cases the thickness of remaining stock can be dimensioned instead of depth g Spotface - area where the surface is matched just enough to provide smooth, level seating for bolt head, nut or washer g Dia of the faced area, and depth or remaining thickness given g Spotface may be specified by a general note and not delineated in the drawing g If no depth is give, minimum depth for specified diameter is taken 37

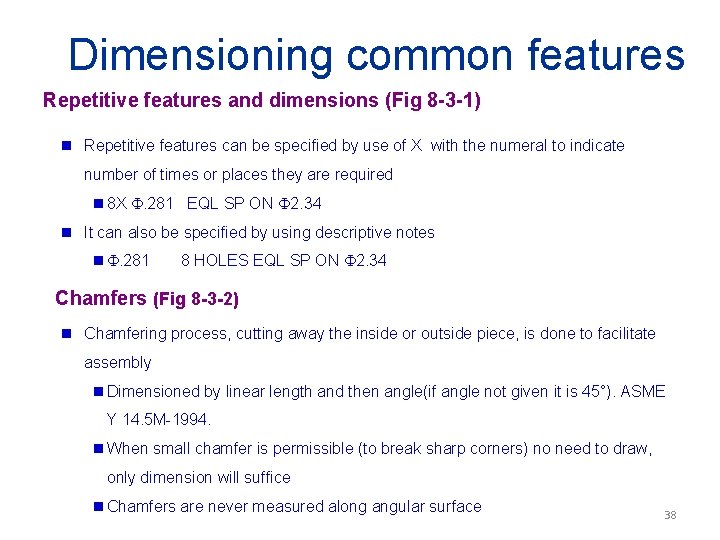
Dimensioning common features Repetitive features and dimensions (Fig 8 -3 -1) g Repetitive features can be specified by use of X with the numeral to indicate number of times or places they are required g 8 X g . 281 EQL SP ON 2. 34 It can also be specified by using descriptive notes g . 281 8 HOLES EQL SP ON 2. 34 Chamfers (Fig 8 -3 -2) g Chamfering process, cutting away the inside or outside piece, is done to facilitate assembly g Dimensioned by linear length and then angle(if angle not given it is 45°). ASME Y 14. 5 M-1994. g When small chamfer is permissible (to break sharp corners) no need to draw, only dimension will suffice g Chamfers are never measured along angular surface 38

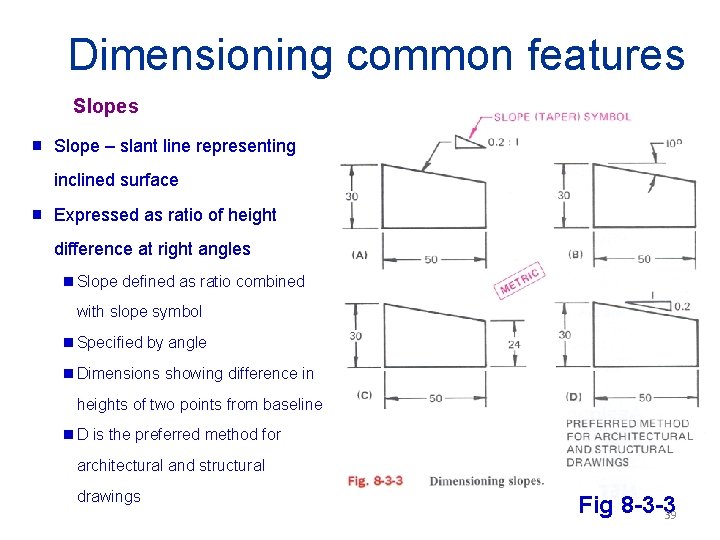
Dimensioning common features Slopes g Slope – slant line representing inclined surface g Expressed as ratio of height difference at right angles g Slope defined as ratio combined with slope symbol g Specified by angle g Dimensions showing difference in heights of two points from baseline g. D is the preferred method for architectural and structural drawings Fig 8 -3 -3 39

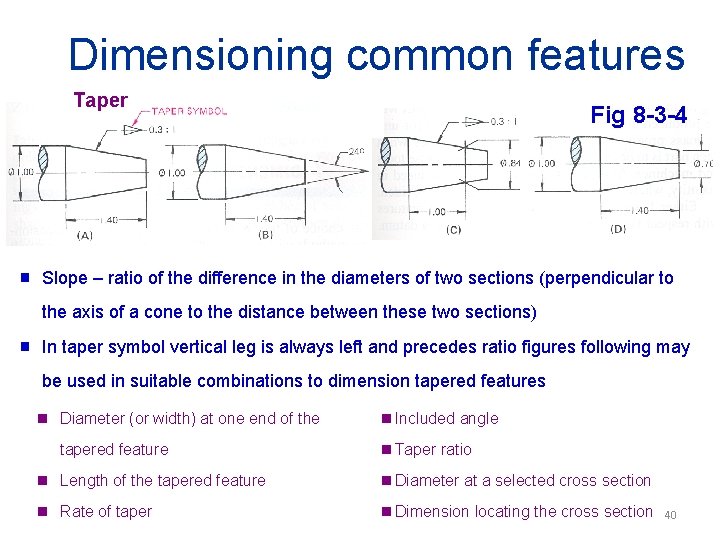
Dimensioning common features Taper g Fig 8 -3 -4 Slope – ratio of the difference in the diameters of two sections (perpendicular to the axis of a cone to the distance between these two sections) g In taper symbol vertical leg is always left and precedes ratio figures following may be used in suitable combinations to dimension tapered features Diameter (or width) at one end of the g Included tapered feature g Taper g Length of the tapered feature g Diameter g Rate of taper g Dimension g angle ratio at a selected cross section locating the cross section 40

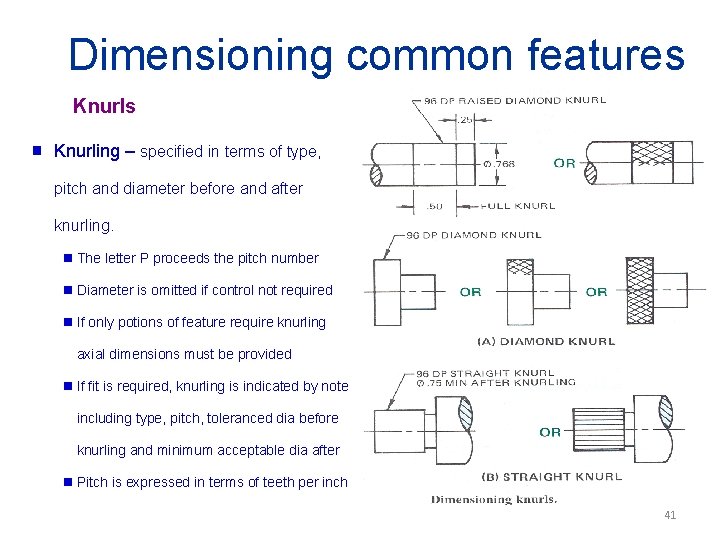
Dimensioning common features Knurls g Knurling – specified in terms of type, pitch and diameter before and after knurling. g The letter P proceeds the pitch number g Diameter is omitted if control not required g If only potions of feature require knurling axial dimensions must be provided g If fit is required, knurling is indicated by note including type, pitch, toleranced dia before knurling and minimum acceptable dia after g Pitch is expressed in terms of teeth per inch 41

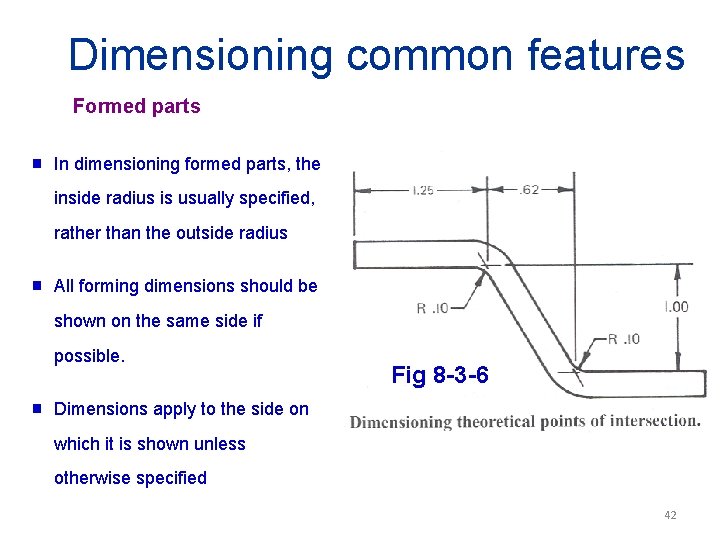
Dimensioning common features Formed parts g In dimensioning formed parts, the inside radius is usually specified, rather than the outside radius g All forming dimensions should be shown on the same side if possible. g Fig 8 -3 -6 Dimensions apply to the side on which it is shown unless otherwise specified 42

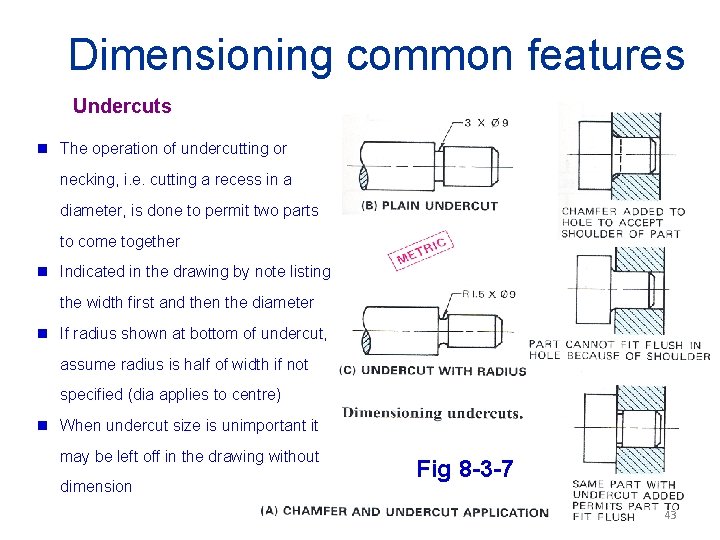
Dimensioning common features Undercuts g The operation of undercutting or necking, i. e. cutting a recess in a diameter, is done to permit two parts to come together g Indicated in the drawing by note listing the width first and then the diameter g If radius shown at bottom of undercut, assume radius is half of width if not specified (dia applies to centre) g When undercut size is unimportant it may be left off in the drawing without dimension Fig 8 -3 -7 43

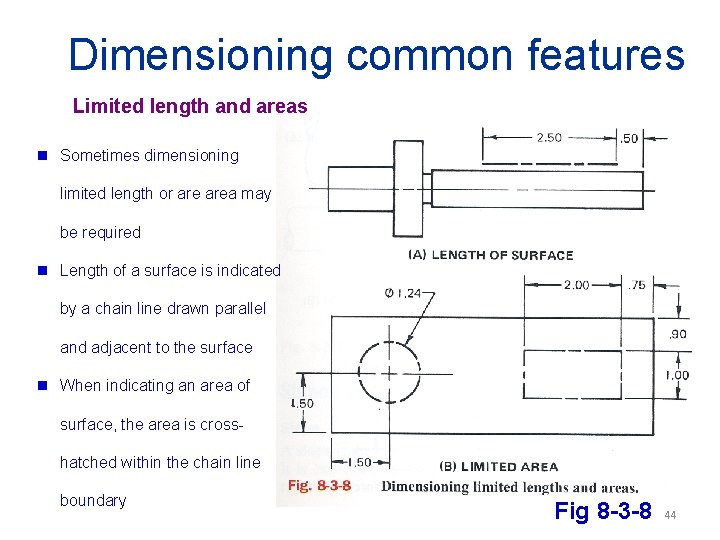
Dimensioning common features Limited length and areas g Sometimes dimensioning limited length or area may be required g Length of a surface is indicated by a chain line drawn parallel and adjacent to the surface g When indicating an area of surface, the area is crosshatched within the chain line boundary Fig 8 -3 -8 44

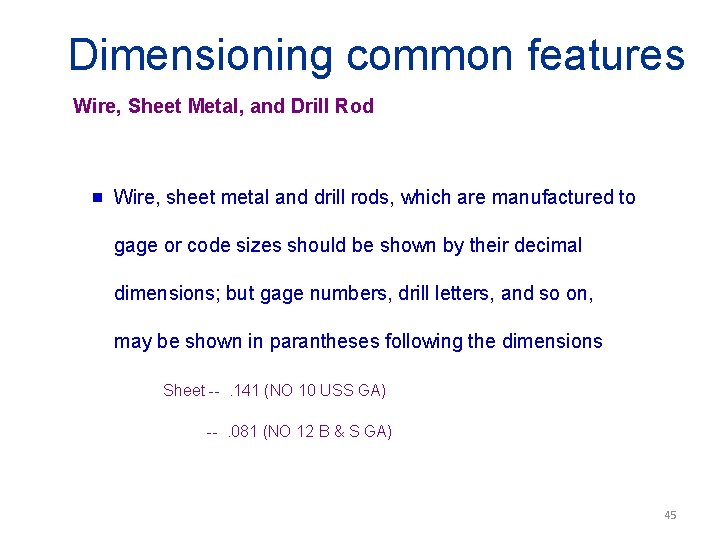
Dimensioning common features Wire, Sheet Metal, and Drill Rod g Wire, sheet metal and drill rods, which are manufactured to gage or code sizes should be shown by their decimal dimensions; but gage numbers, drill letters, and so on, may be shown in parantheses following the dimensions Sheet --. 141 (NO 10 USS GA) --. 081 (NO 12 B & S GA) 45

Dimensioning methods g Choice dimensions and dimensioning methods depend (to some extent) on how the parts will be produced (unit or mass production) g Unit production: each part is made separately using general purpose tools and machines g Mass production: parts produced in quantity using special tools (jigs and fixtures) g Linear or angular dimensions locate feature from one another (or from a datum) g Point to point dimensions are done for simple parts and dimension from datum may be need for parts with more than one critical dimension must mate with another part g Hence method of dimensioning becomes critical 46

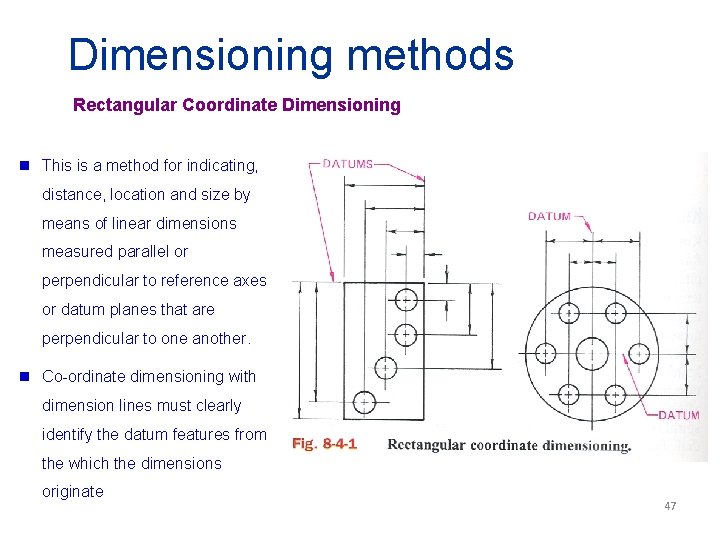
Dimensioning methods Rectangular Coordinate Dimensioning g This is a method for indicating, distance, location and size by means of linear dimensions measured parallel or perpendicular to reference axes or datum planes that are perpendicular to one another. g Co-ordinate dimensioning with dimension lines must clearly identify the datum features from the which the dimensions originate 47

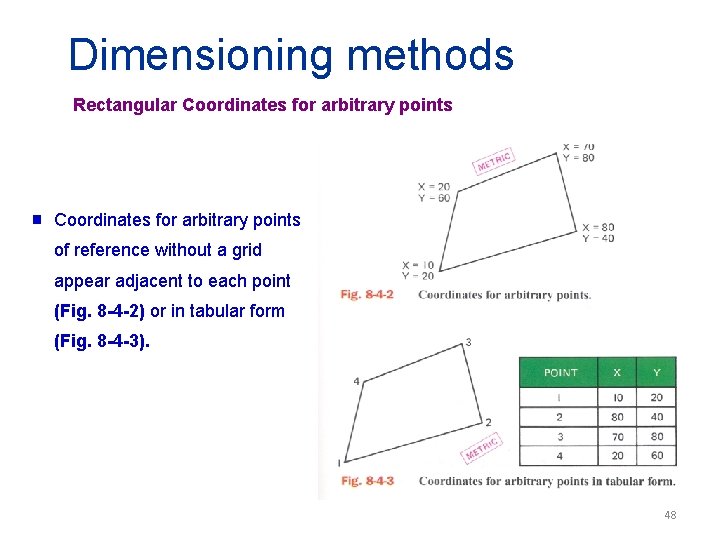
Dimensioning methods Rectangular Coordinates for arbitrary points g Coordinates for arbitrary points of reference without a grid appear adjacent to each point (Fig. 8 -4 -2) or in tabular form (Fig. 8 -4 -3). 48

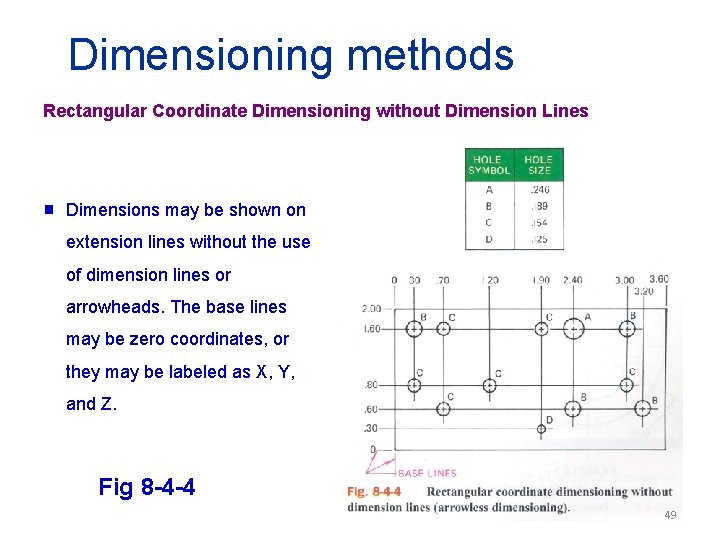
Dimensioning methods Rectangular Coordinate Dimensioning without Dimension Lines g Dimensions may be shown on extension lines without the use of dimension lines or arrowheads. The base lines may be zero coordinates, or they may be labeled as X, Y, and Z. Fig 8 -4 -4 49

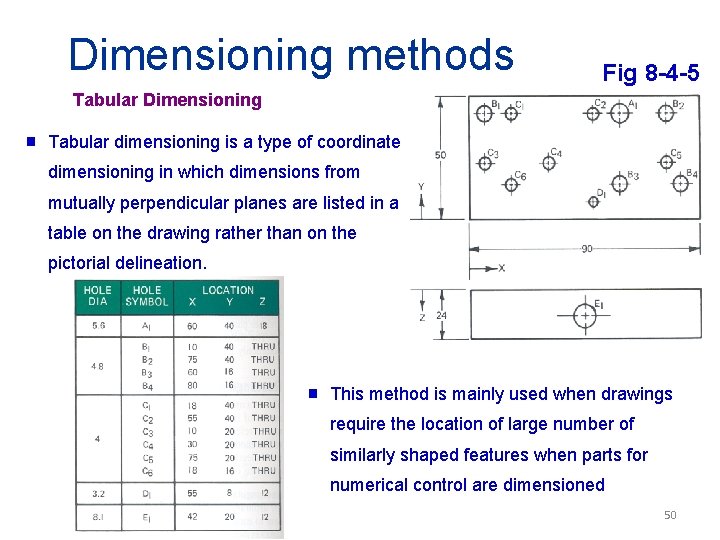
Dimensioning methods Fig 8 -4 -5 Tabular Dimensioning g Tabular dimensioning is a type of coordinate dimensioning in which dimensions from mutually perpendicular planes are listed in a table on the drawing rather than on the pictorial delineation. g This method is mainly used when drawings require the location of large number of similarly shaped features when parts for numerical control are dimensioned 50

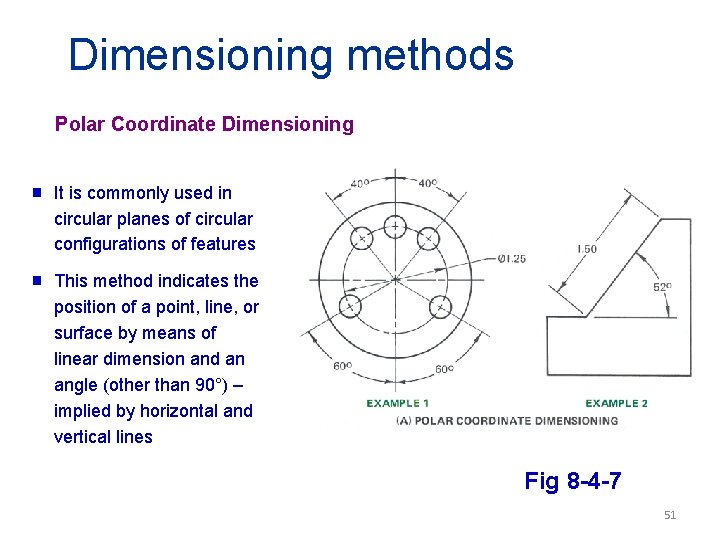
Dimensioning methods Polar Coordinate Dimensioning g It is commonly used in circular planes of circular configurations of features g This method indicates the position of a point, line, or surface by means of linear dimension and an angle (other than 90°) – implied by horizontal and vertical lines Fig 8 -4 -7 51

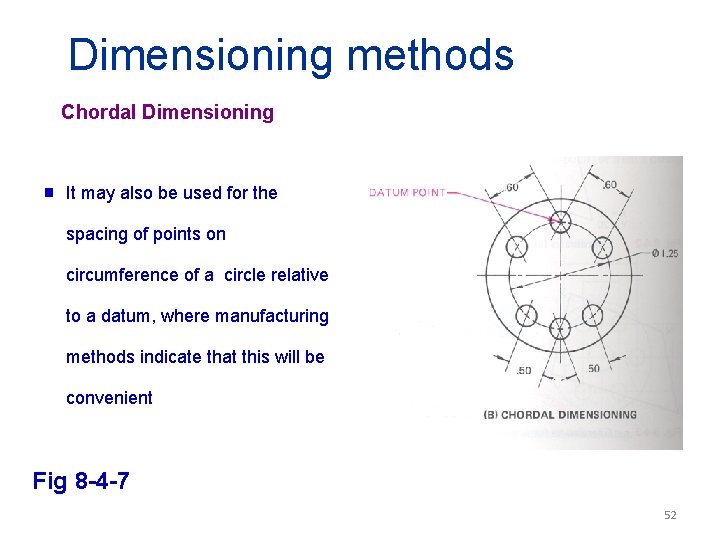
Dimensioning methods Chordal Dimensioning g It may also be used for the spacing of points on circumference of a circle relative to a datum, where manufacturing methods indicate that this will be convenient Fig 8 -4 -7 52

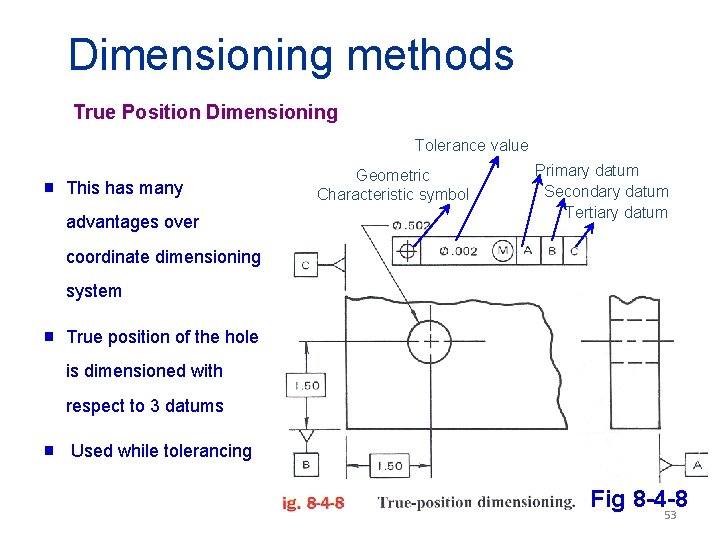
Dimensioning methods True Position Dimensioning Tolerance value g This has many advantages over Geometric Characteristic symbol Primary datum Secondary datum Tertiary datum coordinate dimensioning system g True position of the hole is dimensioned with respect to 3 datums g Used while tolerancing Fig 8 -4 -8 53

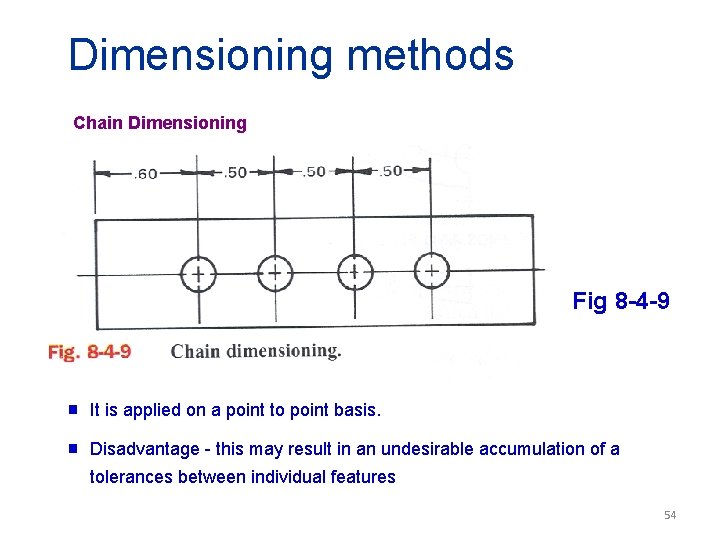
Dimensioning methods Chain Dimensioning Fig 8 -4 -9 g It is applied on a point to point basis. g Disadvantage - this may result in an undesirable accumulation of a tolerances between individual features 54

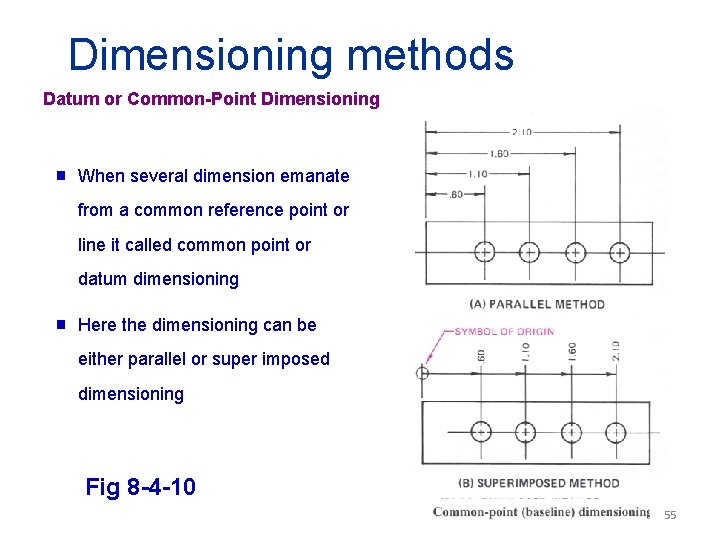
Dimensioning methods Datum or Common-Point Dimensioning g When several dimension emanate from a common reference point or line it called common point or datum dimensioning g Here the dimensioning can be either parallel or super imposed dimensioning Fig 8 -4 -10 55

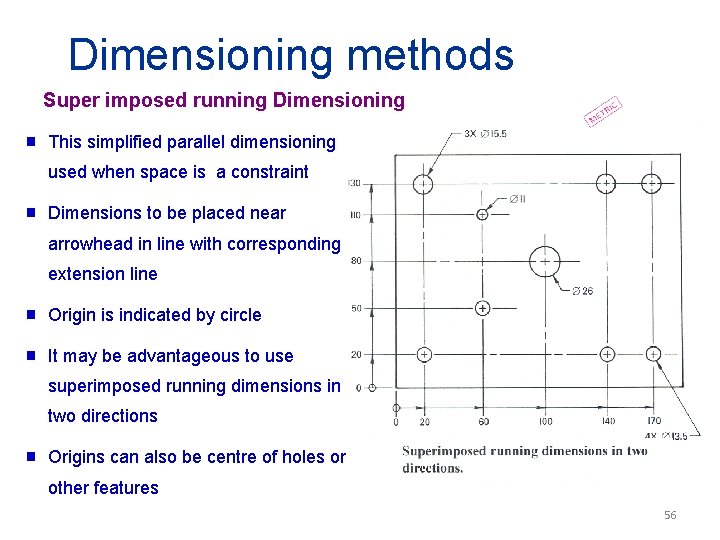
Dimensioning methods Super imposed running Dimensioning g This simplified parallel dimensioning used when space is a constraint g Dimensions to be placed near arrowhead in line with corresponding extension line g Origin is indicated by circle g It may be advantageous to use superimposed running dimensions in two directions g Origins can also be centre of holes or other features 56