GEOMETRIC DIMENSIONING TOLERANCING DPT 122 Engineering Drawing CAD
- Slides: 44

GEOMETRIC DIMENSIONING & TOLERANCING DPT 122 Engineering Drawing & CAD

GEOMETRIC DIMENSIONING & TOLERANCING Tolerance is the total amount that a specific dimension is permitted to vary. Example: Ø Measuring the features of any part or assembly to such precision that no two would be identical Ø For their intended purposes, all parts can vary within limits and still be adequate Ø Too little precision produces bad product Ø To much precision causes the higher prices Ø The products produce must have tolerance for economical manufacture.

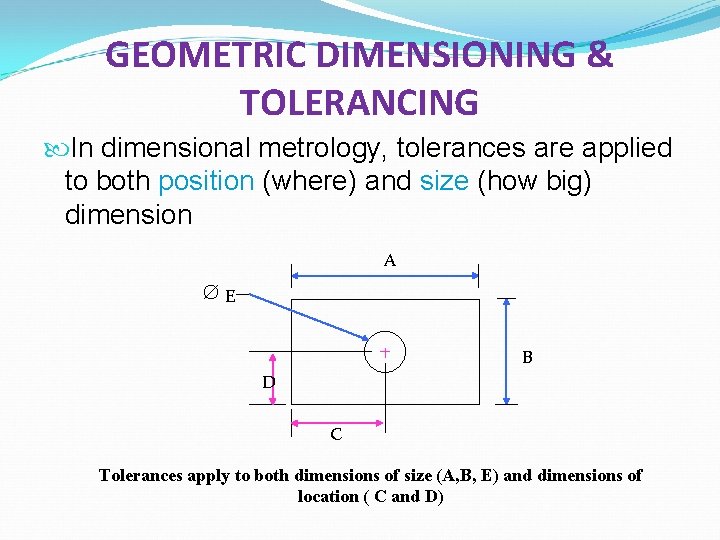
GEOMETRIC DIMENSIONING & TOLERANCING In dimensional metrology, tolerances are applied to both position (where) and size (how big) dimension A E B D C Tolerances apply to both dimensions of size (A, B, E) and dimensions of location ( C and D)

GEOMETRIC DIMENSIONING & TOLERANCING Ø GD&T is a means of dimensioning and tolerancing a drawing with respect to the actual function or relationship of part features that can be most economically produced Ø It is a language of symbols used on mechanical drawings to efficiently, and accurately communicate geometry requirements for features on parts and assemblies.

GEOMETRIC DIMENSIONING & TOLERANCING BENEFIT OF GDT Ø Ø Ø The universal symbols can be used to convey design intent to remote manufacturing or assembly sites Provide a common standard for dimensioning practices Enhance repeatability of part orientation Increase interchangeability of parts Increase production tolerancing

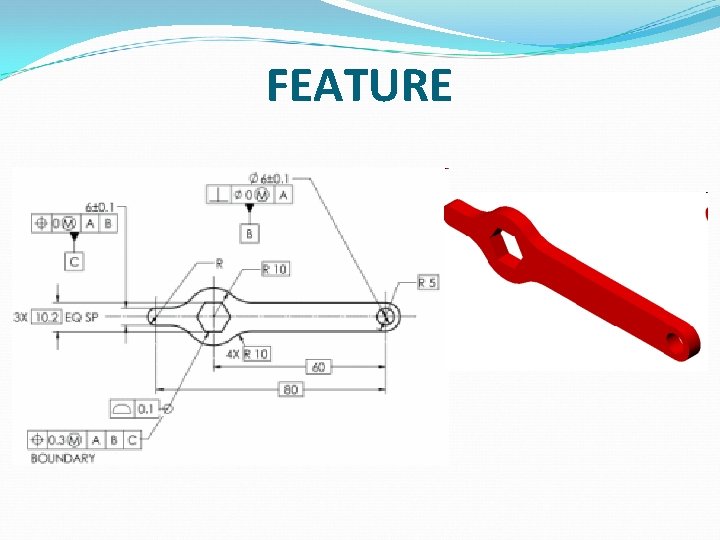
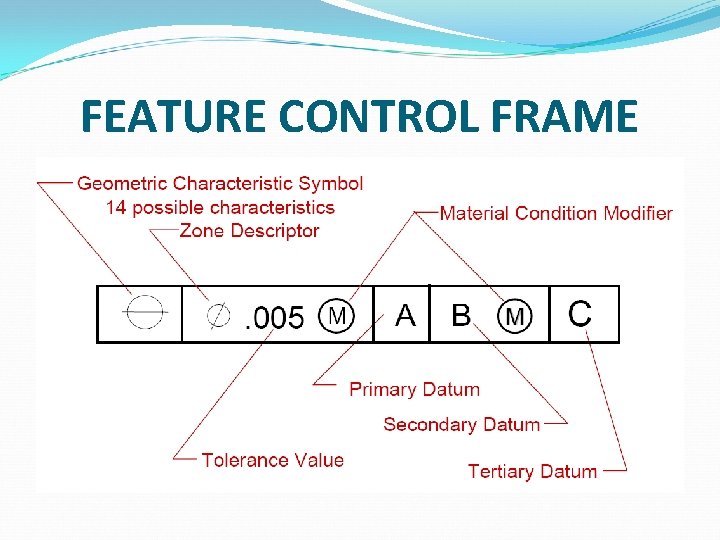
KEY TERMS IN GDT Ø Feature – general term applied to a physical portion of a part such as a surface, hole or slot. Generally part surface. Ø Feature control frame – rectangular box that contains the geometric symbols, modifiers and datum reference Ø Datum- a theoretically exact plane, point axis from which a dimension is measured. Ø Datum feature – part feature that contacts a datum (use as the origin for measurement) Ø Feature of size- one cylindrical or spherical surface, or a set of two opposed parallel surface associated with a size dimension i. ii. internal – the diameter of a hole or the width of a slot External – the width or length of a block or a shaft diameter

FEATURE

FEATURE CONTROL FRAME

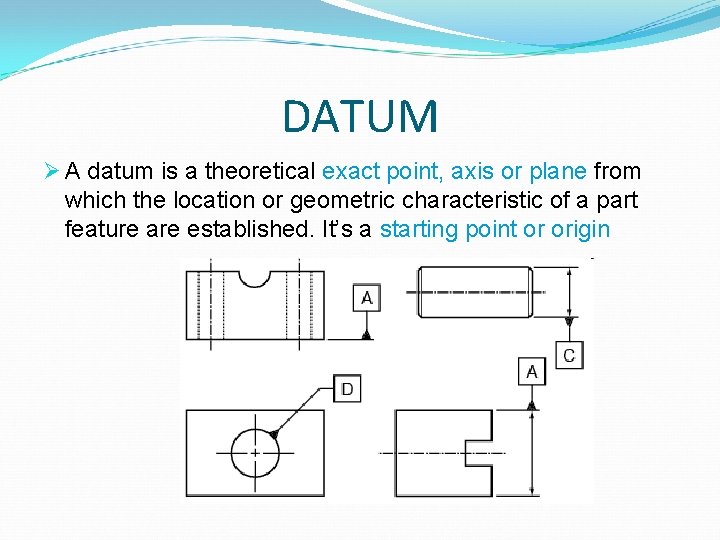
DATUM Ø A datum is a theoretical exact point, axis or plane from which the location or geometric characteristic of a part feature are established. It’s a starting point or origin

MATERIAL CONDITION MODIFIER 1. Maximum material condition (MMC) F The condition in which a feature of size contains the maximum materials within its stated tolerance limit 2. Least material condition (LMC) F LMC is the condition in which a feature of size contains the least amount of material within its permissible limits 3. Regardless of Feature Size (RFS) F Indicates a geometric tolerance that applies at any increment of size of the feature within its permissible limits.

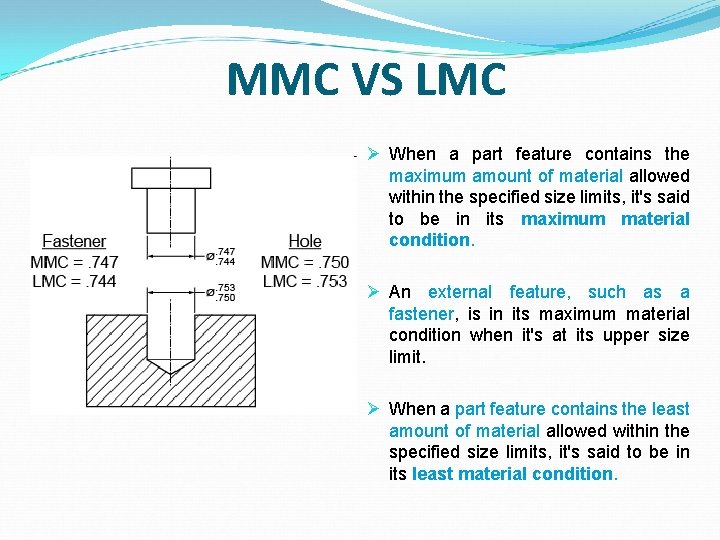
MMC VS LMC Ø When a part feature contains the maximum amount of material allowed within the specified size limits, it's said to be in its maximum material condition. Ø An external feature, such as a fastener, is in its maximum material condition when it's at its upper size limit. Ø When a part feature contains the least amount of material allowed within the specified size limits, it's said to be in its least material condition.

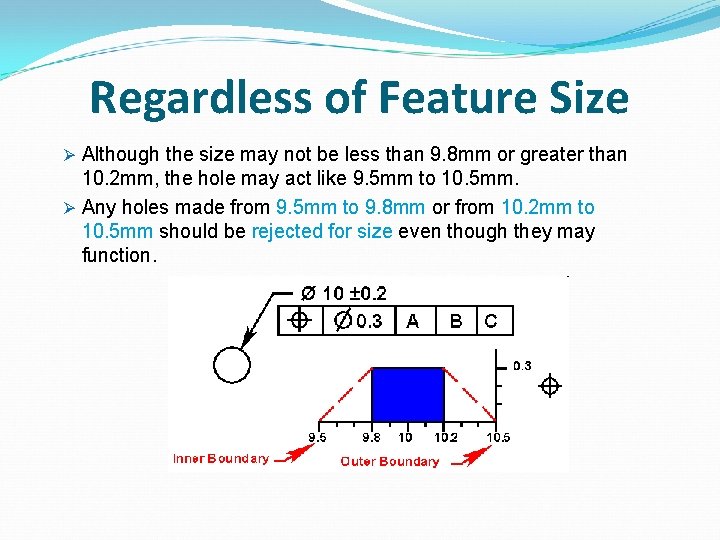
Regardless of Feature Size Ø Although the size may not be less than 9. 8 mm or greater than 10. 2 mm, the hole may act like 9. 5 mm to 10. 5 mm. Ø Any holes made from 9. 5 mm to 9. 8 mm or from 10. 2 mm to 10. 5 mm should be rejected for size even though they may function.

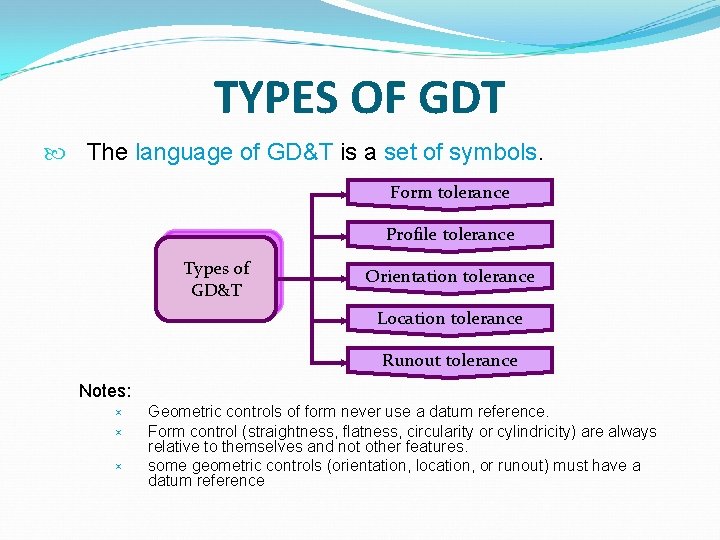
TYPES OF GDT The language of GD&T is a set of symbols. Form tolerance Profile tolerance Types of GD&T Orientation tolerance Location tolerance Runout tolerance Notes: × × × Geometric controls of form never use a datum reference. Form control (straightness, flatness, circularity or cylindricity) are always relative to themselves and not other features. some geometric controls (orientation, location, or runout) must have a datum reference

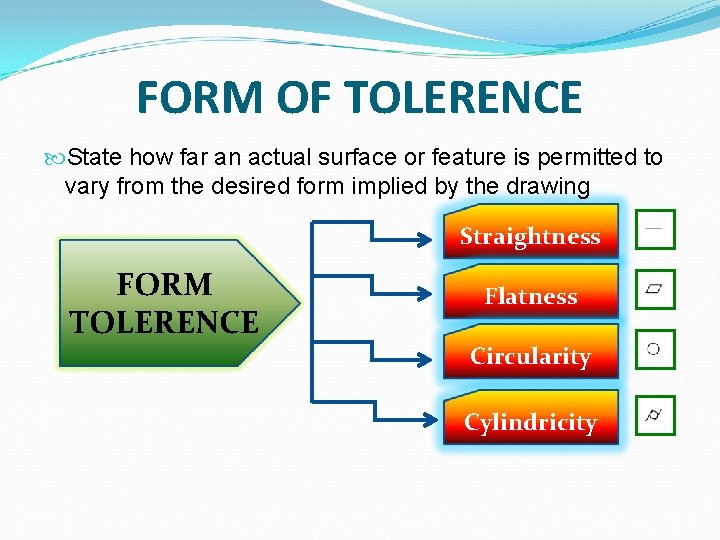
FORM OF TOLERENCE State how far an actual surface or feature is permitted to vary from the desired form implied by the drawing Straightness FORM TOLERENCE Flatness Circularity Cylindricity

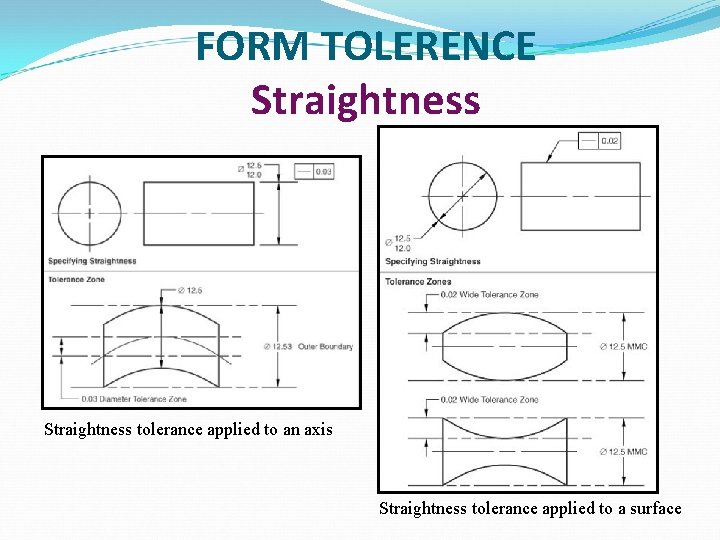
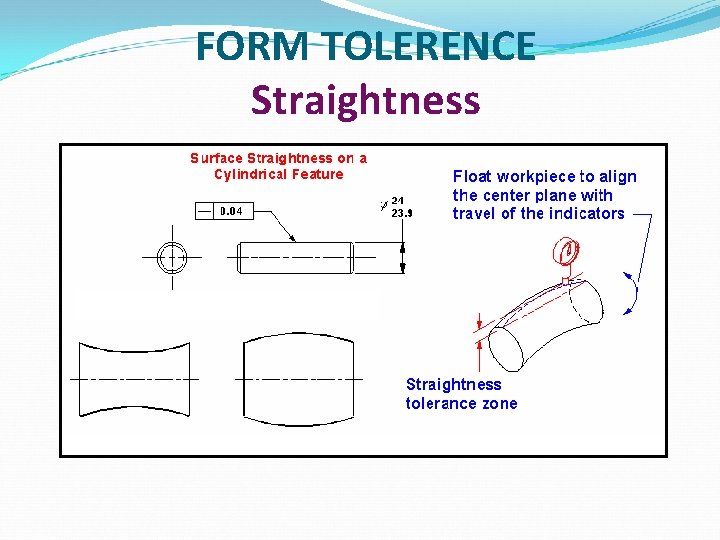
FORM TOLERENCE Straightness tolerance applied to an axis Straightness tolerance applied to a surface

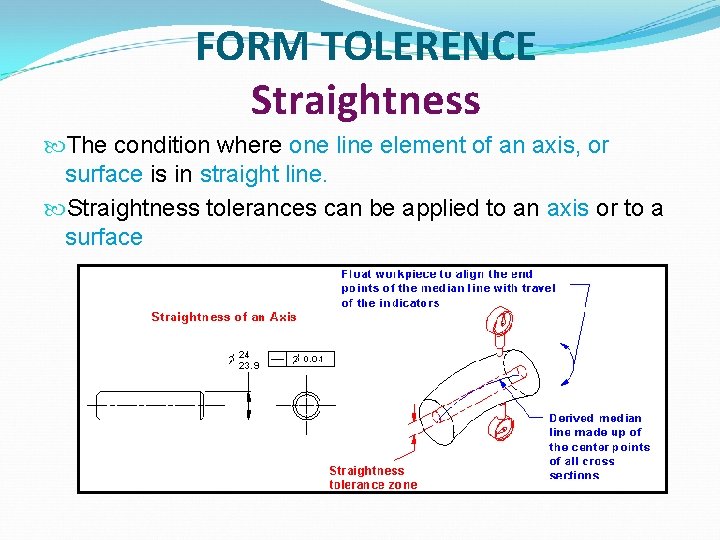
FORM TOLERENCE Straightness The condition where one line element of an axis, or surface is in straight line. Straightness tolerances can be applied to an axis or to a surface

FORM TOLERENCE Straightness

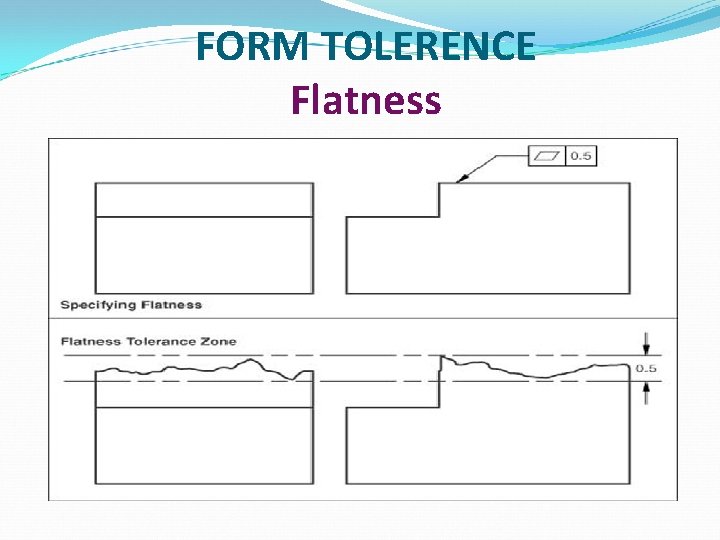
FORM TOLERENCE Flatness Ø The condition of surface having all elements in one plane Ø When flatness is specified, the feature control frame is attached directly to the surface or to an extension line of the surface Ø The flatness tolerance zone is defined by two parallel planes Ø All points of the surface must be within the limits of the tolerance zone defined by these two planes. Ø The smaller the tolerance zone, the flatter the surface Ø Does not need to be related to a datum

FORM TOLERENCE Flatness

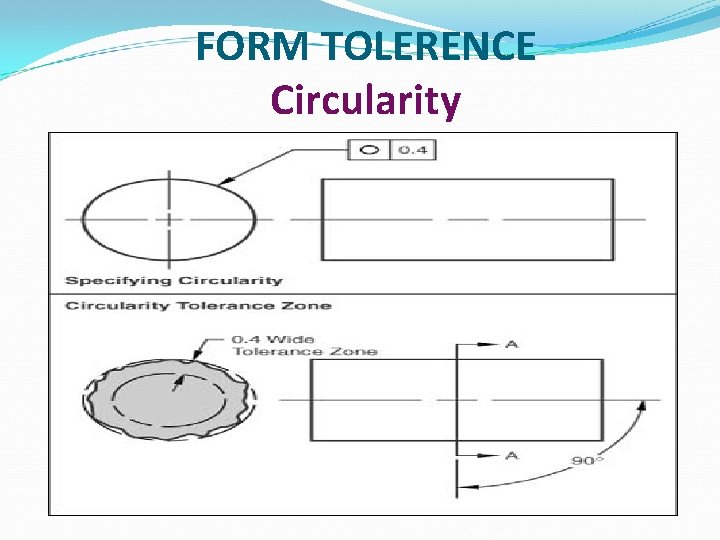
FORM TOLERENCE Circularity Ø Circularity is identified with any given cross section taken perpendicular to the axis of a cylinder or cone or through the center of sphere Ø The tolerance is bounded by two concentric circles Ø Each circular element of the surface must be contained within these concentric circles Ø The circularity tolerance must be less than the size tolerance, except for parts subject to free state variation

FORM TOLERENCE Circularity

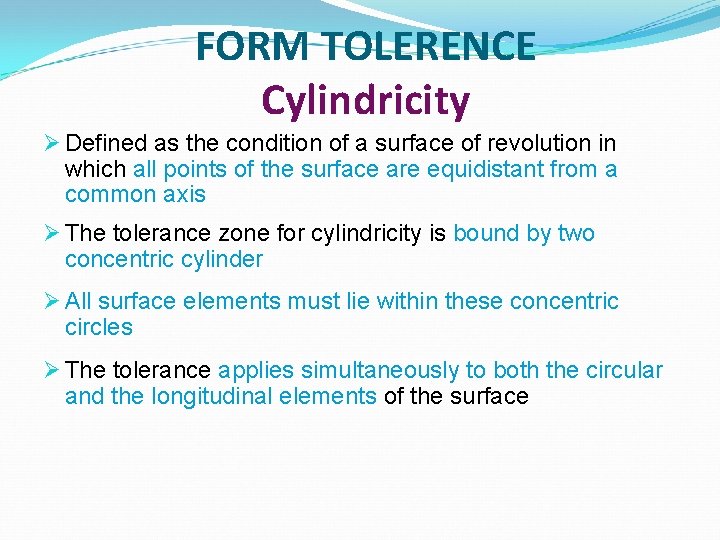
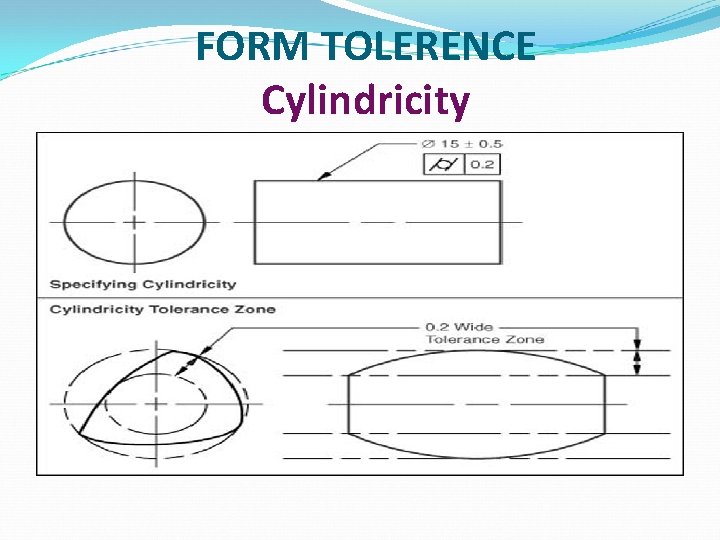
FORM TOLERENCE Cylindricity Ø Defined as the condition of a surface of revolution in which all points of the surface are equidistant from a common axis Ø The tolerance zone for cylindricity is bound by two concentric cylinder Ø All surface elements must lie within these concentric circles Ø The tolerance applies simultaneously to both the circular and the longitudinal elements of the surface

FORM TOLERENCE Cylindricity

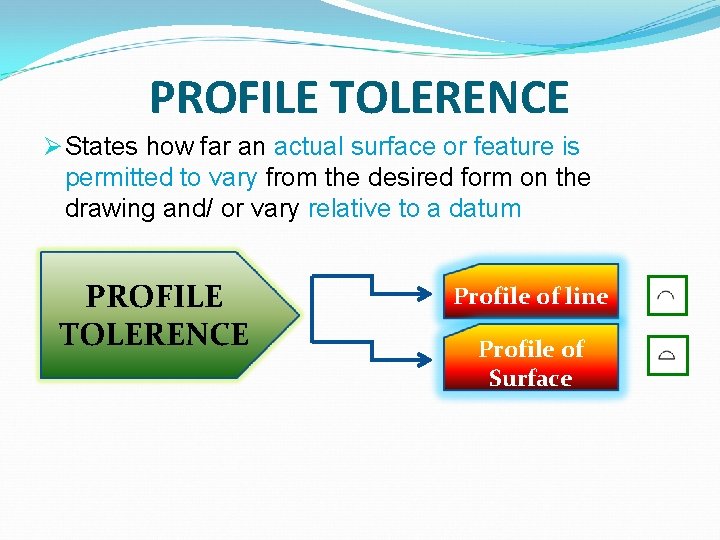
PROFILE TOLERENCE Ø States how far an actual surface or feature is permitted to vary from the desired form on the drawing and/ or vary relative to a datum PROFILE TOLERENCE Profile of line Profile of Surface

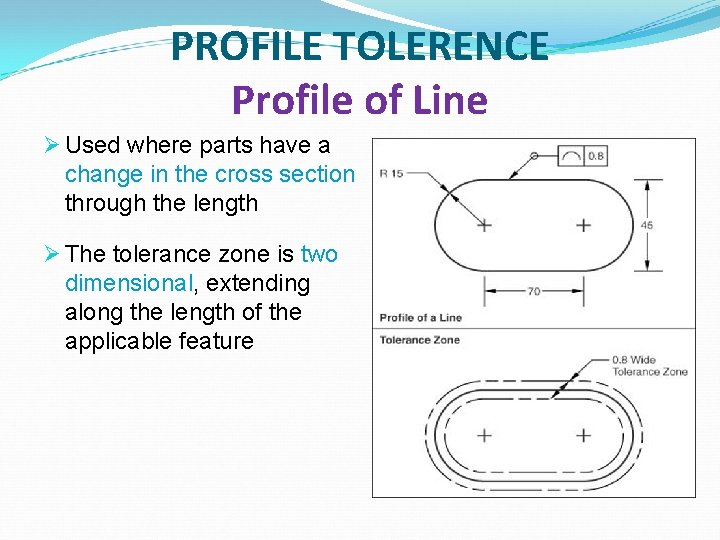
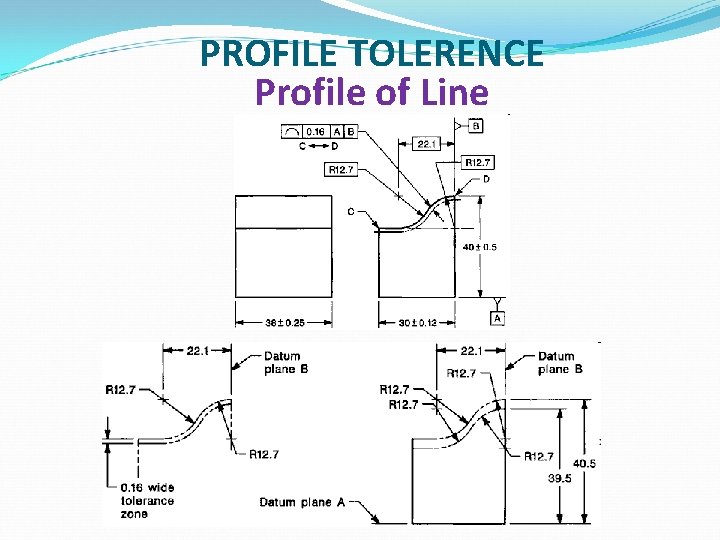
PROFILE TOLERENCE Profile of Line Ø Used where parts have a change in the cross section through the length Ø The tolerance zone is two dimensional, extending along the length of the applicable feature

PROFILE TOLERENCE Profile of Line

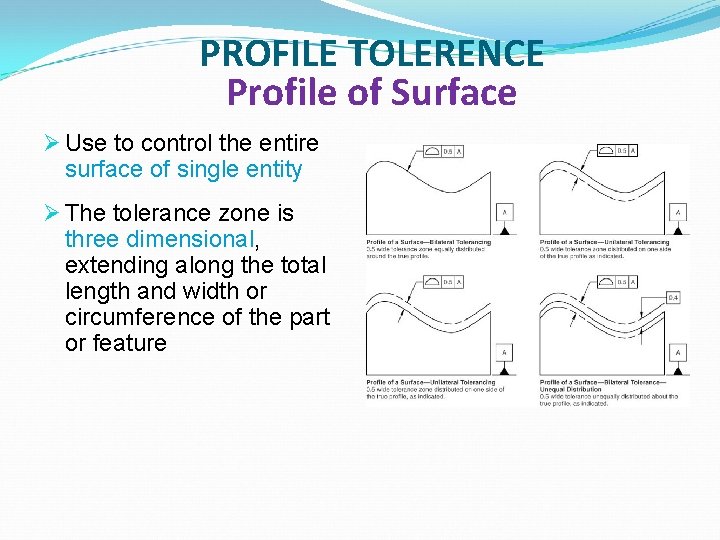
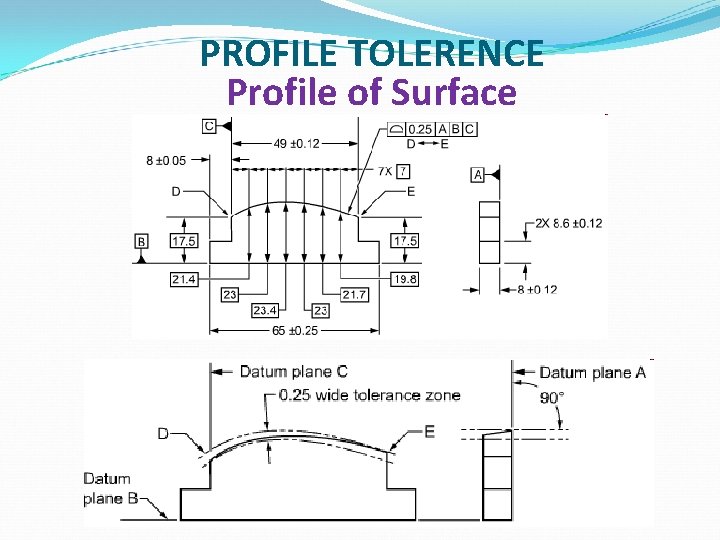
PROFILE TOLERENCE Profile of Surface Ø Use to control the entire surface of single entity Ø The tolerance zone is three dimensional, extending along the total length and width or circumference of the part or feature

PROFILE TOLERENCE Profile of Surface

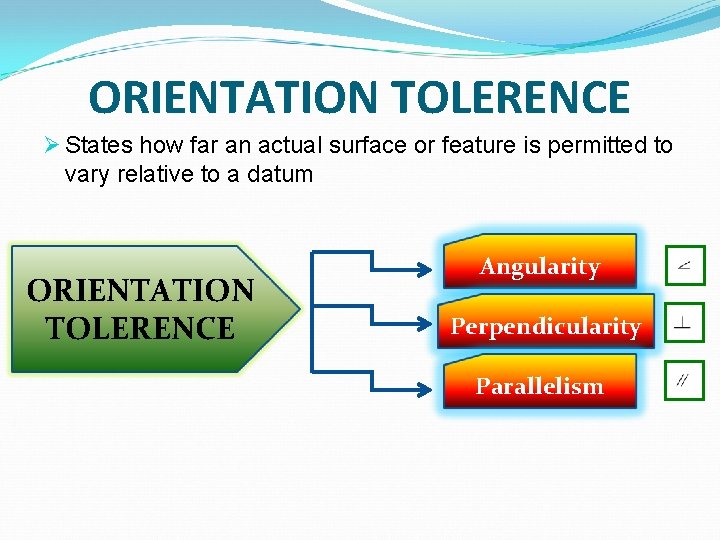
ORIENTATION TOLERENCE Ø States how far an actual surface or feature is permitted to vary relative to a datum ORIENTATION TOLERENCE Angularity Perpendicularity Parallelism

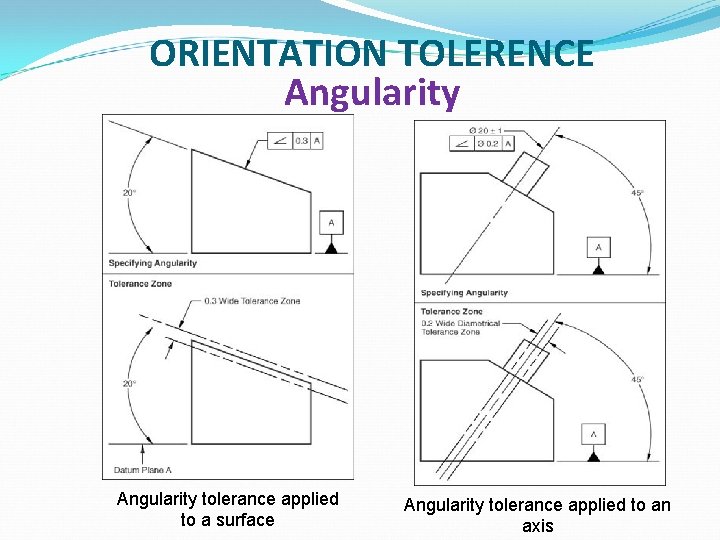
ORIENTATION TOLERENCE Angularity Ø Angularity is the condition of a surface, center plane, or axis at a specific angle from a datum plane or axis. Ø The tolerance zone is established by two parallel planes or a cylindrical zone at any specified angle other than 90%, to a datum plane or an axis Ø Where angularity is applied to a surface, the feature control frame is connected to the surface by a leader Ø The angle is specified by a basic angle from the datum plane

ORIENTATION TOLERENCE Angularity tolerance applied to a surface Angularity tolerance applied to an axis

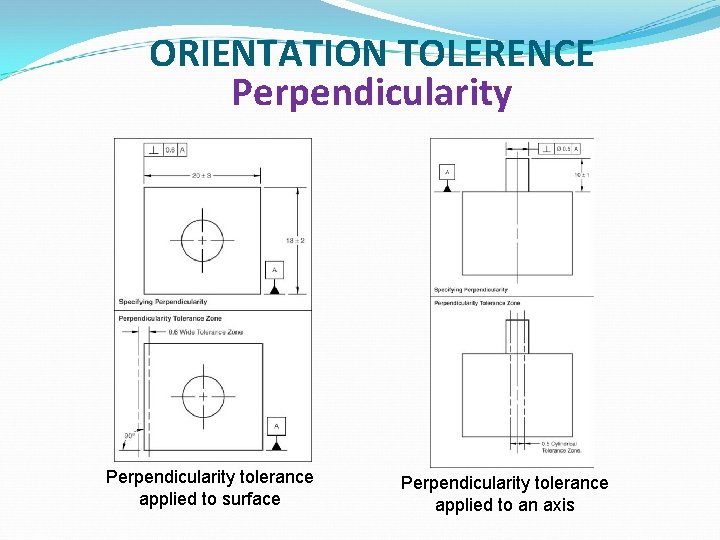
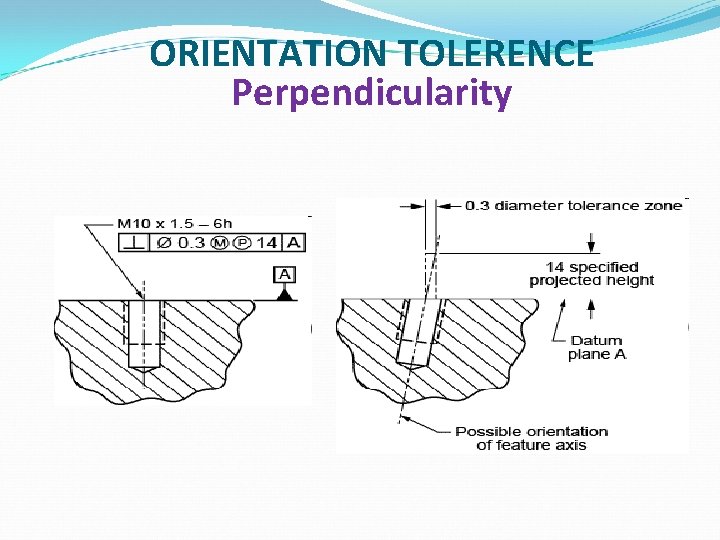
ORIENTATION TOLERENCE Perpendicularity Ø Perpendicularity is the condition when a surface, center plane or axis is at exactly 90 degree to a datum Ø The tolerance zone for perpendicularity is established by two parallel planes or cylindrical zones that are 90 degree to a specified datum plane or axis Ø Perpendicularity can be applied to a surface or an axis Ø When applied to a surface, the shape of the tolerance zone is parallel planes that are at a 90 degree angle to a datum plane. Ø The tolerance value identifies the size of the tolerance zone Ø All elements of the surface must lie within this tolerance zone

ORIENTATION TOLERENCE Perpendicularity tolerance applied to surface Perpendicularity tolerance applied to an axis

ORIENTATION TOLERENCE Perpendicularity

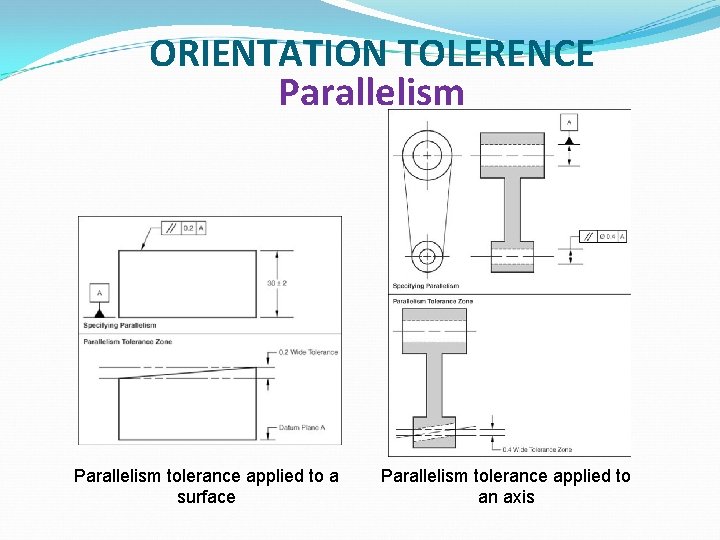
ORIENTATION TOLERENCE Parallelism Ø Parallelism is the condition where a surface, center plane or axis is exactly parallel to a datum. Ø Parallelism may be applied to a surface, resulting in a tolerance zone of two parallel planes, or applied to an axis resulting in a cylindrical tolerance zone. Ø When surface is controlled parallel to a datum, all elements of that surface must lie within two parallel planes, parallel to the datum Ø Parallelism may be applied to the axis of two or more features where a parallel relationship is required.

ORIENTATION TOLERENCE Parallelism tolerance applied to a surface Parallelism tolerance applied to an axis

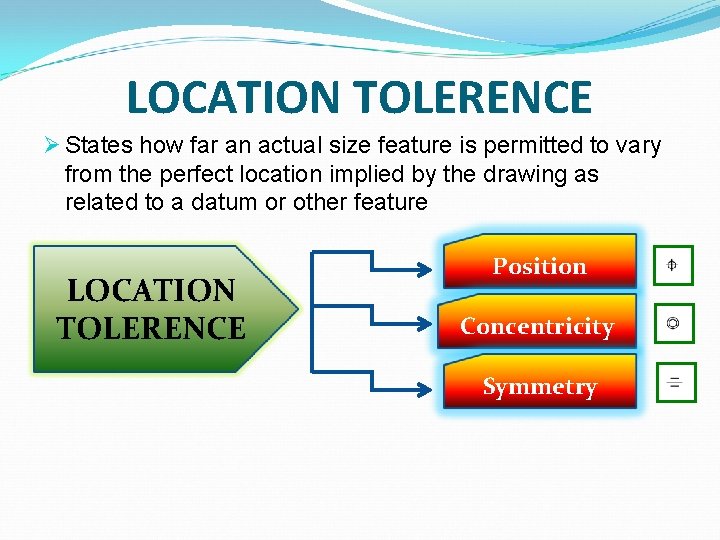
LOCATION TOLERENCE Ø States how far an actual size feature is permitted to vary from the perfect location implied by the drawing as related to a datum or other feature LOCATION TOLERENCE Position Concentricity Symmetry

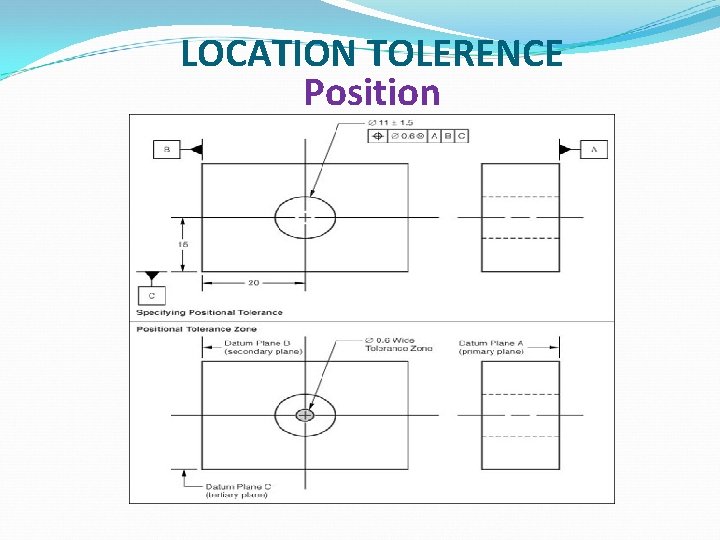
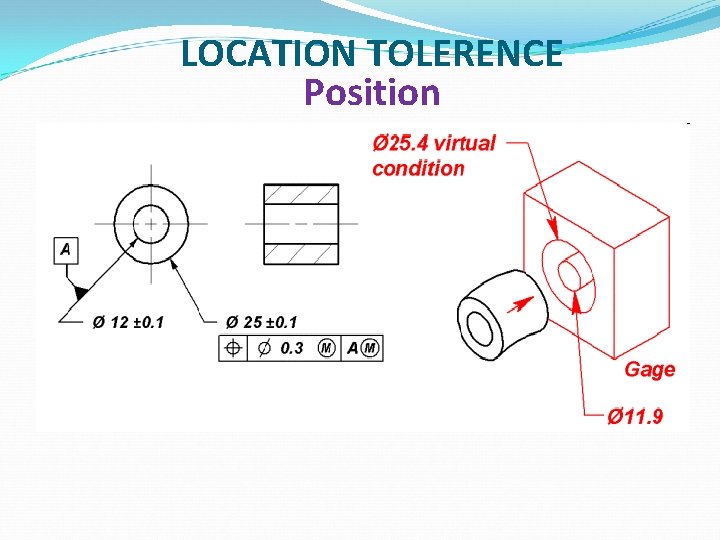
LOCATION TOLERENCE Position ØPosition tolerance defines a condition where the center, axis or center plane of a feature of size is allowed to vary from true position ØTrue position is theoretically exact location of a feature. ØThe location of each feature is given by basic dimension and the location tolerance is indicated by the position symbol, a tolerance value, applicable modifiers and datum references

LOCATION TOLERENCE Position

LOCATION TOLERENCE Position

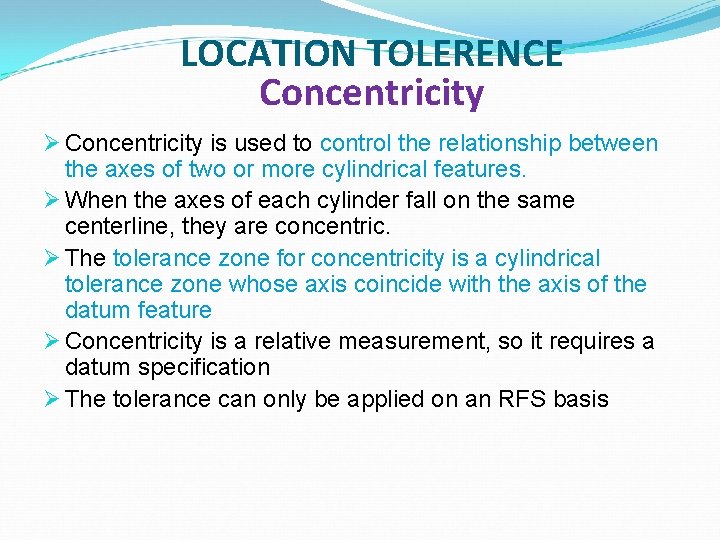
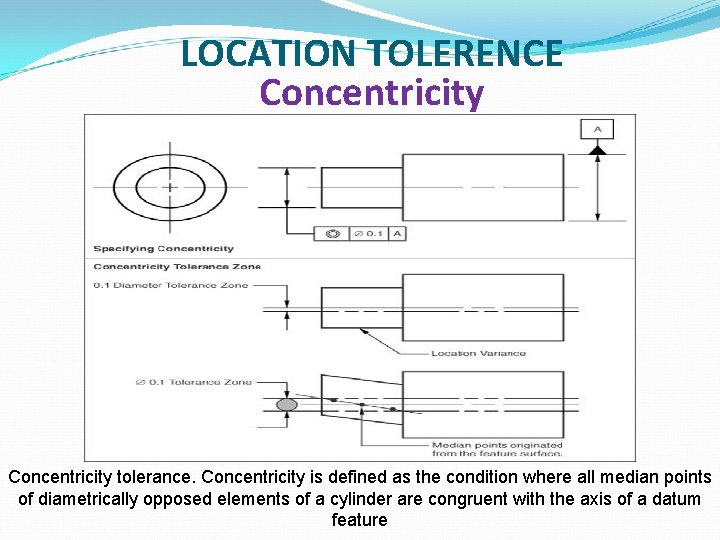
LOCATION TOLERENCE Concentricity Ø Concentricity is used to control the relationship between the axes of two or more cylindrical features. Ø When the axes of each cylinder fall on the same centerline, they are concentric. Ø The tolerance zone for concentricity is a cylindrical tolerance zone whose axis coincide with the axis of the datum feature Ø Concentricity is a relative measurement, so it requires a datum specification Ø The tolerance can only be applied on an RFS basis

LOCATION TOLERENCE Concentricity tolerance. Concentricity is defined as the condition where all median points of diametrically opposed elements of a cylinder are congruent with the axis of a datum feature

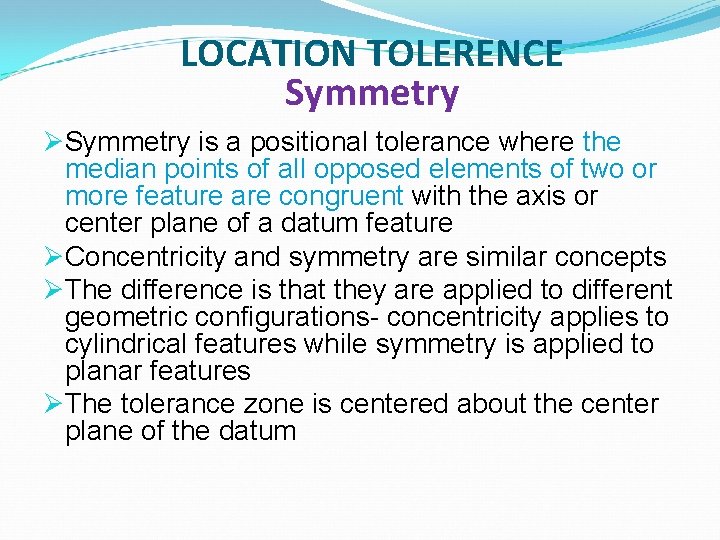
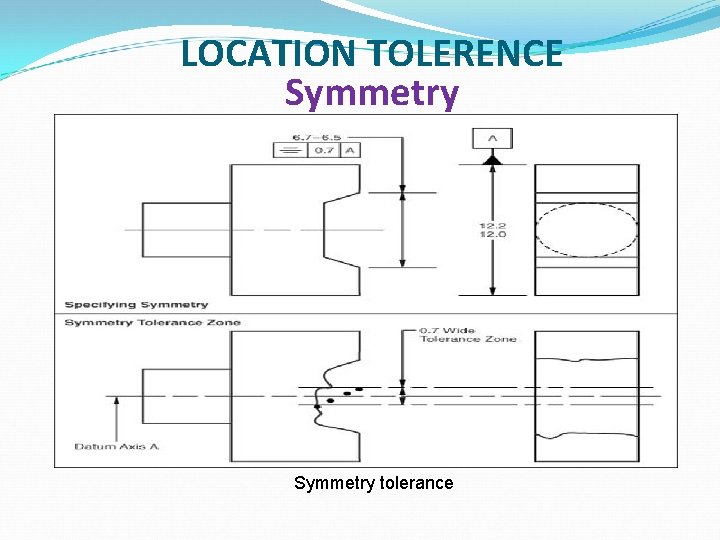
LOCATION TOLERENCE Symmetry ØSymmetry is a positional tolerance where the median points of all opposed elements of two or more feature are congruent with the axis or center plane of a datum feature ØConcentricity and symmetry are similar concepts ØThe difference is that they are applied to different geometric configurations- concentricity applies to cylindrical features while symmetry is applied to planar features ØThe tolerance zone is centered about the center plane of the datum

LOCATION TOLERENCE Symmetry tolerance