Precision Dimensioning Engineering II Dimensioning Rectangular Prisms Dimensioning
- Slides: 31

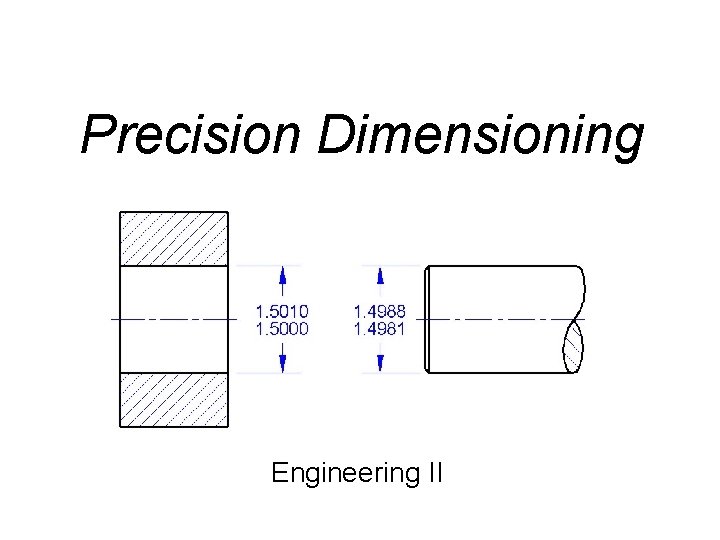
Precision Dimensioning Engineering II

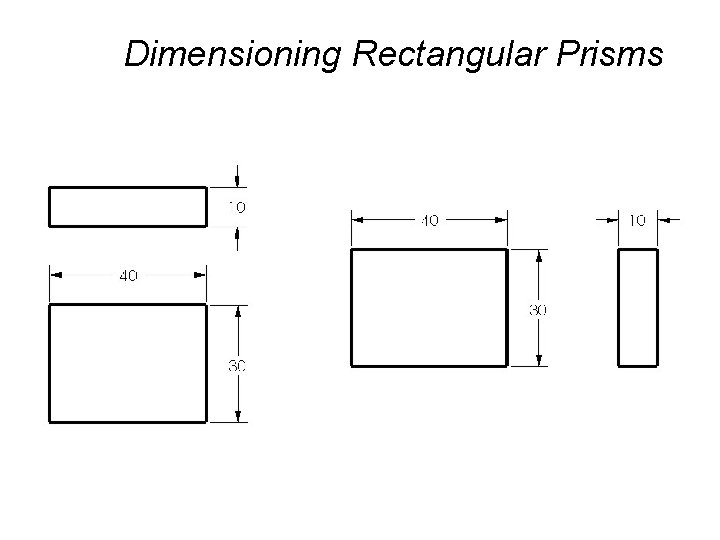
Dimensioning Rectangular Prisms

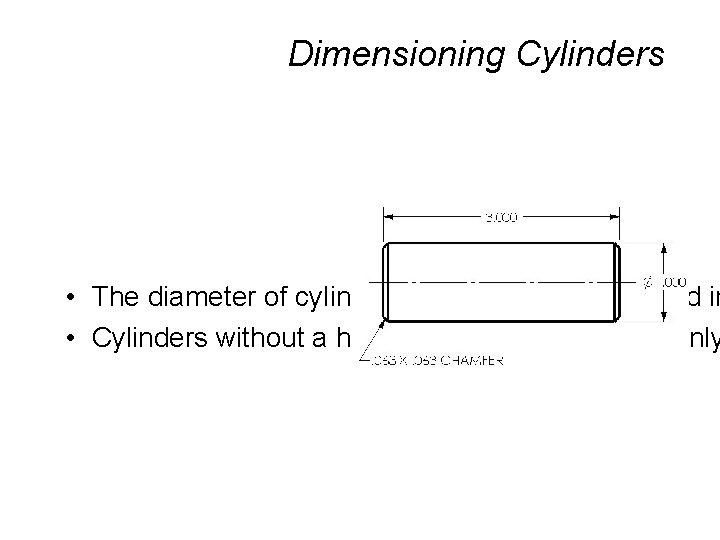
Dimensioning Cylinders • The diameter of cylinders should be dimensioned in • Cylinders without a hole passing through them only

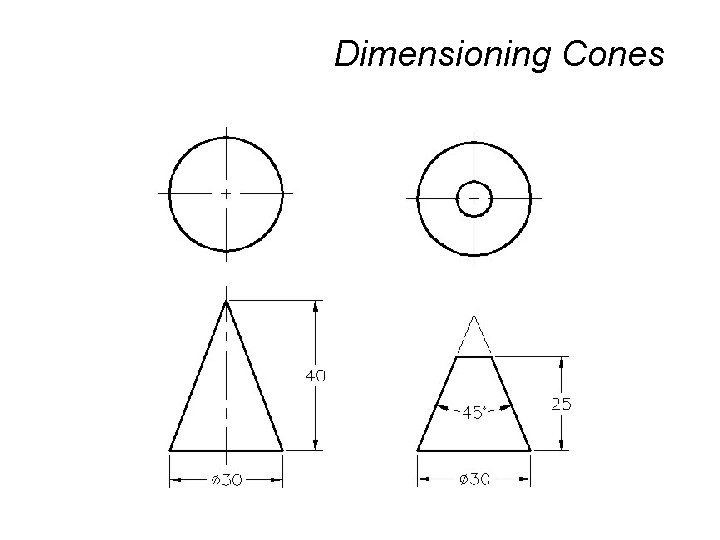
Dimensioning Cones

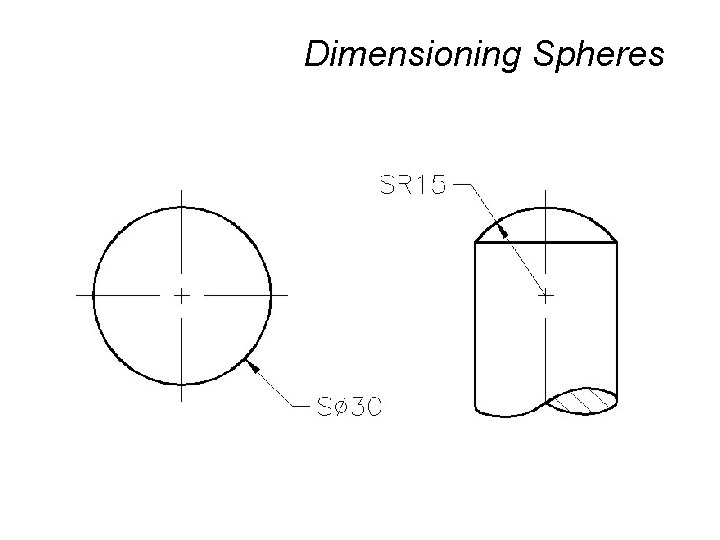
Dimensioning Spheres

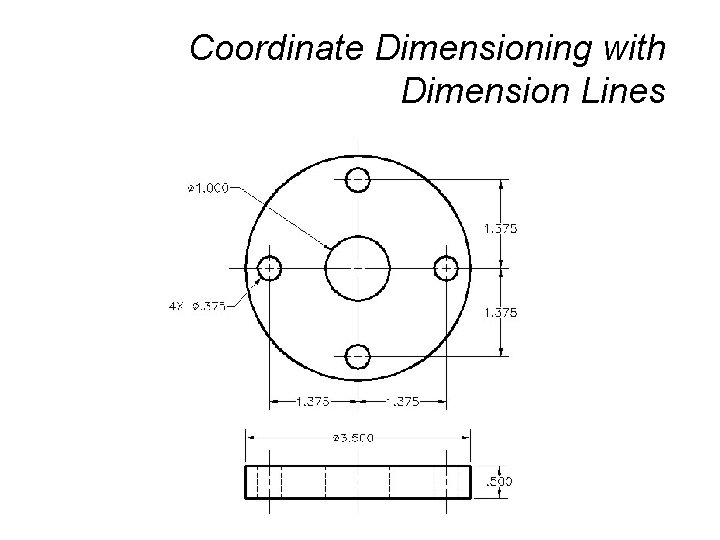
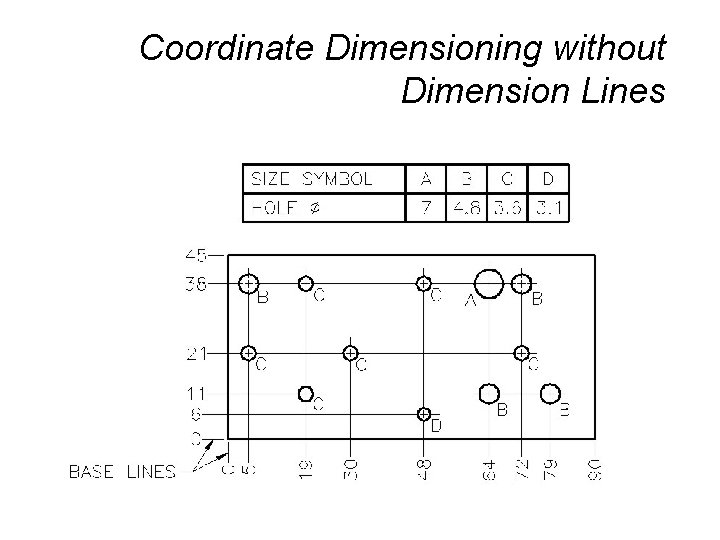
Rectangular Coordinate Dimensioning • Used when computer-controlled production machines are used to manufacture parts. • The designer should consult with personnel in manufacturing to ensure that the origin is located in an appropriate position. • Two types of rectangular coordinate dimensioning: – Coordinate Dimensioning with Dimension Lines – Coordinate Dimensioning Without Dimension Lines

Coordinate Dimensioning with Dimension Lines

Coordinate Dimensioning without Dimension Lines

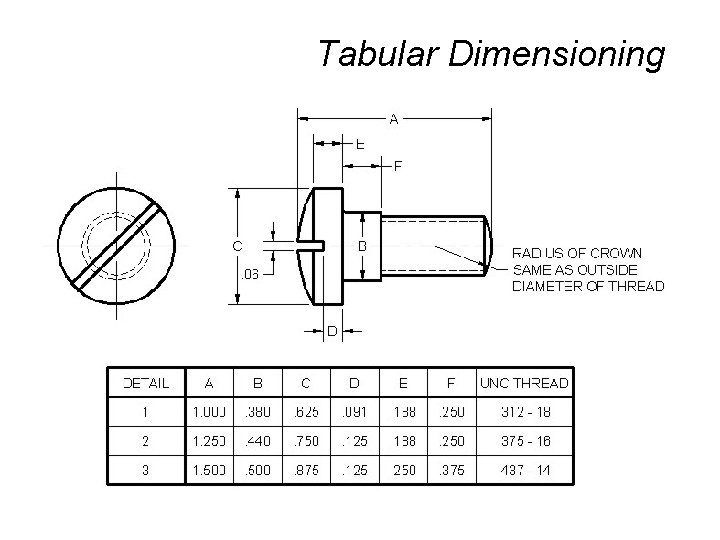
Tabular Dimensioning • Tabular dimensioning is used when a series of parts consists of the same features or geometry but vary in dimension. • Letters are used in place of dimension values, and the values are then placed in a table. • Most standard parts are dimensioned this way in catalogs, the machinery handbook, and in the back of most textbooks.

Tabular Dimensioning

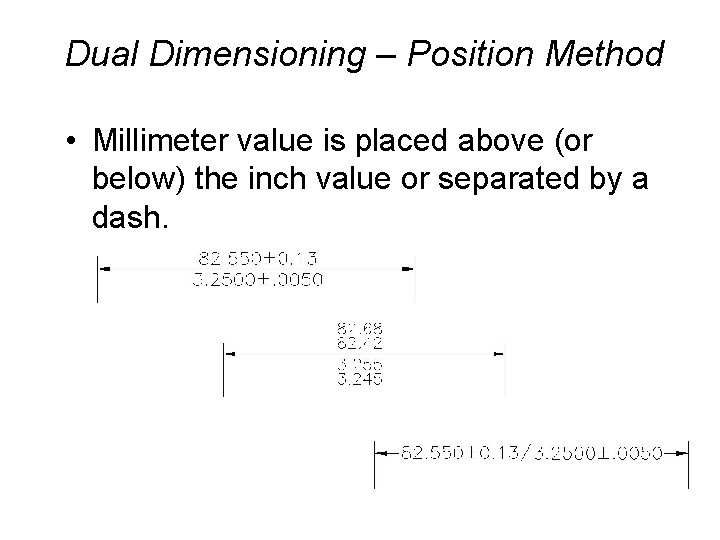
Dual Dimensioning – Position Method • Millimeter value is placed above (or below) the inch value or separated by a dash.

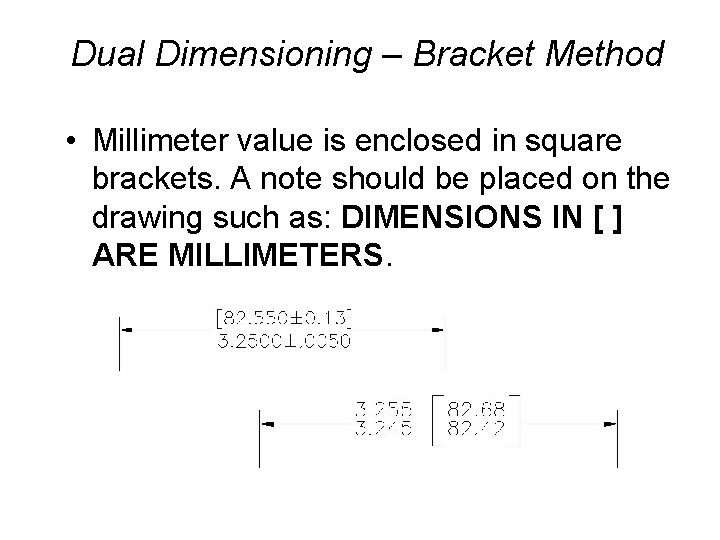
Dual Dimensioning – Bracket Method • Millimeter value is enclosed in square brackets. A note should be placed on the drawing such as: DIMENSIONS IN [ ] ARE MILLIMETERS.

Tolerance Dimensioning • Why do we need tolerance dimensioning? – Interchangeable parts manufacturing – Parts are manufactured at widely separate localities – Effective size control – Modern industry relies on it for subcontracting and replacement parts • Accuracy is Expensive, however

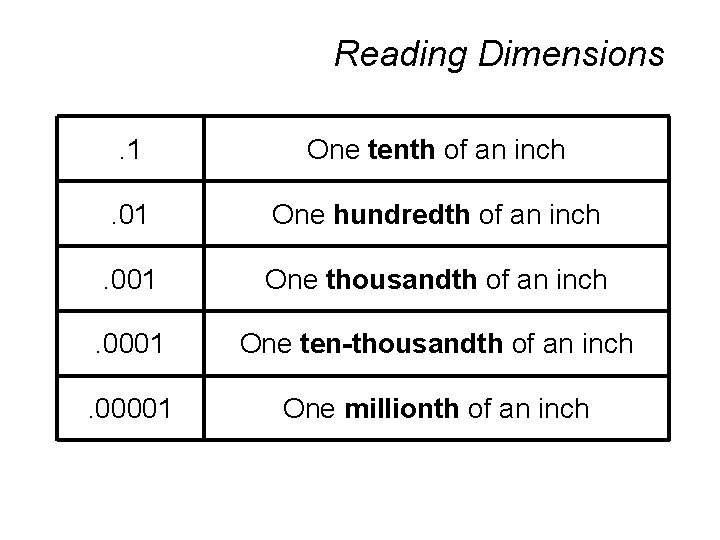
Reading Dimensions. 1 One tenth of an inch . 01 One hundredth of an inch . 001 One thousandth of an inch . 0001 One ten-thousandth of an inch . 00001 One millionth of an inch

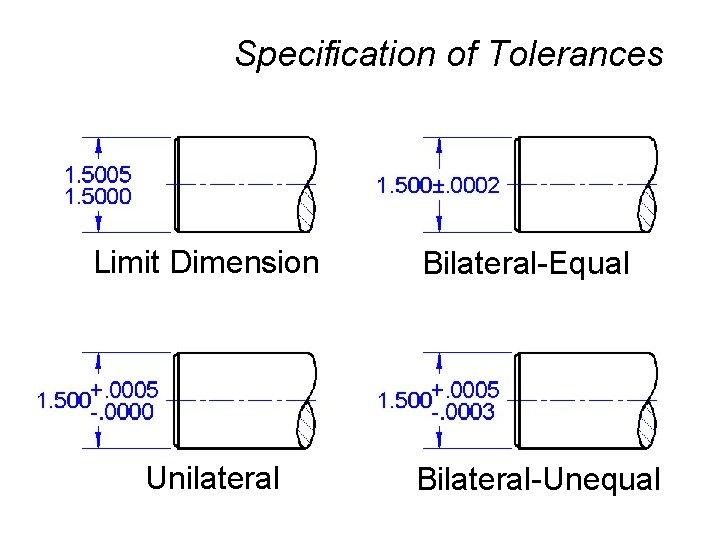
Specification of Tolerances Limit Dimension Unilateral Bilateral-Equal Bilateral-Unequal

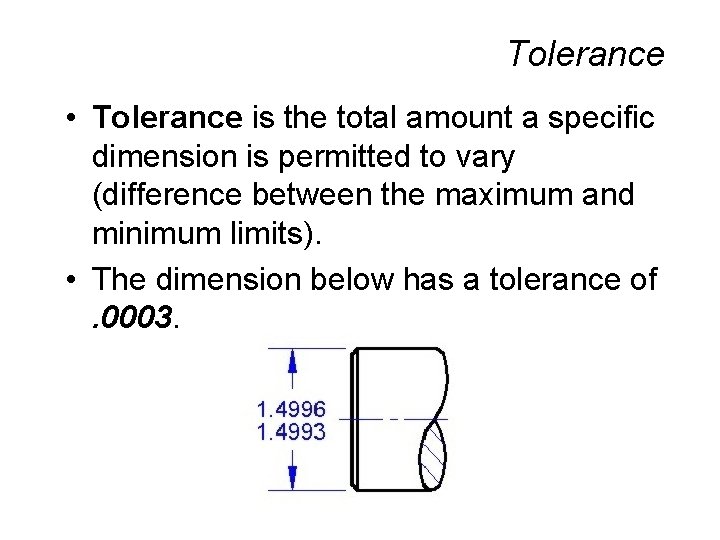
Tolerance • Tolerance is the total amount a specific dimension is permitted to vary (difference between the maximum and minimum limits). • The dimension below has a tolerance of. 0003.

Maximum Material Condition • When specifying tolerance dimensions, the maximum material condition (MMC) means the product or part contains the maximum amount of material specified by the tolerance. • The heaviest part.

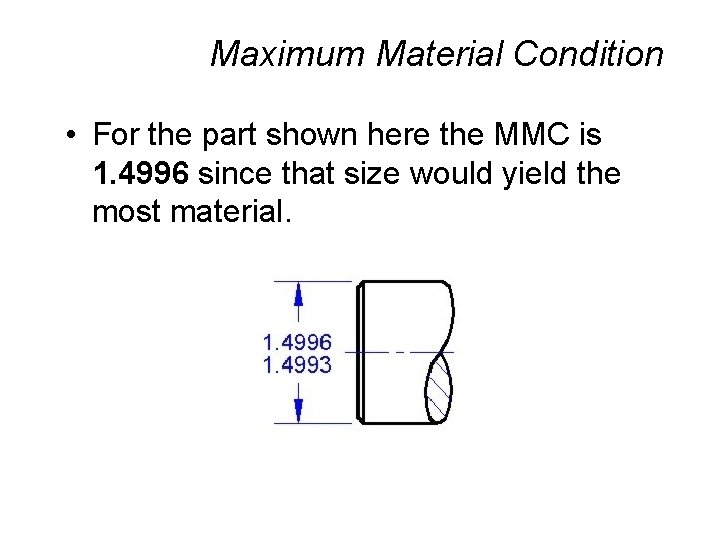
Maximum Material Condition • For the part shown here the MMC is 1. 4996 since that size would yield the most material.

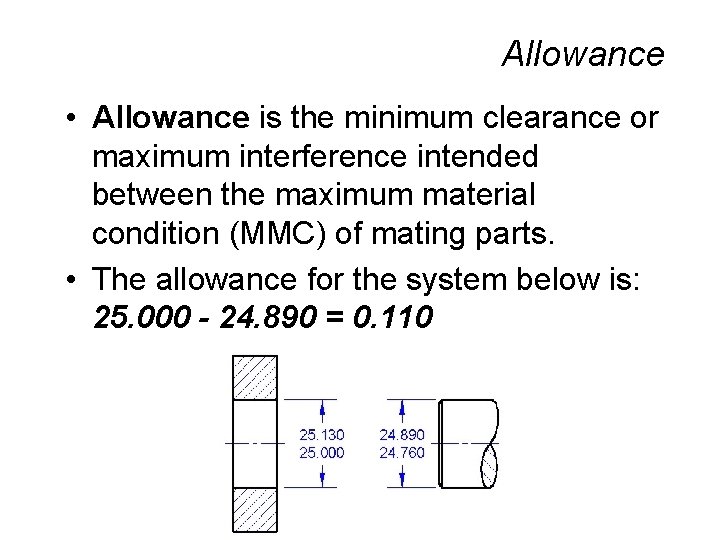
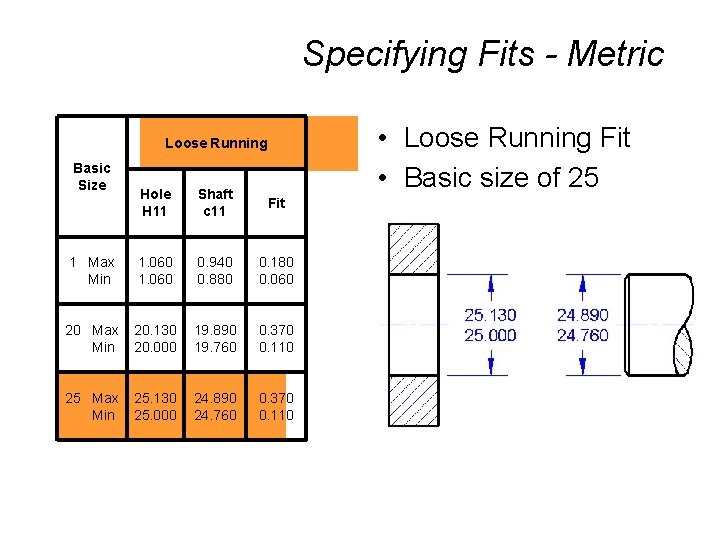
Allowance • Allowance is the minimum clearance or maximum interference intended between the maximum material condition (MMC) of mating parts. • The allowance for the system below is: 25. 000 - 24. 890 = 0. 110

More Terminology • Nominal Size - General identification in fractions (ex. 1 -1/2 for 1. 500). • Basic Size - General identification in decimal (ex. 1. 500). • Actual Size - Measured size. • Limits - Maximum and minimum sizes indicated by the tolerance dimensions.

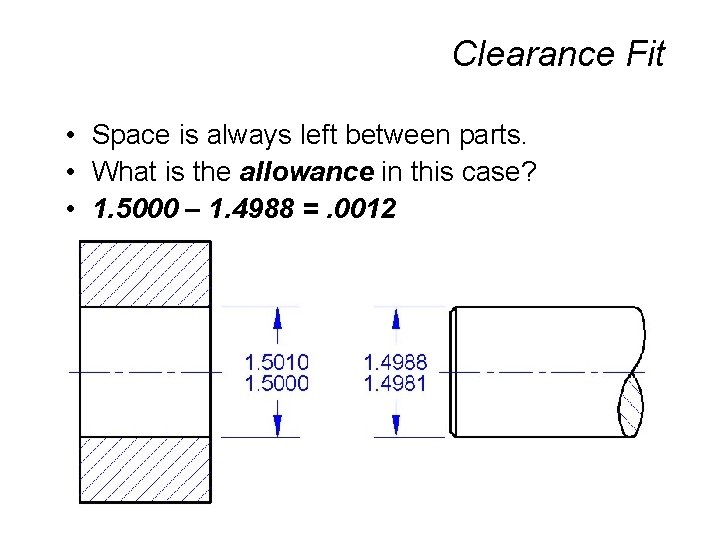
Clearance Fit • Space is always left between parts. • What is the allowance in this case? • 1. 5000 – 1. 4988 =. 0012

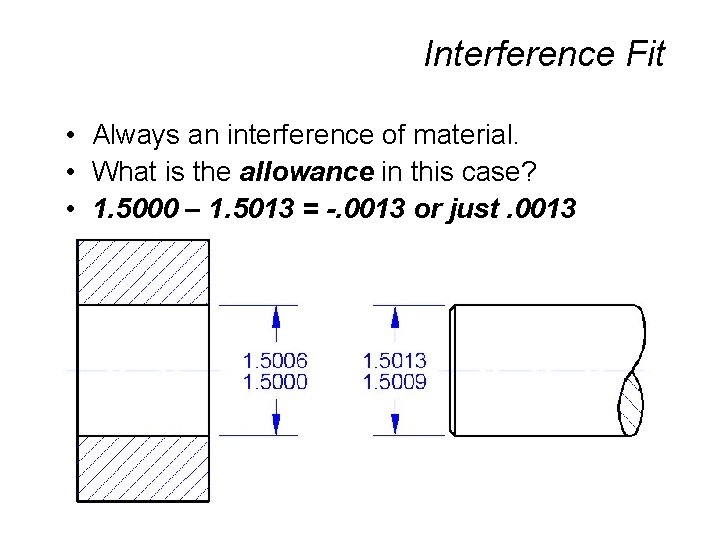
Interference Fit • Always an interference of material. • What is the allowance in this case? • 1. 5000 – 1. 5013 = -. 0013 or just. 0013

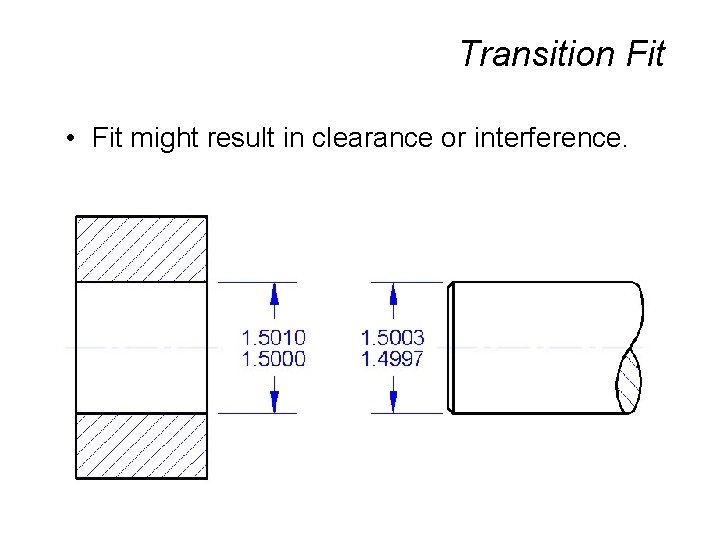
Transition Fit • Fit might result in clearance or interference.

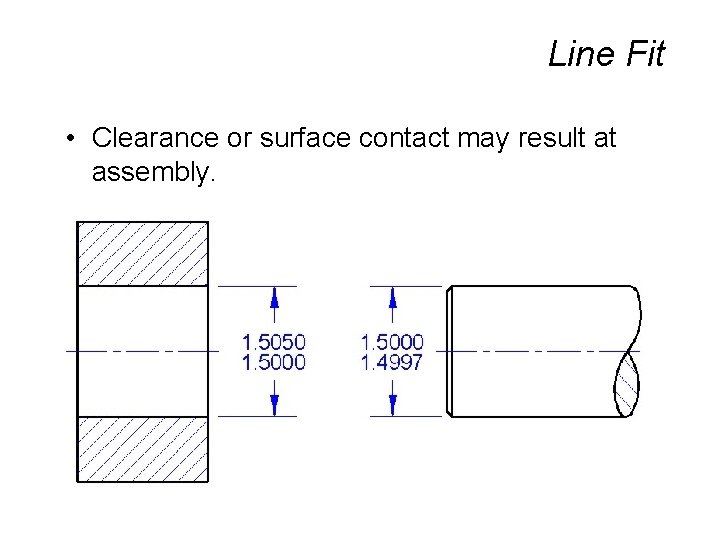
Line Fit • Clearance or surface contact may result at assembly.

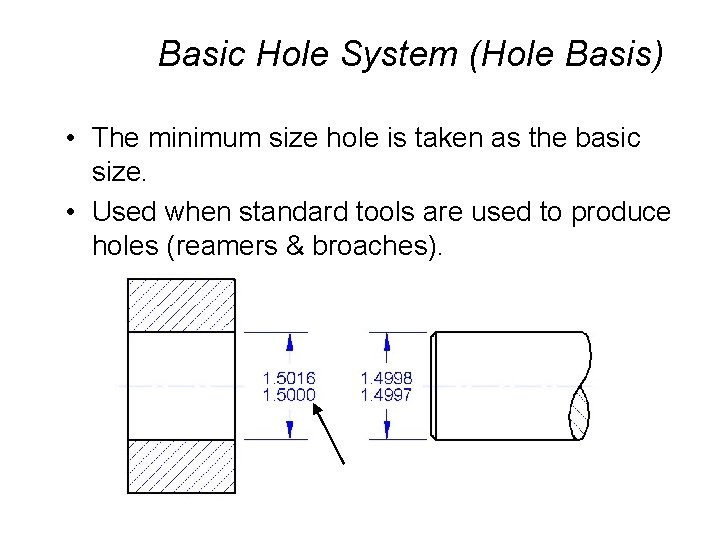
Basic Hole System (Hole Basis) • The minimum size hole is taken as the basic size. • Used when standard tools are used to produce holes (reamers & broaches).

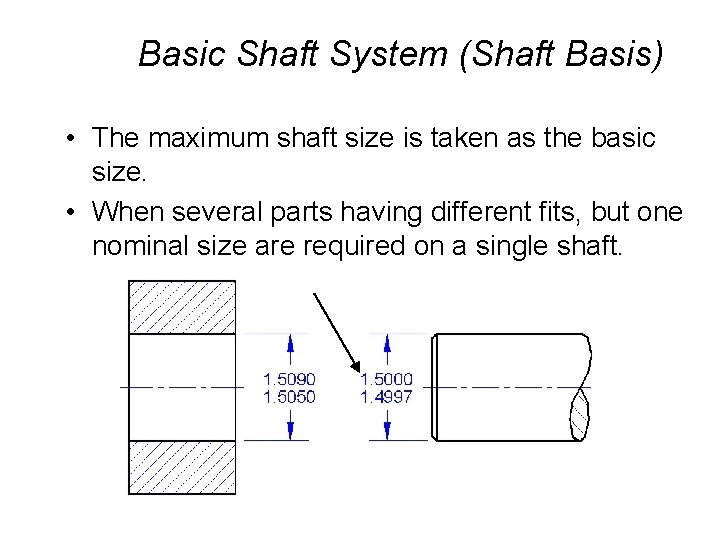
Basic Shaft System (Shaft Basis) • The maximum shaft size is taken as the basic size. • When several parts having different fits, but one nominal size are required on a single shaft.

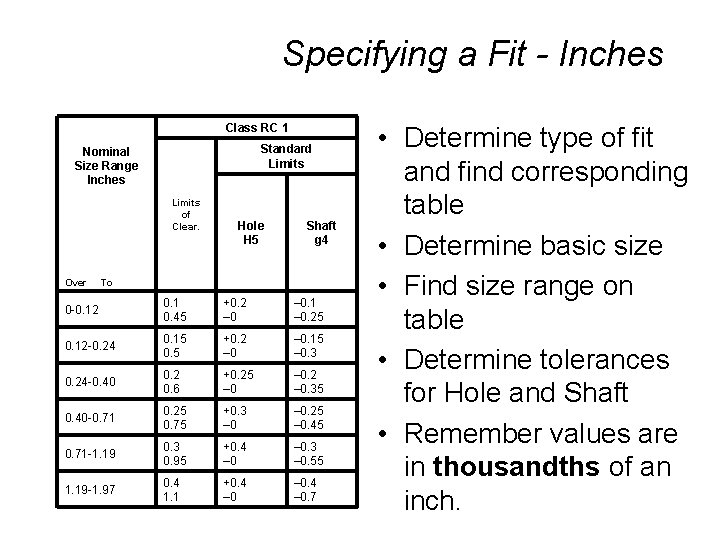
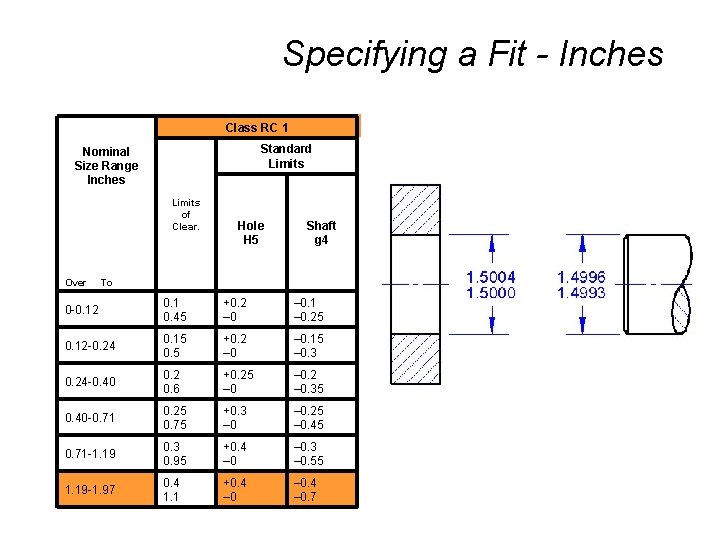
Specifying a Fit - Inches Class RC 1 Standard Limits Nominal Size Range Inches Limits of Clear. Over Hole H 5 Shaft g 4 To 0 -0. 12 0. 1 0. 45 +0. 2 – 0. 1 – 0. 25 0. 12 -0. 24 0. 15 0. 5 +0. 2 – 0. 15 – 0. 3 0. 24 -0. 40 0. 2 0. 6 +0. 25 – 0. 2 – 0. 35 0. 40 -0. 71 0. 25 0. 75 +0. 3 – 0. 25 – 0. 45 0. 71 -1. 19 0. 3 0. 95 +0. 4 – 0. 3 – 0. 55 1. 19 -1. 97 0. 4 1. 1 +0. 4 – 0. 7 • Determine type of fit and find corresponding table • Determine basic size • Find size range on table • Determine tolerances for Hole and Shaft • Remember values are in thousandths of an inch.

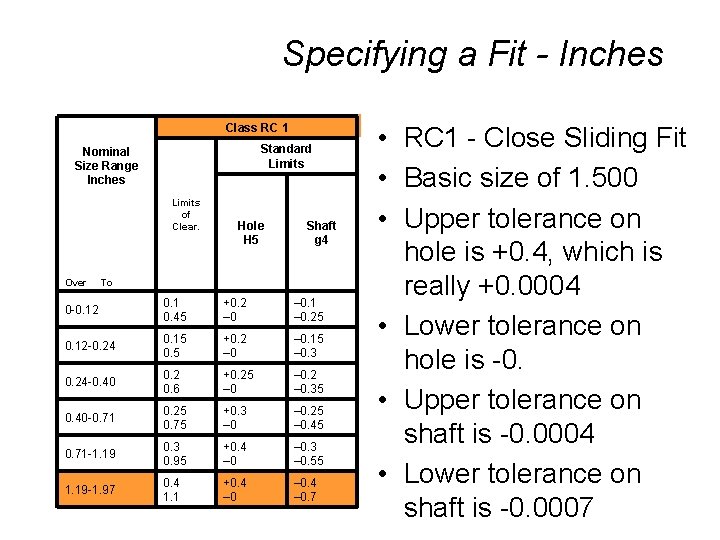
Specifying a Fit - Inches Class RC 1 Standard Limits Nominal Size Range Inches Limits of Clear. Over Hole H 5 Shaft g 4 To 0 -0. 12 0. 1 0. 45 +0. 2 – 0. 1 – 0. 25 0. 12 -0. 24 0. 15 0. 5 +0. 2 – 0. 15 – 0. 3 0. 24 -0. 40 0. 2 0. 6 +0. 25 – 0. 2 – 0. 35 0. 40 -0. 71 0. 25 0. 75 +0. 3 – 0. 25 – 0. 45 0. 71 -1. 19 0. 3 0. 95 +0. 4 – 0. 3 – 0. 55 1. 19 -1. 97 0. 4 1. 1 +0. 4 – 0. 7 • RC 1 - Close Sliding Fit • Basic size of 1. 500 • Upper tolerance on hole is +0. 4, which is really +0. 0004 • Lower tolerance on hole is -0. • Upper tolerance on shaft is -0. 0004 • Lower tolerance on shaft is -0. 0007

Specifying a Fit - Inches Class RC 1 Standard Limits Nominal Size Range Inches Limits of Clear. Over Hole H 5 Shaft g 4 To 0 -0. 12 0. 1 0. 45 +0. 2 – 0. 1 – 0. 25 0. 12 -0. 24 0. 15 0. 5 +0. 2 – 0. 15 – 0. 3 0. 24 -0. 40 0. 2 0. 6 +0. 25 – 0. 2 – 0. 35 0. 40 -0. 71 0. 25 0. 75 +0. 3 – 0. 25 – 0. 45 0. 71 -1. 19 0. 3 0. 95 +0. 4 – 0. 3 – 0. 55 1. 19 -1. 97 0. 4 1. 1 +0. 4 – 0. 7

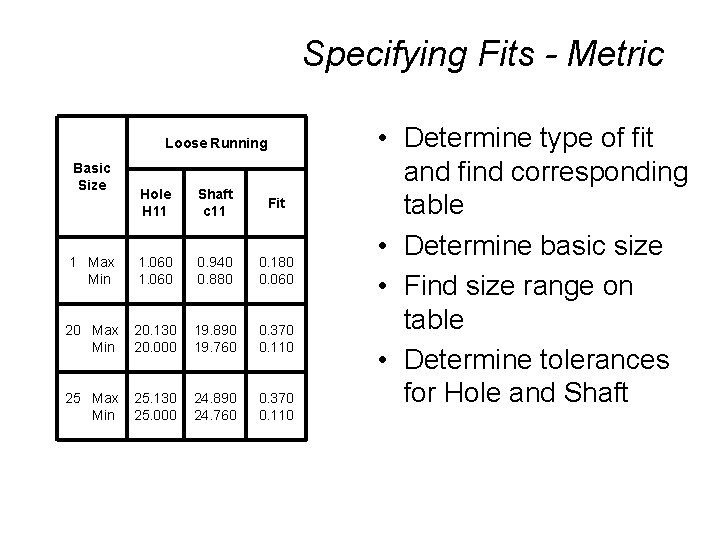
Specifying Fits - Metric Loose Running Basic Size Hole H 11 Shaft c 11 Fit 1 Max Min 1. 060 0. 940 0. 880 0. 180 0. 060 20 Max Min 20. 130 20. 000 19. 890 19. 760 0. 370 0. 110 25 Max Min 25. 130 25. 000 24. 890 24. 760 0. 370 0. 110 • Determine type of fit and find corresponding table • Determine basic size • Find size range on table • Determine tolerances for Hole and Shaft

Specifying Fits - Metric • Loose Running Fit • Basic size of 25 Loose Running Basic Size Hole H 11 Shaft c 11 Fit 1 Max Min 1. 060 0. 940 0. 880 0. 180 0. 060 20 Max Min 20. 130 20. 000 19. 890 19. 760 0. 370 0. 110 25 Max Min 25. 130 25. 000 24. 890 24. 760 0. 370 0. 110