Geometric Dimensioning and Tolerancing Chapter 3 Coordinate Tolerancing


- Slides: 29

Geometric Dimensioning and Tolerancing Chapter 3 Coordinate Tolerancing and Geometric Dimensioning and Tolerancing Mr. Zboril | Cincinnati State Workforce Development Center This Photo by Unknown Author is licensed under CC BY-SA-NC

Unit 3 – Coordinate Tolerancing and GD&T After studying this unit, you will know: • Coordinate tolerancing method and why it is UNSAFE • Uses and Consequences of using the coordinate tolerancing method • What the Geometric Dimensioning & Tolerancing System is. • The design philosophy of GD&T and the six major components in the GD&T language • Where GD&T is used and the four benefits. • How GD&T eliminates UNSAFE conditions of coordinate tolerancing • The “great myth” of GD&T.

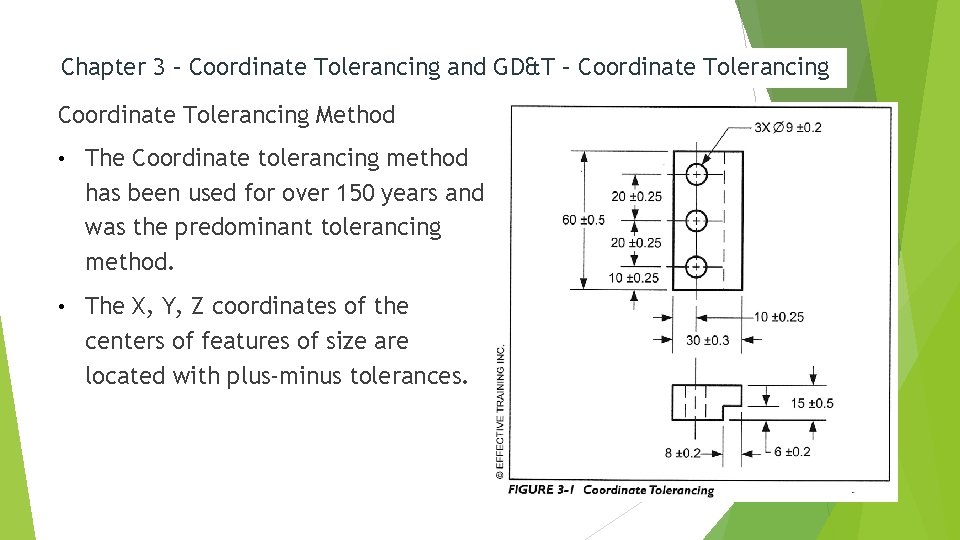
Chapter 3 – Coordinate Tolerancing and GD&T – Coordinate Tolerancing Method • The Coordinate tolerancing method has been used for over 150 years and was the predominant tolerancing method. • The X, Y, Z coordinates of the centers of features of size are located with plus-minus tolerances.

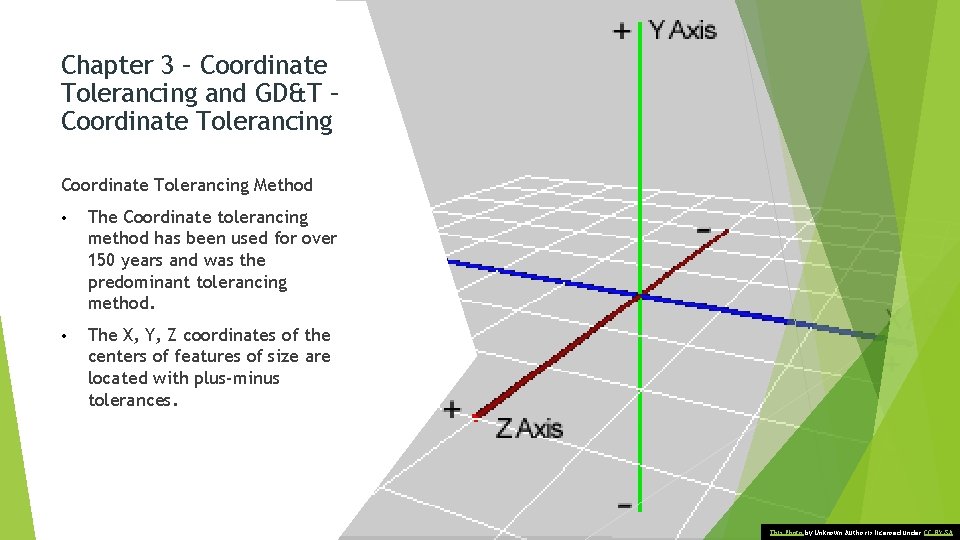
Chapter 3 – Coordinate Tolerancing and GD&T – Coordinate Tolerancing Method • The Coordinate tolerancing method has been used for over 150 years and was the predominant tolerancing method. • The X, Y, Z coordinates of the centers of features of size are located with plus-minus tolerances. This Photo by Unknown Author is licensed under CC BY-SA

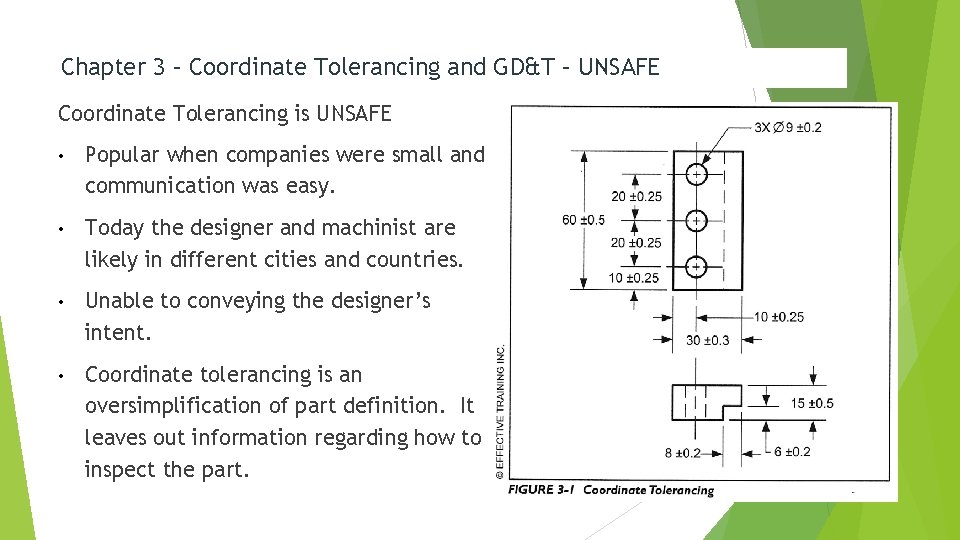
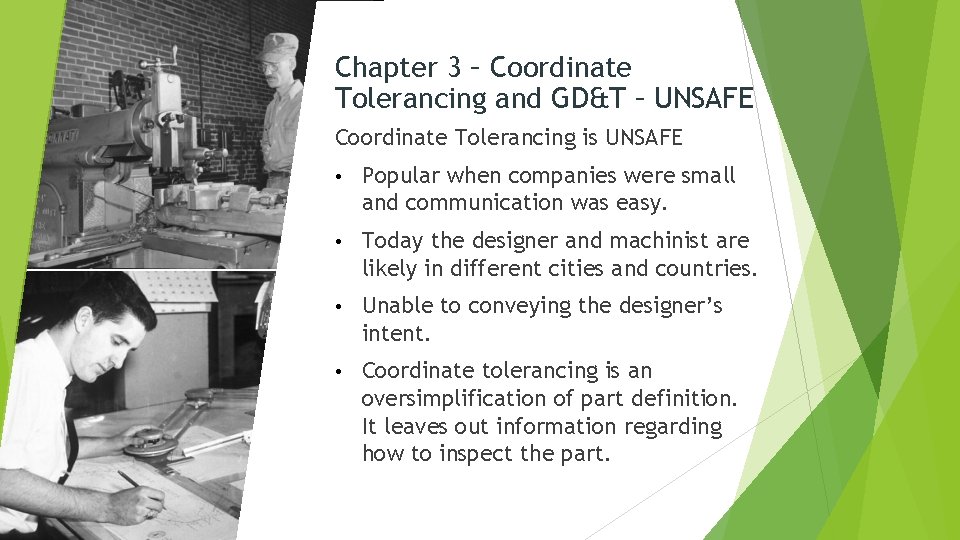
Chapter 3 – Coordinate Tolerancing and GD&T – UNSAFE Coordinate Tolerancing is UNSAFE • Popular when companies were small and communication was easy. • Today the designer and machinist are likely in different cities and countries. • Unable to conveying the designer’s intent. • Coordinate tolerancing is an oversimplification of part definition. It leaves out information regarding how to inspect the part.

Chapter 3 – Coordinate Tolerancing and GD&T – UNSAFE Coordinate Tolerancing is UNSAFE • Popular when companies were small and communication was easy. • Today the designer and machinist are likely in different cities and countries. • Unable to conveying the designer’s intent. • Coordinate tolerancing is an oversimplification of part definition. It leaves out information regarding how to inspect the part.

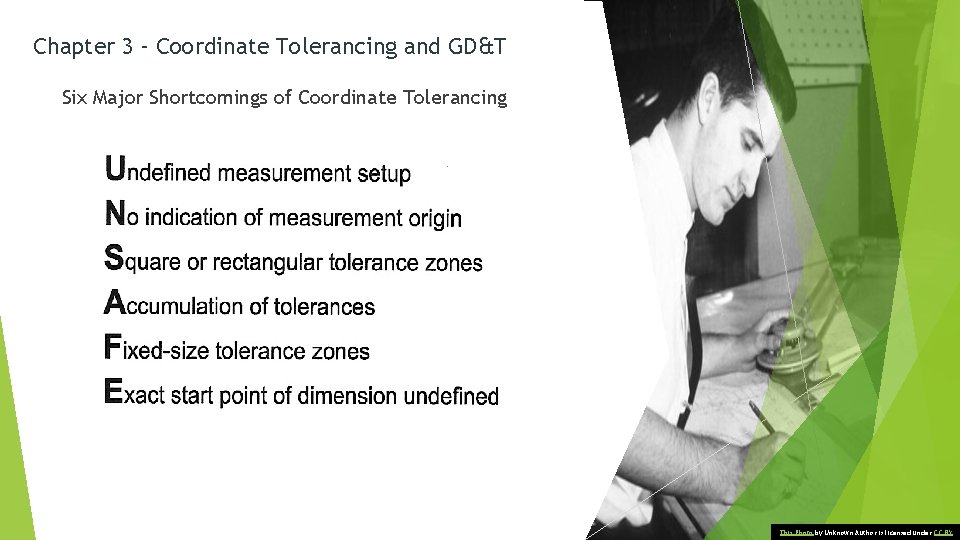
Chapter 3 – Coordinate Tolerancing and GD&T Six Major Shortcomings of Coordinate Tolerancing This Photo by Unknown Author is licensed under CC BY

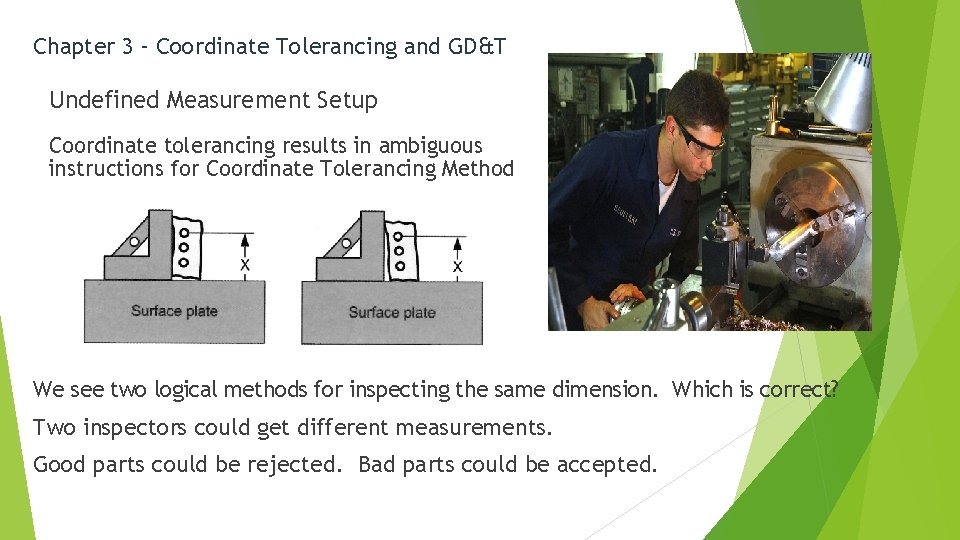
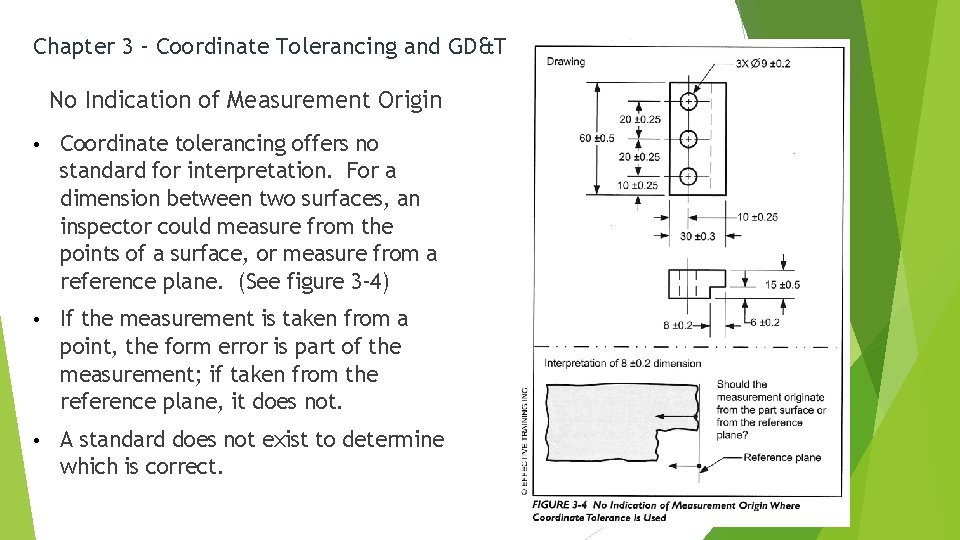
Chapter 3 – Coordinate Tolerancing and GD&T Undefined Measurement Setup Coordinate tolerancing results in ambiguous instructions for Coordinate Tolerancing Method We see two logical methods for inspecting the same dimension. Which is correct? Two inspectors could get different measurements. Good parts could be rejected. Bad parts could be accepted.

Chapter 3 – Coordinate Tolerancing and GD&T No Indication of Measurement Origin • Coordinate tolerancing offers no standard for interpretation. For a dimension between two surfaces, an inspector could measure from the points of a surface, or measure from a reference plane. (See figure 3 -4) • If the measurement is taken from a point, the form error is part of the measurement; if taken from the reference plane, it does not. • A standard does not exist to determine which is correct.

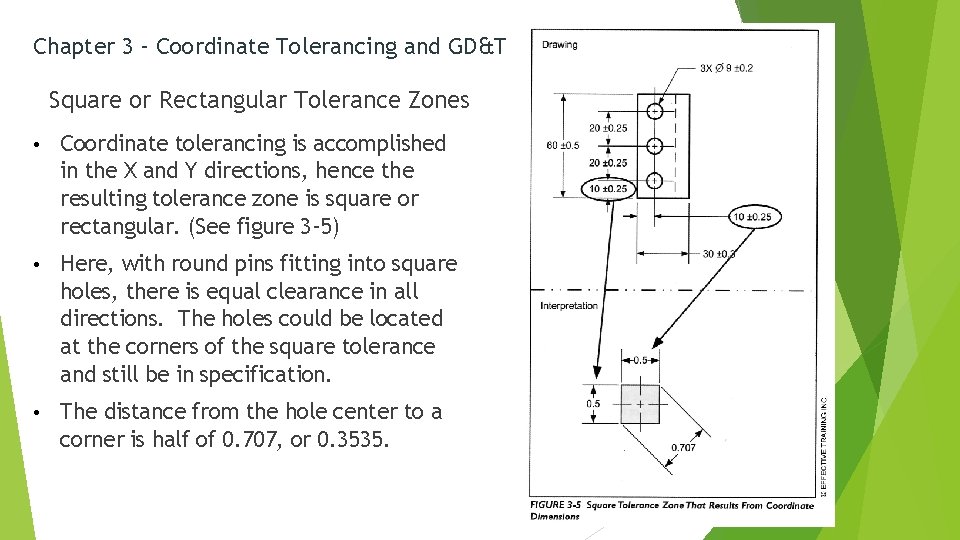
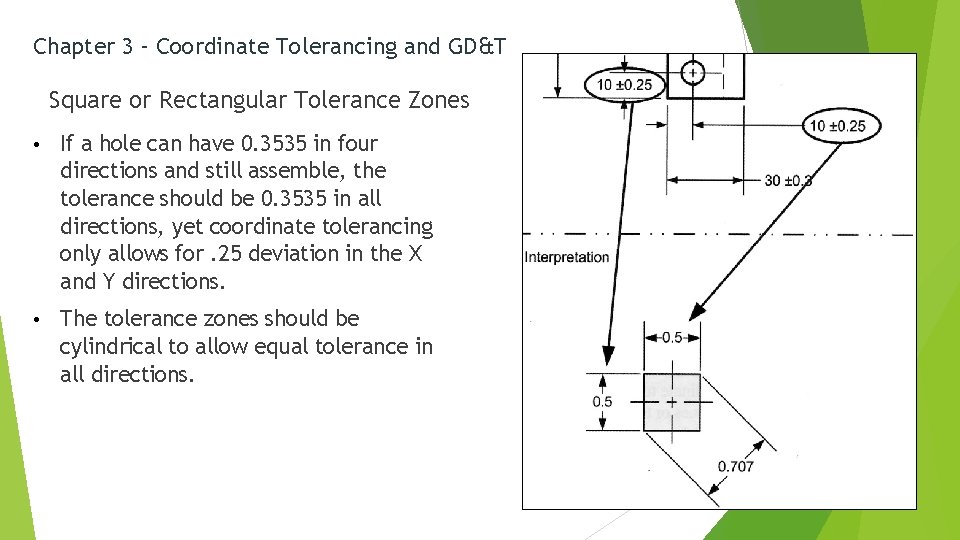
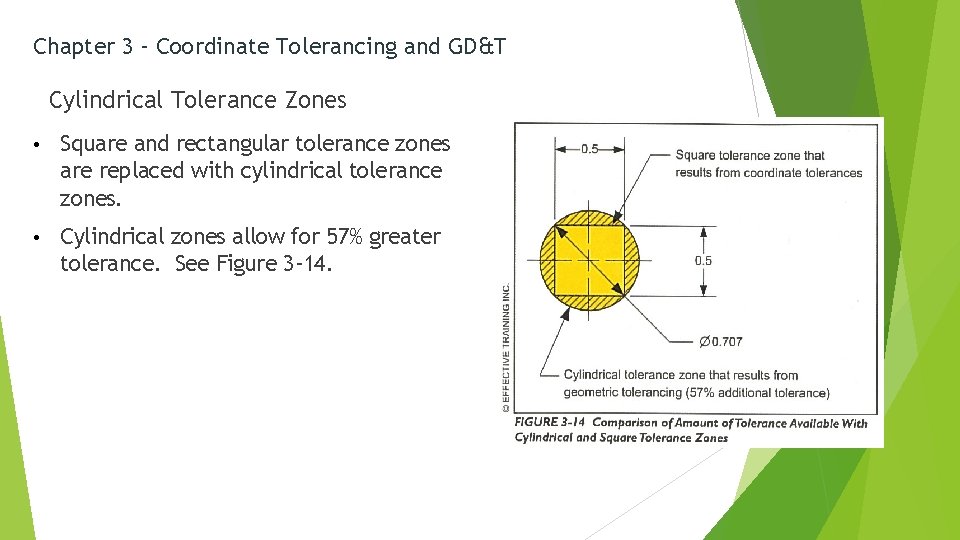
Chapter 3 – Coordinate Tolerancing and GD&T Square or Rectangular Tolerance Zones • Coordinate tolerancing is accomplished in the X and Y directions, hence the resulting tolerance zone is square or rectangular. (See figure 3 -5) • Here, with round pins fitting into square holes, there is equal clearance in all directions. The holes could be located at the corners of the square tolerance and still be in specification. • The distance from the hole center to a corner is half of 0. 707, or 0. 3535.

Chapter 3 – Coordinate Tolerancing and GD&T Square or Rectangular Tolerance Zones • If a hole can have 0. 3535 in four directions and still assemble, the tolerance should be 0. 3535 in all directions, yet coordinate tolerancing only allows for. 25 deviation in the X and Y directions. • The tolerance zones should be cylindrical to allow equal tolerance in all directions.

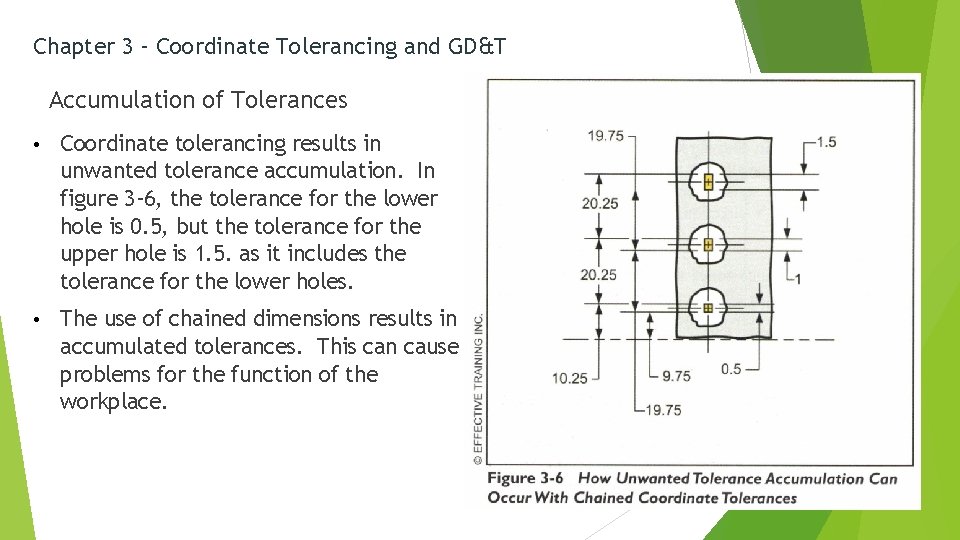
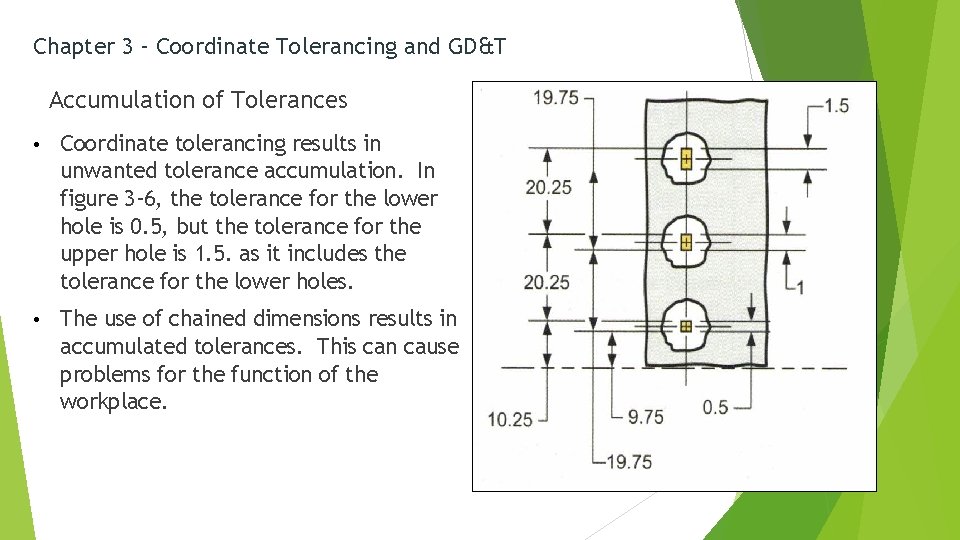
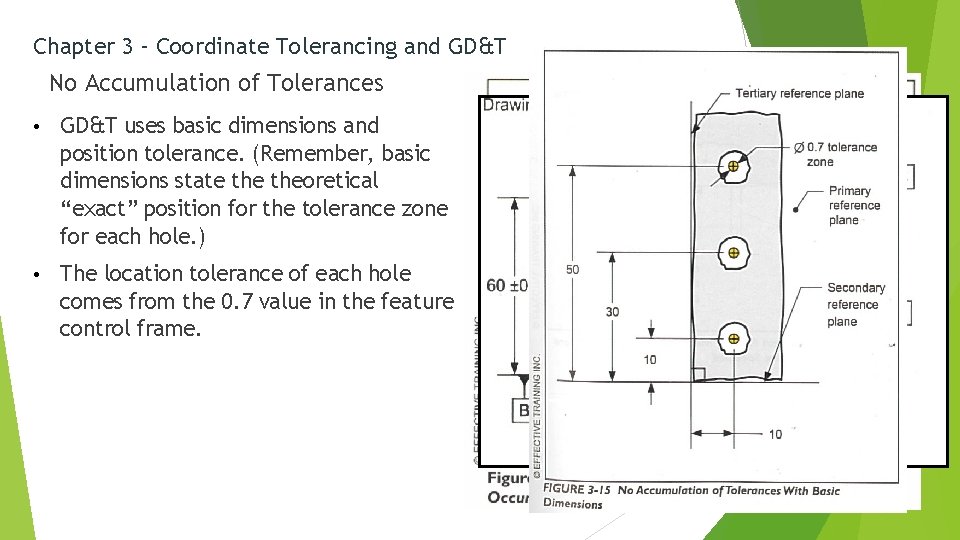
Chapter 3 – Coordinate Tolerancing and GD&T Accumulation of Tolerances • Coordinate tolerancing results in unwanted tolerance accumulation. In figure 3 -6, the tolerance for the lower hole is 0. 5, but the tolerance for the upper hole is 1. 5. as it includes the tolerance for the lower holes. • The use of chained dimensions results in accumulated tolerances. This can cause problems for the function of the workplace.

Chapter 3 – Coordinate Tolerancing and GD&T Accumulation of Tolerances • Coordinate tolerancing results in unwanted tolerance accumulation. In figure 3 -6, the tolerance for the lower hole is 0. 5, but the tolerance for the upper hole is 1. 5. as it includes the tolerance for the lower holes. • The use of chained dimensions results in accumulated tolerances. This can cause problems for the function of the workplace.

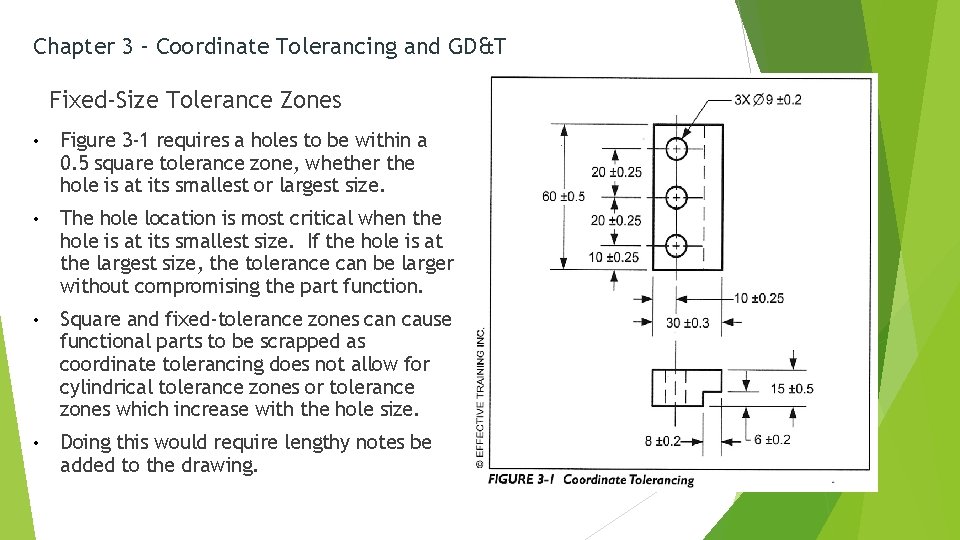
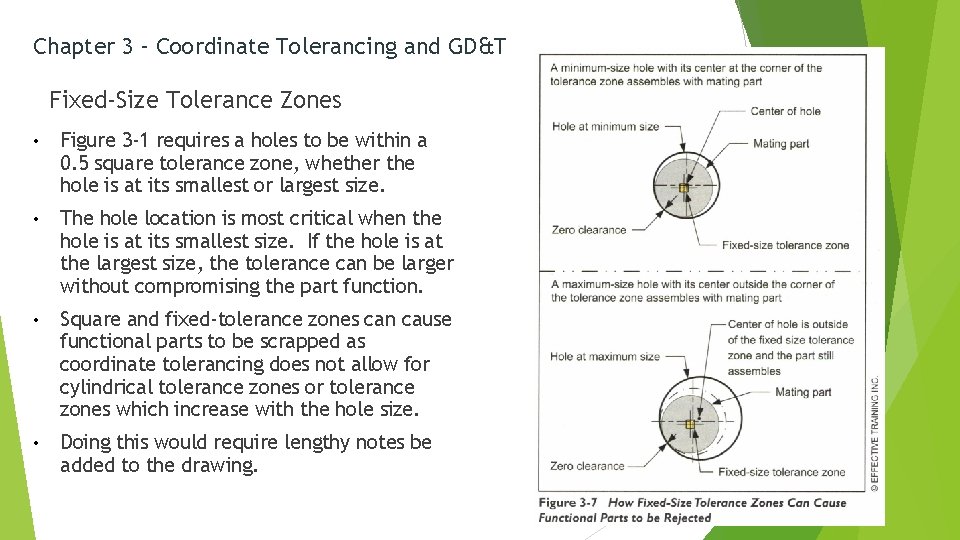
Chapter 3 – Coordinate Tolerancing and GD&T Fixed-Size Tolerance Zones • Figure 3 -1 requires a holes to be within a 0. 5 square tolerance zone, whether the hole is at its smallest or largest size. • The hole location is most critical when the hole is at its smallest size. If the hole is at the largest size, the tolerance can be larger without compromising the part function. • Square and fixed-tolerance zones can cause functional parts to be scrapped as coordinate tolerancing does not allow for cylindrical tolerance zones or tolerance zones which increase with the hole size. • Doing this would require lengthy notes be added to the drawing.

Chapter 3 – Coordinate Tolerancing and GD&T Fixed-Size Tolerance Zones • Figure 3 -1 requires a holes to be within a 0. 5 square tolerance zone, whether the hole is at its smallest or largest size. • The hole location is most critical when the hole is at its smallest size. If the hole is at the largest size, the tolerance can be larger without compromising the part function. • Square and fixed-tolerance zones can cause functional parts to be scrapped as coordinate tolerancing does not allow for cylindrical tolerance zones or tolerance zones which increase with the hole size. • Doing this would require lengthy notes be added to the drawing.

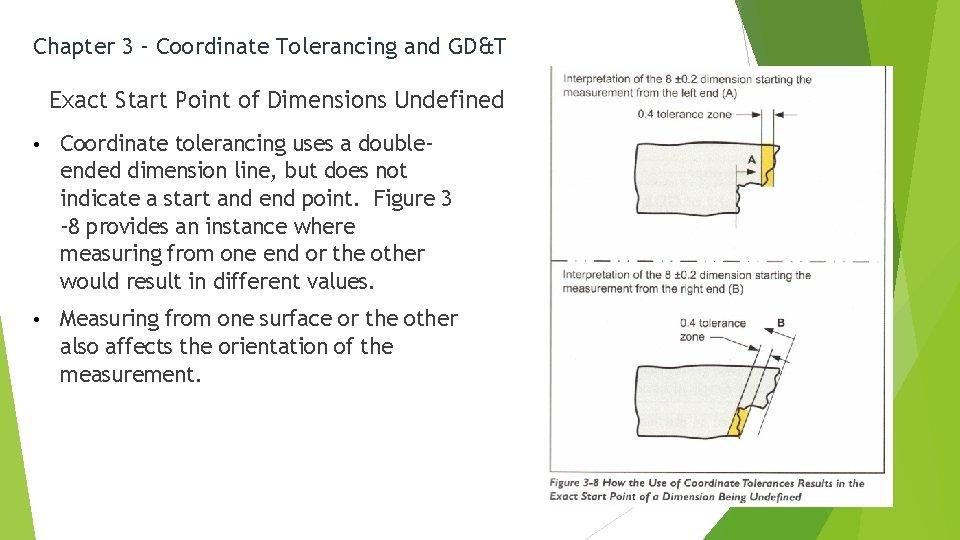
Chapter 3 – Coordinate Tolerancing and GD&T Exact Start Point of Dimensions Undefined • Coordinate tolerancing uses a doubleended dimension line, but does not indicate a start and end point. Figure 3 -8 provides an instance where measuring from one end or the other would result in different values. • Measuring from one surface or the other also affects the orientation of the measurement.

Chapter 3 – Coordinate Tolerancing and GD&T Potential Consequences of Coordinate Tolerances • Coordinate tolerancing allows for several ways to interpret dimensions. This results in: 1. Increased Manufacturing Costs – square (or rectangular) and fixed -size tolerances increase manufacturing costs as usable parts would be rejected. 2. Part Acceptance Disputes – the open interpretation for measurement may result in two inspectors obtaining different measurements. This would cause waste, delays, and added costs. 3. Assembly Problems – where coordinate tolerances are used, the risk of non-functional parts being used exists as parts measured with different setups may not assemble.

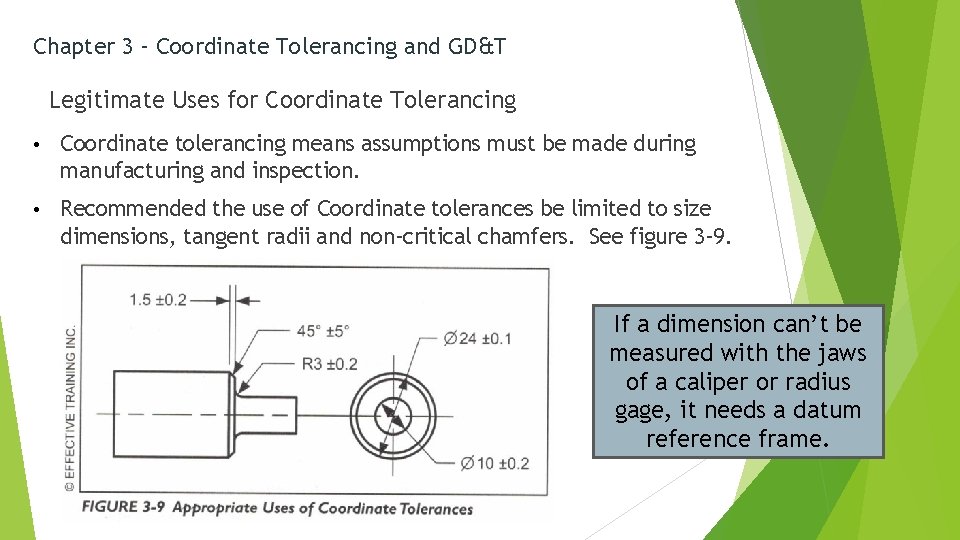
Chapter 3 – Coordinate Tolerancing and GD&T Legitimate Uses for Coordinate Tolerancing • Coordinate tolerancing means assumptions must be made during manufacturing and inspection. • Recommended the use of Coordinate tolerances be limited to size dimensions, tangent radii and non-critical chamfers. See figure 3 -9. If a dimension can’t be measured with the jaws of a caliper or radius gage, it needs a datum reference frame.

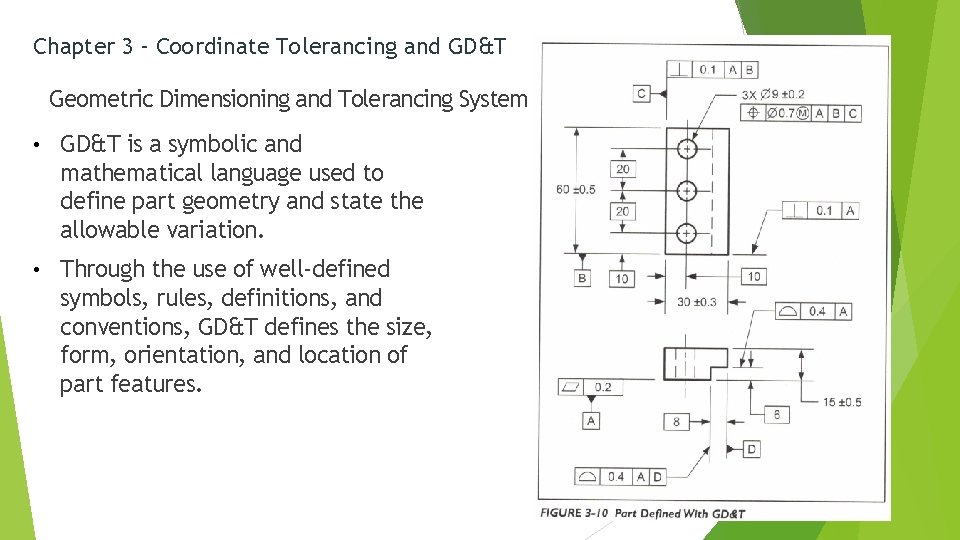
Chapter 3 – Coordinate Tolerancing and GD&T Geometric Dimensioning and Tolerancing System • GD&T is a symbolic and mathematical language used to define part geometry and state the allowable variation. • Through the use of well-defined symbols, rules, definitions, and conventions, GD&T defines the size, form, orientation, and location of part features.

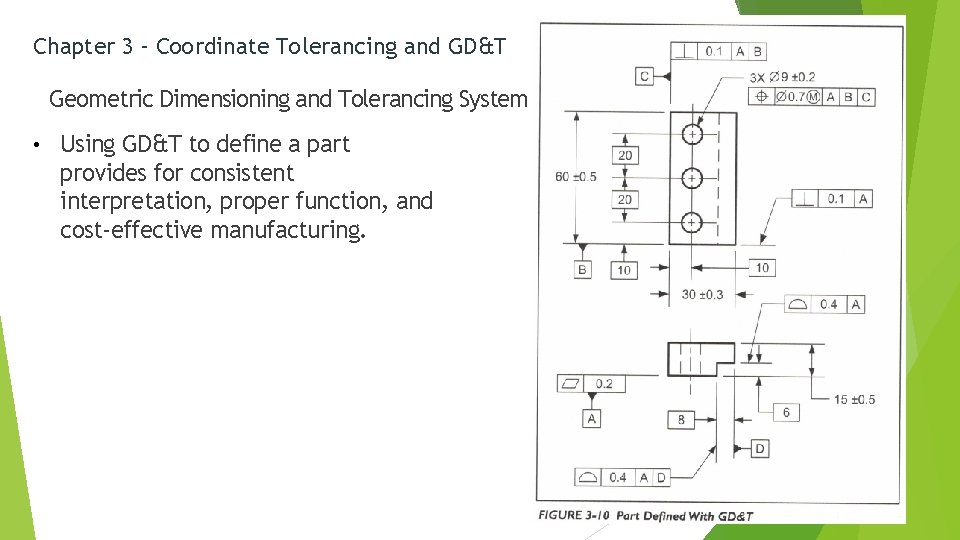
Chapter 3 – Coordinate Tolerancing and GD&T Geometric Dimensioning and Tolerancing System • Using GD&T to define a part provides for consistent interpretation, proper function, and cost-effective manufacturing.

Chapter 3 – Coordinate Tolerancing and GD&T Design Philosophy of GD&T • The design philosophy of GD&T is functional dimensioning. • Functional dimensioning defines a part based on the product fit and function requirements. • • This does not mean the designer may ignore manufacturing and inspection needs. Often drawings contain a mixture of functional dimensioning and dimensions based. Functional dimensioning defines a part based on the product fit and function requirements.

Chapter 3 – Coordinate Tolerancing and GD&T Six Major Components of the GD&T Language • Vocabulary (definitions and rules) FOUNDATION SKILLS • Concepts / Datum System / Symbols CORE SKILLS • Tolerance Zone Requirements (shape/size/location/orientation) CORE SKILLS • Design Philosophy APPLICATION SKILLS • Understanding how each topic fits into this structure will help understand GD&T and be confident in interpreting it.

Chapter 3 – Coordinate Tolerancing and GD&T Where GD&T Should be Used • Geometric Dimensioning and Tolerancing should be used when: • Reduce manufacturing costs • Protect an important functional relationship on a part • Ensure the part can be assembled • Reduce drawing revisions • Verify the part with a functional gage • Improve measurement repeatability • Outsource the part • Analyze the design

Chapter 3 – Coordinate Tolerancing and GD&T Four Benefits of GD&T 1. Improves Communication GD&T offers uniformity in drawing specification and interpretation, thus reducing controversy, guesswork, and assumption. Design, production, and inspection all work in the same language. 2. Provides Better Product Design Provides designers the ability to “say what they mean” and follow the functional dimensioning philosophy. 3. Increased Tolerance for Production GD&T offers increased tolerances in two ways: § Certain conditions (typically involving MMC and LMC) offer a “bonus” tolerance § The use of functional dimensioning assigns tolerances based on the functional requirements. This typically allows for larger tolerance for manufacturing. 4. Lower Costs The first three benefits result in lowered costs for the manufacturing and inspection of parts. These reduced costs are the result of savings in time, tooling, and gaging costs.

Chapter 3 – Coordinate Tolerancing and GD&T Eliminates UNSAFE Coordinate Tolerancing Shortcomings Defined Measurement Setup Measurement origin indication Cylindrical Tolerance Zones No Accumulation of Tolerances No Fixed-Size Tolerance Zones Exact Start Point of Dimensions Defined This Photo by Unknown Author is licensed under CC BY

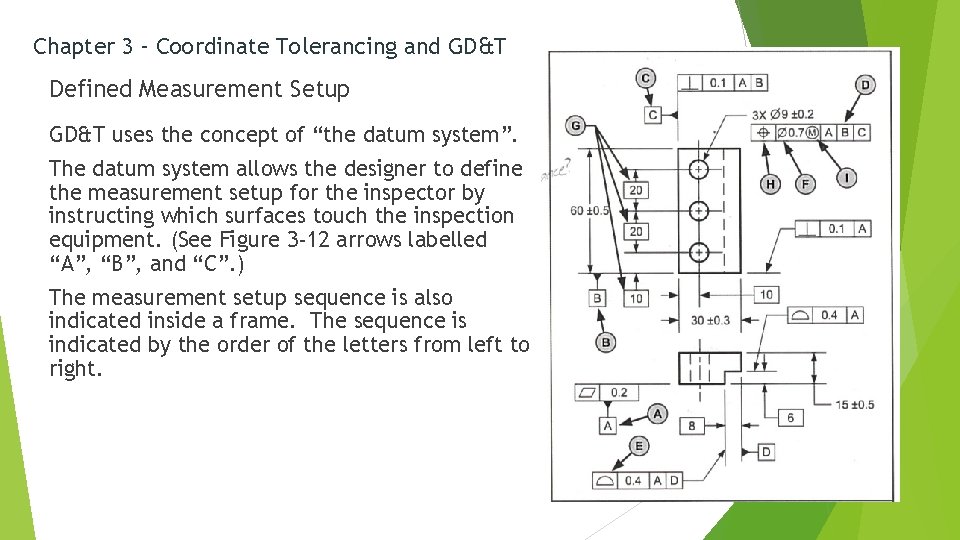
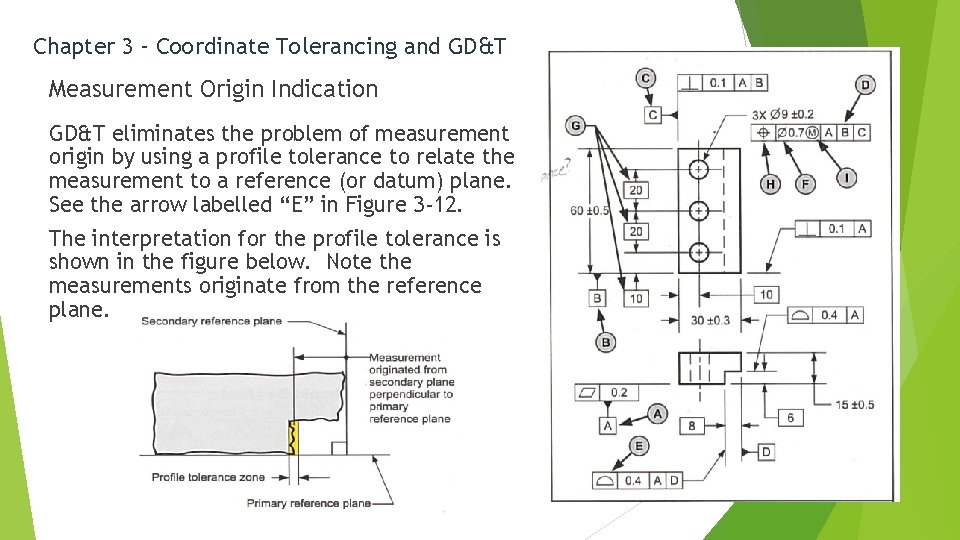
Chapter 3 – Coordinate Tolerancing and GD&T Defined Measurement Setup GD&T uses the concept of “the datum system”. The datum system allows the designer to define the measurement setup for the inspector by instructing which surfaces touch the inspection equipment. (See Figure 3 -12 arrows labelled “A”, “B”, and “C”. ) The measurement setup sequence is also indicated inside a frame. The sequence is indicated by the order of the letters from left to right.

Chapter 3 – Coordinate Tolerancing and GD&T Measurement Origin Indication GD&T eliminates the problem of measurement origin by using a profile tolerance to relate the measurement to a reference (or datum) plane. See the arrow labelled “E” in Figure 3 -12. The interpretation for the profile tolerance is shown in the figure below. Note the measurements originate from the reference plane.

Chapter 3 – Coordinate Tolerancing and GD&T Cylindrical Tolerance Zones • Square and rectangular tolerance zones are replaced with cylindrical tolerance zones. • Cylindrical zones allow for 57% greater tolerance. See Figure 3 -14.

Chapter 3 – Coordinate Tolerancing and GD&T No Accumulation of Tolerances • GD&T uses basic dimensions and position tolerance. (Remember, basic dimensions state theoretical “exact” position for the tolerance zone for each hole. ) • The location tolerance of each hole comes from the 0. 7 value in the feature control frame.