Lecture 7 Geometrical Tolerancing Ch 16 Dr John
- Slides: 43

Lecture 7 • Geometrical Tolerancing – Ch. 16. • Dr John Cheung 1

Modern engineering tolerancing Modern Tolerancing – Rationale § Engineering drawing of part - Convey information from the designer to the manufacturer to the inspector. § Enabling manufacturing, and subsequently for inspection, if part manufactured as per design specification. § § Each drawing - Convey three essential types of information: 1. Material to be used 2. Size or dimensions of the part 3. Shape or geometric characteristics Drawing - Specify permissible variations for above aspects in the form of tolerance or limits. § Materials - Covered by separate specifications or supplementary documents, drawings need only make reference to these and quote material symbol used. 2

Modern engineering tolerancing Modern Tolerancing – Rationale § In the past: § Tolerances shown - no precise interpretation. § Omission of datum lines where it is intended required measurement between features § Confusion to method of expressing tolerances and decimals places used. § Tolerancing of geometric characteristics was sometimes specified in notes (no clear interpretation, shop floor worker – individual judgment). § Modern tolerancing: § Includes geometric and positional tolerancing. § Use of datum and datum targets. § Precise information of part’s linear and angular variations permissible. § Using symbols - Applicable across language barriers. 3

Modern engineering tolerancing National and international standards § Drawing standards are published by International standardizing bodies like ISO and some national bodies as in US and Canada § Symbols (most) in all these standards are identical. However, since information is exchanged beyond borders, it is good for designers to get acquainted to various symbols § For this reason whenever differences between United States and ISO standards occur, two methods are shown in some of the illustrations, and each is labeled with the acronym of the appropriate standardizing body, ANSI, ISO, or CSA. 4

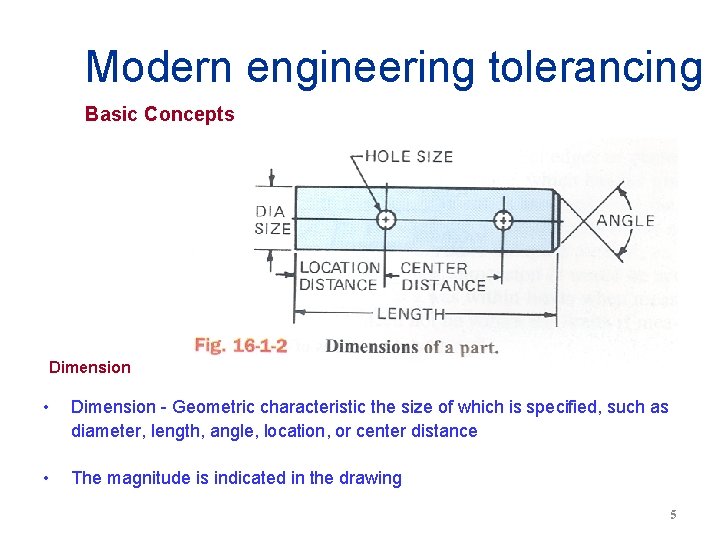
Modern engineering tolerancing Basic Concepts Dimension • Dimension - Geometric characteristic the size of which is specified, such as diameter, length, angle, location, or center distance • The magnitude is indicated in the drawing 5

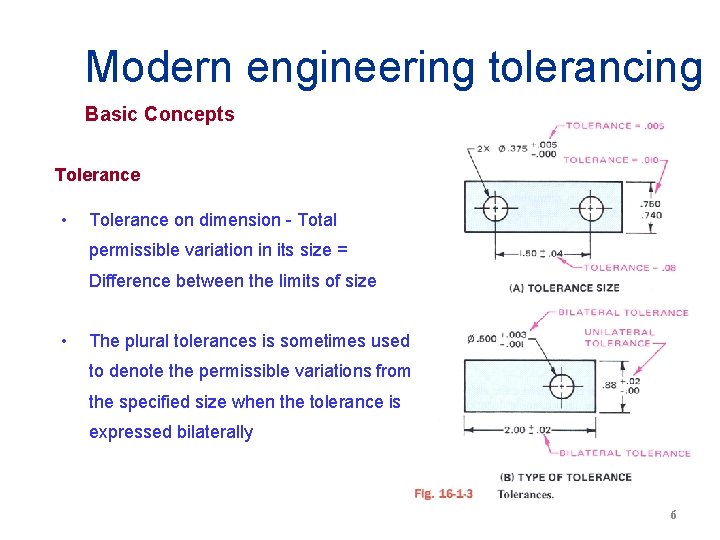
Modern engineering tolerancing Basic Concepts Tolerance • Tolerance on dimension - Total permissible variation in its size = Difference between the limits of size • The plural tolerances is sometimes used to denote the permissible variations from the specified size when the tolerance is expressed bilaterally 6

Modern engineering tolerancing Size of Dimensions § Impossible to produce part to exact size - Number of distinct sizes for each dimension have to be recognized: actual size, nominal size, specified size, and design size. § Actual Size - Measured size of an individual part. § Nominal Size - Designation of size - General identification, e. g. , Referring to part in an assembly drawing stock list, in a specification, or in other such documents. § This is the same as basic size, but may vary widely in some cases e. g. The external diameter of a. 50 -in. steel pipe is. 84 in. (21. 34 mm). The nominal size is. 50 in. Only for Nominal Pipe Size. 7

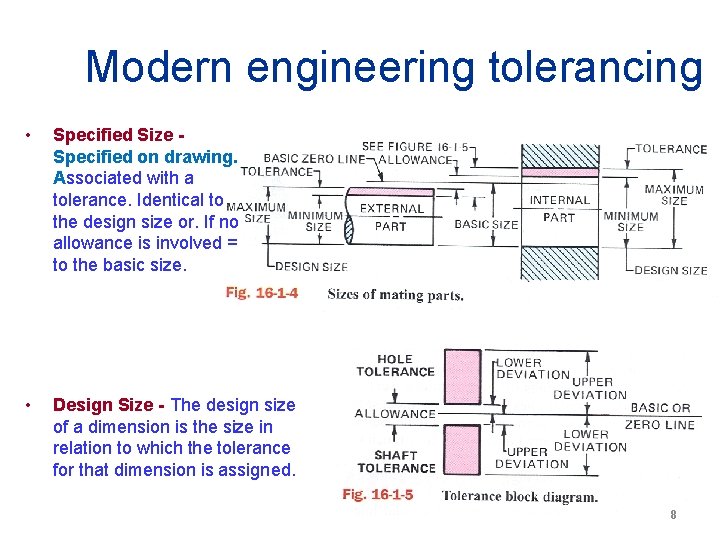
Modern engineering tolerancing • Specified Size Specified on drawing. Associated with a tolerance. Identical to the design size or. If no allowance is involved = to the basic size. • Design Size - The design size of a dimension is the size in relation to which the tolerance for that dimension is assigned. 8

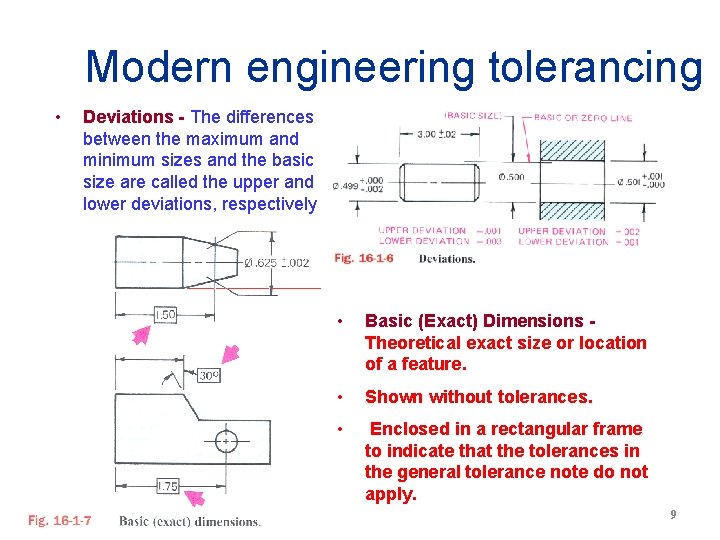
Modern engineering tolerancing • Deviations - The differences between the maximum and minimum sizes and the basic size are called the upper and lower deviations, respectively • Basic (Exact) Dimensions Theoretical exact size or location of a feature. • Shown without tolerances. • Enclosed in a rectangular frame to indicate that the tolerances in the general tolerance note do not apply. 9

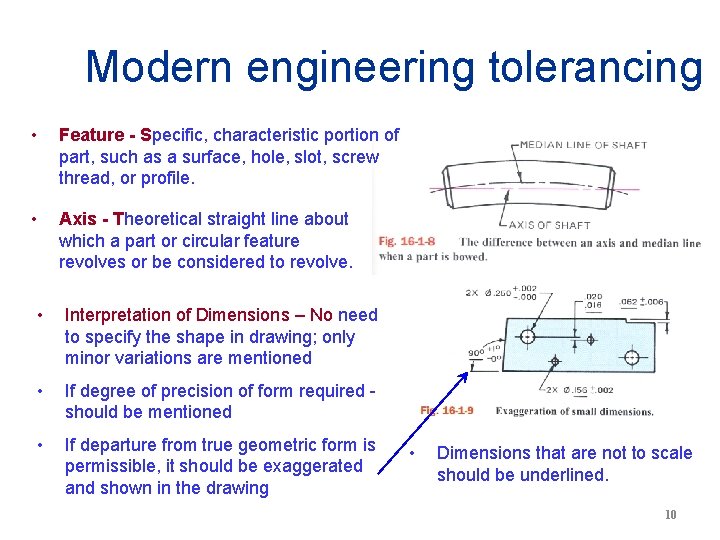
Modern engineering tolerancing • Feature - Specific, characteristic portion of part, such as a surface, hole, slot, screw thread, or profile. • Axis - Theoretical straight line about which a part or circular feature revolves or be considered to revolve. • Interpretation of Dimensions – No need to specify the shape in drawing; only minor variations are mentioned • If degree of precision of form required should be mentioned • If departure from true geometric form is permissible, it should be exaggerated and shown in the drawing • Dimensions that are not to scale should be underlined. 10

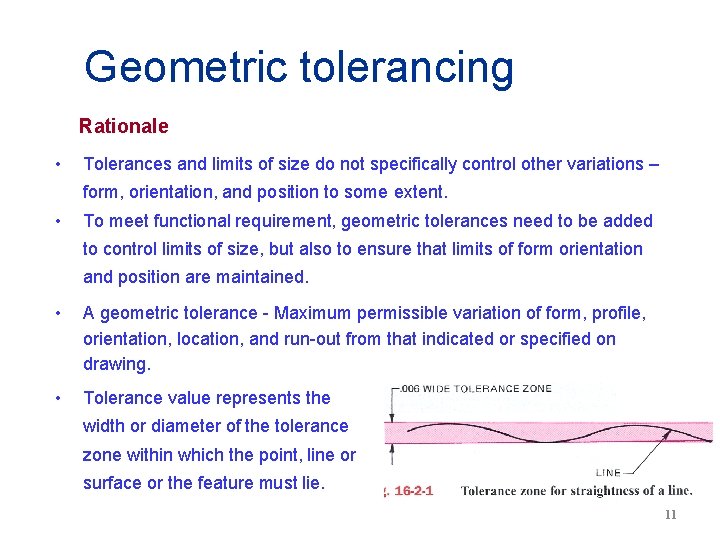
Geometric tolerancing Rationale • Tolerances and limits of size do not specifically control other variations – form, orientation, and position to some extent. • To meet functional requirement, geometric tolerances need to be added to control limits of size, but also to ensure that limits of form orientation and position are maintained. • A geometric tolerance - Maximum permissible variation of form, profile, orientation, location, and run-out from that indicated or specified on drawing. • Tolerance value represents the width or diameter of the tolerance zone within which the point, line or surface or the feature must lie. 11

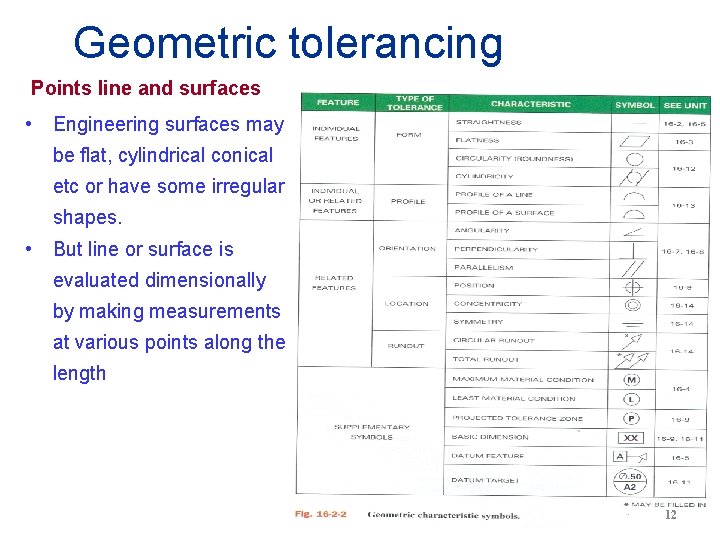
Geometric tolerancing Points line and surfaces • Engineering surfaces may be flat, cylindrical conical etc or have some irregular shapes. • But line or surface is evaluated dimensionally by making measurements at various points along the length 12

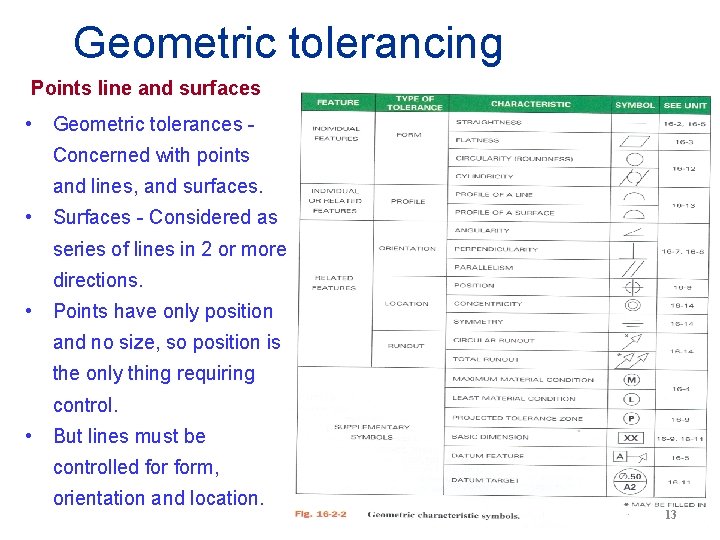
Geometric tolerancing Points line and surfaces • Geometric tolerances Concerned with points and lines, and surfaces. • Surfaces - Considered as series of lines in 2 or more directions. • Points have only position and no size, so position is the only thing requiring control. • But lines must be controlled form, orientation and location. 13

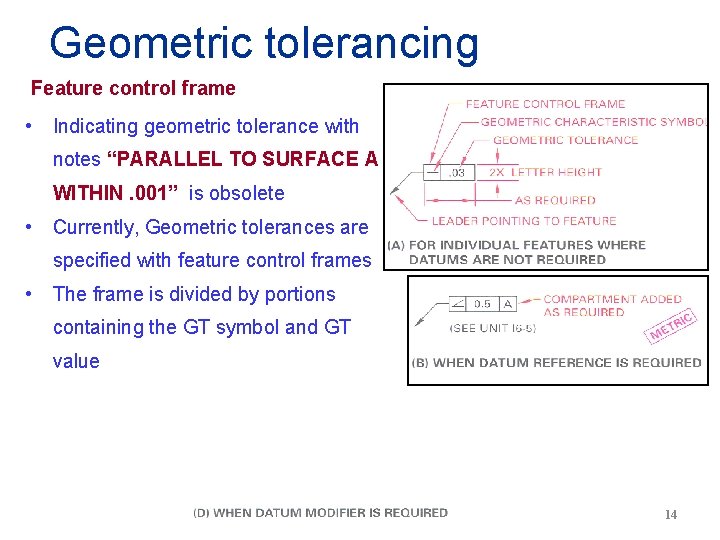
Geometric tolerancing Feature control frame • Indicating geometric tolerance with notes “PARALLEL TO SURFACE A WITHIN. 001” is obsolete • Currently, Geometric tolerances are specified with feature control frames • The frame is divided by portions containing the GT symbol and GT value 14

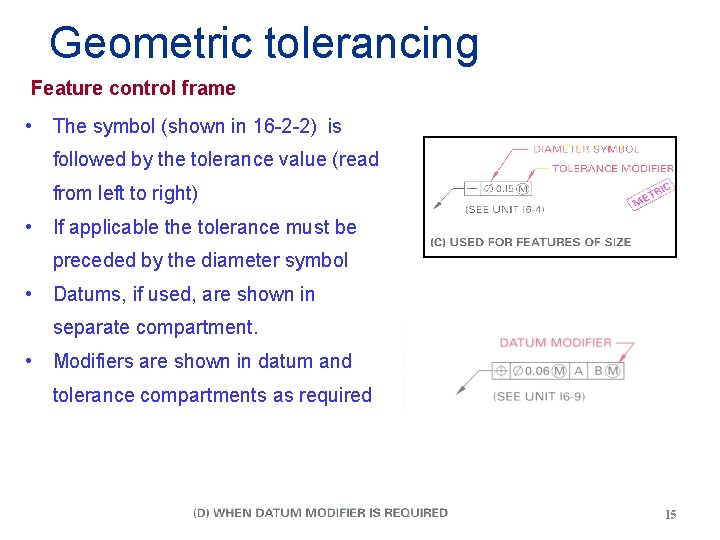
Geometric tolerancing Feature control frame • The symbol (shown in 16 -2 -2) is followed by the tolerance value (read from left to right) • If applicable the tolerance must be preceded by the diameter symbol • Datums, if used, are shown in separate compartment. • Modifiers are shown in datum and tolerance compartments as required 15

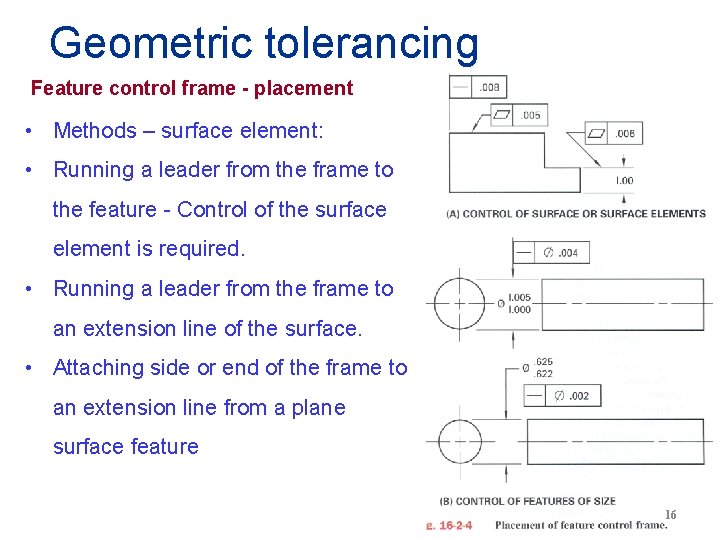
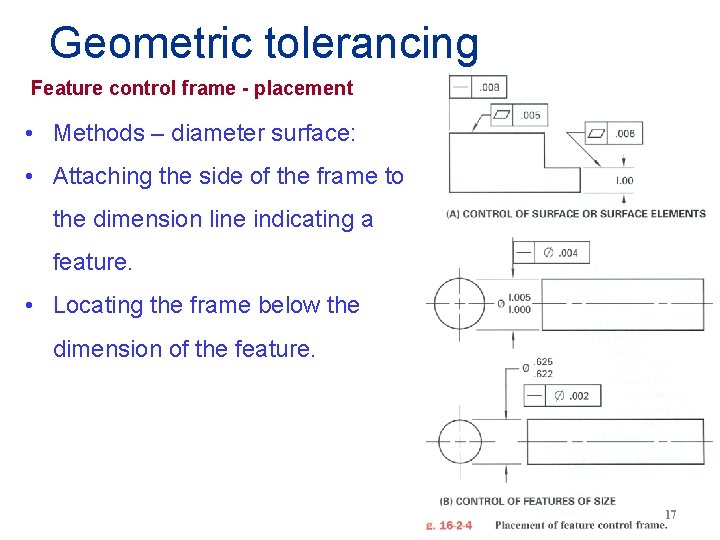
Geometric tolerancing Feature control frame - placement • Methods – surface element: • Running a leader from the frame to the feature - Control of the surface element is required. • Running a leader from the frame to an extension line of the surface. • Attaching side or end of the frame to an extension line from a plane surface feature 16

Geometric tolerancing Feature control frame - placement • Methods – diameter surface: • Attaching the side of the frame to the dimension line indicating a feature. • Locating the frame below the dimension of the feature. 17

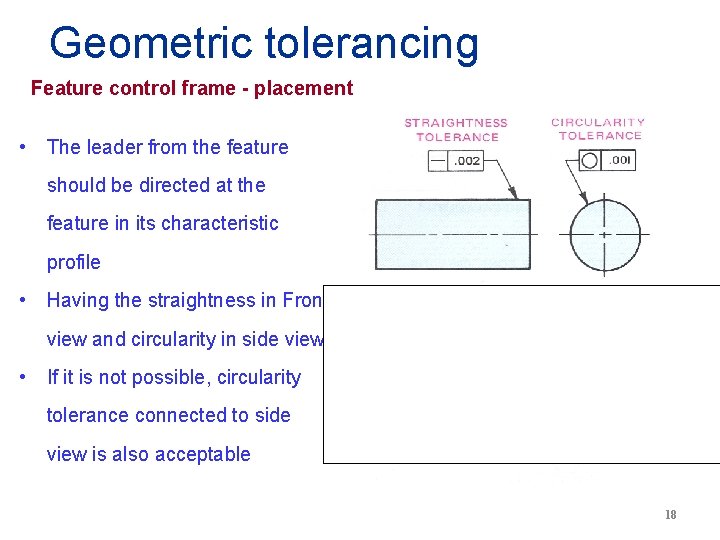
Geometric tolerancing Feature control frame - placement • The leader from the feature should be directed at the feature in its characteristic profile • Having the straightness in Front view and circularity in side view. • If it is not possible, circularity tolerance connected to side view is also acceptable 18

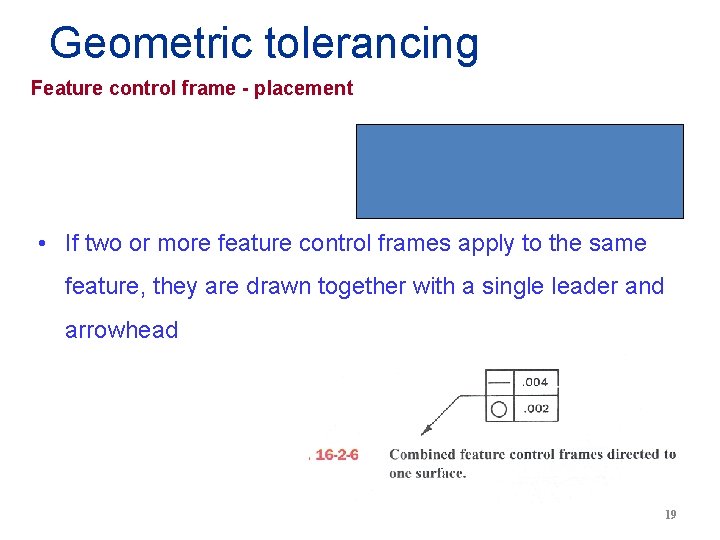
Geometric tolerancing Feature control frame - placement • If two or more feature control frames apply to the same feature, they are drawn together with a single leader and arrowhead 19

Geometric tolerancing Form tolerances • Form tolerances: • Control straightness, flatness, circularity and cylindricity. • Applicable to single features or elements of single features. • Do not requiring locating dimensions. • Orientation tolerances: • Control angularity, perpendicularity and parallelism. • Specify maximum permissible variation from the desired form and apply to all points on the surface. (Roundout and roundness only apply to selected location along the surface. ) 20

Geometric tolerancing • Straightness: • Condition in which the element of the surface is a straight line. • Straightness tolerance specifies the tolerance zone within which the considered element of surface must lie. • Applied to the view where the elements that need to be controlled are represented by a straight line. 21

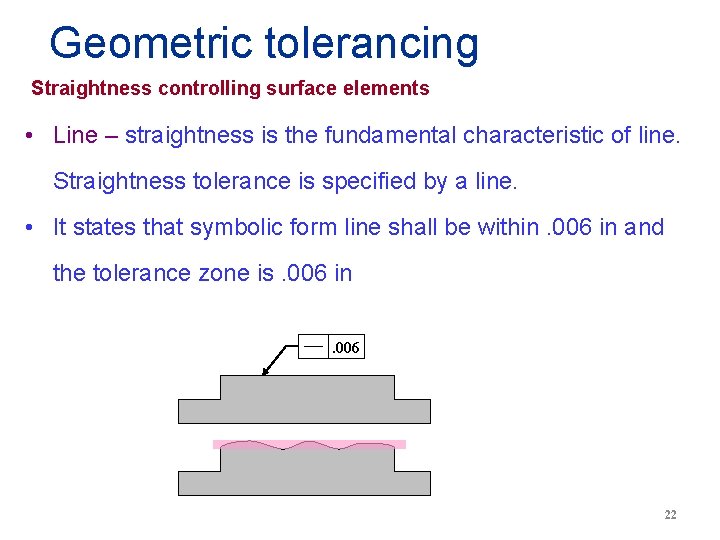
Geometric tolerancing Straightness controlling surface elements • Line – straightness is the fundamental characteristic of line. Straightness tolerance is specified by a line. • It states that symbolic form line shall be within. 006 in and the tolerance zone is. 006 in. 006 22

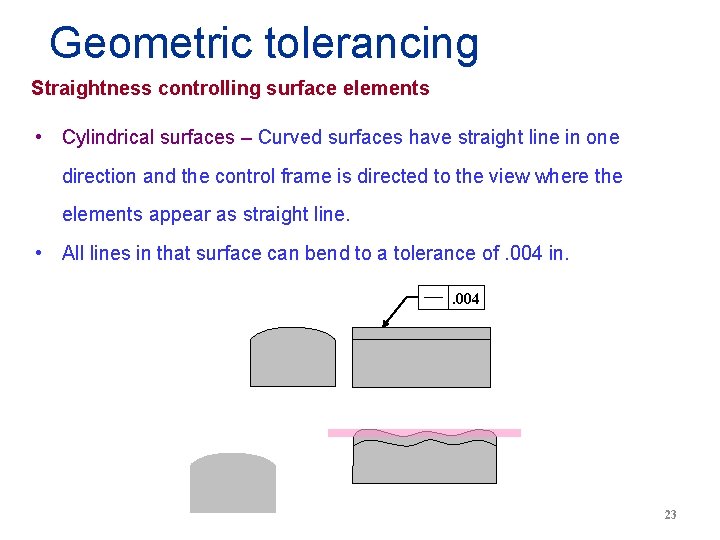
Geometric tolerancing Straightness controlling surface elements • Cylindrical surfaces – Curved surfaces have straight line in one direction and the control frame is directed to the view where the elements appear as straight line. • All lines in that surface can bend to a tolerance of. 004 in. . 004 23

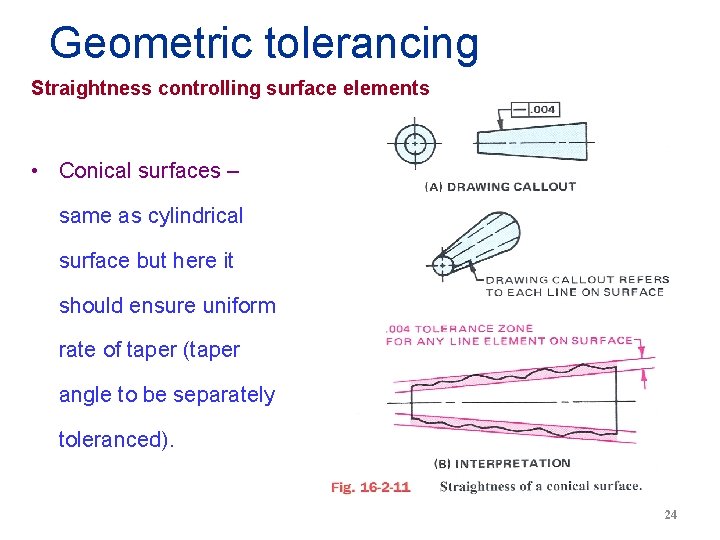
Geometric tolerancing Straightness controlling surface elements • Conical surfaces – same as cylindrical surface but here it should ensure uniform rate of taper (taper angle to be separately toleranced). 24

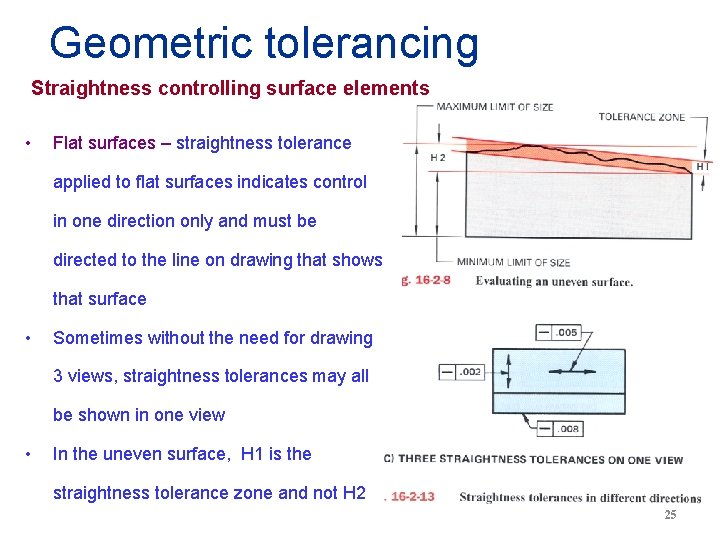
Geometric tolerancing Straightness controlling surface elements • Flat surfaces – straightness tolerance applied to flat surfaces indicates control in one direction only and must be directed to the line on drawing that shows that surface • Sometimes without the need for drawing 3 views, straightness tolerances may all be shown in one view • In the uneven surface, H 1 is the straightness tolerance zone and not H 2 25

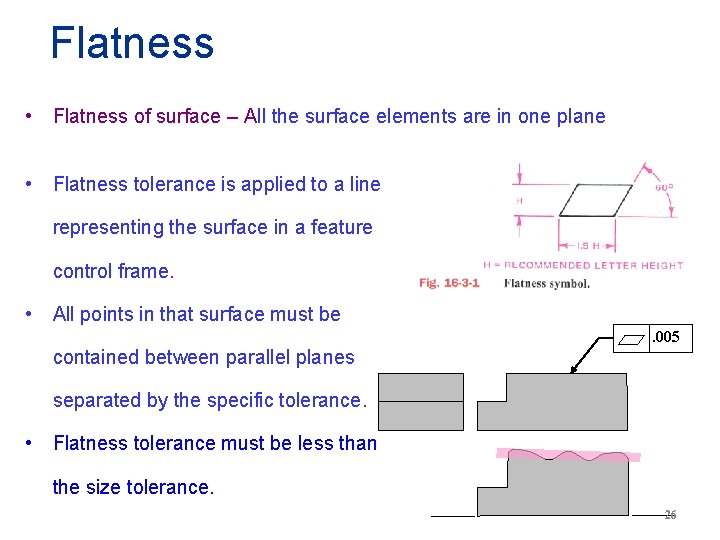
Flatness • Flatness of surface – All the surface elements are in one plane • Flatness tolerance is applied to a line representing the surface in a feature control frame. • All points in that surface must be. 005 contained between parallel planes separated by the specific tolerance. • Flatness tolerance must be less than the size tolerance. 26

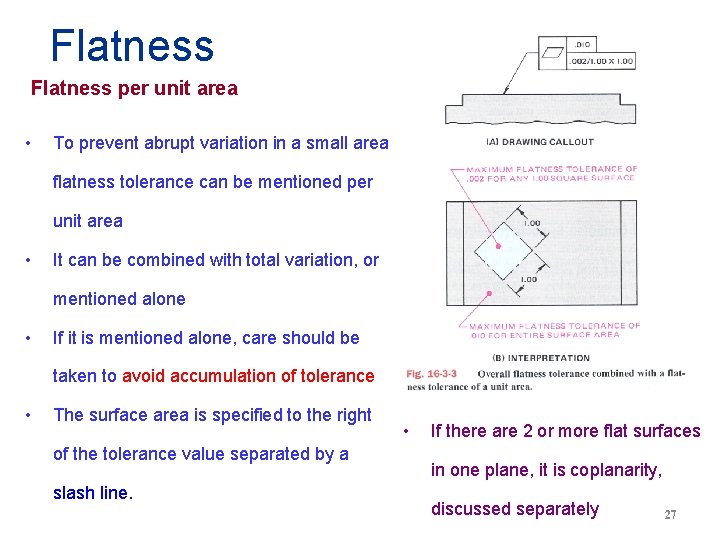
Flatness per unit area • To prevent abrupt variation in a small area flatness tolerance can be mentioned per unit area • It can be combined with total variation, or mentioned alone • If it is mentioned alone, care should be taken to avoid accumulation of tolerance • The surface area is specified to the right of the tolerance value separated by a slash line. • If there are 2 or more flat surfaces in one plane, it is coplanarity, discussed separately 27

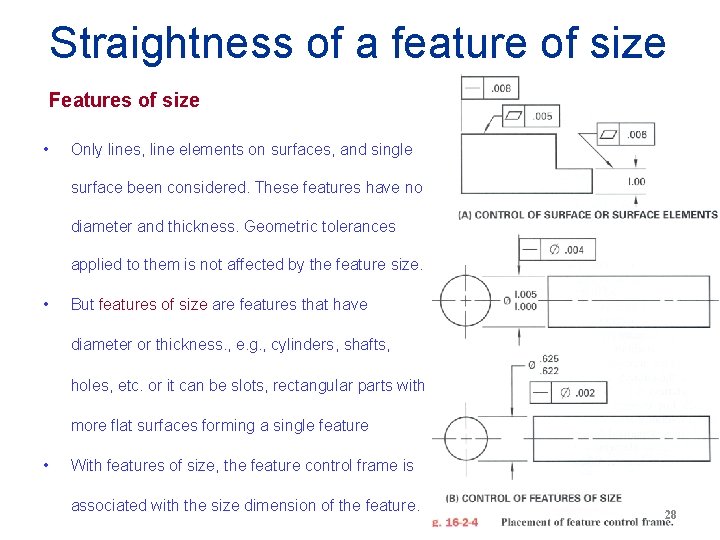
Straightness of a feature of size Features of size • Only lines, line elements on surfaces, and single surface been considered. These features have no diameter and thickness. Geometric tolerances applied to them is not affected by the feature size. • But features of size are features that have diameter or thickness. , e. g. , cylinders, shafts, holes, etc. or it can be slots, rectangular parts with more flat surfaces forming a single feature • With features of size, the feature control frame is associated with the size dimension of the feature. 28

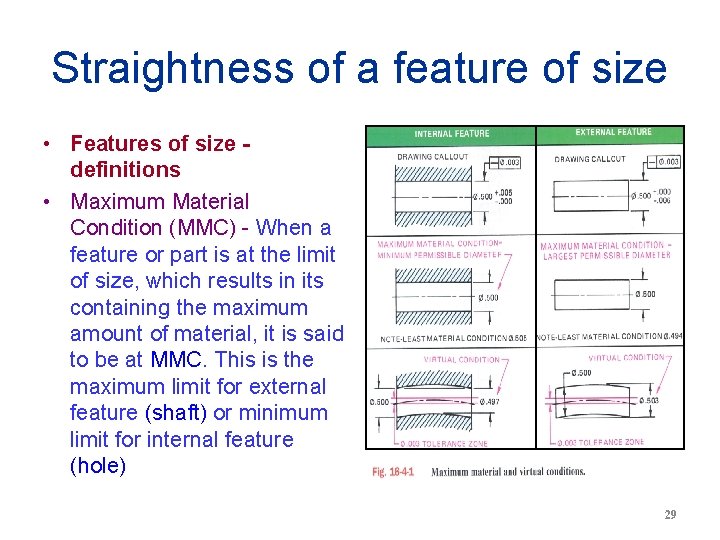
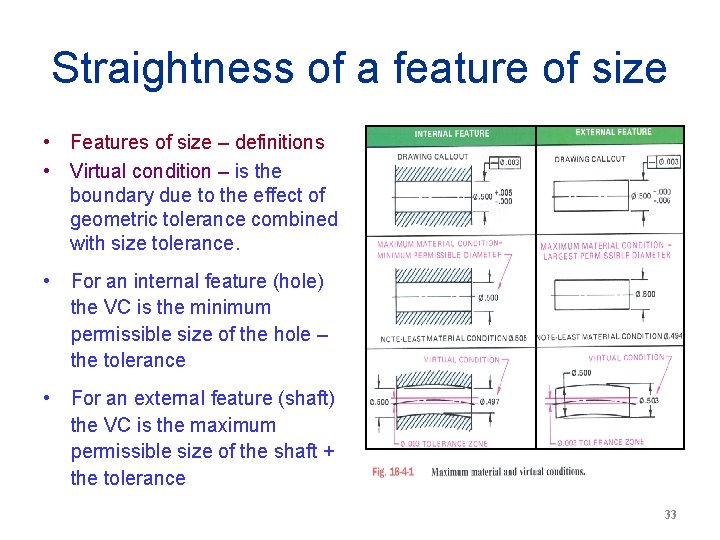
Straightness of a feature of size • Features of size definitions • Maximum Material Condition (MMC) - When a feature or part is at the limit of size, which results in its containing the maximum amount of material, it is said to be at MMC. This is the maximum limit for external feature (shaft) or minimum limit for internal feature (hole) 29

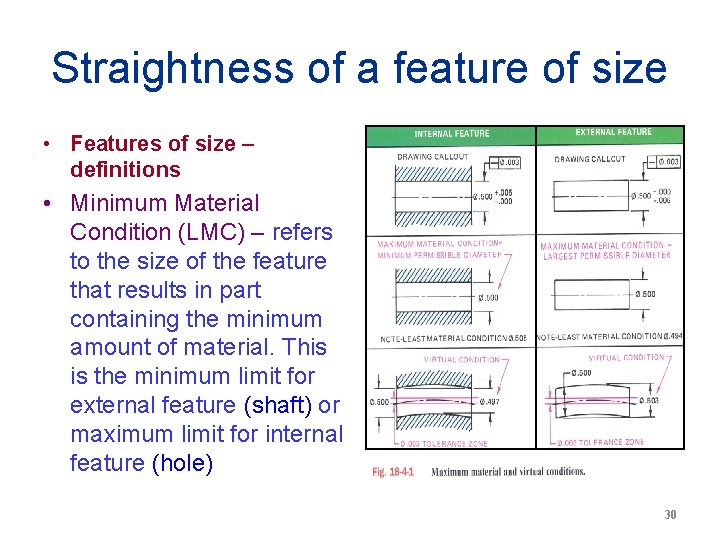
Straightness of a feature of size • Features of size – definitions • Minimum Material Condition (LMC) – refers to the size of the feature that results in part containing the minimum amount of material. This is the minimum limit for external feature (shaft) or maximum limit for internal feature (hole) 30

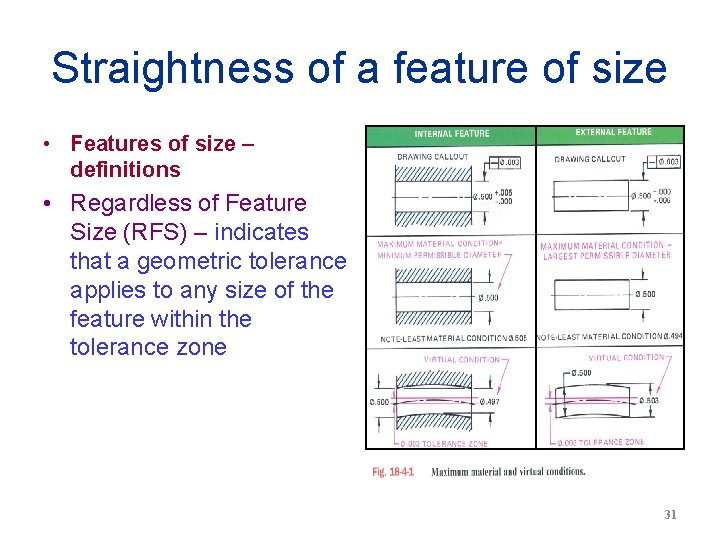
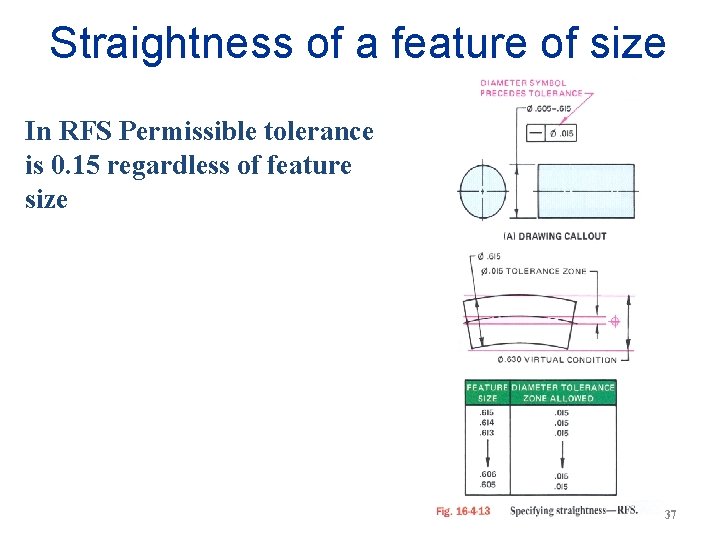
Straightness of a feature of size • Features of size – definitions • Regardless of Feature Size (RFS) – indicates that a geometric tolerance applies to any size of the feature within the tolerance zone 31

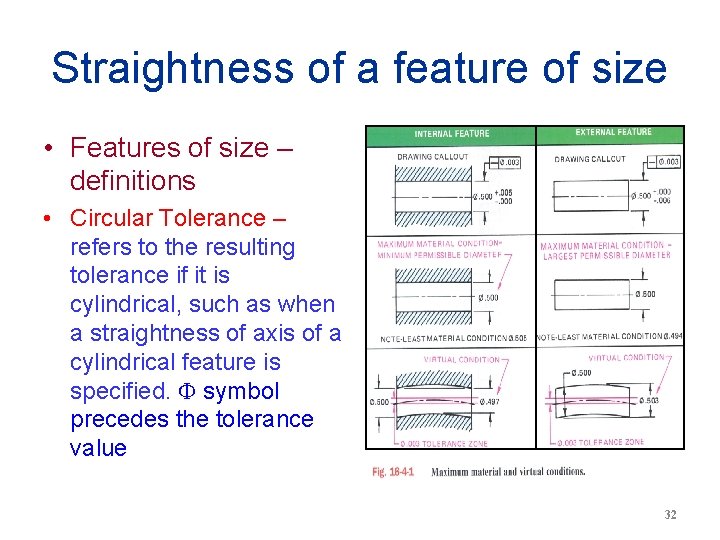
Straightness of a feature of size • Features of size – definitions • Circular Tolerance – refers to the resulting tolerance if it is cylindrical, such as when a straightness of axis of a cylindrical feature is specified. symbol precedes the tolerance value 32

Straightness of a feature of size • Features of size – definitions • Virtual condition – is the boundary due to the effect of geometric tolerance combined with size tolerance. • For an internal feature (hole) the VC is the minimum permissible size of the hole – the tolerance • For an external feature (shaft) the VC is the maximum permissible size of the shaft + the tolerance 33

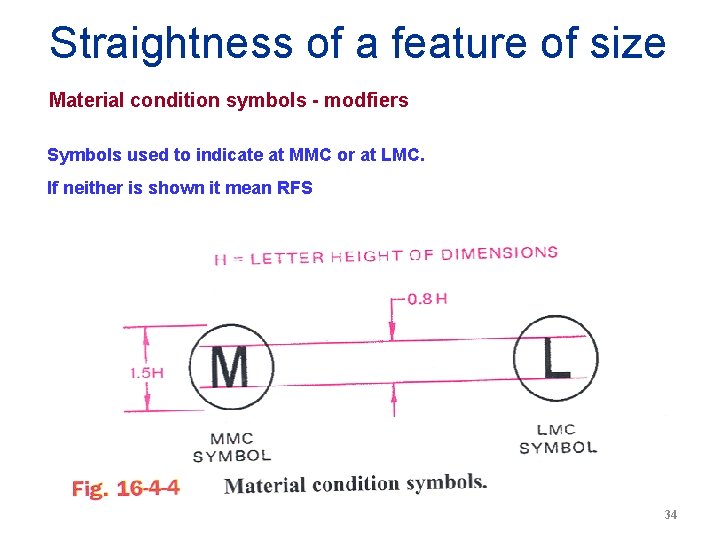
Straightness of a feature of size Material condition symbols - modfiers Symbols used to indicate at MMC or at LMC. If neither is shown it mean RFS 34

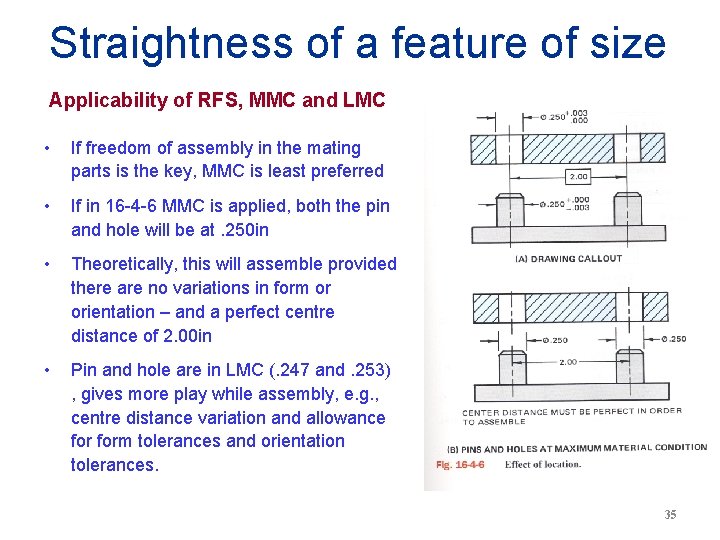
Straightness of a feature of size Applicability of RFS, MMC and LMC • If freedom of assembly in the mating parts is the key, MMC is least preferred • If in 16 -4 -6 MMC is applied, both the pin and hole will be at. 250 in • Theoretically, this will assemble provided there are no variations in form or orientation – and a perfect centre distance of 2. 00 in • Pin and hole are in LMC (. 247 and. 253) , gives more play while assembly, e. g. , centre distance variation and allowance form tolerances and orientation tolerances. 35

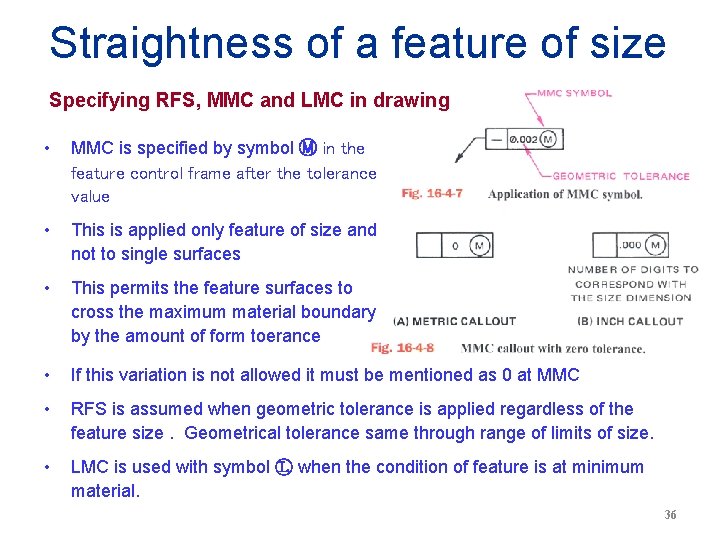
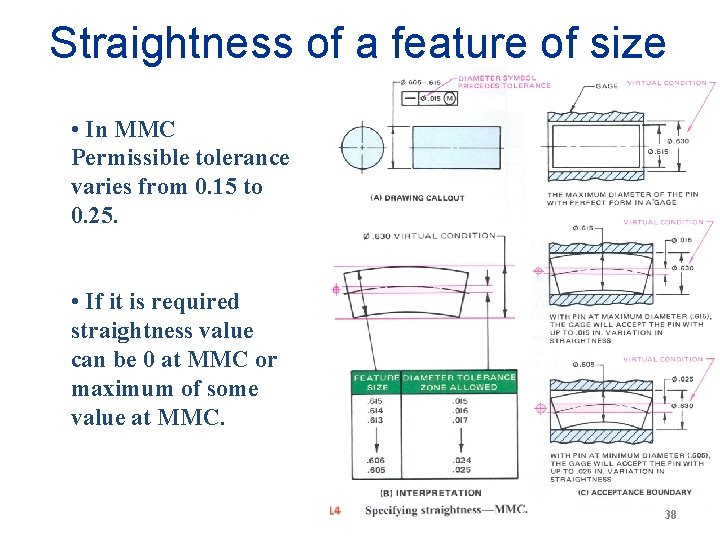
Straightness of a feature of size Specifying RFS, MMC and LMC in drawing • MMC is specified by symbol Ⓜ in the feature control frame after the tolerance value • This is applied only feature of size and not to single surfaces • This permits the feature surfaces to cross the maximum material boundary by the amount of form toerance • If this variation is not allowed it must be mentioned as 0 at MMC • RFS is assumed when geometric tolerance is applied regardless of the feature size. Geometrical tolerance same through range of limits of size. • LMC is used with symbol Ⓛ when the condition of feature is at minimum material. 36

Straightness of a feature of size In RFS Permissible tolerance is 0. 15 regardless of feature size 37

Straightness of a feature of size • In MMC Permissible tolerance varies from 0. 15 to 0. 25. • If it is required straightness value can be 0 at MMC or maximum of some value at MMC. 38

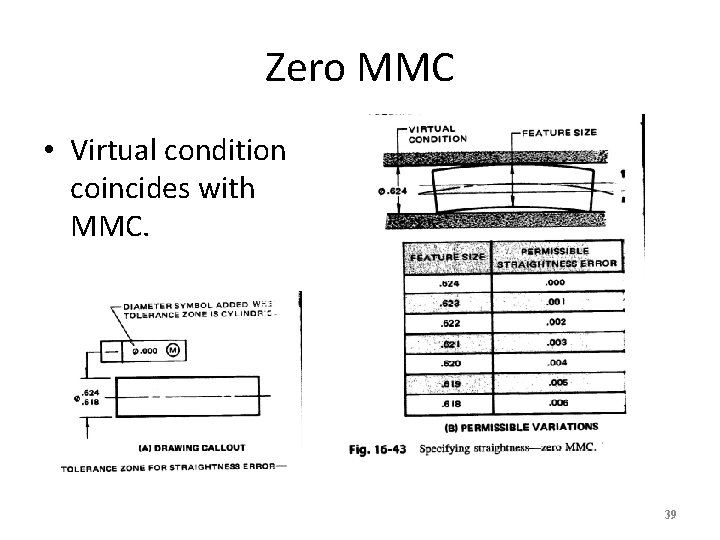
Zero MMC • Virtual condition coincides with MMC. 39

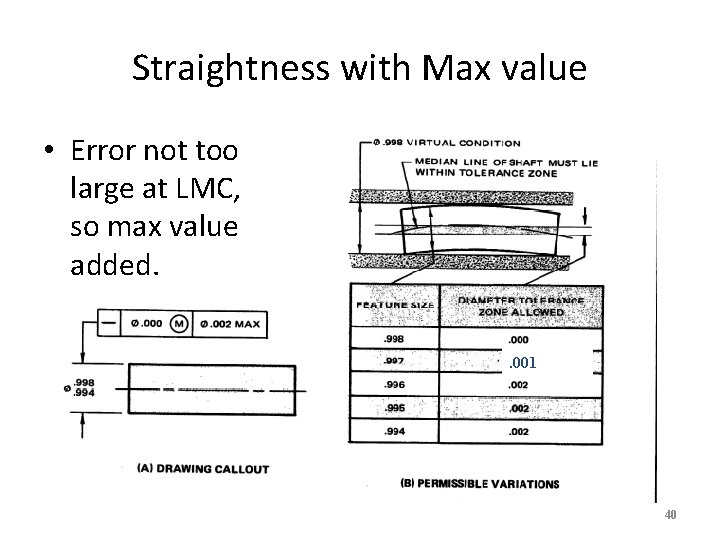
Straightness with Max value • Error not too large at LMC, so max value added. . 001 40

Datums and 3 plane concept • Datums - A datum is a theoretical point, line, plane, or other geometric surface from which dimensions are measured when so specified or to which geometric tolerances are referenced. • Datum Feature - A datum feature is a feature of a part, such as a surface, that forms the basis for a datum or is used to establish its location. • Datums for Geometric Tolerancing - Datums are exact geometric points, lines, or surfaces, each based on one or more datum features of the part. (theoretical but considered to exist) 41

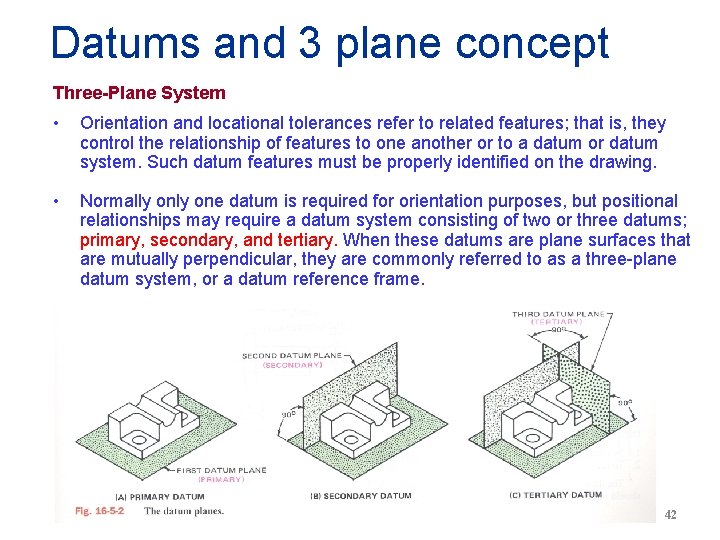
Datums and 3 plane concept Three-Plane System • Orientation and locational tolerances refer to related features; that is, they control the relationship of features to one another or to a datum or datum system. Such datum features must be properly identified on the drawing. • Normally one datum is required for orientation purposes, but positional relationships may require a datum system consisting of two or three datums; primary, secondary, and tertiary. When these datums are plane surfaces that are mutually perpendicular, they are commonly referred to as a three-plane datum system, or a datum reference frame. 42

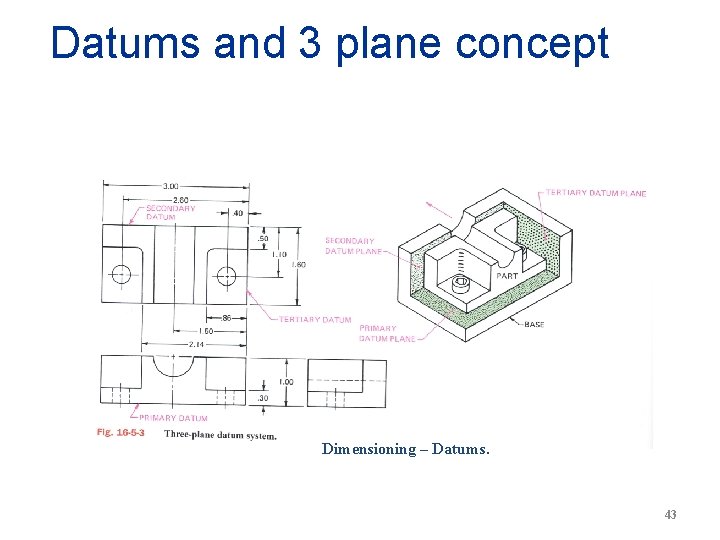
Datums and 3 plane concept Dimensioning – Datums. 43