When should you use geometric dimensioning and tolerancing
- Slides: 27

When should you use geometric dimensioning and tolerancing? 1. When part features are critical to function or interchangeability, or when functional gaging techniques are desirable. 2. When datum references are desirable to ensure consistency between design, manufacturing and verification operations. 3. When standard interpretation or tolerance is not already implied.

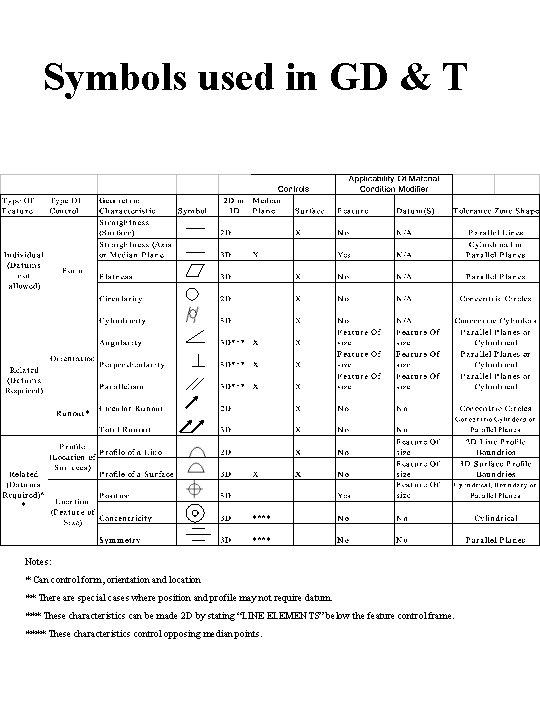
Symbols used in GD & T Notes: * Can control form, orientation and location ** There are special cases where position and profile may not require datum. *** These characteristics can be made 2 D by stating “LINE ELEMENTS” below the feature control frame. **** These characteristics control opposing median points.

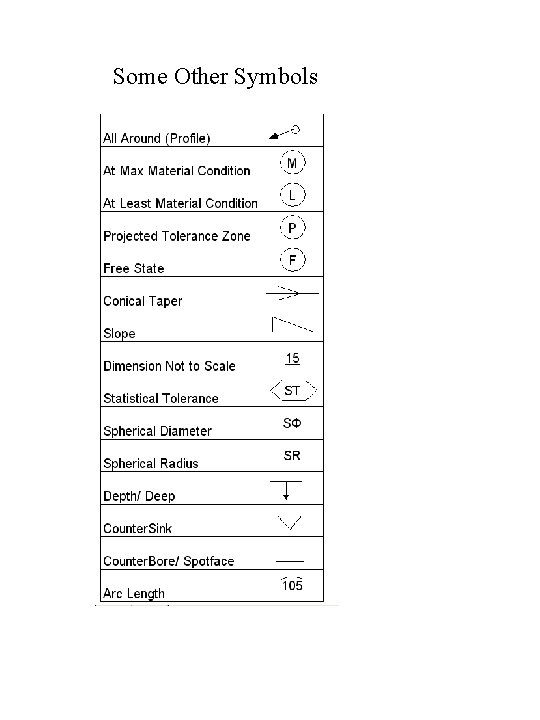
Some Other Symbols

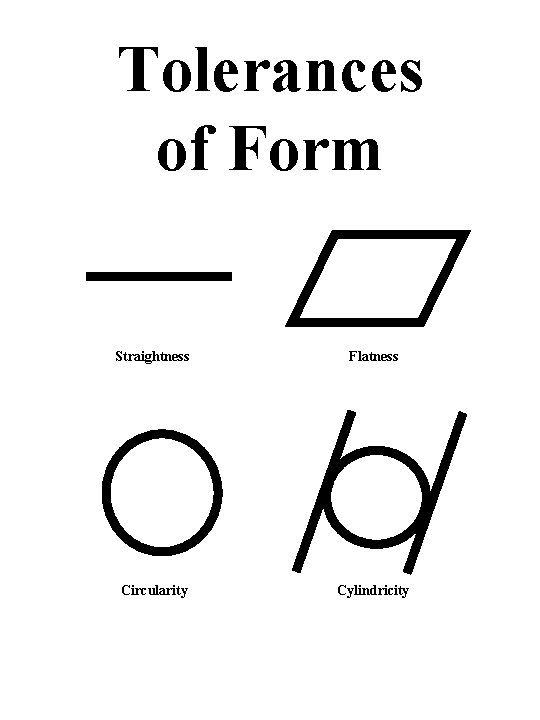
Tolerances of Form Straightness Flatness Circularity Cylindricity

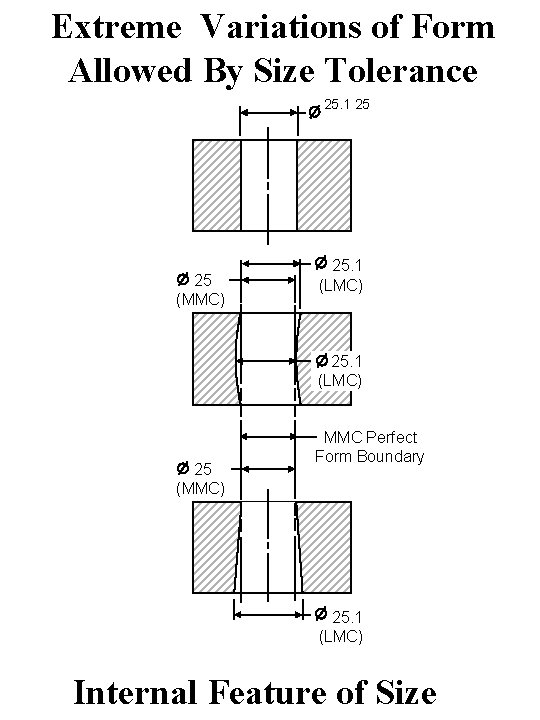
Extreme Variations of Form Allowed By Size Tolerance 25. 1 25 25 (MMC) 25. 1 (LMC) 25 (MMC) MMC Perfect Form Boundary 25. 1 (LMC) Internal Feature of Size

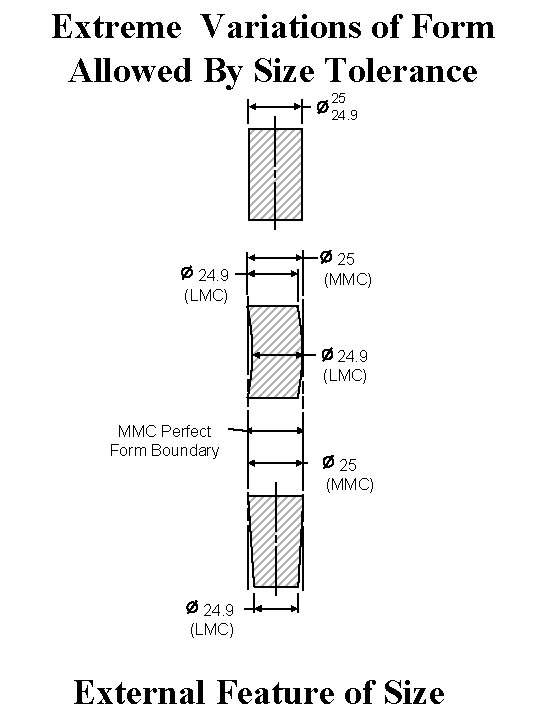
Extreme Variations of Form Allowed By Size Tolerance 25 24. 9 (LMC) 25 (MMC) 24. 9 (LMC) MMC Perfect Form Boundary 25 (MMC) 24. 9 (LMC) External Feature of Size

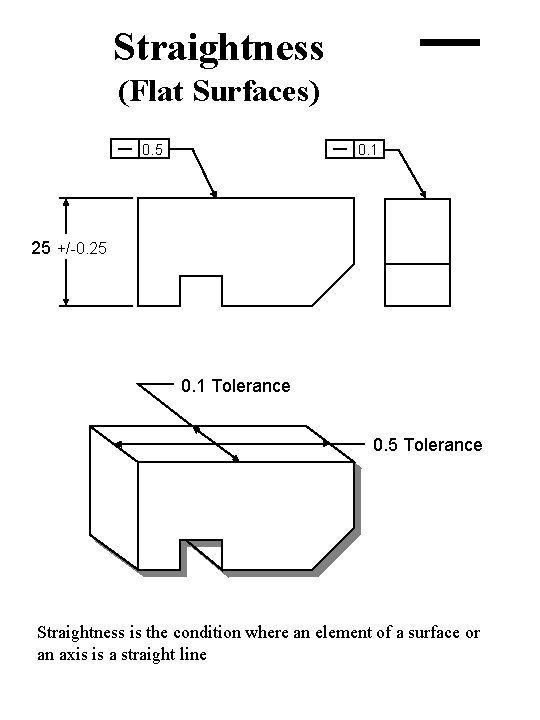
Straightness (Flat Surfaces) 0. 5 0. 1 25 +/-0. 25 0. 1 Tolerance 0. 5 Tolerance Straightness is the condition where an element of a surface or an axis is a straight line

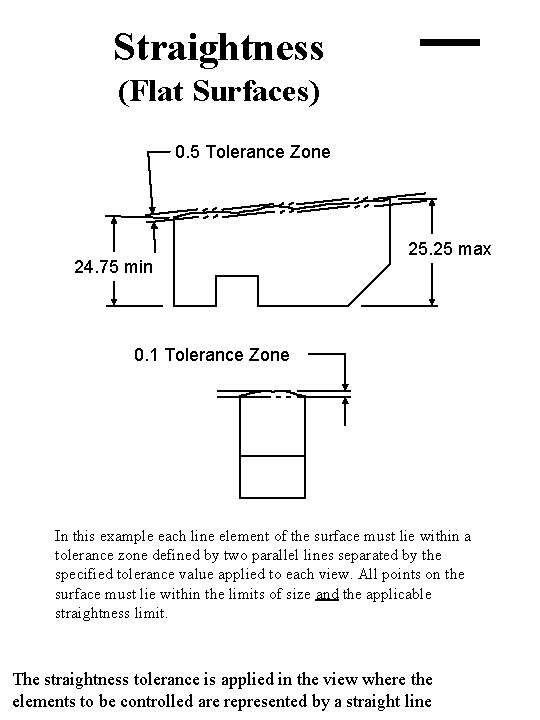
Straightness (Flat Surfaces) 0. 5 Tolerance Zone 24. 75 min 25. 25 max 0. 1 Tolerance Zone In this example each line element of the surface must lie within a tolerance zone defined by two parallel lines separated by the specified tolerance value applied to each view. All points on the surface must lie within the limits of size and the applicable straightness limit. The straightness tolerance is applied in the view where the elements to be controlled are represented by a straight line

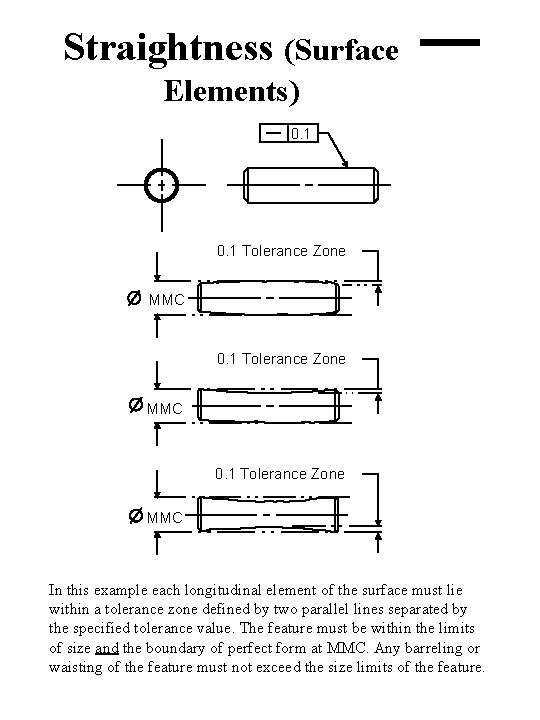
Straightness (Surface Elements) 0. 1 Tolerance Zone MMC In this example each longitudinal element of the surface must lie within a tolerance zone defined by two parallel lines separated by the specified tolerance value. The feature must be within the limits of size and the boundary of perfect form at MMC. Any barreling or waisting of the feature must not exceed the size limits of the feature.

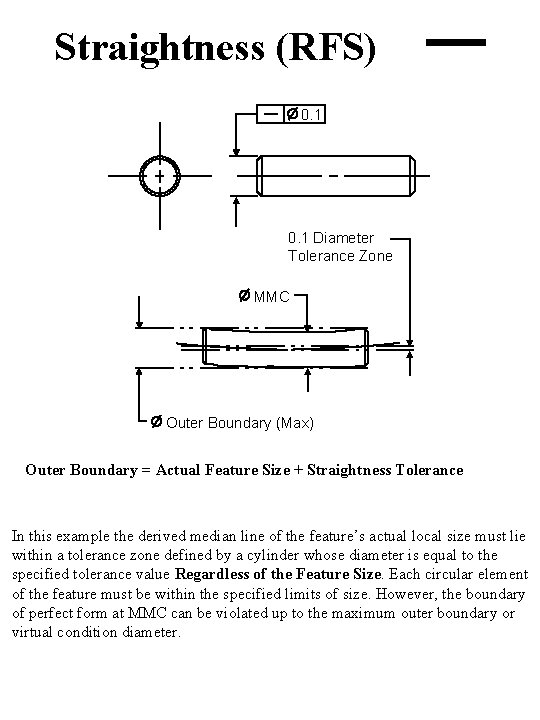
Straightness (RFS) 0. 1 Diameter Tolerance Zone MMC Outer Boundary (Max) Outer Boundary = Actual Feature Size + Straightness Tolerance In this example the derived median line of the feature’s actual local size must lie within a tolerance zone defined by a cylinder whose diameter is equal to the specified tolerance value Regardless of the Feature Size. Each circular element of the feature must be within the specified limits of size. However, the boundary of perfect form at MMC can be violated up to the maximum outer boundary or virtual condition diameter.

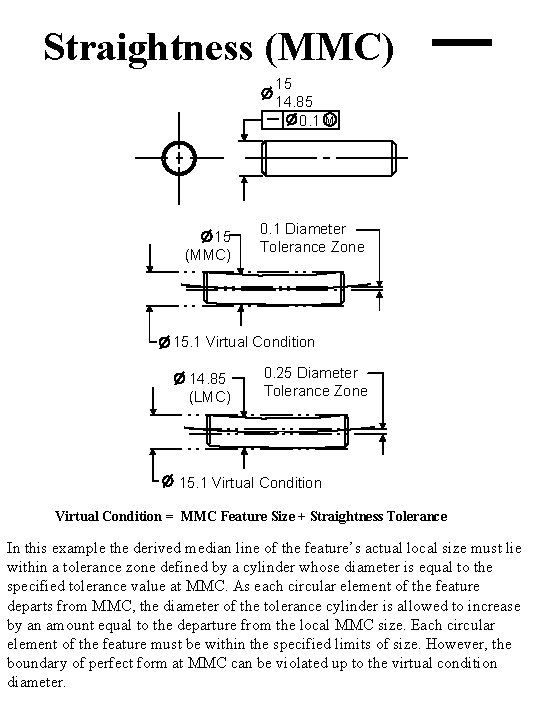
Straightness (MMC) 15 14. 85 0. 1 15 (MMC) M 0. 1 Diameter Tolerance Zone 15. 1 Virtual Condition 14. 85 (LMC) 0. 25 Diameter Tolerance Zone 15. 1 Virtual Condition = MMC Feature Size + Straightness Tolerance In this example the derived median line of the feature’s actual local size must lie within a tolerance zone defined by a cylinder whose diameter is equal to the specified tolerance value at MMC. As each circular element of the feature departs from MMC, the diameter of the tolerance cylinder is allowed to increase by an amount equal to the departure from the local MMC size. Each circular element of the feature must be within the specified limits of size. However, the boundary of perfect form at MMC can be violated up to the virtual condition diameter.

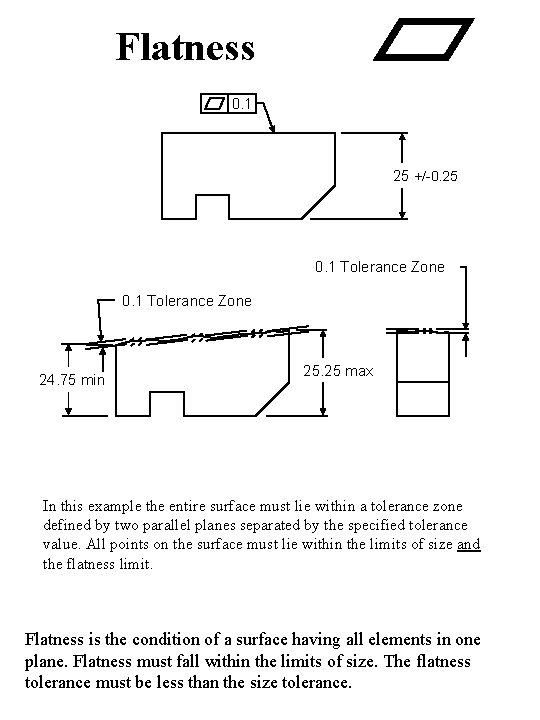
Flatness 0. 1 25 +/-0. 25 0. 1 Tolerance Zone 24. 75 min 25. 25 max In this example the entire surface must lie within a tolerance zone defined by two parallel planes separated by the specified tolerance value. All points on the surface must lie within the limits of size and the flatness limit. Flatness is the condition of a surface having all elements in one plane. Flatness must fall within the limits of size. The flatness tolerance must be less than the size tolerance.

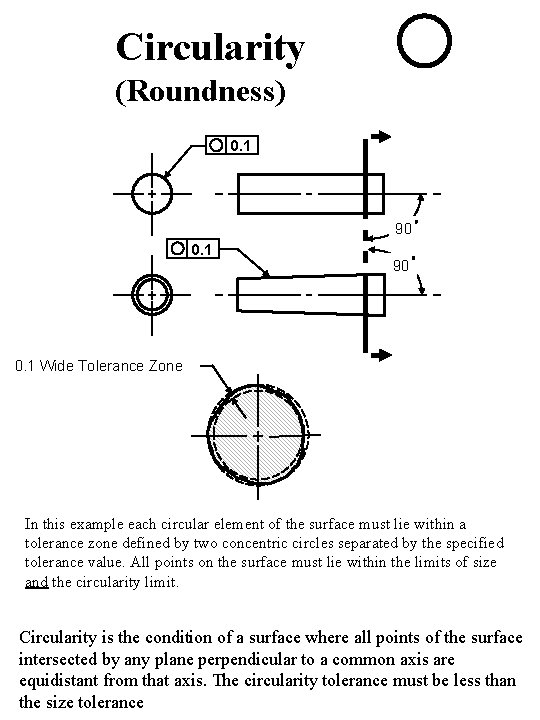
Circularity (Roundness) 0. 1 90 0. 1 Wide Tolerance Zone In this example each circular element of the surface must lie within a tolerance zone defined by two concentric circles separated by the specified tolerance value. All points on the surface must lie within the limits of size and the circularity limit. Circularity is the condition of a surface where all points of the surface intersected by any plane perpendicular to a common axis are equidistant from that axis. The circularity tolerance must be less than the size tolerance

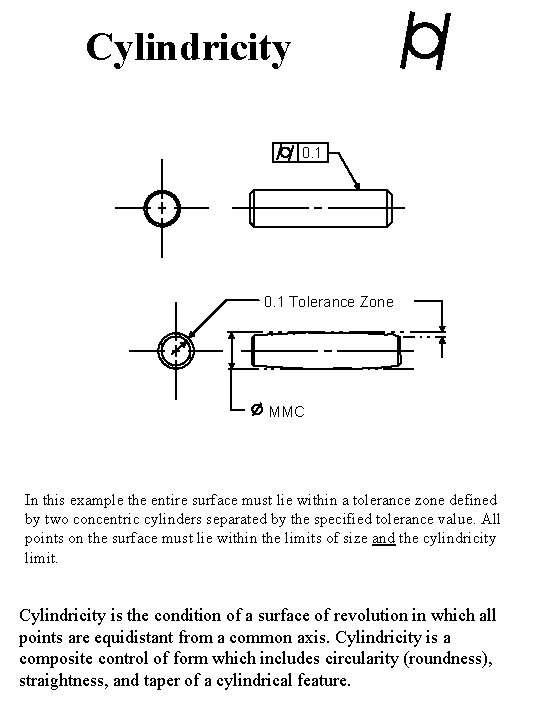
Cylindricity 0. 1 Tolerance Zone MMC In this example the entire surface must lie within a tolerance zone defined by two concentric cylinders separated by the specified tolerance value. All points on the surface must lie within the limits of size and the cylindricity limit. Cylindricity is the condition of a surface of revolution in which all points are equidistant from a common axis. Cylindricity is a composite control of form which includes circularity (roundness), straightness, and taper of a cylindrical feature.

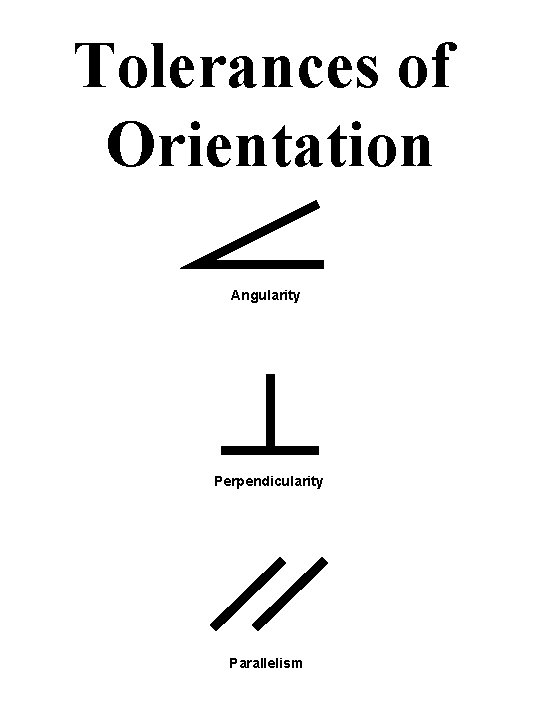
Tolerances of Orientation Angularity Perpendicularity Parallelism

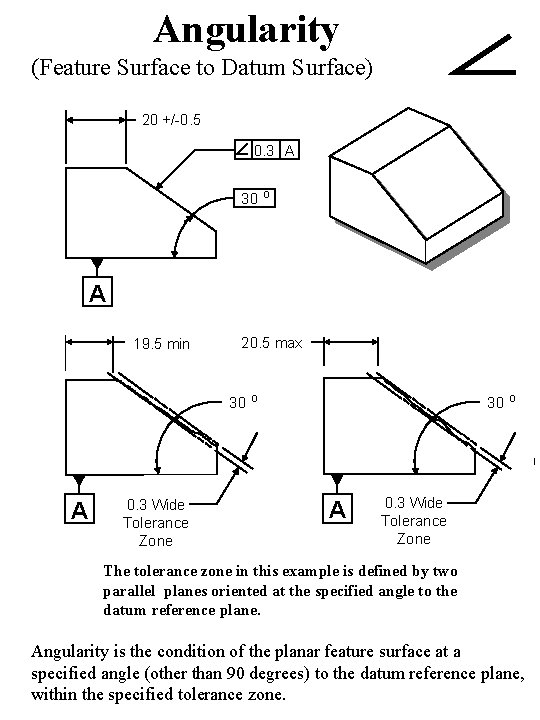
Angularity (Feature Surface to Datum Surface) 20 +/-0. 5 0. 3 A 30 o A 19. 5 min 20. 5 max 30 A 0. 3 Wide Tolerance Zone o 30 A o 0. 3 Wide Tolerance Zone The tolerance zone in this example is defined by two parallel planes oriented at the specified angle to the datum reference plane. Angularity is the condition of the planar feature surface at a specified angle (other than 90 degrees) to the datum reference plane, within the specified tolerance zone.

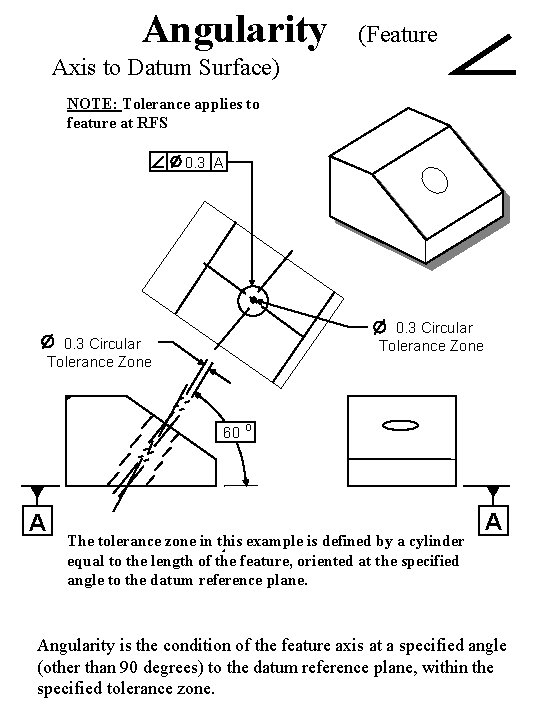
Angularity (Feature Axis to Datum Surface) NOTE: Tolerance applies to feature at RFS 0. 3 A 0. 3 Circular Tolerance Zone 60 A o The tolerance zone in this example is defined by a cylinder equal to the length of the feature, oriented at the specified angle to the datum reference plane. A Angularity is the condition of the feature axis at a specified angle (other than 90 degrees) to the datum reference plane, within the specified tolerance zone.

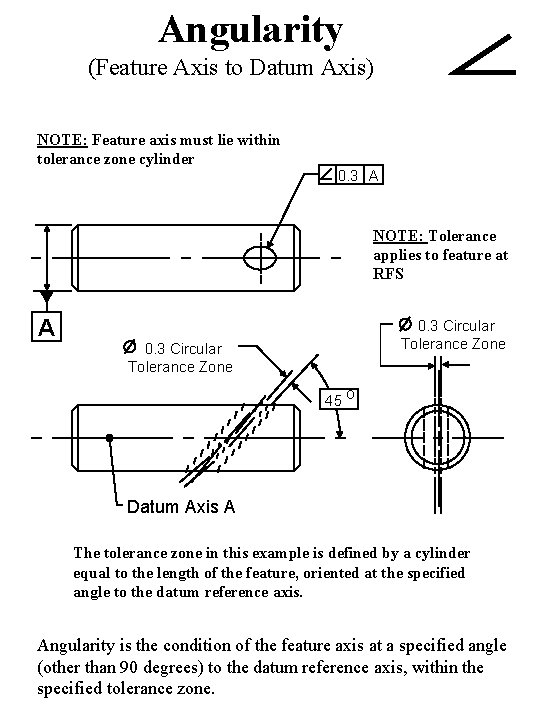
Angularity (Feature Axis to Datum Axis) NOTE: Feature axis must lie within tolerance zone cylinder 0. 3 A NOTE: Tolerance applies to feature at RFS A 0. 3 Circular Tolerance Zone 45 o Datum Axis A The tolerance zone in this example is defined by a cylinder equal to the length of the feature, oriented at the specified angle to the datum reference axis. Angularity is the condition of the feature axis at a specified angle (other than 90 degrees) to the datum reference axis, within the specified tolerance zone.

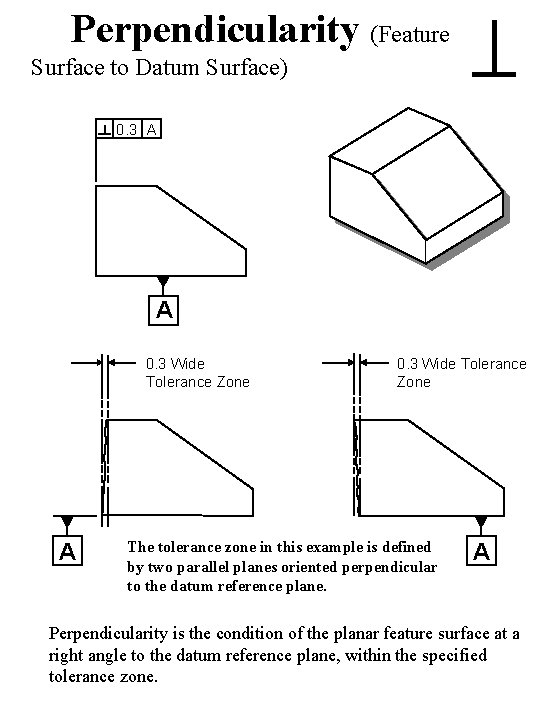
Perpendicularity (Feature Surface to Datum Surface) 0. 3 A A 0. 3 Wide Tolerance Zone The tolerance zone in this example is defined by two parallel planes oriented perpendicular to the datum reference plane. A Perpendicularity is the condition of the planar feature surface at a right angle to the datum reference plane, within the specified tolerance zone.

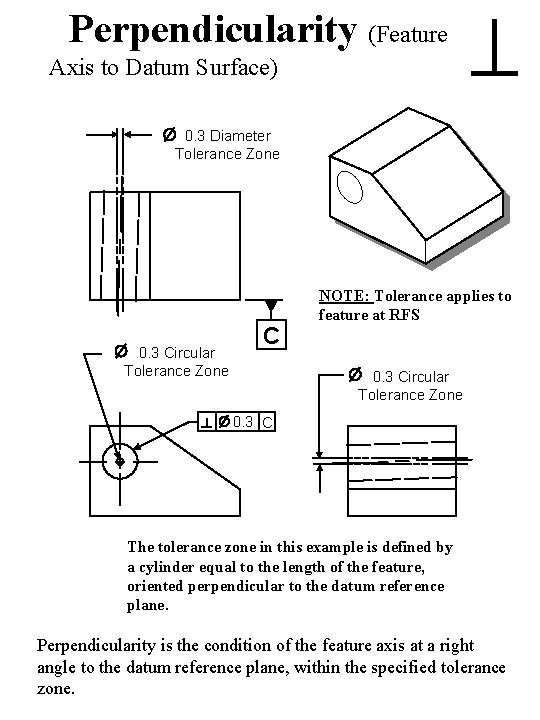
Perpendicularity (Feature Axis to Datum Surface) 0. 3 Diameter Tolerance Zone 0. 3 Circular Tolerance Zone C NOTE: Tolerance applies to feature at RFS 0. 3 Circular Tolerance Zone 0. 3 C The tolerance zone in this example is defined by a cylinder equal to the length of the feature, oriented perpendicular to the datum reference plane. Perpendicularity is the condition of the feature axis at a right angle to the datum reference plane, within the specified tolerance zone.

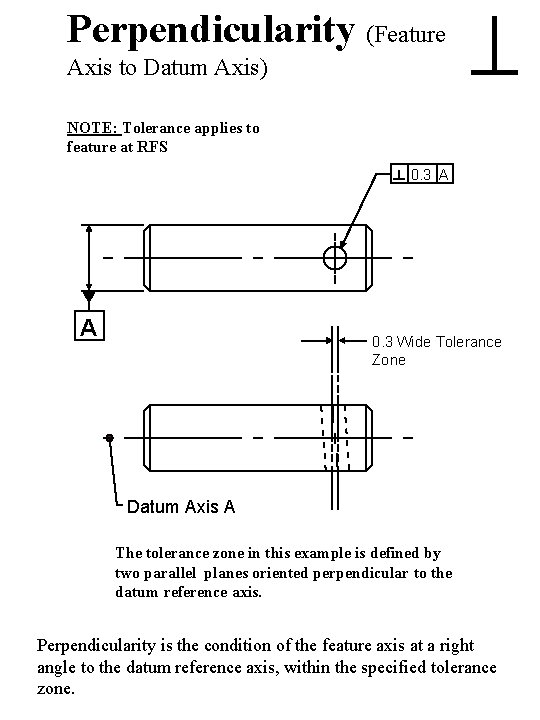
Perpendicularity (Feature Axis to Datum Axis) NOTE: Tolerance applies to feature at RFS 0. 3 A A 0. 3 Wide Tolerance Zone Datum Axis A The tolerance zone in this example is defined by two parallel planes oriented perpendicular to the datum reference axis. Perpendicularity is the condition of the feature axis at a right angle to the datum reference axis, within the specified tolerance zone.

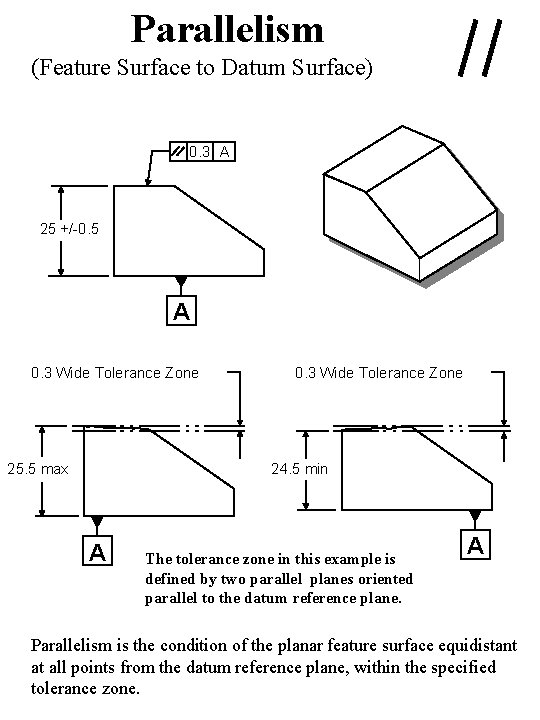
Parallelism (Feature Surface to Datum Surface) 0. 3 A 25 +/-0. 5 A 0. 3 Wide Tolerance Zone 25. 5 max 0. 3 Wide Tolerance Zone 24. 5 min A The tolerance zone in this example is defined by two parallel planes oriented parallel to the datum reference plane. A Parallelism is the condition of the planar feature surface equidistant at all points from the datum reference plane, within the specified tolerance zone.

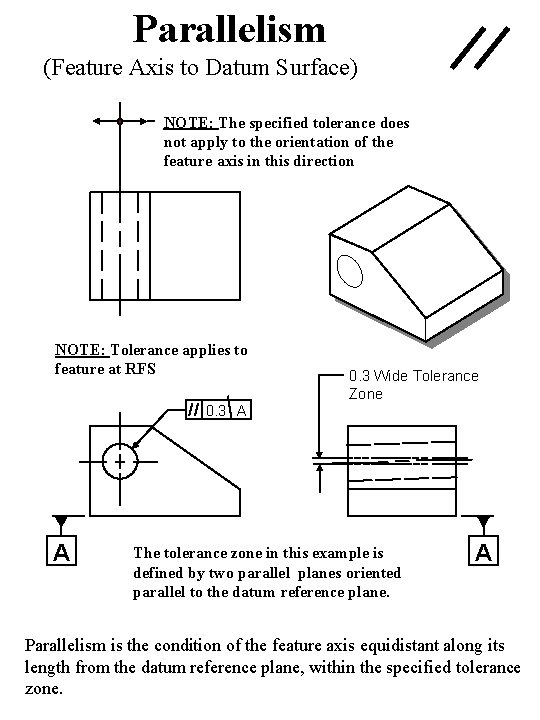
Parallelism (Feature Axis to Datum Surface) NOTE: The specified tolerance does not apply to the orientation of the feature axis in this direction NOTE: Tolerance applies to feature at RFS 0. 3 Wide Tolerance Zone 0. 3 A A The tolerance zone in this example is defined by two parallel planes oriented parallel to the datum reference plane. A Parallelism is the condition of the feature axis equidistant along its length from the datum reference plane, within the specified tolerance zone.

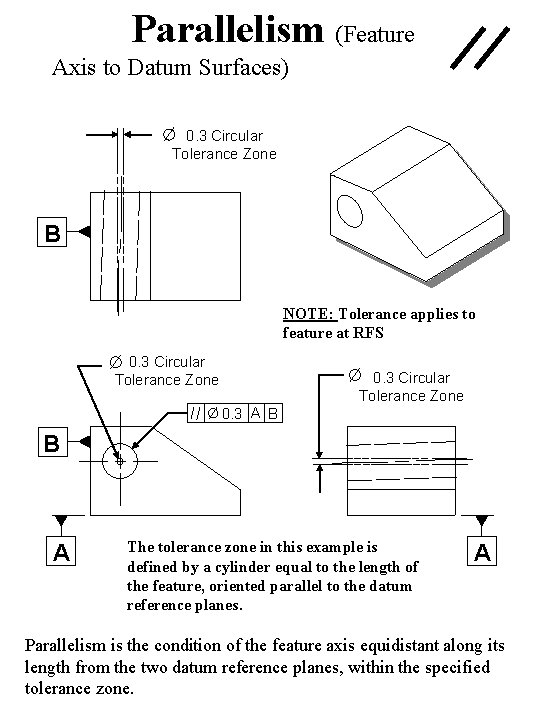
Parallelism (Feature Axis to Datum Surfaces) 0. 3 Circular Tolerance Zone B NOTE: Tolerance applies to feature at RFS 0. 3 Circular Tolerance Zone 0. 3 A B B A The tolerance zone in this example is defined by a cylinder equal to the length of the feature, oriented parallel to the datum reference planes. A Parallelism is the condition of the feature axis equidistant along its length from the two datum reference planes, within the specified tolerance zone.

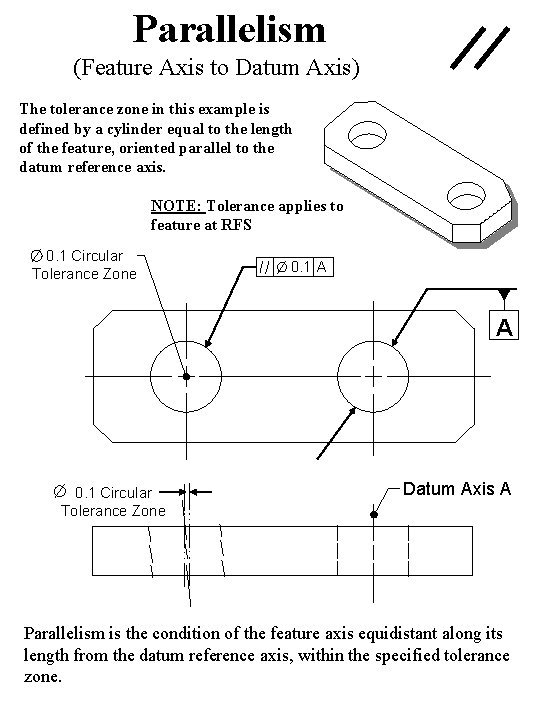
Parallelism (Feature Axis to Datum Axis) The tolerance zone in this example is defined by a cylinder equal to the length of the feature, oriented parallel to the datum reference axis. NOTE: Tolerance applies to feature at RFS 0. 1 Circular Tolerance Zone 0. 1 A A 0. 1 Circular Tolerance Zone Datum Axis A Parallelism is the condition of the feature axis equidistant along its length from the datum reference axis, within the specified tolerance zone.

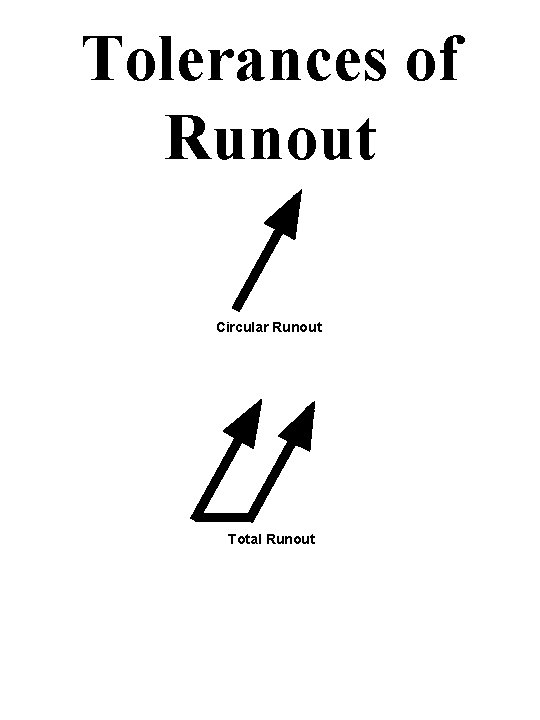
Tolerances of Runout Circular Runout Total Runout

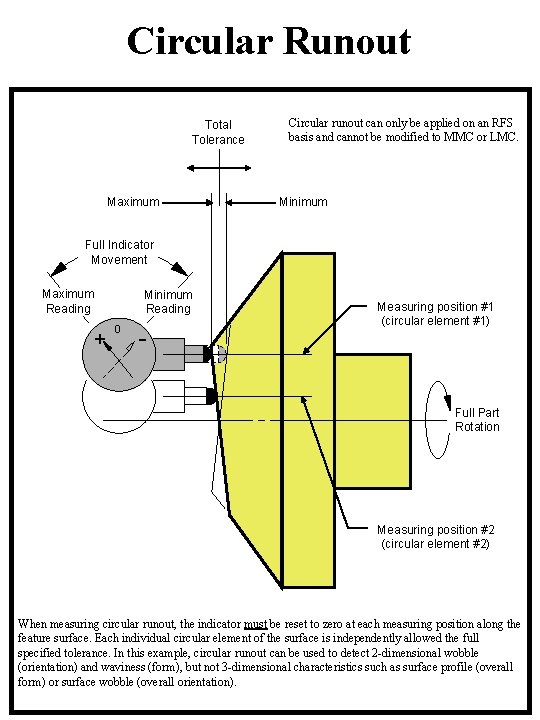
Circular Runout Total Tolerance Maximum Circular runout can only be applied on an RFS basis and cannot be modified to MMC or LMC. Minimum Full Indicator Movement Maximum Reading + Minimum Reading 0 - Measuring position #1 (circular element #1) Full Part Rotation Measuring position #2 (circular element #2) When measuring circular runout, the indicator must be reset to zero at each measuring position along the feature surface. Each individual circular element of the surface is independently allowed the full specified tolerance. In this example, circular runout can be used to detect 2 -dimensional wobble (orientation) and waviness (form), but not 3 -dimensional characteristics such as surface profile (overall form) or surface wobble (overall orientation).