Computer Integrated Manufacturing CIM Defining Computer Aided Design

- Slides: 69

Computer Integrated Manufacturing CIM

Defining Computer Aided Design (CAD) q Computer Aided Design (CAD) is the modeling of physical objects on computers , allowing both interactive and automatic analysis of design, and the expression of design in a form suitable for manufacturing. q Computer Aided Design (CAD) can be defined as the use of computer systems to assist in the creation, modification, analysis, or optimization of a design (computer system consists of Hardware and Software).

Selection of CAD Systems q The following is a brief characterization of various elements of CAD systems. This will help in evaluating and selection the CAD system by utilizing a specific criteria. q These characteristics are: • System related issues. • Geometric modeling related issues. • Design documentation related issues. • Applications related issues.

1 - System related issues • System-related issues essentially concern Hardware, Software, Maintenance, and Service support 1 - Hardware Normally, there are two popular hardware configurations of workstations • Workstations with disks. • Workstations without disks 2 - Software selection depends on three main factors: • The type of operating system. • The type of user interface. • The quality of documentation.

1 - System related issues 3 - Maintenance When selection a CAD system, it is important to examine critically the issues of repair and maintenance of hardware systems and upgrade of the software. 4 - Vendor service & support Vendor support typically includes training, field services, and technical support.

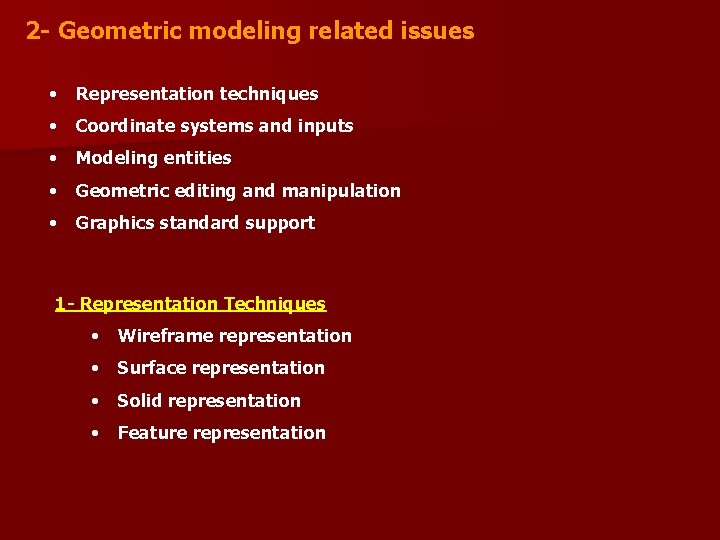
2 - Geometric modeling related issues • Representation techniques • Coordinate systems and inputs • Modeling entities • Geometric editing and manipulation • Graphics standard support 1 - Representation Techniques • Wireframe representation • Surface representation • Solid representation • Feature representation

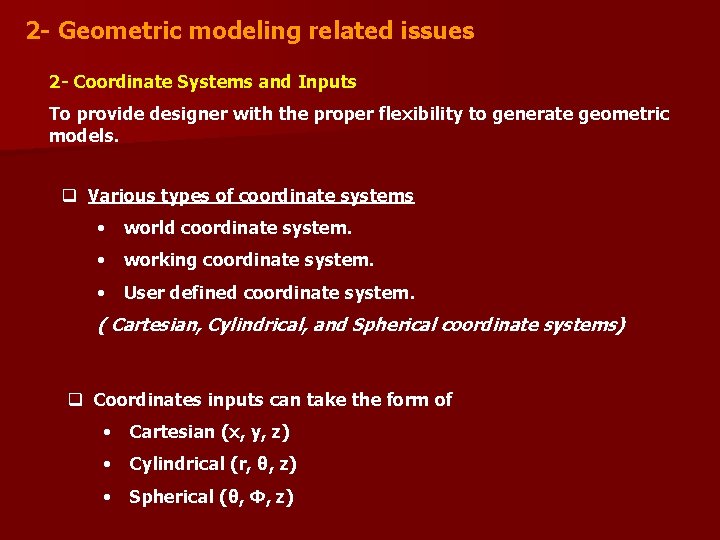
2 - Geometric modeling related issues 2 - Coordinate Systems and Inputs To provide designer with the proper flexibility to generate geometric models. q Various types of coordinate systems • world coordinate system. • working coordinate system. • User defined coordinate system. ( Cartesian, Cylindrical, and Spherical coordinate systems) q Coordinates inputs can take the form of • Cartesian (x, y, z) • Cylindrical (r, θ, z) • Spherical (θ, Φ, z)

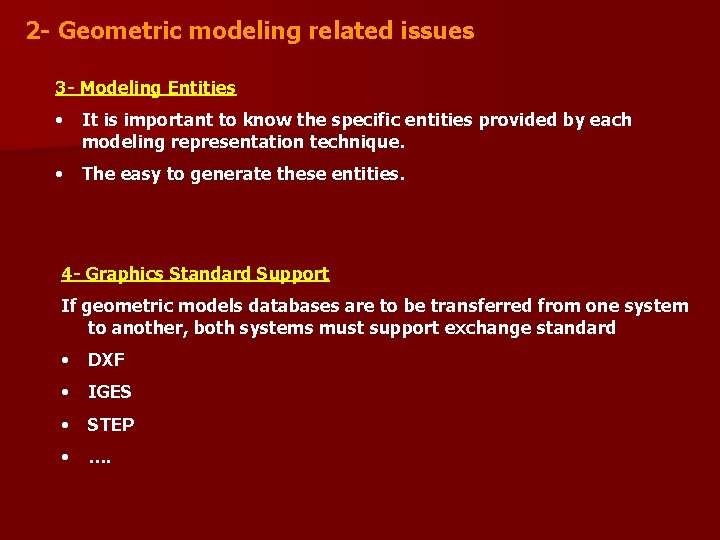
2 - Geometric modeling related issues 3 - Modeling Entities • It is important to know the specific entities provided by each modeling representation technique. • The easy to generate these entities. 4 - Graphics Standard Support If geometric models databases are to be transferred from one system to another, both systems must support exchange standard • DXF • IGES • STEP • ….

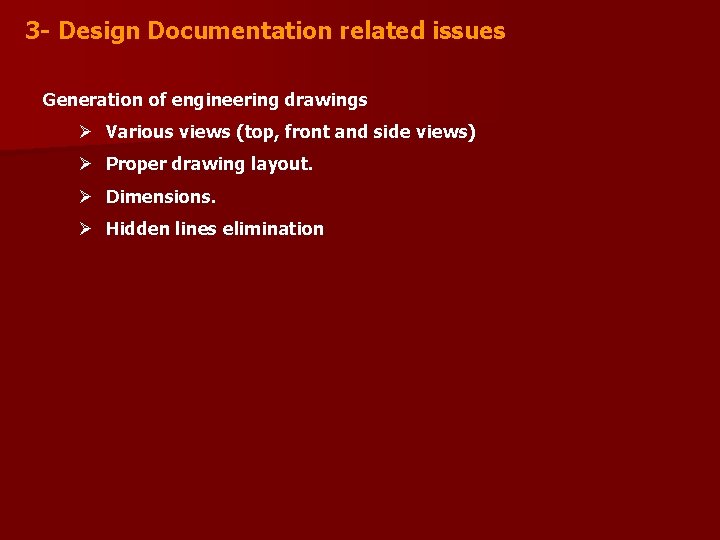
3 - Design Documentation related issues Generation of engineering drawings Ø Various views (top, front and side views) Ø Proper drawing layout. Ø Dimensions. Ø Hidden lines elimination

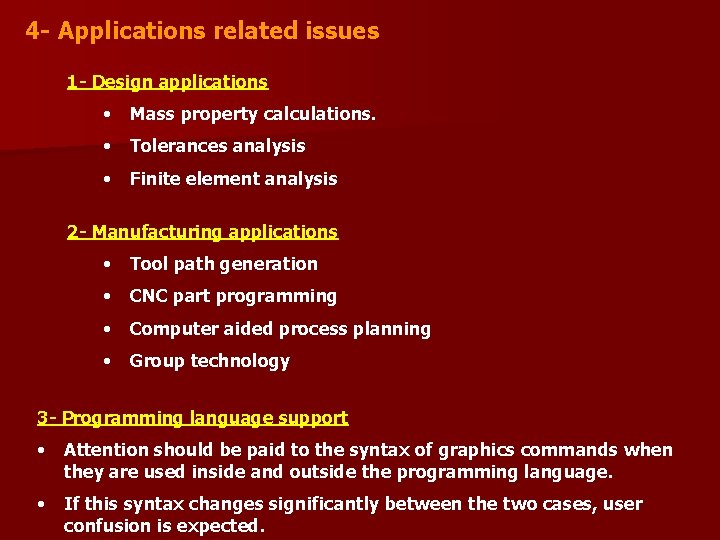
4 - Applications related issues 1 - Design applications • Mass property calculations. • Tolerances analysis • Finite element analysis 2 - Manufacturing applications • Tool path generation • CNC part programming • Computer aided process planning • Group technology 3 - Programming language support • Attention should be paid to the syntax of graphics commands when they are used inside and outside the programming language. • If this syntax changes significantly between the two cases, user confusion is expected.

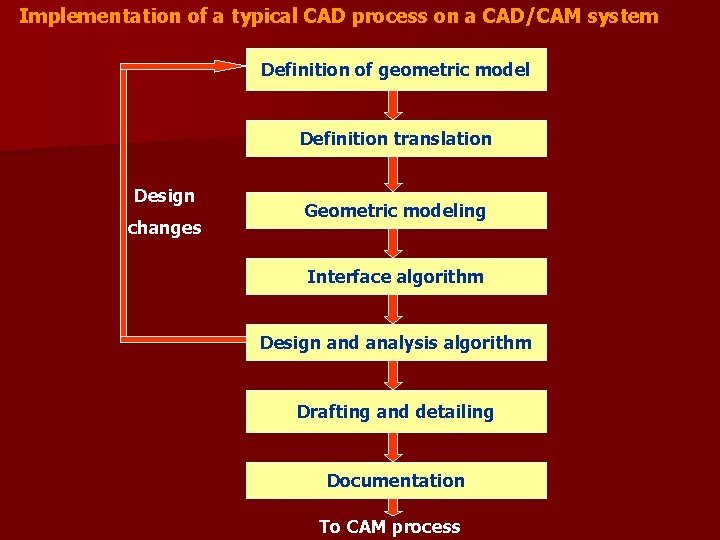
Implementation of a typical CAD process on a CAD/CAM system Definition of geometric model Definition translation Design changes Geometric modeling Interface algorithm Design and analysis algorithm Drafting and detailing Documentation To CAM process

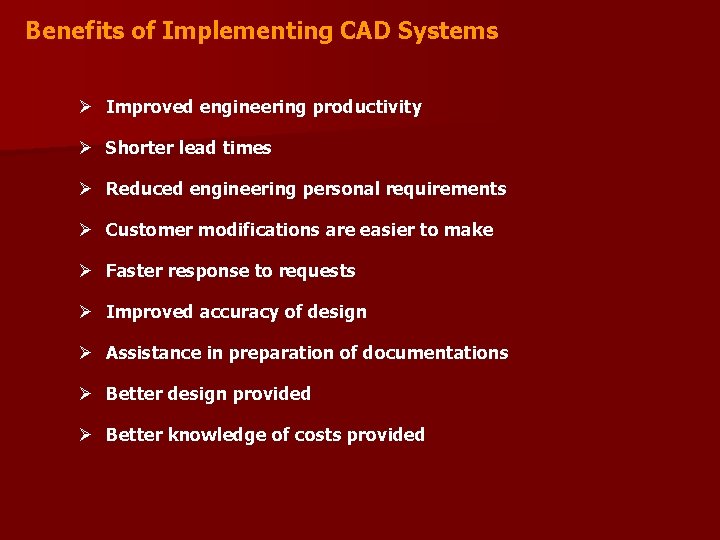
Benefits of Implementing CAD Systems Ø Improved engineering productivity Ø Shorter lead times Ø Reduced engineering personal requirements Ø Customer modifications are easier to make Ø Faster response to requests Ø Improved accuracy of design Ø Assistance in preparation of documentations Ø Better design provided Ø Better knowledge of costs provided

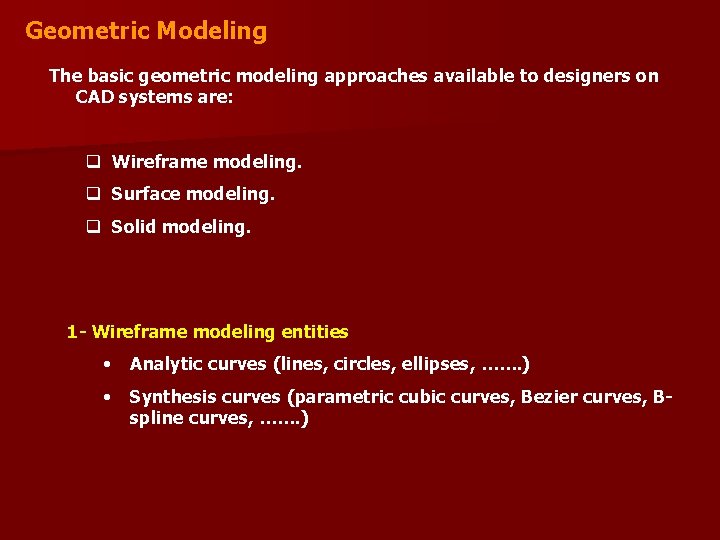
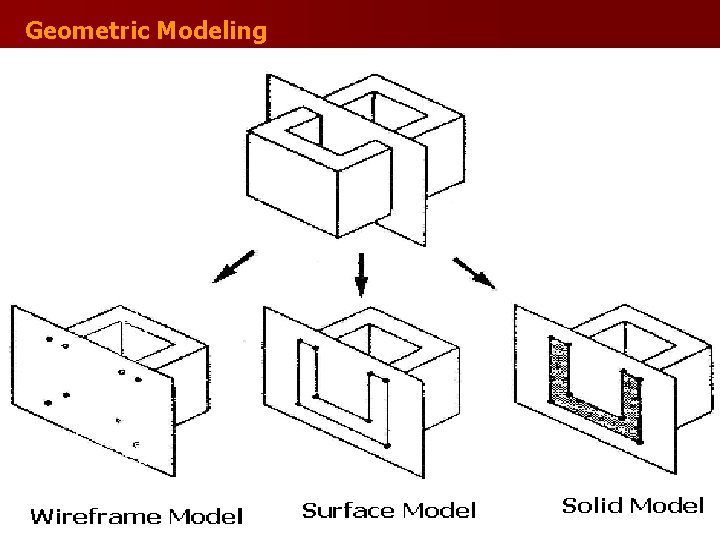
Geometric Modeling The basic geometric modeling approaches available to designers on CAD systems are: q Wireframe modeling. q Surface modeling. q Solid modeling. 1 - Wireframe modeling entities • Analytic curves (lines, circles, ellipses, ……. ) • Synthesis curves (parametric cubic curves, Bezier curves, Bspline curves, ……. )

Geometric Modeling

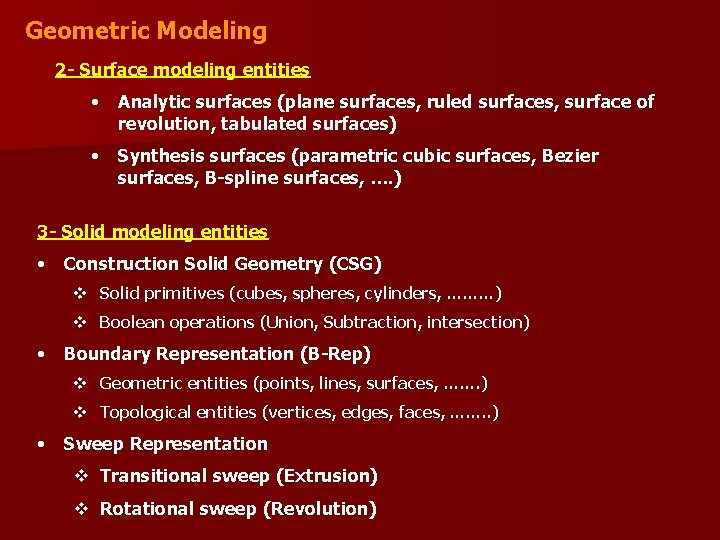
Geometric Modeling 2 - Surface modeling entities • Analytic surfaces (plane surfaces, ruled surfaces, surface of revolution, tabulated surfaces) • Synthesis surfaces (parametric cubic surfaces, Bezier surfaces, B-spline surfaces, …. ) 3 - Solid modeling entities • Construction Solid Geometry (CSG) v Solid primitives (cubes, spheres, cylinders, ………) v Boolean operations (Union, Subtraction, intersection) • Boundary Representation (B-Rep) v Geometric entities (points, lines, surfaces, ……. ) v Topological entities (vertices, edges, faces, ……. . ) • Sweep Representation v Transitional sweep (Extrusion) v Rotational sweep (Revolution)

Parametric Modeling • Methodology utilizes dimension-driven capability. • By dimension-driven capability we mean that an object defined by a set of dimensions can vary in size according to the dimensions associated with it at any time during the design process

Feature-based Modeling A feature represents the engineering meaning or significance of the geometry of a part. q Feature modeling techniques • Interactive feature definition • Design by features Ø Destructive by features Ø Synthesis by features • Automatic feature recognition Ø Machining region recognition Ø Pre-defined feature recognition

CAD Data Exchange Two important issues in this subject: 1. Data representation. 2. Data exchange • Data translation between CAD systems • Data sharing on database • DXF (Drawing e. Xchange Format) • IGES (Initial Graphics Exchange Format) • STEP (STandard for Exchange of Product data)

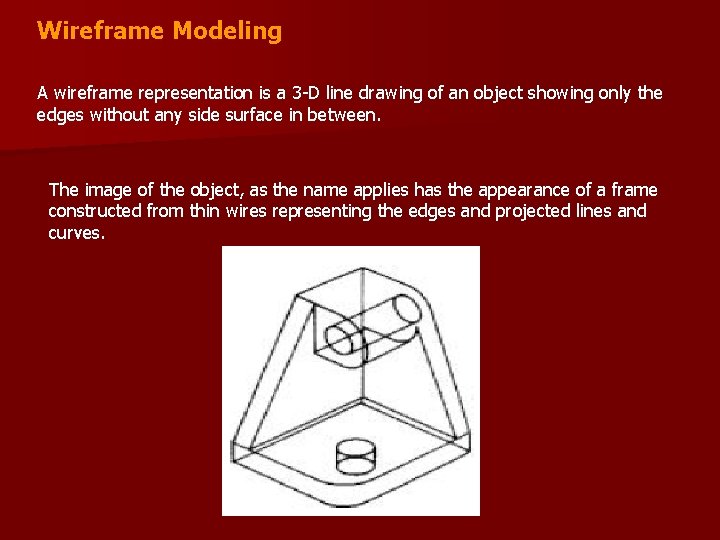
Wireframe Modeling A wireframe representation is a 3 -D line drawing of an object showing only the edges without any side surface in between. The image of the object, as the name applies has the appearance of a frame constructed from thin wires representing the edges and projected lines and curves.

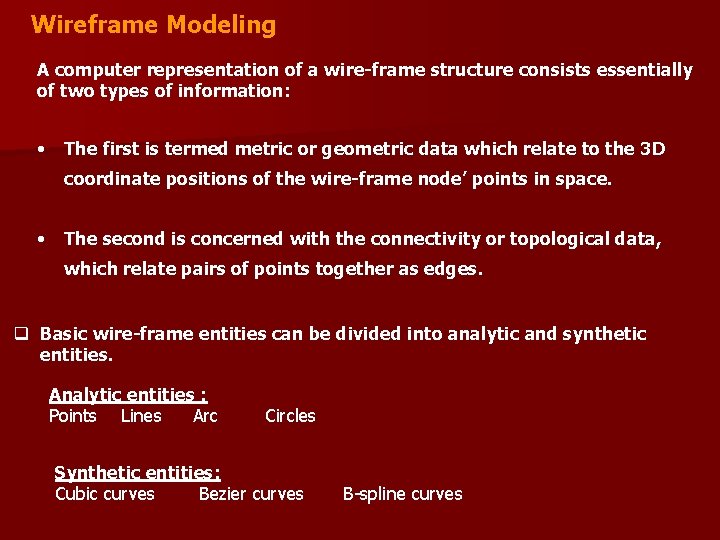
Wireframe Modeling A computer representation of a wire-frame structure consists essentially of two types of information: • The first is termed metric or geometric data which relate to the 3 D coordinate positions of the wire-frame node’ points in space. • The second is concerned with the connectivity or topological data, which relate pairs of points together as edges. q Basic wire-frame entities can be divided into analytic and synthetic entities. Analytic entities : Points Lines Arc Circles Synthetic entities: Cubic curves Bezier curves B-spline curves

Wireframe Modeling Limitations • From the point of view of engineering Applications, it is not possible to calculate volume and mass properties of a design • In the wireframe representation, the virtual edges (profile) are not usually provided. v (for example, a cylinder is represented by three edges, that is, two circles and one straight line) • The creation of wireframe models usually involves more user effort to input necessary information that of solid models, especially for large and complex parts.

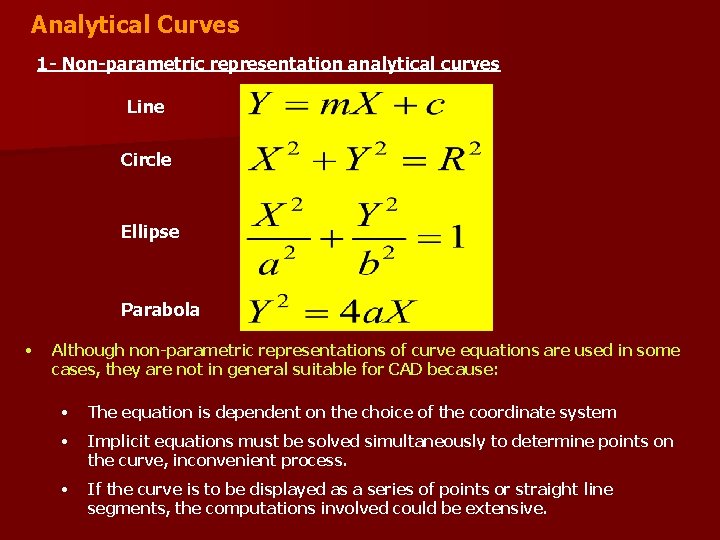
Analytical Curves 1 - Non-parametric representation analytical curves Line Circle Ellipse Parabola • Although non-parametric representations of curve equations are used in some cases, they are not in general suitable for CAD because: • The equation is dependent on the choice of the coordinate system • Implicit equations must be solved simultaneously to determine points on the curve, inconvenient process. • If the curve is to be displayed as a series of points or straight line segments, the computations involved could be extensive.

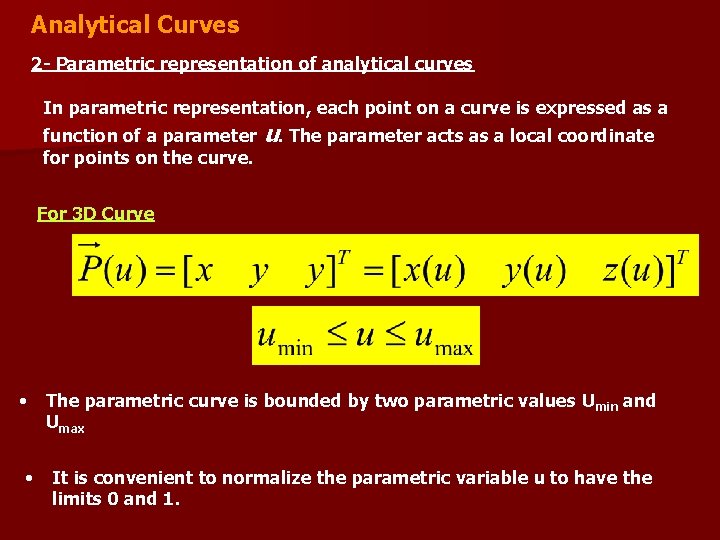
Analytical Curves 2 - Parametric representation of analytical curves In parametric representation, each point on a curve is expressed as a function of a parameter for points on the curve. u. The parameter acts as a local coordinate For 3 D Curve • • The parametric curve is bounded by two parametric values Umin and Umax It is convenient to normalize the parametric variable u to have the limits 0 and 1.

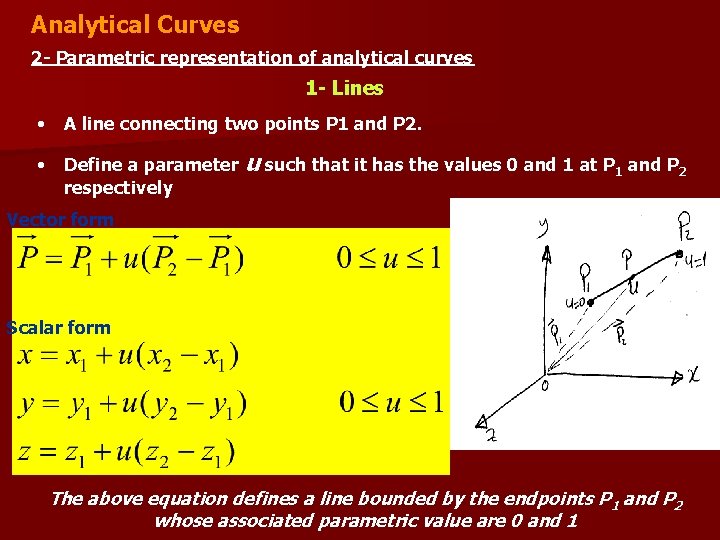
Analytical Curves 2 - Parametric representation of analytical curves 1 - Lines • A line connecting two points P 1 and P 2. • Define a parameter respectively u such that it has the values 0 and 1 at P 1 and P 2 Vector form Scalar form The above equation defines a line bounded by the endpoints P 1 and P 2 whose associated parametric value are 0 and 1

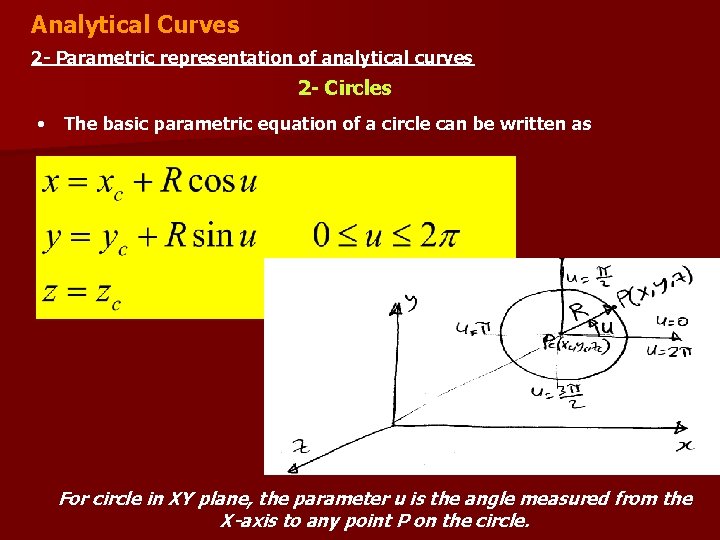
Analytical Curves 2 - Parametric representation of analytical curves 2 - Circles • The basic parametric equation of a circle can be written as For circle in XY plane, the parameter u is the angle measured from the X-axis to any point P on the circle.

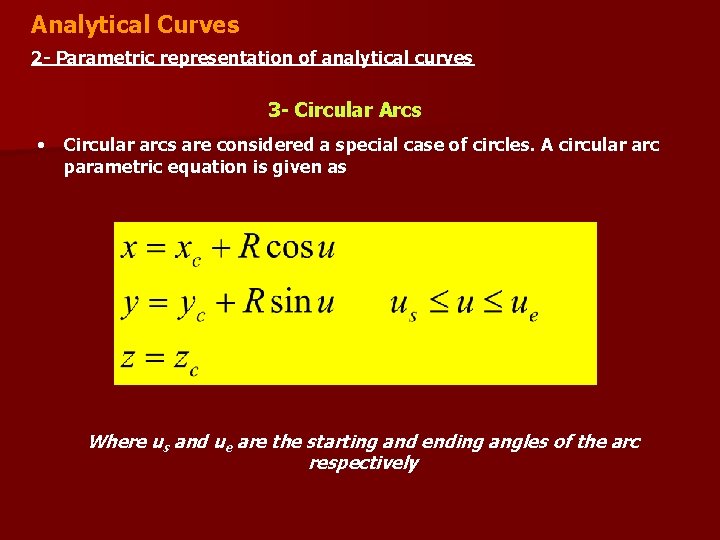
Analytical Curves 2 - Parametric representation of analytical curves 3 - Circular Arcs • Circular arcs are considered a special case of circles. A circular arc parametric equation is given as Where us and ue are the starting and ending angles of the arc respectively

Synthesis Curves that are constructed by many curve segments are called Synthesis Curves • Analytic curves are not sufficient to meet geometric design requirements of mechanical parts • Products such as car bodies, airplanes, propeller blades, etc. are a few examples that require free-form or synthetic curves and surfaces • Mathematical approaches to the representation of curves in CAD can be based on either • Interpolation • Approximation q If the problem of curve design is a problem of data fitting, the classic interpolation solutions are used. q If the problem is dealing with free form design with smooth shapes, approximation methods are used.

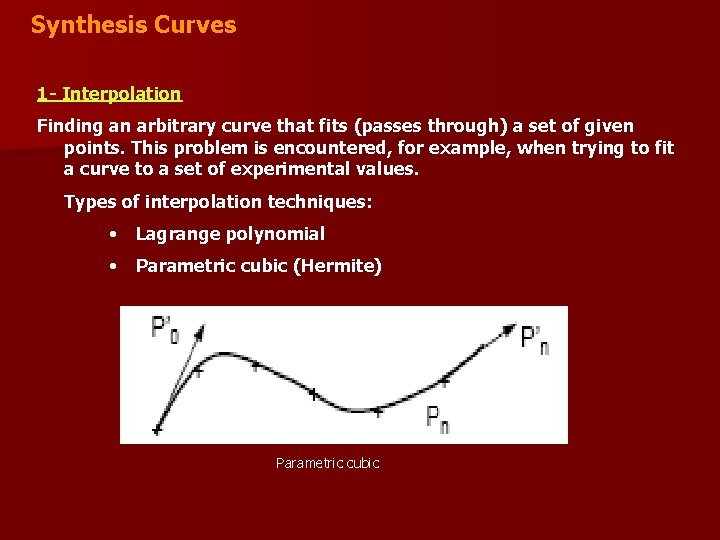
Synthesis Curves 1 - Interpolation Finding an arbitrary curve that fits (passes through) a set of given points. This problem is encountered, for example, when trying to fit a curve to a set of experimental values. Types of interpolation techniques: • Lagrange polynomial • Parametric cubic (Hermite) Parametric cubic

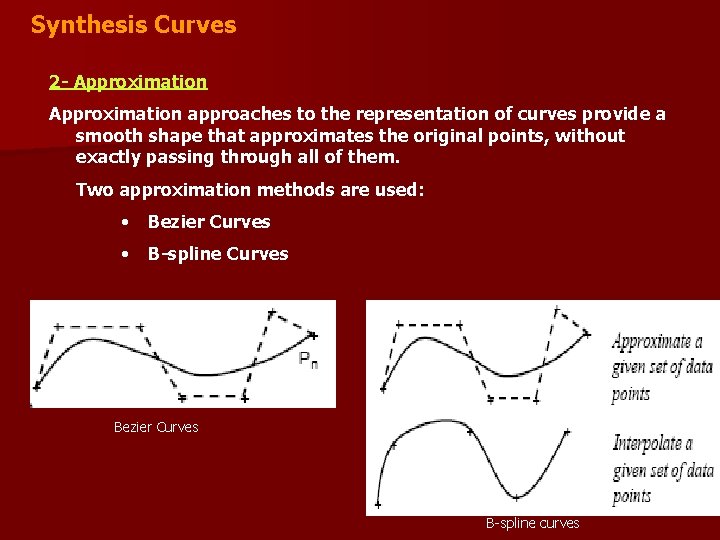
Synthesis Curves 2 - Approximation approaches to the representation of curves provide a smooth shape that approximates the original points, without exactly passing through all of them. Two approximation methods are used: • Bezier Curves • B-spline Curves Bezier Curves B-spline curves

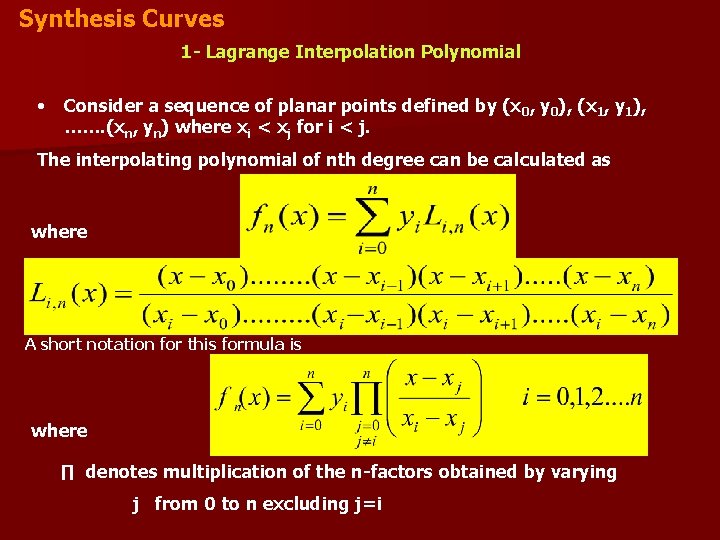
Synthesis Curves 1 - Lagrange Interpolation Polynomial • Consider a sequence of planar points defined by (x 0, y 0), (x 1, y 1), ……. (xn, yn) where xi < xj for i < j. The interpolating polynomial of nth degree can be calculated as where A short notation for this formula is where ∏ denotes multiplication of the n-factors obtained by varying j from 0 to n excluding j=i

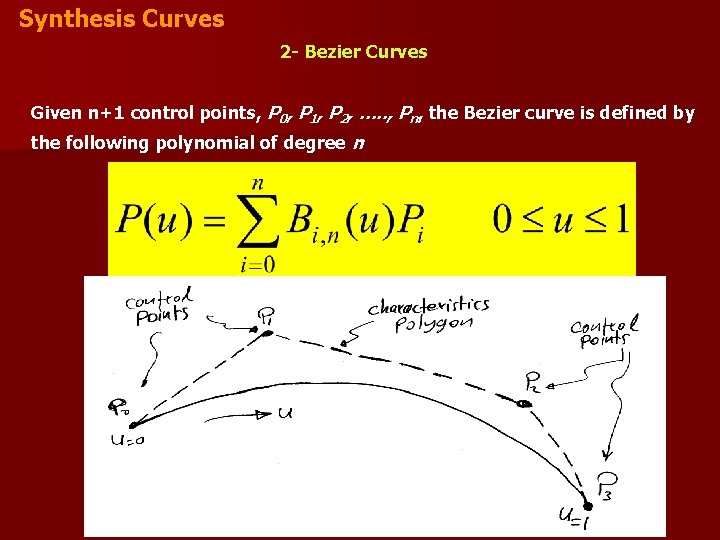
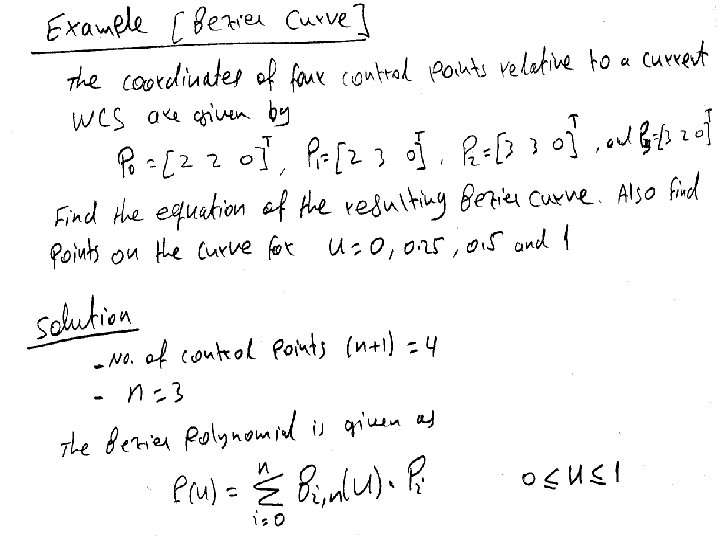
Synthesis Curves 2 - Bezier Curves Given n+1 control points, P 0, P 1, P 2, …. . , Pn, the Bezier curve is defined by the following polynomial of degree n

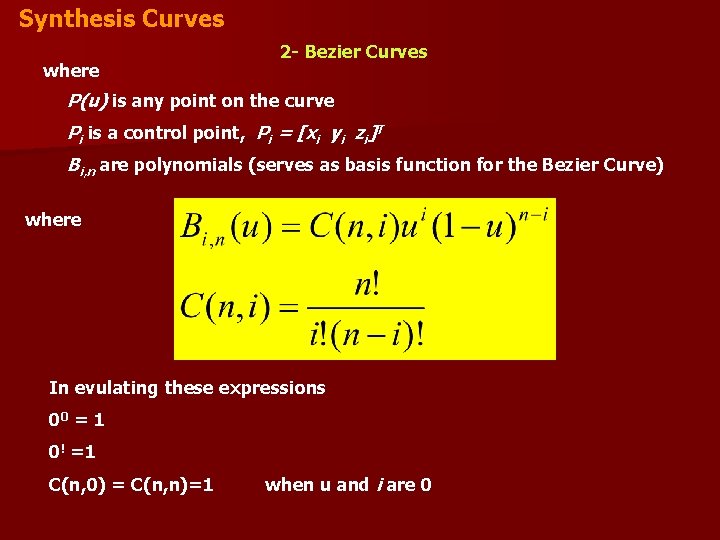
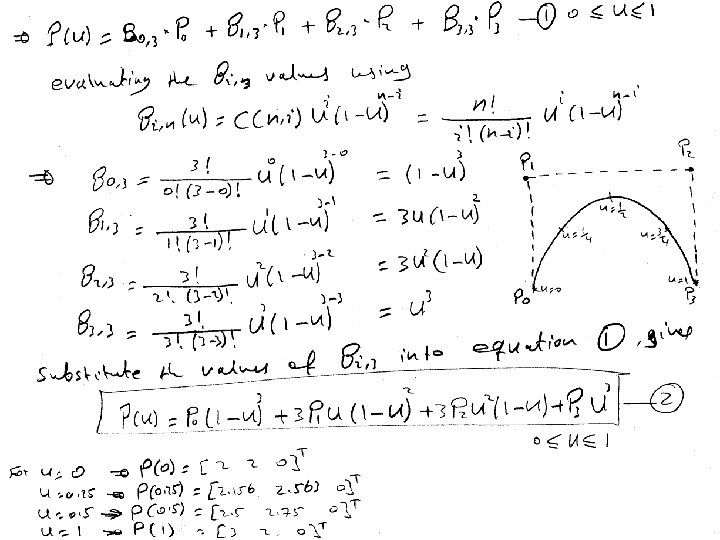
Synthesis Curves where 2 - Bezier Curves P(u) is any point on the curve Pi is a control point, Pi = [xi yi zi]T Bi, n are polynomials (serves as basis function for the Bezier Curve) where In evulating these expressions 00 = 1 0! =1 C(n, 0) = C(n, n)=1 when u and i are 0

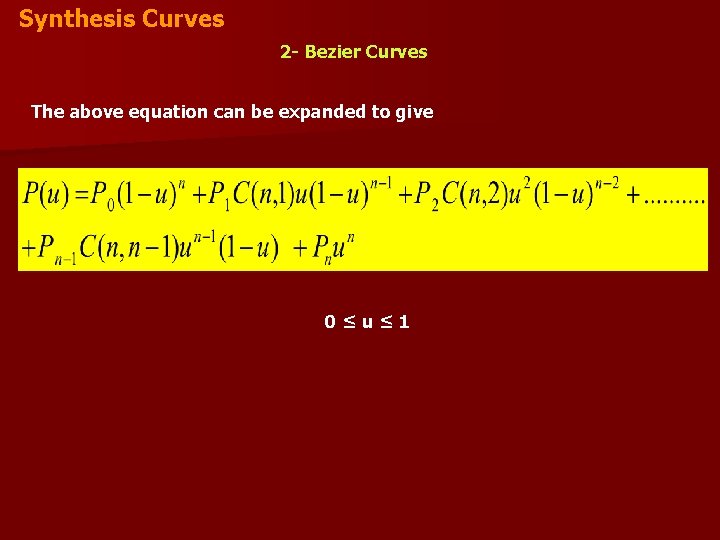
Synthesis Curves 2 - Bezier Curves The above equation can be expanded to give 0≤u≤ 1


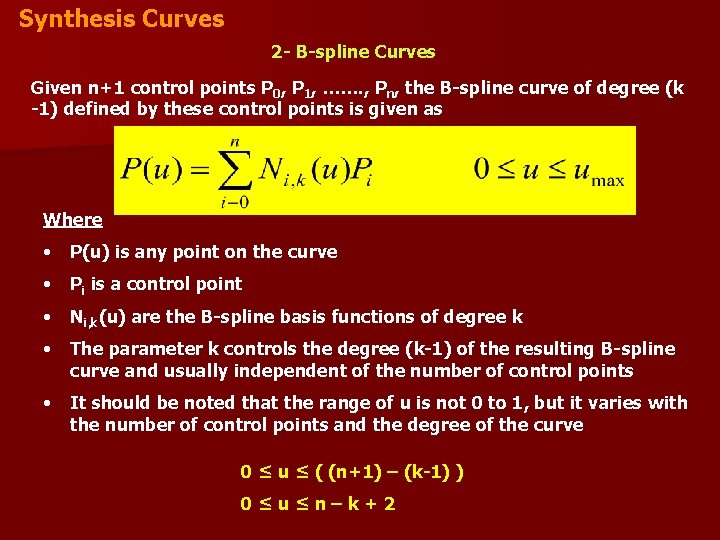
Synthesis Curves 2 - B-spline Curves Given n+1 control points P 0, P 1, ……. , Pn, the B-spline curve of degree (k -1) defined by these control points is given as Where • P(u) is any point on the curve • Pi is a control point • Ni, k(u) are the B-spline basis functions of degree k • The parameter k controls the degree (k-1) of the resulting B-spline curve and usually independent of the number of control points • It should be noted that the range of u is not 0 to 1, but it varies with the number of control points and the degree of the curve 0 ≤ u ≤ ( (n+1) – (k-1) ) 0≤u≤n–k+2

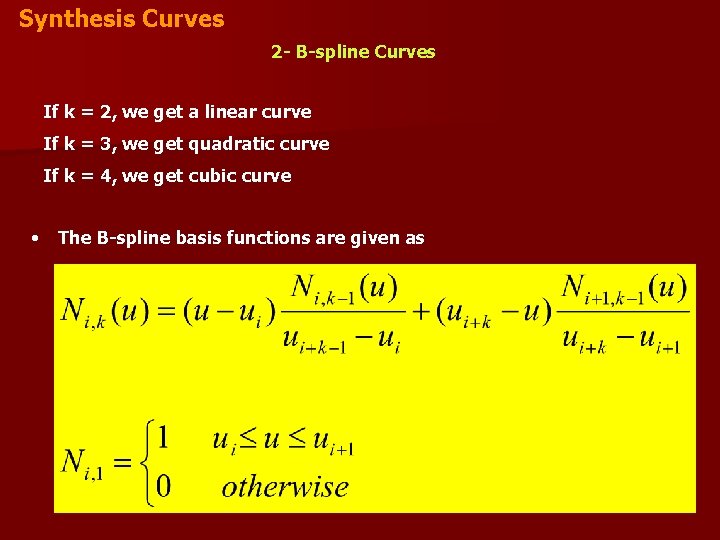
Synthesis Curves 2 - B-spline Curves If k = 2, we get a linear curve If k = 3, we get quadratic curve If k = 4, we get cubic curve • The B-spline basis functions are given as

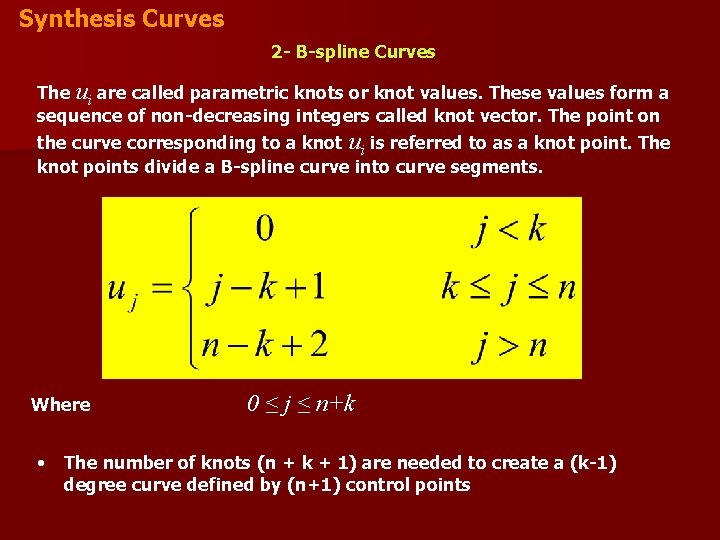
Synthesis Curves 2 - B-spline Curves The ui are called parametric knots or knot values. These values form a sequence of non-decreasing integers called knot vector. The point on the curve corresponding to a knot ui is referred to as a knot point. The knot points divide a B-spline curve into curve segments. Where • 0 ≤ j ≤ n+k The number of knots (n + k + 1) are needed to create a (k-1) degree curve defined by (n+1) control points

Surface Modeling • Surface modeling is a widely used modeling technique in which objects are defined by their bounding faces. • Surface modeling systems contain definitions of surfaces, edges, and vertices • Complex objects such as car or airplane body can not be achieved utilizing wireframe modeling. • Surface modeling are used in Ø calculating mass properties Ø checking for interference Ø between mating parts Ø generating cross-section views Ø generating finite elements meshes Ø generating NC tool paths for Ø continuous path machining

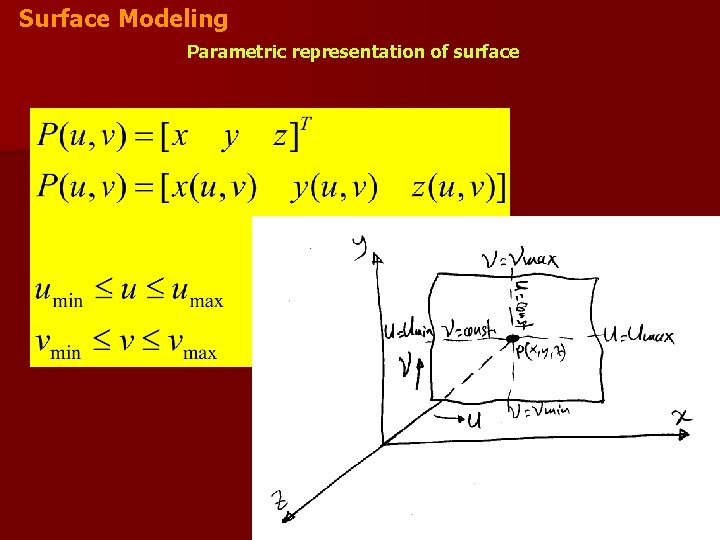
Surface Modeling Parametric representation of surface

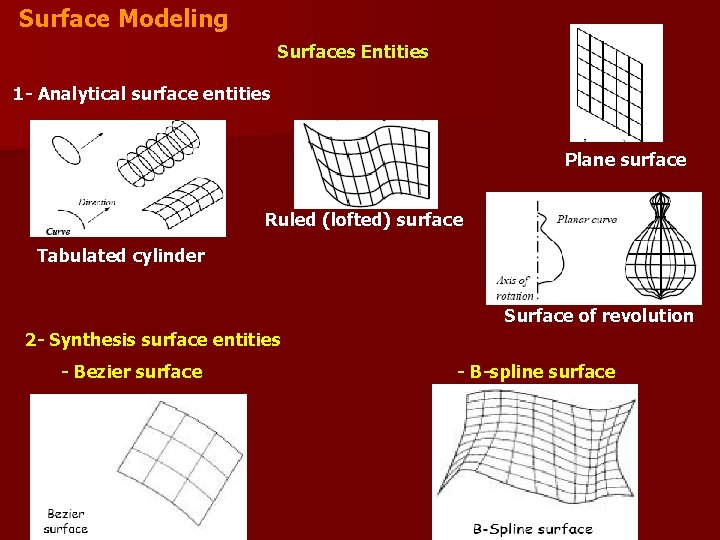
Surface Modeling Surfaces Entities 1 - Analytical surface entities Plane surface Ruled (lofted) surface Tabulated cylinder Surface of revolution 2 - Synthesis surface entities - Bezier surface - B-spline surface

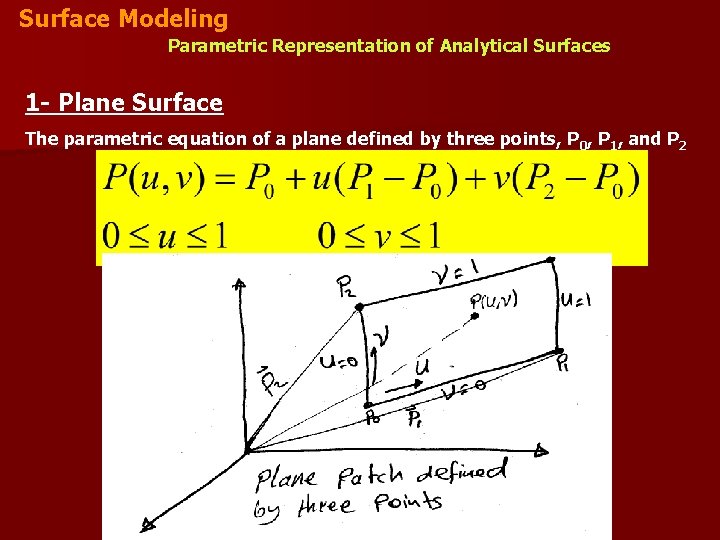
Surface Modeling Parametric Representation of Analytical Surfaces 1 - Plane Surface The parametric equation of a plane defined by three points, P 0, P 1, and P 2

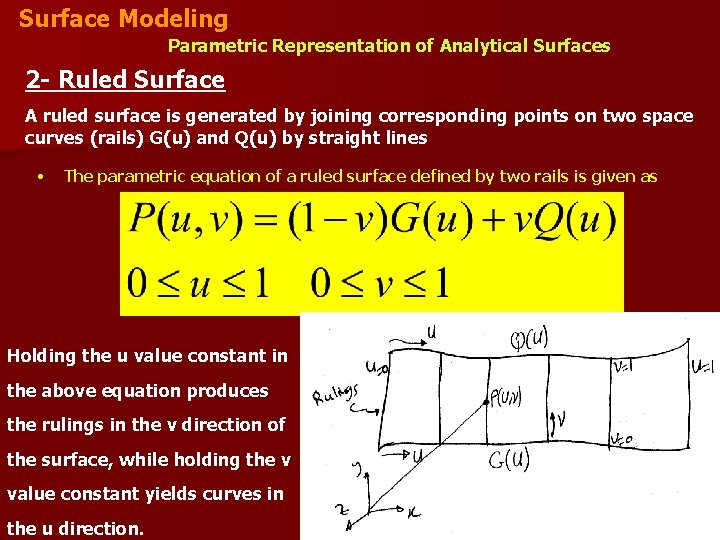
Surface Modeling Parametric Representation of Analytical Surfaces 2 - Ruled Surface A ruled surface is generated by joining corresponding points on two space curves (rails) G(u) and Q(u) by straight lines • The parametric equation of a ruled surface defined by two rails is given as Holding the u value constant in the above equation produces the rulings in the v direction of the surface, while holding the v value constant yields curves in the u direction.

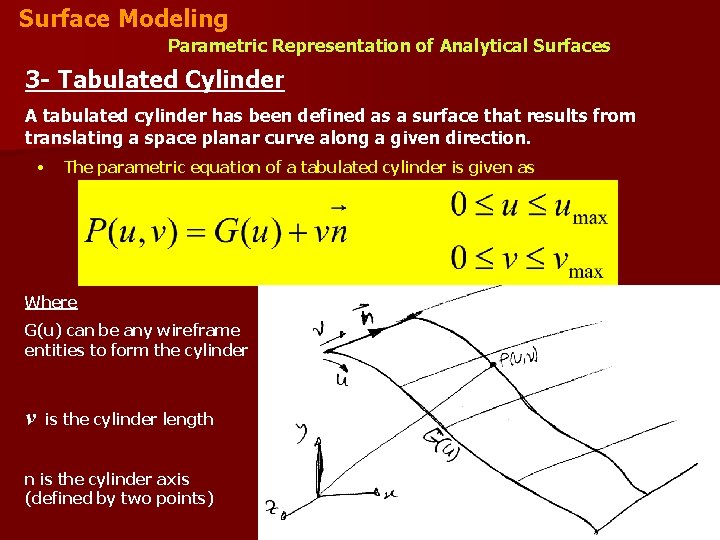
Surface Modeling Parametric Representation of Analytical Surfaces 3 - Tabulated Cylinder A tabulated cylinder has been defined as a surface that results from translating a space planar curve along a given direction. • The parametric equation of a tabulated cylinder is given as Where G(u) can be any wireframe entities to form the cylinder v is the cylinder length n is the cylinder axis (defined by two points)

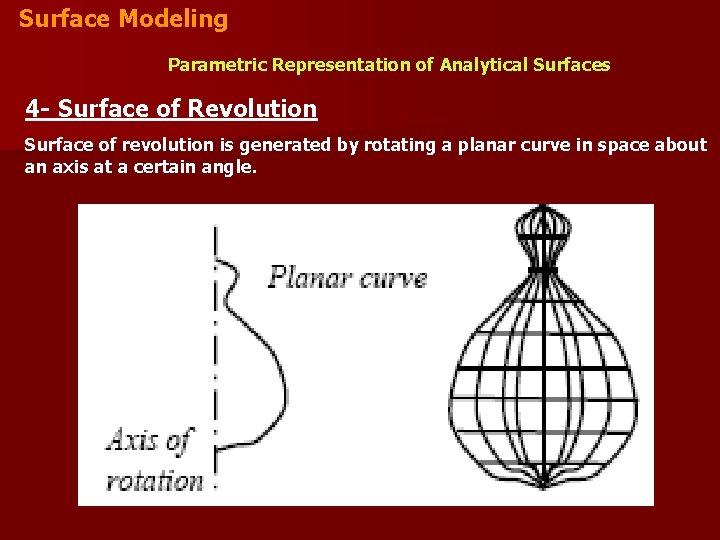
Surface Modeling Parametric Representation of Analytical Surfaces 4 - Surface of Revolution Surface of revolution is generated by rotating a planar curve in space about an axis at a certain angle.

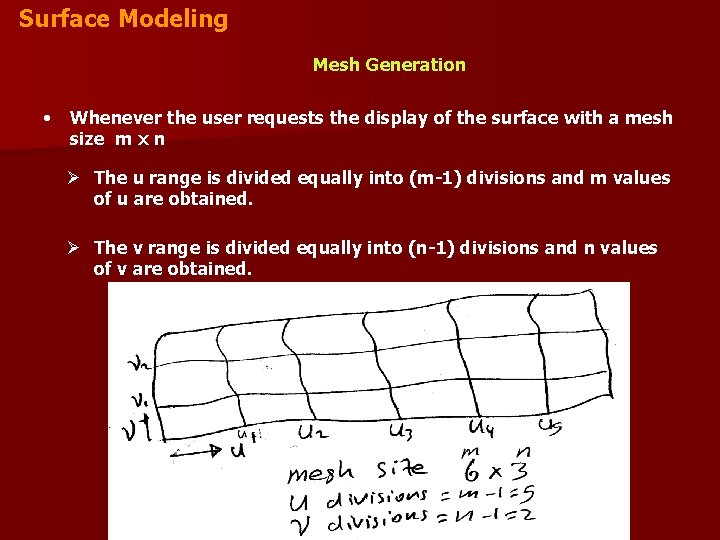
Surface Modeling Mesh Generation • Whenever the user requests the display of the surface with a mesh size m x n Ø The u range is divided equally into (m-1) divisions and m values of u are obtained. Ø The v range is divided equally into (n-1) divisions and n values of v are obtained.

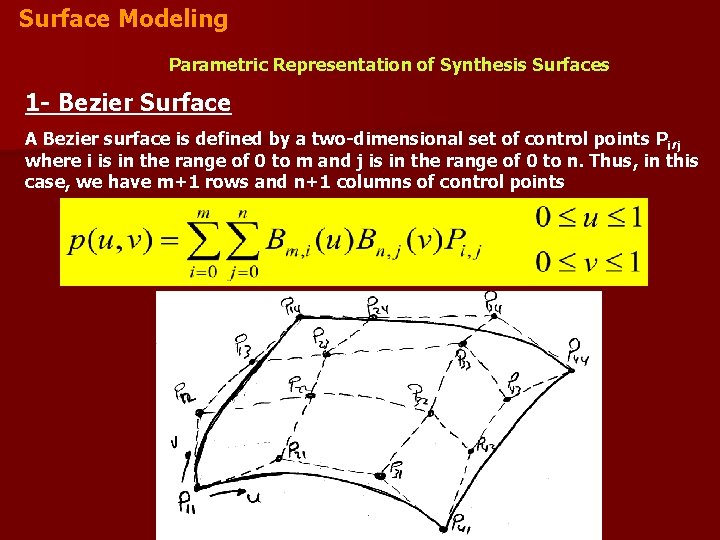
Surface Modeling Parametric Representation of Synthesis Surfaces 1 - Bezier Surface A Bezier surface is defined by a two-dimensional set of control points Pi, j where i is in the range of 0 to m and j is in the range of 0 to n. Thus, in this case, we have m+1 rows and n+1 columns of control points

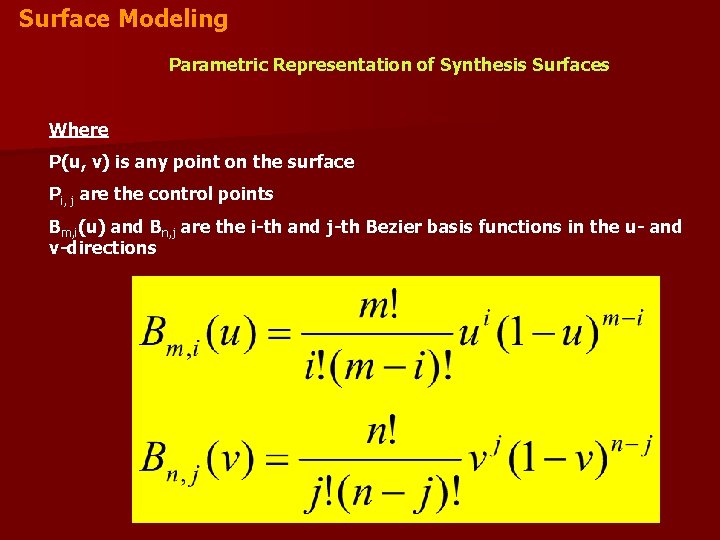
Surface Modeling Parametric Representation of Synthesis Surfaces Where P(u, v) is any point on the surface Pi, j are the control points Bm, i(u) and Bn, j are the i-th and j-th Bezier basis functions in the u- and v-directions

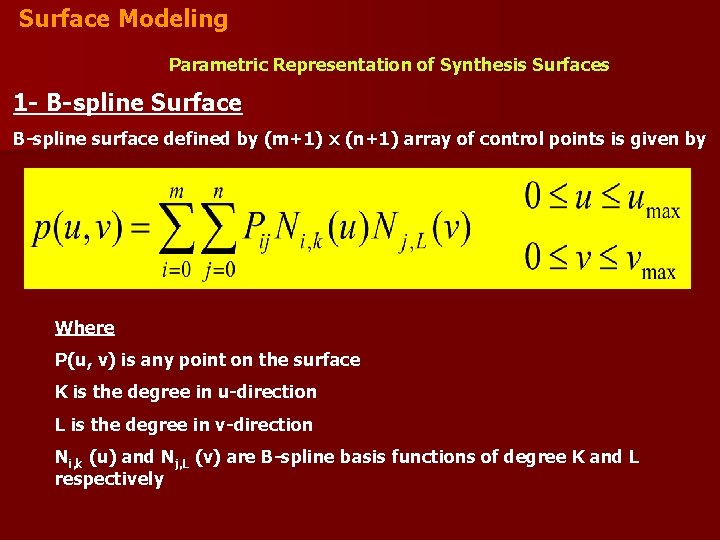
Surface Modeling Parametric Representation of Synthesis Surfaces 1 - B-spline Surface B-spline surface defined by (m+1) x (n+1) array of control points is given by Where P(u, v) is any point on the surface K is the degree in u-direction L is the degree in v-direction Ni, k (u) and Nj, L (v) are B-spline basis functions of degree K and L respectively

Solid Modeling Solid modeling techniques provide the user with the means to create, store, and manipulate complete representations of solid objects with the potential for integration and improved automation. Solid Representation Several representation schemes are available for the creation of solid models. Some of the most popular are given: • Constructive Solid Geometry (CSG). • Boundary Representation (B-Rep). • Sweeping.

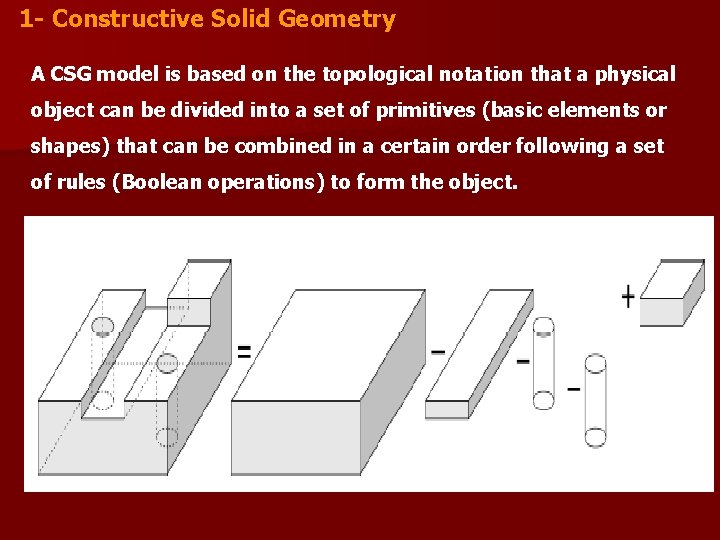
1 - Constructive Solid Geometry A CSG model is based on the topological notation that a physical object can be divided into a set of primitives (basic elements or shapes) that can be combined in a certain order following a set of rules (Boolean operations) to form the object.

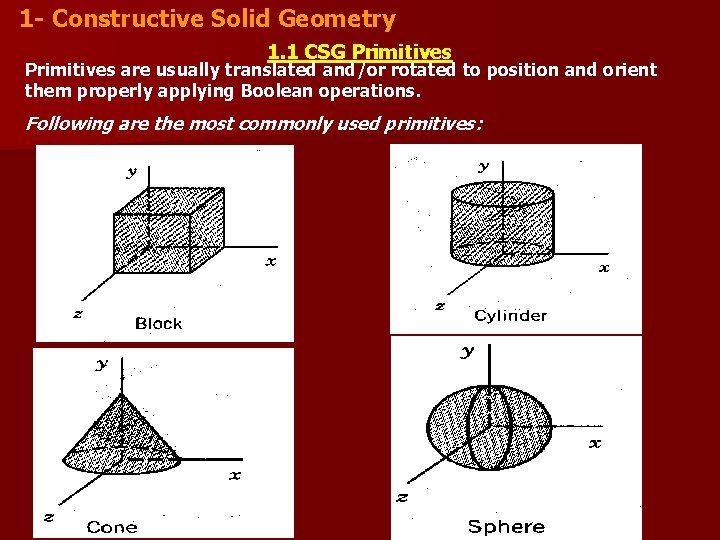
1 - Constructive Solid Geometry 1. 1 CSG Primitives are usually translated and/or rotated to position and orient them properly applying Boolean operations. Following are the most commonly used primitives:

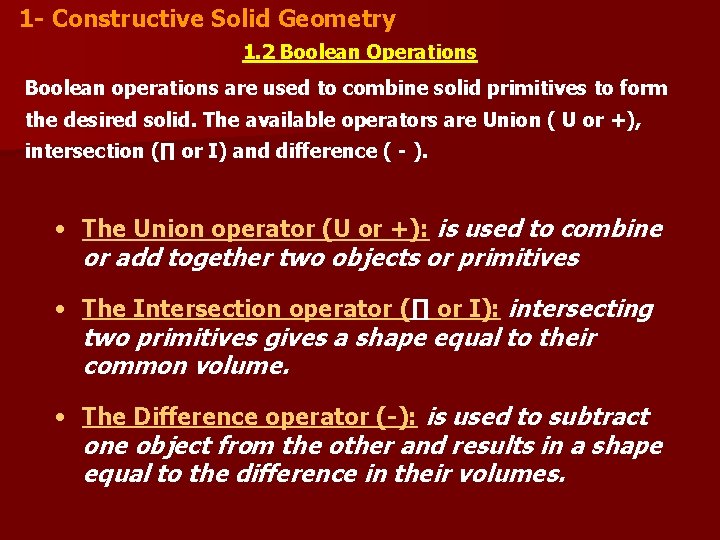
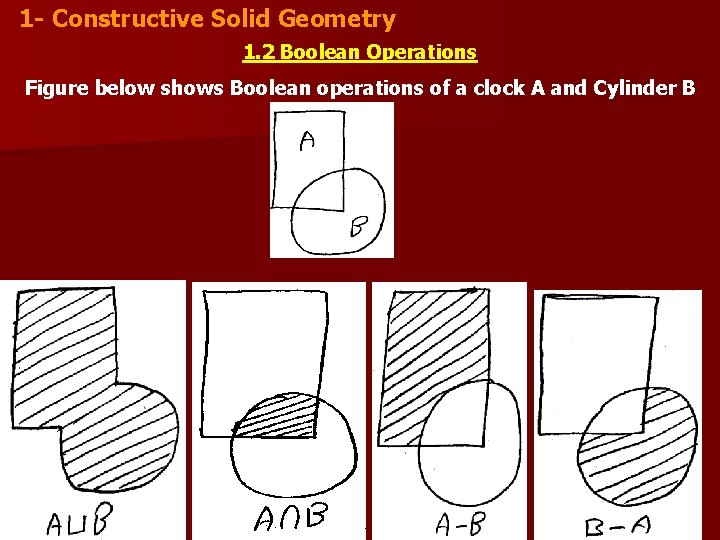
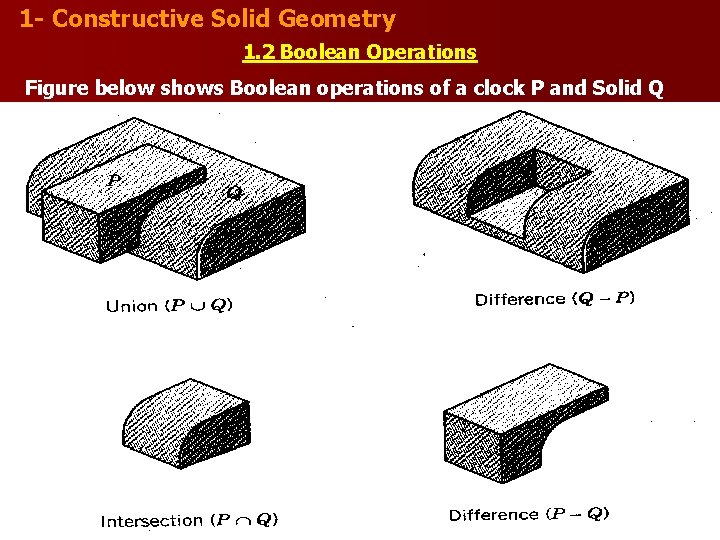
1 - Constructive Solid Geometry 1. 2 Boolean Operations Boolean operations are used to combine solid primitives to form the desired solid. The available operators are Union ( U or +), intersection (∏ or I) and difference ( - ). • The Union operator (U or +): is used to combine or add together two objects or primitives • The Intersection operator (∏ or I): intersecting two primitives gives a shape equal to their common volume. • The Difference operator (-): is used to subtract one object from the other and results in a shape equal to the difference in their volumes.

1 - Constructive Solid Geometry 1. 2 Boolean Operations Figure below shows Boolean operations of a clock A and Cylinder B

1 - Constructive Solid Geometry 1. 2 Boolean Operations Figure below shows Boolean operations of a clock P and Solid Q

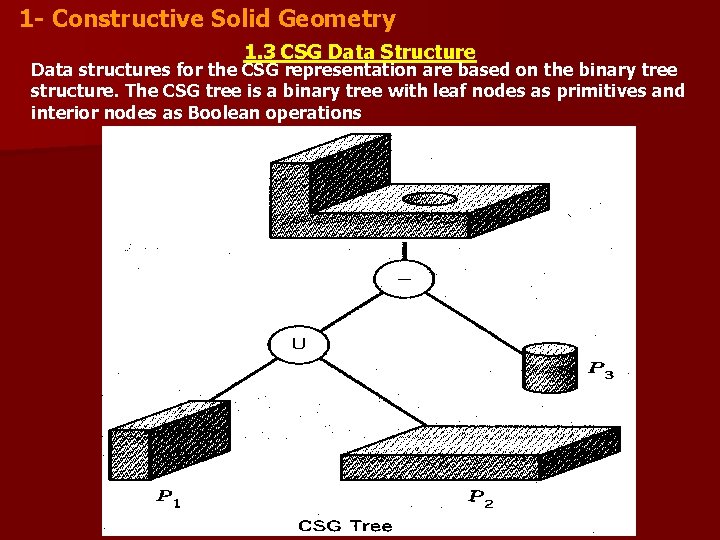
1 - Constructive Solid Geometry 1. 3 CSG Data Structure Data structures for the CSG representation are based on the binary tree structure. The CSG tree is a binary tree with leaf nodes as primitives and interior nodes as Boolean operations

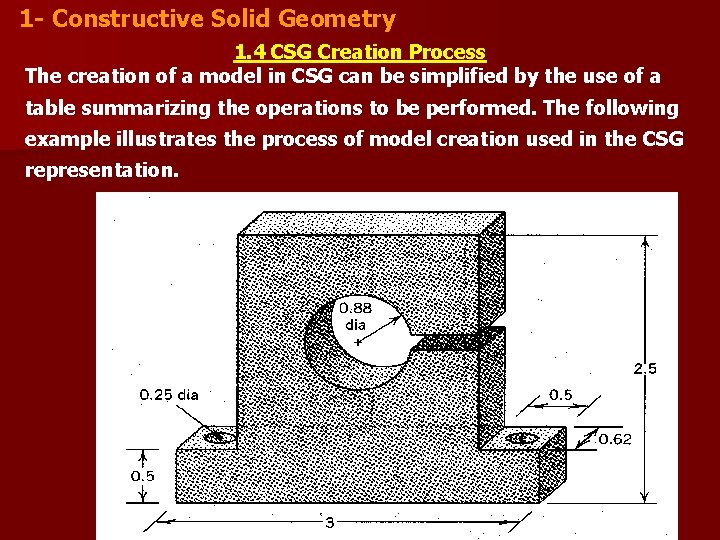
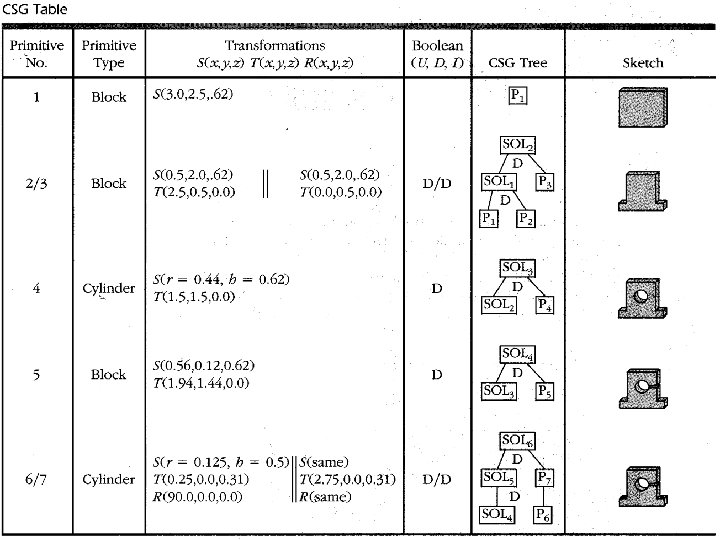
1 - Constructive Solid Geometry 1. 4 CSG Creation Process The creation of a model in CSG can be simplified by the use of a table summarizing the operations to be performed. The following example illustrates the process of model creation used in the CSG representation.


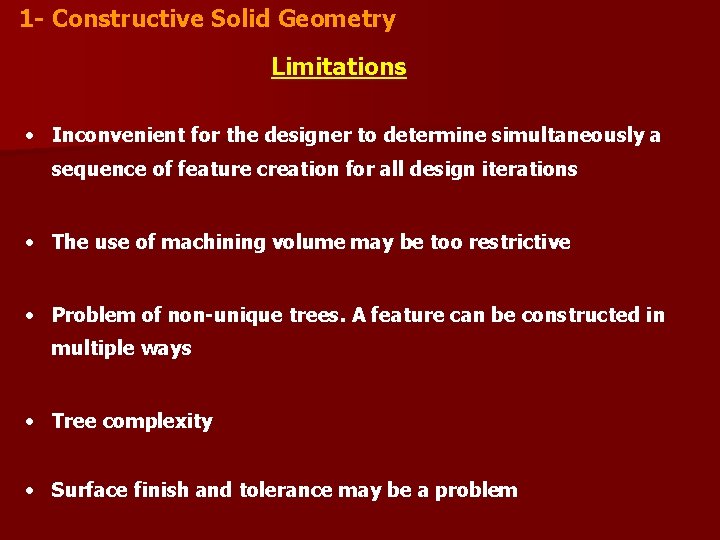
1 - Constructive Solid Geometry Limitations • Inconvenient for the designer to determine simultaneously a sequence of feature creation for all design iterations • The use of machining volume may be too restrictive • Problem of non-unique trees. A feature can be constructed in multiple ways • Tree complexity • Surface finish and tolerance may be a problem

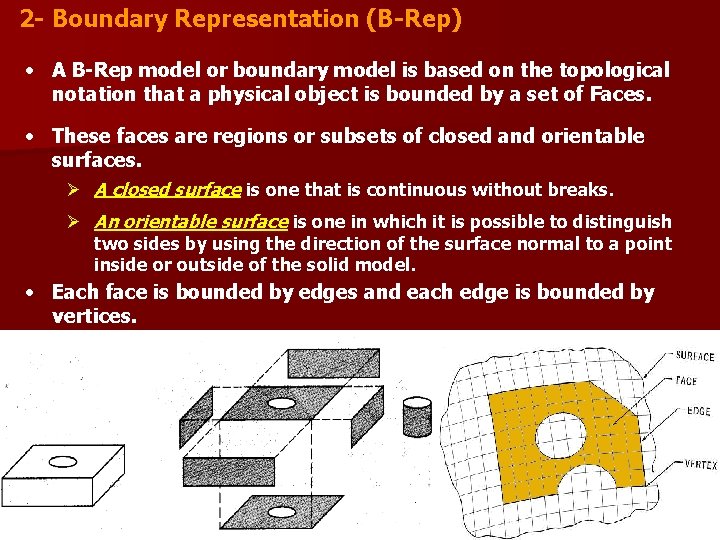
2 - Boundary Representation (B-Rep) • A B-Rep model or boundary model is based on the topological notation that a physical object is bounded by a set of Faces. • These faces are regions or subsets of closed and orientable surfaces. Ø A closed surface is one that is continuous without breaks. Ø An orientable surface is one in which it is possible to distinguish two sides by using the direction of the surface normal to a point inside or outside of the solid model. • Each face is bounded by edges and each edge is bounded by vertices.

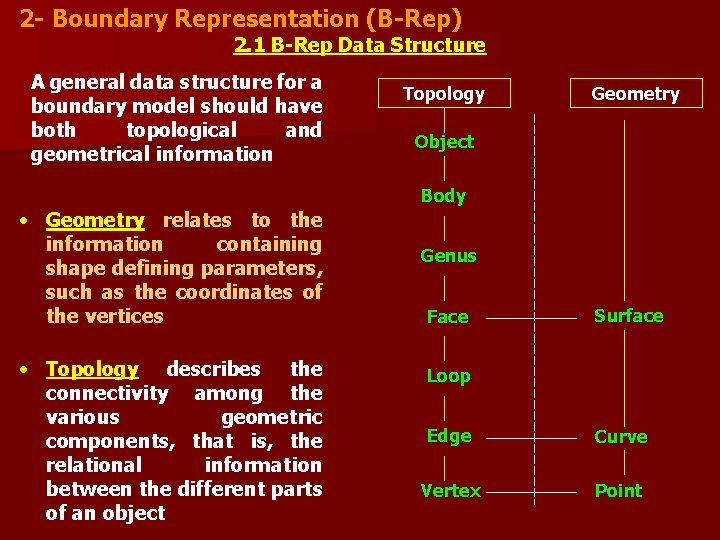
2 - Boundary Representation (B-Rep) 2. 1 B-Rep Data Structure A general data structure for a boundary model should have both topological and geometrical information Topology Geometry Object Body • Geometry relates to the information containing shape defining parameters, such as the coordinates of the vertices • Topology describes the connectivity among the various geometric components, that is, the relational information between the different parts of an object Genus Face Surface Loop Edge Curve Vertex Point

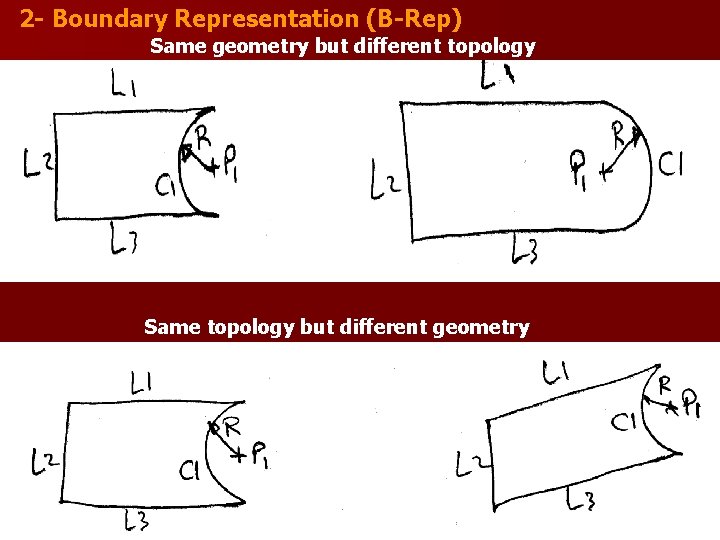
2 - Boundary Representation (B-Rep) Same geometry but different topology Same topology but different geometry

2 - Boundary Representation (B-Rep) Two important questions in B-Rep 1. What is a face, edge or a vertex? 2. How can we know that when we combine these entities we would create valid objects?

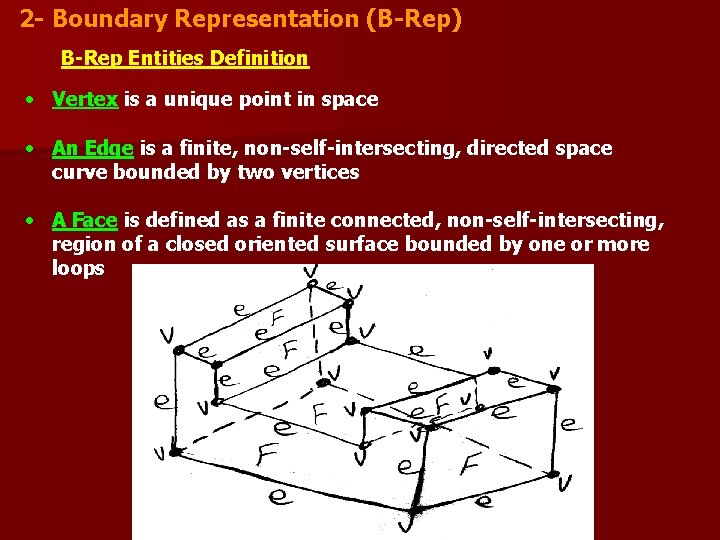
2 - Boundary Representation (B-Rep) B-Rep Entities Definition • Vertex is a unique point in space • An Edge is a finite, non-self-intersecting, directed space curve bounded by two vertices • A Face is defined as a finite connected, non-self-intersecting, region of a closed oriented surface bounded by one or more loops

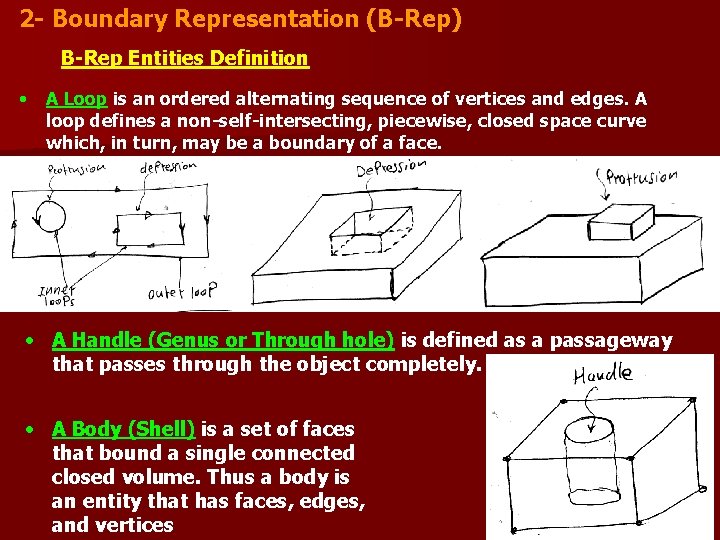
2 - Boundary Representation (B-Rep) B-Rep Entities Definition • A Loop is an ordered alternating sequence of vertices and edges. A loop defines a non-self-intersecting, piecewise, closed space curve which, in turn, may be a boundary of a face. • A Handle (Genus or Through hole) is defined as a passageway that passes through the object completely. • A Body (Shell) is a set of faces that bound a single connected closed volume. Thus a body is an entity that has faces, edges, and vertices

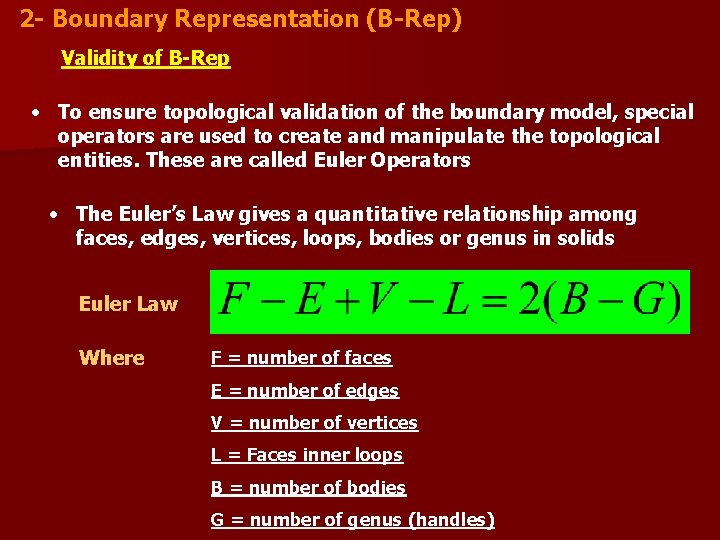
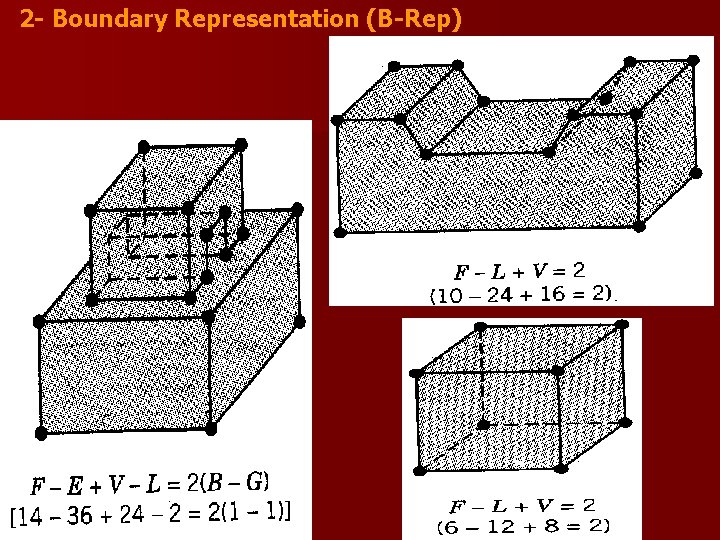
2 - Boundary Representation (B-Rep) Validity of B-Rep • To ensure topological validation of the boundary model, special operators are used to create and manipulate the topological entities. These are called Euler Operators • The Euler’s Law gives a quantitative relationship among faces, edges, vertices, loops, bodies or genus in solids Euler Law Where F = number of faces E = number of edges V = number of vertices L = Faces inner loops B = number of bodies G = number of genus (handles)

2 - Boundary Representation (B-Rep)

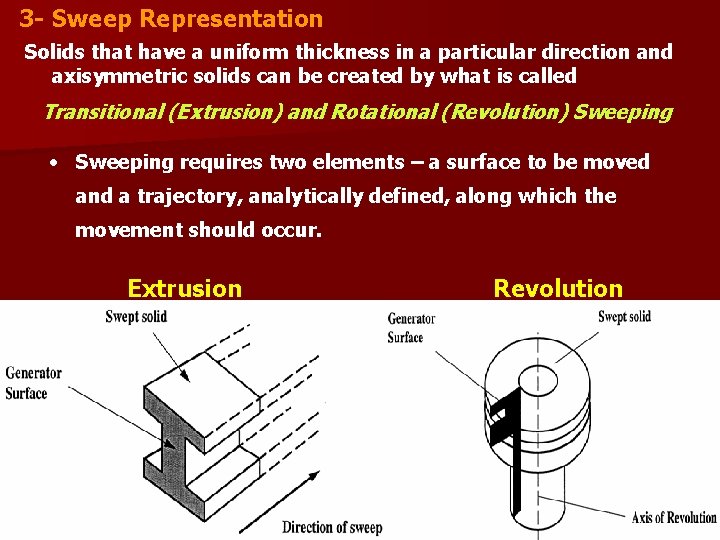
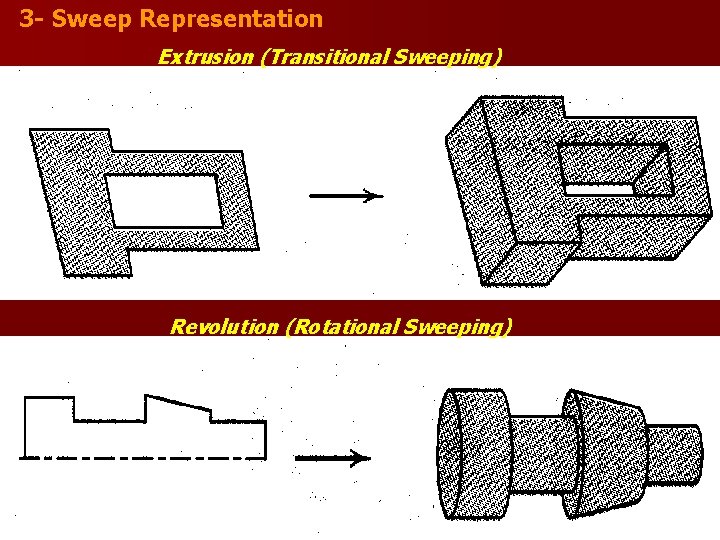
3 - Sweep Representation Solids that have a uniform thickness in a particular direction and axisymmetric solids can be created by what is called Transitional (Extrusion) and Rotational (Revolution) Sweeping • Sweeping requires two elements – a surface to be moved and a trajectory, analytically defined, along which the movement should occur. Extrusion Revolution

3 - Sweep Representation Extrusion (Transitional Sweeping) Revolution (Rotational Sweeping)