Process Two Manufacturing Solutions Using process engineering Version



- Slides: 86

Process Two Manufacturing Solutions Using process engineering Version 1. 5

John Hayter Industry background Tool fitter and mechanical engineer/design. • 38 years experience in the manufacturing industry in Australia, South America, Africa, Asia Pacific, Europe and North America. – – – 2 Process engineer / Manager Supplier quality Assurance engineer Product development engineer Production Engineer Project manager. Version 1. 5

Greg Vincent Industry background Fitter and turner, tool maker, and production technician. • 35 years of experience in the manufacturing industry in Australia, South Africa, Asia Pacific, Japan and Thailand. – – – – 3 Tool maker/maintenance fitter Engine plant and machining Production supervision Apprentice master (training) Production management Manufacturing manager for Asia Pacific Manufacturing engineering manager for Asia Pacific and South Africa. Version 1. 5

Objectives of session This course is designed to increase awareness and develop practical skills for process engineering and will include: • Process controls and auditing documents • Testing and inspection • Process improvements. 4 Version 1. 5

Topics to be covered Part one: • Process controls – – – Part two: • Process improvements – – Auditing documents Flow charts Issue control Process control plan SOP • Testing and inspection – Destructive/non-destructive – Patrol inspections • Machine set up data 5 Version 1. 5 Takt time vs cycle time Process mapping Plant layout PFMEA.

Process controls Version 1. 5

Objectives Process control is a method for controlling the output of a specific process. Documents used in the manufacturing process: – – – Process control flow chart Process control plan (PCP) Standard operating procedures (SOP) Machine set up data Non Destructive / Destructive testing Inspection records. Version 1. 5

Auditing documents Documentation is used for following the history of a production process and assists with: • Traceability • Conforms to quality assurance (QA) standards • Provides evidence through recording data • Protects staff. Version 1. 5

Auditing documents The following documents are used for the life of the project: • Process control flow chart • Process control plan • Patrol inspection records • Standard operating procedures (SOP) • Test records • 5 S records. Version 1. 5

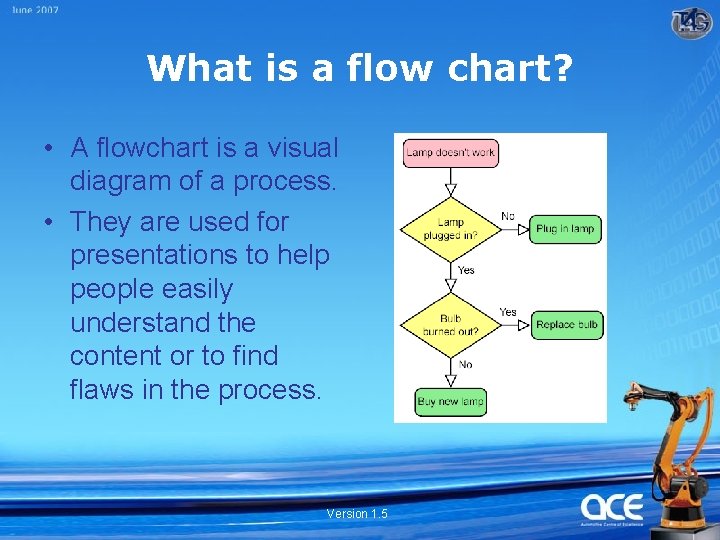
What is a flow chart? • A flowchart is a visual diagram of a process. • They are used for presentations to help people easily understand the content or to find flaws in the process. Version 1. 5

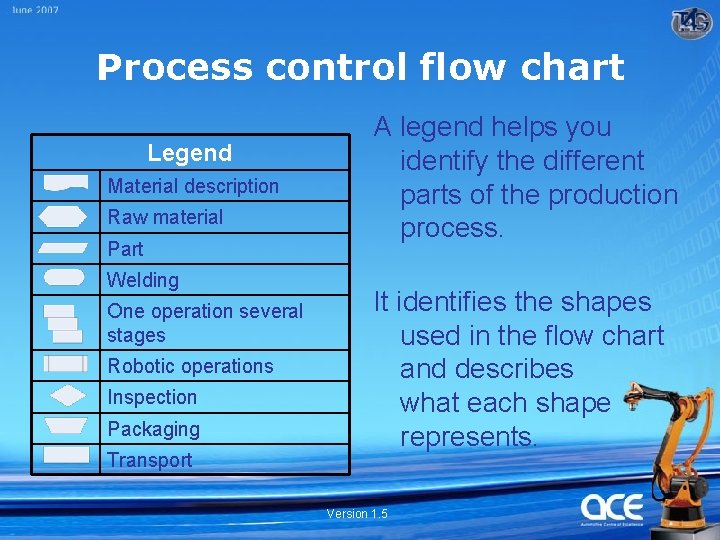
Process control flow chart Legend Material description Raw material Part Welding One operation several stages Robotic operations Inspection Packaging Transport A legend helps you identify the different parts of the production process. It identifies the shapes used in the flow chart and describes what each shape represents. Version 1. 5

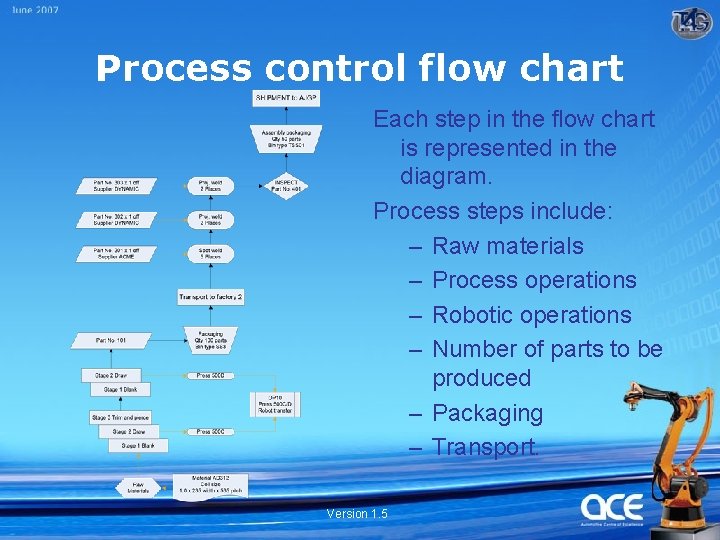
Process control flow chart Each step in the flow chart is represented in the diagram. Process steps include: – Raw materials – Process operations – Robotic operations – Number of parts to be produced – Packaging – Transport. Version 1. 5

Process control flow chart Important information found on the process control flow chart includes: – – – – Customer name Item/part description Your company item/part number Customer part number Estimated annual volume (EAV) Engineering responsibility and name Date List of all assemblies made by the same robot/process. Version 1. 5

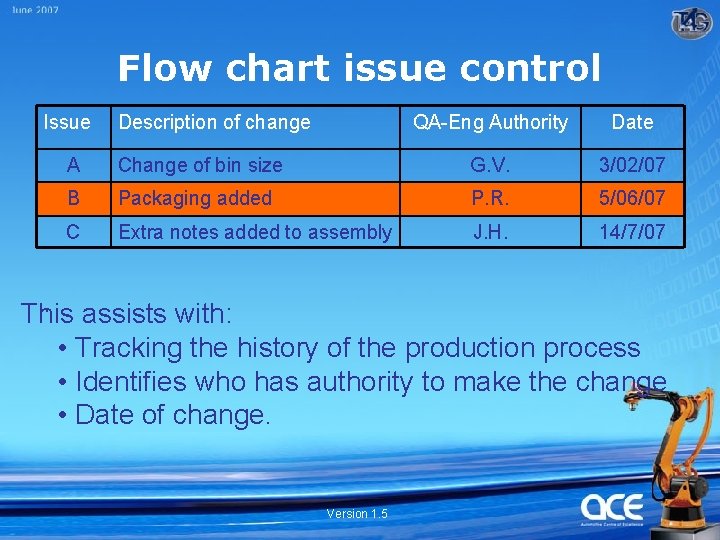
Flow chart issue control Issue Description of change QA-Eng Authority Date A Change of bin size G. V. 3/02/07 B Packaging added P. R. 5/06/07 C Extra notes added to assembly J. H. 14/7/07 . assists with: This • Tracking the history of the production process • Identifies who has authority to make the change • Date of change. Version 1. 5

Process control plan Definition A process control plan PCP is the detailed planning of manufacturing processes, required to convert raw materials into finished product before commencing an operation. Version 1. 5

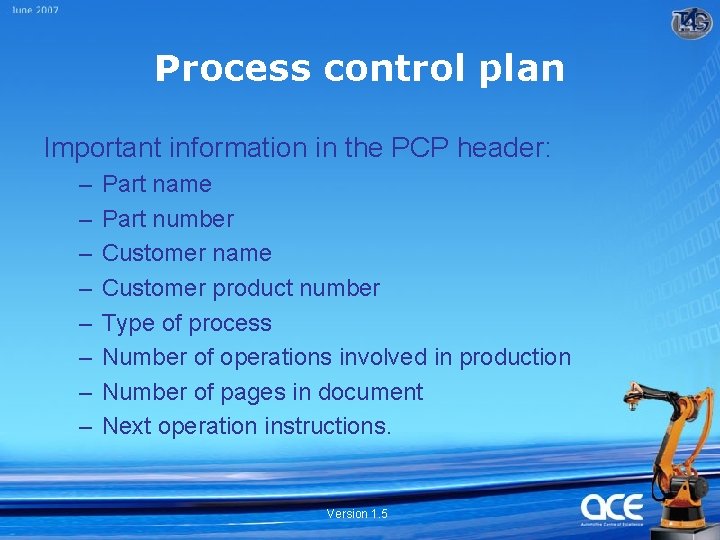
Process control plan Important information in the PCP header: – – – – Part name Part number Customer name Customer product number Type of process Number of operations involved in production Number of pages in document Next operation instructions. Version 1. 5

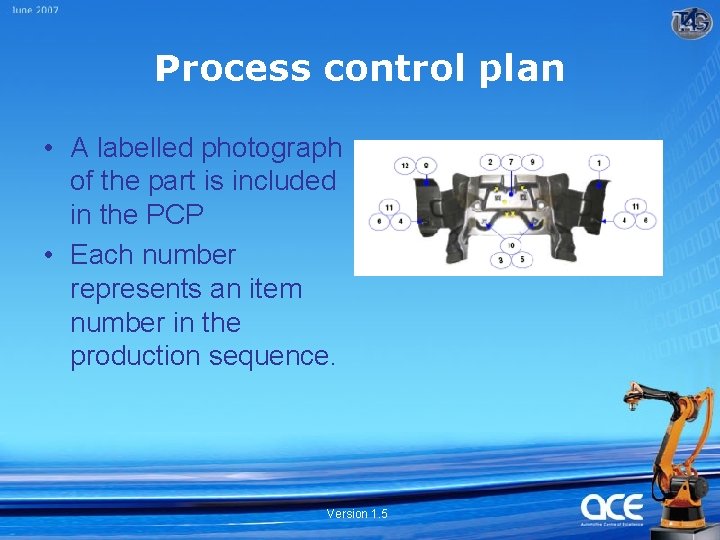
Process control plan • A labelled photograph of the part is included in the PCP • Each number represents an item number in the production sequence. Version 1. 5

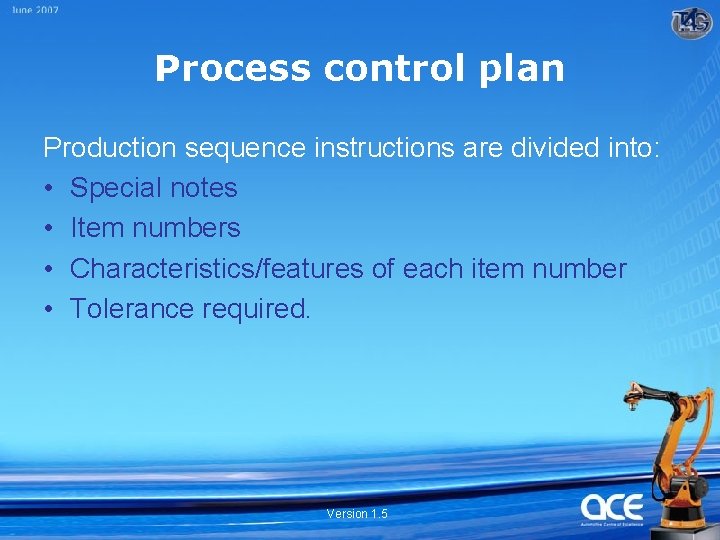
Process control plan Production sequence instructions are divided into: • Special notes • Item numbers • Characteristics/features of each item number • Tolerance required. Version 1. 5

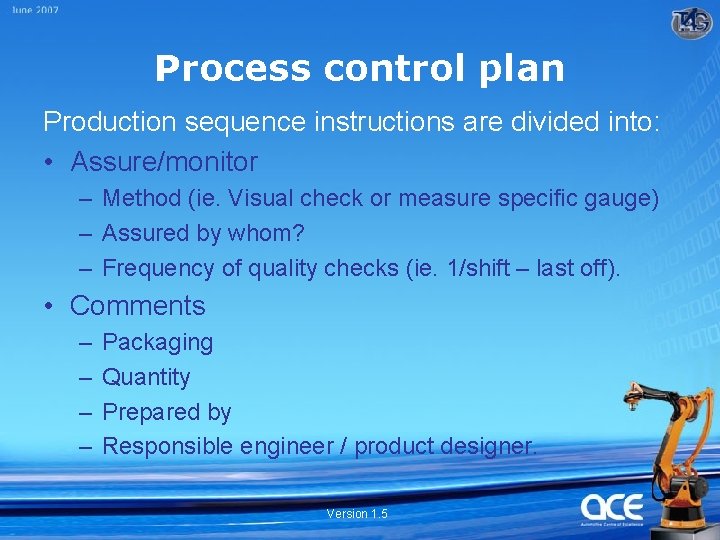
Process control plan Production sequence instructions are divided into: • Assure/monitor – Method (ie. Visual check or measure specific gauge) – Assured by whom? – Frequency of quality checks (ie. 1/shift – last off). • Comments – – Packaging Quantity Prepared by Responsible engineer / product designer. Version 1. 5

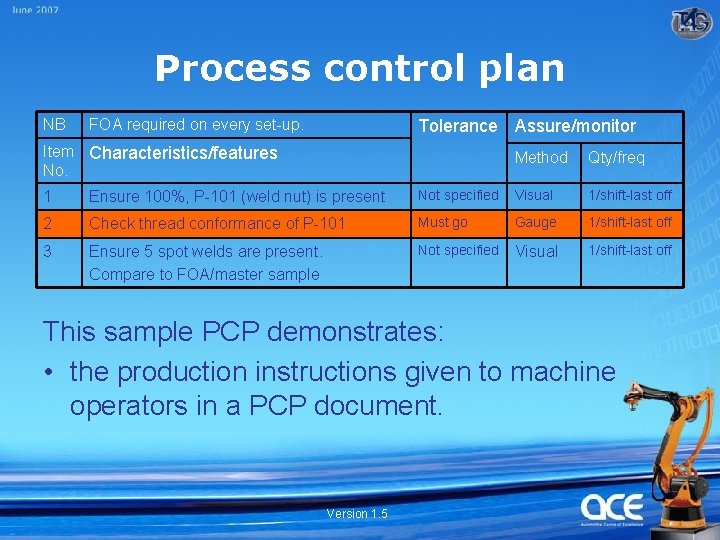
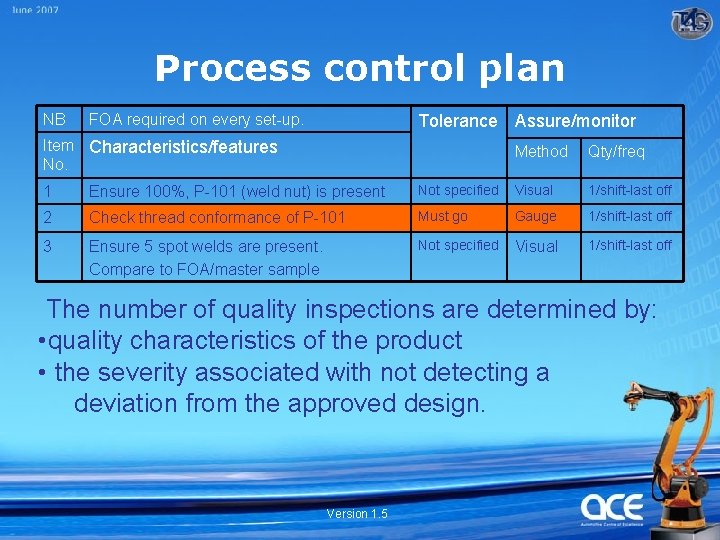
Process control plan NB FOA required on every set-up. Tolerance Assure/monitor Item Characteristics/features No. Method Qty/freq 1 Ensure 100%, P-101 (weld nut) is present Not specified Visual 1/shift-last off 2 Check thread conformance of P-101 Must go Gauge 1/shift-last off 3 Ensure 5 spot welds are present. Compare to FOA/master sample Not specified Visual 1/shift-last off This sample PCP demonstrates: • the production instructions given to machine operators in a PCP document. Version 1. 5

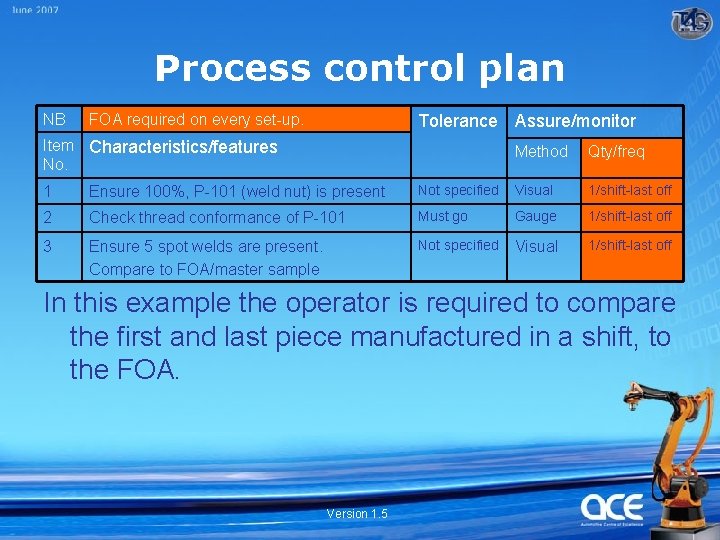
Process control plan NB FOA required on every set-up. Tolerance Assure/monitor Item Characteristics/features No. Method Qty/freq 1 Ensure 100%, P-101 (weld nut) is present Not specified Visual 1/shift-last off 2 Check thread conformance of P-101 Must go Gauge 1/shift-last off 3 Ensure 5 spot welds are present. Compare to FOA/master sample Not specified Visual 1/shift-last off In this example the operator is required to compare the first and last piece manufactured in a shift, to the FOA. Version 1. 5

Process control plan NB FOA required on every set-up. Tolerance Assure/monitor Item Characteristics/features No. Method Qty/freq 1 Ensure 100%, P-101 (weld nut) is present Not specified Visual 1/shift-last off 2 Check thread conformance of P-101 Must go Gauge 1/shift-last off 3 Ensure 5 spot welds are present. Compare to FOA/master sample Not specified Visual 1/shift-last off The number of quality inspections are determined by: • quality characteristics of the product • the severity associated with not detecting a deviation from the approved design. Version 1. 5

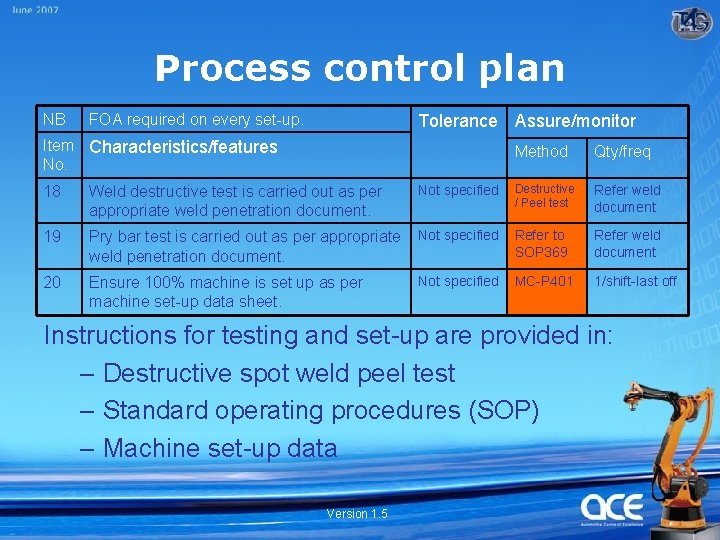
Process control plan NB FOA required on every set-up. Tolerance Assure/monitor Item Characteristics/features No. Method Qty/freq 18 Weld destructive test is carried out as per appropriate weld penetration document. Not specified Destructive / Peel test Refer weld document 19 Pry bar test is carried out as per appropriate weld penetration document. Not specified Refer to SOP 369 Refer weld document 20 Ensure 100% machine is set up as per machine set-up data sheet. Not specified MC-P 401 1/shift-last off Instructions for testing and set-up are provided in: – Destructive spot weld peel test – Standard operating procedures (SOP) – Machine set-up data Version 1. 5

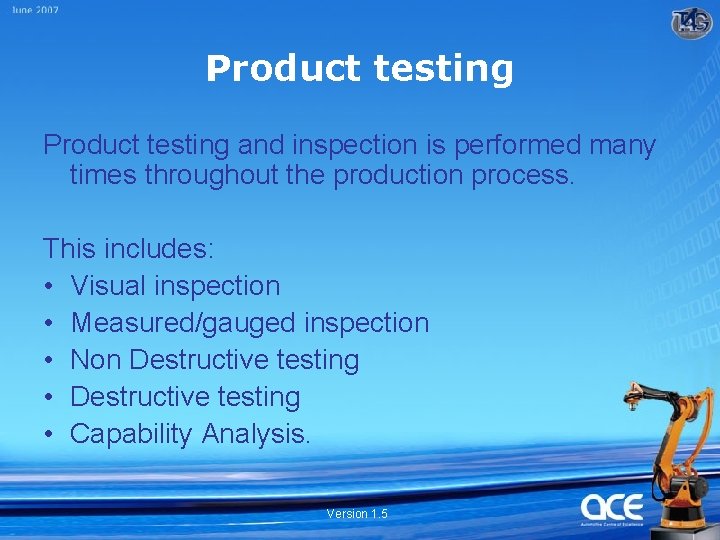
Product testing and inspection is performed many times throughout the production process. This includes: • Visual inspection • Measured/gauged inspection • Non Destructive testing • Capability Analysis. Version 1. 5

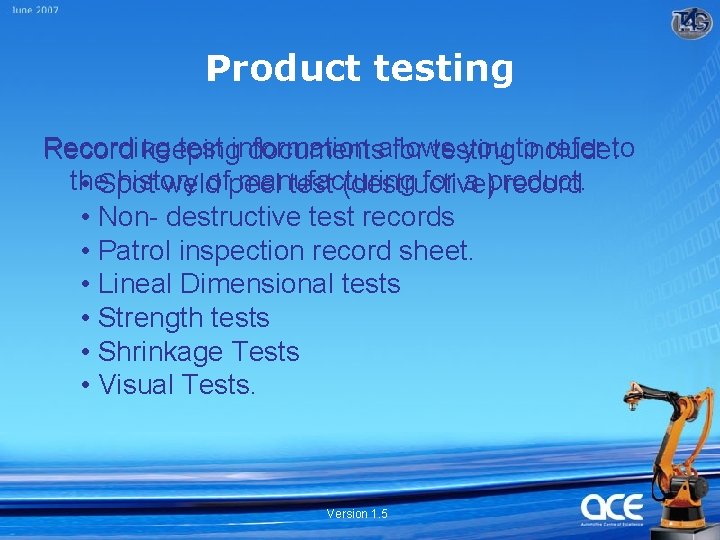
Product testing Recording test information you to refer to Record keeping documentsallows for testing include: the history manufacturing for a product. • Spot weldofpeel test (destructive) record • Non- destructive test records • Patrol inspection record sheet. • Lineal Dimensional tests • Strength tests • Shrinkage Tests • Visual Tests. Version 1. 5

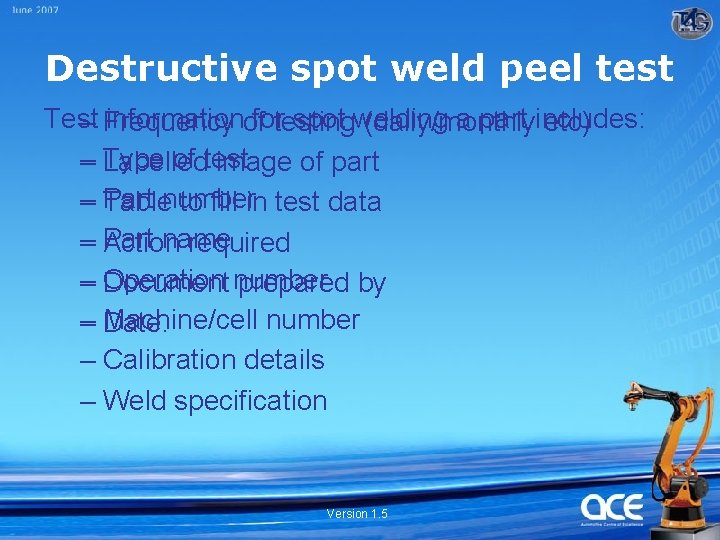
Destructive spot weld peel test Test informationoffortesting spot welding a part includes: – Frequency (daily/monthly etc) – Type of test Labelled image of part – Part Tablenumber to fill in test data Part name – Action required – Operation Document number prepared by – Machine/cell number Date. – Calibration details – Weld specification Version 1. 5

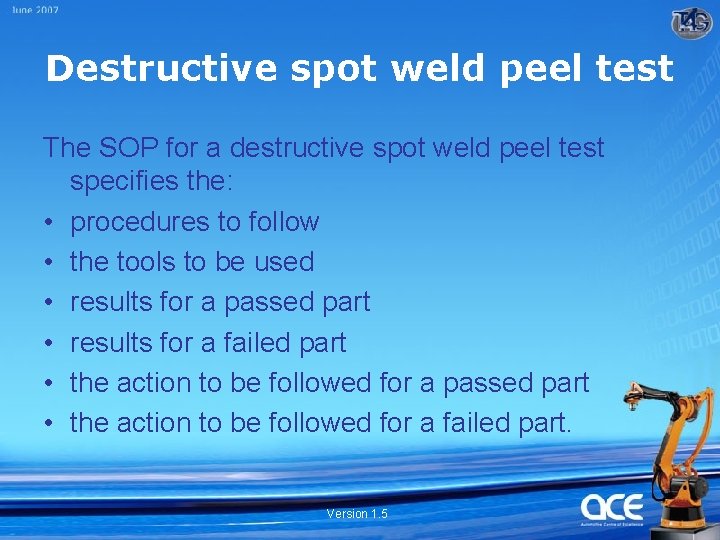
Destructive spot weld peel test The SOP for a destructive spot weld peel test specifies the: • procedures to follow • the tools to be used • results for a passed part • results for a failed part • the action to be followed for a passed part • the action to be followed for a failed part. Version 1. 5

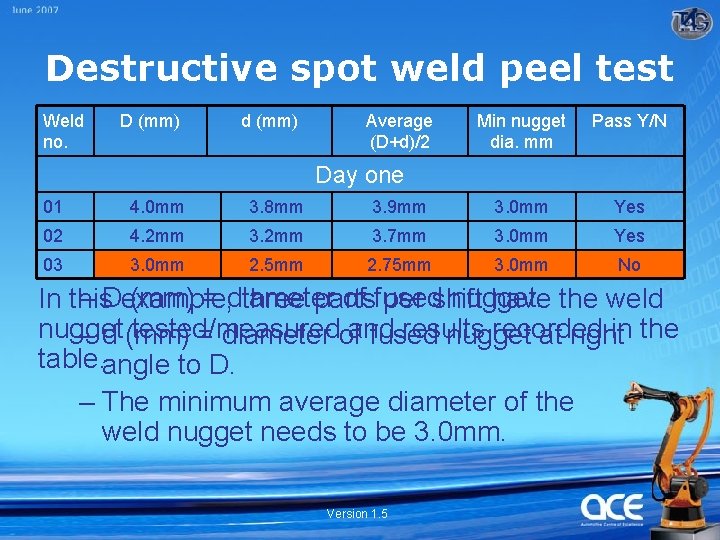
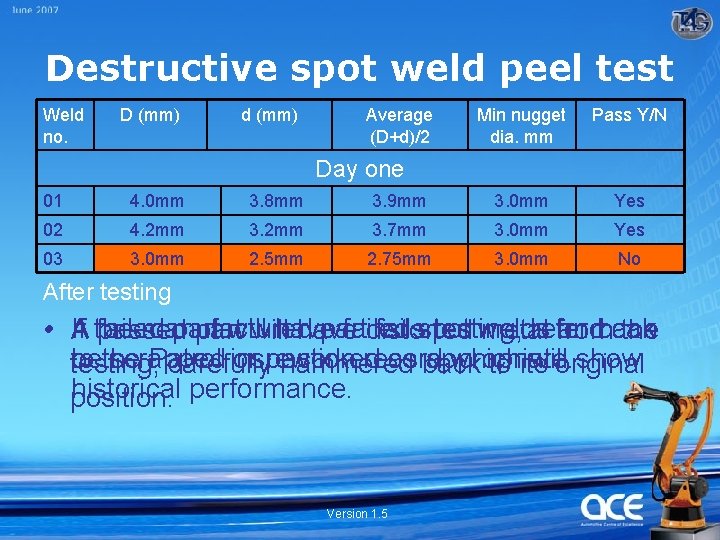
Destructive spot weld peel test Weld no. D (mm) d (mm) Average (D+d)/2 Min nugget dia. mm Pass Y/N Day one 01 4. 0 mm 3. 8 mm 3. 9 mm 3. 0 mm Yes 02 4. 2 mm 3. 7 mm 3. 0 mm Yes 03 3. 0 mm 2. 5 mm 2. 75 mm 3. 0 mm No – Dexample, (mm) = diameter of fused nugget. In this three parts per shift have the weld nugget tested/measured and results recorded in the – d (mm) = diameter of fused nugget at right table. angle to D. – The minimum average diameter of the weld nugget needs to be 3. 0 mm. Version 1. 5

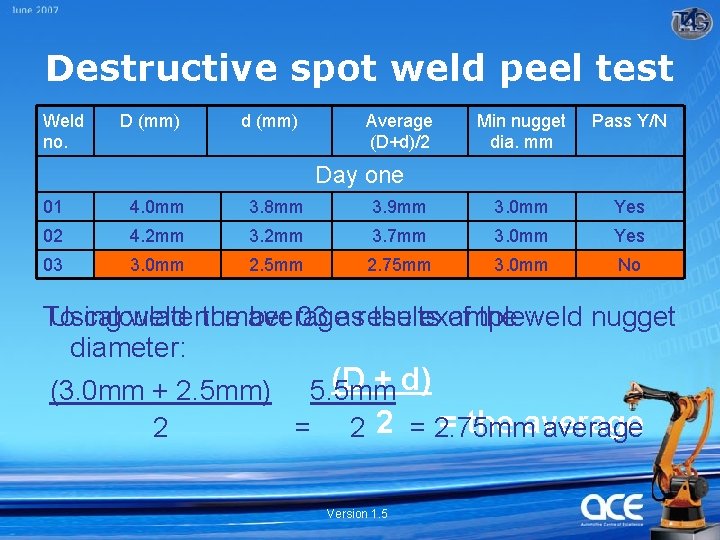
Destructive spot weld peel test Weld no. D (mm) d (mm) Average (D+d)/2 Min nugget dia. mm Pass Y/N Day one 01 4. 0 mm 3. 8 mm 3. 9 mm 3. 0 mm Yes 02 4. 2 mm 3. 7 mm 3. 0 mm Yes 03 3. 0 mm 2. 5 mm 2. 75 mm 3. 0 mm No To Using calculate weld number the average 03 asresults the example: of the weld nugget diameter: (D + d) (3. 0 mm + 2. 5 mm) 5. 5 mm = the average 2 = 2. 75 mm average Version 1. 5

Destructive spot weld peel test Weld no. D (mm) d (mm) Average (D+d)/2 Min nugget dia. mm Pass Y/N Day one 01 4. 0 mm 3. 8 mm 3. 9 mm 3. 0 mm Yes 02 4. 2 mm 3. 7 mm 3. 0 mm Yes 03 3. 0 mm 2. 5 mm 2. 75 mm 3. 0 mm No After testing If the failed manufactured part will have part failed failsspot testing, welds refer andback can • A passed part will have distorted metal from the bethe to scrapped Patrol inspection or reworked record as back appropriate. which willoriginal show testing, carefully hammered to its historical performance. position. Version 1. 5

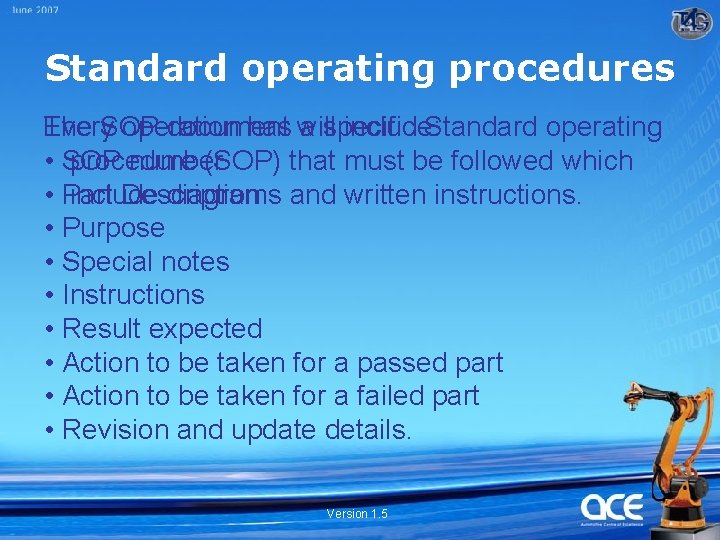
Standard operating procedures Every operation has will a specific Standard operating The SOP document include: procedure (SOP) that must be followed which • SOP number include diagrams and written instructions. • Part Description • Purpose • Special notes • Instructions • Result expected • Action to be taken for a passed part • Action to be taken for a failed part • Revision and update details. Version 1. 5

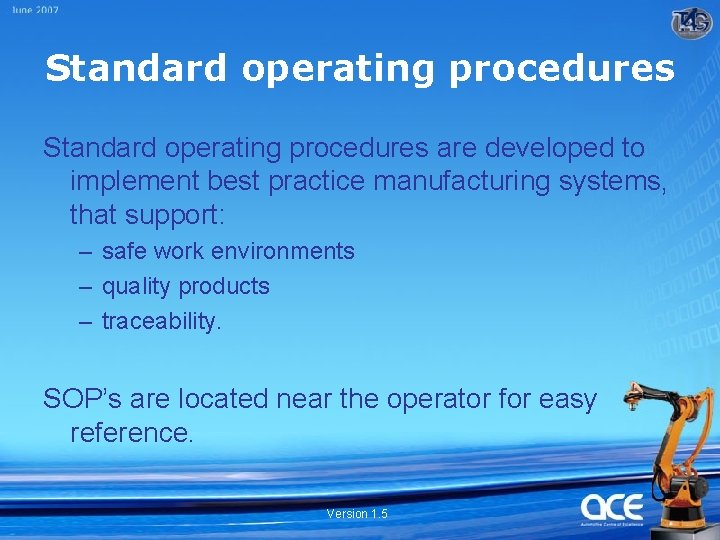
Standard operating procedures are developed to implement best practice manufacturing systems, that support: – safe work environments – quality products – traceability. SOP’s are located near the operator for easy reference. Version 1. 5

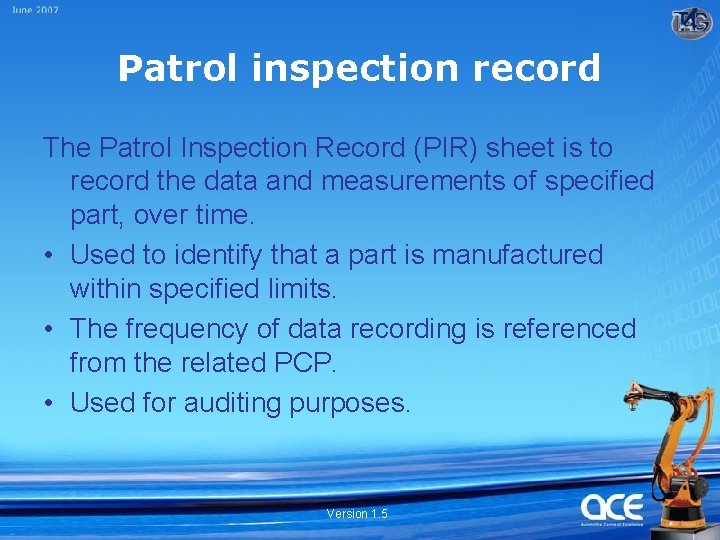
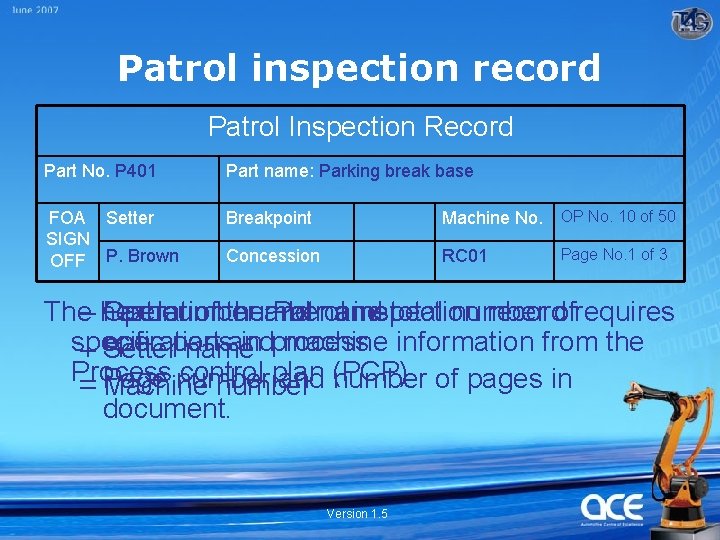
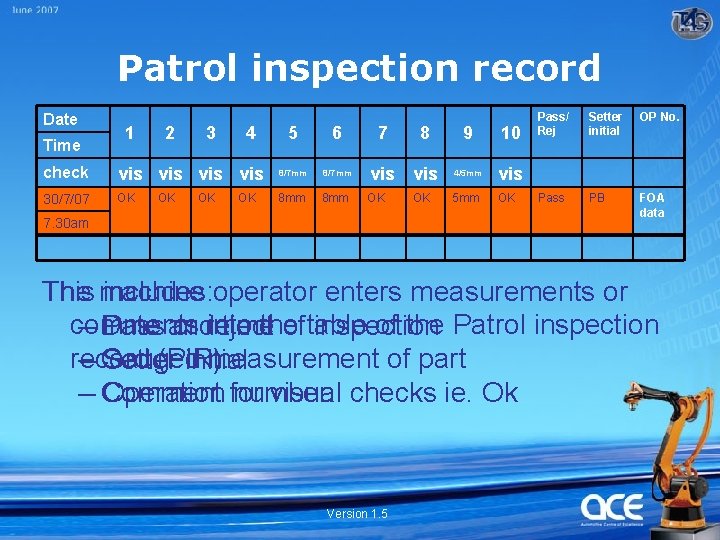
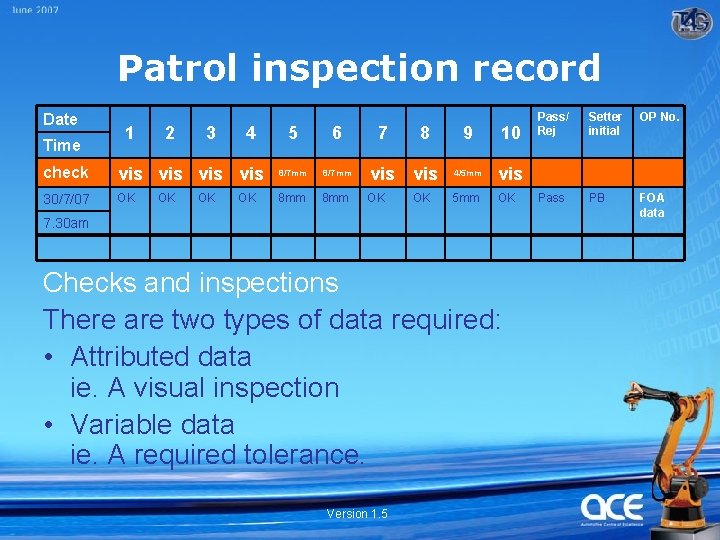
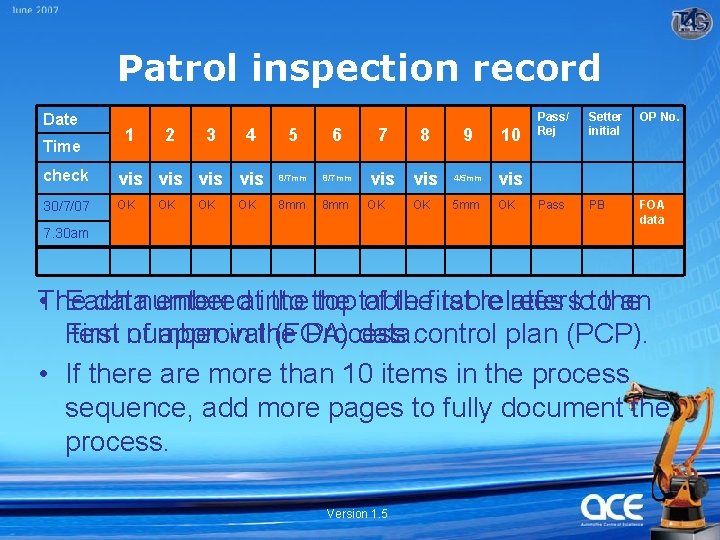
Patrol inspection record The Patrol Inspection Record (PIR) sheet is to record the data and measurements of specified part, over time. • Used to identify that a part is manufactured within specified limits. • The frequency of data recording is referenced from the related PCP. • Used for auditing purposes. Version 1. 5

Patrol inspection record Patrol Inspection Record Part No. P 401 Part name: Parking break base FOA Setter SIGN OFF P. Brown Breakpoint Machine No. OP No. 10 of 50 Concession RC 01 Page No. 1 of 3 The– header Part number Operation of the number and Patrol name and inspection total number recordofrequires specific and in process machine information from the – operations Setterpart name Process control plan – number and (PCP). number of pages in – Page Machine number document. Version 1. 5

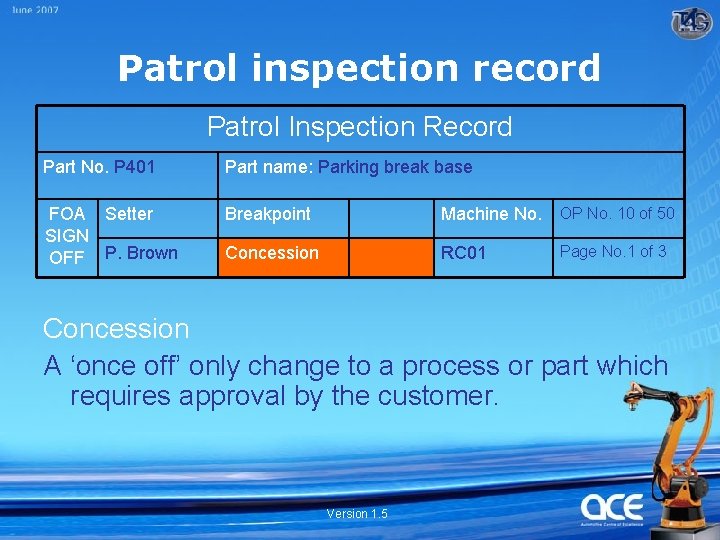
Patrol inspection record Patrol Inspection Record Part No. P 401 Part name: Parking break base FOA Setter SIGN OFF P. Brown Breakpoint Machine No. OP No. 10 of 50 Concession RC 01 Page No. 1 of 3 Concession A ‘once off’ only change to a process or part which requires approval by the customer. Version 1. 5

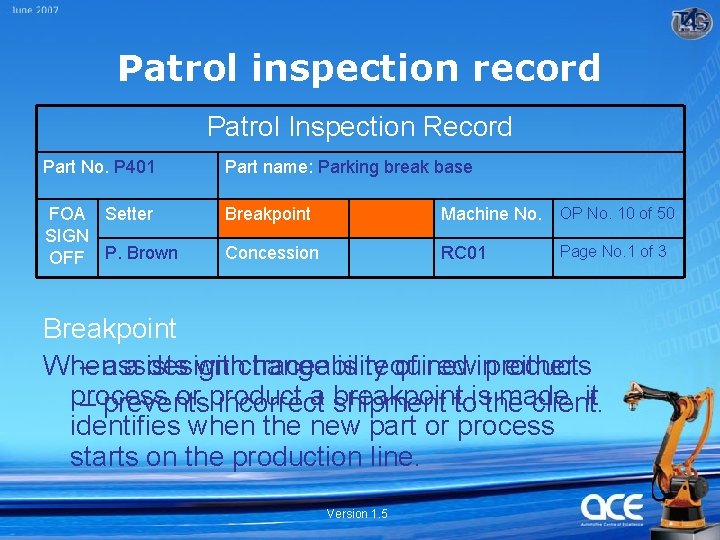
Patrol inspection record Patrol Inspection Record Part No. P 401 Part name: Parking break base FOA Setter SIGN OFF P. Brown Breakpoint Machine No. OP No. 10 of 50 Concession RC 01 Page No. 1 of 3 Breakpoint When a design is required either – assists withchange traceability of newinproducts process or product a shipment breakpointtoisthe made, it – prevents incorrect client. identifies when the new part or process starts on the production line. Version 1. 5

Patrol inspection record Specific information for gauges, tools and visual checks are included in the note section of the patrol inspection record. For example: • Operator to use gauge number • Item numbers for gauges • Operator to visually check item number. Version 1. 5

Patrol inspection record Date Time 1 2 3 4 5 6 check vis vis 8/7 mm 30/7/07 OK 8 mm OK OK OK 7 8 vis OK 7. 30 am OK 9 10 4/5 mm vis 5 mm OK Pass/ Rej Setter initial OP No. Pass PB FOA data The machine This includes: operator enters measurements or comments into the of the Patrol inspection – Date time oftable inspection Pass and or reject record (PIR). – Gauged measurement of part Setter initial – Comment visual checks ie. Ok Operation for number. Version 1. 5

Patrol inspection record Date Time 1 2 3 4 5 6 check vis vis 8/7 mm 30/7/07 OK 8 mm OK OK OK 7 8 vis OK OK 9 10 4/5 mm vis 5 mm OK 7. 30 am Checks and inspections There are two types of data required: • Attributed data ie. A visual inspection • Variable data ie. A required tolerance. Version 1. 5 Pass/ Rej Setter initial OP No. Pass PB FOA data

Patrol inspection record Date Time 1 2 3 4 5 6 check vis vis 8/7 mm 30/7/07 OK 8 mm OK OK OK 7 8 vis OK 7. 30 am OK 9 10 4/5 mm vis 5 mm OK Pass/ Rej Setter initial OP No. Pass PB FOA data • The Each datanumber enteredatinto the top table of thefirst table relates referstotothe an First number item of approval in the (FOA) Process data. control plan (PCP). • If there are more than 10 items in the process sequence, add more pages to fully document the process. Version 1. 5

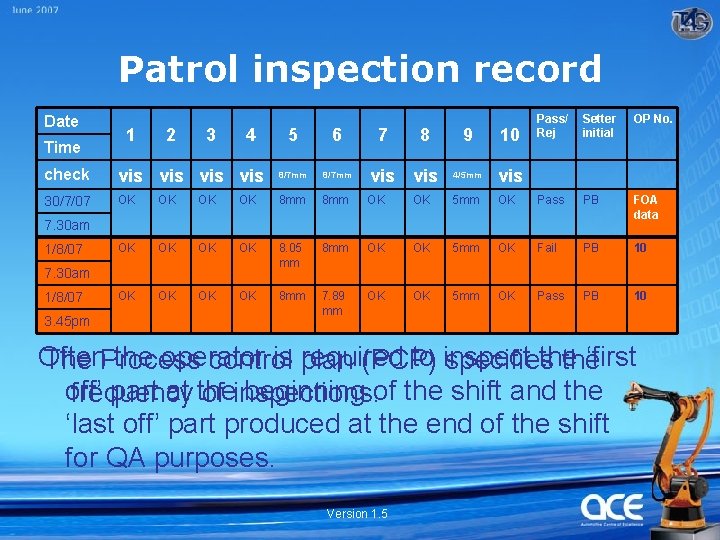
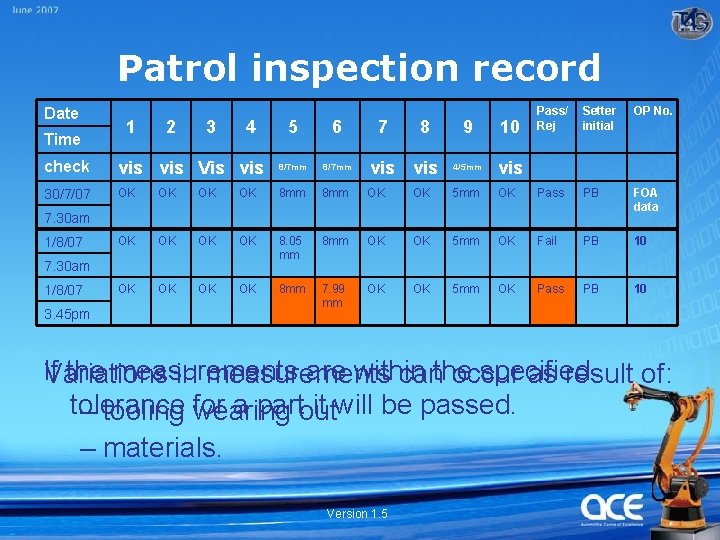
Patrol inspection record Date Time 1 2 3 4 5 6 7 8 9 10 4/5 mm vis Pass/ Rej Setter initial OP No. check vis vis 8/7 mm 30/7/07 OK OK 8 mm OK OK 5 mm OK Pass PB FOA data OK OK 8. 05 mm 8 mm OK OK 5 mm OK Fail PB 10 OK OK 8 mm 7. 89 mm OK OK 5 mm OK Pass PB 10 vis 7. 30 am 1/8/07 3. 45 pm Often the operator is plan required to inspect the ‘first The Process control (PCP) specifies the off’ part at the beginning of the shift and the frequency of inspections. ‘last off’ part produced at the end of the shift for QA purposes. Version 1. 5

Patrol inspection record Date Time 1 2 3 4 5 6 7 8 9 10 4/5 mm vis Pass/ Rej Setter initial OP No. check vis Vis vis 8/7 mm 30/7/07 OK OK 8 mm OK OK 5 mm OK Pass PB FOA data OK OK 8. 05 mm 8 mm OK OK 5 mm OK Fail PB 10 OK OK 8 mm 7. 99 mm OK OK 5 mm OK Pass PB 10 vis 7. 30 am 1/8/07 3. 45 pm If the measurements are within specified Variations in measurements canthe occur as result of: tolerance for a partout it will be passed. – tooling wearing – materials. Version 1. 5

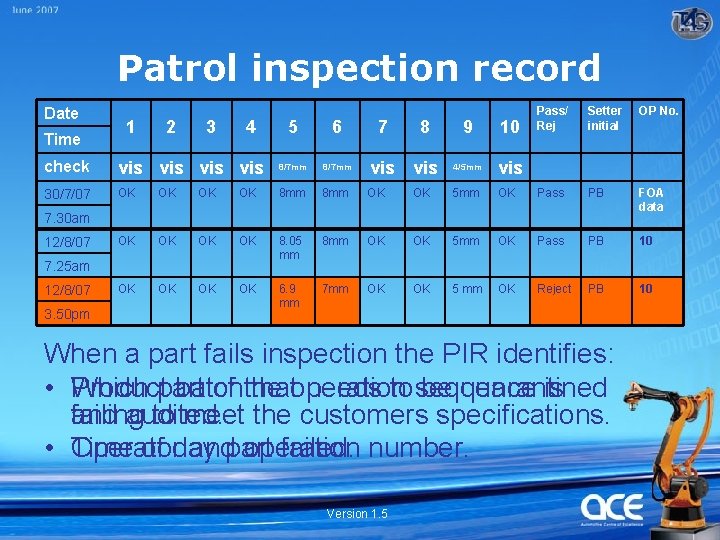
Patrol inspection record Date Time 1 2 3 4 5 6 7 8 9 10 4/5 mm vis Pass/ Rej Setter initial OP No. check vis vis 8/7 mm 30/7/07 OK OK 8 mm OK OK 5 mm OK Pass PB FOA data OK OK 8. 05 mm 8 mm OK OK 5 mm OK Pass PB 10 OK OK 6. 9 mm 7 mm OK OK 5 mm OK Reject PB 10 vis 7. 30 am 12/8/07 7. 25 am 12/8/07 3. 50 pm When a part fails inspection the PIR identifies: • Product Which part batch of the thatoperation needs to sequence be quarantined is failing and audited. to meet the customers specifications. • Operator Time of day andpart operation failed. number. Version 1. 5

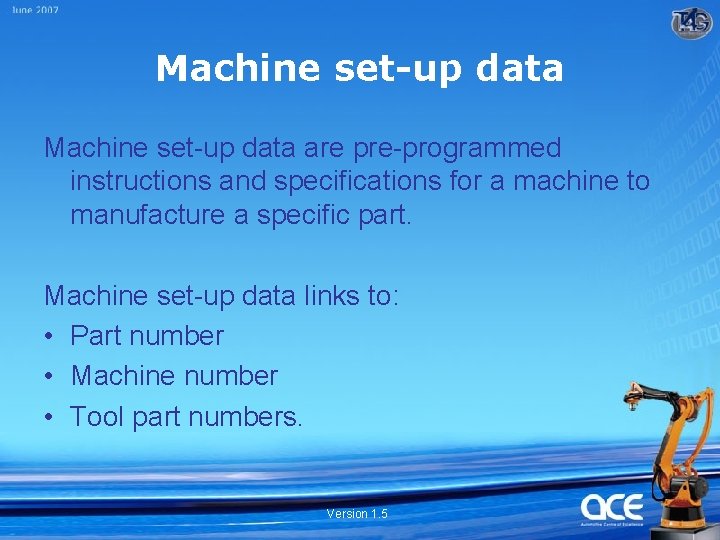
Machine set-up data are pre-programmed instructions and specifications for a machine to manufacture a specific part. Machine set-up data links to: • Part number • Machine number • Tool part numbers. Version 1. 5

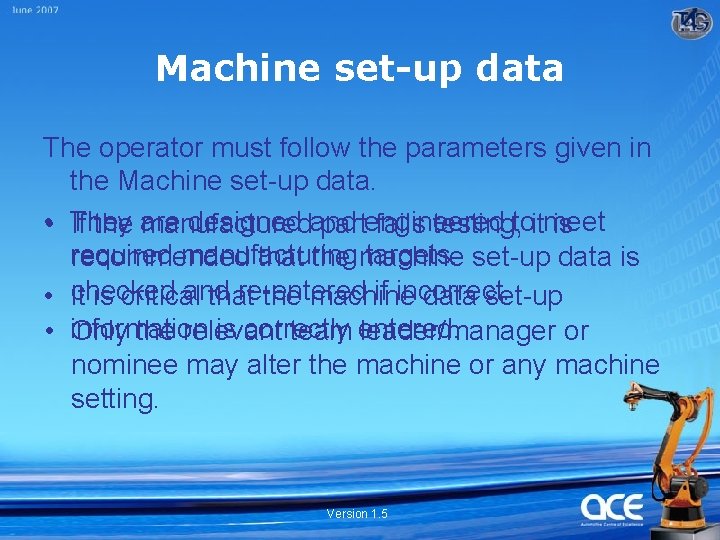
Machine set-up data The operator must follow the parameters given in the Machine set-up data. • They designed and If the are manufactured partengineered fails testing, toitmeet is required manufacturing targets. set-up data is recommended that the machine checked and re-entered if incorrect. • It is critical that the machine data set-up is correctly • information Only the relevant team entered. leader/manager or nominee may alter the machine or any machine setting. Version 1. 5

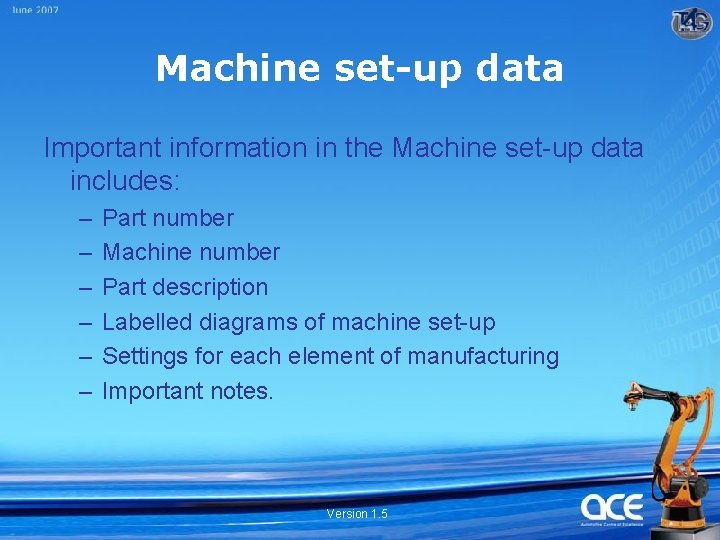
Machine set-up data Important information in the Machine set-up data includes: – – – Part number Machine number Part description Labelled diagrams of machine set-up Settings for each element of manufacturing Important notes. Version 1. 5

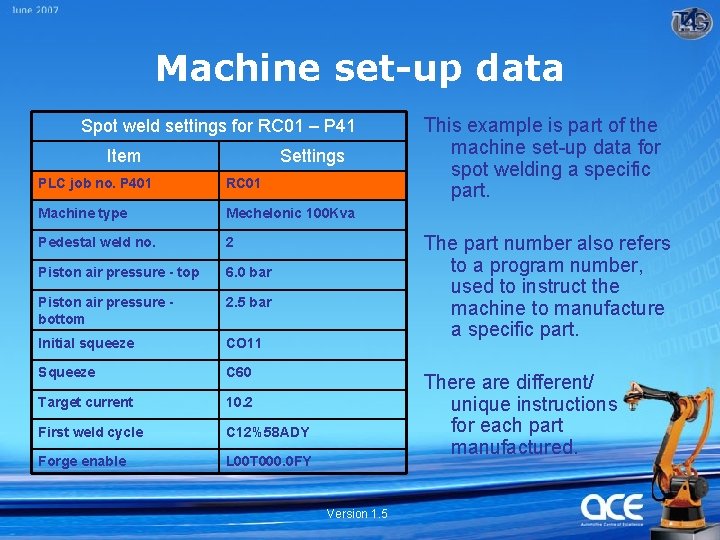
Machine set-up data Spot weld settings for RC 01 – P 41 Item Settings PLC job no. P 401 RC 01 Machine type Mechelonic 100 Kva Pedestal weld no. 2 Piston air pressure - top 6. 0 bar Piston air pressure bottom 2. 5 bar Initial squeeze CO 11 Squeeze C 60 Target current 10. 2 First weld cycle C 12%58 ADY Forge enable L 00 T 000. 0 FY This example is part of the machine set-up data for spot welding a specific part. The part number also refers to a program number, used to instruct the machine to manufacture a specific part. There are different/ unique instructions for each part manufactured. Version 1. 5

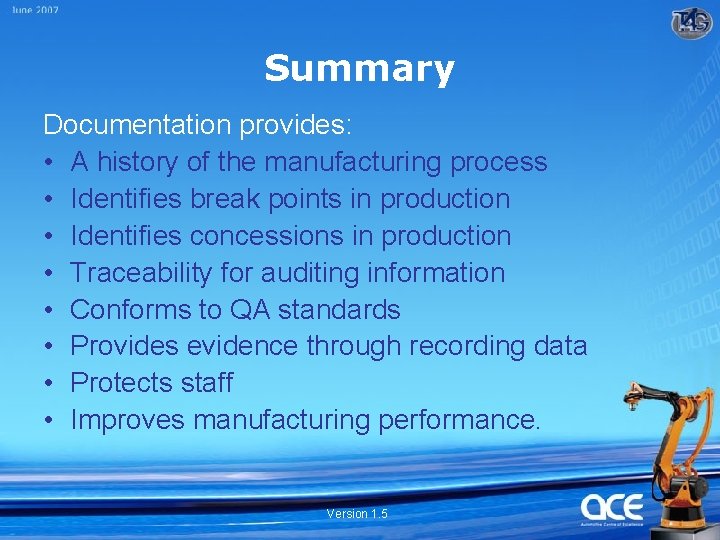
Summary Documentation provides: • A history of the manufacturing process • Identifies break points in production • Identifies concessions in production • Traceability for auditing information • Conforms to QA standards • Provides evidence through recording data • Protects staff • Improves manufacturing performance. Version 1. 5

Process TAKT vs CYCLE Version 1. 5

Objectives • • • Satisfy the customer schedules Maintain company reputation Improve productivity Apply lean initiatives Reduce manufacturing costs Improve house keeping Meet OHS requirements Reduce WIP Better utilisation of machinery Improved QA Version 1. 5

Balancing the sequence Balancing the manufacturing sequence allows production to flow smoothly and improves manufacturing performance. Balancing the manufacturing sequence reduces: • the amount of work in progress (WIP) • storage of parts • time wasting • QA issues • OHS. Version 1. 5

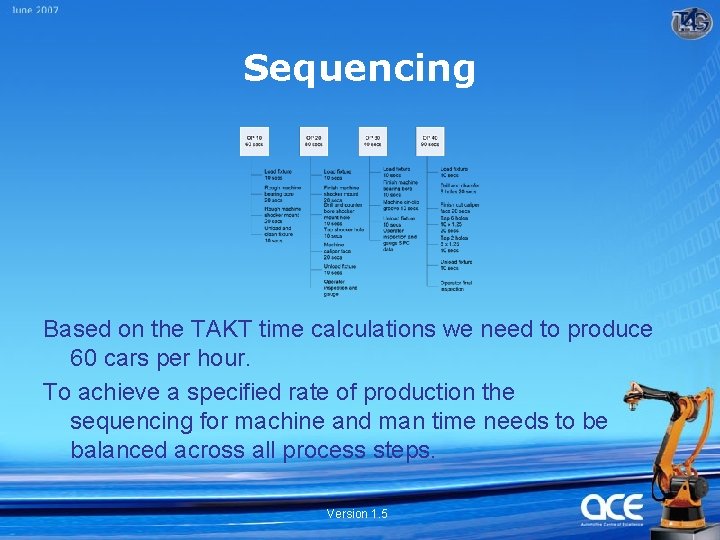
Sequencing Based on the TAKT time calculations we need to produce 60 cars per hour. To achieve a specified rate of production the sequencing for machine and man time needs to be balanced across all process steps. Version 1. 5

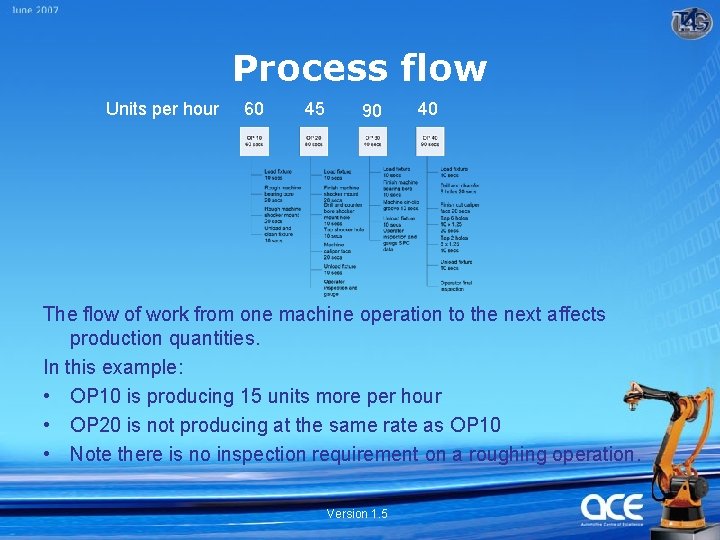
Process flow Units per hour 60 45 90 40 The flow of work from one machine operation to the next affects production quantities. In this example: • OP 10 is producing 15 units more per hour • OP 20 is not producing at the same rate as OP 10 • Note there is no inspection requirement on a roughing operation. Version 1. 5

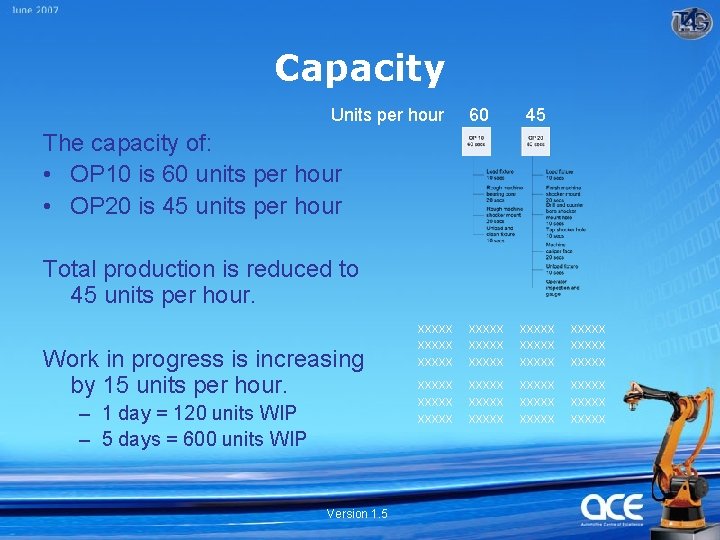
Capacity Units per hour 60 45 The capacity of: • OP 10 is 60 units per hour • OP 20 is 45 units per hour Total production is reduced to 45 units per hour. Work in progress is increasing by 15 units per hour. – 1 day = 120 units WIP – 5 days = 600 units WIP Version 1. 5 xxxxx xxxxx xxxxx xxxxx xxxxx xxxxx

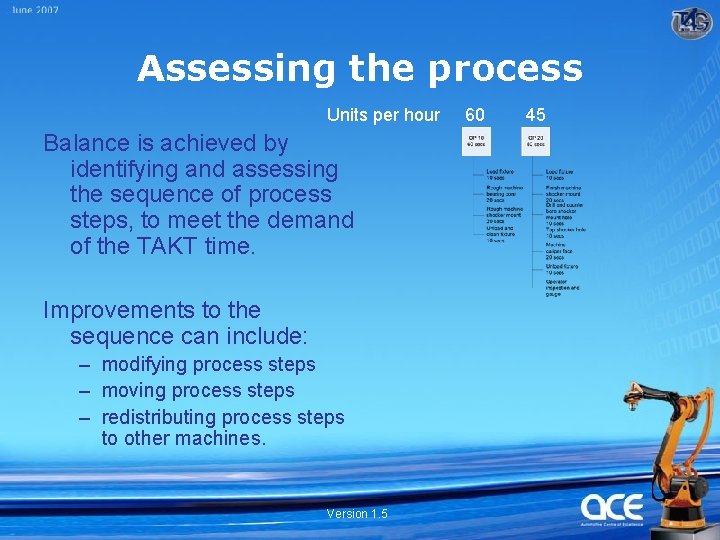
Assessing the process Units per hour Balance is achieved by identifying and assessing the sequence of process steps, to meet the demand of the TAKT time. Improvements to the sequence can include: – modifying process steps – moving process steps – redistributing process steps to other machines. Version 1. 5 60 45

Assessing change to process Changes and modifications need to be assessed to identify how the manufacturing process may be affected. Cost, availability or time can effect the final solution. For example: • A fixtures ability to take extra load • Operator time • PFMEA/QA risk through changes • Costs. Version 1. 5

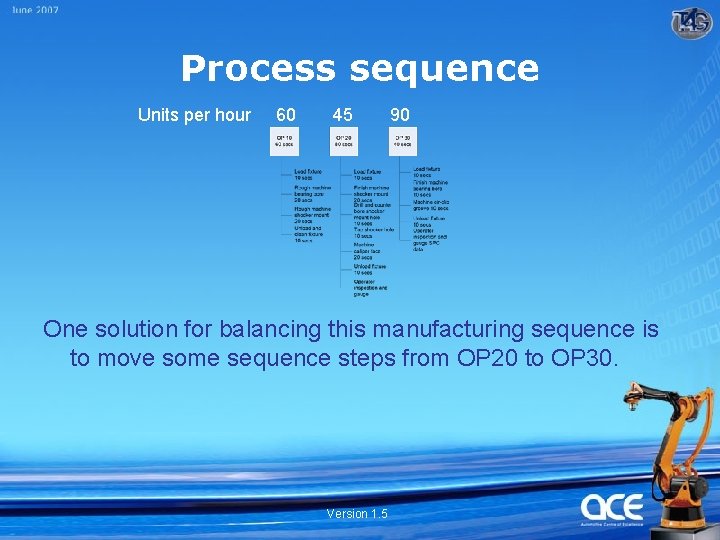
Process sequence Units per hour 60 45 90 One solution for balancing this manufacturing sequence is to move some sequence steps from OP 20 to OP 30. Version 1. 5

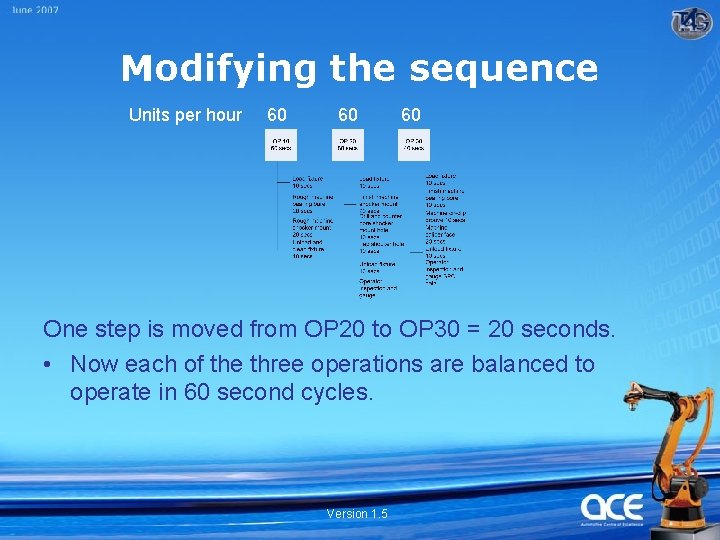
Modifying the sequence Units per hour 60 60 60 One step is moved from OP 20 to OP 30 = 20 seconds. • Now each of the three operations are balanced to operate in 60 second cycles. Version 1. 5

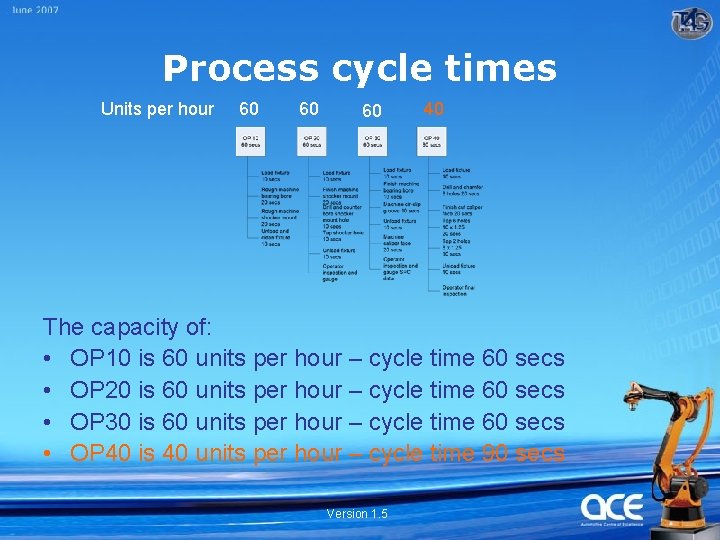
Process cycle times Units per hour 60 60 60 40 The capacity of: • OP 10 is 60 units per hour – cycle time 60 secs • OP 20 is 60 units per hour – cycle time 60 secs • OP 30 is 60 units per hour – cycle time 60 secs • OP 40 is 40 units per hour – cycle time 90 secs Version 1. 5

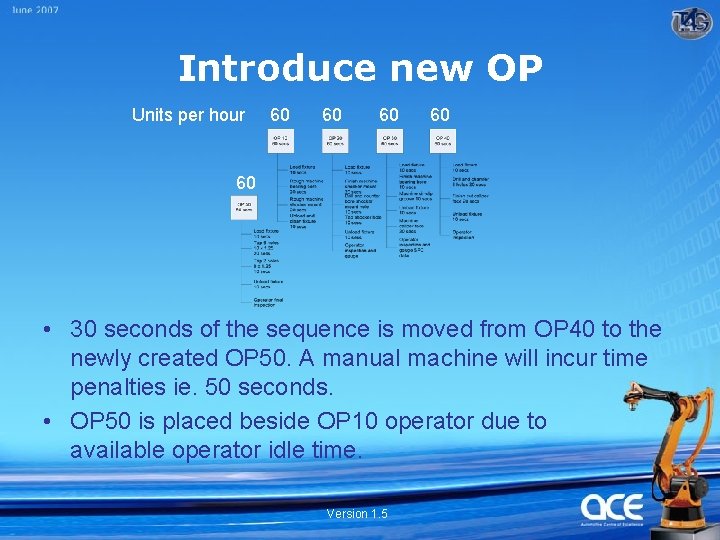
Introduce new OP Units per hour 60 60 60 • 30 seconds of the sequence is moved from OP 40 to the newly created OP 50. A manual machine will incur time penalties ie. 50 seconds. • OP 50 is placed beside OP 10 operator due to available operator idle time. Version 1. 5

Summary 1. 2. 3. 4. 5. 6. 7. 8. TAKT time calculations to meet customer needs. Identify equipment that cannot achieve TAKT time. Identify the equipment sequence and activity. Relocate equipment to meet TAKT time. Use PFMEA to assess risk. Introduced new OP. Outcome achieved by balancing line. Manufacturing supports customer needs. Version 1. 5

Production PFMEA Version 1. 5

What is a PFMEA? Potential failure mode and effect analysis (PFMEA) Definition • Used to assess the production process and potential effects of process failure. • It outlines actions that can be taken to eliminate or reduce the potential causes leading to process failures. • Using a PFMEA ensures that the manufactured products meet the engineered product specifications. Version 1. 5

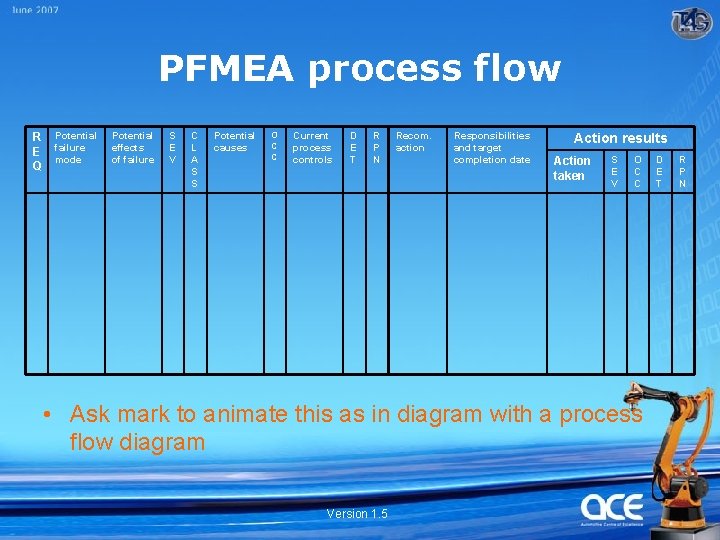
PFMEA process flow R E Q Potential failure mode Potential effects of failure S E V C L A S S Potential causes O C C Current process controls D E T R P N Recom. action Responsibilities and target completion date Action results Action taken S E V O C C • Ask mark to animate this as in diagram with a process flow diagram Version 1. 5 D E T R P N

Why use a PFMEA? PFMEA assists project managers with: • time constraints • provides an in-depth analysis of the manufacturing process • lowers product development and design times • lowers cost • improves design for programs. Version 1. 5

What is the PFMEA process? Creating a PFMEA is a process evaluating failures that can occur in the manufacturing process and finding solutions. PFMEA starts with: – – – reviewing the process brainstorming potential failure modes listing their possible effects Allocating risk priority numbers Developing an action plan. Version 1. 5

Reviewing process Identifying items Each part of the manufacturing sequence that requires a review is listed as an item, for example: • Operator load part/fixture. Version 1. 5

Reviewing process Listing functions Each item is broken down into specific functions: • Operator will collect hoist • Clamp fixture • Tap holes. Version 1. 5

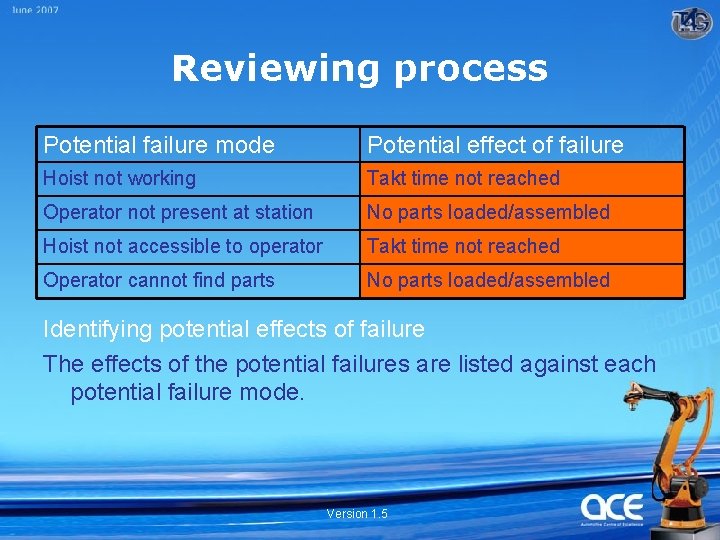
Reviewing process Identifying potential failures Each function is assessed and all the potential reasons for failures are listed. Example Operator will collect hoist: • Hoist not working • Operator not present at station • Hoist not accessible to operator • Operator cannot find parts. Version 1. 5

Reviewing process Potential failure mode Potential effect of failure Hoist not working Takt time not reached Operator not present at station No parts loaded/assembled Hoist not accessible to operator Takt time not reached Operator cannot find parts No parts loaded/assembled Identifying potential effects of failure The effects of the potential failures are listed against each potential failure mode. Version 1. 5

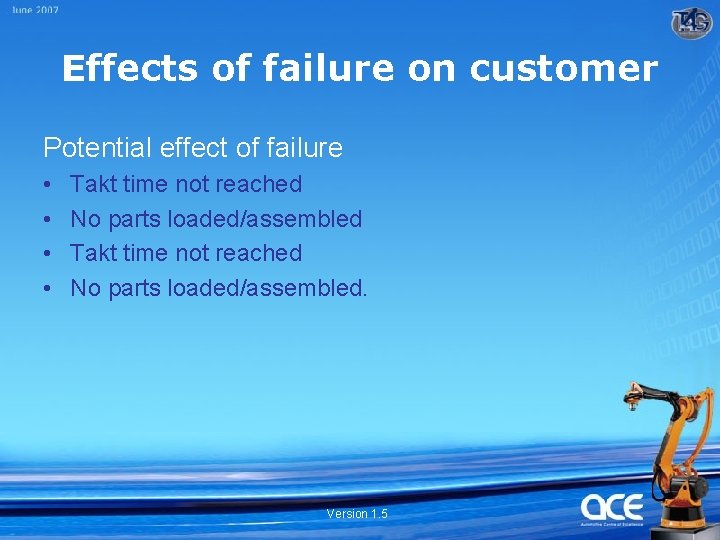
Effects of failure on customer Potential effect of failure • • Takt time not reached No parts loaded/assembled. Version 1. 5

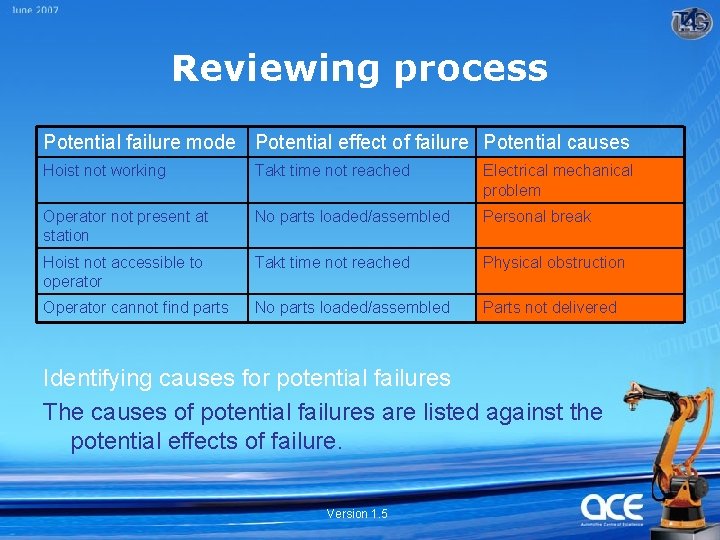
Reviewing process Potential failure mode Potential effect of failure Potential causes Hoist not working Takt time not reached Electrical mechanical problem Operator not present at station No parts loaded/assembled Personal break Hoist not accessible to operator Takt time not reached Physical obstruction Operator cannot find parts No parts loaded/assembled Parts not delivered Identifying causes for potential failures The causes of potential failures are listed against the potential effects of failure. Version 1. 5

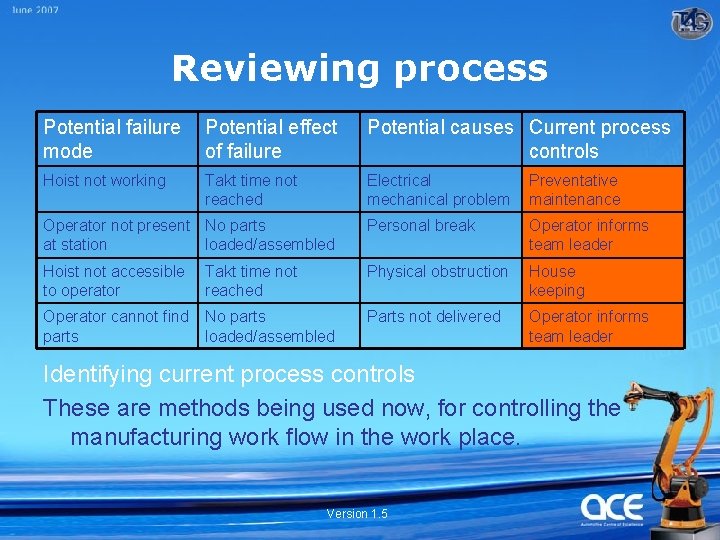
Reviewing process Potential failure mode Potential effect of failure Potential causes Current process controls Hoist not working Takt time not reached Electrical mechanical problem Preventative maintenance Operator not present No parts at station loaded/assembled Personal break Operator informs team leader Hoist not accessible to operator Takt time not reached Physical obstruction House keeping Operator cannot find parts No parts loaded/assembled Parts not delivered Operator informs team leader Identifying current process controls These are methods being used now, for controlling the manufacturing work flow in the work place. Version 1. 5

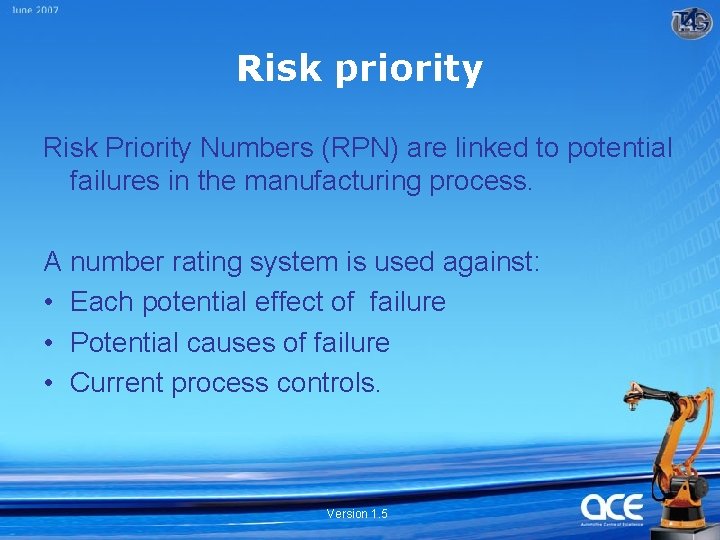
Risk priority Risk Priority Numbers (RPN) are linked to potential failures in the manufacturing process. A number rating system is used against: • Each potential effect of failure • Potential causes of failure • Current process controls. Version 1. 5

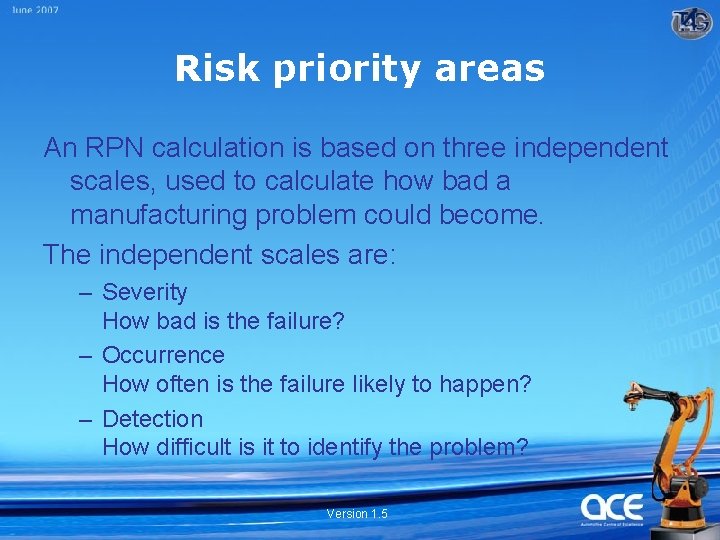
Risk priority areas An RPN calculation is based on three independent scales, used to calculate how bad a manufacturing problem could become. The independent scales are: – Severity How bad is the failure? – Occurrence How often is the failure likely to happen? – Detection How difficult is it to identify the problem? Version 1. 5

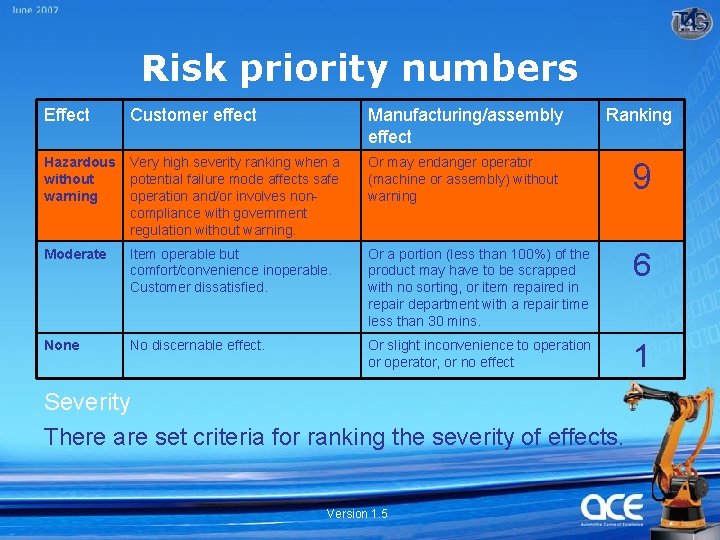
Risk priority numbers Effect Customer effect Manufacturing/assembly effect Ranking Hazardous without warning Very high severity ranking when a potential failure mode affects safe operation and/or involves noncompliance with government regulation without warning. Or may endanger operator (machine or assembly) without warning 9 Moderate Item operable but comfort/convenience inoperable. Customer dissatisfied. Or a portion (less than 100%) of the product may have to be scrapped with no sorting, or item repaired in repair department with a repair time less than 30 mins. 6 None No discernable effect. Or slight inconvenience to operation or operator, or no effect 1 Severity There are set criteria for ranking the severity of effects. Version 1. 5

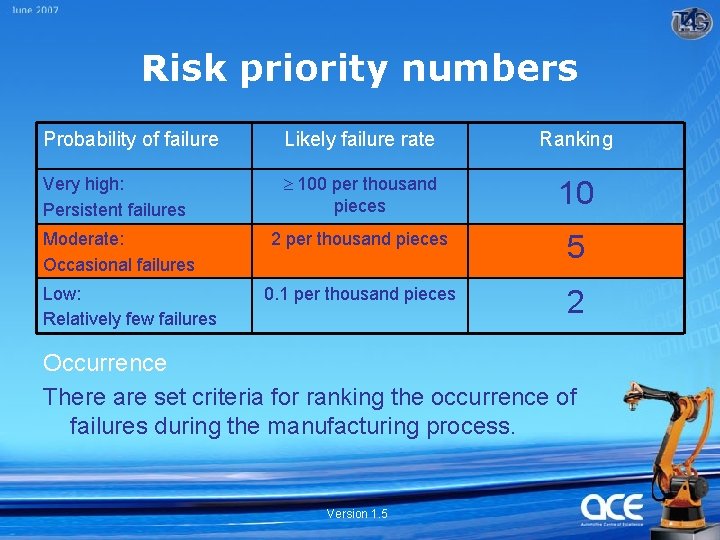
Risk priority numbers Probability of failure Likely failure rate Ranking Very high: Persistent failures 100 per thousand pieces 10 Moderate: Occasional failures 2 per thousand pieces 5 0. 1 per thousand pieces 2 Low: Relatively few failures Occurrence There are set criteria for ranking the occurrence of failures during the manufacturing process. Version 1. 5

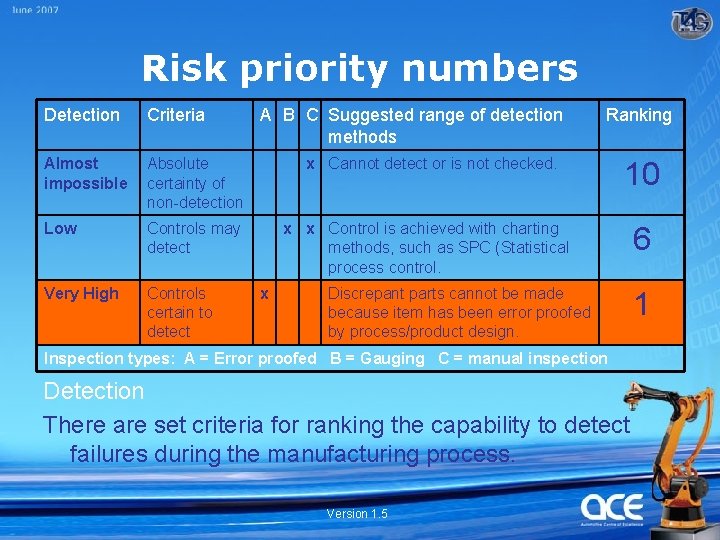
Risk priority numbers Detection Criteria Almost impossible Absolute certainty of non-detection Low Controls may detect Very High Controls certain to detect A B C Suggested range of detection methods Ranking x Cannot detect or is not checked. 10 x x Control is achieved with charting methods, such as SPC (Statistical process control. x Discrepant parts cannot be made because item has been error proofed by process/product design. Inspection types: A = Error proofed B = Gauging C = manual inspection Detection There are set criteria for ranking the capability to detect failures during the manufacturing process. Version 1. 5 6 1

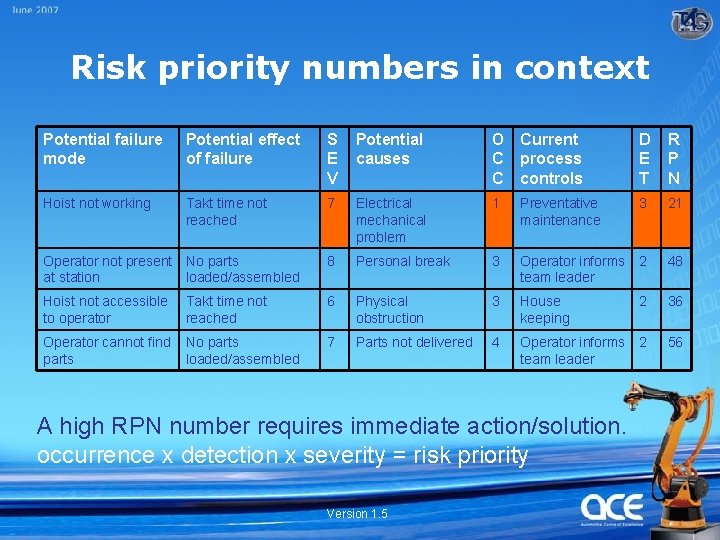
Risk priority numbers in context Potential failure mode Potential effect of failure S E V Potential causes O Current C process C controls D E T R P N Hoist not working Takt time not reached 7 Electrical mechanical problem 1 Preventative maintenance 3 21 Operator not present No parts at station loaded/assembled 8 Personal break 3 Operator informs team leader 2 48 Hoist not accessible to operator Takt time not reached 6 Physical obstruction 3 House keeping 2 36 Operator cannot find parts No parts loaded/assembled 7 Parts not delivered 4 Operator informs team leader 2 56 A high RPN number requires immediate action/solution. occurrence x detection x severity = risk priority Version 1. 5

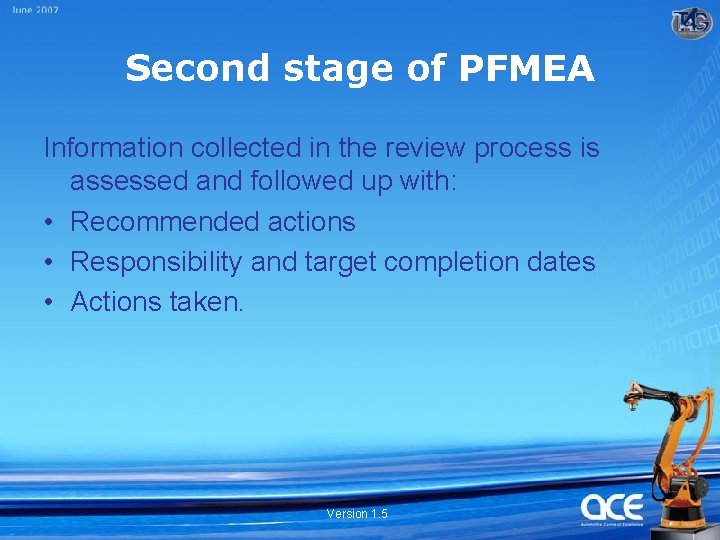
Second stage of PFMEA Information collected in the review process is assessed and followed up with: • Recommended actions • Responsibility and target completion dates • Actions taken. Version 1. 5

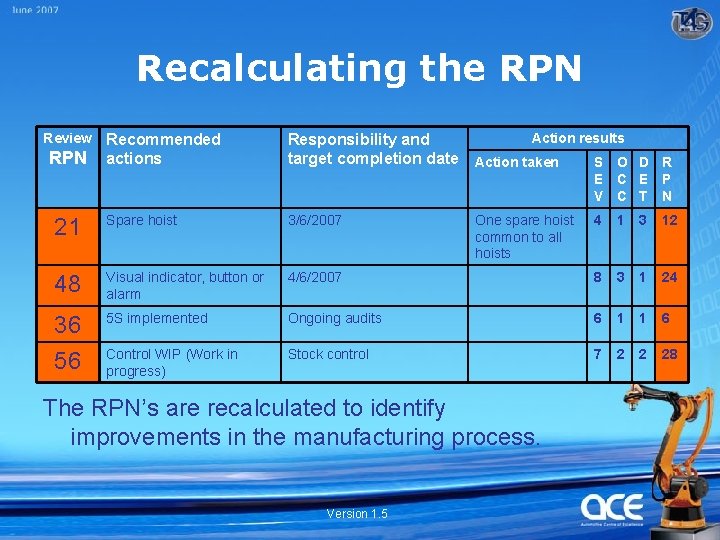
Recalculating the RPN Review RPN Recommended actions Action results Responsibility and target completion date Action taken S O D R E C E P V C T N 21 Spare hoist 3/6/2007 48 Visual indicator, button or alarm 36 56 One spare hoist common to all hoists 4 1 3 12 4/6/2007 8 3 1 24 5 S implemented Ongoing audits 6 1 1 6 Control WIP (Work in progress) Stock control 7 2 2 28 The RPN’s are recalculated to identify improvements in the manufacturing process. Version 1. 5

RPN actions The assessment of an RPN can vary subject to the customers expectations. • Vehicle manufacturers generally consider 300 and below as non-critical and considered low priority. • Aircraft industry anything above 20 is considered of a critical nature and requires correction. Version 1. 5

Summary • A PFMEA is a live document Information is continually being monitored, reviewed and assessed to improve the manufactured product. • Used to identify potential effects of process failure for the manufacturing process. • Lists actions that can be taken to eliminate/reduce potential causes leading to process failures. • Ensures that the manufactured products meet the engineered product specifications for the client. • Reduces costs. • Improves productivity. Version 1. 5

End Version 1. 5

Class activity Obtain company SOP Identify risks of each process step (HML) Based on that assessment prepare a PFMEA Version 1. 5

End Thank you for taking part in today's session. Version 1. 5