orthogonal cutting a Orthogonal cutting with a welldefined
- Slides: 49


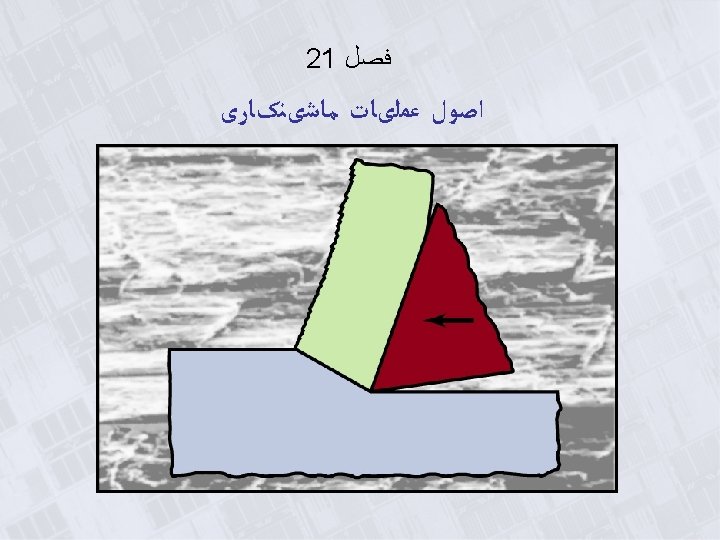
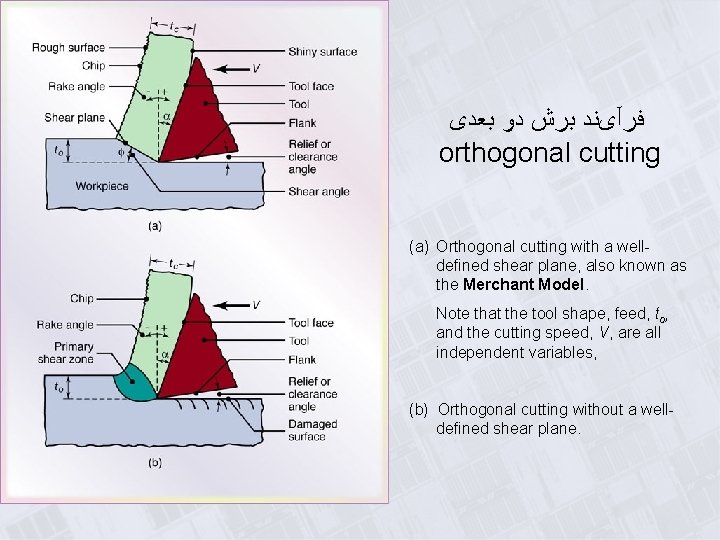
ﻓﺮآیﻨﺪ ﺑﺮﺵ ﺩﻭ ﺑﻌﺪی orthogonal cutting (a) Orthogonal cutting with a welldefined shear plane, also known as the Merchant Model. Note that the tool shape, feed, to, and the cutting speed, V, are all independent variables, (b) Orthogonal cutting without a welldefined shear plane.


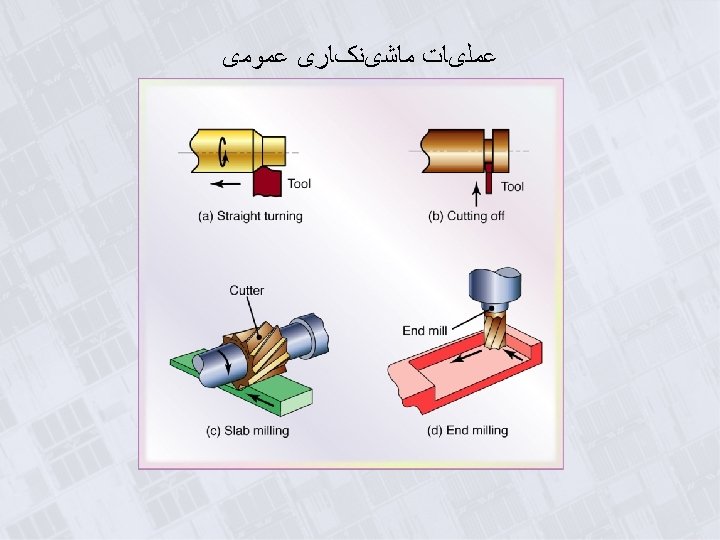
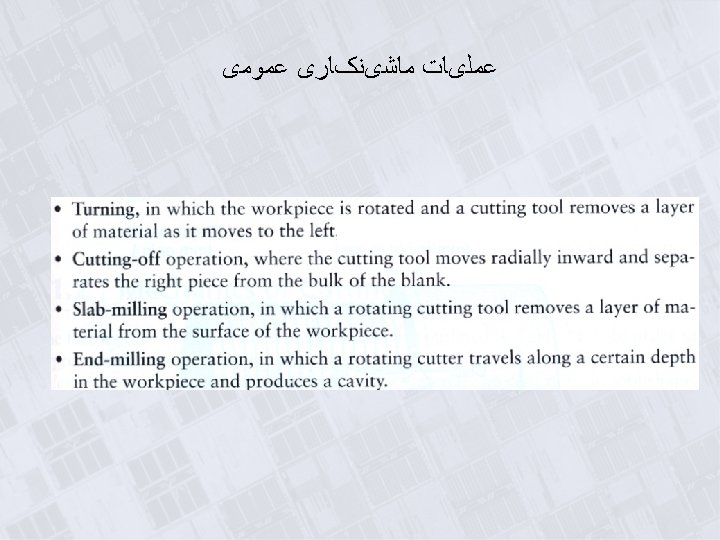
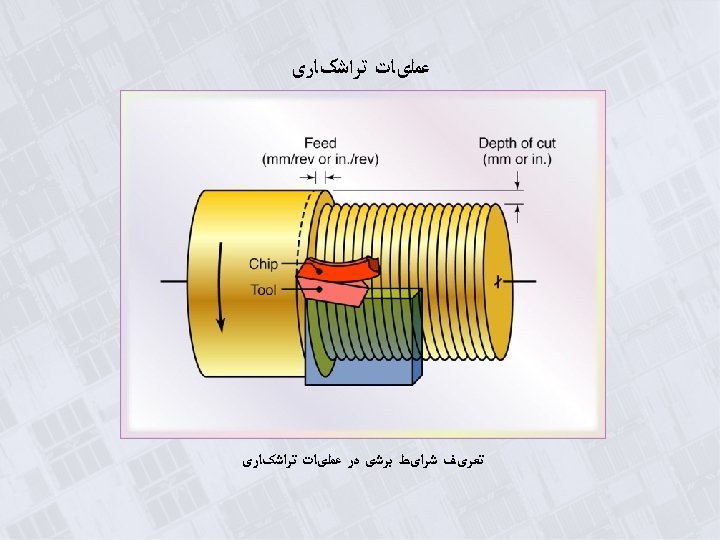
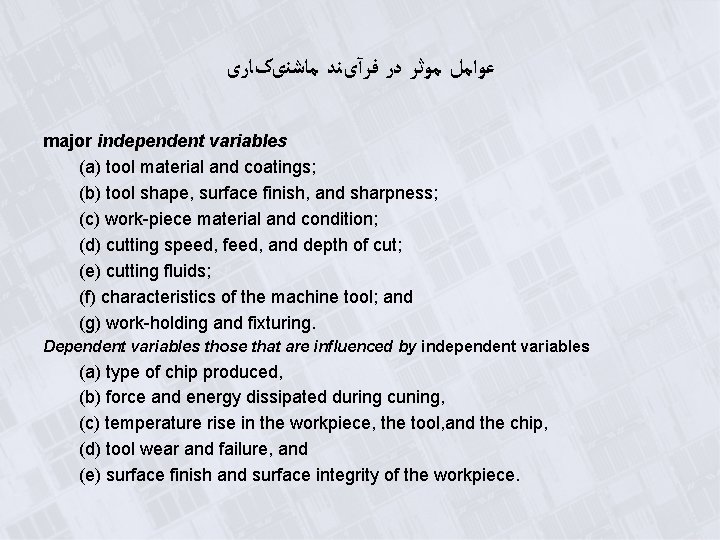
ﻋﻮﺍﻣﻞ ﻣﻮﺛﺮ ﺩﺭ ﻓﺮآیﻨﺪ ﻣﺎﺷﻨیکﺎﺭی major independent variables (a) tool material and coatings; (b) tool shape, surface finish, and sharpness; (c) work-piece material and condition; (d) cutting speed, feed, and depth of cut; (e) cutting fluids; (f) characteristics of the machine tool; and (g) work-holding and fixturing. Dependent variables those that are influenced by independent variables (a) type of chip produced, (b) force and energy dissipated during cuning, (c) temperature rise in the workpiece, the tool, and the chip, (d) tool wear and failure, and (e) surface finish and surface integrity of the workpiece.


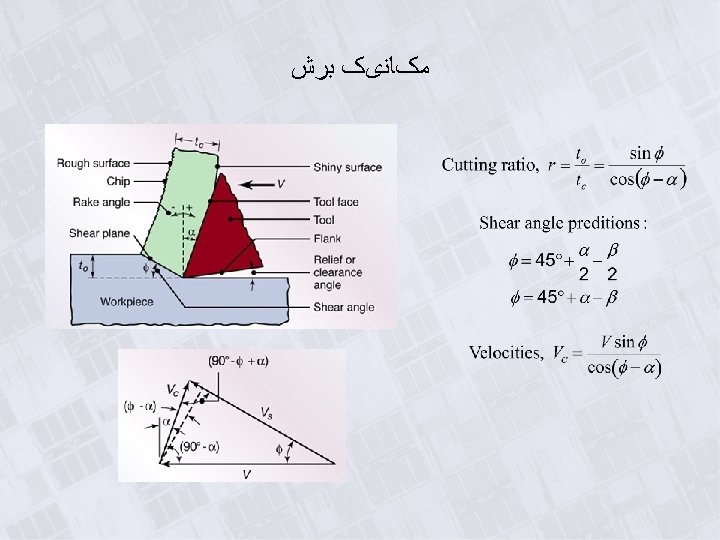
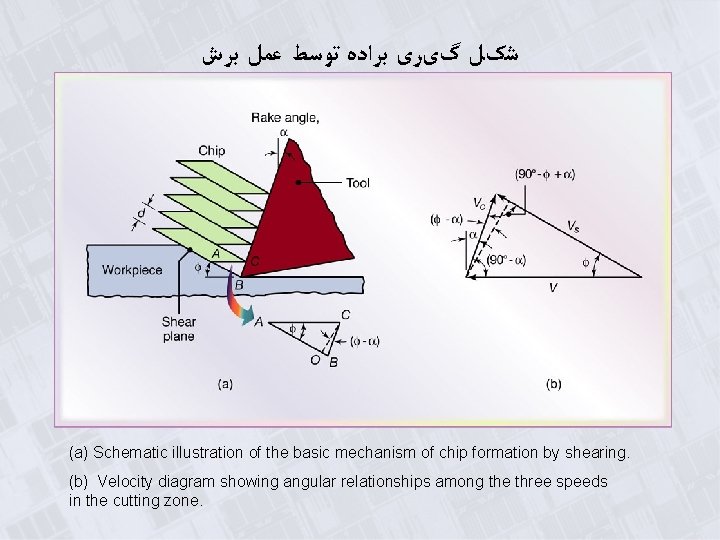
ﺷکﻞ گیﺮی ﺑﺮﺍﺩﻩ ﺗﻮﺳﻂ ﻋﻤﻞ ﺑﺮﺵ (a) Schematic illustration of the basic mechanism of chip formation by shearing. (b) Velocity diagram showing angular relationships among the three speeds in the cutting zone.

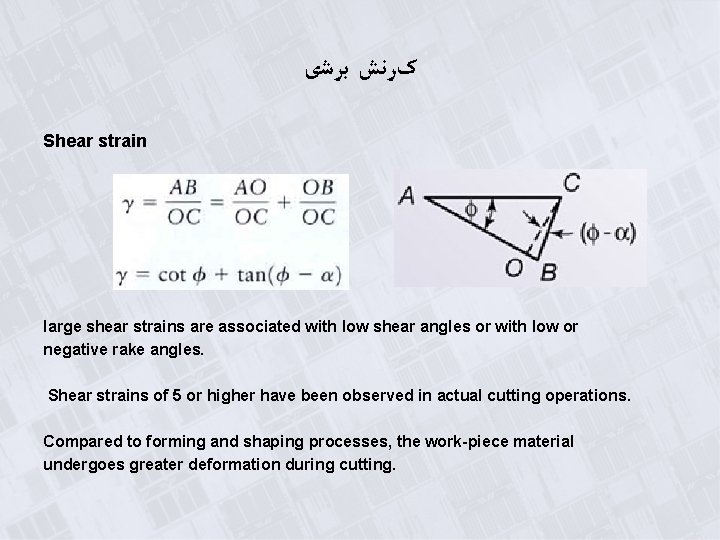
کﺮﻧﺶ ﺑﺮﺷی Shear strain large shear strains are associated with low shear angles or with low or negative rake angles. Shear strains of 5 or higher have been observed in actual cutting operations. Compared to forming and shaping processes, the work-piece material undergoes greater deformation during cutting.

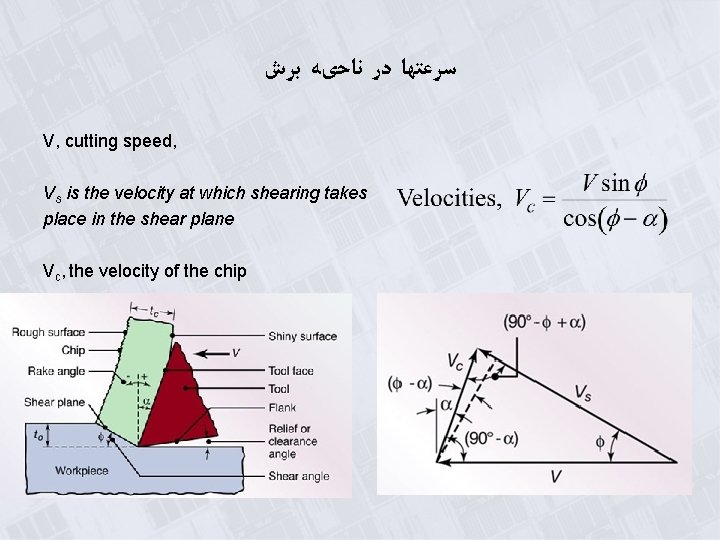
ﺳﺮﻋﺘﻬﺎ ﺩﺭ ﻧﺎﺣیﻪ ﺑﺮﺵ V, cutting speed, Vs is the velocity at which shearing takes place in the shear plane Vc, the velocity of the chip

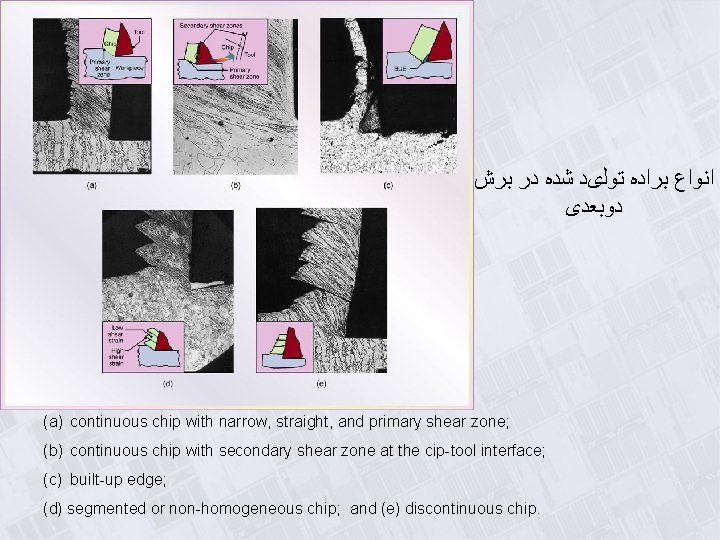
ﺍﻧﻮﺍﻉ ﺑﺮﺍﺩﻩ ﺗﻮﻟیﺪ ﺷﺪﻩ ﺩﺭ ﺑﺮﺵ ﺩﻭﺑﻌﺪی (a) continuous chip with narrow, straight, and primary shear zone; (b) continuous chip with secondary shear zone at the cip-tool interface; (c) built-up edge; (d) segmented or non-homogeneous chip; and (e) discontinuous chip.

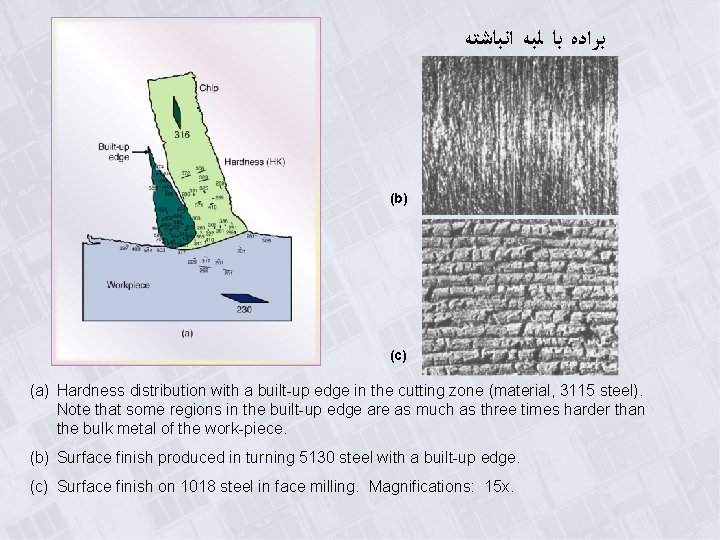
ﺑﺮﺍﺩﻩ ﺑﺎ ﻟﺒﻪ ﺍﻧﺒﺎﺷﺘﻪ (b) (c) (a) Hardness distribution with a built-up edge in the cutting zone (material, 3115 steel). Note that some regions in the built-up edge are as much as three times harder than the bulk metal of the work-piece. (b) Surface finish produced in turning 5130 steel with a built-up edge. (c) Surface finish on 1018 steel in face milling. Magnifications: 15 x.

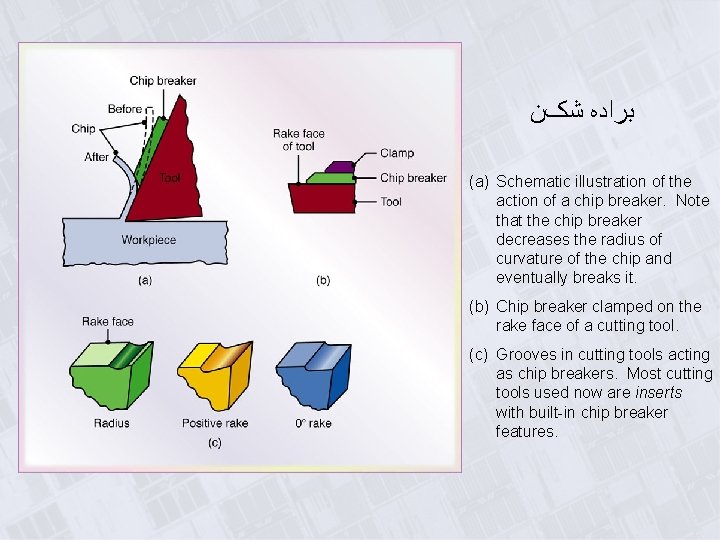
ﺑﺮﺍﺩﻩ ﺷکﻦ (a) Schematic illustration of the action of a chip breaker. Note that the chip breaker decreases the radius of curvature of the chip and eventually breaks it. (b) Chip breaker clamped on the rake face of a cutting tool. (c) Grooves in cutting tools acting as chip breakers. Most cutting tools used now are inserts with built-in chip breaker features.

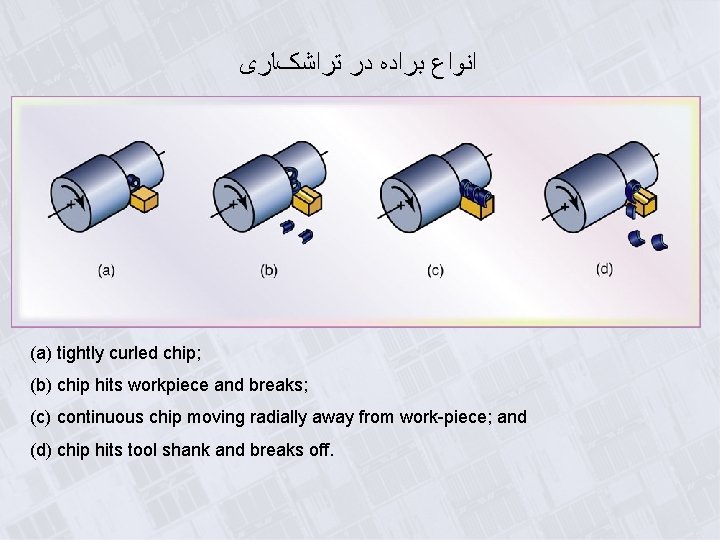
ﺍﻧﻮﺍﻉ ﺑﺮﺍﺩﻩ ﺩﺭ ﺗﺮﺍﺷکﺎﺭی (a) tightly curled chip; (b) chip hits workpiece and breaks; (c) continuous chip moving radially away from work-piece; and (d) chip hits tool shank and breaks off.

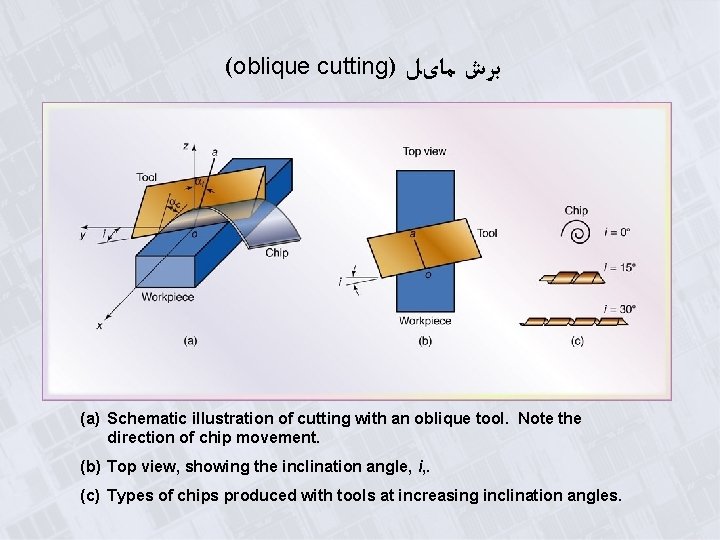
(oblique cutting) ﺑﺮﺵ ﻣﺎیﻞ (a) Schematic illustration of cutting with an oblique tool. Note the direction of chip movement. (b) Top view, showing the inclination angle, i, . (c) Types of chips produced with tools at increasing inclination angles.

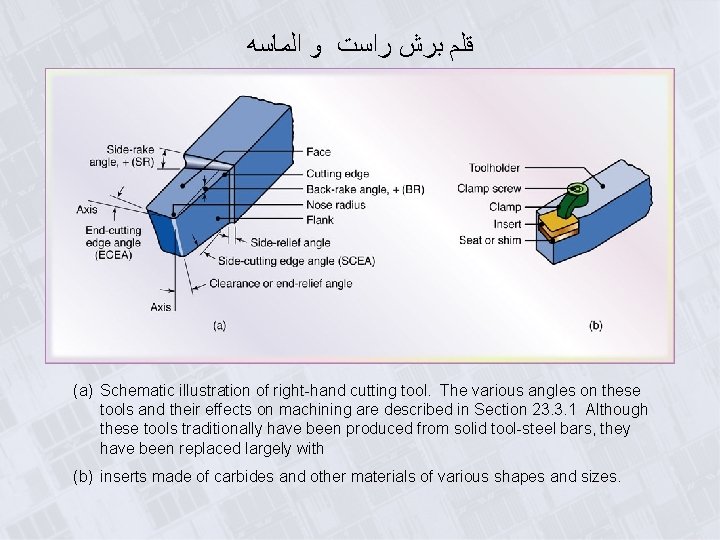
ﻗﻠﻢ ﺑﺮﺵ ﺭﺍﺳﺖ ﻭ ﺍﻟﻤﺎﺳﻪ (a) Schematic illustration of right-hand cutting tool. The various angles on these tools and their effects on machining are described in Section 23. 3. 1 Although these tools traditionally have been produced from solid tool-steel bars, they have been replaced largely with (b) inserts made of carbides and other materials of various shapes and sizes.

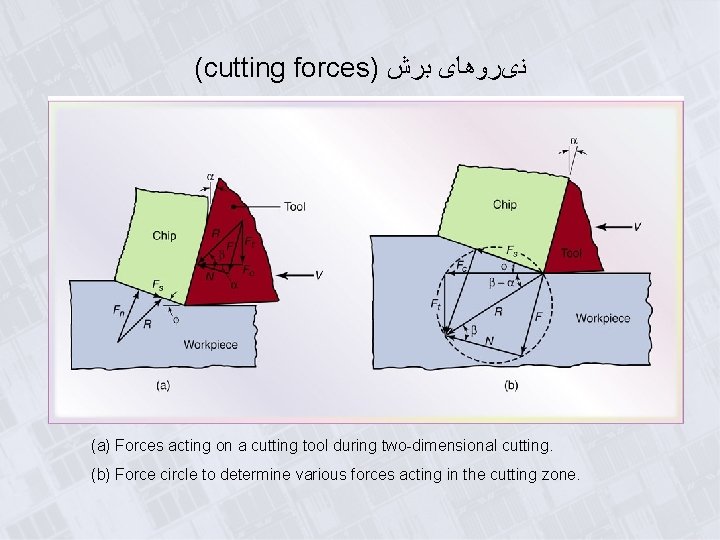
(cutting forces) ﻧیﺮﻭﻫﺎی ﺑﺮﺵ (a) Forces acting on a cutting tool during two-dimensional cutting. (b) Force circle to determine various forces acting in the cutting zone.


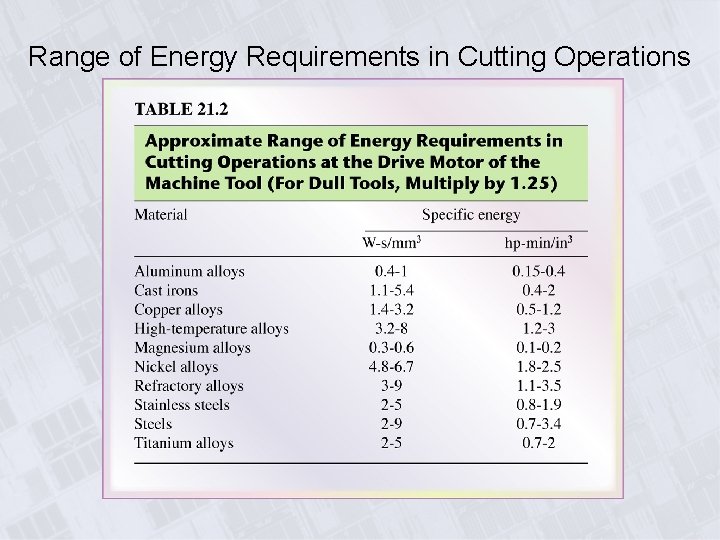
Range of Energy Requirements in Cutting Operations

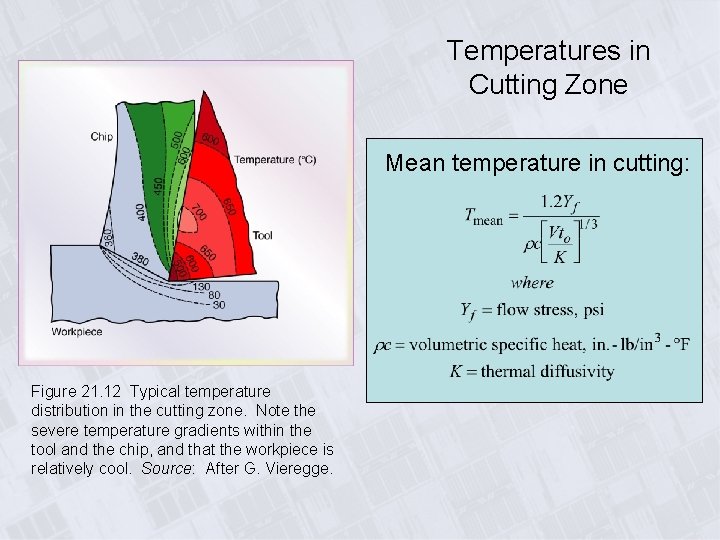
Temperatures in Cutting Zone Mean temperature in cutting: Figure 21. 12 Typical temperature distribution in the cutting zone. Note the severe temperature gradients within the tool and the chip, and that the workpiece is relatively cool. Source: After G. Vieregge.

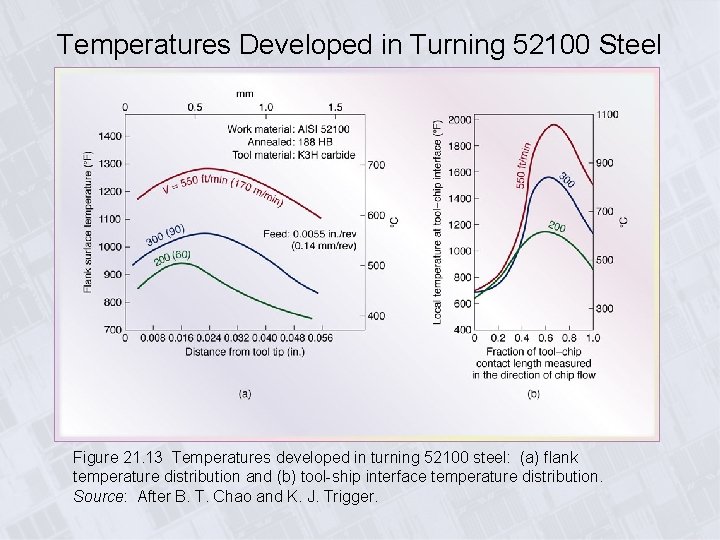
Temperatures Developed in Turning 52100 Steel Figure 21. 13 Temperatures developed in turning 52100 steel: (a) flank temperature distribution and (b) tool-ship interface temperature distribution. Source: After B. T. Chao and K. J. Trigger.

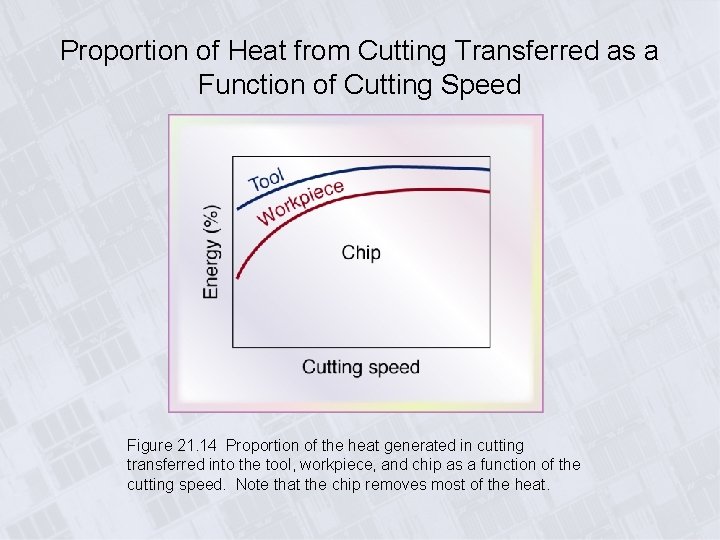
Proportion of Heat from Cutting Transferred as a Function of Cutting Speed Figure 21. 14 Proportion of the heat generated in cutting transferred into the tool, workpiece, and chip as a function of the cutting speed. Note that the chip removes most of the heat.

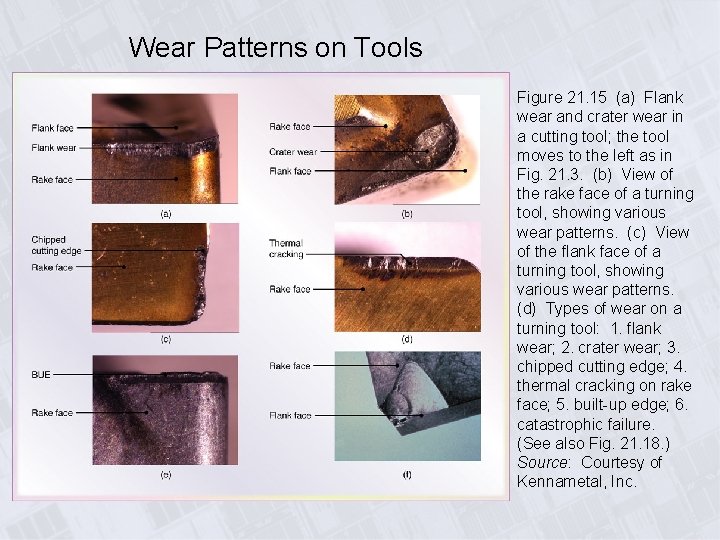
Wear Patterns on Tools Figure 21. 15 (a) Flank wear and crater wear in a cutting tool; the tool moves to the left as in Fig. 21. 3. (b) View of the rake face of a turning tool, showing various wear patterns. (c) View of the flank face of a turning tool, showing various wear patterns. (d) Types of wear on a turning tool: 1. flank wear; 2. crater wear; 3. chipped cutting edge; 4. thermal cracking on rake face; 5. built-up edge; 6. catastrophic failure. (See also Fig. 21. 18. ) Source: Courtesy of Kennametal, Inc.

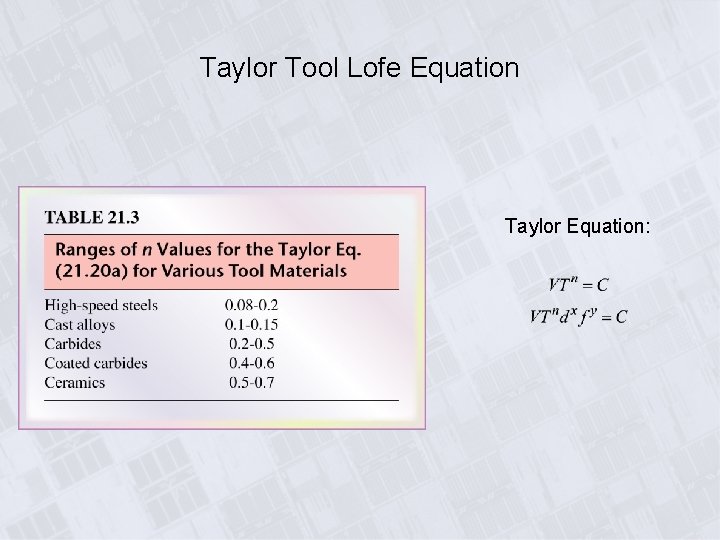
Taylor Tool Lofe Equation Taylor Equation:

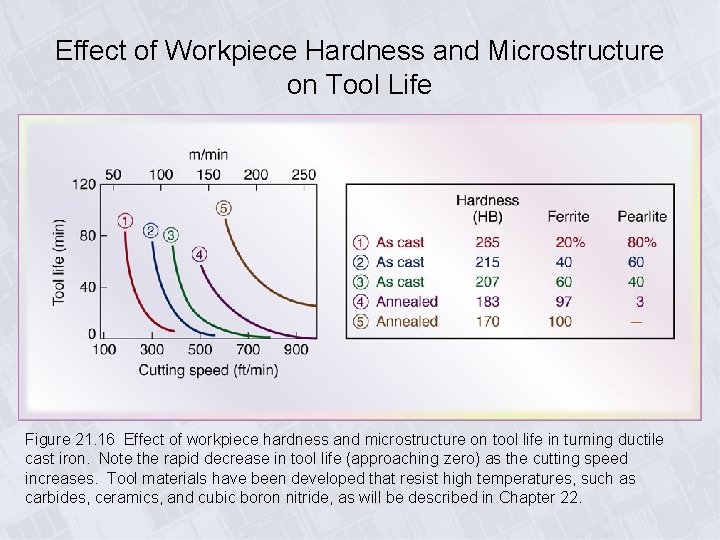
Effect of Workpiece Hardness and Microstructure on Tool Life Figure 21. 16 Effect of workpiece hardness and microstructure on tool life in turning ductile cast iron. Note the rapid decrease in tool life (approaching zero) as the cutting speed increases. Tool materials have been developed that resist high temperatures, such as carbides, ceramics, and cubic boron nitride, as will be described in Chapter 22.

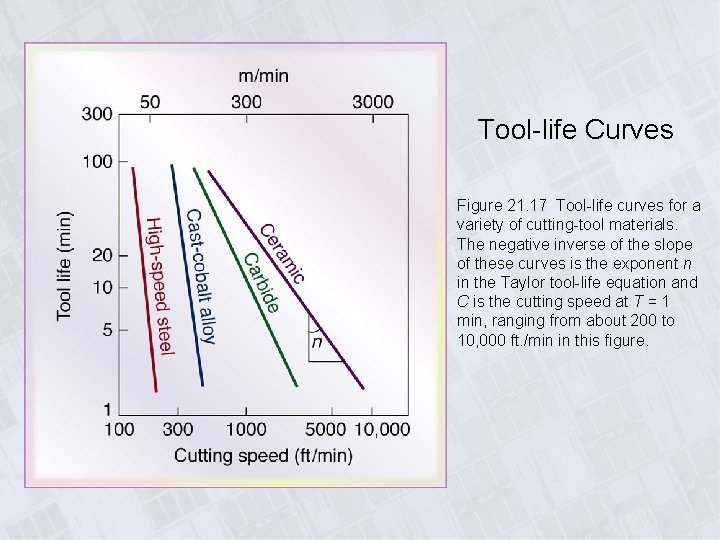
Tool-life Curves Figure 21. 17 Tool-life curves for a variety of cutting-tool materials. The negative inverse of the slope of these curves is the exponent n in the Taylor tool-life equation and C is the cutting speed at T = 1 min, ranging from about 200 to 10, 000 ft. /min in this figure.

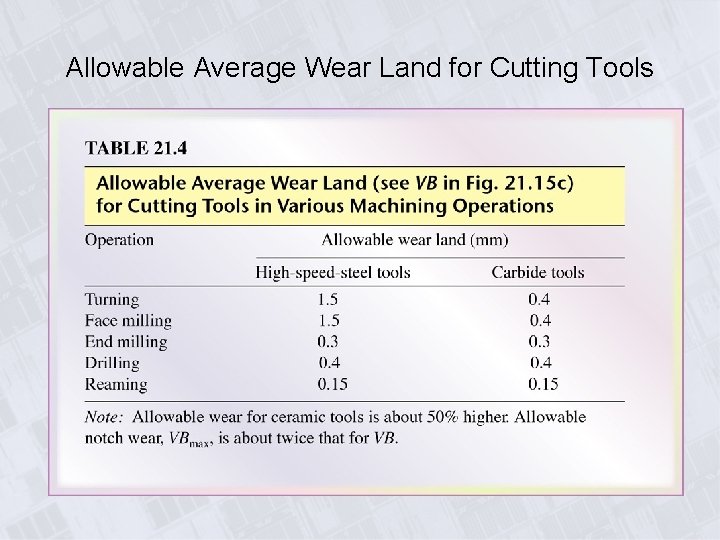
Allowable Average Wear Land for Cutting Tools

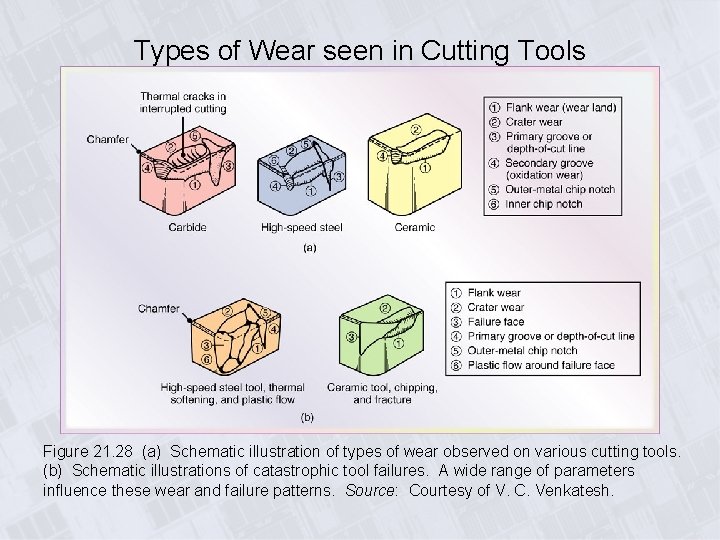
Types of Wear seen in Cutting Tools Figure 21. 28 (a) Schematic illustration of types of wear observed on various cutting tools. (b) Schematic illustrations of catastrophic tool failures. A wide range of parameters influence these wear and failure patterns. Source: Courtesy of V. C. Venkatesh.

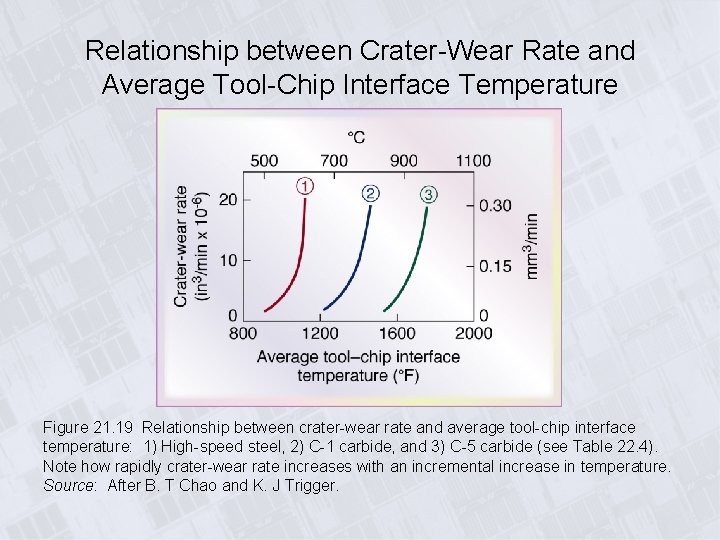
Relationship between Crater-Wear Rate and Average Tool-Chip Interface Temperature Figure 21. 19 Relationship between crater-wear rate and average tool-chip interface temperature: 1) High-speed steel, 2) C-1 carbide, and 3) C-5 carbide (see Table 22. 4). Note how rapidly crater-wear rate increases with an incremental increase in temperature. Source: After B. T Chao and K. J Trigger.

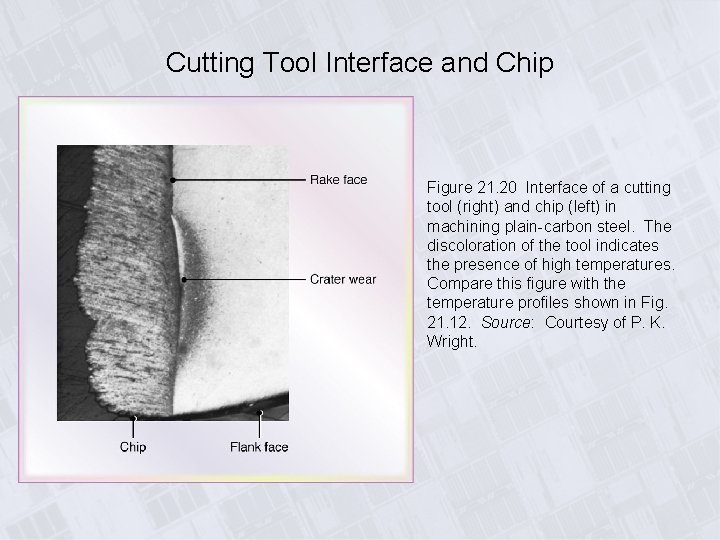
Cutting Tool Interface and Chip Figure 21. 20 Interface of a cutting tool (right) and chip (left) in machining plain-carbon steel. The discoloration of the tool indicates the presence of high temperatures. Compare this figure with the temperature profiles shown in Fig. 21. 12. Source: Courtesy of P. K. Wright.

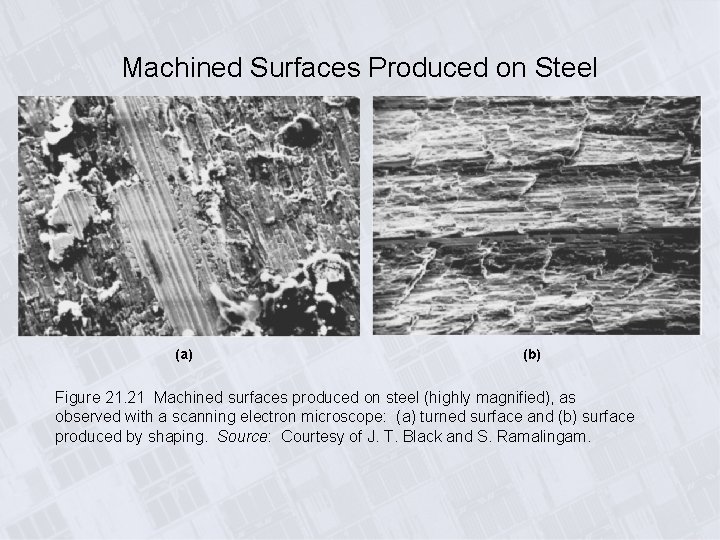
Machined Surfaces Produced on Steel (a) (b) Figure 21. 21 Machined surfaces produced on steel (highly magnified), as observed with a scanning electron microscope: (a) turned surface and (b) surface produced by shaping. Source: Courtesy of J. T. Black and S. Ramalingam.

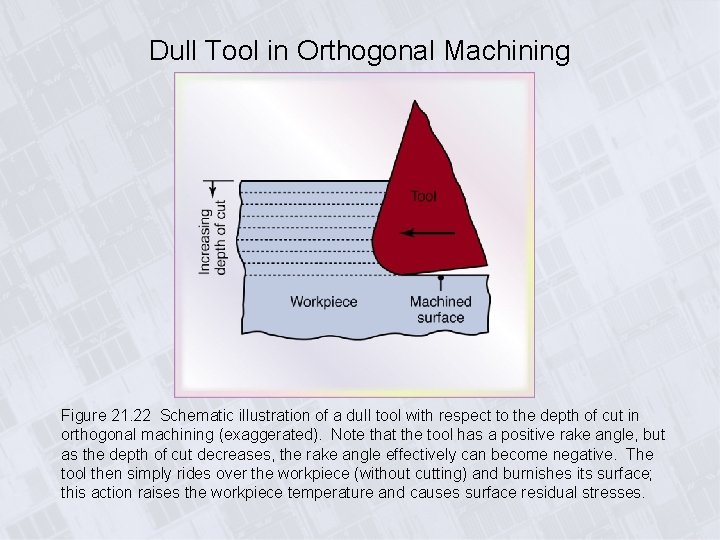
Dull Tool in Orthogonal Machining Figure 21. 22 Schematic illustration of a dull tool with respect to the depth of cut in orthogonal machining (exaggerated). Note that the tool has a positive rake angle, but as the depth of cut decreases, the rake angle effectively can become negative. The tool then simply rides over the workpiece (without cutting) and burnishes its surface; this action raises the workpiece temperature and causes surface residual stresses.

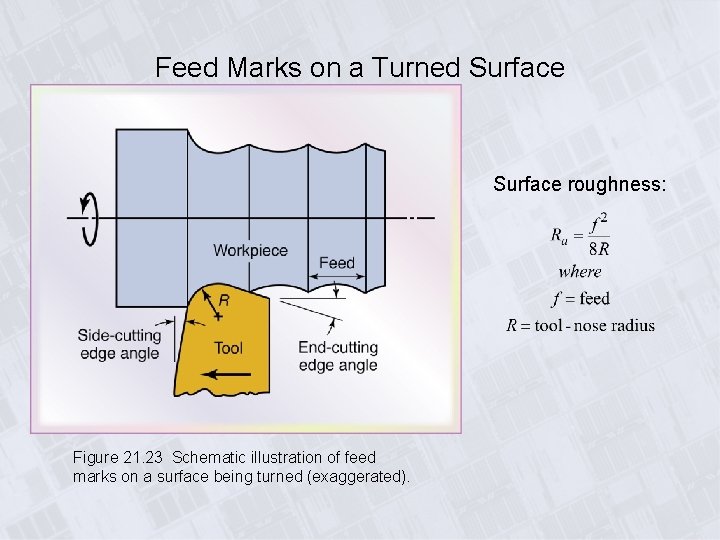
Feed Marks on a Turned Surface roughness: Figure 21. 23 Schematic illustration of feed marks on a surface being turned (exaggerated).

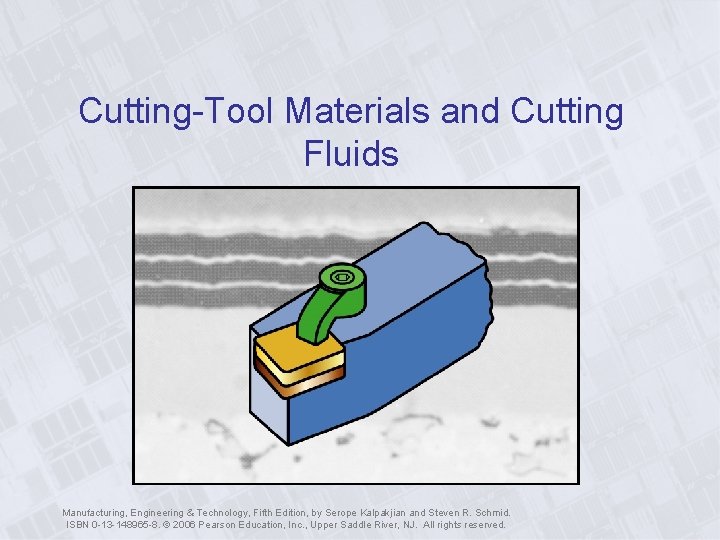
Cutting-Tool Materials and Cutting Fluids Manufacturing, Engineering & Technology, Fifth Edition, by Serope Kalpakjian and Steven R. Schmid. ISBN 0 -13 -148965 -8. © 2006 Pearson Education, Inc. , Upper Saddle River, NJ. All rights reserved.

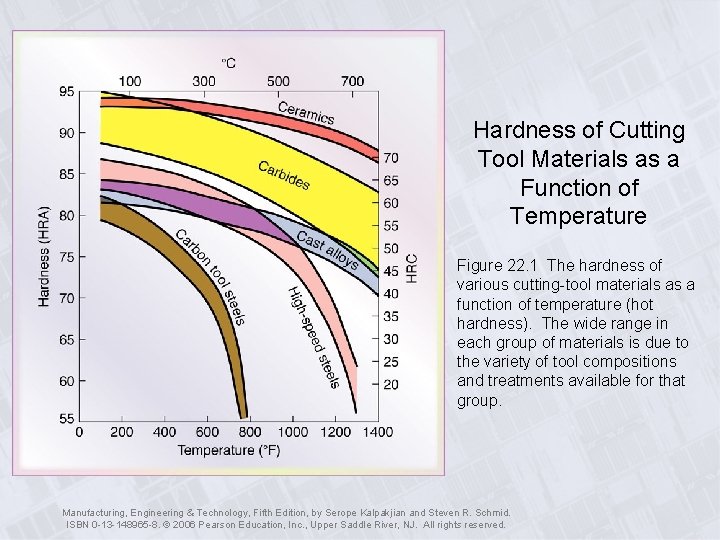
Hardness of Cutting Tool Materials as a Function of Temperature Figure 22. 1 The hardness of various cutting-tool materials as a function of temperature (hot hardness). The wide range in each group of materials is due to the variety of tool compositions and treatments available for that group. Manufacturing, Engineering & Technology, Fifth Edition, by Serope Kalpakjian and Steven R. Schmid. ISBN 0 -13 -148965 -8. © 2006 Pearson Education, Inc. , Upper Saddle River, NJ. All rights reserved.

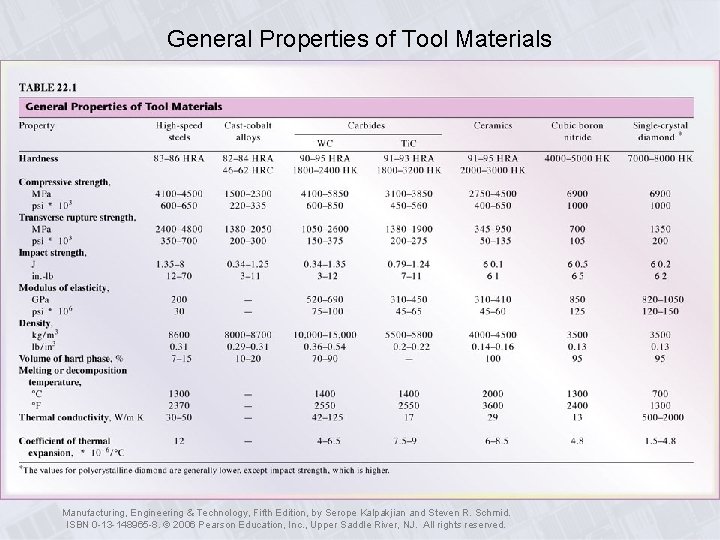
General Properties of Tool Materials Manufacturing, Engineering & Technology, Fifth Edition, by Serope Kalpakjian and Steven R. Schmid. ISBN 0 -13 -148965 -8. © 2006 Pearson Education, Inc. , Upper Saddle River, NJ. All rights reserved.

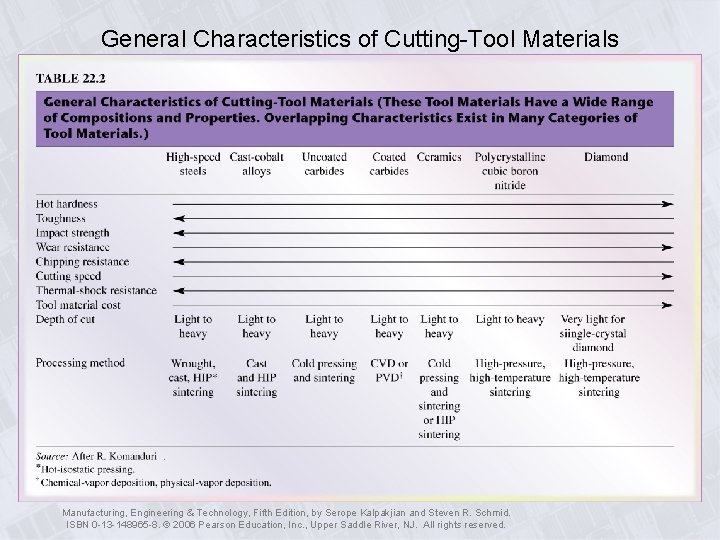
General Characteristics of Cutting-Tool Materials Manufacturing, Engineering & Technology, Fifth Edition, by Serope Kalpakjian and Steven R. Schmid. ISBN 0 -13 -148965 -8. © 2006 Pearson Education, Inc. , Upper Saddle River, NJ. All rights reserved.

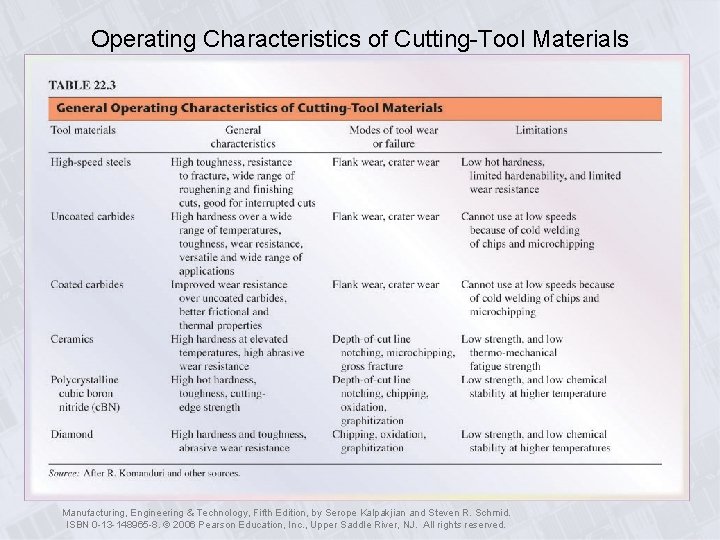
Operating Characteristics of Cutting-Tool Materials Manufacturing, Engineering & Technology, Fifth Edition, by Serope Kalpakjian and Steven R. Schmid. ISBN 0 -13 -148965 -8. © 2006 Pearson Education, Inc. , Upper Saddle River, NJ. All rights reserved.

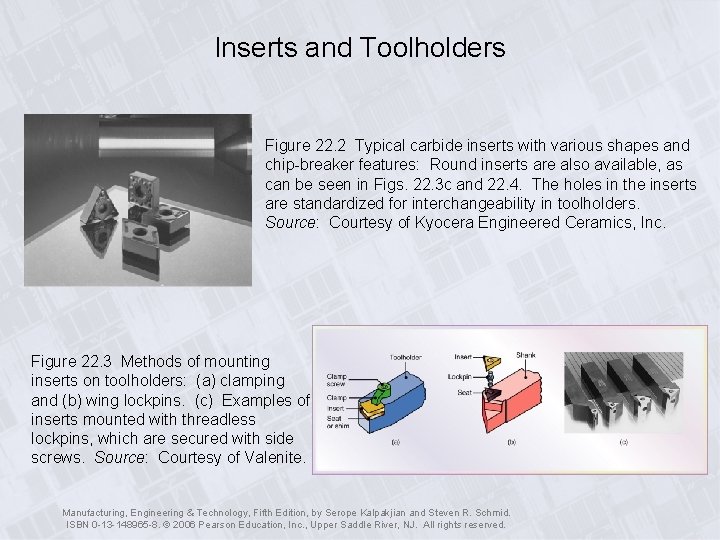
Inserts and Toolholders Figure 22. 2 Typical carbide inserts with various shapes and chip-breaker features: Round inserts are also available, as can be seen in Figs. 22. 3 c and 22. 4. The holes in the inserts are standardized for interchangeability in toolholders. Source: Courtesy of Kyocera Engineered Ceramics, Inc. Figure 22. 3 Methods of mounting inserts on toolholders: (a) clamping and (b) wing lockpins. (c) Examples of inserts mounted with threadless lockpins, which are secured with side screws. Source: Courtesy of Valenite. Manufacturing, Engineering & Technology, Fifth Edition, by Serope Kalpakjian and Steven R. Schmid. ISBN 0 -13 -148965 -8. © 2006 Pearson Education, Inc. , Upper Saddle River, NJ. All rights reserved.

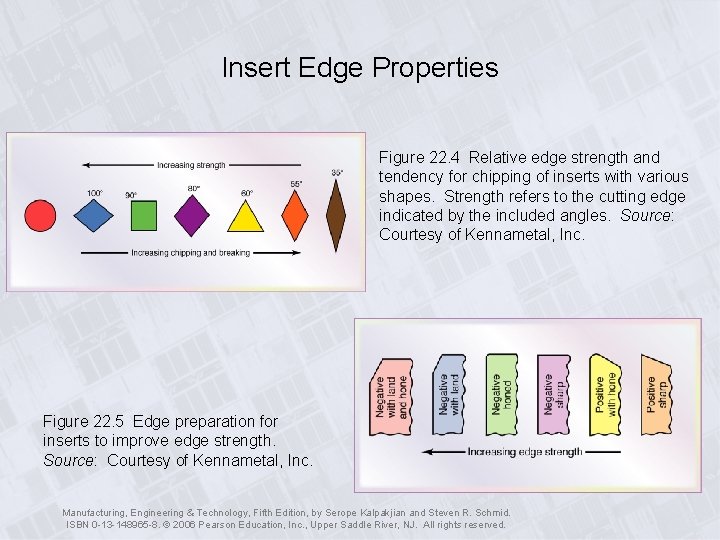
Insert Edge Properties Figure 22. 4 Relative edge strength and tendency for chipping of inserts with various shapes. Strength refers to the cutting edge indicated by the included angles. Source: Courtesy of Kennametal, Inc. Figure 22. 5 Edge preparation for inserts to improve edge strength. Source: Courtesy of Kennametal, Inc. Manufacturing, Engineering & Technology, Fifth Edition, by Serope Kalpakjian and Steven R. Schmid. ISBN 0 -13 -148965 -8. © 2006 Pearson Education, Inc. , Upper Saddle River, NJ. All rights reserved.

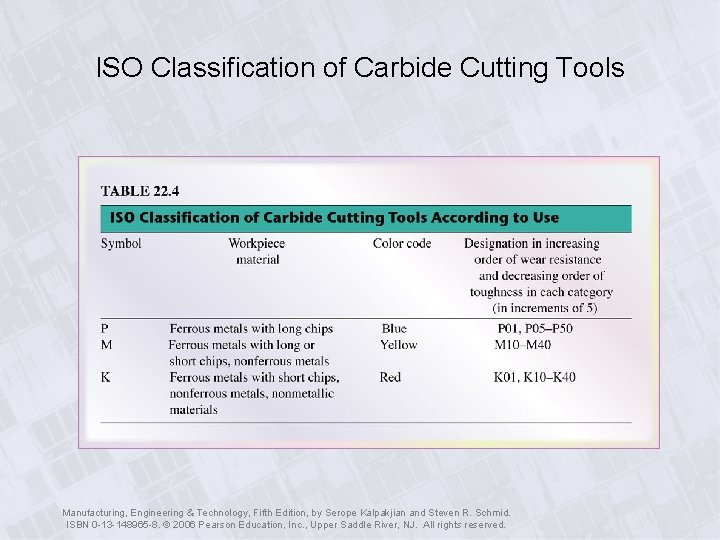
ISO Classification of Carbide Cutting Tools Manufacturing, Engineering & Technology, Fifth Edition, by Serope Kalpakjian and Steven R. Schmid. ISBN 0 -13 -148965 -8. © 2006 Pearson Education, Inc. , Upper Saddle River, NJ. All rights reserved.

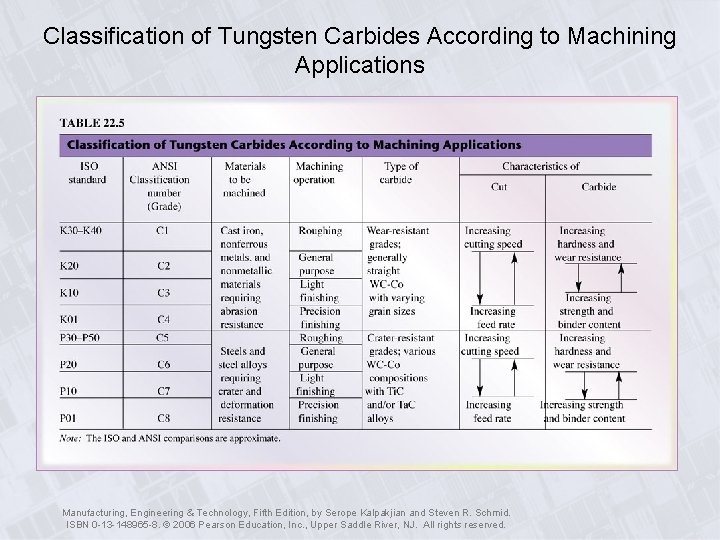
Classification of Tungsten Carbides According to Machining Applications Manufacturing, Engineering & Technology, Fifth Edition, by Serope Kalpakjian and Steven R. Schmid. ISBN 0 -13 -148965 -8. © 2006 Pearson Education, Inc. , Upper Saddle River, NJ. All rights reserved.

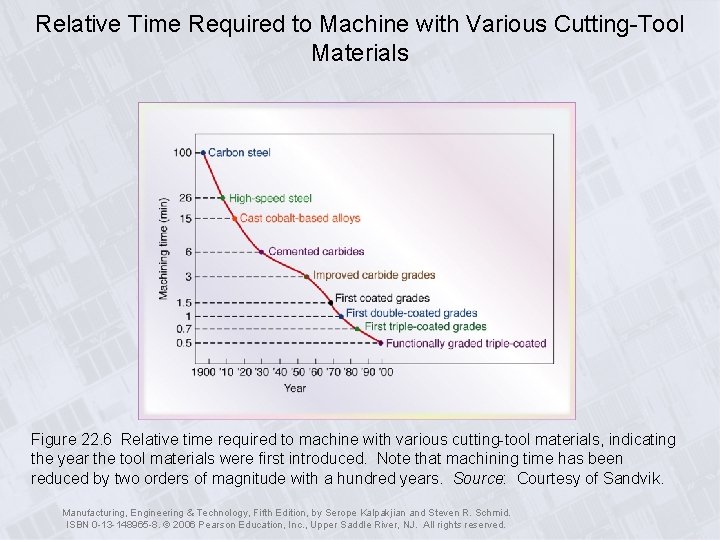
Relative Time Required to Machine with Various Cutting-Tool Materials Figure 22. 6 Relative time required to machine with various cutting-tool materials, indicating the year the tool materials were first introduced. Note that machining time has been reduced by two orders of magnitude with a hundred years. Source: Courtesy of Sandvik. Manufacturing, Engineering & Technology, Fifth Edition, by Serope Kalpakjian and Steven R. Schmid. ISBN 0 -13 -148965 -8. © 2006 Pearson Education, Inc. , Upper Saddle River, NJ. All rights reserved.

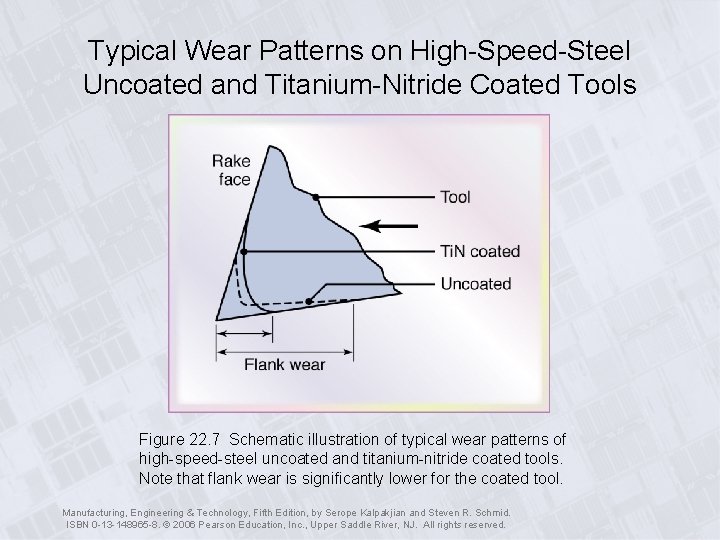
Typical Wear Patterns on High-Speed-Steel Uncoated and Titanium-Nitride Coated Tools Figure 22. 7 Schematic illustration of typical wear patterns of high-speed-steel uncoated and titanium-nitride coated tools. Note that flank wear is significantly lower for the coated tool. Manufacturing, Engineering & Technology, Fifth Edition, by Serope Kalpakjian and Steven R. Schmid. ISBN 0 -13 -148965 -8. © 2006 Pearson Education, Inc. , Upper Saddle River, NJ. All rights reserved.

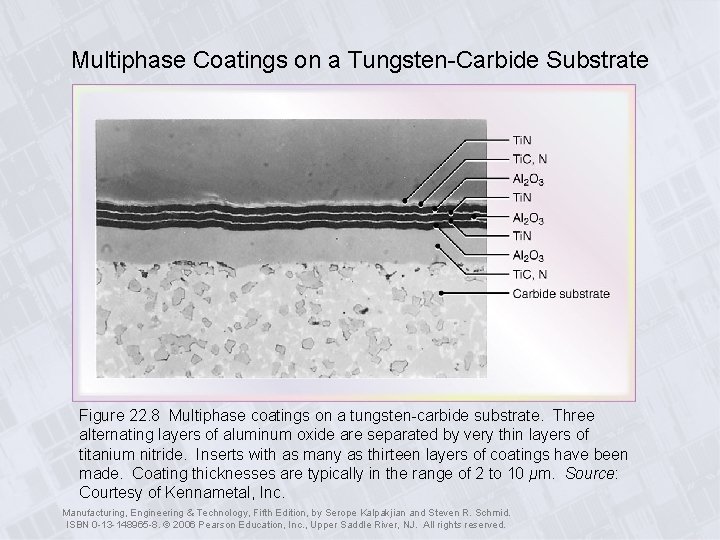
Multiphase Coatings on a Tungsten-Carbide Substrate Figure 22. 8 Multiphase coatings on a tungsten-carbide substrate. Three alternating layers of aluminum oxide are separated by very thin layers of titanium nitride. Inserts with as many as thirteen layers of coatings have been made. Coating thicknesses are typically in the range of 2 to 10 μm. Source: Courtesy of Kennametal, Inc. Manufacturing, Engineering & Technology, Fifth Edition, by Serope Kalpakjian and Steven R. Schmid. ISBN 0 -13 -148965 -8. © 2006 Pearson Education, Inc. , Upper Saddle River, NJ. All rights reserved.

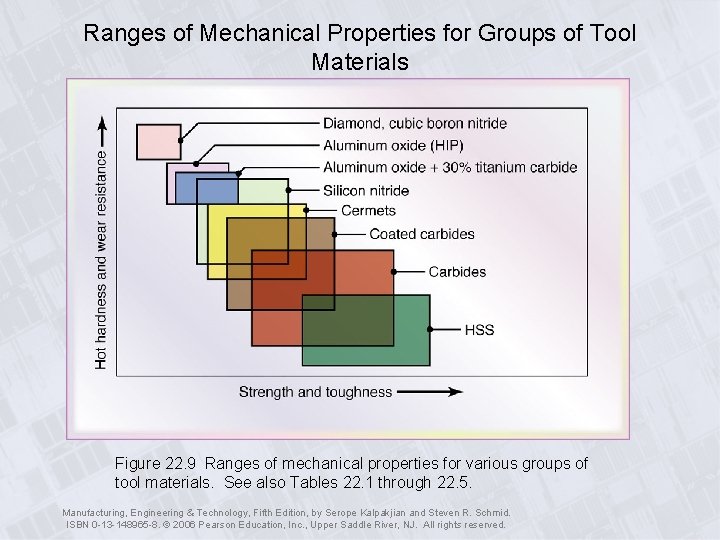
Ranges of Mechanical Properties for Groups of Tool Materials Figure 22. 9 Ranges of mechanical properties for various groups of tool materials. See also Tables 22. 1 through 22. 5. Manufacturing, Engineering & Technology, Fifth Edition, by Serope Kalpakjian and Steven R. Schmid. ISBN 0 -13 -148965 -8. © 2006 Pearson Education, Inc. , Upper Saddle River, NJ. All rights reserved.

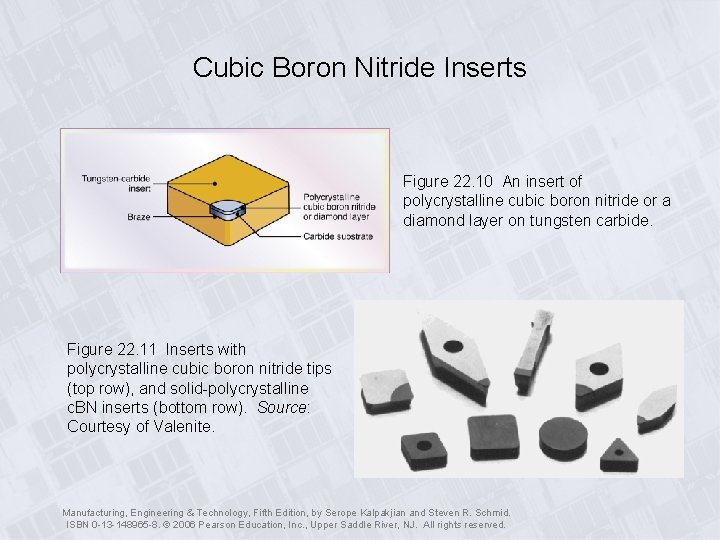
Cubic Boron Nitride Inserts Figure 22. 10 An insert of polycrystalline cubic boron nitride or a diamond layer on tungsten carbide. Figure 22. 11 Inserts with polycrystalline cubic boron nitride tips (top row), and solid-polycrystalline c. BN inserts (bottom row). Source: Courtesy of Valenite. Manufacturing, Engineering & Technology, Fifth Edition, by Serope Kalpakjian and Steven R. Schmid. ISBN 0 -13 -148965 -8. © 2006 Pearson Education, Inc. , Upper Saddle River, NJ. All rights reserved.

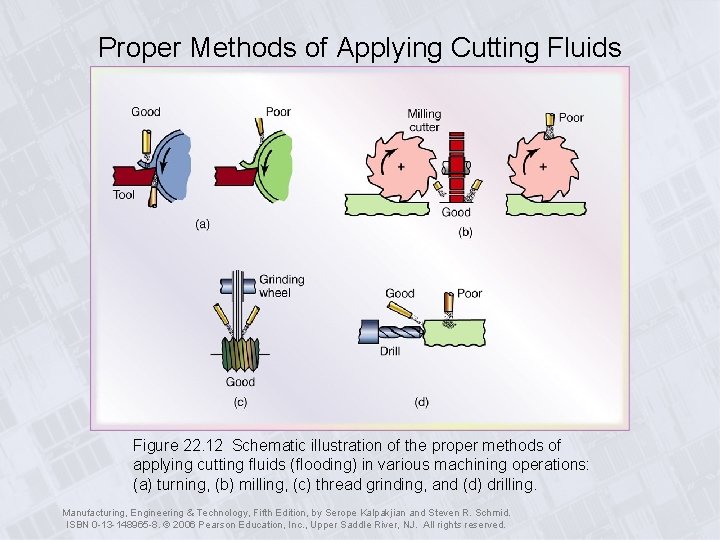
Proper Methods of Applying Cutting Fluids Figure 22. 12 Schematic illustration of the proper methods of applying cutting fluids (flooding) in various machining operations: (a) turning, (b) milling, (c) thread grinding, and (d) drilling. Manufacturing, Engineering & Technology, Fifth Edition, by Serope Kalpakjian and Steven R. Schmid. ISBN 0 -13 -148965 -8. © 2006 Pearson Education, Inc. , Upper Saddle River, NJ. All rights reserved.