IE 550 Manufacturing Systems PART DESIGN SPECIFICATION Fall

- Slides: 52

IE 550 - Manufacturing Systems PART DESIGN SPECIFICATION Fall 2008 Dr. R. A. Wysk 11/22/2020 1

IE 550 - Manufacturing Systems Agenda • Go over engineering specifications • Functional requirements • Form, fit and function – – 11/22/2020 Dimensioning Tolerancing Engineering drawings datum 2

IE 550 - Manufacturing Systems Materials • Read Chapter 2 and 3 from Computer Aided manufacturing (3 rd Edition) • Overview of engineering design • Mechanical design representations • Engineering drawing • Geometric dimensioning and tolerancing • AMSE Y 14. 5 11/22/2020 3

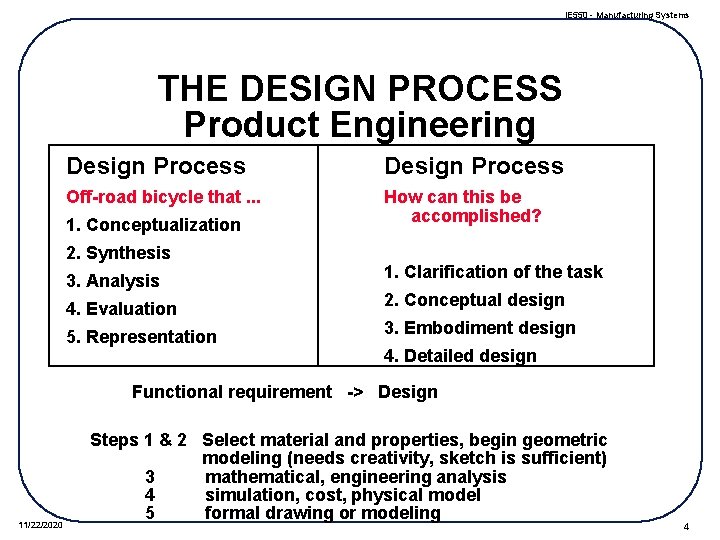
IE 550 - Manufacturing Systems THE DESIGN PROCESS Product Engineering Design Process Off-road bicycle that. . . How can this be accomplished? 1. Conceptualization 2. Synthesis 3. Analysis 4. Evaluation 5. Representation 1. Clarification of the task 2. Conceptual design 3. Embodiment design 4. Detailed design Functional requirement -> Design 11/22/2020 Steps 1 & 2 Select material and properties, begin geometric modeling (needs creativity, sketch is sufficient) 3 mathematical, engineering analysis 4 simulation, cost, physical model 5 formal drawing or modeling 4

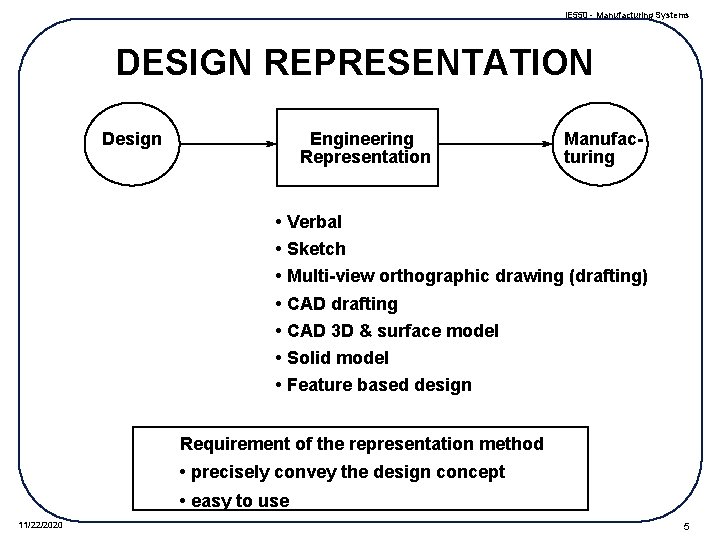
IE 550 - Manufacturing Systems DESIGN REPRESENTATION Design Engineering Representation Manufacturing • Verbal • Sketch • Multi-view orthographic drawing (drafting) • CAD drafting • CAD 3 D & surface model • Solid model • Feature based design Requirement of the representation method • precisely convey the design concept • easy to use 11/22/2020 5

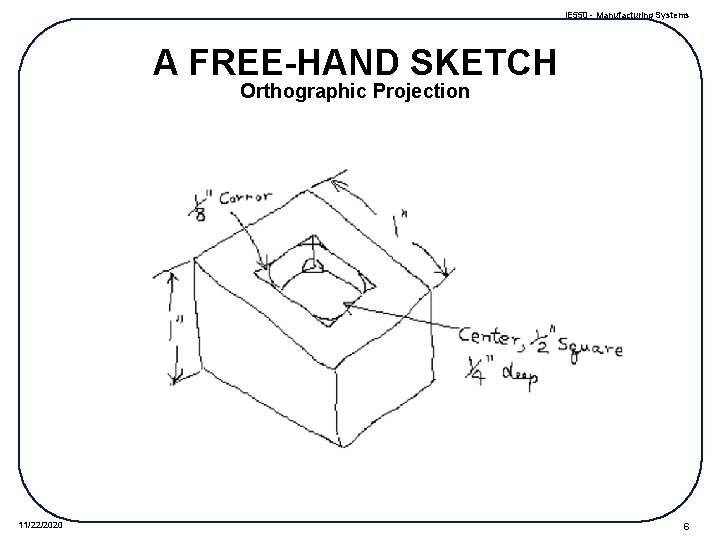
IE 550 - Manufacturing Systems A FREE-HAND SKETCH Orthographic Projection 11/22/2020 6

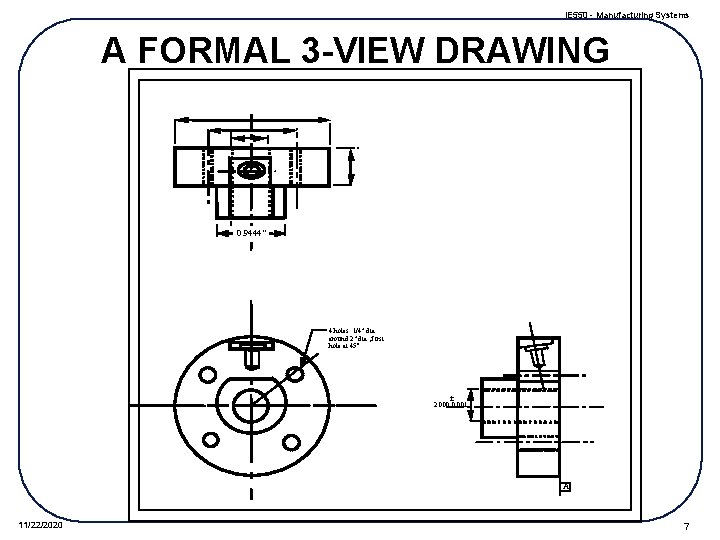
IE 550 - Manufacturing Systems A FORMAL 3 -VIEW DRAWING 0. 9444" 4 holes 1/4" dia around 2" dia , first hole at 45° ± 2. 000 0. 001 A 11/22/2020 7

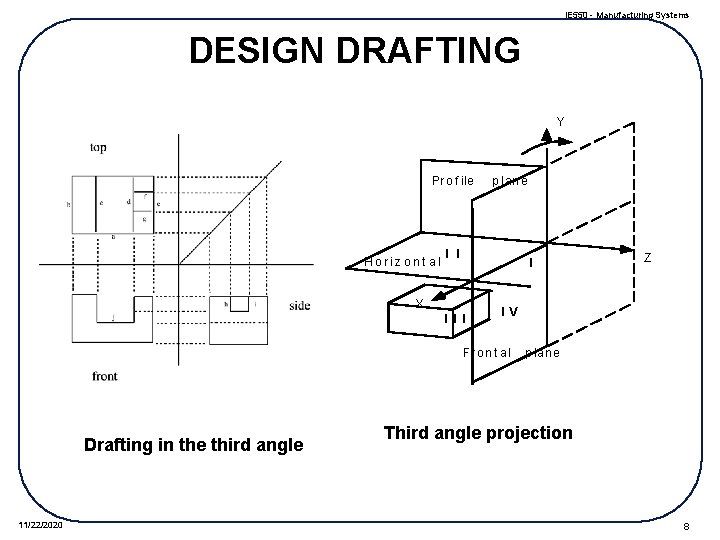
IE 550 - Manufacturing Systems DESIGN DRAFTING Y Pr o f ile H o r iz o n t a l p lan e I I I X I I V Fr o n t a l Drafting in the third angle 11/22/2020 Z p lan e Third angle projection 8

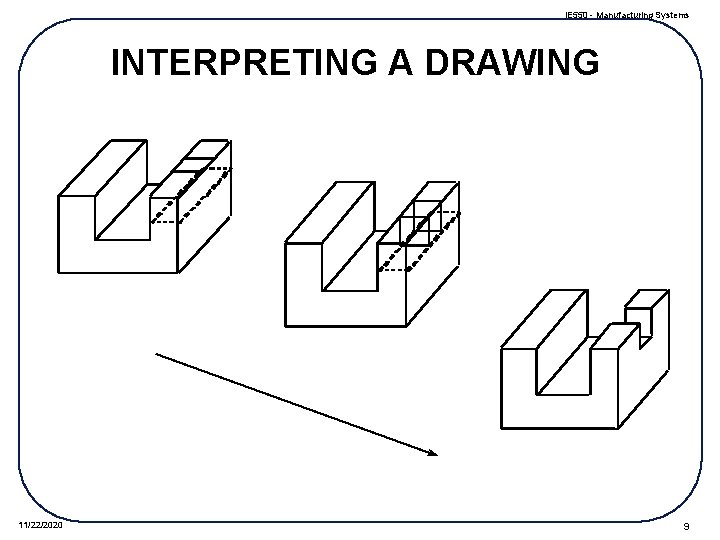
IE 550 - Manufacturing Systems INTERPRETING A DRAWING 11/22/2020 9

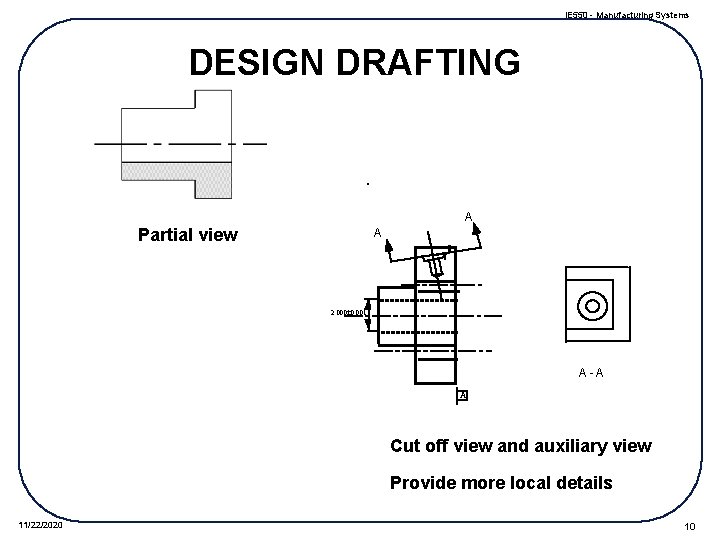
IE 550 - Manufacturing Systems DESIGN DRAFTING A Partial view A 2. 000± 0. 001 A-A A Cut off view and auxiliary view Provide more local details 11/22/2020 10

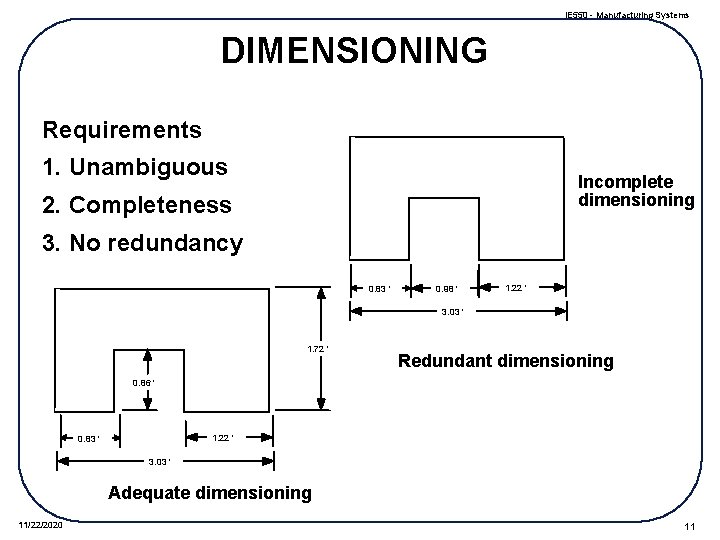
IE 550 - Manufacturing Systems DIMENSIONING Requirements 1. Unambiguous Incomplete dimensioning 2. Completeness 3. No redundancy 0. 83 ' 0. 98 ' 1. 22 ' 3. 03 ' 1. 72 ' Redundant dimensioning 0. 86 ' 1. 22 ' 0. 83 ' 3. 03 ' Adequate dimensioning 11/22/2020 11

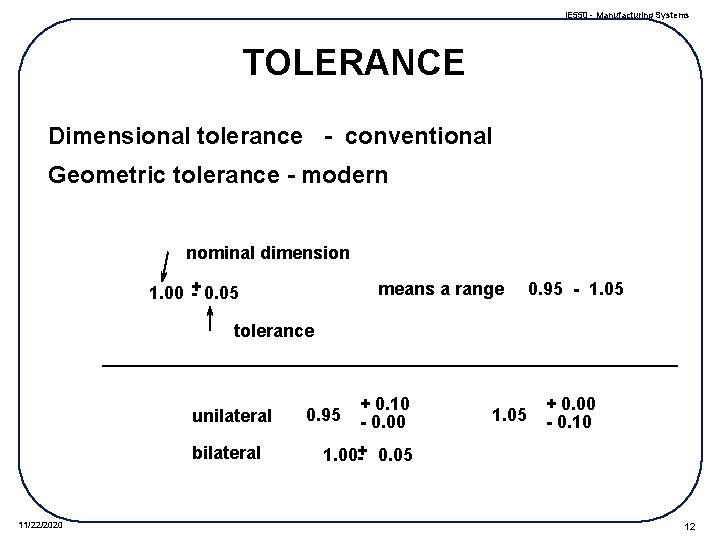
IE 550 - Manufacturing Systems TOLERANCE Dimensional tolerance - conventional Geometric tolerance - modern nominal dimension 1. 00 + - 0. 05 means a range 0. 95 - 1. 05 tolerance unilateral bilateral 11/22/2020 0. 95 + 0. 10 - 0. 00 1. 05 + 0. 00 - 0. 10 1. 00+ - 0. 05 12

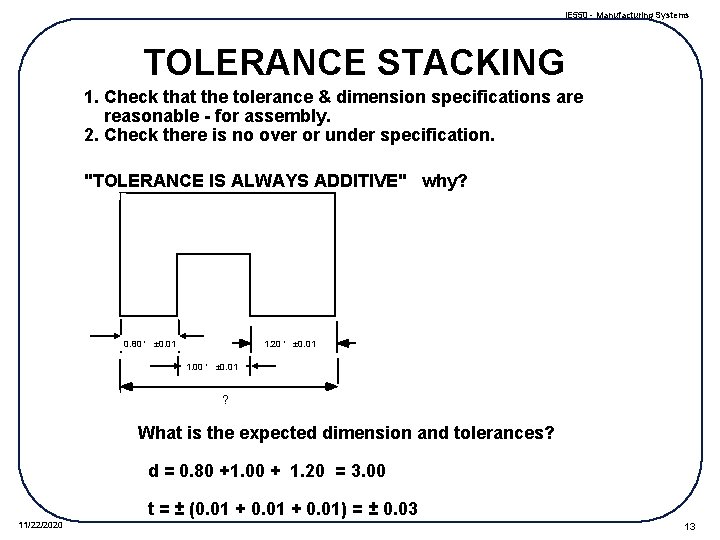
IE 550 - Manufacturing Systems TOLERANCE STACKING 1. Check that the tolerance & dimension specifications are reasonable - for assembly. 2. Check there is no over or under specification. "TOLERANCE IS ALWAYS ADDITIVE" why? 0. 80 ' ± 0. 01 1. 20 ' ± 0. 01 1. 00 ' ± 0. 01 ? What is the expected dimension and tolerances? d = 0. 80 +1. 00 + 1. 20 = 3. 00 t = ± (0. 01 + 0. 01) = ± 0. 03 11/22/2020 13

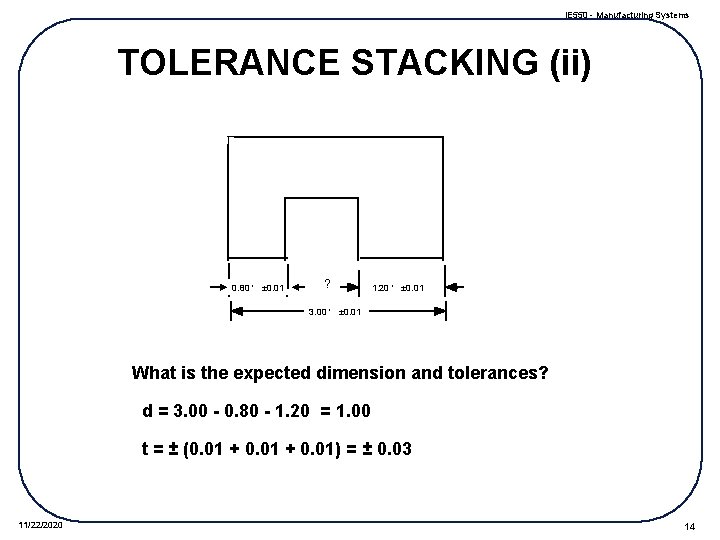
IE 550 - Manufacturing Systems TOLERANCE STACKING (ii) 0. 80 ' ± 0. 01 ? 1. 20 ' ± 0. 01 3. 00 ' ± 0. 01 What is the expected dimension and tolerances? d = 3. 00 - 0. 80 - 1. 20 = 1. 00 t = ± (0. 01 + 0. 01) = ± 0. 03 11/22/2020 14

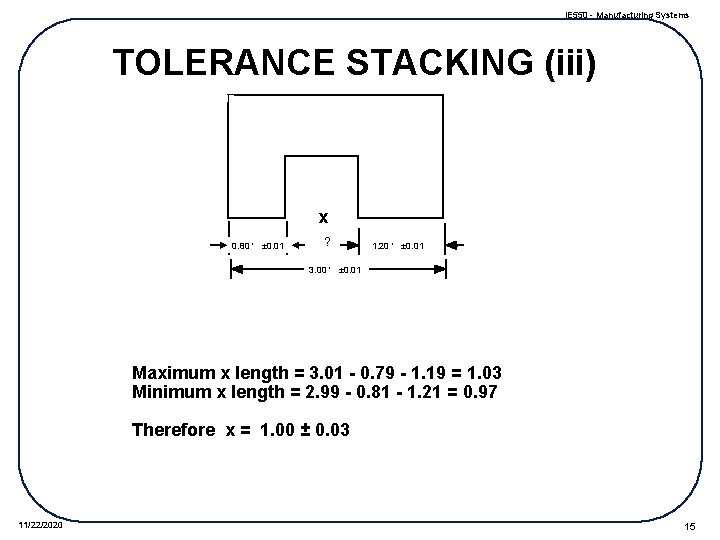
IE 550 - Manufacturing Systems TOLERANCE STACKING (iii) x 0. 80 ' ± 0. 01 ? 1. 20 ' ± 0. 01 3. 00 ' ± 0. 01 Maximum x length = 3. 01 - 0. 79 - 1. 19 = 1. 03 Minimum x length = 2. 99 - 0. 81 - 1. 21 = 0. 97 Therefore x = 1. 00 ± 0. 03 11/22/2020 15

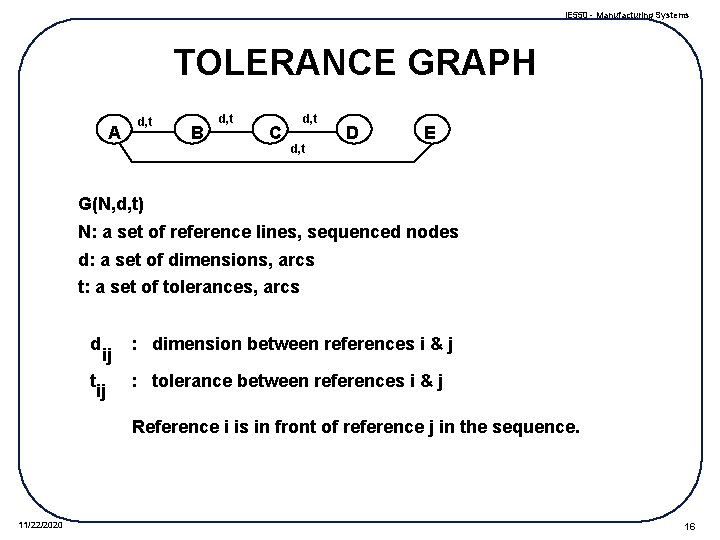
IE 550 - Manufacturing Systems TOLERANCE GRAPH A d, t B d, t C d, t D E G(N, d, t) N: a set of reference lines, sequenced nodes d: a set of dimensions, arcs t: a set of tolerances, arcs d t ij ij : dimension between references i & j : tolerance between references i & j Reference i is in front of reference j in the sequence. 11/22/2020 16

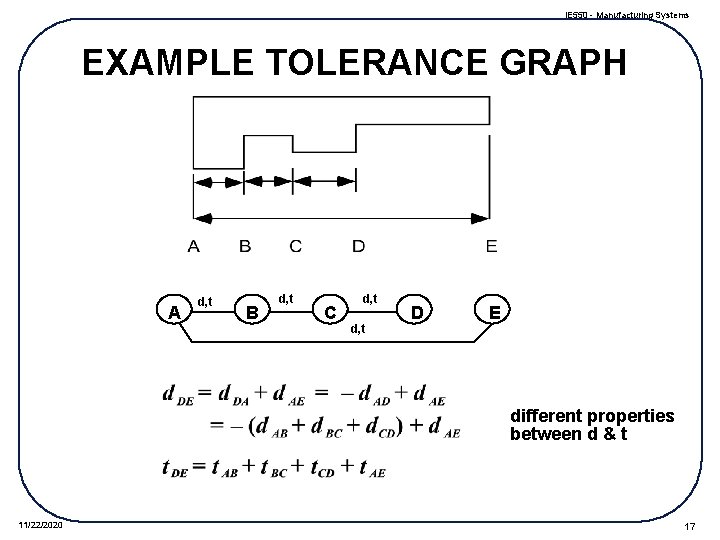
IE 550 - Manufacturing Systems EXAMPLE TOLERANCE GRAPH A d, t B d, t C d, t D E different properties between d & t 11/22/2020 17

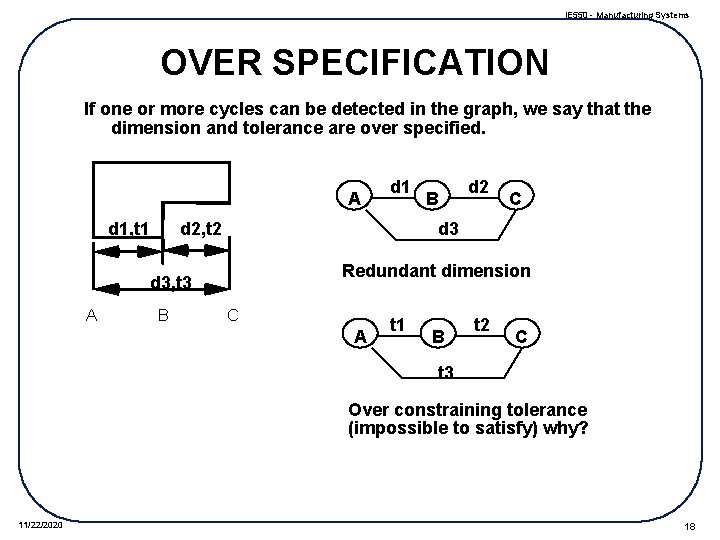
IE 550 - Manufacturing Systems OVER SPECIFICATION If one or more cycles can be detected in the graph, we say that the dimension and tolerance are over specified. A d 1, t 1 d 2, t 2 B B d 2 C d 3 Redundant dimension d 3, t 3 A d 1 C A t 1 B t 2 C t 3 Over constraining tolerance (impossible to satisfy) why? 11/22/2020 18

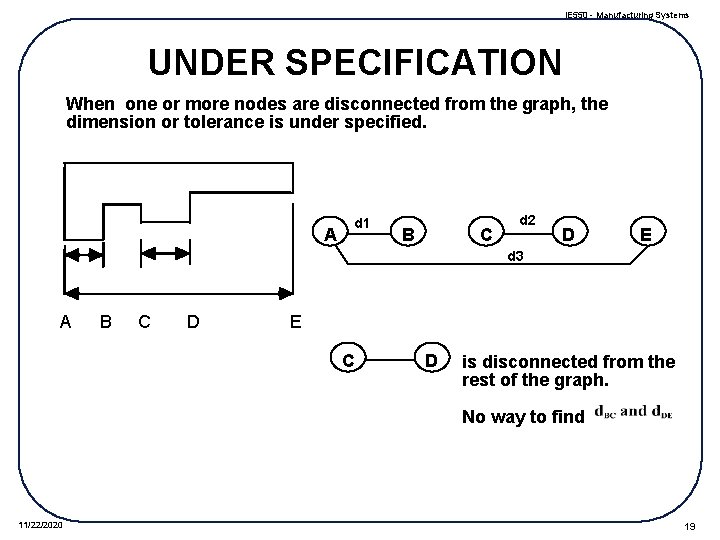
IE 550 - Manufacturing Systems UNDER SPECIFICATION When one or more nodes are disconnected from the graph, the dimension or tolerance is under specified. A d 1 B C d 2 D E d 3 A B C D E C D is disconnected from the rest of the graph. No way to find 11/22/2020 19

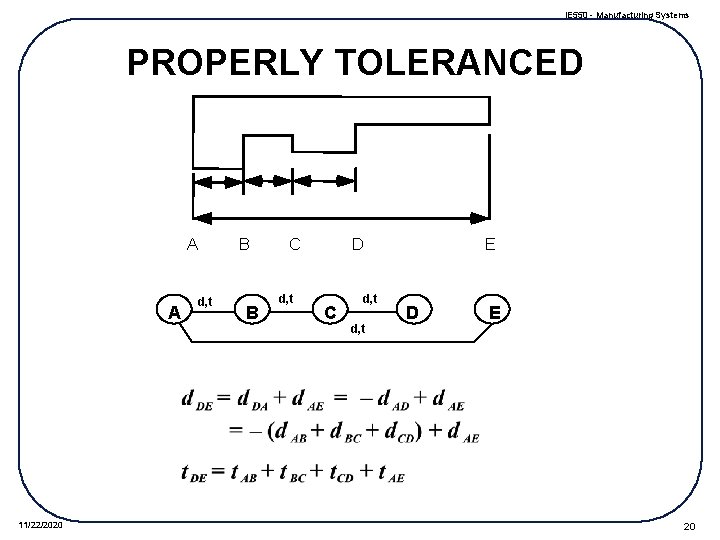
IE 550 - Manufacturing Systems PROPERLY TOLERANCED A A 11/22/2020 d, t B B C d, t D C d, t E D E 20

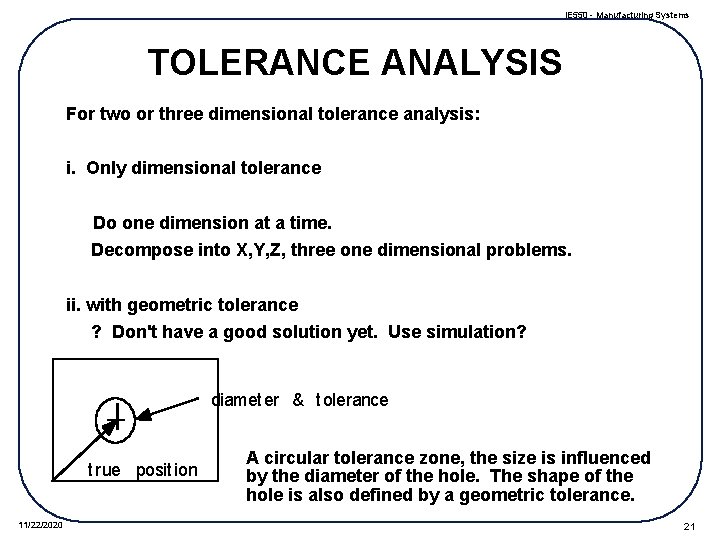
IE 550 - Manufacturing Systems TOLERANCE ANALYSIS For two or three dimensional tolerance analysis: i. Only dimensional tolerance Do one dimension at a time. Decompose into X, Y, Z, three one dimensional problems. ii. with geometric tolerance ? Don't have a good solution yet. Use simulation? diamet er & t olerance t rue posit ion 11/22/2020 A circular tolerance zone, the size is influenced by the diameter of the hole. The shape of the hole is also defined by a geometric tolerance. 21

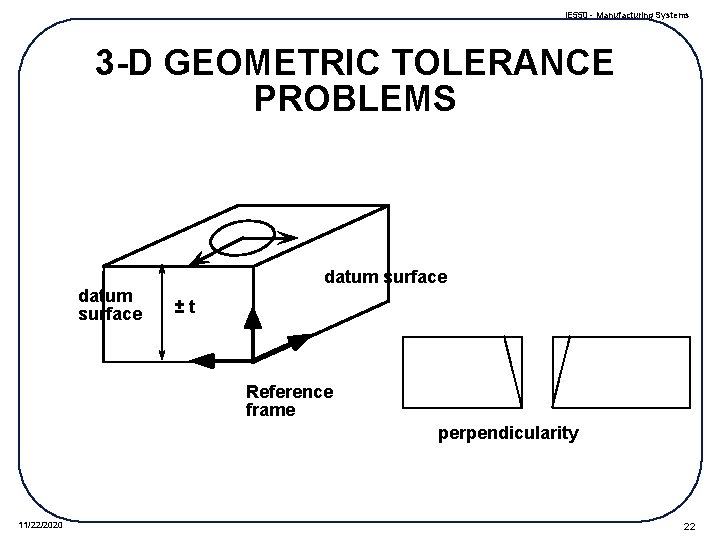
IE 550 - Manufacturing Systems 3 -D GEOMETRIC TOLERANCE PROBLEMS datum surface ±t Reference frame perpendicularity 11/22/2020 22

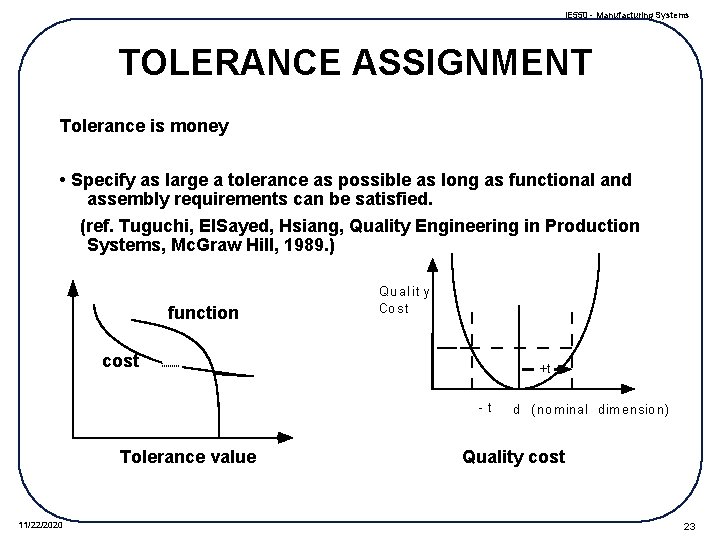
IE 550 - Manufacturing Systems TOLERANCE ASSIGNMENT Tolerance is money • Specify as large a tolerance as possible as long as functional and assembly requirements can be satisfied. (ref. Tuguchi, El. Sayed, Hsiang, Quality Engineering in Production Systems, Mc. Graw Hill, 1989. ) function Qu al it y Co st cost +t -t Tolerance value 11/22/2020 d ( nom inal dim ensio n) Quality cost 23

IE 550 - Manufacturing Systems REASON OF HAVING TOLERANCE • No manufacturing process is perfect. • Nominal dimension (the "d" value) can not be achieved exactly. • Without tolerance we lose the control and as a consequence cause functional or assembly failure. 11/22/2020 24

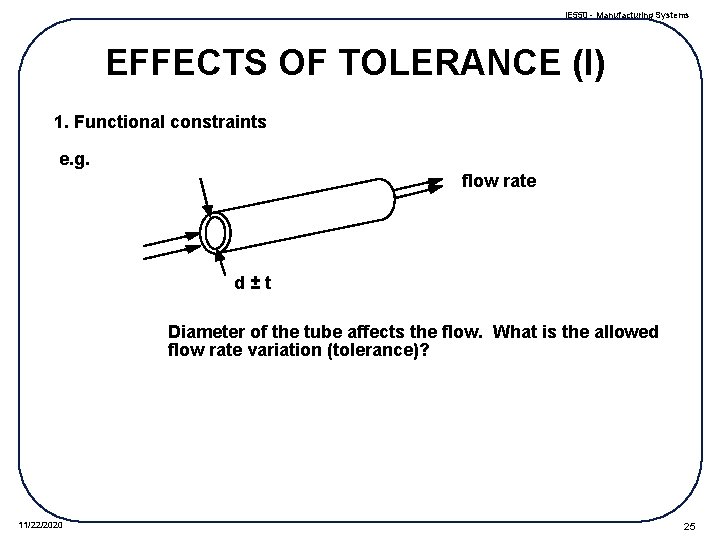
IE 550 - Manufacturing Systems EFFECTS OF TOLERANCE (I) 1. Functional constraints e. g. flow rate d±t Diameter of the tube affects the flow. What is the allowed flow rate variation (tolerance)? 11/22/2020 25

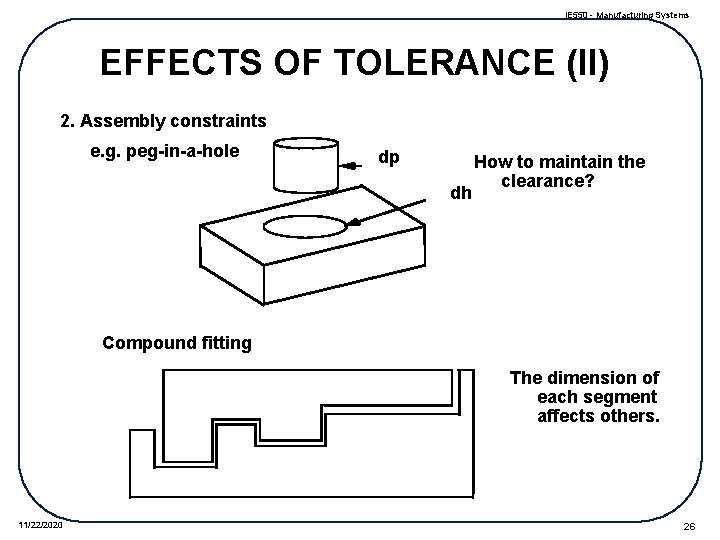
IE 550 - Manufacturing Systems EFFECTS OF TOLERANCE (II) 2. Assembly constraints e. g. peg-in-a-hole dp dh How to maintain the clearance? Compound fitting The dimension of each segment affects others. 11/22/2020 26

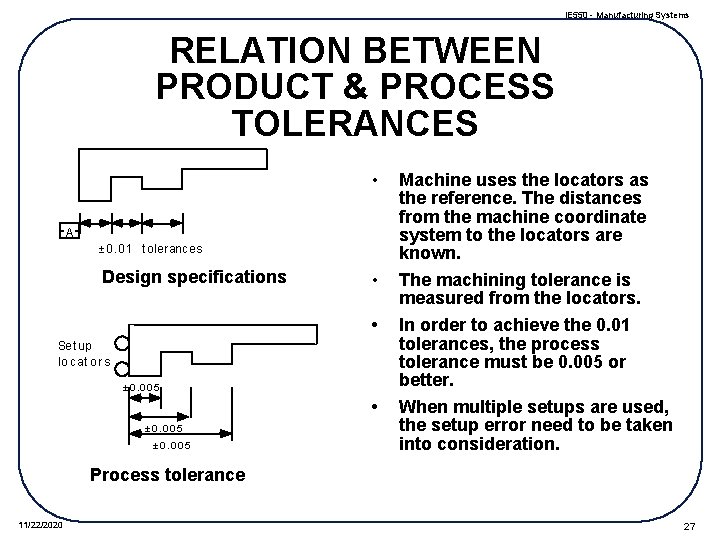
IE 550 - Manufacturing Systems RELATION BETWEEN PRODUCT & PROCESS TOLERANCES • A ± 0. 0 1 t olerances Design specifications • • Set up lo cat o r s ± 0. 0 0 5 • ± 0. 0 0 5 Machine uses the locators as the reference. The distances from the machine coordinate system to the locators are known. The machining tolerance is measured from the locators. In order to achieve the 0. 01 tolerances, the process tolerance must be 0. 005 or better. When multiple setups are used, the setup error need to be taken into consideration. Process tolerance 11/22/2020 27

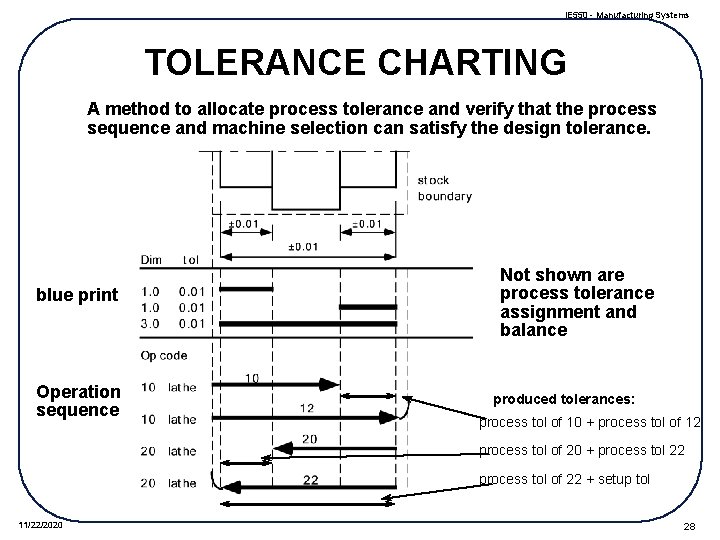
IE 550 - Manufacturing Systems TOLERANCE CHARTING A method to allocate process tolerance and verify that the process sequence and machine selection can satisfy the design tolerance. blue print Operation sequence Not shown are process tolerance assignment and balance produced tolerances: process tol of 10 + process tol of 12 process tol of 20 + process tol 22 process tol of 22 + setup tol 11/22/2020 28

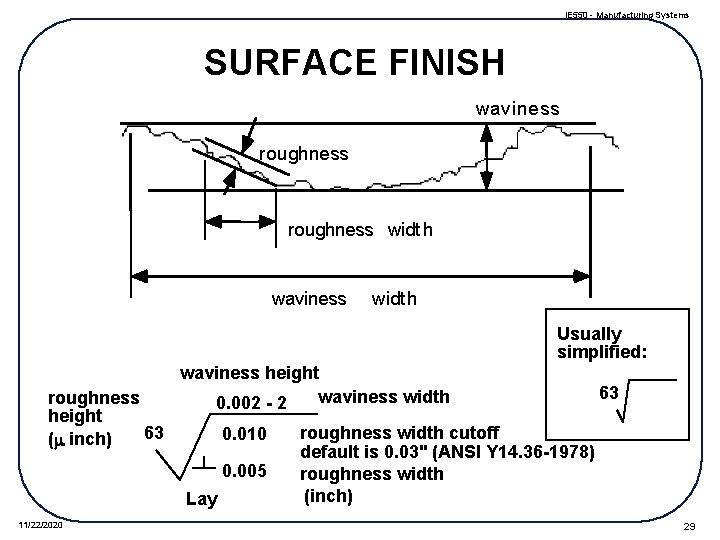
IE 550 - Manufacturing Systems SURFACE FINISH waviness roughness widt h waviness widt h Usually simplified: roughness height 63 (m inch) waviness height waviness width 0. 002 - 2 0. 010 0. 005 Lay 11/22/2020 63 roughness width cutoff default is 0. 03" (ANSI Y 14. 36 -1978) roughness width (inch) 29

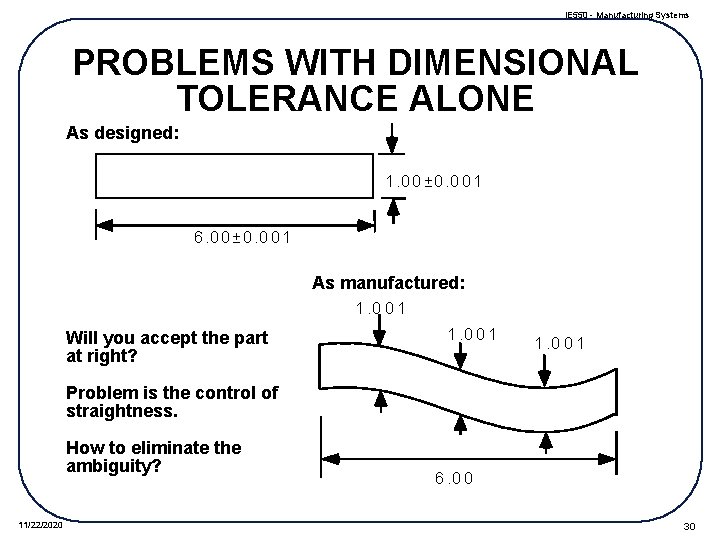
IE 550 - Manufacturing Systems PROBLEMS WITH DIMENSIONAL TOLERANCE ALONE As designed: 1. 00± 0. 0 01 6. 00± 0. 001 As manufactured: 1. 0 0 1 Will you accept the part at right? 1. 0 0 1 Problem is the control of straightness. How to eliminate the ambiguity? 11/22/2020 6. 0 0 30

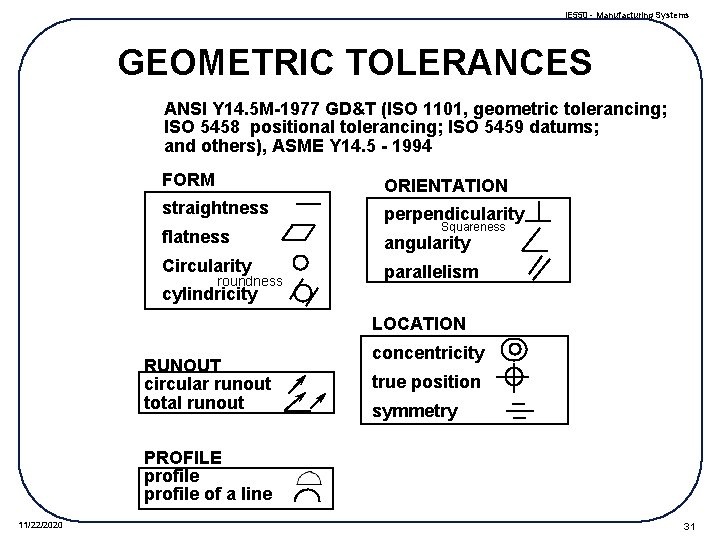
IE 550 - Manufacturing Systems GEOMETRIC TOLERANCES ANSI Y 14. 5 M-1977 GD&T (ISO 1101, geometric tolerancing; ISO 5458 positional tolerancing; ISO 5459 datums; and others), ASME Y 14. 5 - 1994 FORM ORIENTATION straightness perpendicularity Squareness flatness angularity Circularity parallelism roundness cylindricity LOCATION RUNOUT circular runout total runout concentricity true position symmetry PROFILE profile of a line 11/22/2020 31

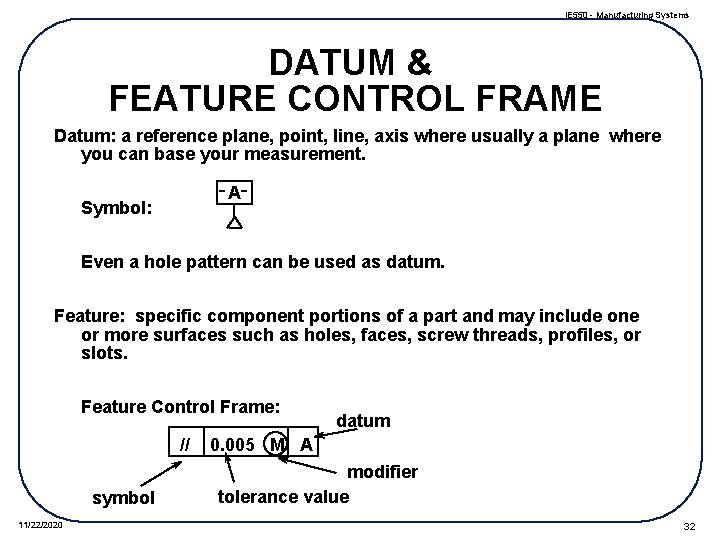
IE 550 - Manufacturing Systems DATUM & FEATURE CONTROL FRAME Datum: a reference plane, point, line, axis where usually a plane where you can base your measurement. A Symbol: Even a hole pattern can be used as datum. Feature: specific component portions of a part and may include one or more surfaces such as holes, faces, screw threads, profiles, or slots. Feature Control Frame: // symbol 11/22/2020 datum 0. 005 M A modifier tolerance value 32

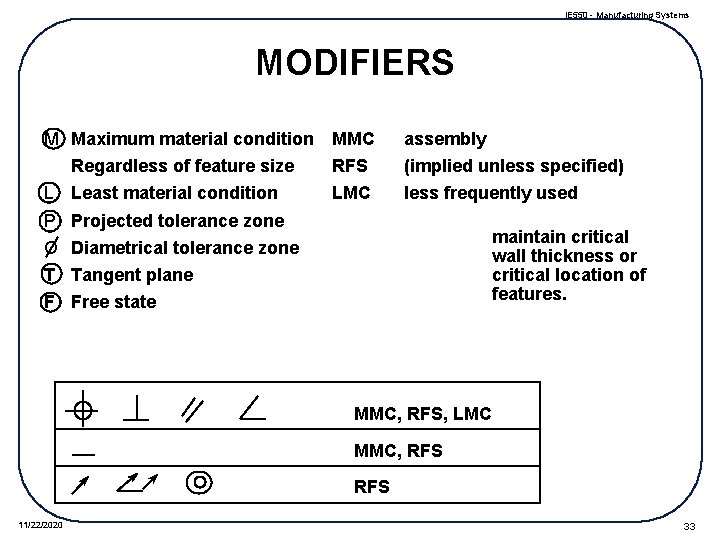
IE 550 - Manufacturing Systems MODIFIERS M Maximum material condition MMC Regardless of feature size RFS L Least material condition LMC P Projected tolerance zone O Diametrical tolerance zone T Tangent plane F Free state assembly (implied unless specified) less frequently used maintain critical wall thickness or critical location of features. MMC, RFS, LMC MMC, RFS 11/22/2020 33

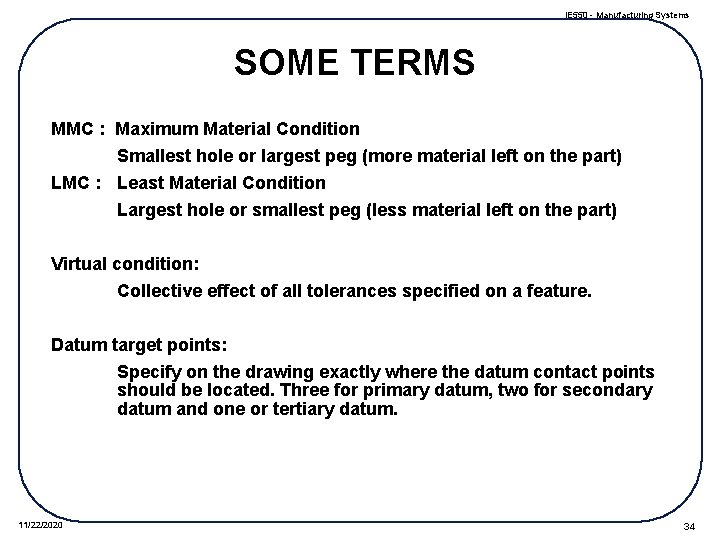
IE 550 - Manufacturing Systems SOME TERMS MMC : Maximum Material Condition Smallest hole or largest peg (more material left on the part) LMC : Least Material Condition Largest hole or smallest peg (less material left on the part) Virtual condition: Collective effect of all tolerances specified on a feature. Datum target points: Specify on the drawing exactly where the datum contact points should be located. Three for primary datum, two for secondary datum and one or tertiary datum. 11/22/2020 34

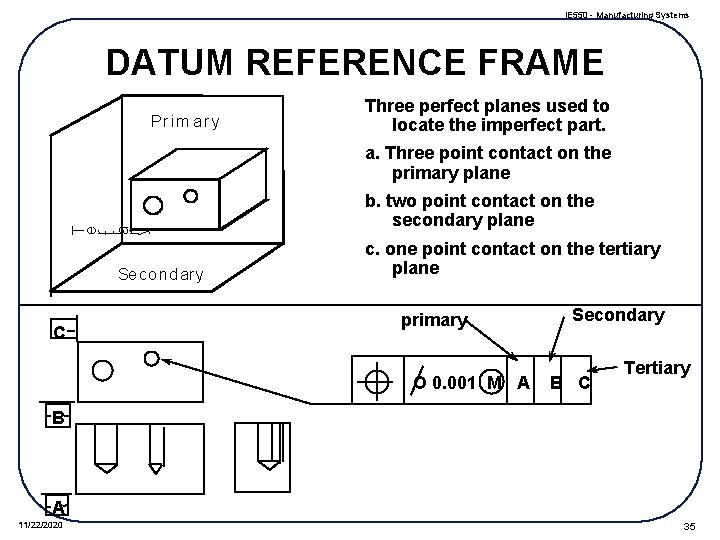
IE 550 - Manufacturing Systems DATUM REFERENCE FRAME Pr i m a r y Three perfect planes used to locate the imperfect part. T e rt ia r y a. Three point contact on the primary plane Sec on dar y C b. two point contact on the secondary plane c. one point contact on the tertiary plane primary O 0. 001 M A Secondary B C Tertiary B A 11/22/2020 35

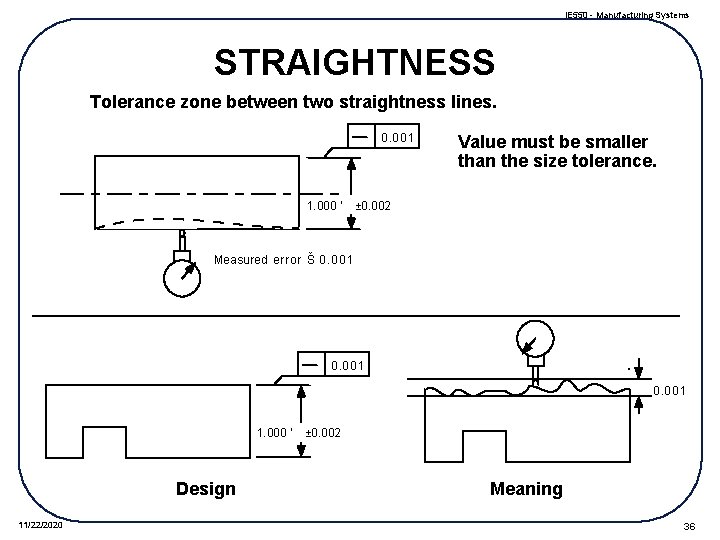
IE 550 - Manufacturing Systems STRAIGHTNESS Tolerance zone between two straightness lines. 0. 0 01 1. 000 ' Value must be smaller than the size tolerance. ± 0. 002 Measured error Š 0. 0 0 1 0. 0 01 1. 000 ' Design 11/22/2020 ± 0. 002 Meaning 36

IE 550 - Manufacturing Systems 11/22/2020 37

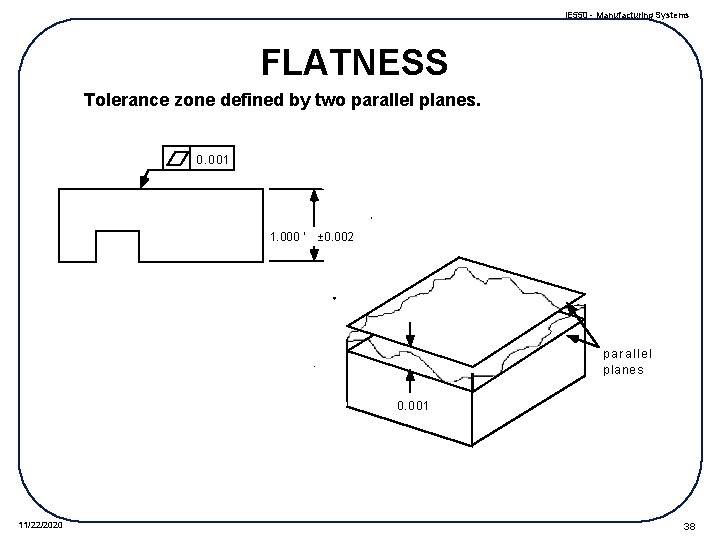
IE 550 - Manufacturing Systems FLATNESS Tolerance zone defined by two parallel planes. 0. 0 01 1. 000 ' ± 0. 002 p ar al l e l p lanes 0. 0 01 11/22/2020 38

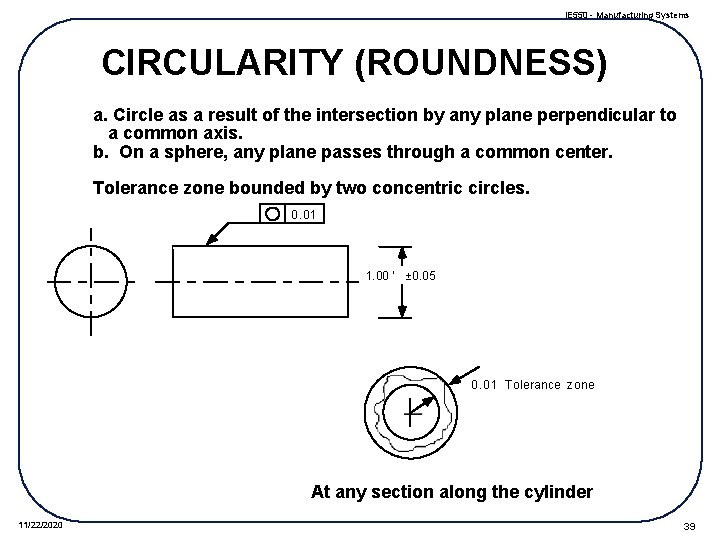
IE 550 - Manufacturing Systems CIRCULARITY (ROUNDNESS) a. Circle as a result of the intersection by any plane perpendicular to a common axis. b. On a sphere, any plane passes through a common center. Tolerance zone bounded by two concentric circles. 0. 01 1. 00 ' ± 0. 05 0. 0 1 Tolerance zone At any section along the cylinder 11/22/2020 39

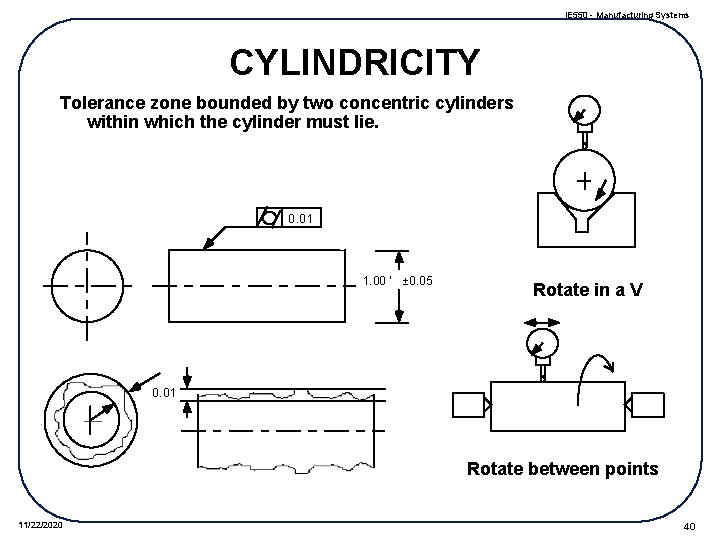
IE 550 - Manufacturing Systems CYLINDRICITY Tolerance zone bounded by two concentric cylinders within which the cylinder must lie. 0. 01 1. 00 ' ± 0. 05 Rotate in a V 0. 01 Rotate between points 11/22/2020 40

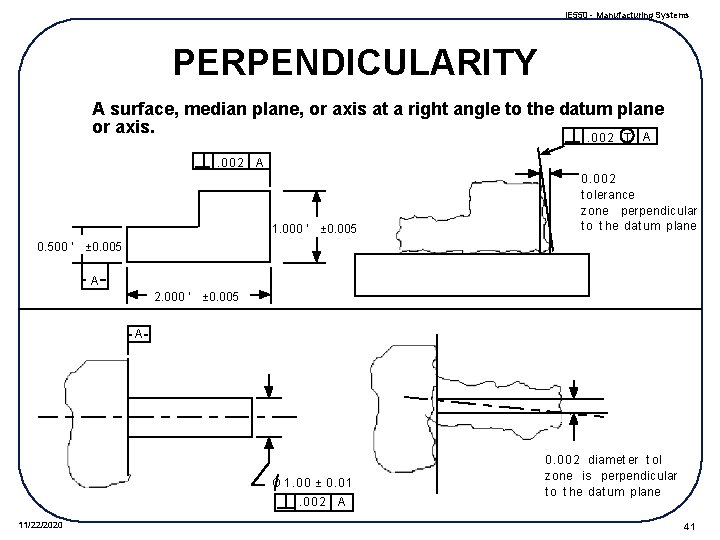
IE 550 - Manufacturing Systems PERPENDICULARITY A surface, median plane, or axis at a right angle to the datum plane or axis. A. 0 0 2 T . 0 0 2 A 1. 000 ' 0. 500 ' ± 0. 005 0. 0 0 2 t olerance zone perpendicular t o t he dat um plane ± 0. 005 A 2. 000 ' ± 0. 005 A O 1. 0 0 ± 0. 0 1. 0 0 2 11/22/2020 A 0. 0 0 2 diamet er t ol zone is perpendicular t o t he dat um plane 41

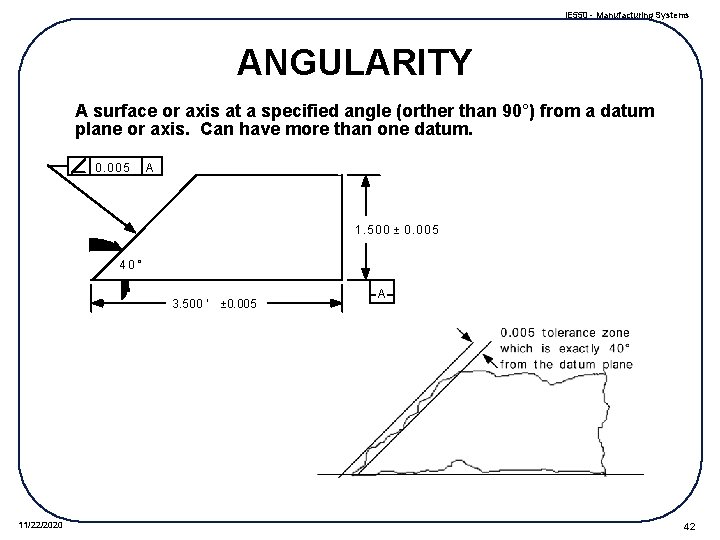
IE 550 - Manufacturing Systems ANGULARITY A surface or axis at a specified angle (orther than 90°) from a datum plane or axis. Can have more than one datum. 0. 0 0 5 A 1. 5 0 0 ± 0. 0 0 5 40° 3. 500 ' 11/22/2020 ± 0. 005 A 42

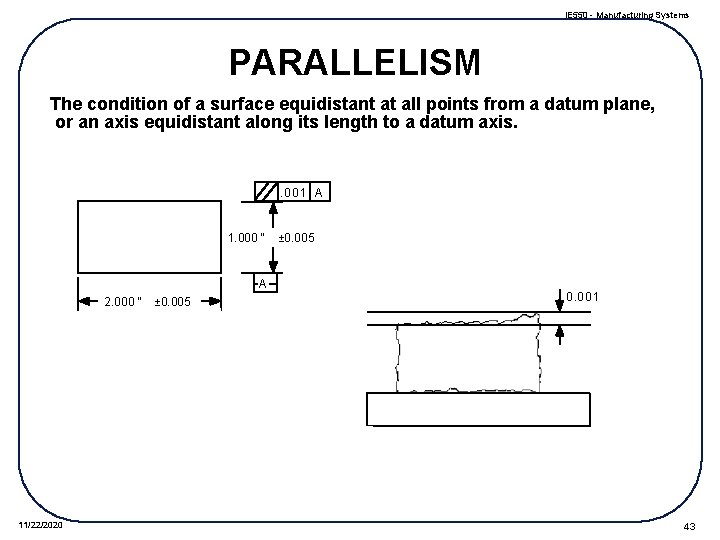
IE 550 - Manufacturing Systems PARALLELISM The condition of a surface equidistant at all points from a datum plane, or an axis equidistant along its length to a datum axis. . 0 0 1 A 1. 000 " A 2. 000 " 11/22/2020 ± 0. 005 0. 0 01 43

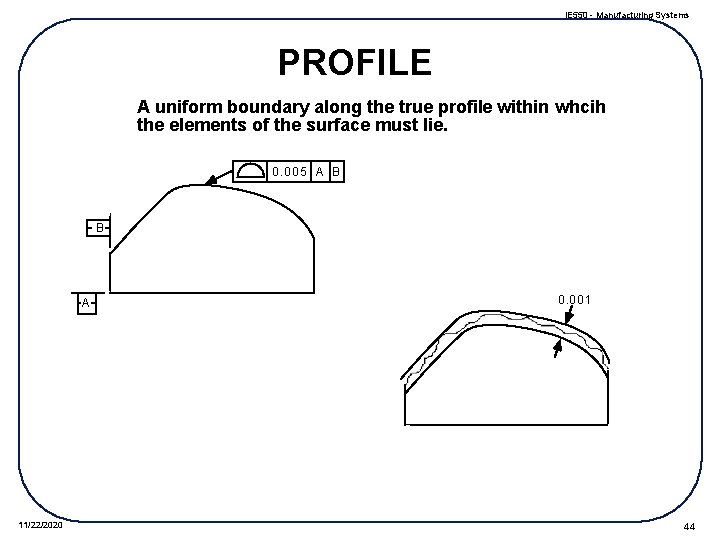
IE 550 - Manufacturing Systems PROFILE A uniform boundary along the true profile within whcih the elements of the surface must lie. 0. 0 0 5 A B B A 11/22/2020 0. 0 01 44

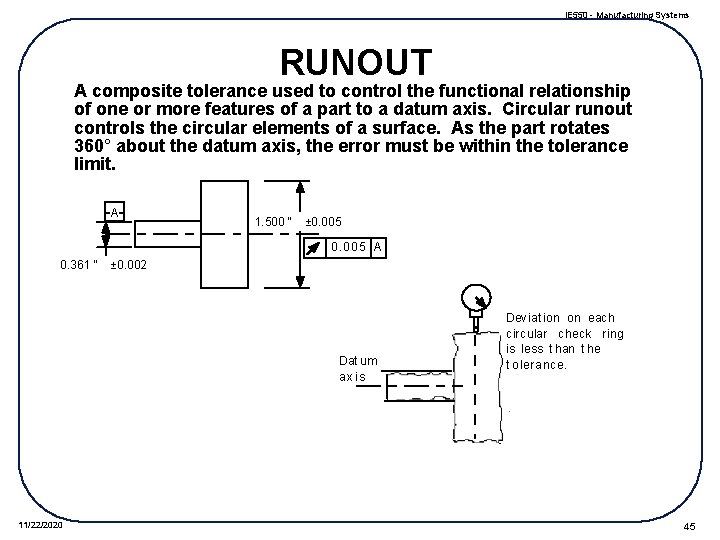
IE 550 - Manufacturing Systems RUNOUT A composite tolerance used to control the functional relationship of one or more features of a part to a datum axis. Circular runout controls the circular elements of a surface. As the part rotates 360° about the datum axis, the error must be within the tolerance limit. A 1. 500 " ± 0. 005 0. 0 0 5 A 0. 361 " ± 0. 002 Dat um ax is 11/22/2020 Deviat ion on each circular check ring is less t han t he t olerance. 45

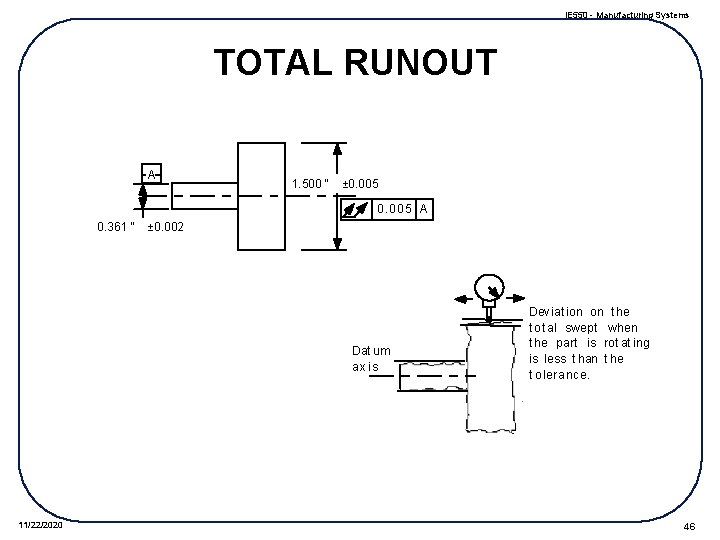
IE 550 - Manufacturing Systems TOTAL RUNOUT A 1. 500 " ± 0. 005 0. 0 0 5 A 0. 361 " ± 0. 002 Dat um ax is 11/22/2020 Deviat ion on t he t ot al swept when t he part is rot at ing is less t han t he t olerance. 46

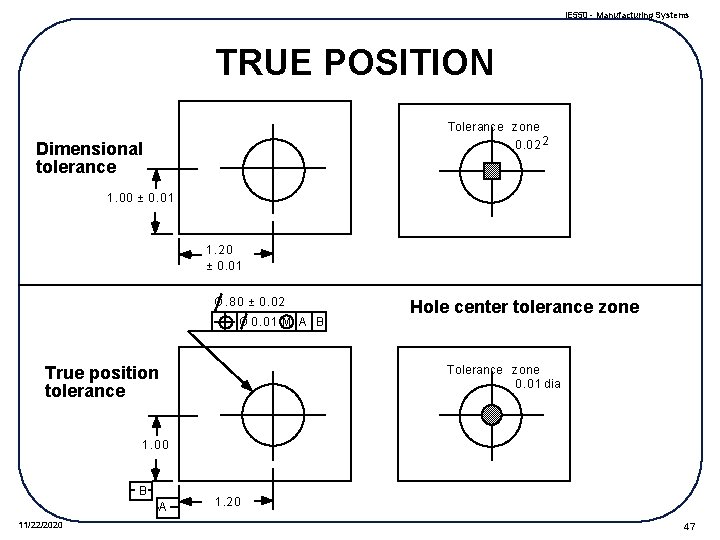
IE 550 - Manufacturing Systems TRUE POSITION Tolerance zone 0. 0 2 2 Dimensional tolerance 1. 0 0 ± 0. 0 1 1. 2 0 ± 0. 0 1 O. 8 0 ± 0. 0 2 O 0. 0 1 M A B True position tolerance Hole center tolerance zone Tolerance zone 0. 0 1 dia 1. 0 0 B A 11/22/2020 1. 2 0 47

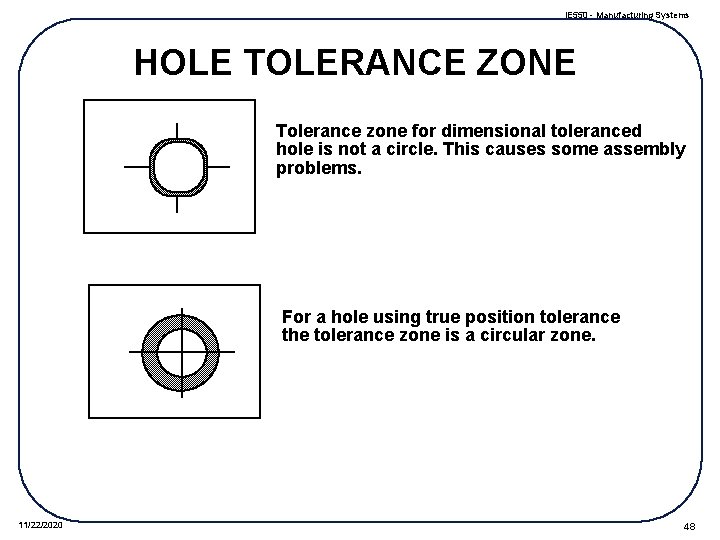
IE 550 - Manufacturing Systems HOLE TOLERANCE ZONE Tolerance zone for dimensional toleranced hole is not a circle. This causes some assembly problems. For a hole using true position tolerance the tolerance zone is a circular zone. 11/22/2020 48

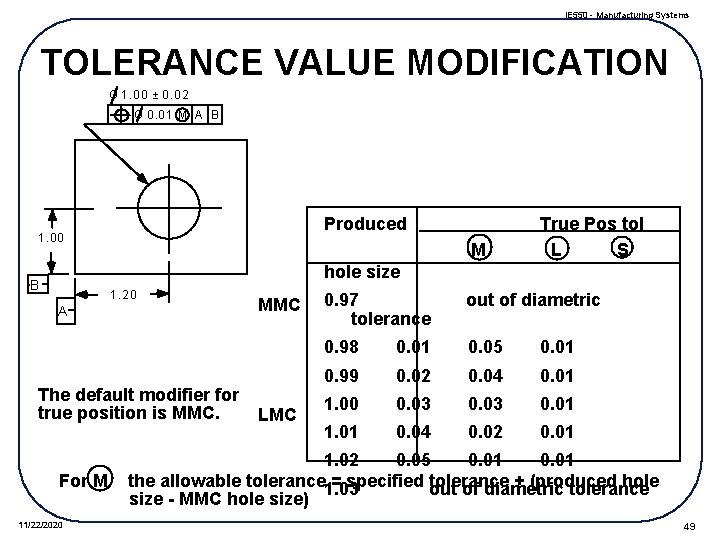
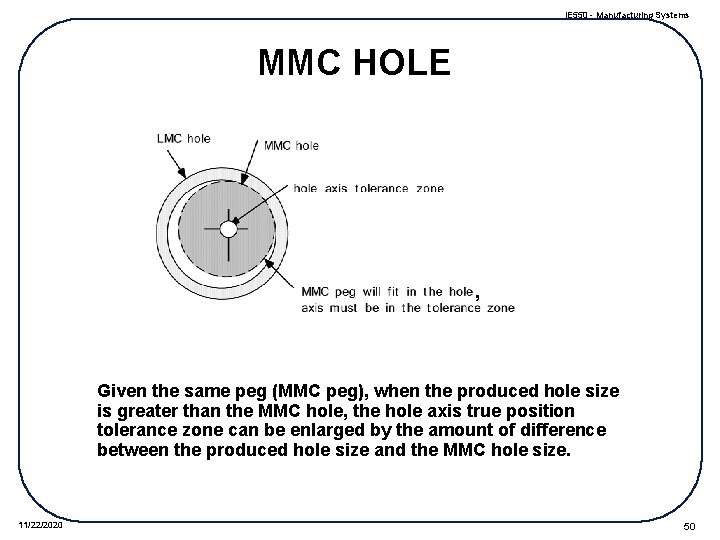
IE 550 - Manufacturing Systems TOLERANCE VALUE MODIFICATION O 1. 0 0 ± 0. 0 2 O 0. 0 1 M A B Produced 1. 0 0 M True Pos tol L S hole size B 1. 2 0 A The default modifier for true position is MMC. For M 11/22/2020 MMC LMC 0. 97 tolerance out of diametric 0. 98 0. 01 0. 05 0. 01 0. 99 0. 02 0. 04 0. 01 1. 00 0. 03 0. 01 1. 01 0. 04 0. 02 0. 01 1. 02 0. 05 0. 01 the allowable tolerance 1. 03 = specified out tolerance + (produced hole of diametric tolerance size - MMC hole size) 49

IE 550 - Manufacturing Systems MMC HOLE , Given the same peg (MMC peg), when the produced hole size is greater than the MMC hole, the hole axis true position tolerance zone can be enlarged by the amount of difference between the produced hole size and the MMC hole size. 11/22/2020 50

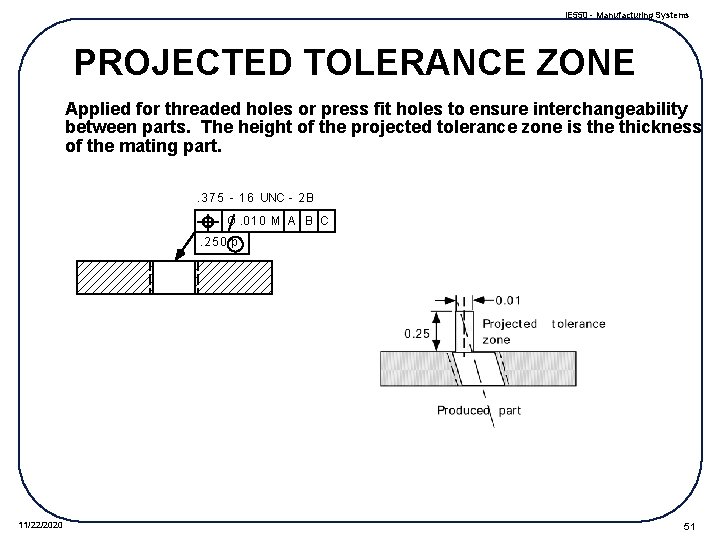
IE 550 - Manufacturing Systems PROJECTED TOLERANCE ZONE Applied for threaded holes or press fit holes to ensure interchangeability between parts. The height of the projected tolerance zone is the thickness of the mating part. . 3 7 5 - 1 6 UNC - 2 B O. 0 1 0 M A B C. 2 5 0 p 11/22/2020 51

IE 550 - Manufacturing Systems SOME NUMBERS Krulikowski, A. , GD&T Challenges the Fast Draw, MFG ENG, Feb 1994. GD&T drawings are more expansive to make, however, saves revision cost. Drawing revision costs $500 - $2000 on the paper work How much does it cost to “put a part number” onto a part? Estimates range from $1, 000 -$10, 000. 11/22/2020 52