IAT 106 Spatial Thinking and Communicating Auxiliary Views



- Slides: 66

IAT 106 Spatial Thinking and Communicating Auxiliary Views, Cross-sections & Solid. Works Assemblies Week 6 IAT 106: Aux. Views, Cross-sections, and Assemblies M 6. 1

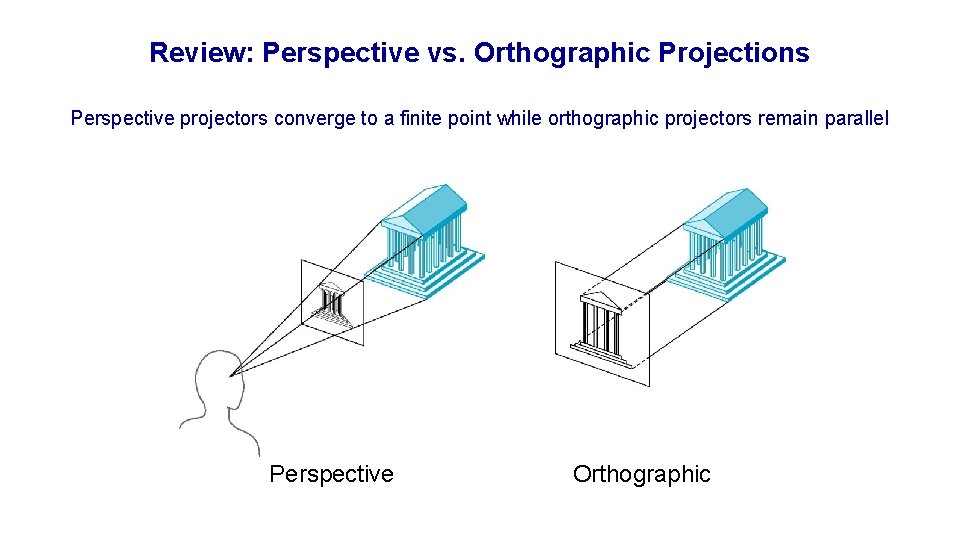
Review: Perspective vs. Orthographic Projections Perspective projectors converge to a finite point while orthographic projectors remain parallel Perspective Orthographic

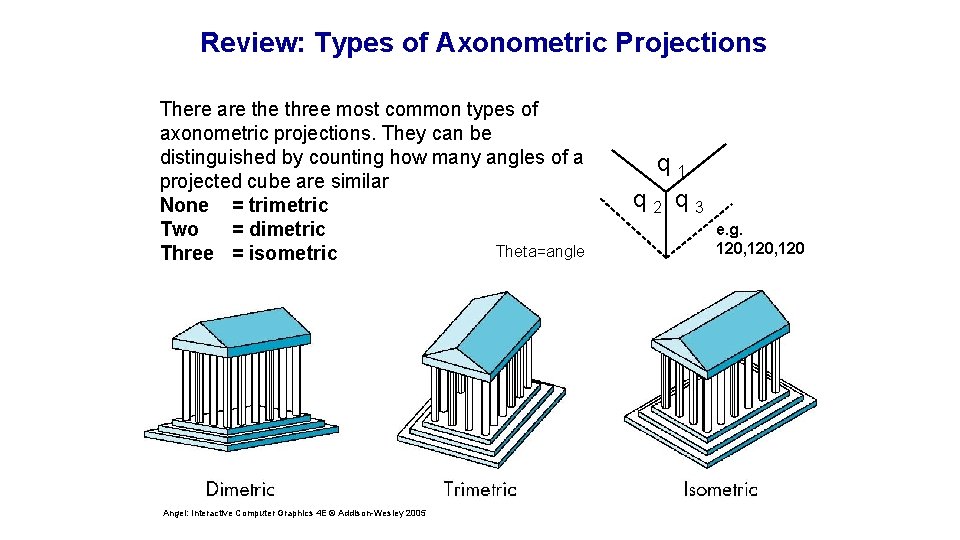
Review: Types of Axonometric Projections There are three most common types of axonometric projections. They can be distinguished by counting how many angles of a projected cube are similar None = trimetric Two = dimetric Theta=angle Three = isometric Angel: Interactive Computer Graphics 4 E © Addison-Wesley 2005 q 1 q 2 q 3 e. g. 120, 120

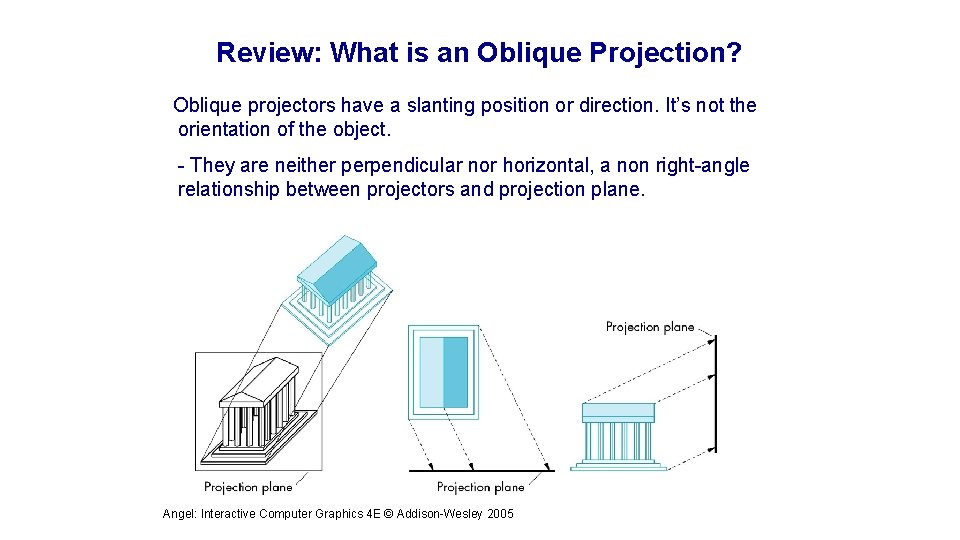
Review: What is an Oblique Projection? Oblique projectors have a slanting position or direction. It’s not the orientation of the object. - They are neither perpendicular nor horizontal, a non right-angle relationship between projectors and projection plane. Angel: Interactive Computer Graphics 4 E © Addison-Wesley 2005

Learning objectives for week 6 Auxiliary view Cross-section view Degrees of Freedom

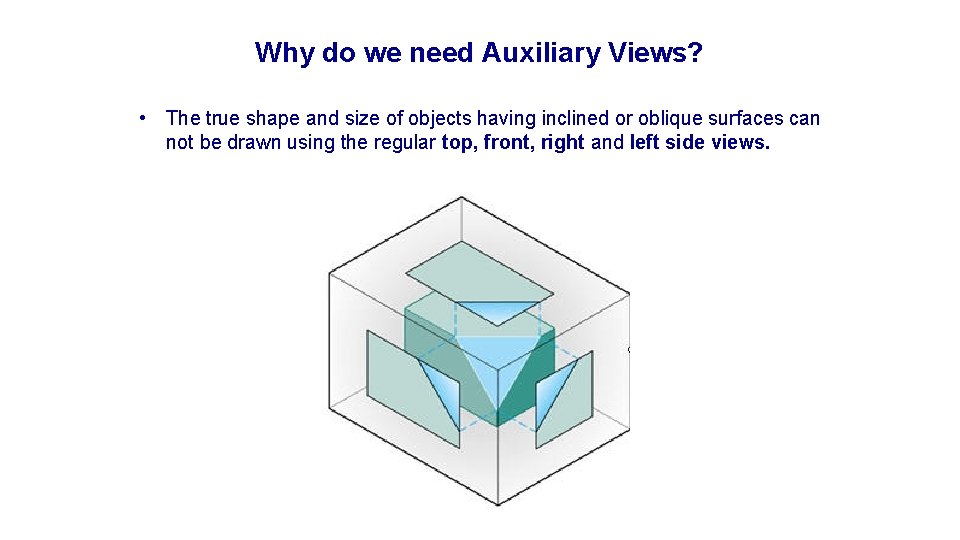
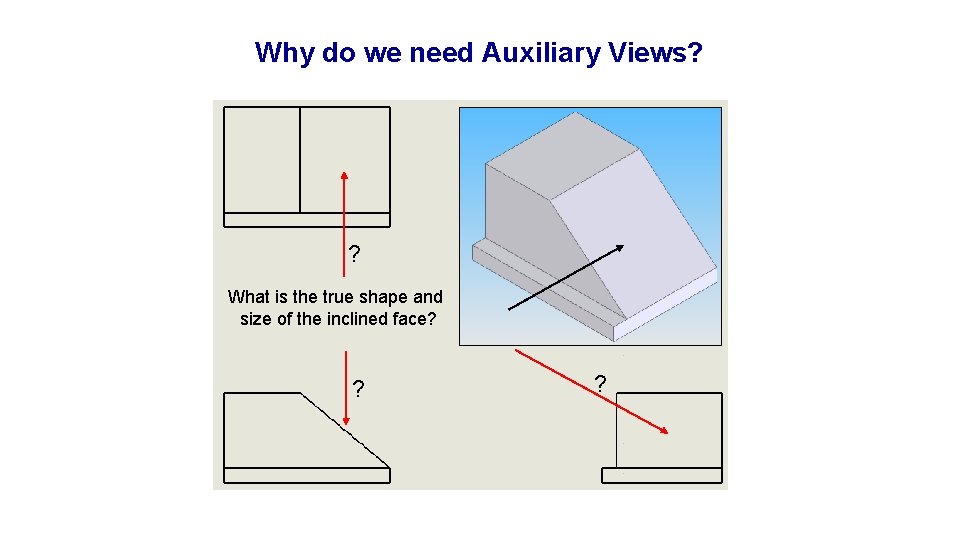
Why do we need Auxiliary Views? • The true shape and size of objects having inclined or oblique surfaces can not be drawn using the regular top, front, right and left side views.

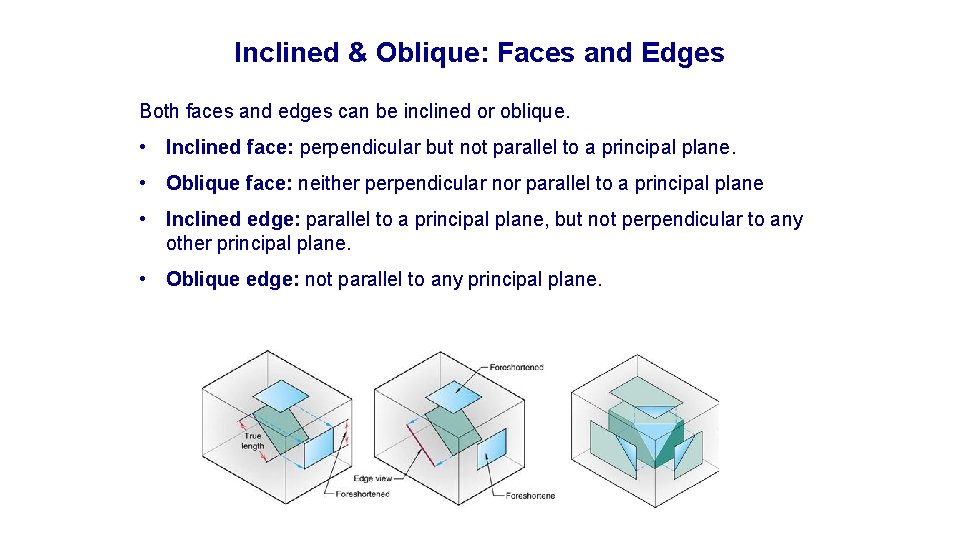
Inclined & Oblique: Faces and Edges Both faces and edges can be inclined or oblique. • Inclined face: perpendicular but not parallel to a principal plane. • Oblique face: neither perpendicular nor parallel to a principal plane • Inclined edge: parallel to a principal plane, but not perpendicular to any other principal plane. • Oblique edge: not parallel to any principal plane.

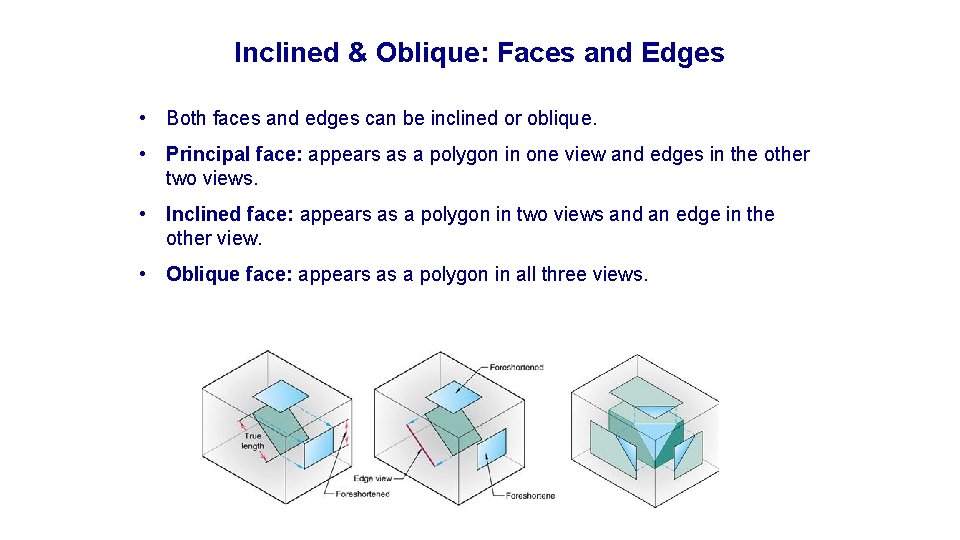
Inclined & Oblique: Faces and Edges • Both faces and edges can be inclined or oblique. • Principal face: appears as a polygon in one view and edges in the other two views. • Inclined face: appears as a polygon in two views and an edge in the other view. • Oblique face: appears as a polygon in all three views.

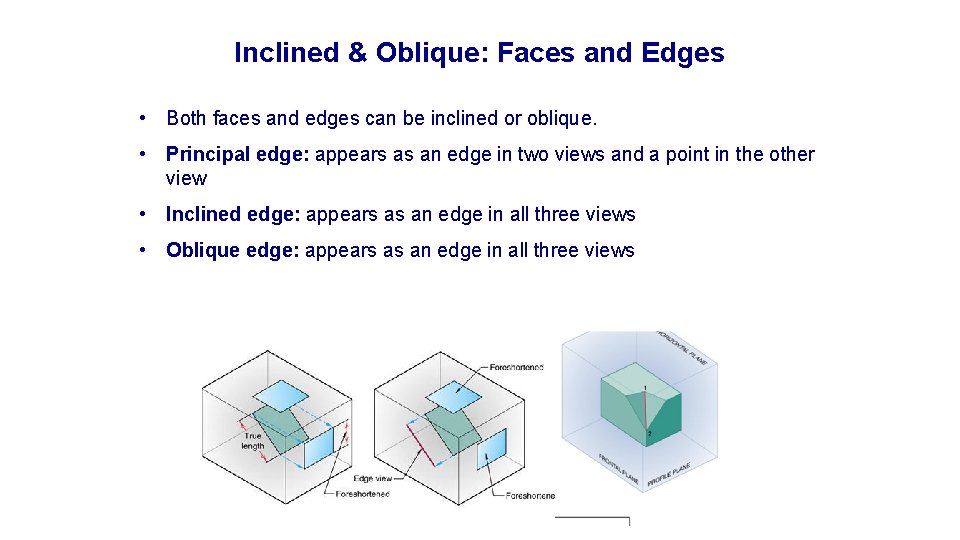
Inclined & Oblique: Faces and Edges • Both faces and edges can be inclined or oblique. • Principal edge: appears as an edge in two views and a point in the other view • Inclined edge: appears as an edge in all three views • Oblique edge: appears as an edge in all three views

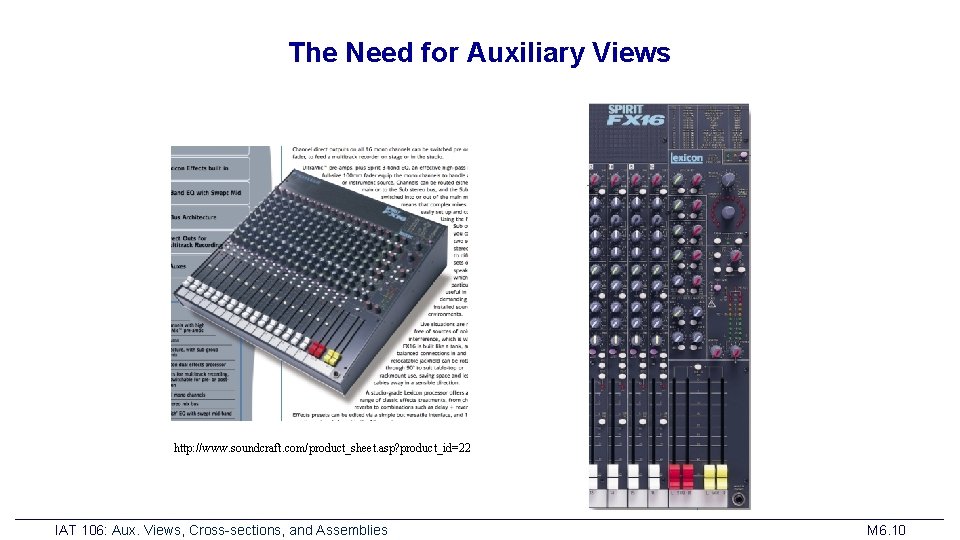
The Need for Auxiliary Views http: //www. soundcraft. com/product_sheet. asp? product_id=22 IAT 106: Aux. Views, Cross-sections, and Assemblies M 6. 10

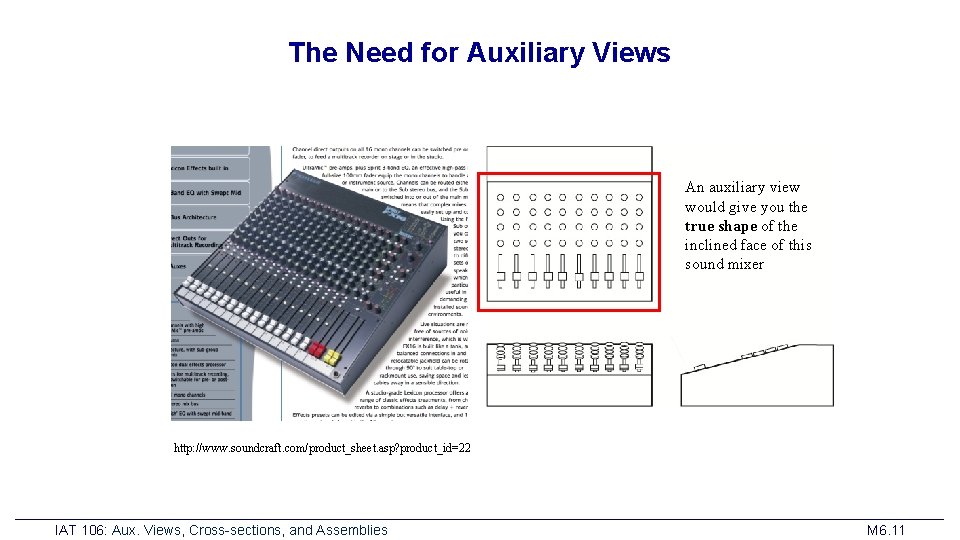
The Need for Auxiliary Views An auxiliary view would give you the true shape of the inclined face of this sound mixer http: //www. soundcraft. com/product_sheet. asp? product_id=22 IAT 106: Aux. Views, Cross-sections, and Assemblies M 6. 11

Why do we need Auxiliary Views? ? What is the true shape and size of the inclined face? ? ?

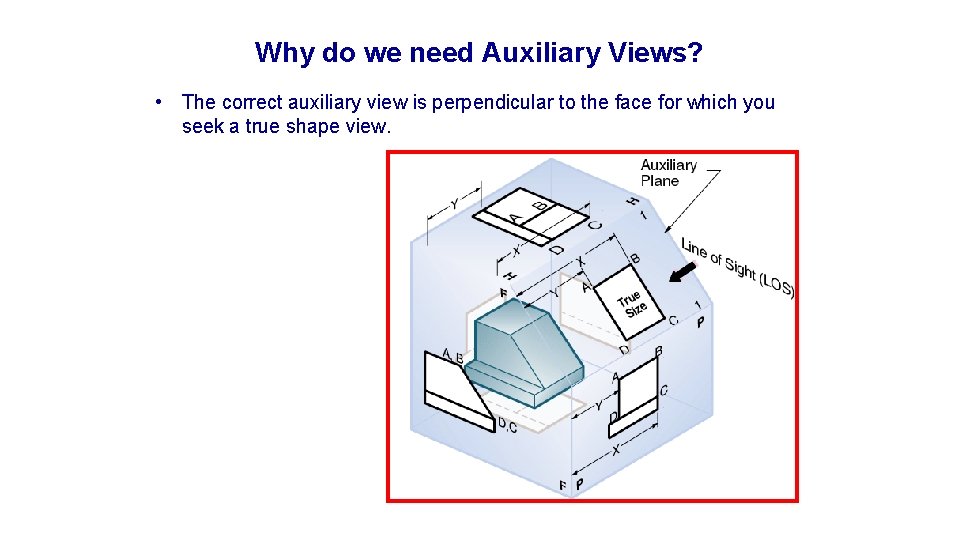
Why do we need Auxiliary Views? • The correct auxiliary view is perpendicular to the face for which you seek a true shape view.

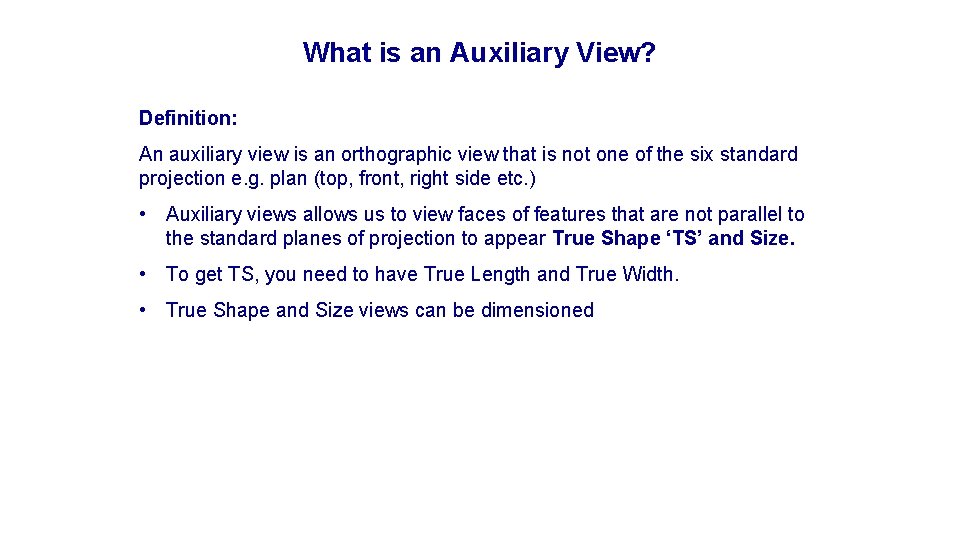
What is an Auxiliary View? Definition: An auxiliary view is an orthographic view that is not one of the six standard projection e. g. plan (top, front, right side etc. ) • Auxiliary views allows us to view faces of features that are not parallel to the standard planes of projection to appear True Shape ‘TS’ and Size. • To get TS, you need to have True Length and True Width. • True Shape and Size views can be dimensioned

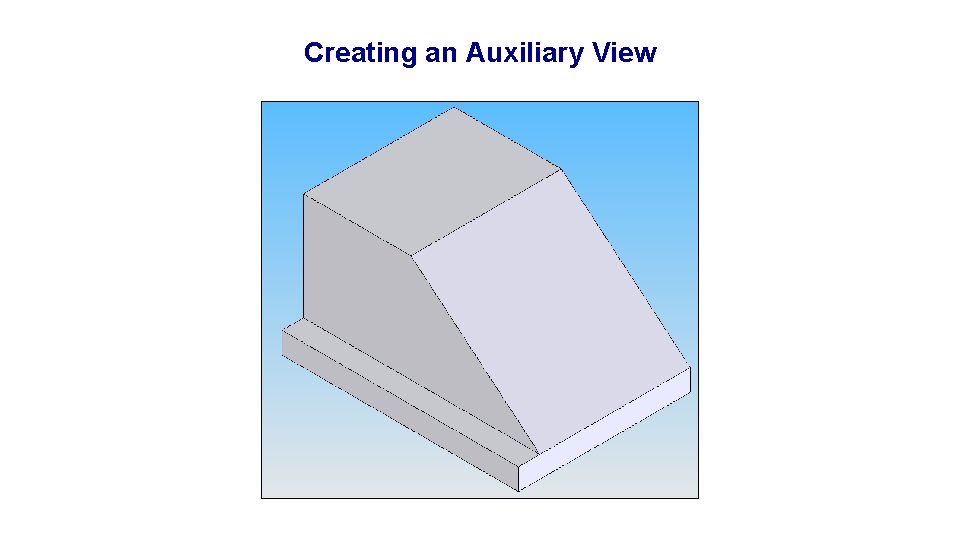
Creating an Auxiliary View

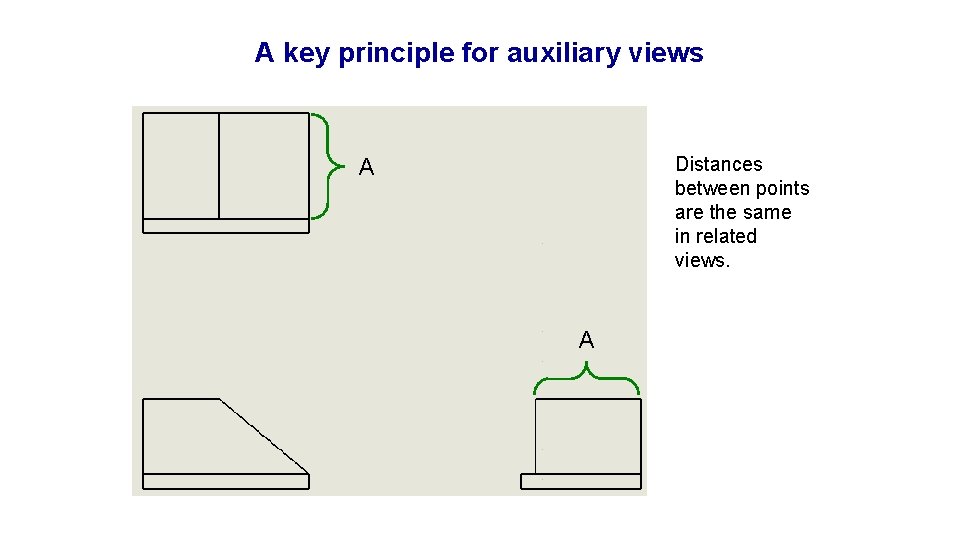
A key principle for auxiliary views Distances between points are the same in related views. A A

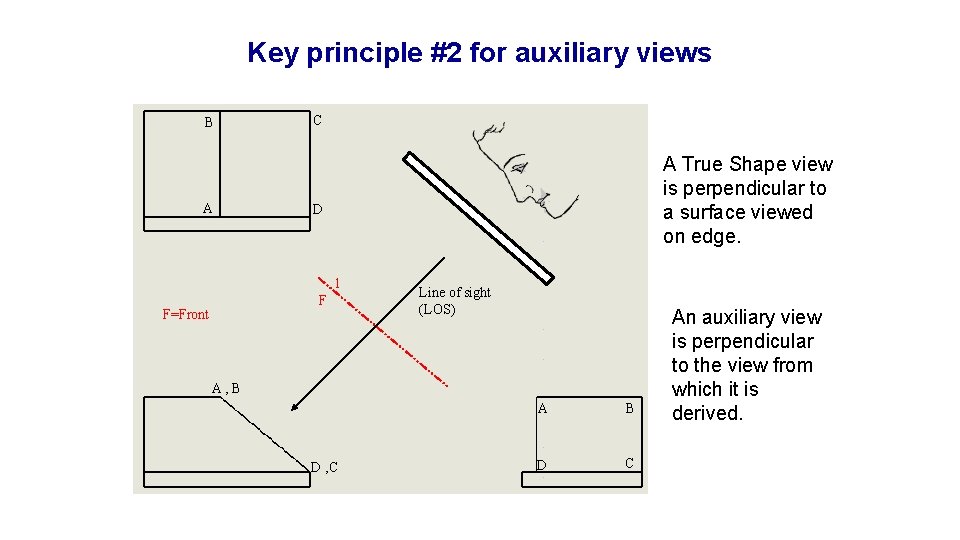
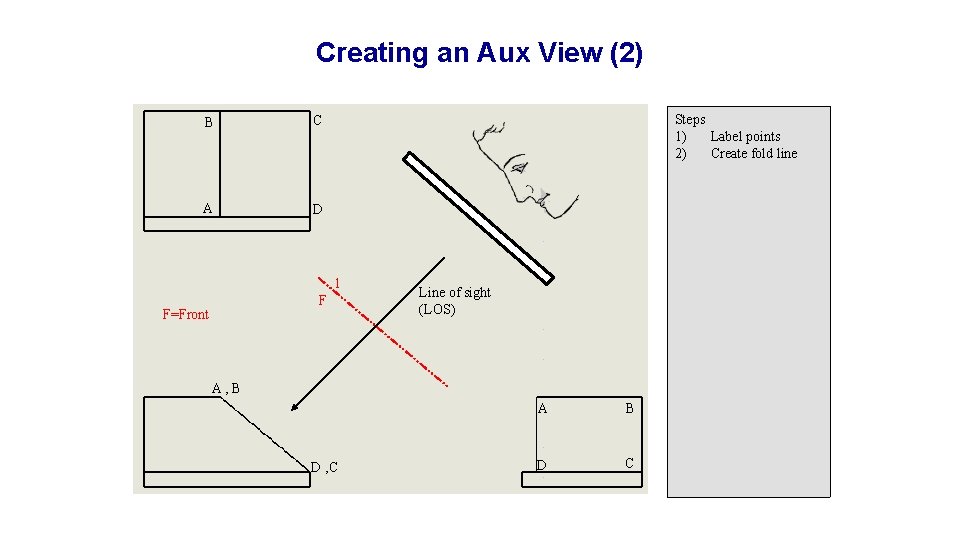
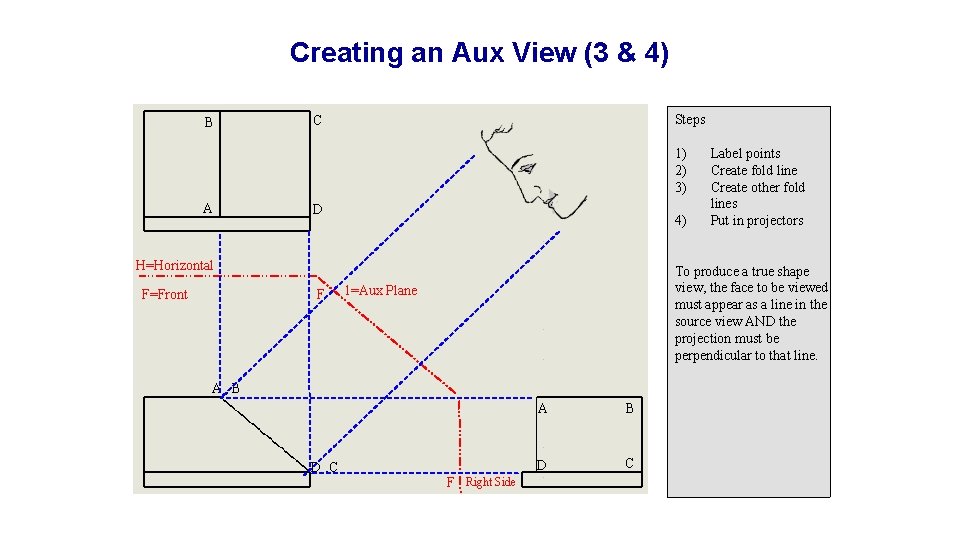
Key principle #2 for auxiliary views B A C A True Shape view is perpendicular to a surface viewed on edge. D 1 F F=Front Line of sight (LOS) A, B D , C A B D C An auxiliary view is perpendicular to the view from which it is derived.

Drawing an Auxiliary View • Precaution: • When drawing auxiliary views, the usual practice is to show only the true shape portion of the view. • It is usually not necessary to draw a full projection of the object, just the face in question.

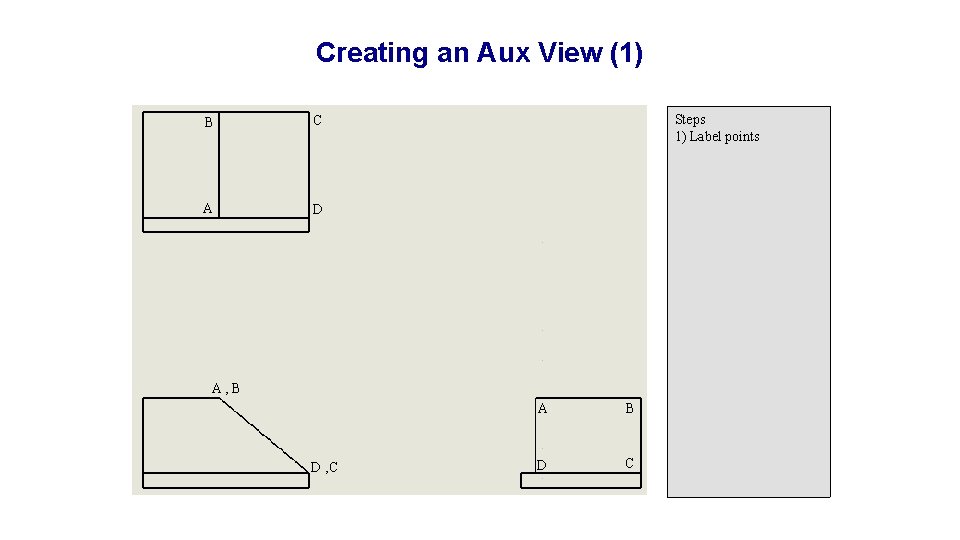
Creating an Aux View (1) B C A D Steps 1) Label points A, B D , C A B D C

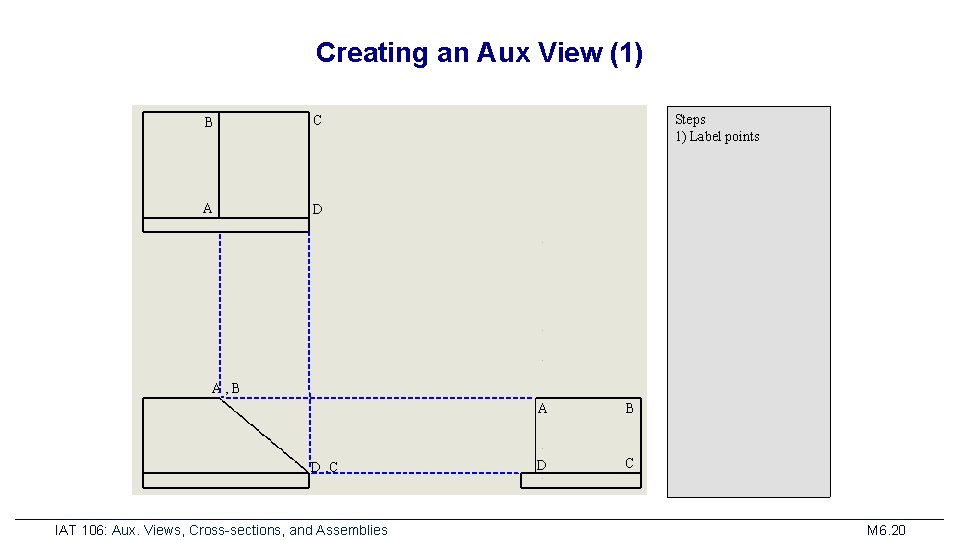
Creating an Aux View (1) B C A D Steps 1) Label points A, B D , C IAT 106: Aux. Views, Cross-sections, and Assemblies A B D C M 6. 20

Creating an Aux View (2) B C A D Steps 1) Label points 2) Create fold line 1 F F=Front Line of sight (LOS) A, B D , C A B D C

Creating an Aux View (3 & 4) B Steps C 1) 2) 3) A D 4) H=Horizontal F F=Front To produce a true shape view, the face to be viewed must appear as a line in the source view AND the projection must be perpendicular to that line. 1=Aux Plane A, B D , C Label points Create fold line Create other fold lines Put in projectors F Right Side A B D C

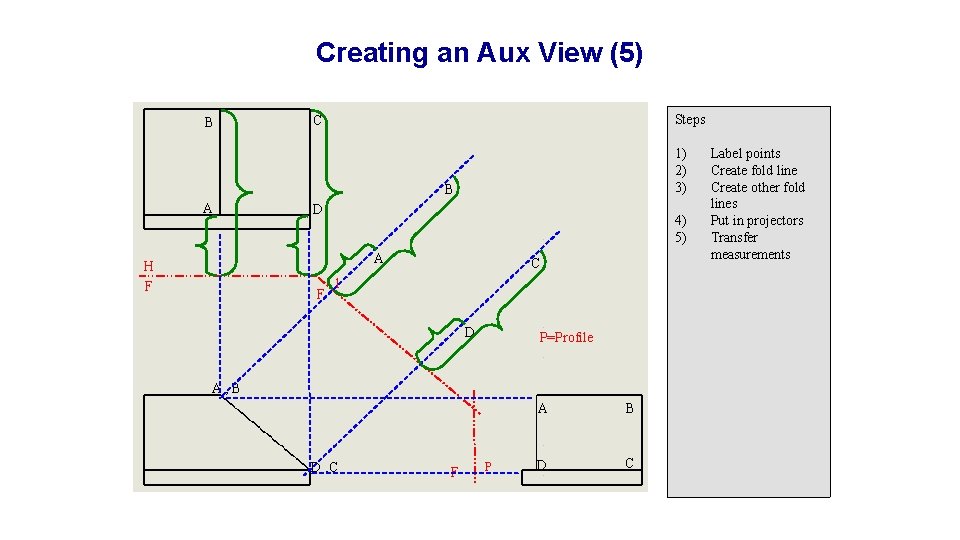
Creating an Aux View (5) B Steps C 1) 2) 3) B A D 4) 5) A H F F C 1 D P=Profile A, B D , C F P A B D C Label points Create fold line Create other fold lines Put in projectors Transfer measurements

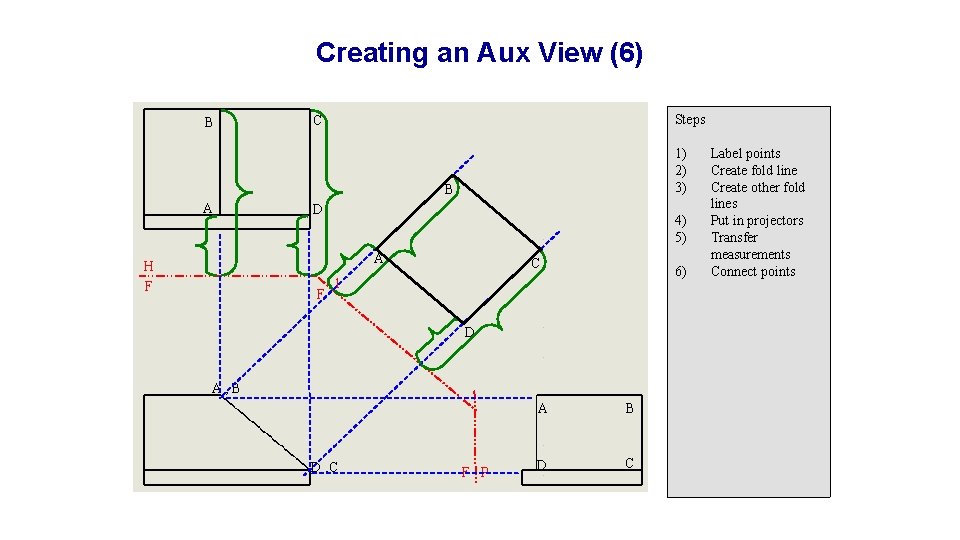
Creating an Aux View (6) B Steps C 1) 2) 3) B A D 4) 5) A H F F C 6) 1 D A, B D , C F P A B D C Label points Create fold line Create other fold lines Put in projectors Transfer measurements Connect points

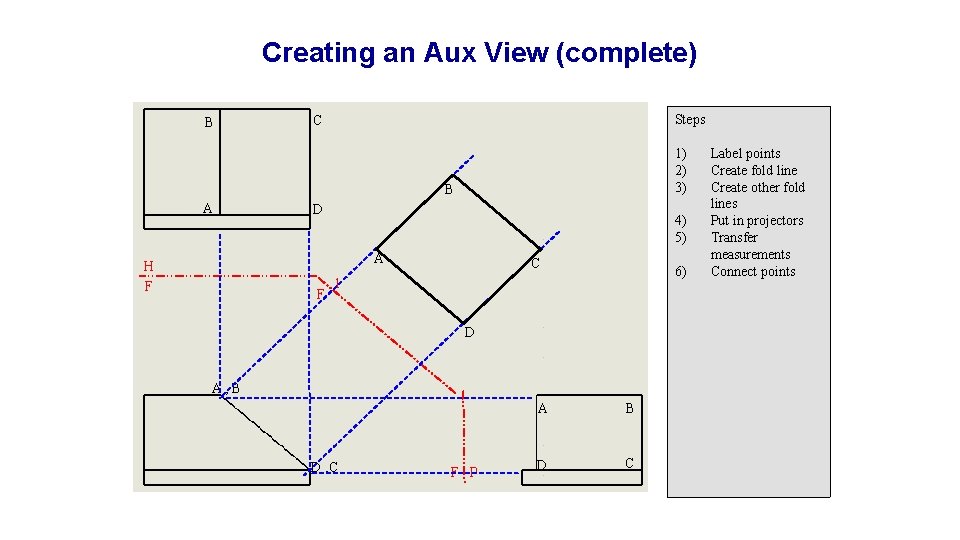
Creating an Aux View (complete) B Steps C 1) 2) 3) B A D 4) 5) A H F F C 6) 1 D A, B D , C F P A B D C Label points Create fold line Create other fold lines Put in projectors Transfer measurements Connect points

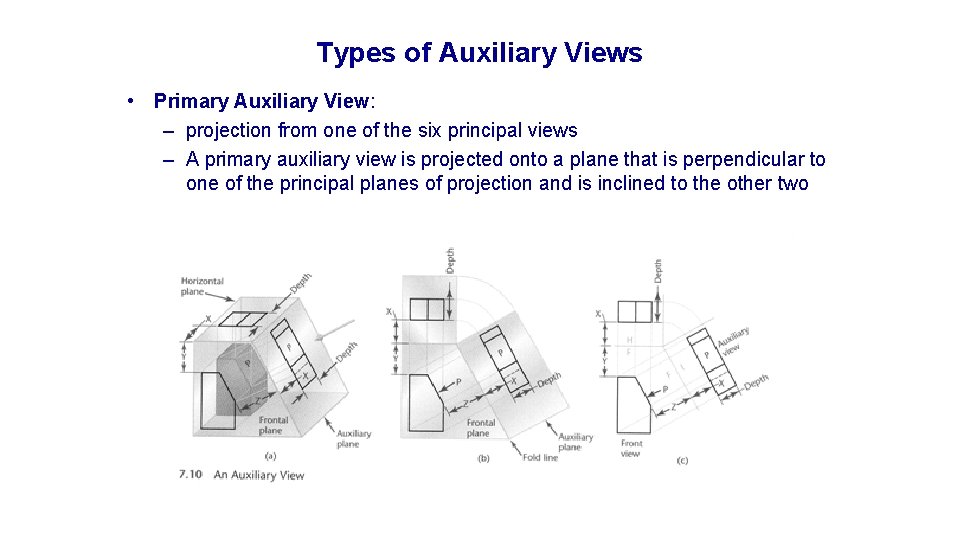
Types of Auxiliary Views • Primary Auxiliary View: – projection from one of the six principal views – A primary auxiliary view is projected onto a plane that is perpendicular to one of the principal planes of projection and is inclined to the other two

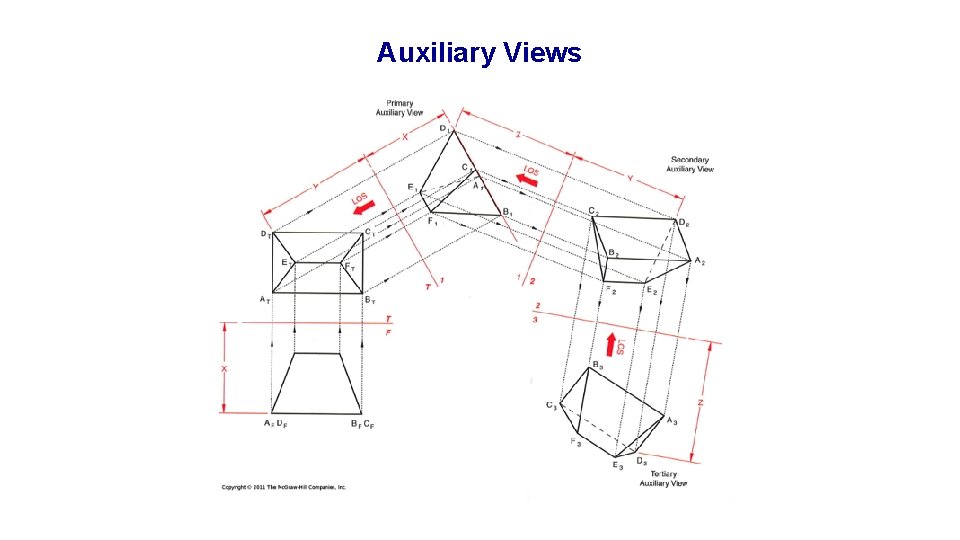
Auxiliary Views

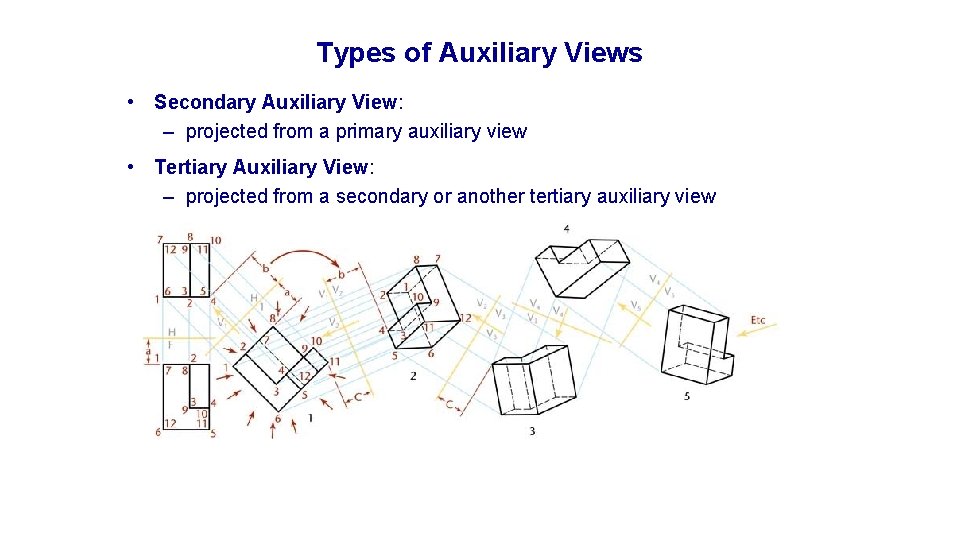
Types of Auxiliary Views • Secondary Auxiliary View: – projected from a primary auxiliary view • Tertiary Auxiliary View: – projected from a secondary or another tertiary auxiliary view

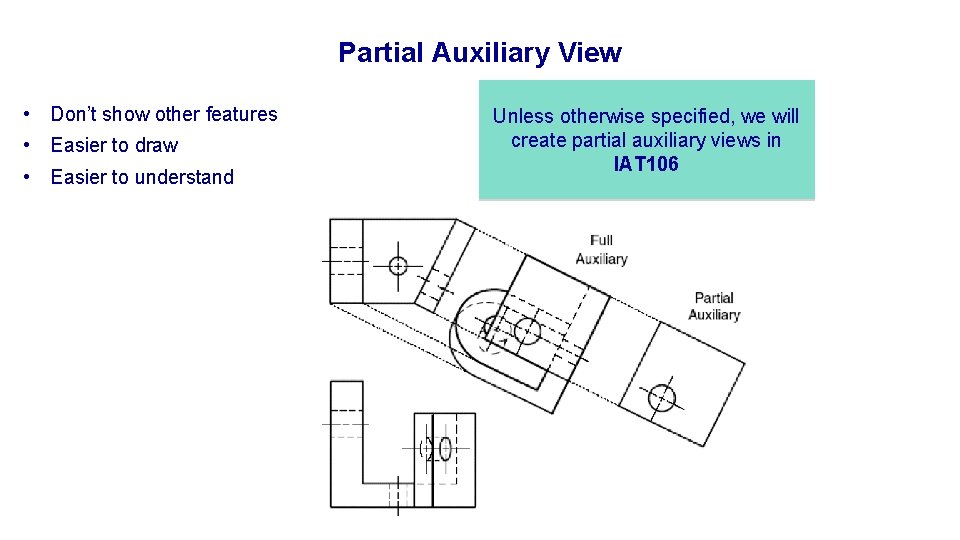
Partial Auxiliary View • Don’t show other features • Easier to draw • Easier to understand Unless otherwise specified, we will create partial auxiliary views in IAT 106

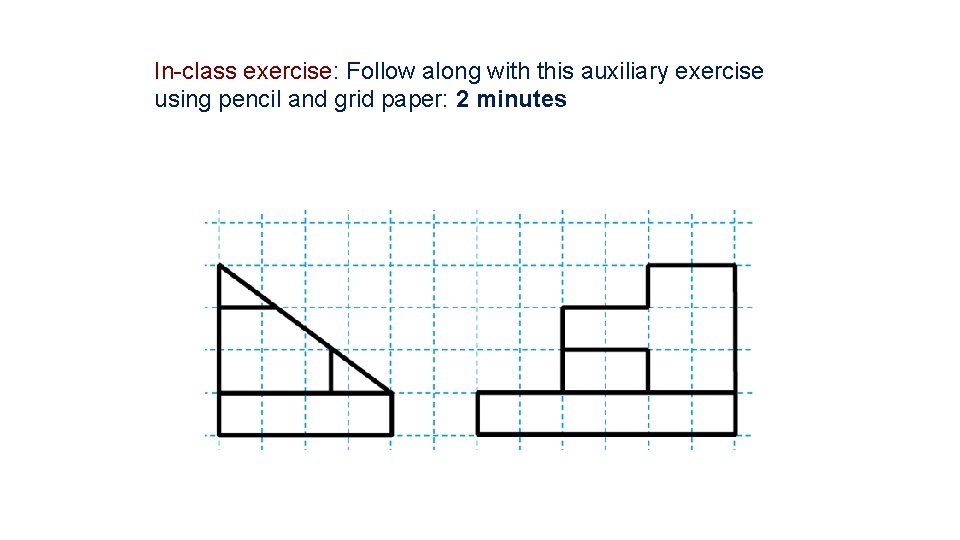
In-class exercise: Follow along with this auxiliary exercise using pencil and grid paper: 2 minutes

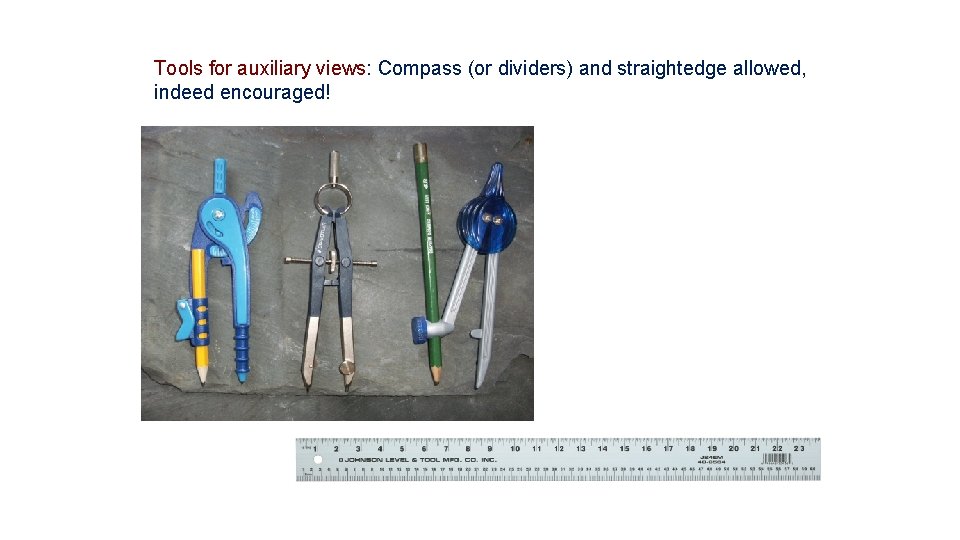
Tools for auxiliary views: Compass (or dividers) and straightedge allowed, indeed encouraged!

Cross-sections

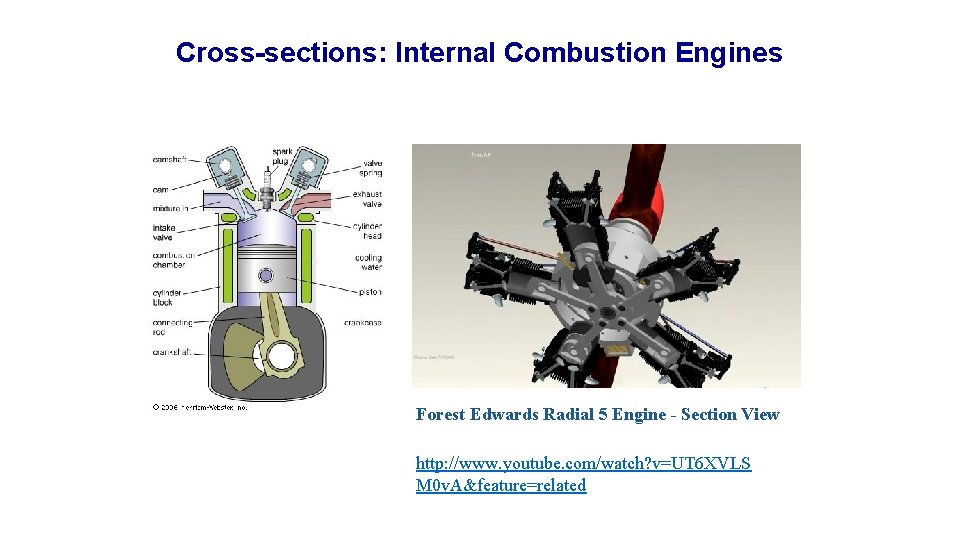
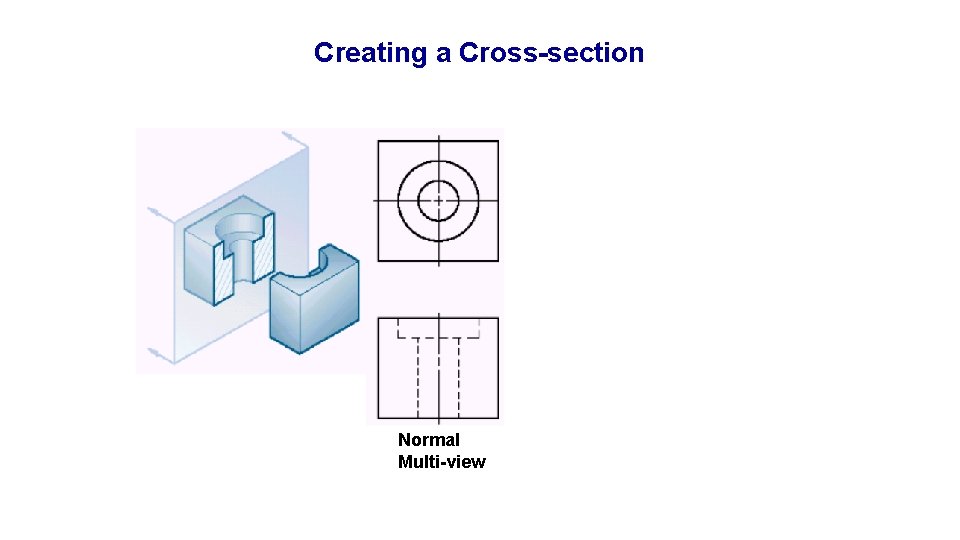
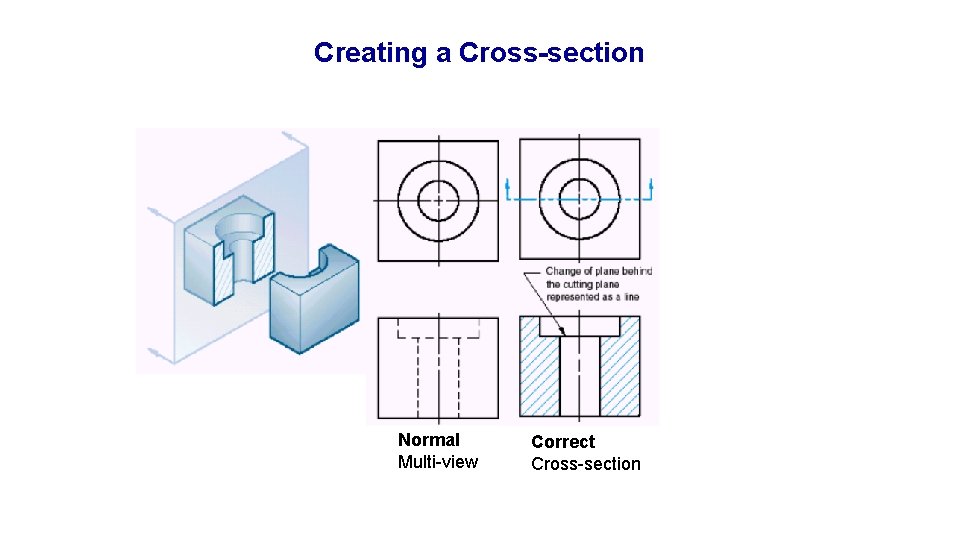
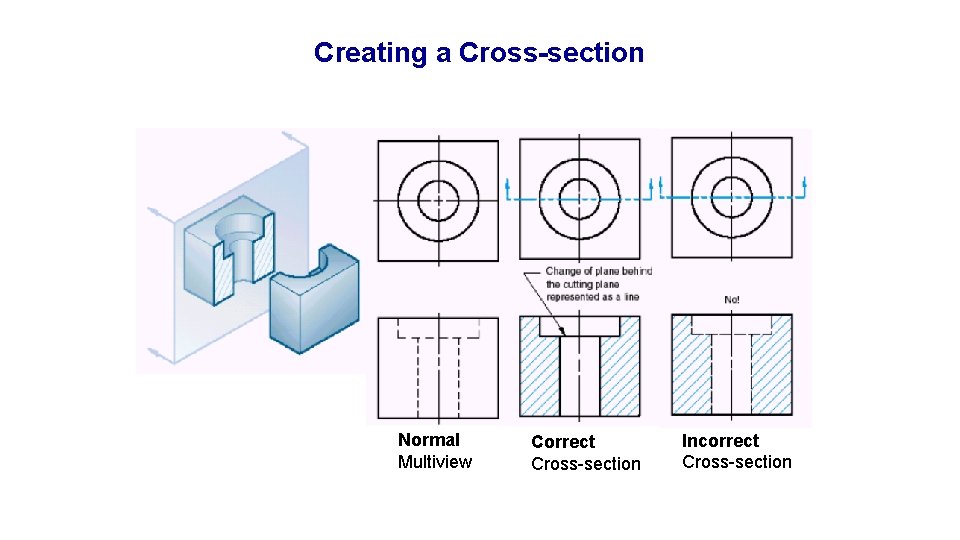
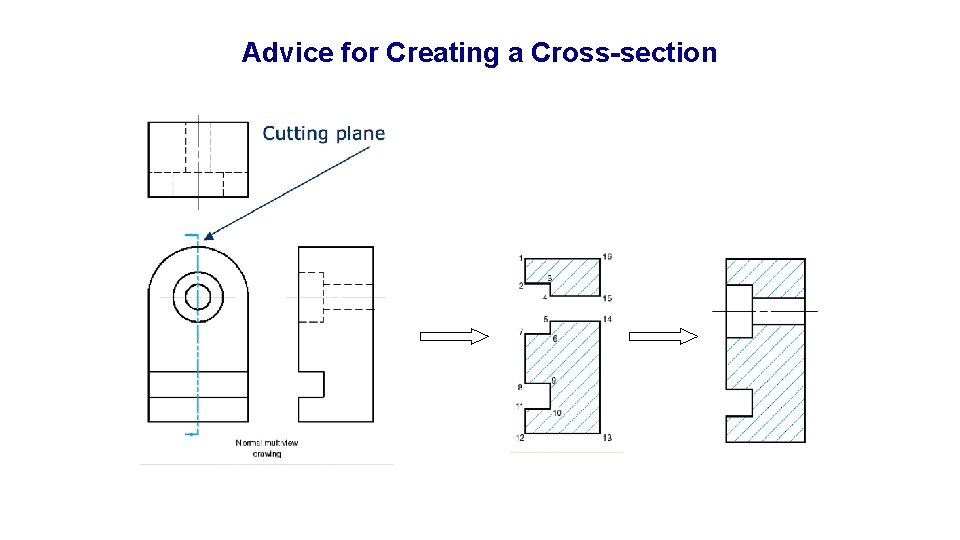
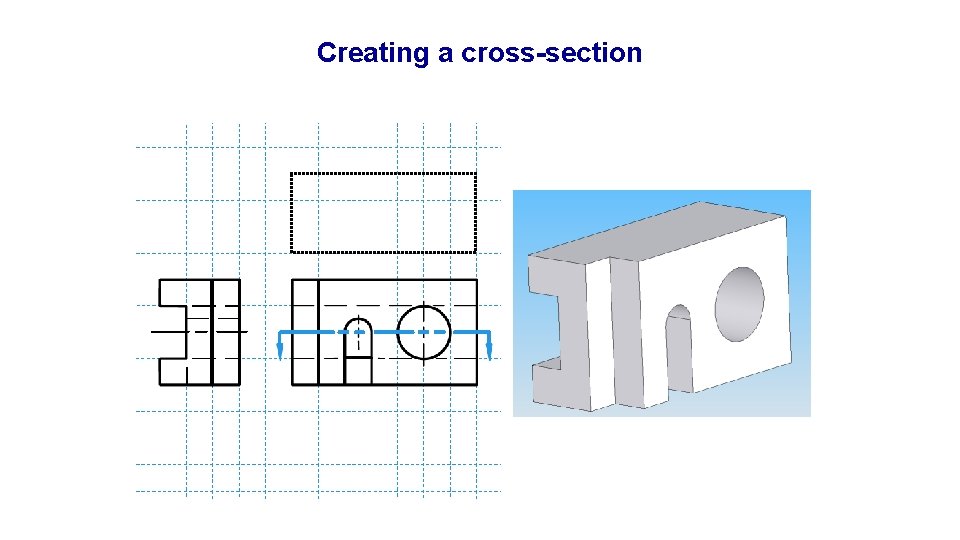
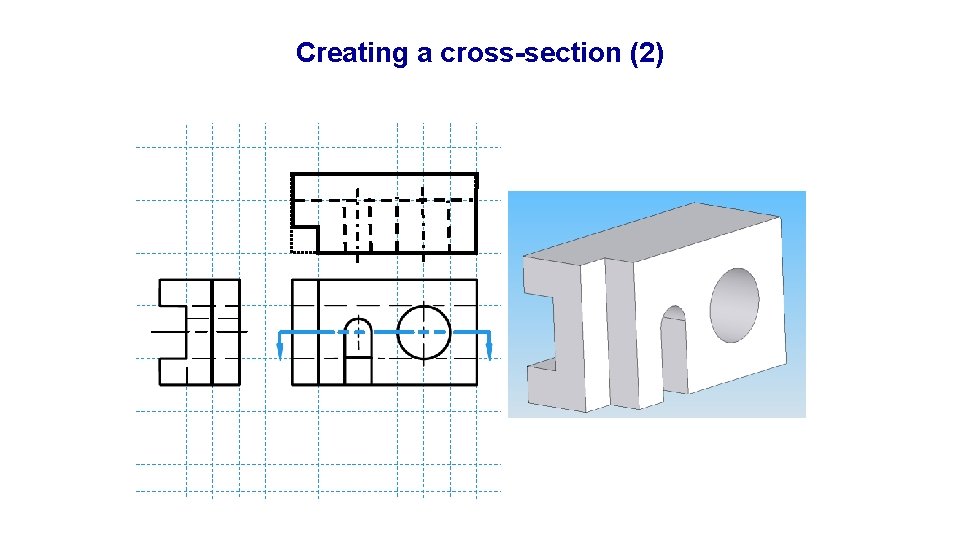
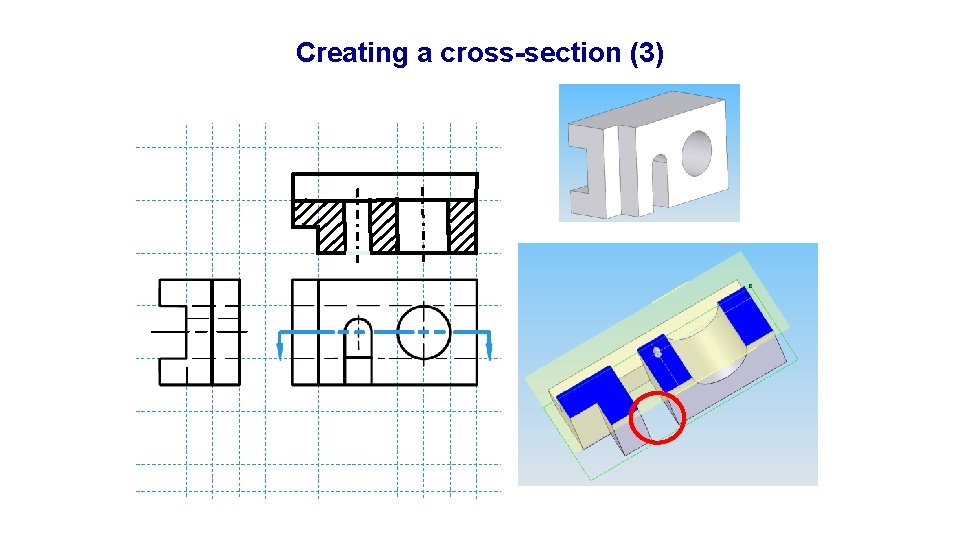
What are Sectional Views? • When there are complicated internal features, they may be hard to identify in normal views with hidden lines. • A view with some of the part "cut away" can make the internal features very easy to see, these are called section views.

The Need for Cross-sections http: //www. geodegallery. com/coconuts/wholecoconuts. html IAT 106: Aux. Views, Cross-sections, and Assemblies M 6. 34

Cross-sections: Internal Combustion Engines Forest Edwards Radial 5 Engine - Section View http: //www. youtube. com/watch? v=UT 6 XVLS M 0 v. A&feature=related

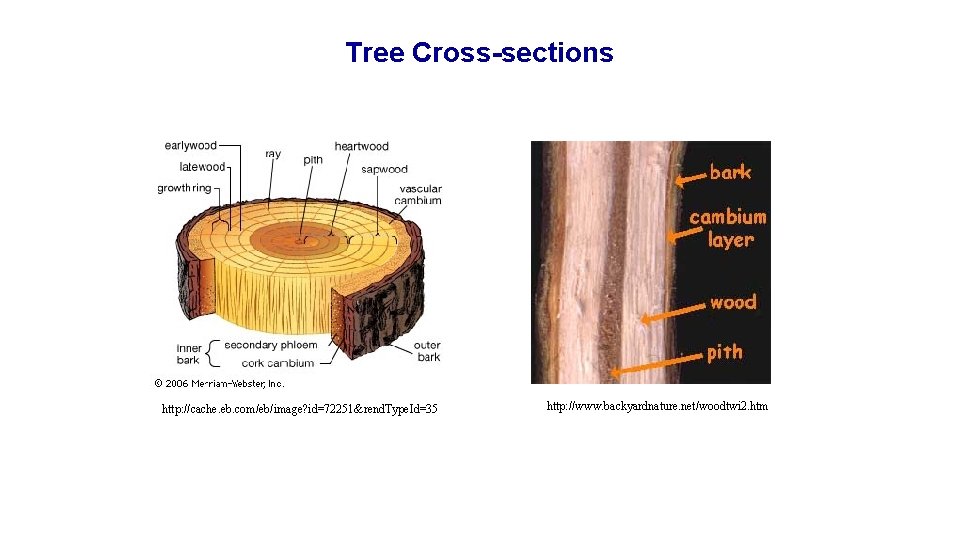
Tree Cross-sections http: //cache. eb. com/eb/image? id=72251&rend. Type. Id=35 http: //www. backyardnature. net/woodtwi 2. htm

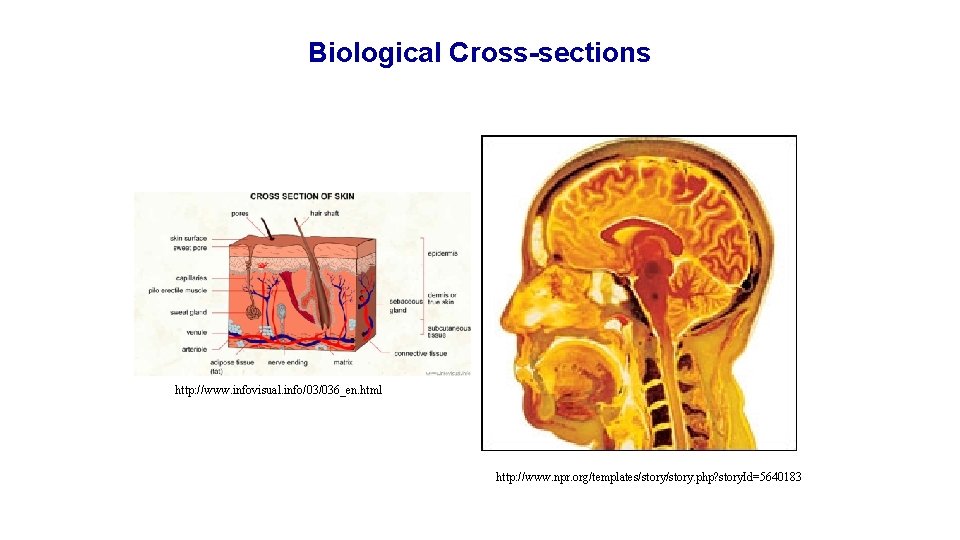
Biological Cross-sections http: //www. infovisual. info/03/036_en. html http: //www. npr. org/templates/story. php? story. Id=5640183

Creating a Cross-section Normal Multi-view Correct Cross-section Incorrect Cross-section

Creating a Cross-section Normal Multi-view Correct Cross-section Incorrect Cross-section

Creating a Cross-section Normal Multiview Correct Cross-section Incorrect Cross-section

Advice for Creating a Cross-section

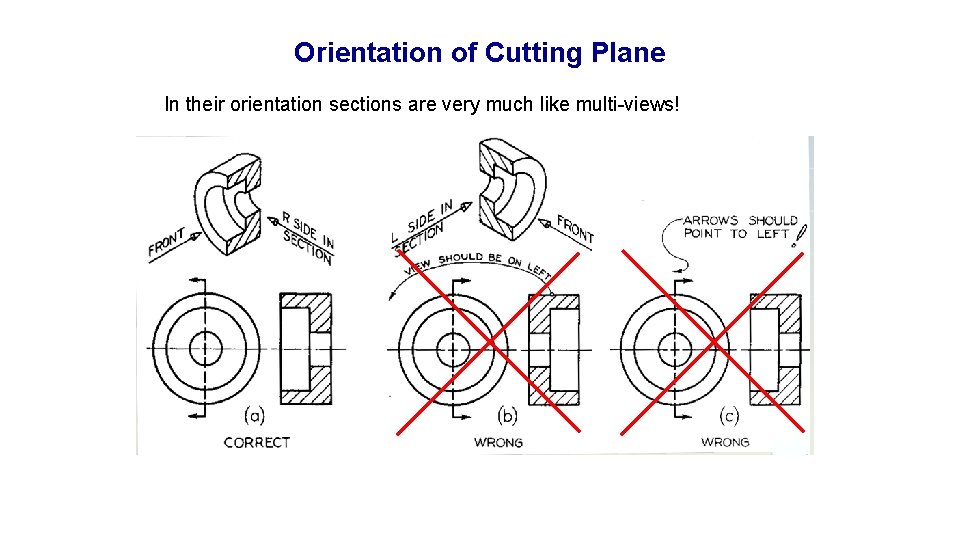
Orientation of Cutting Plane In their orientation sections are very much like multi-views!

Creating a cross-section

Creating a cross-section (2)

Creating a cross-section (3)

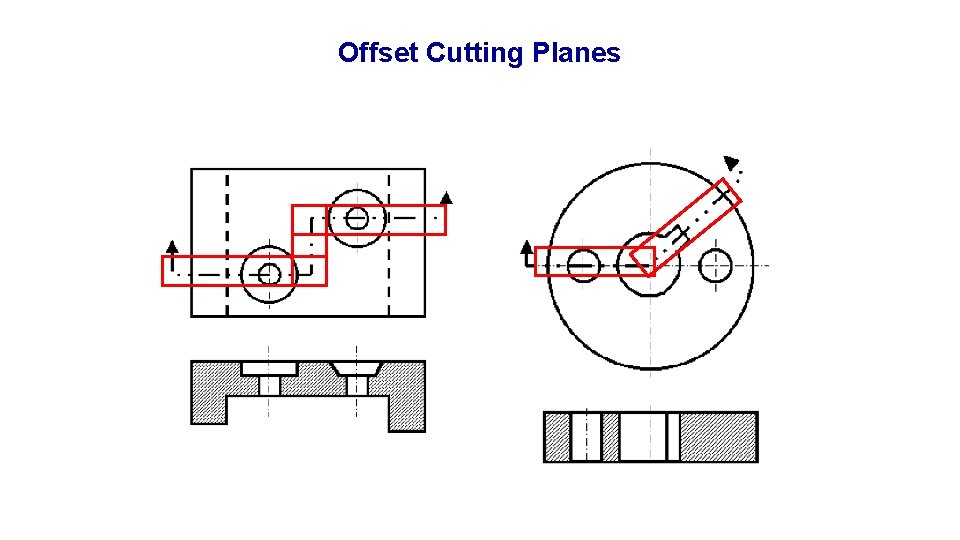
Offset Cutting Planes

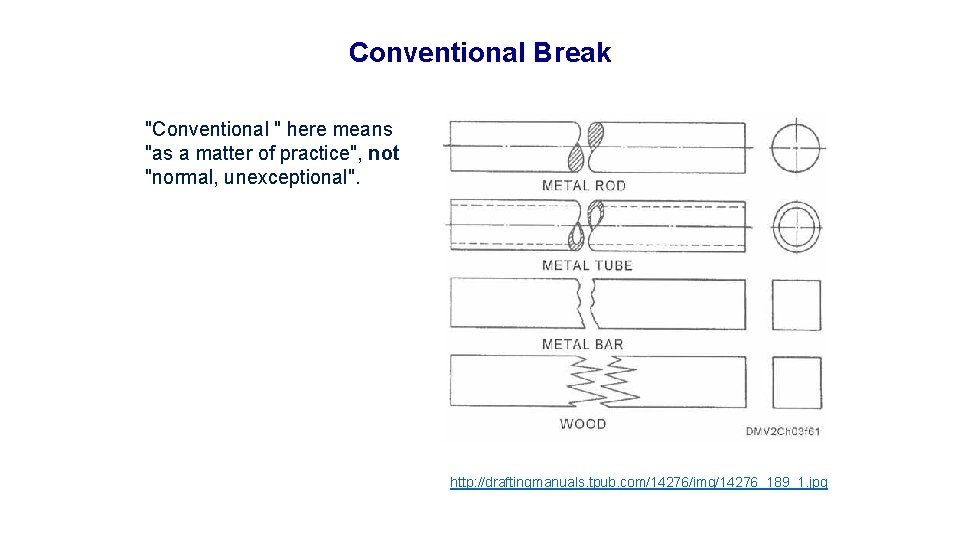
Oversized Objects When a small cross section and of some length has to be drawn, there are two choices: (1) If the drawing is made full size, it may be too large to fit on your sheet (2) If the drawing is reduced in scale, the details may be too small to give the required information or to be dimensioned. (3) In such cases, the object can be reduced in length via a Conventional Break.

Conventional Break "Conventional " here means "as a matter of practice", not "normal, unexceptional". http: //draftingmanuals. tpub. com/14276/img/14276_189_1. jpg

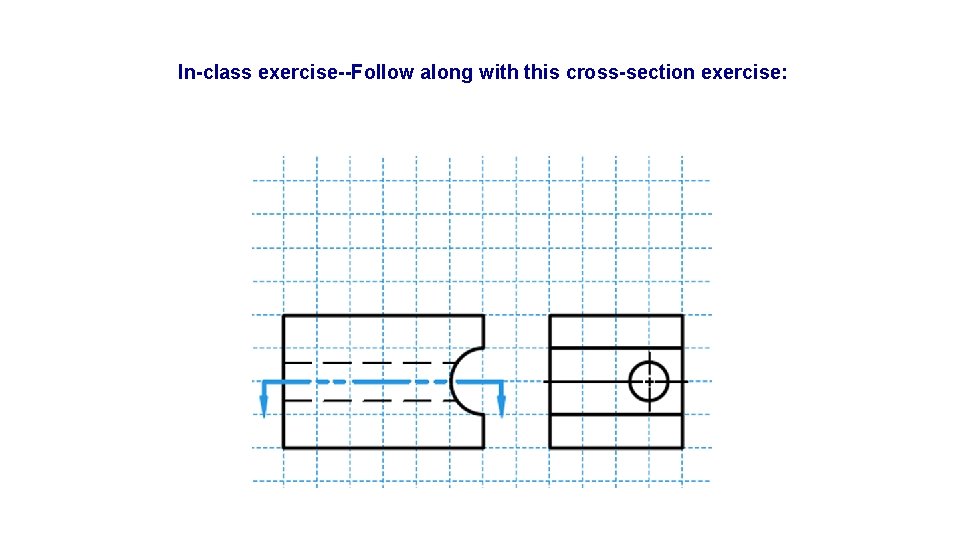
In-class exercise--Follow along with this cross-section exercise:

Degrees of Freedom

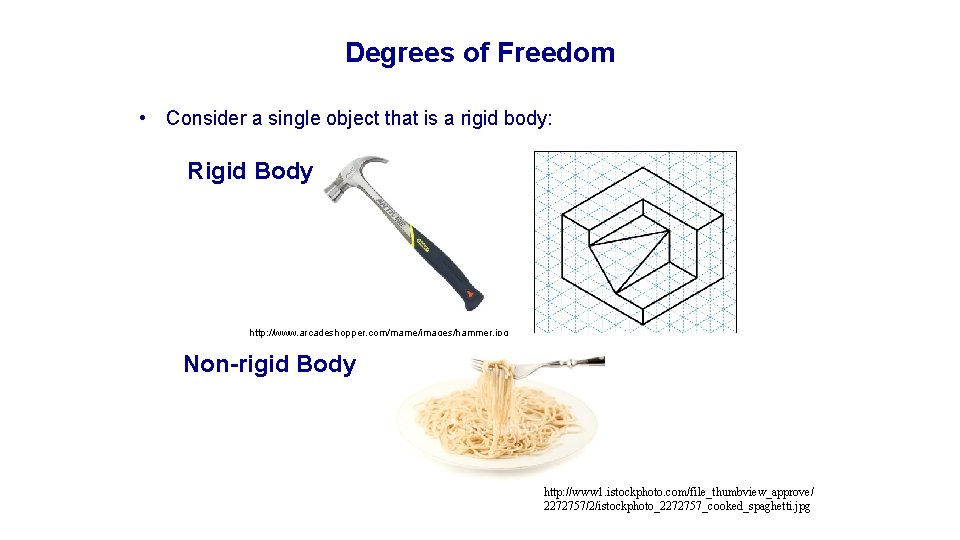
Degrees of Freedom • Consider a single object that is a rigid body: Rigid Body http: //www. arcadeshopper. com/mame/images/hammer. jpg Non-rigid Body http: //www 1. istockphoto. com/file_thumbview_approve/ 2272757/2/istockphoto_2272757_cooked_spaghetti. jpg

Degrees of Freedom (For a Rigid Body) • The number of variables needed to describe the position and orientation of an object in space. • Divide movement into two types: – Translational (think of side to side, laterally) – Rotational (think of twisting)

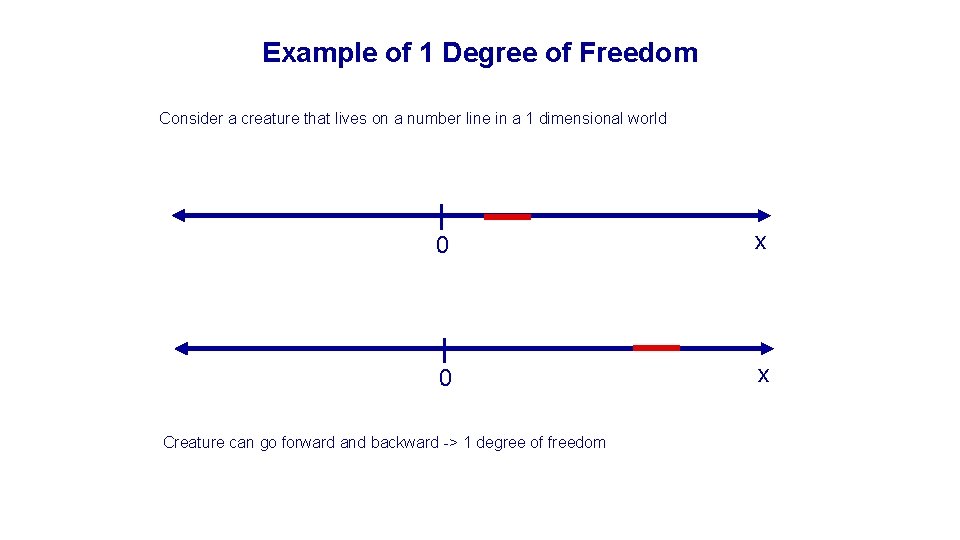
Example of 1 Degree of Freedom Consider a creature that lives on a number line in a 1 dimensional world 0 x Creature can go forward and backward -> 1 degree of freedom

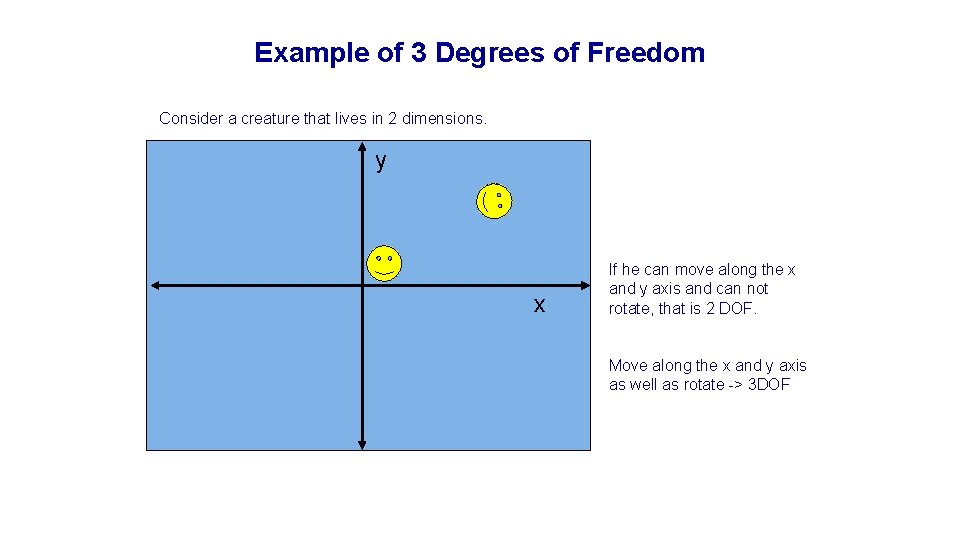
Example of 3 Degrees of Freedom Consider a creature that lives in 2 dimensions. y x If he can move along the x and y axis and can not rotate, that is 2 DOF. Move along the x and y axis as well as rotate -> 3 DOF

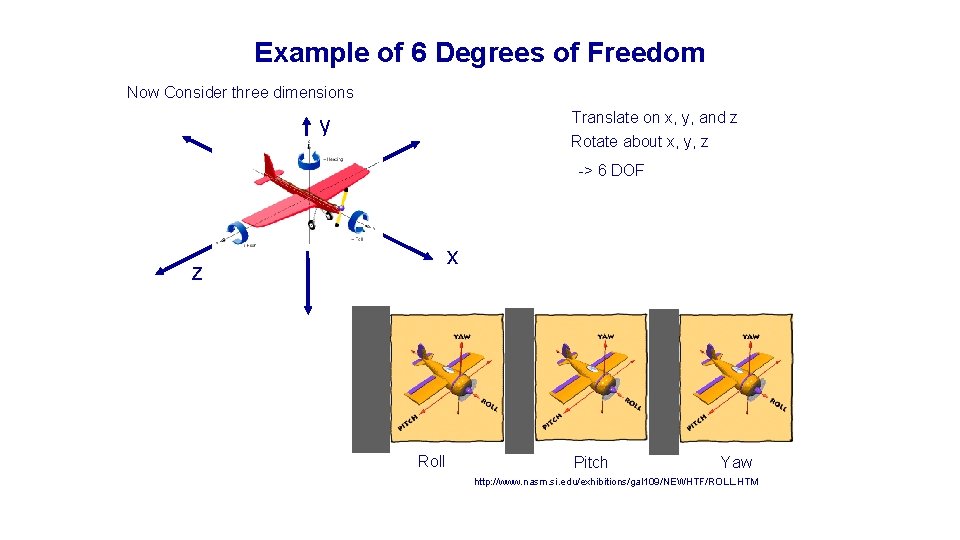
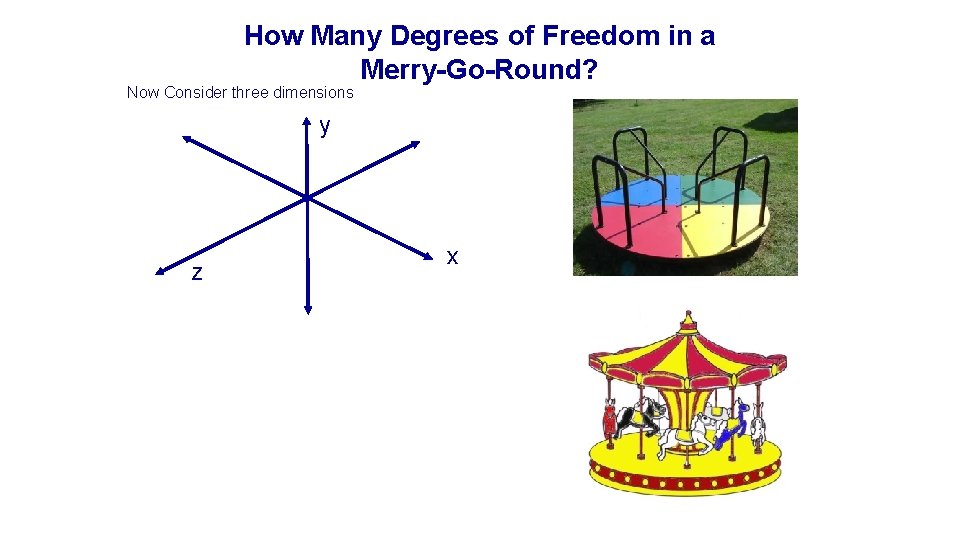
Example of 6 Degrees of Freedom Now Consider three dimensions Translate on x, y, and z y Rotate about x, y, z -> 6 DOF x z Roll Pitch Yaw http: //www. nasm. si. edu/exhibitions/gal 109/NEWHTF/ROLL. HTM

How Many Degrees of Freedom in a Merry-Go-Round? Now Consider three dimensions y z x

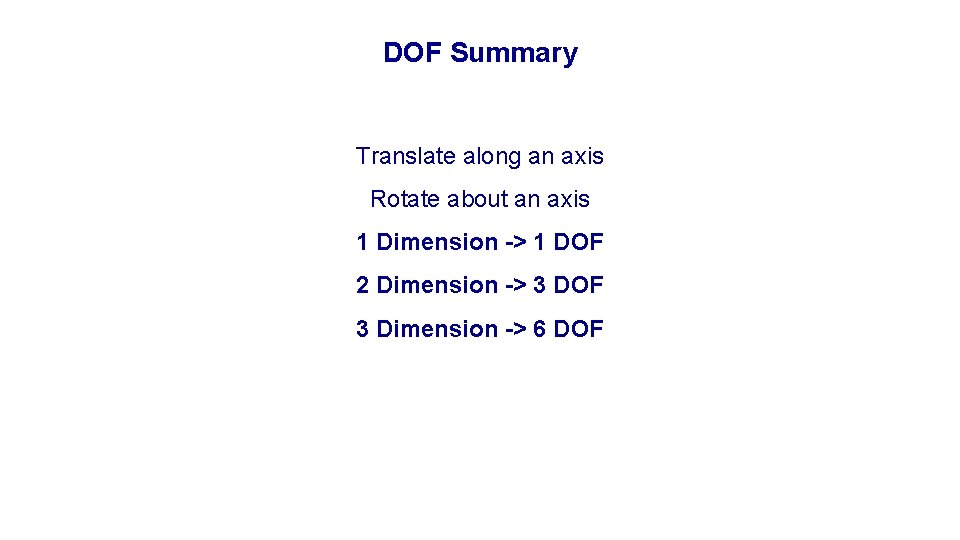
DOF Summary Translate along an axis Rotate about an axis 1 Dimension -> 1 DOF 2 Dimension -> 3 DOF 3 Dimension -> 6 DOF

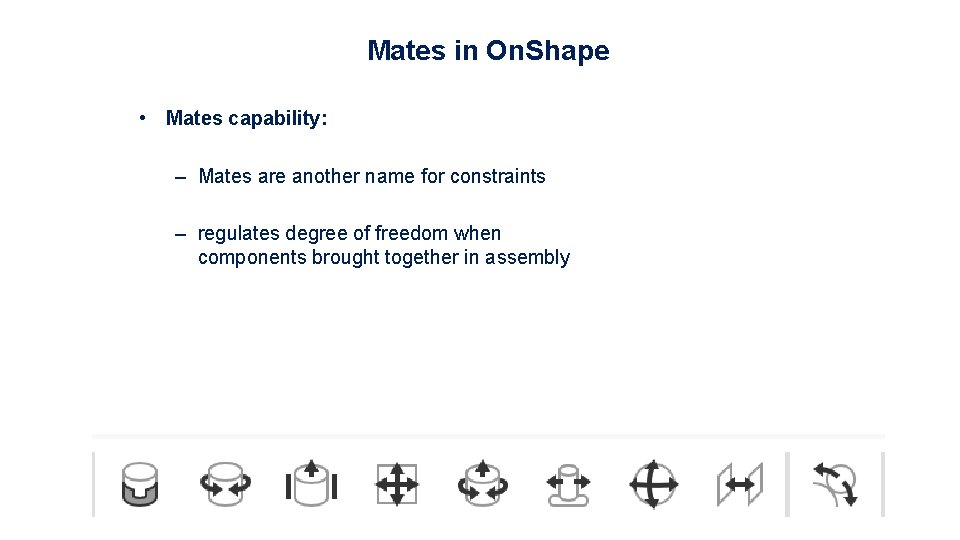
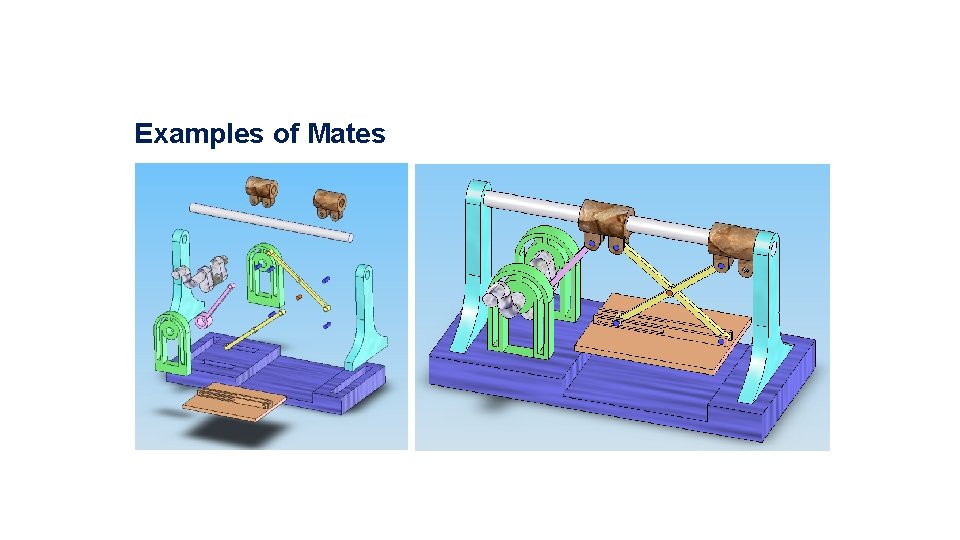
Mates in On. Shape • Mates capability: – Mates are another name for constraints – regulates degree of freedom when components brought together in assembly

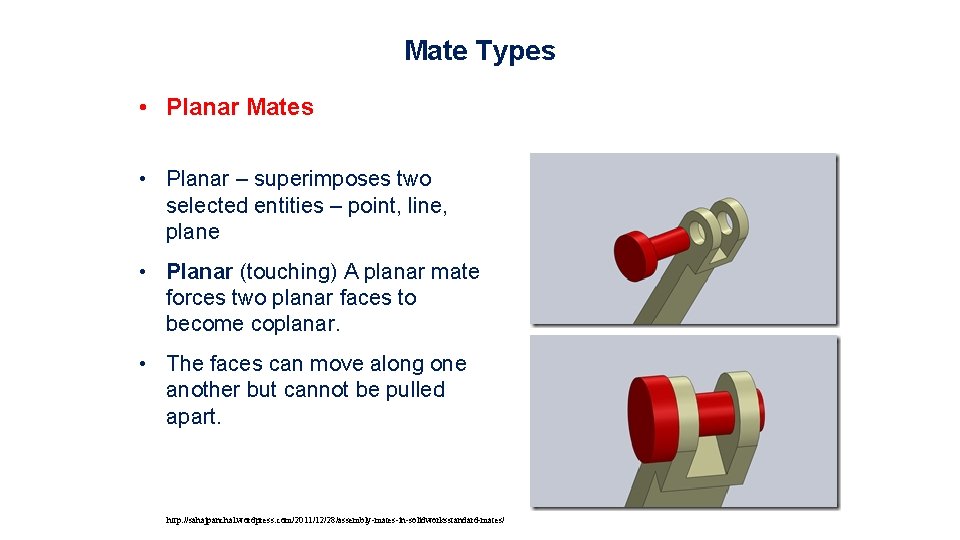
Mate Types • Planar Mates • Planar – superimposes two selected entities – point, line, plane • Planar (touching) A planar mate forces two planar faces to become coplanar. • The faces can move along one another but cannot be pulled apart. http: //sahajpanchal. wordpress. com/2011/12/28/assembly-mates-in-solidworksstandard-mates/

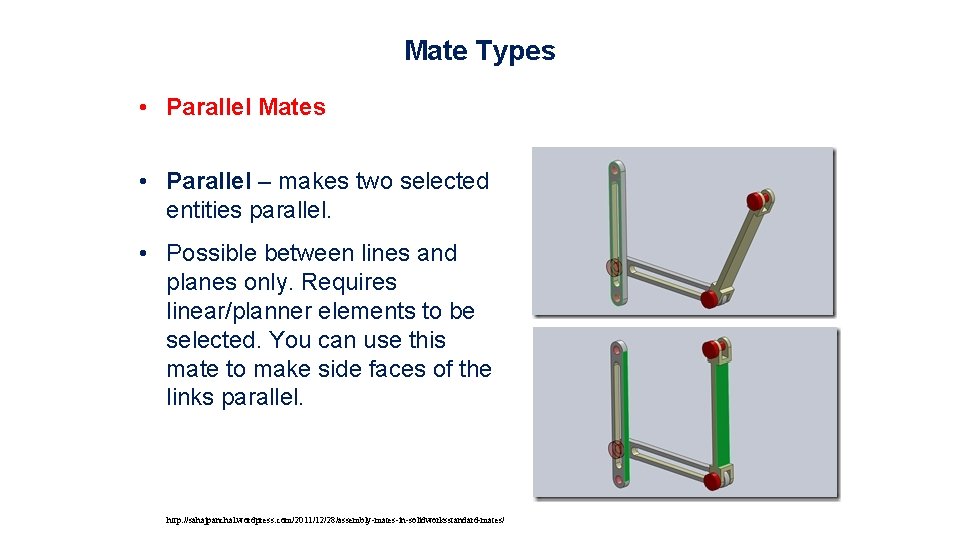
Mate Types • Parallel Mates • Parallel – makes two selected entities parallel. • Possible between lines and planes only. Requires linear/planner elements to be selected. You can use this mate to make side faces of the links parallel. http: //sahajpanchal. wordpress. com/2011/12/28/assembly-mates-in-solidworksstandard-mates/

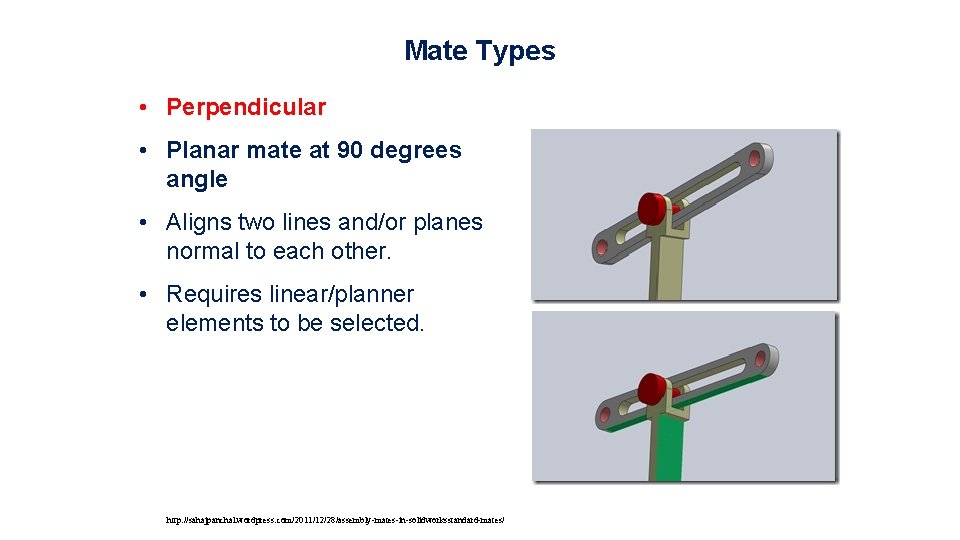
Mate Types • Perpendicular • Planar mate at 90 degrees angle • Aligns two lines and/or planes normal to each other. • Requires linear/planner elements to be selected. http: //sahajpanchal. wordpress. com/2011/12/28/assembly-mates-in-solidworksstandard-mates/

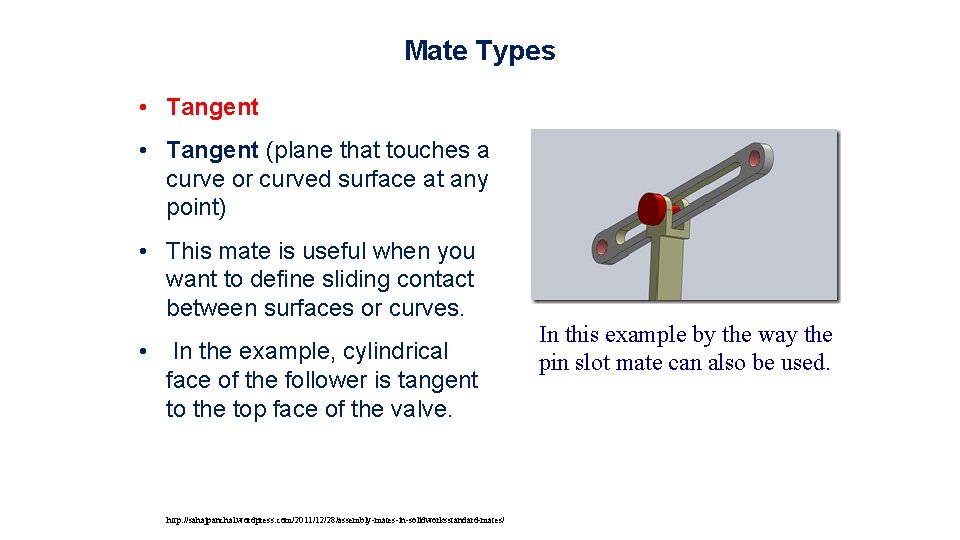
Mate Types • Tangent (plane that touches a curve or curved surface at any point) • This mate is useful when you want to define sliding contact between surfaces or curves. • In the example, cylindrical face of the follower is tangent to the top face of the valve. http: //sahajpanchal. wordpress. com/2011/12/28/assembly-mates-in-solidworksstandard-mates/ In this example by the way the pin slot mate can also be used.

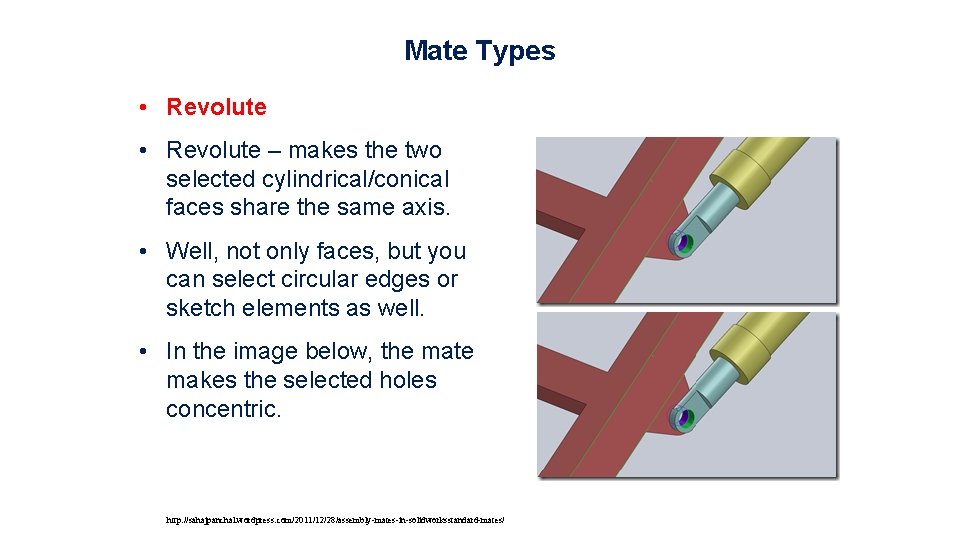
Mate Types • Revolute – makes the two selected cylindrical/conical faces share the same axis. • Well, not only faces, but you can select circular edges or sketch elements as well. • In the image below, the mate makes the selected holes concentric. http: //sahajpanchal. wordpress. com/2011/12/28/assembly-mates-in-solidworksstandard-mates/

Examples of Mates

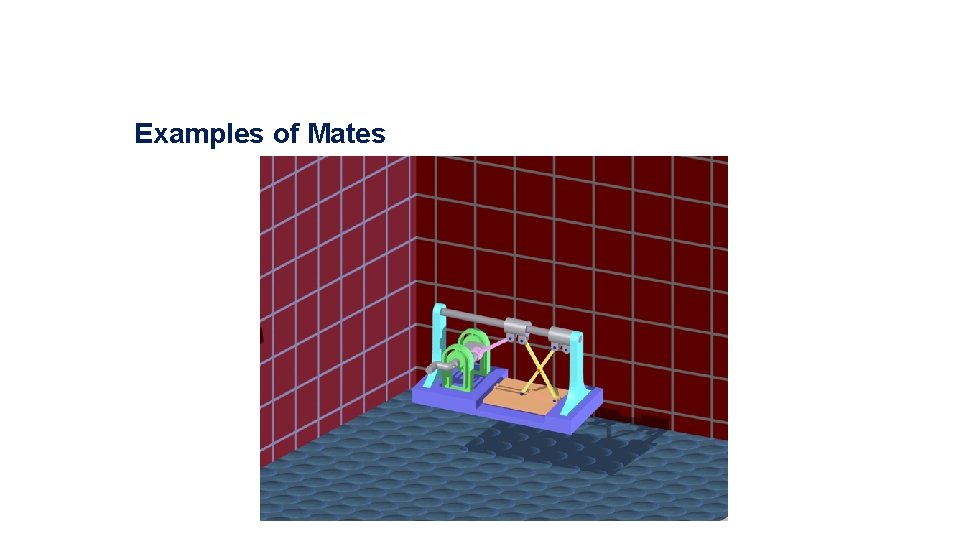
Examples of Mates

This Week’s Lab • Completing exercises related to auxiliary views, and cross-sections, as well as creating assemblies in Solid. Works • BRING: pencil, eraser, graph paper, plain paper, and textbook. • Assigned readings: – Auxiliary Views: Chapter 6 6. 1 to 6. 2. 7 and 6. 3. 4 – Cross-sections: Chapter 8 8. 1 -8. 2 and 8. 4. 1 -8. 4. 6