SITEFINITY TRAINING NORWAY SWEDEN AND DENMARK January 2015


- Slides: 67

SITEFINITY TRAINING – NORWAY, SWEDEN AND DENMARK January 2015 Delivering Transformation. Together.

OVERVIEW 10 am Intro to Sitefinity Adding Dynamic content Accessing the system Presentation – Press releases, publications, success stories, videos, events Backoffice / front office Static content / dynamic content 11. 30 break 11. 45 Adding static content on the back office Presentation exercise based on your content 13. 00 lunch Exercise 14. 00 Linking dynamic content to a static page presentation 16. 00 Newsroom How it works on corporate Discussion about how your newsroom could work 17 h finish Accessibility 2

BEFORE WE START! 1. This is a new site with a new CMS and a new organisation with new processes 2. Accessibility – I know! 3. There is no such thing as a silly question! - Ask questions, discuss ideas, brainstorm and plan future enhancements 4. If I dont know the answer to a question I will either: 1. 2. 3. Work it out with you Make a note and ask Loris Make a note and ask Coralie (if branding or structure etc) 5. SHOUT! if I talk too much, too fast or for too long or if you need a break!

WHO IS WHO? Celine Dojwa – Director of Group Comms Coralie Bitan – Deputy Comms director – leading Digital and Events Loris Herveux – Web developer, Francoise Van Craeynest , Jessica Michel, Adam De Vile… Elham – internal comms Jennifer – returning on 27 January Patricia - events 4 Title presentation

FLIP CHART Questions that can’t be answered or need to be parked Actions Ideas Strange things to be corrected – words in French or English 5

INDIA There are only 3 in the team to support all Steria sites (except corporate and UK) They can help content loading of static content and dynamic content. They cannot do development and wont have admin access They don’t provide day to day support – ie ‘can you just change a typo’. They currently wont be available after June All requests, in the first instance, to come via Adam Hanne to send ADV a plan for outlining what loading you need help with and when over the next X weeks. 6

YOUR VISION What is your vision for the three sites? 7

BY THE END OF THE DAY/TOMORROW MORNING Train you on sitefinity so that you can start planning and creating your sites Understand what development needs you have for the site Have a clear picture as to what your structure will be Understand how you will develop your content Have all the basic information I need for the Nordic briefing document 8

INTRO TO SITEFINITY 9 Title presentation

WHAT IS SITEFINITY? Sitefinity is a multilingual CMS based on Microsoft ASP. Net technology. It enables the updating of content from a platform that is accessible via the Internet and is secured by means of a password. Content is uploaded directly via the website. Sitefinity is compatible with all browsers (Internet Explorer, Firefox, Chrome etc. )

ACCESSING SITEFINITY Main site: http: //www. soprasteria. no/new_home Access to the backend: www. soprasteria. com/Sitefinity Enter your username (firstinitialsurname) and soprasteria 123 (your access level will give you access to the three sites (unless you prefer not to) Day to day support available from Adam De Vile in first instance via lync, email or phone. You may receive a security warning. eg in Firefox. You need to select ‘trust connection’ or add certificates.

SITEFINITY Two approaches to content modification Back office Front office to be used only for correcting text

SITEFINITY • On Sitefinity, there is a distinction between two types of content: Static content - Pages (standard pages, e. g. About us, markets, Solutions, newsroom etc. ) Dynamic content - Content, also referred to as “Sopra Steria Contents” (news, events, success stories, white papers etc. ) using specific widgets. • Dynamic and static content must be uploaded from the back-office. • Only the modification of static data can be realised from the front-office.

ADDING STANDARD STATIC PAGES 14 Title presentation

WHAT ARE STANDARD PAGES? On Sitefinity, pages are composed of a menu and the associated pages The pages can then be made up of lists, texts, images, forms etc. Pages can be organised by means of drag & drop or on the basis of their properties, which are accessible while editing the page.

STANDARD PAGES To create a standard page, you need to define an image for the top banner, before you create the page. The creation of a page then requires several parameters: The name of the page (name that will appear in the navigation bar), Its position within the navigation bar (main/secondary), Whether this page should appear in the navigation bar, Whether it is only used to group together several pages, Whether this page should redirect to another page (web page or an external page on the site) The title to appear in the browser address bar, as well as in search engines (by default, this field matches the name of the page), The page template to be used if you want to add content to it. A box for ‘Description’ and ‘ ’Keywords’ - important for SEO Various advanced options

STANDARD PAGES (2) Here we can see the box for editing core content using the "Content block" widget. Upon opening, an html editor is provided, enabling you to enter content and to format it using the button bar. As with most CMS’s it is best to copy and paste in to notepad before going copying to Sitefinity. Once the text has been entered, click on the "Save" button. While the page is still yet to be published, this remains invisible to the eyes of the users.

PREVIEWING AND PUBLISHING STANDARD PAGES Once you have finished entering your text, use the "Preview" button at the top of the page to display the page inside the site, as it will appear to a standard Internet user. To validate the changes, click on the "Publish" button. This will activate the menu in the navigation bar and will make this page accessible to all Internet users. It is also possible to time delay your updates or page

USING THE FRONT OFFICE In order to be able to make changes directly in the pages of the site, you will have to connect to the platform beforehand. Once connected, a small "Tools" box will appear on the right-hand side of your site. By clicking on it, a second box will offer you the choice to either: • display the editing tools (for the purpose of making changes directly on the site), • modify the page in back-office. • deconnect

MANAGEMENT OF CONTENT FRONT OFFICE By selecting the first option, the page will refresh and the editable content will change in to yellow. By selecting the first option, the page will reload, now featuring various "Edit" buttons, which thus enable you to edit the content. It is possible to save as draft or publish your content direct. Click on ‘quit editing’ to return to the live page.

HOW TO CREATE A STANDARD PAGE

CREATING A STANDARD PAGE WITH A BANNER Ensure your header image is 1005 x 600 px Go to ‘Content/Images’ Open the library ‘Banners’ and click on ‘upload images’ In the section ‘Categories and tags’, define a tag eg ‘Aerospace’ or ‘banking’ relevant to the subject of your page. Click on ‘upload and publish’ and then return to ‘pages ’ list Category tags are very important. Without them Sitefinity does not work properly. TAGS should follow the subject of the page

CREATING A PAGE • Level 2 - Click on the button ‘Create a page’ at the top of the screen • Level 3 - Select a page and click on the button ‘Create a child page of the selected page’

CREATING A STANDARD PAGE Complete the different fields: Name Check the place of the page in the structure Title of the page (for navigation and search engine) Template used Description of the page Keywords Click on the button ‘Select another template’ and select the template ‘Sopra Steria Page No’ (select the template ‘Sopra Steria Page(no img) No’ if for level 3 pages. ) Click on the button ‘Create and add content’ to save

CREATING A STANDARD PAGE On the left you can see the page in the process of being edited, and on the right a list of objects that we call widgets.

EDITING A STANDARD PAGE By default, the templates proposes 3 pre configured widgets Gallery Image‘, ‘Content Block’ and ‘Aside’ To edit the gallery image widget, in the option ‘Narrow selection’ select the image tag you uploaded before and click on ‘save’ To edit the header content change the title ‘Aeroline’ with the relevant title BUG ALERT – once you edit the text and image, you cannot edit again. Only ‘admins can

EDITING A STANDARD PAGE • To add your main content, select the widget ‘Content Block’ and move it to the zone ‘Main Content’. • Adding content to the right column will be covered later on. • Click on the preview button to see your new page • Click on ‘publish’ to save your page • The button ‘save as a draft’ allows you to save your page and return to it later.

EXERCISE 1 Pick an existing standard page from your current site eg Steria. com/no Find an appropriate image for the header (on google if you don’t have one) Create a standard page Change the header text Copy and paste some main content in to the new page. 28 Title presentation

MANAGEMENT OF DYNAMIC CONTENT 29 Title presentation

WHAT IS DYNAMIC CONTENT? Events, PRs, publications, success stories, 3 minute guides videos etc – all the content you would see in your newsroom Dynamic content is created using Sopra Steria widgets. That have defined settings built in. The editing of Sopra Steria Contents is relatively simple - all you have to do is fill in the pre-set fields: Title, Sub-title, Abstract, Text, Image, Associated document, Type of content, Homepage etc. In order to view the content in the page, click on the "Save as draft" button. From this list, click on the created content and then click on the "Preview" button. If the result is satisfactory, validate the content by clicking on "Publish".

PREPARING YOUR DYNAMIC CONTENT Loading and publishing dynamic content on sitefinity is done in a different way to other CMS’s eg typo 3. On Typo 3 a publications, for example, can be loaded direct to the relevant page, or to a central media library then linked to. On Sitefinity, all dynamic content needs to be loaded centrally in the ‘contents/sopra stera contents’ area first. Then linked to from relevant pages. You therefore have to prepare your content and load it centrally with relevant key tags, images etc, and using the relevant list templates.

HOW TO CREATE DYNAMIC CONTENT

MANAGEMENT OF CONTENT BACK OFFICE – CONTENT The site features various dynamic content: - Press releases, Brochures/publications Success Stories Events, Free text boxes All of this content will be accessible from one single type of content, "Sopra Steria Contents".

UPLOADING A PRESS RELEASE Liste des champs nécessaires : Title Abstract (summary) Content Type Document to download Tag (useful for linking to a static page)

PRESS RELEASES Title Document to download Abstract Date inclus dans Content

UPLOADING A PRESS RELEASE Go to ‘content/sopra steria content. Click on ‘create a sopra content’ You will then see a form to fill in Add the PR title in the title field (sub title doesn’t do anything) In ‘Abstract’ add the PR summary In ‘content’ add the full text In ‘content type’ select ‘Pressemeldinger’ Add a tag (same as subject) if you want it to appear on a static page PRs will not automatically appear on the newsroom or homepage, unless you tell them via ‘visibility’ If you want to insert a date, insert it in to the content field. For the date use the colour « #d 4002 e » Under ‘links’ you can add a downloadable pdf of the release and/or a publication associated. Under ‘more options’ you can change the PR url. Which can be useful for promoting the link on Twitter. Then press ‘publish’ Tag is important for linking to content

UPLOADING A PUBLICATION From the home page of sitefinity Go to ‘content/sopra steria content’. You will then see a list of all your dynamic content Click on ‘create sopra content’ You will then see a form to fill in Add the publication title in the title field Under ‘media’ you can add a thumbnail In ‘classifications’ select ‘content type ‘Brosjyre’ ‘Give the publication the same tag as the subject so that you can link to it from the static page Under ‘links’ you can add a downloadable pdf of publication Under ‘more options’ you can change the url if needed Then press ‘publish’

UPLOADING A SUCCESS STORY Fields: Title Abstract (summary) Content Images (via Additional fields) Content Type Domaine (subject area) Client (via ‘Success Stories’ field) Document to download Success Stories can either be set to open direct to a PDF or open a web page or both

SUCCESS STORY Titre : auto format Abstract : auto format Content : Classic format Image : size : 124 x 220 px Content Type = Suksesshistorier Domaine : the sector or market for the success story. Client : the client name Visibility

UPLOADING A SUCCESS STORY Go to ‘content/sopra steria content’. You will then see a list of all your dynamic content Click on ‘create sopra content’ You will then see a form to fill in Add the Success Story title in the title field If you want a web page version and the text in ‘content’ Add an image under ‘media’ it will then be shown on the static page In ‘classifications’ select ‘Suksesshistorier’ In Category select the relevant industry eg ‘retail’ The ‘tag’ should be the same as the industry or solution the Success Story is for eg ‘retail’. Check that the tag already exists. If not create one. There is then a drop down menu called ‘Success Stories’ click on it and add the name of the client Under ‘links’ you can add a downloadable pdf of publication Under ‘more options’ you can change the url if needed Then press ‘publish’

UPLOADING A VIDEO • • Go to ‘content/sopra steria content’. Click on ‘create sopra content’ You will then see a form to fill in – Add the video title in the title field – Under ‘media’ add an image to be shown on the static page – Add the you tube link for your video – OR If your audience might have You Tube blocked you can add a local copy of the video under ‘Videéo sur serveur’ ‘select video’ and then ‘upload a video’. It must be MP 4 format – In ‘classifications’ select ‘video’ – The ‘tag’ should be the same as the industry or solution the video is for eg ‘retail’. Check that the tag already exists. If not create one. – Under ‘more options’ you can change the url if needed Then press ‘publish’ Videos for soprasteria. com should be hosted on You Tube. However we realise that some people cannot access You Tube. 335 px x 298 px

ADDING EVENTS Fields Title Content Event Start Event End Type of event

ADDING EVENTS From the main content menu, select ‘Events’ Add a title Add content Event start date – Select the start date of your event Event finish date – Select the finish date of your event You can also select ‘all day’

EXERCISE 2 Pick an existing PR, publication, event or success story from the your Steria site Recreate it on the new sitefinity newsroom 44 Title presentation

ADDING DYNAMIC CONTENT TO A STATIC PAGE 45 Title presentation

ADDING DYNAMIC CONTENT TO A STATIC PAGE

CONFIGURING A SOPRA STERIA CONTENT WIDGET Go to your static page, then drag the ‘sopra widget’ from the right to the ‘aside’ area of the page. The widget "Sopra Contents" will list all input information listed in the back office under "Content / Sopra Steria Contents". The first tab will allow us to filter the content that we want to appear

CONFIGURING A SOPRA STERIA CONTENT WIDGET The second tab allows you to change the settings of a listing • The third tab allows you to define how the list will be shown

ADDING A PRESS RELEASE WIDGET TO A STATIC PAGE

ADDING A PUBLICATIONS WIDGET TO A STATIC PAGE

ADDING A SUCCESS STORY WIDGET ON A STATIC PAGE

ADDING A FREE TEXT BLOCK TO A RIGHT COLUMN • You can add a free text box for: • • • A link to a site A specific contact box etc • Select the ‘Content Block’ widget • Place it in the ‘Aside’ area

FREE TEXT AREA (CONTINUED) • Click on ‘edit’ and enter content • To add a link To view the link as a button to create the link , click on "More Options" and in the " Css. Class " enter: _btn

FREE TEXT AREA (CONTINUED) • Then click on the ‘advanced’ button • In the new window , go to the field ‘Css. Class ’ and replace ‘sf. Content. Block’ with ‘‘brick _white’ • Click on save’ to save those settings and then save the whole page to see the new format

EXERCISE 3 Go back to the static page you created earlier. And try to link publish the content you created in exercise 2 to the right column. 56 Title presentation

HOMEPAGE, NEWSROOM AND INTRO PAGES 57 Title presentation

Updating your homepage Be careful – there are 2 home pages The homepage is divided in to 3 zones : In each zone you have a main banner and image The main image size is 1005*1100 px You will need to ensure that the text box does not block important parts of your image

UPDATING YOUR HOMEPAGE 1 2 3 4

HOMEPAGE

HOME PAGE ZONES

UPLOADING A MAIN HOME PAGE IMAGE The image must measure : 1005*1100 px Go to ‘Content/Images Open the folder ‘Banners’ Click on ‘Upload images’ and upload your image then press publish Open the image you just created. Add a title (this is the title that will appear in the black box on the home page) Add a descriptive text in ‘Alternative Texte’, In the section ‘categories and tags’ select ‘selection’ then ‘either Section 1, Section 2 or Section 3 depending on which zone you want the image), Add a link for the story Select the button ‘Target’ You can change the button text if you want Click on ‘publish’

Homepage – blocks Blocks can be manual free text content or automated dynamic content Orange - The twitter block can be configured to show the last tweet (but needs specific coding) Red boxes are publications Block 1: Automatically lists the last Press release that has been selected (visible / homepage’ on the release. Block 2 : Automatically lists all the events which have been selected ‘Visibilité : Homepage’ Block 3 : Automatically lists the last document which has ‘Visibilité : Homepage’ selected Block 4 : Automatically lists the last ‘Sopra Steria Content’ video that has ‘visabilty / Homepage’ selected. If no content exists, the block on the left with spread across both areas

HOMEPAGE Discussion 64

INTRO/LANDING PAGES 65

NEWSROOM Discussion First impressions How to adapt it to fit the German newsroom Technical requirements 66

AND FINALLY…. Prepare your content before hand, text, header images, brochure thumbnails, links etc Think about tags Dont import an HD image if it will only be a thumbnail If you are not sure, ask Adam.

WHAT HAPPENS NOW Briefing document Things for Adam to do: Development needs • Add Search 3 minute guides Anything else? filters Categories, types of content, domains India help Structure and content Any new plans for careers Other local sites 68 • Follow us links • Add Site map • Legal for local editing
 Sweden and norway use equal quantities of resources
 Onenote asana
 January 29 2015
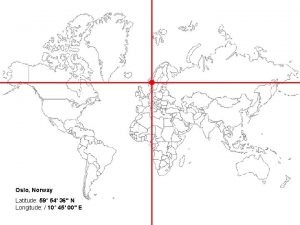
 Oslo longitude and latitude
 Living and working in norway
 Iso 9001 presentation
 Iso awareness training for employees
 17 elements of iso 14001
 Ministry of food agriculture and fisheries denmark
 Sollentuna prison sweden
 Norway water resources
 Vikings mc norway
 Imdi norway
 Russ knots
 Map of norway with major cities
 Michael reiertsen
 Norint0500
 Religion in norway
 Ncis
Ncis Norway currency
 Popultion of norway
 Norway ppp
 Western norway university of applied sciences
 Bixter training germany
 Dt kontakt kjell
 Pluralisation
 Homelessness in norway
 Spectacular norway base jumping
 Geodata norway
 Pretec group as
 Atlanterhavsveien
 Kristian jong høines
 Norway welfare
 Office of the auditor general of norway
 Digitalization of infrastructure
 Ginnungagap ro
 Europess
 Lars ailo bongo
 Wind power norway
 Caa norway
 Dressmann finland
 Months of the year december
 April may june july
 Ophelia monologue o my lord
 Tefl denmark
 Number the stars chapter 17
 Famous people from denmark
 Dpa system
 Whychristmas.com denmark
 Characters of hamlet
 Denmark kangaroo orange implicit bias
 Animation workshop denmark
 Holger christiansen as
 Payday loan in denmark
 Nrna membership fee
 He is the prime developer of natural gymnastics.
 Denmark vesey
 Denmark airspace
 Denmark vesey
 American landrace origin
 Denmark
 Denmark education statistics
 For adult
 Denmark support
 Denmark kot
 Digital audio denmark
 Capital of denmark
 Demographic transition model

