UNIT4 SOFTWARE TESTING What is Testing Many people


 consists of three stages that")


 is the phase in software testing in")


:")


 UNDERSTAND THE SOURCE CODE • The tester must be very knowledgeable in")
 CREATE TEST CASES AND EXECUTE • Writing more code to test the")


: To calculate Statement Coverage, find out the shortest number")

 and")


 for variable x is a pair of")


 Req. ID Description Priority (High, Medium, Low) Test Conditions Test Case")

 • Experience shows that test cases that are close to")


 of the dynamic behavior of")


 • Review is “a process of meeting during which")


 actively records all issues that")


- Slides: 157
UNIT-4 SOFTWARE TESTING
What is Testing? Many people understand many definitions of testing- 1. Testing is the process of demonstrating that errors are not present. 2. The purpose of testing is to show that a program performs its intended functions correctly. 3. Testing is the process of establishing confidence that a program does what it is supposed to do. These definitions are incorrect.
What is Testing? A more appropriate definition is“ Testing is the process of executing a program with the intent of finding errors “.
Why should we test? • Although software testing is itself an expensive activity, yet launching of software without testing may lead to cost potentially much higher than that of testing, specially in system where human safety is involved. • In the software life cycle, the earlier the errors are discovered and removed, the lower is the cost of their removal.
Who should do the testing? • The testing requires the developers to find errors from their software. • It is very difficult for software developer to point out errors from own creations. • Many organizations have made a distinction between development and testing phase by making different people responsible for each phase.
What should we test? • We should test the program’s responses to every possible input. • It means, we should test for all valid and invalid inputs.
Testing Objectives • Software Testing has different objectives. The major objectives of Software testing are as follows: 1. Finding defects which may get created by the programmer while developing the software. 2. To make sure that the end result meets the user requirements. 3. To ensure that it satisfies the SRS that is System Requirement Specifications. 4. To gain the confidence of the customers by providing them a quality product.
Principles of Software Testing 1. 2. 3. 4. 5. 6. 7. Testing shows presence of defects. Exhaustive testing is impossible Early testing Defect clustering The Pesticide Paradox Testing is context dependent Absence of errors fallacy.
Other principles are • Testing must be done by an independent party. • Assign best personnel to the task. • Test for invalid and unexpected input conditions as well as valid conditions. • Keep software static during test. • Provide expected test results if possible.
1. TESTING SHOWS THE PRESENCE OF BUGS Testing an application can only reveal that one or more defects exist in the application, however, testing alone cannot prove that the application is error free. Therefore, it is important to design test cases which find as many defects as possible. 2. EXHAUSTIVE TESTING IS IMPOSSIBLE Unless the application under test has a very simple logical structure and limited input, it is not possible to test all possible combinations of data and scenarios. For this reason, risk and priorities are used to concentrate on the most important aspects to test. 3. EARLY TESTING The sooner we start the testing activities the better we can utilize the available time. As soon as the initial products, such the requirement or design documents are available, we can start testing. It is common for the testing phase to get squeezed at the end of the development lifecycle, i. e. when development has finished, so by starting testing early, we can prepare testing for each level of the development lifecycle. Another important point about early testing is that when defects are found earlier in the lifecycle, they are much easier and cheaper to fix. It is much cheaper to change an incorrect requirement than having to change a functionality in a large system that is not working as requested or as designed!
4. DEFECT CLUSTERING During testing, it can be observed that most of the reported defects are related to small number of modules within a system. i. e. small number of modules contain most of the defects in the system. This is the application of the Pareto Principle to software testing: approximately 80% of the problems are found in 20% of the modules. 5. THE PESTICIDE PARADOX If you keep running the same set of tests over and over again, chances are no more new defects will be discovered by those test cases. Because as the system evolves, many of the previously reported defects will have been fixed and the old test cases do not apply anymore. Anytime a fault is fixed or a new functionality added, we need to do regression testing to make sure the new changed software has not broken any other part of the software. However, those regression test cases also need to change to reflect the changes made in the software to be applicable and hopefully fine new defects. 6. TESTING IS CONTEXT DEPENDENT Different methodologies, techniques and types of testing is related to the type and nature of the application. For example, a software application in a medical device needs more testing than a games software. More importantly a medical device software requires risk based testing, be compliant with medical industry regulators and possibly specific test design techniques. By the same token, a very popular website, needs to go through rigorous performance testing as well as functionality testing to make sure the performance is not affected by the load on the servers. 7. ABSENCE OF ERRORS FALLACY Just because testing didn’t find any defects in the software, it doesn’t mean that the software is ready to be shipped. Were the executed tests really designed to catch the most defects? or where they designed to see if the software matched the user’s requirements? There are many other factors to be considered before making a decision to ship the software. If the system built is unusable and does not fulfil the user’s needs and expectations then finding and fixing defects does not help.
• Other principles to note are: – Testing must be done by an independent party. Testing should not be performed by the person or team that developed the software since they tend to defend the correctness of the program. – Assign best personnel to the task. Because testing requires high creativity and responsibility only the best personnel must be assigned to design, implement, and analyze test cases, test data and test results. – Test for invalid and unexpected input conditions as well as valid conditions. The program should generate correct messages when an invalid test is encountered and should generate correct results when the test is valid. – Keep software static during test. The program must not be modified during the implementation of the set of designed test cases. – Provide expected test results if possible. A necessary part of test documentation is the specification of expected results, even if providing such results is impractical
Some Terminologies Error: It is the human action that produces the incorrect result that produces a fault. Bug: The presence of error at the time of execution of software. Fault: State of software caused by an error. Failure: Deviation of the software from its expected result. It is a failure.
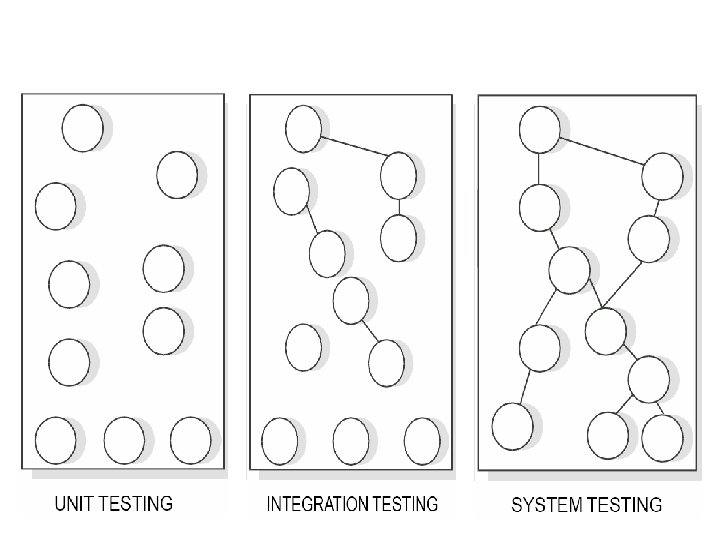
Software Testing Process The most widely used testing process(levels) consists of three stages that are as follows: 1. Unit Testing 2. Integration Testing 3. System Testing
Unit Testing • Unit testing is a method by which individual units of source code are tested to determine if they are fit for use. • A unit is the smallest testable part of an application like functions, classes, procedures, interfaces. • Unit tests are basically written and executed by software developers to make sure that code meets its design and requirements and behaves as expected. • The goal of unit testing is to segregate each part of the program and test that the individual parts are working correctly. • This means that for any function or procedure when a set of inputs are given then it should return the proper values. It should handle the failures gracefully during the course of execution when any invalid input is given.
Advantages of Unit Testing 1. Issues are found at early stage. Since unit testing are carried out by developers where they test their individual code before the integration. Hence the issues can be found very early and can be resolved then and there without impacting the other piece of codes. 2. Unit testing helps in maintaining and changing the code. This is possible by making the codes less interdependent so that unit testing can be executed. Hence chances of impact of changes to any other code gets reduced. 3. Since the bugs are found early in unit testing hence it also helps in reducing the cost of bug fixes. Just imagine the cost of bug found during the later stages of development like during system testing or during acceptance testing. 4. Unit testing helps in simplifying the debugging process. If suppose a test fails then only latest changes made in code needs to be debugged.
Component Testing • It is also called as module testing. • The basic difference between the unit testing and component testing is in unit testing the developers test their piece of code but in component testing the whole component is tested. • There are problems associated with testing a module in isolation. • How do we run a module without anything to call it, to be called by it or, possibly, to output intermediate values obtained during execution?
Stubs and drivers • One approach is to construct an appropriate driver routine to call it and, simple stubs to be called by it, and to insert output statements in it. • Stubs serve to replace modules that are subordinate to (called by) the module to be tested. A stub or dummy subprogram uses the subordinate module’s interface, may do minimal data manipulation, prints verification of entry, and returns.
• Component testing may be done in isolation from rest of the system depending on the development life cycle model chosen for that particular application. • In such case the missing software is replaced by Stubs and Drivers and simulate the interface between the software components in a simple manner. • Let’s take an example to understand it in a better way. Suppose there is an application consisting of three modules say, module A, module B and module C. The developer has developed the module B and now wanted to test it. But in order to test the module B completely few of it’s functionalities are dependent on module A and few on module C. But the module A and module C has not been developed yet. In that case to test the module B completely we can replace the module A and module C by stub and drivers as required.
Stubs and drivers • Driver: Driver – A driver calls the component to be tested – A component, that calls the Tested. Unit • Stub: – A stub is called from the software component to be tested – A component, the Tested. Unit depends on – Partial implementation – Returns fake values. Tested Unit Stub
Stubs �Stub – the dummy modules that simulates the low level modules. Stubs are always distinguish as "called programs“. Test stubs are programs that simulate the behaviors of software components that a module undergoing tests depends on. Test stubs are mainly used in top-down approach. Stubs are computer programs that act as temporary replacement for a called module and give the same output as the actual product or software.
Drivers • Driver – the dummy modules that simulate the high level modules. • Drivers are also considered as the form of dummy modules which are always distinguished as "calling programs”, that is handled in bottom up integration testing, it is only used when main programs are under construction.
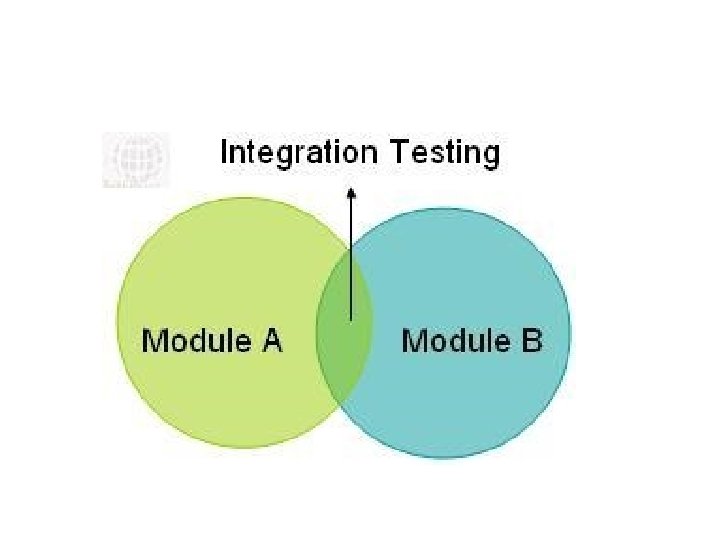
What Is Integration Testing? �Integration testing ("I&T") is the phase in software testing in which individual software modules are combined and tested as a group. �It occurs after unit testing and before system testing. �Integration testing takes as its input modules that have been unit tested, groups them in larger aggregates, applies tests defined in an integration test plan to those aggregates, and delivers as its output the integrated system ready for system testing.
Integration Testing Strategy • The entire system is viewed as a collection of subsystems. • The Integration testing strategy determines the order in which the subsystems are selected for testing and integration– – – Big bang integration (Non incremental) Incremental integration Top down integration Bottom up integration Sandwich testing
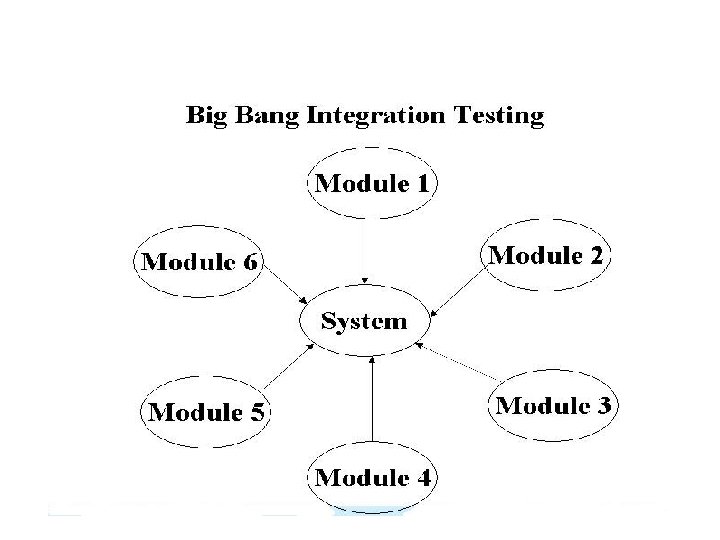
Big Bang Integration • All the components of the system are integrated & tested as a single unit. • Instead of integrating component by component and testing, this approach waits till all components arrive and one round of integration testing is done. • It reduces testing effort, and removes duplication in testing.
A Big-Bang Approach B Test A Test B E Test C Test D Test E Test F Test G Test A, B, C, D, E, F, G C F D G
Advantages and Disadvantages • The only advantage is that – for a small system this will be ideal integration testing technique. • The disadvantages is that – you would have to wait for all the modules to be integrated, so there will be quite a lot of delay. • Errors are identified at a very late stage and it is very hard to identify the fault.
Incremental Integration • The incremental approach means to first combine only two components together and test them. Remove the errors if they are there, otherwise combine another component to it and then test again, and so on until the whole system is developed. • In this, the program is constructed and tested in small increments, where errors are easier to isolate and correct.
Top-down Testing Strategy • Test the top layer or the controlling subsystem first • Then combine all the subsystems that are called by the tested subsystems and test the resulting collection of subsystems • Do this until all subsystems are incorporated into the test • Stubs are needed to do the testing.
A Top-down Integration B E Test A Layer I Test A, B, C, D Layer I + II C F Test A, B, C, D, E, F, G All Layers D G
Top-down Integration • Interfaces can be tested in various orders: -Breadth First Integration(B-C-D, E-F-G): This would integrate all components on a major control path of the structure. -Depth First Integration (A-B-E, A-B-F): This incorporates all components directly subordinate at each level, moving across the structure horizontally.
Advantages and Disadvantages • The advantage is that - If the prototype is released or shown then most of the main functionality will already be working. • The disadvantage is that – Basic functionality is tested at the end of cycle.
Bottom-up Testing Strategy • The subsystems in the lowest layer of the call hierarchy are tested individually • Then the next subsystems are tested that call the previously tested subsystems • This is repeated until all subsystems are included • Drivers are needed. • As integration moves upward, the need for separate test drivers lesser.
A Bottom-up Integration B Test E E Test B, E, F Test C Test G Test D, G Test A, B, C, D, E, F, G C F D G
Advantages and Disadvantages • The advantage is that with this method, you would be able to maintain code more easily and there is more clear structure of how to do things. • The disadvantage is that when releasing a prototype you cannot see a working prototype until nearly all the program has been completed, so that may take a long time before this happens.
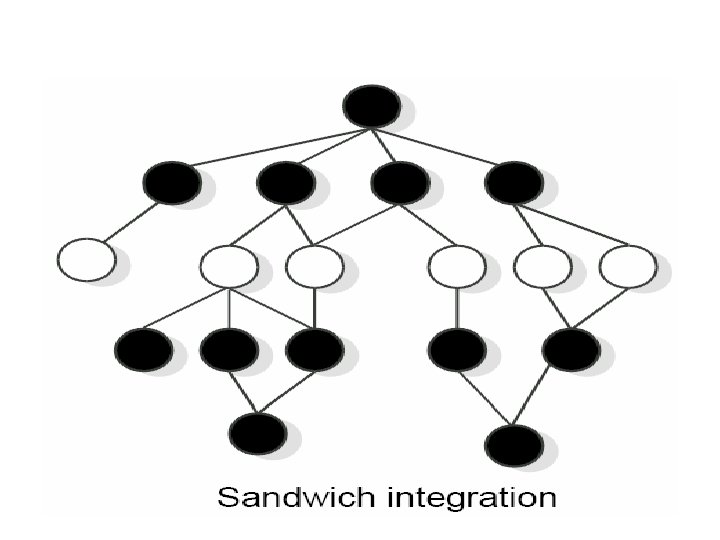
Sandwich/ Bidirectional Testing • Combines top-down strategy with bottom-up strategy • The system is viewed as having three layers – A target layer in the middle – A layer above the target – A layer below the target • Testing converges at the target layer.
Sandwich Testing Strategy A B C D Test A E Test A, B, C, D Test B, E, F Test D, G Test G G F Test A, B, C, D, E, F, G
Sandwich/ Bidirectional Testing • It is performed initially with the use of stubs & drivers. • Drivers are used to provide upstream connectivity while stubs provide downstream connectivity. • Driver is a function which redirects the requests to some other component. • Stubs simulate the behavior of a missing component. • After testing the functionality of the integrated
Guidelines on selection of integration method: S. No Factors Suggested Integration Method 1 Clear req. & design Top down 2 Dynamically changing req. , design. architecture Bottom up 3 Changing Architecture, Stable Design Bi-Directional 4 Limited Changes to existing architecture with less impact Big bang
System Testing • System testing is most often the final test to verify that the system to be delivered meets the specification and its purpose. • It tests both functional & non-functional aspects of the product. • It is started once unit testing , component testing & integration testing are completed. • System testing is carried out by specialists testers or independent testers
System Testing • It is performed on the basis of written test cases according to information collected from SRS & detailed design documents. • It ensures that the product is ready for moving to the user acceptance test level. • This the last chance for the test team to find any remaining product defects before the product is handed over to the customer.
WHY System Testing? • • Bring in customer perspective Build confidence in the product Analyze & reduce risk of releasing the product Ensure product is ready for acceptance testing
Types of System Testing There are essentially three main kinds of system testing – 1. Alpha Testing 2. Beta Testing 3. Acceptance Testing
Alpha Testing • This test takes place at the developer’s site. • Alpha testing is testing of an application when development is about to complete. Minor design changes can still be made as a result of alpha testing. • Alpha testing is typically performed by a group that is independent of the design team, but still within the company, e. g. in-house software test engineers, or software QA engineers. • Alpha testing is final testing before the software is released to the general public. It has two phases: – In the first phase of alpha testing, the software is tested by inhouse developers. They use either debugger software, or hardware-assisted debuggers. The goal is to catch bugs quickly. – In the second phase of alpha testing, the software is handed over to the software QA staff, for additional testing in an environment that is similar to the intended use.
Beta Testing • It takes place at customer’s site. It is the system testing performed by a selected group of friendly customers. It sends the system to users who install it and use the software in testing mode. , that is not live usage. • A beta test is the second phase of software testing in which a sampling of the intended audience tries the product out. (Beta is the second letter of the Greek alphabet. ) Originally, the term alpha test meant the first phase of testing in a software development process. The first phase includes unit testing, component testing, and system testing. Beta testing can be considered “pre-release” testing. • The goal of beta testing is to place your application in the hands of real users outside of your own engineering team to discover any flaws or issues from the user’s perspective that you would not want to have in your final, released version of the application.
Differences between Alpha and Beta Testing Alpha Testing Beta Testing It is done at developer’s site. It is done at one or more customer’s site. It is conducted in a controlled environment with developer. It is conducted in an environment that cannot be controlled by the developer. During alpha testing, developers records errors and usage problems. During beta testing, customer records all problems and submits report to the developer for modifications at regular intervals.
Acceptance Testing • It is a type of testing carried out in order to verify if the product is developed as per the standards and specifies criteria and meets all the requirements specified by customer. • Thus, acceptance testing is the system testing to determine whether to accept or reject the delivery of the system. • The goal of acceptance testing is to establish confidence in the system. • Acceptance testing is most often focused on a validation type testing.
Regression Testing • It is a type of testing carried out to ensure that changes made in the fixes are not impacting the previously working functionality. • The main aim of regression testing is to make sure that changed component is not impacting the unchanged part of the component. • It means re-testing an application after its code has been modified to verify that it still functions correctly.
Software Testing Strategies • It provides a road map for the software developers, quality assurance organizations and the customer. • Common characteristics of software testing strategies include the following: – Testing begins at the module level and works outward toward the integration of the entire system. – Different testing techniques are appropriate at different times. – Testing is conducted by developers and for large projects, by an independent test group.
Types of Testing Strategy 1. Top down Strategy an is Itapproach where modules are developed and tested starting at the top level of the programming hierarchy and continuing with the lower levels. 2. Bottom up Strategy It is opposite of top down method. This process starts with building and testing the low level modules first, working its way up the hierarchy.
White Box testing • White Box testing is based on the inner workings of an application and revolves around internal testing. The term "whitebox" was used because of the see-through box concept. The clear box or whitebox name symbolizes the ability to see through the software's outer shell (or "box") into its inner workings. • One of the basic goal of white box testing is to verify a working flow for an application.
White Box Testing • White-box testing is also called as: -Structural testing -Code Based Testing -Clear testing -Open testing - Glass box testing
How do you perform White Box Testing? • Testers divided it into two basic steps: STEP 1) UNDERSTAND THE SOURCE CODE Step 2) CREATE TEST CASES AND EXECUTE
STEP 1) UNDERSTAND THE SOURCE CODE • The tester must be very knowledgeable in the programming languages used in the applications they are testing. Also, the testing person must be highly aware of secure coding practices.
Step 2) CREATE TEST CASES AND EXECUTE • Writing more code to test the application's source code. The tester will develop little tests for each process or series of processes in the application.
LEVELS APPLICABLE TO White Box Testing method is applicable to the following levels of software testing: • Unit Testing: For testing paths within a unit. • Integration Testing: For testing paths between units. • System Testing: For testing paths between subsystems. However, it is mainly applied to Unit Testing.
What do you verify in White Box Testing ? • Basically verify the security holes in the code. • Verify the broken or incomplete paths in the code. • Verify the flow of structure mention in the specification document • Verify the Expected outputs • Verify the all conditional loops in the code to check the complete functionality of the application. • Verify the line by line or Section by Section in the code.
White-box Testing Techniques • It examines source code and analyze what is present in the code. • Structural testing doesn’t expose errors of code omission but can estimate the test suite adequacy in terms of code coverage i. e execution of components by the test suite or its faultfinding ability. • The following are some important techniques of white-box testing: A. Basis Path Testing B. Structural Testing C. Logic Based Testing
A. Basis Path Testing • It allows the design and definition of a basis set of execution paths. The test cases created from the basis path allow the program to be executed in such a way as to examine each possible path through the program by executing each statement at least once.
• The following steps can be applied to derive the basis set: 1. Using the design or code as a foundation, draw a corresponding flow graph. 2. Determine the cyclomatic complexity of the resultant flow graph. 3. Determine the basis set of linearly independent paths. 4. Prepare test cases that will force execution of each path in the basis set.
B. Structural Testing • It is a broaden testing coverage and improve quality of white-box testing. • The following are some important types of structural testing: 1. Statement coverage testing 2. Branch coverage testing 3. Condition coverage testing 4. Path coverage testing 5. Data flow based testing
1. Statement Coverage Testing • Statement coverage aim: – design test cases so that every statement in a program is executed at least once. • The principal idea: – unless a statement is executed, we have no way of knowing if an error exists in that statement • Criterion: – Executing some statement once and observing that a statement behaves properly for one input value: • no guarantee that it will behave correctly for all input values.
2. Branch coverage testing • Test cases are designed such that: – different branch conditions is given true and false values in turn. • Branch testing guarantees statement coverage: – a stronger testing compared to the statement coverage-based testing.
3. Condition coverage testing • Test cases are designed such that: – each component of a composite conditional expression given both true and false values. • Example – Consider the conditional expression ((c 1. and. c 2). or. c 3): – Each of c 1, c 2, and c 3 are exercised at least once i. e. given true and false values.
4. Path coverage testing • In path coverage, we write test cases to ensure that each and every path has been traversed at least once. One way to better understand path coverage: – Draw a flow graph to indicate corresponding logic in the program. – Calculate individual paths in the flow graph. – Run the program in all possible ways to cover every statement.
How to calculate Statement Coverage, Branch Coverage & Path Coverage? • Draw the flow in the following way: – Nodes represent entries , exists, decisions, and each statement of code. – Edges represent non-branching and links between nodes.
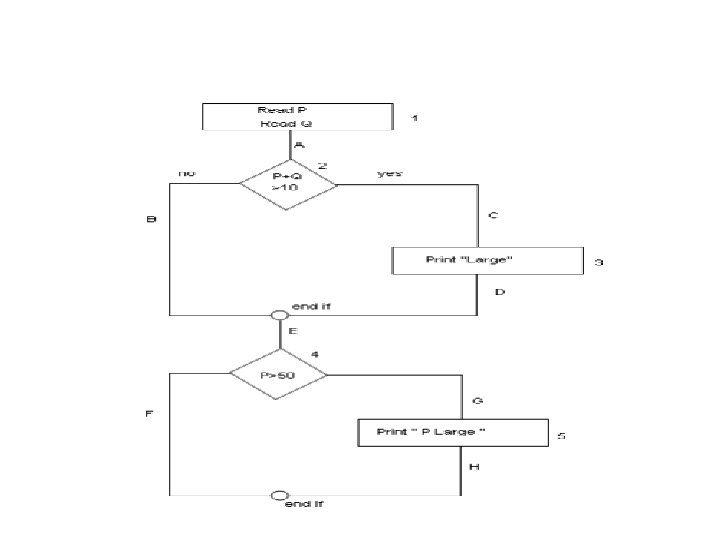
Example 1. 2. 3. 4. 5. 6. 7. Read P, Q If P+Q>100 then Print “Large” End if If P>50 then Print “P Large” End if Calculate Statement Coverage, branch coverage and path coverage
Solution 1 Statement Coverage (SC): To calculate Statement Coverage, find out the shortest number of paths following which all the nodes will be covered. Here by traversing through path 1 A-2 C-3 D-E-4 G-5 H all the nodes are covered. So by traveling through only one path all the nodes 12345 are covered, so the Statement coverage in this case is 1. Branch Coverage (BC): To calculate Branch Coverage, find out the minimum number of paths which will ensure covering of all the edges. In this case there is no single path which will ensure coverage of all the edges at one go. By following paths 1 A-2 C 3 D-E-4 G-5 H, maximum numbers of edges (A, C, D, E, G and H) are covered but edges B and F are left. To covers these edges we follow 1 A-2 B-E-4 F. By the combining the above two paths we can ensure of traveling through all the paths. Hence Branch Coverage is 2. The aim is to cover all possible true/false decisions. Path Coverage (PC): Path Coverage ensures covering of all the paths from start to end. Every distinct path through the code is executed atleast once. All possible paths are 1 A-2 B-E-4 F 1 A-2 B-E-4 G-5 H 1 A-2 C-3 D-E-4 F So path coverage is 4. Thus for the above example SC=1, BC=2 and PC=4.
Solution 2 • First, draw a flowchart or a control flow graph. • Then evaluate Statement Coverage, branch coverage and path coverage – Statement coverage = 1 (1 -2 -3 -4 -5 -6 -7) – Branch coverage = 2(1 -2 -4 -5 -7 , 1 -2 -3 -4 -5 -6 -7) – Path coverage = 4
5. Data-flow-based Testing • Basic idea: test the connections between variable definitions (“write”) and variable uses (“read”) • Starting point: variation of the control flow graph – Each node represents a single statement, not a chain of statements • Set DEF(n) contains variables that are defined at node n (i. e. , they are written) • Set USE(n): variables that are read
Example Assume y is already initialized 1 s: = 0; 2 x: = 0; 3 while (x<y) { 4 x: =x+3; 5 y: =y+2; 6 if (x+y<10) 7 s: =s+x+y; else 8 s: =s+x-y; 9. end if 10. } 1 2 3 DEF(1) : = {s}, USE(1) : = DEF(2) : = {x}, USE(2) : = DEF(3) : = , USE(3) : = {x, y} DEF(4) : = {x}, USE(4) : = {x} DEF(5) : = {y}, USE(5) : = {y} DEF(6) : = , USE(6) : = {x, y} DEF(7) : = {s}, USE(7) : = {s, x, y} DEF(8) : = {s}, USE(8) : = {s, x, y} DEF(9) : = , USE(9) : = DEF(10) : = , USE(10) : = 4 5 6 7 8 9 10
Reaching Definitions A definition of variable x at node n 1 reaches node n 2 if and only if there is a path between n 1 and n 2 that does not contain a definition of x Reaches nodes 2, 3, 4, 5, 6, 7, 8, but not 9 and 10. 1 DEF(1) : = {s}, USE(1) : = DEF(2) : = {x}, USE(2) : = DEF(3) : = , USE(3) : = {x, y} DEF(4) : = {x}, USE(4) : = {x} DEF(5) : = {y}, USE(5) : = {y} DEF(6) : = , USE(6) : = {x, y} DEF(7) : = {s}, USE(7) : = {s, x, y} DEF(8) : = {s}, USE(8) : = {s, x, y} 2 3 4 5 6 7 8 9 10
Def-use Pairs • A def-use pair (DU) for variable x is a pair of nodes (n 1, n 2) such that – x is in DEF(n 1) – The definition of x at n 1 reaches n 2 – x is in USE(n 2) • In other words, the value that is assigned to x at n 1 is used at n 2 – Since the definition reaches n 2, the value is not killed along some path n 1. . . n 2.
Examples of Def-Use Pairs Reaches nodes 2, 3, 4, 5, 6, 7, 8, but not 9, 10 For this definition, two DU pairs: 1 -7, 1 -8 1 2 3 4 DEF(1) : = {s}, USE(1) : = DEF(2) : = {x}, USE(2) : = DEF(3) : = , USE(3) : = {x, y} DEF(4) : = {x}, USE(4) : = {x} DEF(5) : = {y}, USE(5) : = {y} DEF(6) : = , USE(6) : = {x, y} DEF(7) : = {s}, USE(7) : = {s, x, y} DEF(8) : = {s}, USE(8) : = {s, x, y} 5 6 7 8 9 10
Data-flow-based Testing • Identify all DU pairs and construct test cases that cover these pairs – Several variations with different “relative strength” • All-DU-paths: For each DU pair (n 1, n 2) for x, exercise all possible paths n 1, n 2 that are clear of a definition of x • All-uses: for each DU pair (n 1, n 2) for x, exercise at least one path n 1 n 2 that is clear of definitions of x
Data-flow-based Testing • All-definitions: for each definition, cover at least one DU pair for that definition – i. e. , if x is defined at n 1, execute at least one path n 1. . n 2 such that x is in USE(n 2) and the path is clear of definitions of x • Clearly, all-definitions is subsumed by all-uses which is subsumed by all-DU-paths • Motivation: see the effects of using the values produced by computations – Focuses on the data, while control-flow-based testing focuses on the control
C. Logic Based Testing • It is used when the input domain and resulting processing are amenable to a decision table representation. • The following steps are applied: – List all actions that can be associated with a specific algorithm. – List all conditions – Associate specific conditions with specific actions eliminating impossible combination of conditions. – Define rules by indicating what action occurs for a set of conditions.
WHITE BOX TESTING ADVANTAGES • Testing can be commenced at an earlier stage. One need not wait for the GUI to be available. • Testing is more thorough, with the possibility of covering most paths. • As the tester has knowledge of the source code, it becomes very easy to find out which type of data can help in testing the application effectively. • It is easy to automate.
WHITE BOX TESTING DISADVANTAGES • Due to the fact that skilled tester is needed to perform white box testing, the costs are increased. • The tests focus on the software as it exists, and missing functionality may not be discovered. • Test script maintenance can be a burden if the implementation changes too frequently. • It is suitable for small projects.
Black Box Testing This method is named so because the software program, in the eyes of the tester, is like a black box; inside which one cannot see.
A black-box test takes into account only the input and output of the s/w without regard to the internal code of the program.
BLACK BOX TESTING • Also called functional testing and behavioral testing. • It focuses on determining whether or not a program does what it is supposed to do based on its functional requirements. • It attempts to find errors in the external behavior of the code in the following categories : (1) incorrect or missing functionality; (2) Interface errors; (3) Errors in data structures used by interfaces; (4) Behavior or performance errors; (5) initialization and termination errors.
Why Black Box Testing? • It helps in identifying any incomplete & inconsistent requirement. • It addresses the stated req. as well as implied req. • It encompasses the end user perspective. • It handles valid & invalid inputs. • Can be started early in the cycle as soon as the specifications are ready.
When to do Black Box Testing? • Starts from the beginning of the s/w project life cycle, regardless of the SDLC model chosen for the project. • Test scenarios & test data can be prepared when the s/w is in the design phase. • Once the code is ready & delivered for testing, test scenarios are executed.
LEVELS APPLICABLE TO: • Black Box Testing method is applicable to the following levels of software testing: • Integration Testing • System Testing • Acceptance Testing The higher the level, and hence the bigger and more complex the box, the more black box testing method comes into use.
How to do Black Box Testing? • Our objective is to find as many defects as possible in as few test cases as possible. • Various techniques for the effective Black Box Testing are: 1. Requirements Based Testing 2. Positive and Negative testing 3. Boundary Value Analysis 4. Equivalence Partitioning 5. State/Graph Based Testing
1. Requirements Based Testing • We begin by looking at each customer requirement, to make sure that every single requirement has been tested at least once. • The first test case we’d write for any given requirement is the most-used success path for that requirement. By success path, we mean that we want to execute some desirable functionality (something the customer wants to work) without any error conditions. • Thus, it deals with validating the req. given in the SRS of the s/w system.
• Explicit req. are stated & documented as part of the SRS. Whereas Implicit or Implied req. are not documented but assumed to be incorporated in the system. • The Precondition for req. testing is a detailed review of the SRS to ensure that the req. are consistent, complete, correct & testable and making the testing more effective. • Requirements are tracked by a Requirements Traceability Matrix(RTM).
Requirements Traceability Matrix(RTM) Req. ID Description Priority (High, Medium, Low) Test Conditions Test Case IDs Phase of Testing • Each req. is given a unique id along with a brief description of it and its priority. Next, Test Conditions are specified with each id to give a comfort feeling that we have not missed any scenario that could produce a defect. Next, Test Case Ids can be used to map b/w req. & Test cases. Next, a phase of Testing is to be specified to indicate when a req. will be tested.
2. Positive and Negative Testing • Positive testing tries to prove that a given product does what is supposed to do. The purpose of positive testing is to prove that the product works as per specification and expectations. • Negative testing is done to show that the product does not fail when an unexpected input is given. It covers scenarios for which the product is not designed and coded.
3. Boundary Value Analysis(BVA) • Experience shows that test cases that are close to boundary conditions have a higher chances of detecting an error. • Here, boundary condition means just below the boundary(upper side) or just above the boundary(lower side). • Suppose, we have an input variable x with a range from 1 -100. The boundary values are 1, 2, 99, 100.
• Consider a program with two input variables x and y. These input variables have specified boundaries as: a <= x <= b c <= y <= d Hence, both the inputs x and y are bounded by two Intervals [a, b] and [c, d] respectively. For input x, we may design test cases with values a and b , just above a and also just below b. Similarly, for input y, we may have values c & d, just above c and just below d. These test cases may have more chances to detect an error. The input domain is shown in fig.
The basic idea of boundary value analysis is to use input variable values at their minimum, just above minimum, a nominal value, just below their maximum, and at their maximum. Thus, boundary value analysis test cases are obtained by holding the values of all but one variable at their nominal values and letting that variable assume its extreme values. The boundary value analysis test cases for our program with two inputs variables (x and y) that may have any value from 100 to 300 are: (200, 100), (200, 101), (200, 200), (200, 299), (200, 300), (100, 200), (101, 200), (299, 200) and (300, 200). This input domain is shown in Fig. Each dot represent a test case and inner rectangle is the domain of legitimate inputs. Thus, for a program of n variables, boundary value analysis yield 4 n + 1 test cases.
Example
Solution
Example 2
Solution
4. Equivalence Partitioning • The set of input values that generate one single expected output is called a partition. • When the behavior of the s/w is the same for a set of values, then the set is termed as an equivalence class or a partition. • Since all the values produce equal & same output, they are termed as equivalence partition.
Why Equivalence Partitioning? • To keep down our testing costs, we don’t want to write several test cases that test the same aspect of our program. A good test case uncovers a different class of errors that has been uncovered by prior test cases. • Equivalence partitioning is a strategy that can be used to reduce the number of test cases that need to be developed.
Equivalence Partitioning • In short, It is a software test design technique that involves dividing input values into valid and invalid partitions and selecting representative values from each partition as test data. Thereby, it increasing the coverage & reducing the effort involved in testing.
• In this method, input domain of a program is partitioned into a finite number of equivalence classes such that one can reasonably assume, but not be absolutely sure, that the test of a representative value of each class is equivalent to a test of any other value. • Two steps are required to implementing this method: 1. 2. The equivalence classes are identified by taking each input condition and partitioning it into valid and invalid classes. For example, if an input condition specifies a range of values from 1 to 999, we identify one valid equivalence class [1<item<999]; and two invalid equivalence classes [item<1] and [item>999]. previous step. This is performed by writing test cases covering all the valid equivalence classes. Then a test case is written for each invalid equivalence class so that no test contains more than one invalid class. This is to ensure that no two invalid classes mask each other.
Most of the time, equivalence class testing defines classes of the input domain. However, equivalence classes should also be defined for output domain. Hence, we should design equivalence classes based on input and output domain. We should test different types of invalid inputs in order to get more errors. As an example for a program that is supposed to accept any number between 1 and 99, there at least four equivalence classes from input side. The classes are: 1. Any number between 1 and 99 is valid input 2. Any number less than 1. This include 0 and all negative number. 3. Any number greater than 99 4. If it is not a number, it should not be accepted.
E. g. Life Insurance Premium Rates Age Group Additional Premium Under 35 $1. 65 35 -59 $2. 87 60+ $6. 00 Based on the age group, an additional monthly premium has to be paid as base premium($0. 50) + additional premium. Now, The equivalence partitions that are based on the age are: 1. Below 35 yrs of age (Valid i/p) 2. Between 35 & 59 yrs of age (Valid i/p) 3. Above 60 yrs of age (Valid i/p) 4. Negative age (Invalid i/p) 5. Age as 0 (Invalid i/p) 6. Age as any three digit number (Invalid i/p)
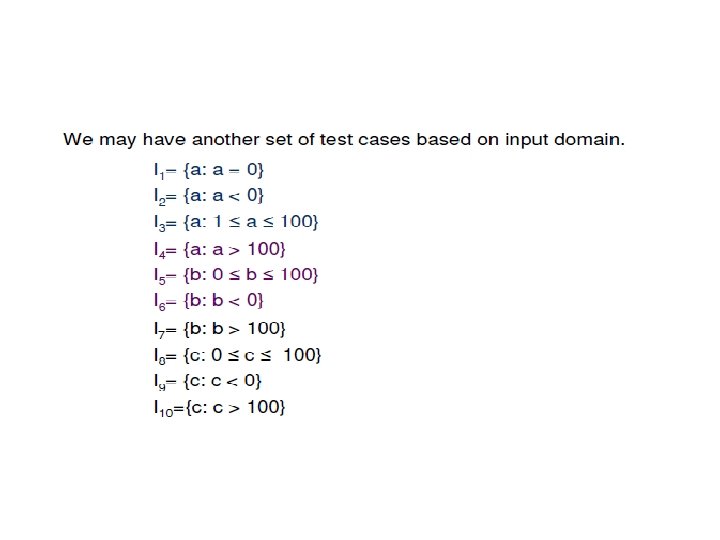
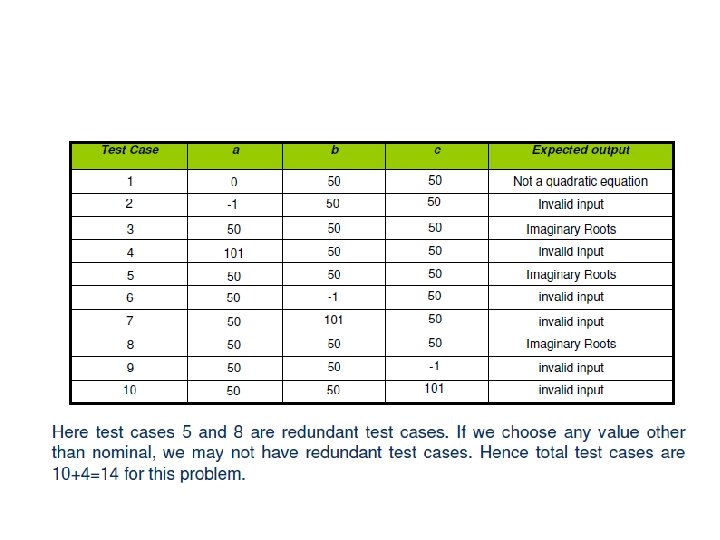
Example Consider a program for the determination of the nature of roots of a quadratic equation. Its input is a triple of positive integers (say a, b, c) and values may be from interval [0, 100]. The program output may have one of the following words. [Not a quadratic equation; Real roots; Imaginary roots; Equal roots] Identify the equivalence class test cases for output and input domains.
Solution
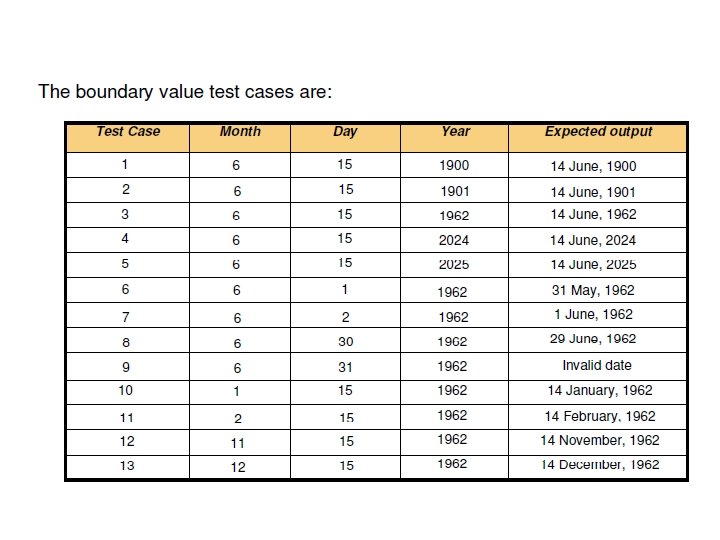
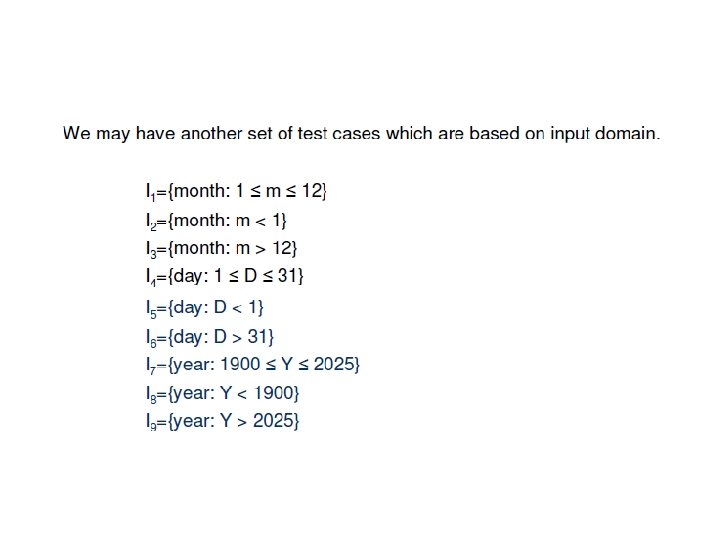
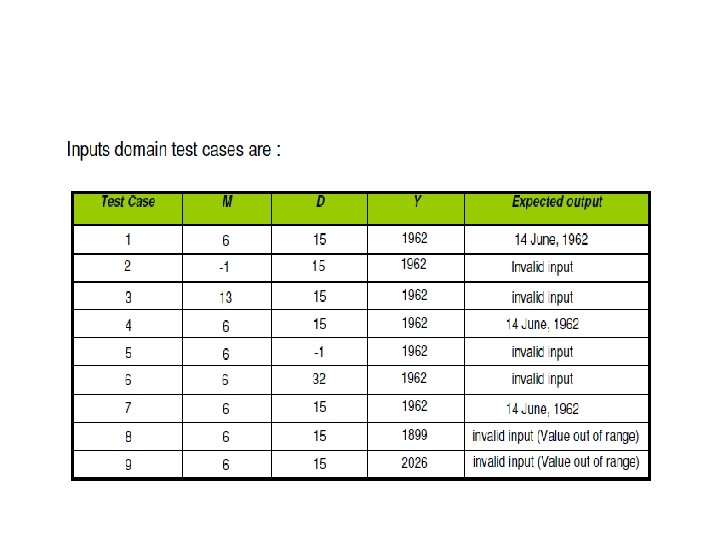
Example Consider a program for determining the Previous date. Its input is a triple of day, month and year with the values in the range 1 <= month <= 12 1 <= day <= 31 1900 <= year <= 2025 The possible outputs would be Previous date or invalid input date. Identify the equivalence class test cases for output & input domains.
Solution
5. State/Graph Based Testing • State machine: implementation-independent specification(model) of the dynamic behavior of the system. i. e. it is the model of a system. state: abstract situation in the life cycle of a system entity (for instance, the contents of an object) event: a particular input (for instance, a message or method call) action: the result, output or operation that follows an event transition: an allowable two-state sequence, that is, a change of state (”firing”) caused by an event guard: predicate expression associated with an event, stating a Boolean restriction for a transition to fire
State-based testing
State-based testing There are several types of state machines: • finite automaton (no guards or actions) • Mealy machine (no actions associated with states) • Moore machine (no actions associated with transitions) • State chart (hierarchical states: common super states) • State transition diagram: graphic representation of a state machine • State transition table: tabular representation of a state machine
BLACK BOX TESTING ADVANTAGES • Tester requires no knowledge of implementation and programming language used. • Reveals any ambiguities and inconsistencies in the functional specifications. • Efficient when used on large systems. • Tests are done from user’s point of view. • Test cases can be designed as soon as the specifications are complete.
BLACK BOX TESTING DISADVANTAGES • Only a small number of possible inputs can be tested and many program paths will be left untested. • Without clear specifications, which is the situation in many projects, test cases will be difficult to design. • Tests can be redundant if the software designer/ developer has already run a test case.
Comparison Between Black-box and White-box Testing Criteria Black Box Testing White Box Testing Definition Black Box Testing is a software testing method in which the internal structure/ design/ implementation of the item being tested is NOT known to the tester White Box Testing is a software testing method in which the internal structure/ design/ implementation of the item being tested is known to the tester. Levels Applicable To Mainly applicable to higher levels of Mainly applicable to lower levels testing: Acceptance Testing of testing: Unit Testing System Testing Integration Testing Scope It is suitable for large projects It is suitable for small projects. Programming Knowledge Not Required Implementation Knowledge Not Required Basis for Test Cases Requirement Specifications Detail Design Time This is the least time consuming The most exhaustive and time and exhaustive consuming testing.
Testing for Functionality • System testing begins with function testing, whereas previous tests concentrates on components and their interaction, this test ignores system structure and focuses on functionality. • It refers to testing which involves only observation of the output for certain input values. There is no attempt to analyze the code which produces the output. • The internal structure of the code is ignored, therefore it is also referred to as Black box testing.
• The guidelines for function testing should : – Have a high probability of detecting a fault. – Use a test team independent of the designers and programmers. – Know the expected actions and outputs. – Test both valid and invalid input. – Never modify the system just to make testing easier.
• It typically involves five steps: – The identification of functions that the software is expected to perform. – The creation of input data based on the function’s specifications. – The determination of output based on the function’s specifications. – The execution of the test case. – The comparison of actual and expected output. • It is performed in a carefully controlled situation. It can be started even before the entire system is constructed because only one function is tested at a time. It compares the system’s actual performance with its requirements so the test cases for function testing are developed from the requirements
Performance Testing • Functional testing addresses the functional requirements, whereas performance testing addresses the non-functional requirements. • It is measured against the performance objectives set by the customer as expressed in the non-functional requirements. • It is performed to determine how fast some aspect of a system perform under a particular workload.
Performance Testing • The focus of Performance testing is checking a software program's • Speed - Determines whether the application responds quickly • Scalability - Determines maximum user load the software application can handle. • Stability - Determines if the application is stable under varying loads
• As it involves hardware as well as software, hardware engineers may be part of the test team. • Different types of performance testing are as follows: – Load testing - checks the application's ability to perform under anticipated user loads. The objective is to identify performance bottlenecks before the software application goes live. – Stress testing - involves testing an application under extreme workloads to see how it handles high traffic or data processing. The objective is to identify breaking point of an application. – Endurance testing - is done to make sure the software can handle the expected load over a long period of time. – Volume testing - Under Volume Testing large no. of data is populated in database and the overall software system's behavior is monitored. The objective is to check software application's performance under varying database volumes.
Test Data Suit Preparation • A test case is a document that describes an input, action or event & its expected result, in order to determine whether the software or a part of software is working correctly or not. • IEEE defines test case as “a set of input values, execution preconditions, expected results and execution post conditions developed for a particular objective or test condition, such as to exercise a particular program path or to verify compliance with a specific requirement. ” • Incomplete & incorrect test cases lead to incorrect and erroneous test outputs. To avoid this, exhaustive testing must be performed, which is not possible. • So, a test case that give satisfactory results is selected.
• Following categories of test data are usually designed in a test data suit: – No data – Valid data set – Invalid data set – Illegal data format – Boundary condition data set In this way, creating separate data sets for each test condition will ensure complete test coverage.
Static Testing • Static testing is a form of software testing where the software is not executed; this is in contrast to dynamic testing. It is generally not detailed testing, but checks mainly for the sanity of the code, algorithm, or document. It is primarily checking of the code and/or manually reviewing the code or document to find errors. This type of testing can be used by the developer who wrote the code, in isolation. Code reviews, inspections and Software walkthroughs are also used. • From the black box testing point of view, static testing involves reviewing requirements and specifications. This is the verification portion of Verification and Validation. • Even static testing can be automated. A static testing test suite consists of programs to be analyzed by an interpreter or a compiler that asserts the programs syntactic validity. • Bugs discovered at this stage of development are less expensive to fix than later in the development cycle. • The people involved in static testing are application developers and testers.
Static Testing • Done by Humans or sometimes with the help of specialized tools • Here People find out whether: - Code works acc. to functional req. - Code written in accordance with design - Code for any functionality has been missed out - Code handle errors properly
Advantages of Static Testing • Sometimes Humans can find errors that computers cannot. • A human evaluation can compare code against specification & design, also can ensure that it does what is intended to do. • A human evaluation can detect problems along with the root cause. • Computer resources can be saved. • Helps in minimizing delay in identification of the problem and thus lesser is the cost of fixing it.
Difference between static and dynamic testing STATIC TESTING DYNAMIC TESTING Testing done without executing the program Testing done by executing the program This testing does verification process This testing does validation process It is about prevention of defects. It is about finding & fixing the defects It can be performed before compilation. It can be performed after compilation. Cost of finding defects and fixing is less. Cost of finding defects and fixing is high. Requires loads of meetings. Comparatively requires lesser meetings.
Static Testing Strategies § Static testing means that the analysis of the program is performed without executing them. § The various static testing strategies are: 1. 2. 3. 4. Formal Technical Reviews (Peer reviews) Walkthrough Code inspection Compliance with design standards.
Formal Technical Reviews (Peer Reviews) • Review is “a process of meeting during which artifacts of software products are examined by project stakeholders, user representatives, or other interested parties for feedback or approval”. • It can be on technical specifications, design, source code, user documentation, support and maintenance documentation , test plans, test specifications, standards, or any other type specific to the product. • It can be conducted at any stage of SDLC. • Purpose of conducting review is to minimize the defect ratio as early as possible in SDLC. • Informal reviews are walkthroughs & formal are inspection.
• A software technical review is a form of peer review in which a team of qualified personnel examines the suitability of the s/w product for its intended use & identifies discrepancies from specifications & standards. • The objectives of FTR are: i. To uncover errors in function, logic or implementation for any representation of the software. ii. To verify that the software under review meets its requirements. iii. To achieve software that is developed in a uniform manner. iv. To make projects more manageable. v. To ensure that the software has been represented according to predefines standards.
• FTR is conducted as a meeting and will be successful only if it is properly planned, controlled and attended. • The Review meeting Each review meeting should abide by the following constraints: i. Between 3 & 5 people should be involved in the review. ii. Advance preparation should occur but should require no more than 2 hrs of work for each person. iii. The duration of the review meeting should be less than two hours.
• Before the review: – The producer who developed the work product, informs project leader that work product is complete & review is required. – Project leader contacts a review leader who generates copies of work product, & distribute it to other reviewers. – Evaluates product for readiness – Establishes agenda for review meeting. During the review: - producer introduces agenda & work product. - Producer gives a walkthrough of the work product, reading the material while reviewers raise issues. - Recorder notes valid problems or errors discovered. - At the end of review, all attendees of the FTR must decide whether to: - Accept the product without further modification - Reject the product due to severe error. (once corrected, another review will be performed) - Accept the product provisionally(minor errors have been encountered & must be corrected, but no additional review will be required) All FTR attendees complete a sign-off, indicating their participation in the review, and their concurrence with the review team findings.
• During the FTR, a reviewer (the recorder) actively records all issues that have been raised. These are summarized at the end of the review meeting and a reviewed issues list is prepared. • A review summary report answers three questions: – What was reviewed? – Who reviewed it? – What were the findings & conclusions. • The review issue list serves two purpose: – To identify problem areas within the product, and – To serve as an action item checklist that guides the producer as corrections are made. An issue list is attached to the summary report.
• Review guidelines must be established in advance, distributed to all reviewers, agreed upon & then followed. The following represents a minimum set of guidelines: – Review the product, not the producer. – Set an agenda & maintain it. – Enunciate problem areas, but don’t attempt to solve every problem noted. – Take written notes. – Limit the no. of participants & insist upon advance preparation. – Develop a checklist for each product that is likely to be reviewed. – Allocate resources & schedule time for FTR’s. – Conduct meaningful training for all reviewers. – Review your early reviews.
Walk Through • Method of conducting informal group/individual review is called walkthrough. • In this, the participants ask questions & make comments about possible errors, violation of development standards & other problems or may suggest improvement on the article. • It can be preplanned or can be conducted at need basis. Generally people working on the work product are involve din the walkthrough process. • The purpose of walkthrough is to: – Find problems – Discuss alternative solution Focusing on demonstrating how work product meets all requirements, IEEE recommends three specialist roles in a walkthrough: 1. Leader 2. Recorder 3. Author
Walkthrough Process Author describes the artifact to be reviewed to reviewers during the meeting. Reviewers present comments, possible defects and improvement suggestions to the author. Recorder records all defects & suggestion during walkthrough meeting. Based on reviewer comments, author performs any necessary rework of the work product , if required. Leader normally monitors overall walkthrough meeting activities as per the defined company process & responsibilities for conducting the reviews. Generally, the leader performs monitoring activities, commitment against action items etc. During the walkthrough session, problems are not resolved. Rather, the goal is to discover & make note of problem areas. The problems are resolved by the reviewer, once the walkthrough session is over. A followup meeting or follow-up memo should be used which will inform the reviewers of the actions taken. The review may work with one or more reviewers to solve problems but it is the reviewer's responsibility to ensure that the problems noted during the walkthrough are solved.
Advantages of Walkthrough • By involving team members in the walkthrough process, project team communication is improved. • It is an excellent education medium for new team members. • If the bugs are found in the earlier part of the life cycle of a product, they are cheaper and easier to fix. • When someone other than the author looks at the design or code, they are likely to find the mistakes which the author might have overlooked. • It gives an opportunity to other team members to learn from someone else’s code. • When the software product is explained to an audience, the author gets an opportunity to review his own program. • When conducted in a proper manner, they save time and improve quality of the software product.
Limitations of Walkthrough • The limitation of walkthrough is that – they take time. Not only the person who is actively involved on the project, but also other people have to devote their precious time for walkthrough.
Code Inspection • It is a formal group review designed to identify problems as close to their point of origin as possible. • It is used to improve the quality of product and to improve productivity.
Objectives of Inspection Process • Find problems at the earliest possible point in the s/w development process. • Verify that the work product meets its requirements. • Ensure that the work product has been presented according to predefined standards. • Provide data on product quality and process effectiveness. • Builds technical knowledge & skills among team members by reviewing the output of other people. • Increases the effectiveness of software testing.
IEEE recommends following roles: 1. 2. 3. 4. 5. Inspection Leader Recorder Reader Author Inspector
Inspection Process • Following are the various phases of inspection process: – Planning – Overview – Preparation – Examination meeting – Rework and followup
Advantages of code inspection 1. Lists all potential design flows that can make s/w code less maintainable and costly to develop 2. Indicates all defects that otherwise are difficult to fix during normal operational testing & usage. 3. A detailed error feedback is provided to individual programmers. It makes easier for them to make changes in the code.
Compliance with Design and Coding Standards • Though at initial stages it seems like a burden to follow standard, its advantages become visible once the software grows to few thousand lines spanning few hundred files. • Some of the advantages are: – Programmer feels comfortable with the code written by others, as it is similar to what he himself would have written. – Person joining the group at later stage can pickup the code easily. (once he is familiar with the standards) – If care is taken to define the standard in such a way that it avoids problematic idioms, then silly mistakes can be avoided.
• The problem with having standard is that it takes time to get acquainted with it. If care is not taken during this transition period, then the resulting code will be a mix of standard and programmer’s natural style. This can be avoided by having regular code review sessions. • Good s/w development organizations usually develop their own coding standards & guidelines depending on what best suits their organization & the type of products they develop.
• The following are some representative coding guidelines recommended by many s/w development organizations. – Do not use a coding style that is too difficult to understand. – Avoid obscure side effects. – Do not use an identifier for multiple purposes. – The code should be well documented. – The length of any function should not exceed 10 source lines. – Do not use goto statements.
END OF UNIT-4