TYPES OF EXERCISES IN PREGNANCY Critical Areas of


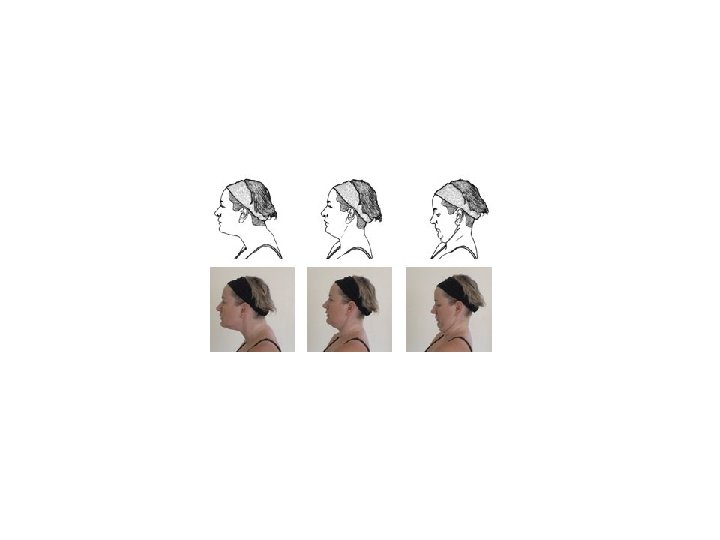
 Upper neck extensors and")


. • Instruct the")


 is the most")


 hip extension • This exercise can be performed safely only. • It")


- Slides: 56
TYPES OF EXERCISES IN PREGNANCY • Critical Areas of Emphasis and Selected Exercise Techniques • Pelvic Floor Awareness, Training, and Strengthening • Relaxation and Breathing Exercises for Use During Labor
TYPES OF EXERCISES IN PREGNANCY Posture Exercises Corrective Exercises for Diastasis Recti Stabilization Exercises Dynamic Trunk Exercises Modified Upper and Lower Extremity Strengthening Pelvic Floor Awareness, Training, and Strengthening Relaxation and Breathing Exercises for Use During Labor
Posture Exercises • The growing fetus places added stress on postural muscles as the center of gravity shifts forward and upward and the spine shifts to compensate and maintain stability. • In addition, after delivery, activities involving holding and caring for the baby stress postural muscles. • Following Exercise are used: 1. Flexibility and stretching exercises are implemented with caution 2. Resistance exercises are performed at a low intensity.
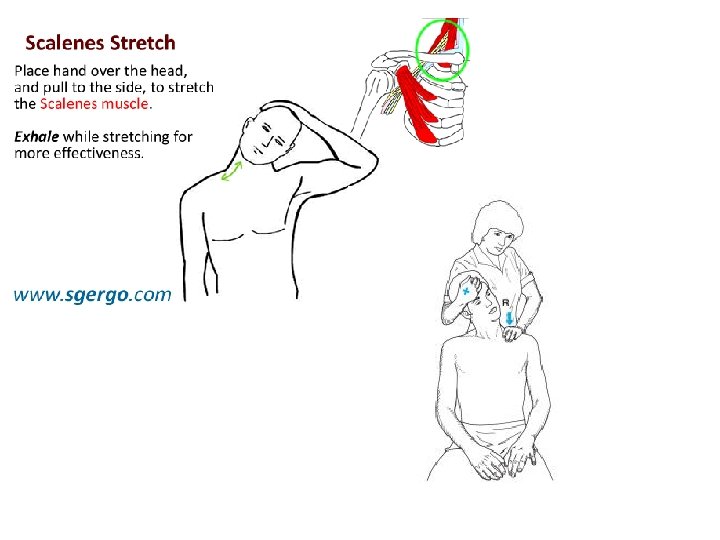
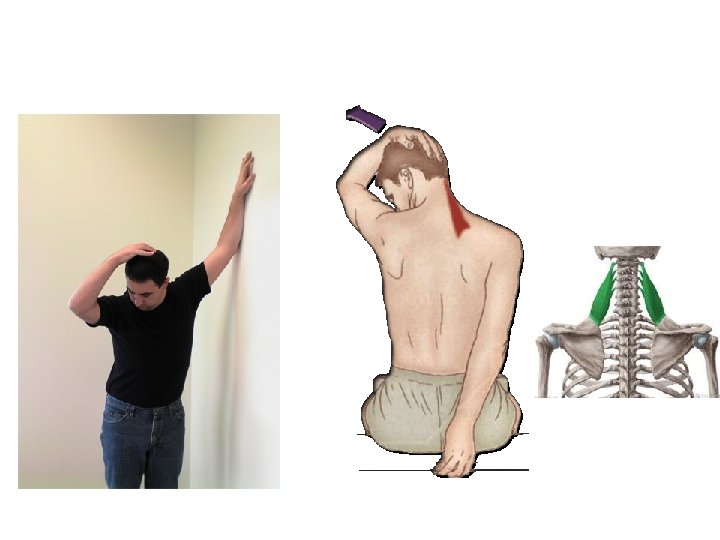
Selected Stretching and Resistance Exercises During Pregnancy Stretching (with Caution) Upper neck extensors and scalenes Scapular protractors, shoulder internal rotators, and levator scapulae Low back extensors Hip flexors, adductors, and hamstrings CAUTION: women with pelvic instabilities should not overstretch these muscles. • Ankle plantarflexors • • Strengthening (Low Intensity) Upper neck flexors and lower neck and upper thoracic extensors Scapular retractors and depressors Shoulder external rotators Trunk flexors ( particularly lower abdominals; use corrective exercises for diastasis recti if present) • Hip extensors (Gluteus) • Knee extensors (Quads) • Ankle dorsiflexors • •
Corrective Exercises for Diastasis Recti • Head Lift with Pelvic Tilt
Abdominal Muscles Exercises 1. Corrective exercises for diastesis recti • Head lift with pelvic tilt 2. Trunk curls 3. Leg sliding
Stabilization Exercises • The exercises should be initiated and progressed at the intensity that the woman is able to safely control. • Slow, controlled breathing is emphasized while developing the stabilizing function of the muscles. • As pregnancy progresses, the abdominals will undergo extreme overstretching. Therefore, exercise must be adapted to meet the needs of each individual, and periodic reassessment must be done (approximately every 4 weeks during pregnancy)
PRECAUTIONS • Because the trunk muscles are contracting isometrically in many of the stabilization exercises, there is a tendency to hold the breath; this is detrimental to the blood pressure and heart rate. Caution the woman to maintain a relaxed breathing pattern and exhale during the exertion phase of each exercise. • If diastasis recti is present, adapt the stabilization exercises to protect the linea alba as described in the Corrective Exercises for Diastasis Recti section. Any progression of postpartum abdominal strengthening exercises should be postponed until the diastasis has been corrected to two finger widths or less. • Keep in mind the 5 -minute time limit for supine positioning when prescribing abdominal exercises after 13 weeks’ gestation.
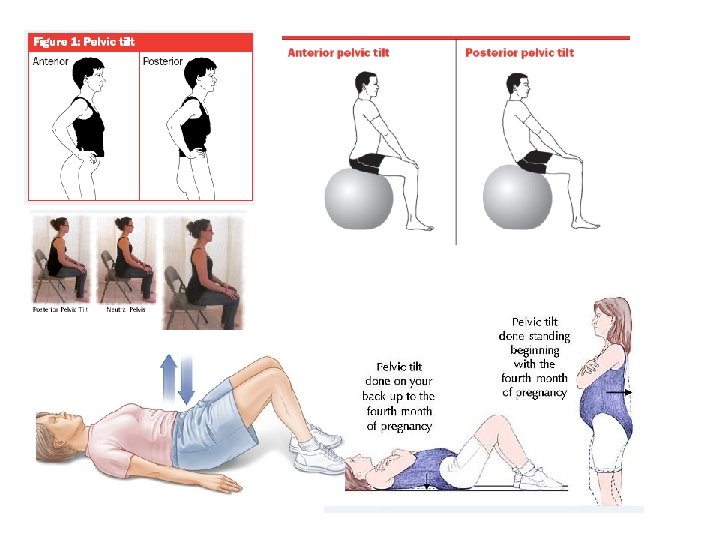
Dynamic Trunk Exercises Pelvic Motion Training Pelvic tilt exercises Pelvic clock
Dynamic Trunk Exercises Pelvic Motion Training These exercises are helpful in cases of • posture-related back pain; • they are beneficial for improving 1. proprioceptive awareness, as well as 2. lumbar, pelvic, and hip mobility.
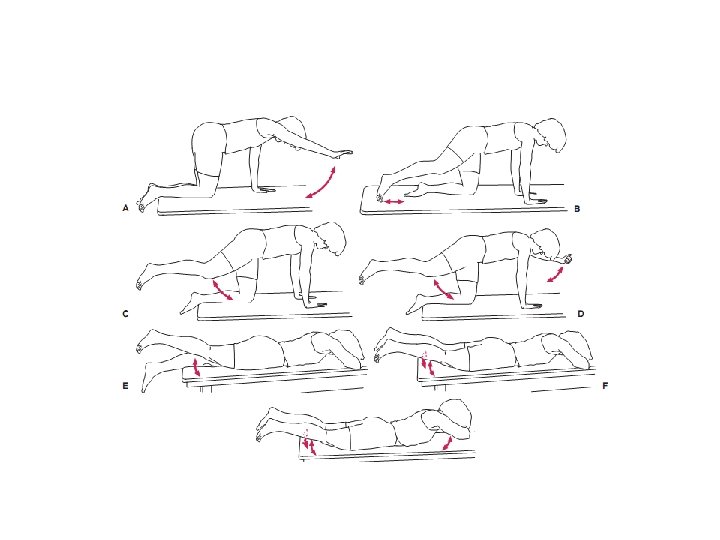
Pelvic tilt exercises • Begin in quadruped (on hands and knees). • Instruct the patient to perform a posterior pelvic tilt. While the patient keeps her back straight, have her isometrically tighten (imagine drawing in) the lower abdominals and hold, then release and perform an anterior tilt through very small range.
Pelvic tilt with Lateral Flexion • For additional exercise, while holding the abdominals in and the back straight, have the woman laterally flex the trunk to the right (sidebend to the right), looking at the right hip, then reverse to the left. • Have the woman practice pelvic tilt exercises in a variety of positions, including side-lying and standing. • 4 th month tk lying, onward 4 th Month sy standing Pelvic tilt
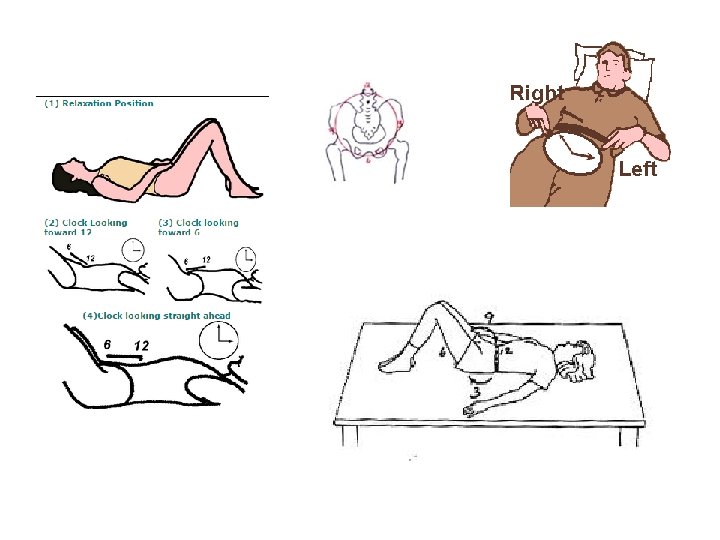
Pelvic clock • With the woman hook-lying, ask her to visualize the face of a clock on her lower abdomen. The umbilicus is 12 o’clock and the pubic symphysis is 6 o’clock. The patient’s legs may move slightly while performing this exercise. • Have her begin with gentle movements back and forth between 12 and 6 o’clock (the basic pelvic tilt exercise). • Then ask her to move back and forth between 3 o’clock (weight shifted to left hip) and 9 o’clock (weight shifted to the right hip). • Then move in a clockwise manner from 12 to 3 to 6 to 9 and then back to 12 o’clock, then reverse.
• With practice, these will become very smooth and rhythmical movements and will not require such concentration on each number of the clock. • Continue relaxed breathing throughout the exercise, and do not force any part of the movement. • If the patient has difficulty with the motion, make the clock “smaller” until coordination improve
Pelvic clock progressions • Use the visual imagery of cutting the face of the clock in half so that there is a right side and a left side or a top half and a bottom half. • Have the woman move her pelvis through the arc on the one side and back (Reverse Movement) through the middle of the clock, and then move the pelvis through the opposite side and back (Reverse Movement) through the middle. Initially, the woman may notice asymmetry when comparing the halves; this will improve with time. • Once the patient understands and is able to perform the clockwise pattern, have her do counterclockwise motions with all of the activities mentioned previously, and then progress the exercises to the sitting position.
Modified Upper and Lower Extremity Strengthening
Standing Push-Ups Patient position and procedure: • Standing, facing a wall, feet pointing straight forward, shoulder-width apart, and approximately an armlength away from the wall. The palms are placed on the wall at shoulder height. • Have the woman slowly bend the elbows, bringing her upper body close to the wall, maintaining a stable trunk and pelvic position, and keeping the heels on the floor. Her elbows should be shoulder height. She then slowly pushes with her arms (extend elbows) , bringing the body back to the original position.
Supine Bridging Patient position and procedure: • Supine in the hook-lying position. Have the woman perform a posterior pelvic tilt and then lift her pelvis off the floor. • She can do 1. repetitive bridges or 2. hold the bridge position and 3. alternately flex and extend her upper extremities to emphasize the stabilization function of the hip extensors and trunk musculature
Quadruped Leg Raising • Patient position and procedure: On hands and knees (hands may be in fists or palms may be open and flat). Instruct the woman to first perform a posterior pelvic tilt and then slowly lift one leg, extending the hip to a level no higher than the pelvis while maintaining the posterior pelvic tilt • She then slowly lowers the leg and repeats with the opposite side. The knee may remain flexed or can be straightened throughout the exercise. Monitor this exercise, and discontinue if there is stress on the sacroiliac joints or ligaments. If the woman cannot stabilize the pelvis while lifting the leg, have her just slide one leg posteriorly along the floor and return
Modified Squatting • Wall slides and supported squatting exercises are used to strengthen the hip and knee extensors for good body mechanics and also to help stretch the perineal area for flexibility during the delivery process. In addition, if the woman wishes to use squatting for labor and delivery, the muscles must be strengthened and endurance trained in advance. • Patient position and procedure: Standing with back against a wall and her feet shoulder-width apart. Have the woman slide her back down the wall as her hips and knees flex only as far as is comfortable, then slide back up. • Patient position and procedure: Standing with feet shoulder width apart or wider, facing a counter, chair, or wall on which the woman can rest her hands and/or forearms for support. Have the woman slowly squat as far as is comfortable
Perineum and Adductor Flexibility • these flexibility exercises prepare the legs and pelvis for childbirth. Self-Stretching • Patient position and procedure: Supine or side-lying. Instruct the woman to abduct the hips and pull the knees toward the sides of her chest and hold the position for as long as is comfortable (at least to the count of 10). • Patient position and procedure: Sitting on a short stool with the hips abducted as far as possible and feet flat on the floor. Have her flex forward slightly at the hips (keeping the back straight), or have her gently press her knees outward with her hands for an additional stretch.
Pelvic Floor Awareness, Training, and Strengthening
• Begin pelvic floor exercise training with an empty bladder. • Gravity-assisted positioning (hips higher than the heart, such as supported bridge ) may be indicated initially for some women with extreme weakness and proprioceptive deficits Contract-Relax “Elevator” Exercise Quick Contractions Pelvic Floor Relaxation
Contract-Relax • Instruct the woman to tighten the pelvic floor as if attempting to stop urine flow or hold back gas. • Hold for 3 to 5 seconds, and relax for at least the same length of time. • Repeat as many as 10 times (if performed with proper technique). • With significant coordination dysfunction or fatigue, substitution with the gluteals, abdominals, or hip adductors may occur. • To maximize proprioception and motor learning, it is important initially to emphasize isolation of the pelvic floor and avoid the substitute muscle actions. • In addition, watch for Valsalva’s maneuver; if necessary, have the woman count out loud to encourage normal breathing patterns.
Quick Contractions • Have the woman perform quick, repeated contractions of the pelvic floor muscles while maintaining a normal breathing rate and keeping accessory muscles relaxed. • Try for 15 to 20 repetitions per set. • This type II-fiber response is important to develop in order to withstand pressure from above, especially with coughing or sneezing.
“Elevator” Exercise • Instruct the woman to imagine riding in an elevator. • As the elevator goes up from one floor to the next, she contracts the pelvic floor muscles a little more. • As strength and awareness improve, add more “floors” to the sequence of the contraction. • Another way to increase difficulty is to ask the woman to relax the muscles gradually, as if the elevator were descending one floor at a time. >> • This component requires an eccentric contraction and is very challenging.
Pelvic Floor Relaxation • Instruct the woman to contract the pelvic floor as in the strengthening exercise, then allow total voluntary release and relaxation of the pelvic floor. Use of the “elevator” imagery should also be emphasized, with particular attention to taking the elevator to the “basement. ” • Pelvic floor relaxation is closely linked with effective breathing and relaxation of the facial muscles. Instruct the woman to concentrate on a slow, deep breath and allow the pelvic floor to completely relax. • Relaxation of the pelvic floor is extremely important during stage 2 of labor and vaginal delivery.
• Chronic inability to relax the pelvic floor muscles may lead to impairments such as 1. Hypertonus 2. Pain with intercourse 3. Voiding dysfunction. • If the patient presents with these symptoms, increase the rest time between pelvic floor contractions and sets; also use submaximal contractions to improve awareness of tension versus relaxation.
Relaxation and Breathing Exercises for Use During Labor
Visual Imagery • Use instrumental music and verbal guidance. • Instruct the woman to concentrate on a relaxing image such as the beach, mountains, or a favorite vacation spot. • Suggest that she focus on the same image throughout the pregnancy so that the image can be called up to the conscious level when recognizing the need to relax during labor.
Muscle Setting • Have the woman lie in a comfortable position. • Have her begin with the lower body. Instruct her to gently contract and then relax first the muscles in the feet, then legs, thighs, pelvic floor, and buttocks. • Next, progress to the upper extremities and trunk, then to the neck and facial muscles. • Reinforce the importance of remaining awake and aware of the contrasting sensations of the muscles. • Emphasize “softening” of the muscles as the session continues. • Add deep, slow, relaxed breathing to the routine.
Selective Tension • Progress the training by emphasizing awareness of muscles contracting in one part of the body while remaining relaxed in other parts. • For example, while she is tensing the fist and upper extremity, the feet and legs should be limp. • Reinforce the comparison between the two sensations and the ability to control both tension and relaxation. • While practicing selective tension, have your client work with a partner who gently shakes the extremity that is “relaxed” to make sure there is no tension in it.
Breathing • Slow, deep breathing (with relaxation of the upper thorax) is the most efficient method for exchange of air to use with relaxation techniques and for controlled breathing during labor. • Teach the woman to relax the abdomen during inspiration so that it feels as though the abdominal cavity is “filling up” and the ribs are expanding laterally. During exhalation, the abdominal cavity becomes smaller; active contraction of the abdominal muscles is not necessary with relaxed breathing. • To prevent hyperventilation, emphasize a slow rate of breathing. Caution the woman to decrease the intensity of the breathing if she experiences dizziness or feels tingling in the lips and fingers.
Relaxation and Breathing During Labor
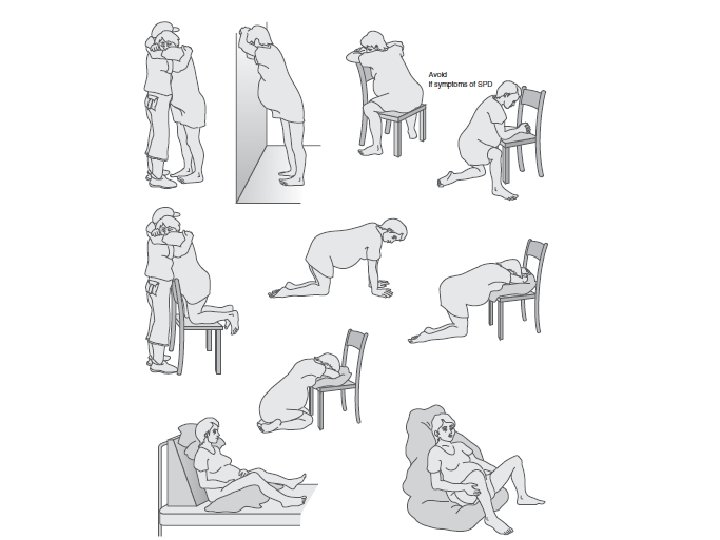
First Stage • As labor progresses, the contractions of the uterus become stronger, longer, and closer together. • Relaxation during the contractions becomes more difficult. • Provide the woman with suggested techniques to assist in relaxation.
• Ensure the woman has emotional support from the father, family member, or special friend to provide encouragement and assist with overall comfort. • Seek comfortable positions including walking, hands and knees , lying on pillows, or sitting on a Swiss ball; include gentle repeated motions such as pelvic rocking. • Breathe slowly with each contraction; use the visual imagery, and relax with each contraction. Some women find it helpful to focus their attention on a specific visual object. Other suggestions include singing, talking, or moaning during each contraction to prevent breath-holding and encourage slow breathing. • During transition (near the end of the first stage), there is often an urge to push. Teach the woman to use quick blowing techniques, using the cheeks, not the abdominal muscles, to overcome the desire to push until the appropriate time. • Massage or apply pressure to any areas that hurt, such as the low back. Using the hands may help distract the focus from the contractions. • Apply heat or cold for local symptoms; wipe the face with a wet washcloth.
Second Stage • Once dilation of the cervix has occurred, the woman may become active in the birth process by assisting the uterus during a contraction in pushing the baby down the birth canal. Teach her the following techniques: • While bearing down, take in a breath, contract the abdominal wall, and slowly breathe out. This will cause increased pressure within the abdomen along with relaxation of the pelvic floor. • PRECAUTION: Tell the woman that >> if she holds her breath, there will be increased tension and resistance in the pelvic floor. >> In addition, exertion with a closed glottis, known as Valsalva’s maneuver, has adverse effects on the cardiovascular system. • For maximum efficiency, maintain relaxation in the extremities, especially the legs and perineum. Keeping the face and jaw relaxed assists with this. • Between contractions, perform total body relaxation.
Unsafe Postures and Exercises During Pregnancy
Bilateral straight-leg raising • This exercise typically places more stress on the abdominal muscles and low back than they can tolerate. • It can cause back injury or diastasis recti and therefore should not be attempted.
Fire hydrant” exercise • This exercise is performed on hands and knees, and one hip is abducted and externally rotated at a time • If the leg is elevated too high, the sacroiliac joint and lumbar vertebrae can be stressed. • It should be avoided by any woman who has preexisting sacroiliac joint symptoms or women in whom symptoms develop.
All-fours (quadruped) hip extension • This exercise can be performed safely only. • It becomes unsafe and can cause low back pain when the leg is elevated beyond the physiologic range of hip extension, causing the pelvis to tilt anteriorly and the lumbar spine to hyperextend.
Unilateral weight-bearing activities • Weight bearing on one leg (which includes slouched standing with the majority of weight shifted to one leg and the pelvis tilted down on the opposite side) during pregnancy can cause sacroiliac joint irritation and should be avoided by women with preexisting sacroiliac joint symptoms. • Unilateral weight bearing also can cause balance problems because of the increasing body weight and shifting of the center of gravity. • This posture becomes a significant problem postpartum when the woman carries her growing child on one hip. Any asymmetries become accentuated, and painful symptoms may develop.
Exercise Critical to the Postpartum Period
After Uncomplicated Delivey • After an uncomplicated vaginal delivery, exercise can be started as soon as the woman feels able to exercise.
Pelvic floor strengthening • Exercises should be resumed as soon after the birth as possible. • These exercises may increase circulation and aid healing of lacerations or episiotomy. • Combining pelvic floor contractions with feeding or changing the baby may help them become integrated into the daily routine. • When treating a postpartum client in the clinic, emphasize life-long need for pelvic floor exercise, especially when lifting or with significant exertion, to allow the pelvic floor muscles to provide additional trunk support.
Diastasis recti correction • The mother should be taught this test and encouraged to perform it on the third postpartum day. • Corrective exercises should continue until the separation is two finger widths or less.
Aerobic and strengthening exercises • As soon as the woman feels able, cardiopulmonary exercise and light resistance training can be resumed with gradually increasing intensity. • A physical examination is suggested before the onset of vigorous exercise or sport-specific training. • Stop exercise if there is bleeding & injury(strain)