Orthographic Writing Contents Orthographic writing Overall steps Suggestions
- Slides: 41

Orthographic Writing

Contents Orthographic writing Overall steps Suggestions on a view selection Additional examples on a view selection Alignment of views (Projection systems) Basic dimensioning Primary auxiliary view

Orthographic writing Contents

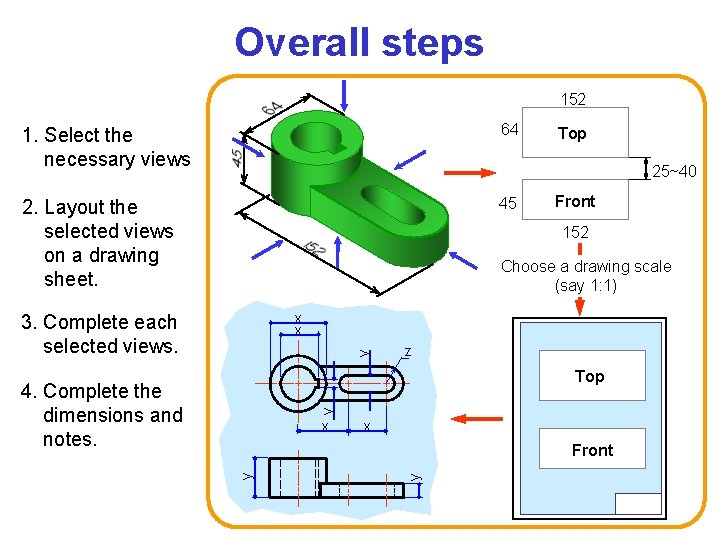
Overall steps 152 1. Select the necessary views 64 2. Layout the selected views on a drawing sheet. 45 Top 25~40 Front 152 Choose a drawing scale (say 1: 1) x x y 3. Complete each selected views. z Top y 4. Complete the dimensions and notes. x x y y Front

View selection procedures 1. Orient the object to the best position relative to a glass box. 2. Select the front view. 3. Select adjacent views.

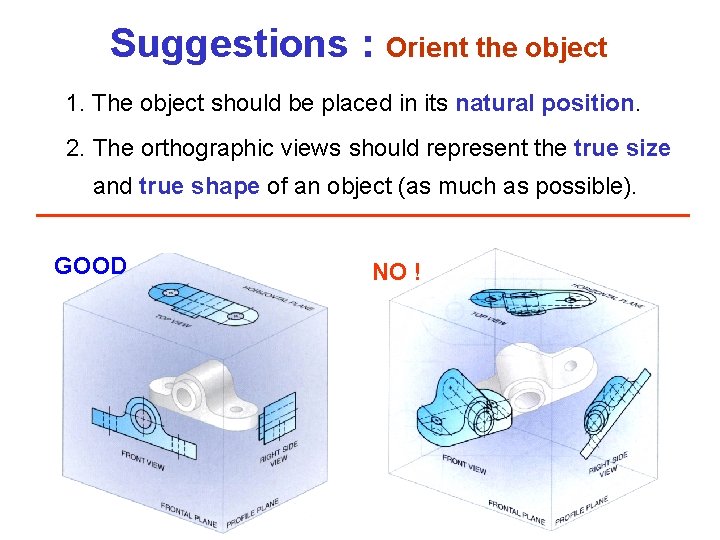
Suggestions : Orient the object 1. The object should be placed in its natural position. 2. The orthographic views should represent the true size and true shape of an object (as much as possible). GOOD NO !

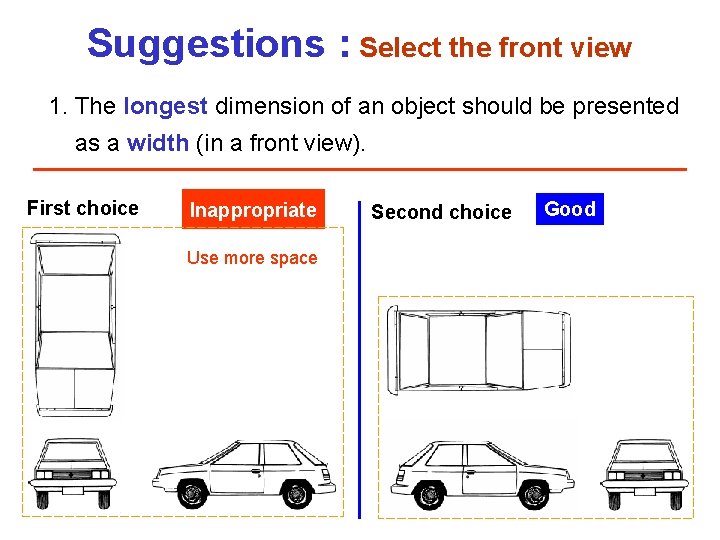
Suggestions : Select the front view 1. The longest dimension of an object should be presented as a width (in a front view). First choice Inappropriate Use more space Second choice Good

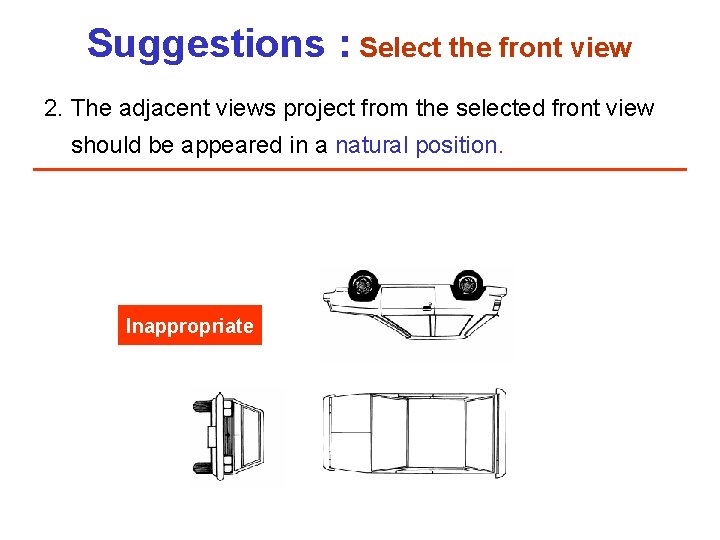
Suggestions : Select the front view 2. The adjacent views project from the selected front view should be appeared in a natural position. Inappropriate

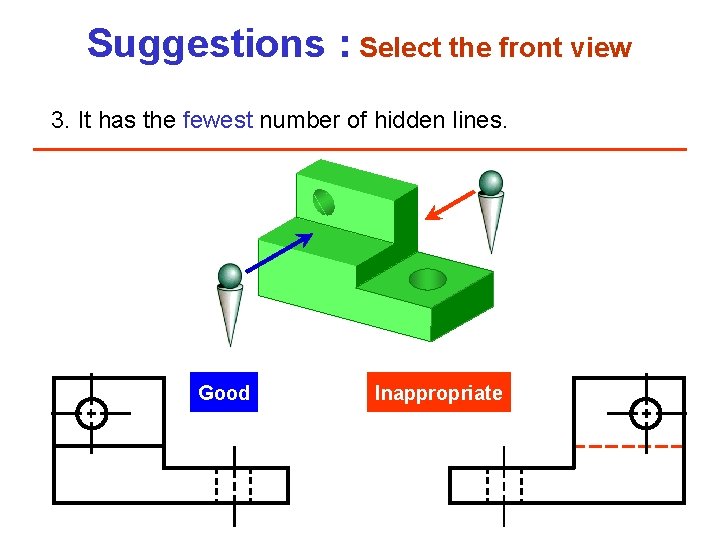
Suggestions : Select the front view 3. It has the fewest number of hidden lines. Good Inappropriate

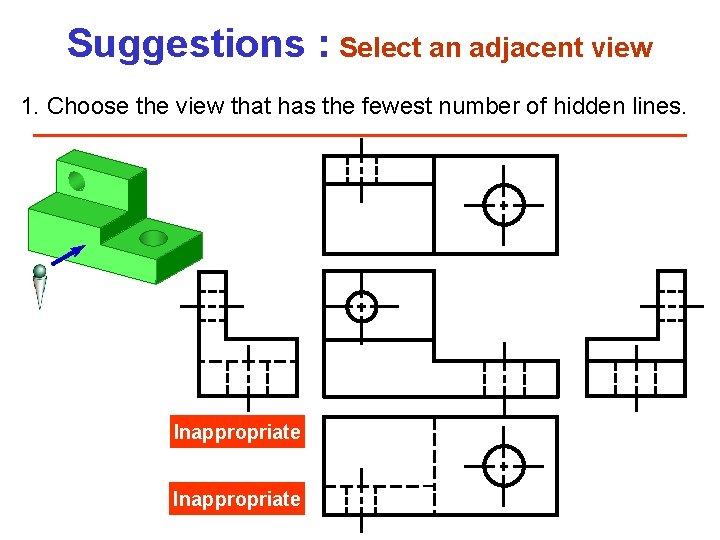
Suggestions : Select an adjacent view 1. Choose the view that has the fewest number of hidden lines. Inappropriate

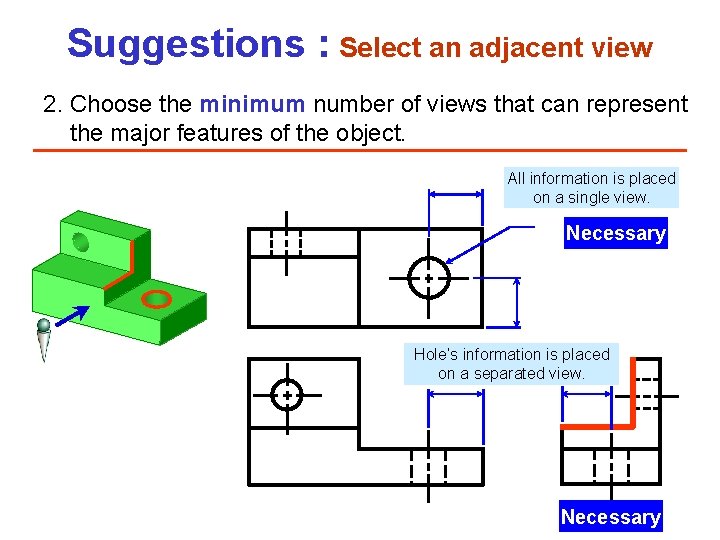
Suggestions : Select an adjacent view 2. Choose the minimum number of views that can represent the major features of the object. All information is placed on a single view. Necessary Hole’s information is placed on a separated view. Necessary

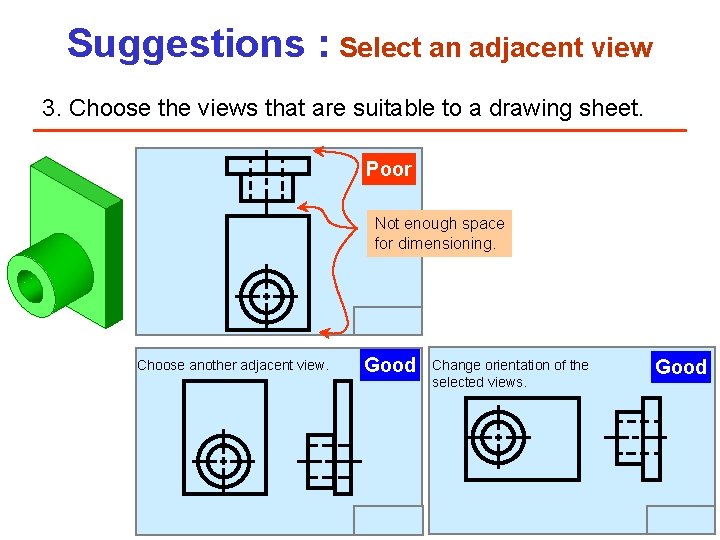
Suggestions : Select an adjacent view 3. Choose the views that are suitable to a drawing sheet. Poor Not enough space for dimensioning. Choose another adjacent view. Good Change orientation of the selected views. Good

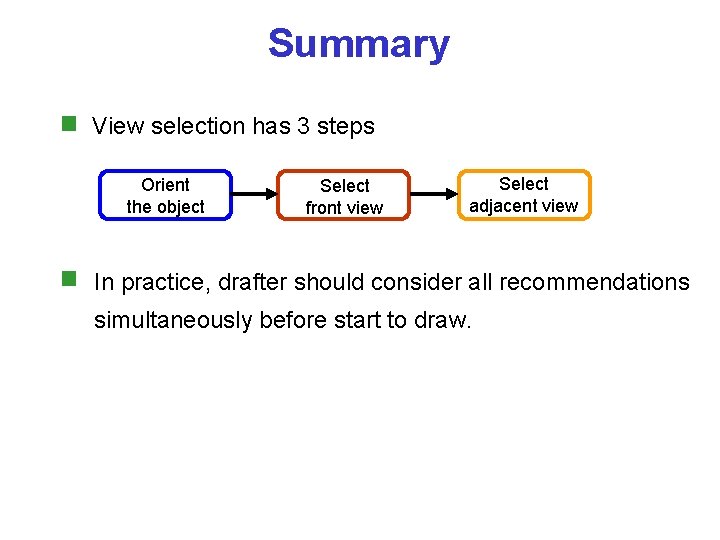
Summary View selection has 3 steps Orient the object Select front view Select adjacent view In practice, drafter should consider all recommendations simultaneously before start to draw.

Additional examples on a view selection Contents

Notes Generally, three views orthographic drawing is selected to describes an object’s information. In some specific case, a necessary view may be less or more than three views. Later chapter

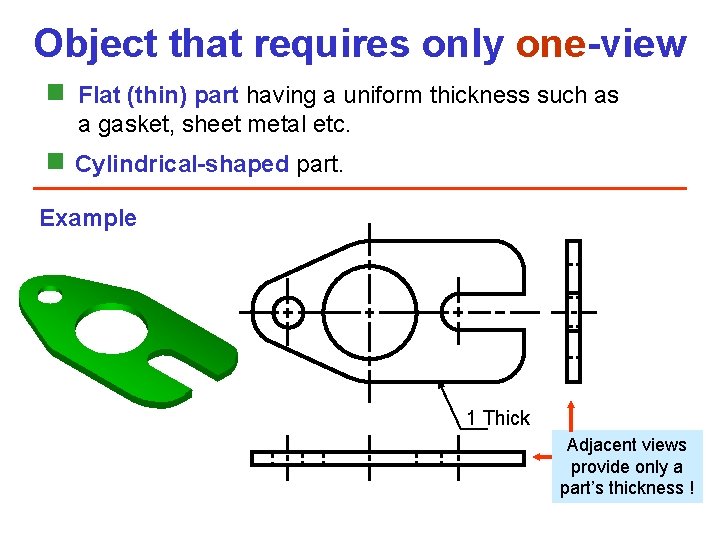
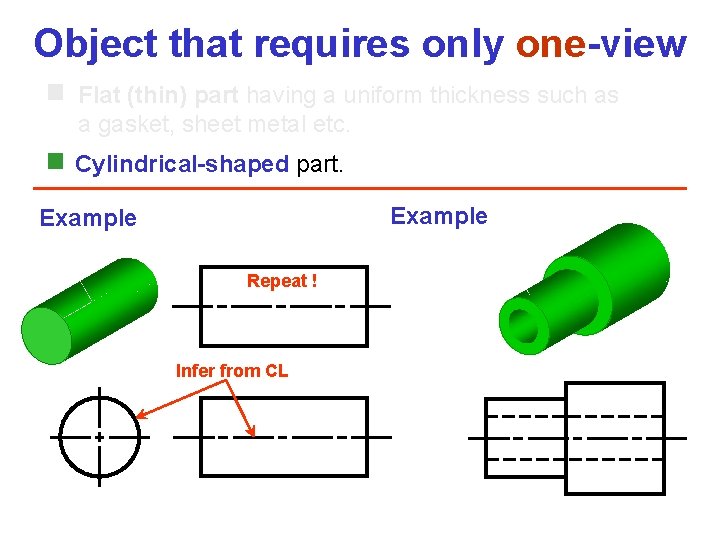
Object that requires only one-view Flat (thin) part having a uniform thickness such as a gasket, sheet metal etc. Cylindrical-shaped part. Example 1 Thick Adjacent views provide only a part’s thickness !

Object that requires only one-view Flat (thin) part having a uniform thickness such as a gasket, sheet metal etc. Cylindrical-shaped part. Example Repeat ! Infer from CL

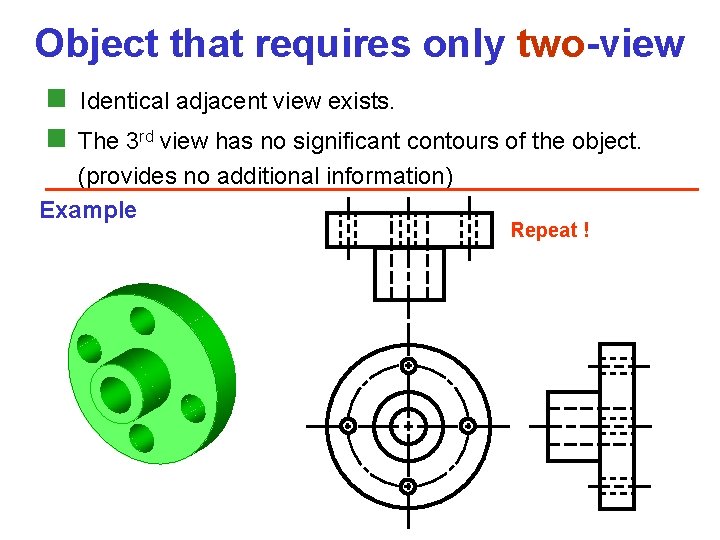
Object that requires only two-view Identical adjacent view exists. The 3 rd view has no significant contours of the object. (provides no additional information) Example Repeat !

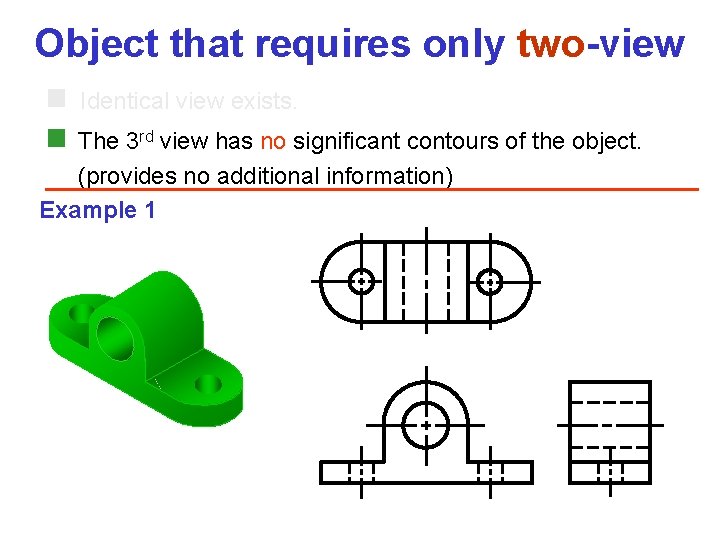
Object that requires only two-view Identical view exists. The 3 rd view has no significant contours of the object. (provides no additional information) Example 1

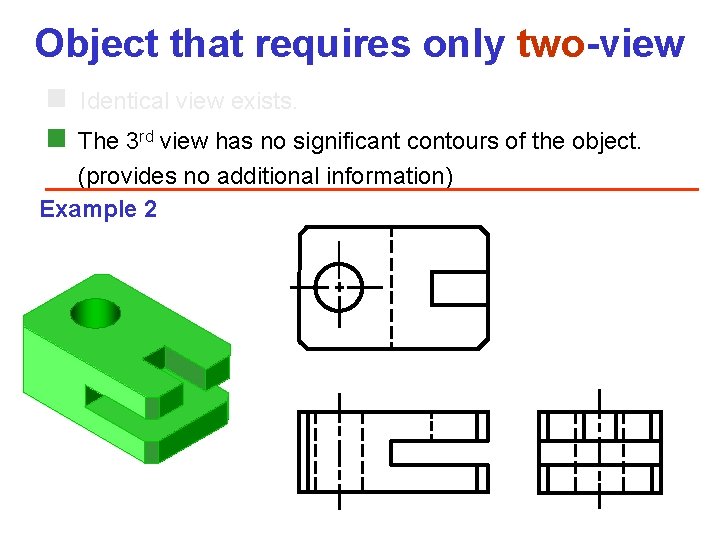
Object that requires only two-view Identical view exists. The 3 rd view has no significant contours of the object. (provides no additional information) Example 2

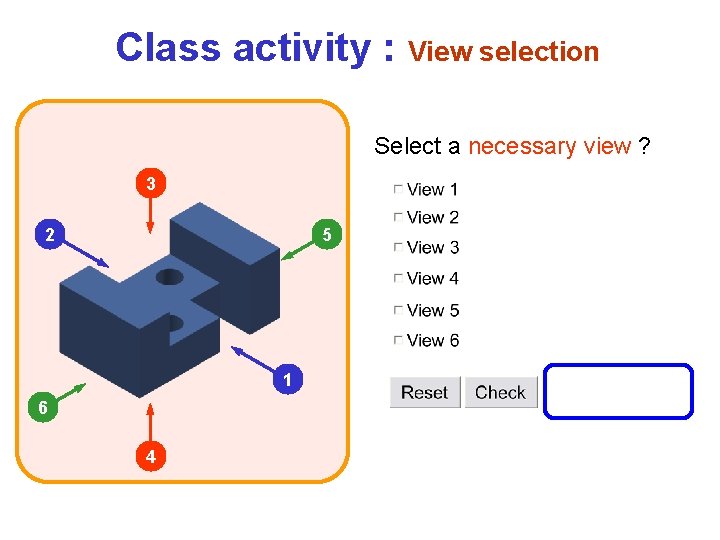
Class activity : View selection Select a necessary view ? 3 2 5 1 6 4

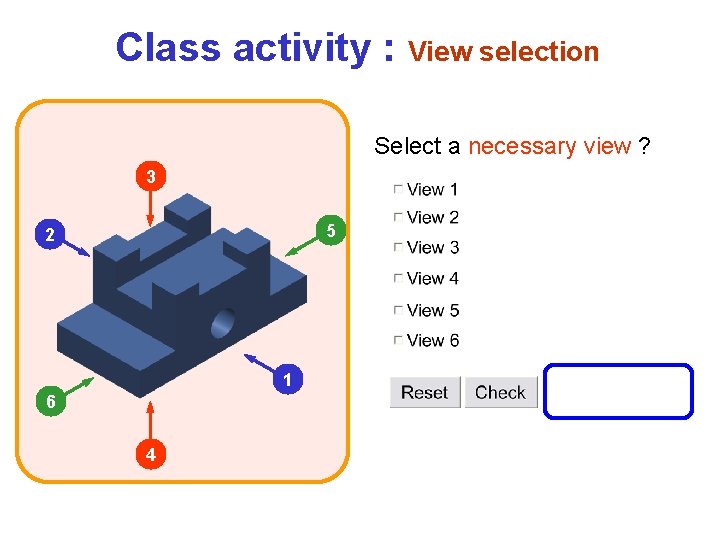
Class activity : View selection Select a necessary view ? 3 5 2 1 6 4

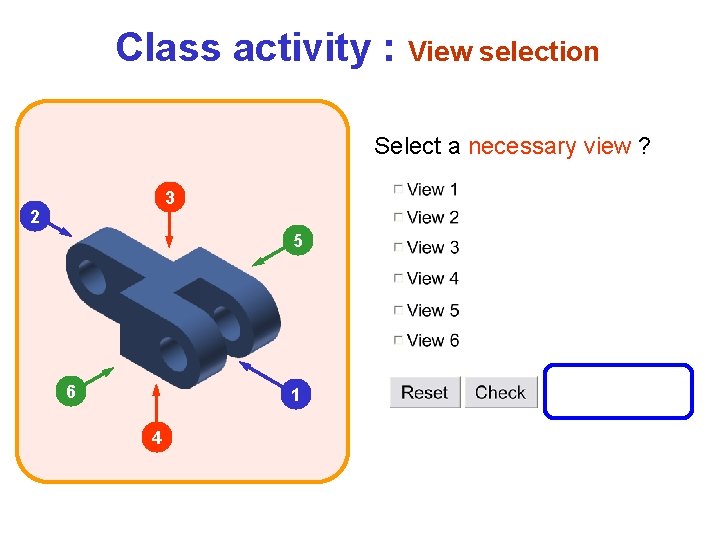
Class activity : View selection Select a necessary view ? 3 2 5 6 1 4

Alignment of views Contents

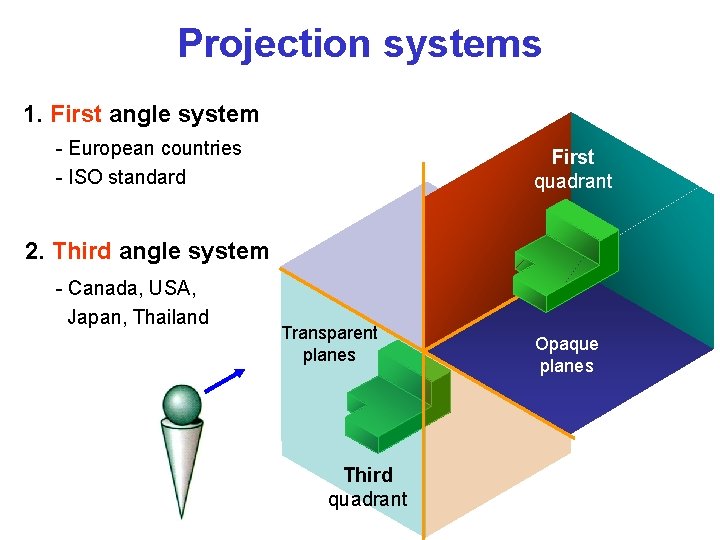
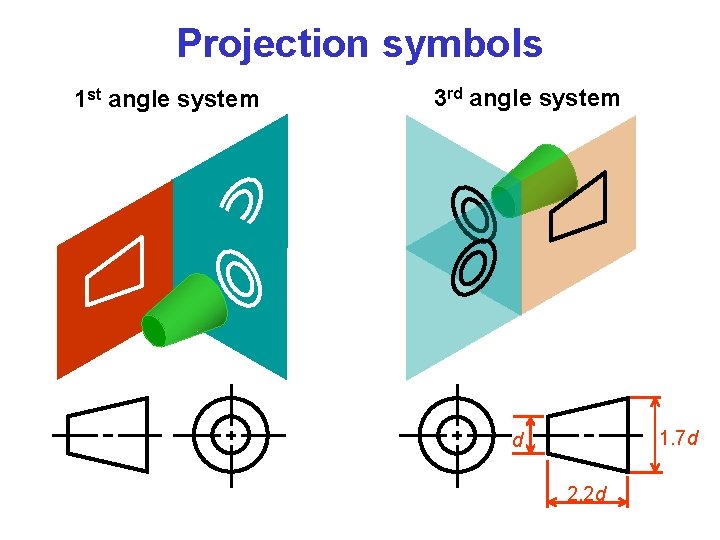
Projection systems 1. First angle system - European countries - ISO standard First quadrant 2. Third angle system - Canada, USA, Japan, Thailand Transparent planes Third quadrant Opaque planes

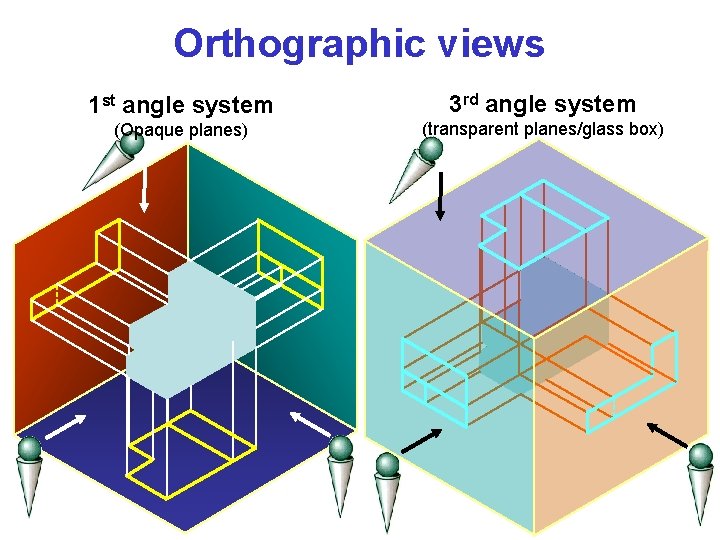
Orthographic views 1 st angle system 3 rd angle system (Opaque planes) (transparent planes/glass box)

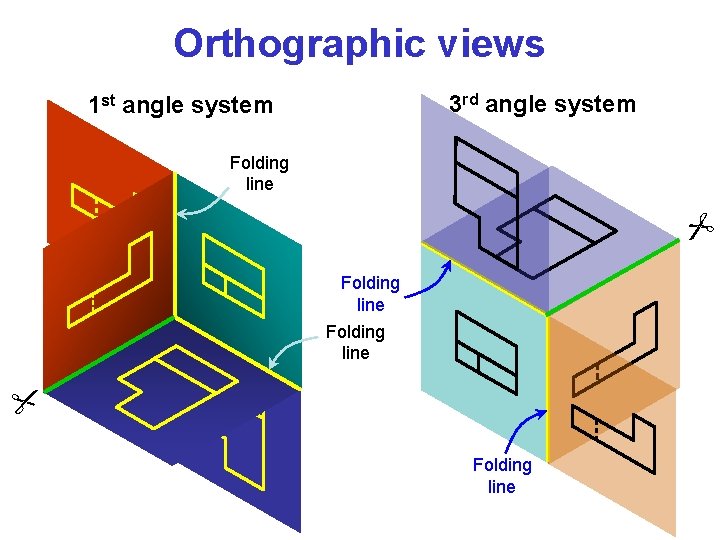
Orthographic views 3 rd angle system 1 st angle system Folding line

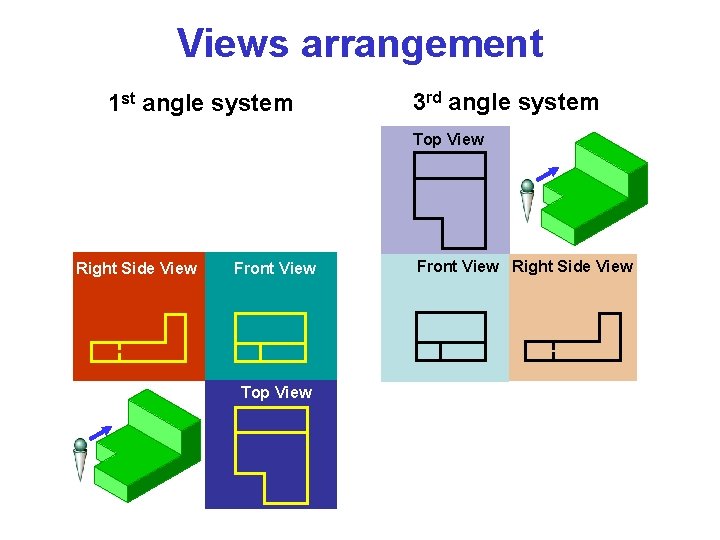
Views arrangement 1 st angle system 3 rd angle system Top View Right Side View Front View Top View Front View Right Side View

Projection symbols 1 st angle system 3 rd angle system 1. 7 d d 2. 2 d

Basic dimensioning Contents

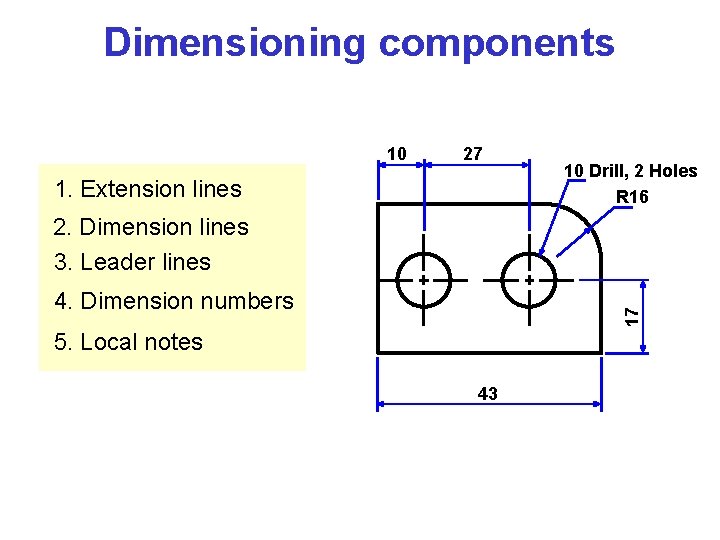
Dimensioning components 10 27 1. Extension lines 10 Drill, 2 Holes R 16 2. Dimension lines 3. Leader lines 17 4. Dimension numbers 5. Local notes 43

Primary auxiliary view Contents

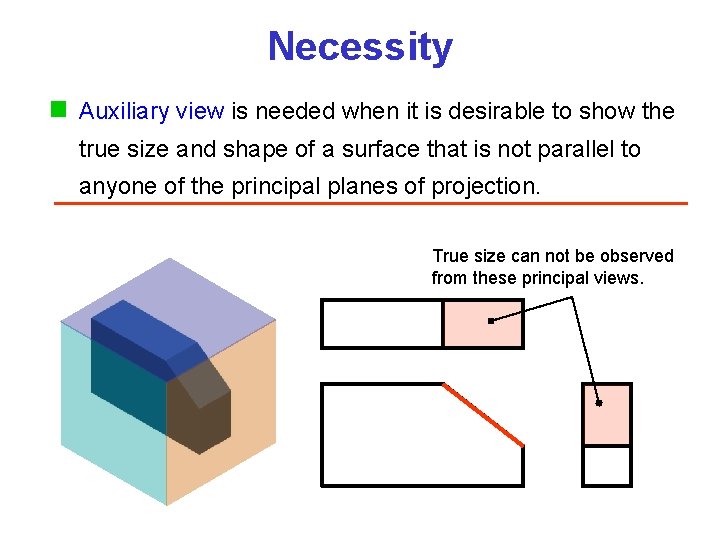
Necessity Auxiliary view is needed when it is desirable to show the true size and shape of a surface that is not parallel to anyone of the principal planes of projection. True size can not be observed from these principal views.

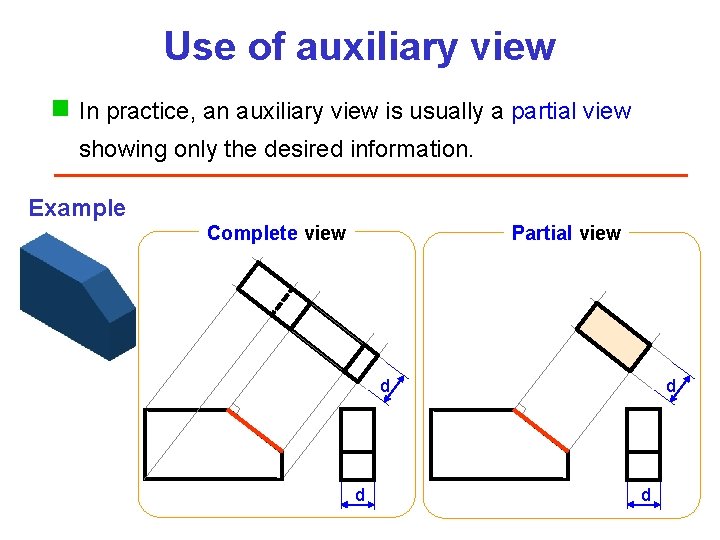
Use of auxiliary view In practice, an auxiliary view is usually a partial view showing only the desired information. Example Complete view Partial view d d

Types of an auxiliary view Primary auxiliary views may be classified into 3 types by their relative to the principal views. 1. Adjacent to front view 2. Adjacent to top view 3. Adjacent to side view

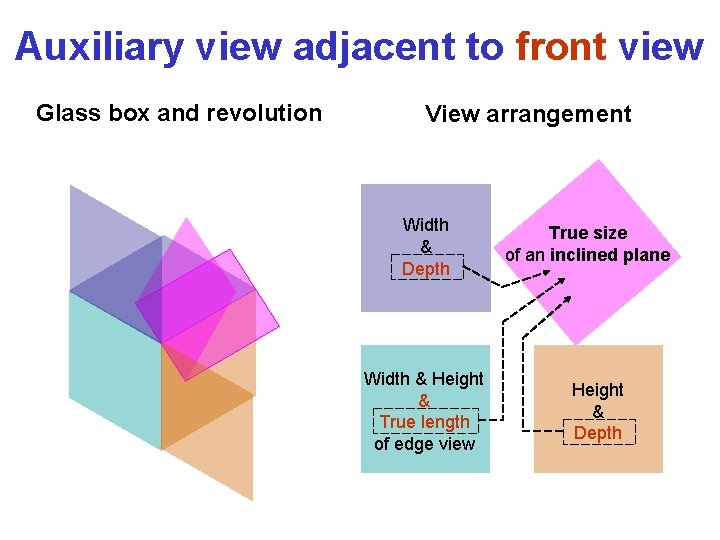
Auxiliary view adjacent to front view Glass box and revolution View arrangement Width & Depth Width & Height & True length of edge view True size of an inclined plane Height & Depth

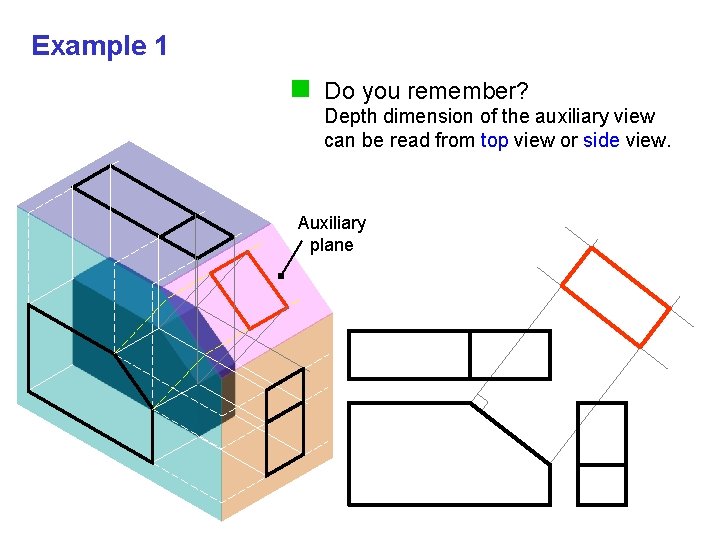
Example 1 Do you remember? Depth dimension of the auxiliary view can be read from top view or side view. Auxiliary plane

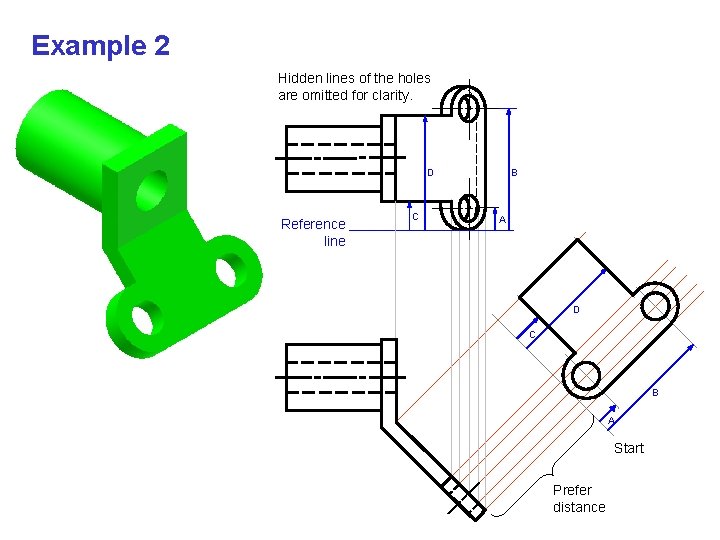
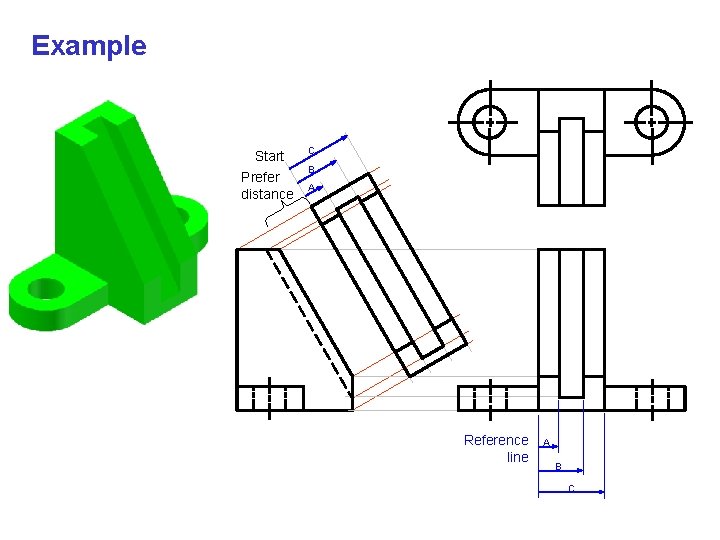
Example 2 Hidden lines of the holes are omitted for clarity. D Reference line C B A D C B A Start Prefer distance

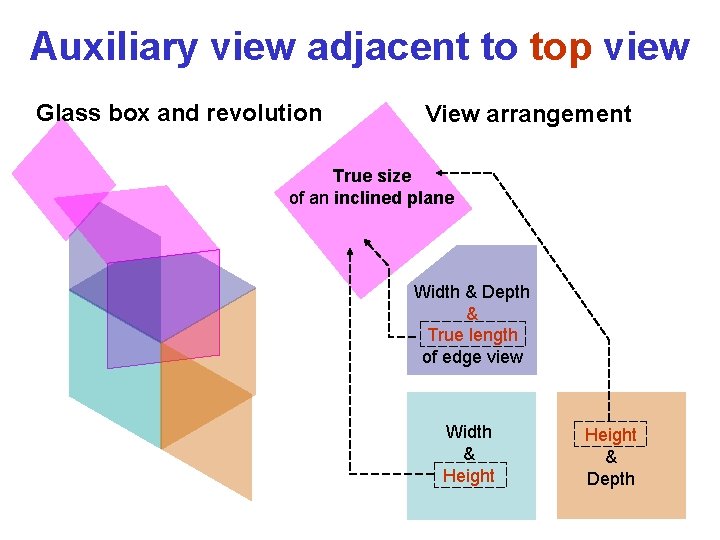
Auxiliary view adjacent to top view Glass box and revolution View arrangement True size of an inclined plane Width & Depth & True length of edge view Width & Height & Depth

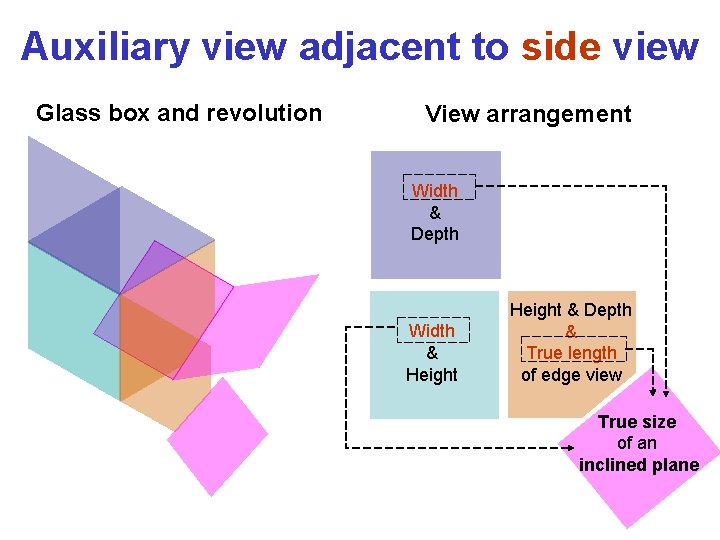
Auxiliary view adjacent to side view Glass box and revolution View arrangement Width & Depth Width & Height & Depth & True length of edge view True size of an inclined plane

Example Start Prefer distance C B A Reference line A B C