Manufacturing Design An Introduction to the Technological World


 Make a list of at least 25 different")


- Slides: 96
Manufacturing & Design An Introduction to the Technological World and the People who Create it…
Unit Overview The purpose of this unit is for you to learn how new technologies are developed and manufactured and how they affect your way of life. During the next several weeks you will learn about: Developing new products The engineering design process How to create engineering drawings
Final Project As a final project in this unit, you will design a new product, first as an individual, and then as a team. Your final project will be a “desk organizer” made from recycled materials.
What Makes a Good Design Notebook? Before you begin to design you have to setup your design notebook. So what makes a good notebook? A good engineering design notebook is one that can be used to reconstruct your work even years after you have completed the original project. Other engineers should be able to use the notebook to reconstruct your work. The notebook will be used to determine the rightful owner of patents and other proprietary ideas.
Design Notebook Guidelines Keep a table of contents in the front of the notebook – go to the middle of your notebook and title your page as Table of Contents Every page of the notebook must be numbered on the outside corner – number your notebook pages All entries should be done in ink Make sure you record all of your information and data Don’t crowd information on the pages Keep your notebook and table of contents up-to-date Include all the information favorable or unfavorable. Errors – cross them out with a single line or an X (make sure you can still read the information) Never tear out a page Rough drawings and calculations should be done directly in the notebook
Design Notebook Guidelines Title each page/section of the notebook and enter the information on the Table of Contents. Sign and date the notebook page on the day you make the entry. Information on loose sheets of paper should be entered into the notebook by: Taping the loose paper to the next available blank page in the notebook Taping each corner of the loose paper Use a tape that will accept ink permanently Place your signature on the loose paper, continue across the tape and end on the design notebook page. Sign across each corner of the taped page. Date the signature.
Gantt Chart Gantt charts are used by engineers to break large projects into smaller tasks with time estimates. Add the following Gantt Chart for unit 1 to your engineering notebook.
Task 1. 1: What is Engineering? 1. 2: Design Process 1. 3: Engineering Drawing 1. 4: Define the Problem 1. 5: Research the Problem 1. 6: Develop Possible Solutions 1. 7: Choose the Best Solution 1. 8: Create a Prototype 1. 9: Test and Evaluate 1. 10: Communicate the Solution 1. 11: Redesign Class Periods 5 10 15 20 25 30 35 40 √
On your Own… (Homework or otherwise) Make a list of at least 25 different technologies that you see in a day. Technology is… All of the ways that people modify nature to suit human needs or wants. Do not include specific objects on your list, but rather kinds of objects or processes. Chevrolets, Cadillacs, and Jeeps are not three different technologies; they are all cars with internal combustion engines. An electric car is a different technology because it works on different principles.
Class Discussion: Technologies What were some of the technologies you listed?
What do you know? What is Engineering?
What do you know? What is Engineering?
Task 1. 1: What is Engineering? Essential Questions: How and why do industrial designers work in diverse teams? How do industrial designers improve current technologies?
Nightline: Deep Dive A design story featuring IDEO and a talented team of designers… (Video length - 22 min. )
Let’s Discuss What were the different team member roles in the video? Did everyone in the team have an engineering background? What steps did the team follow? How did they make sure that everyone’s idea was considered? Is this what you thought engineers did?
Key Points to Remember Engineers work in teams with a variety of expertise in order to come up with different solutions. All suggestions are respected and evaluated fairly in order to develop a good solution. You will be working as a part of a design team similar to the one you saw in the video today.
So far, we have… asked ourselves some questions about engineering, technology, design, and team work. seen the design process first hand through IDEO’s shopping cart project. identified some key components of team work. defined technology and thought of various different technologies.
1. 1 Essential Questions Revisited How and why do industrial designers work in diverse teams? How do industrial designers improve current technologies?
Task 1. 2: Design a Coffee Cup Sleeve The Design Process Essential Questions: How do people use a given technology? How are technologies redesigned to meet people’s needs? What is a mock-up and how does it help the design process? How is mathematics used to determine costs and feasibility? What do industrial designers, engineers, and scientists do?
Your challenge… Throughout this activity, using a manila folder and tape, you will build a mockup (model) of a new kind of coffee cup sleeve. Think about new features or improve some old ones. You’ll have to design the coffee cup sleeve and calculate how much you can sell them for based on the cost of manufacturing and distributing the new product.
Define the Problem Research the Problem Redesign Communica te Engineeri ng Design Develop Possible Solutions Choose the Best Solution Test and Evaluate Create a Prototype
This stage includes the problem statement and also a list of Criteria/Constraints. Criteria (desired features) Constraints (limitations) Your Task: Design a coffee cup sleeve Must fold up for storage. Must open and be ready to use. Must have a handle. Only the provided materials may be used
Research comes in many forms: Internet Interviews Observations Library In the interest of time, we’ll conduct limited research by letting you interview one-another about platform design as well as shoe aesthetics. Your Task: Gather information about: how to make a structure that will fold. What types of coffee sleeves already exist.
Brainstorming – think of as many solutions as possible. This stage almost always entails quick design sketches Your Task: Sketch at least two different ideas Label the different parts of your design Think about which components are the most important to you?
Be careful not to pick a solution based solely on just if you “like it. ” At this point you need to compare each solution with the criteria you set in the identify the problem step. Design 1 2 3 4 5 6 Folds flat - 5 Easy to use - 5 5 4 Handle Tota -5 l 3 12 Create a Pugh Chart • Which solution will you make a mock-up of with manila folders? • Can you combine various aspects of different solutions into one final solution? • How will you cut the material and construct the design?
Before committing to a particular solution, engineers create a prototype. Prototype: full scale working model that tests whether the technology meets the requirements. Prototypes rarely work as expected. Your Task: Build a mock-up with the available materials. Pay attention to detail and try to produce a quality model. Grading – accomplishes task (4), appearance (6)
Test the solutions to see if it meets the design criteria. Your Task: Test your design and record your results. Does it fit? Does it fold flat? Can you open it and start using it easily?
Explain your solution Communicate the solution to the people who might use the product. Your Task: Why should someone buy your holder? What makes it worth it? If you had enough time and materials, what would you do differently?
Find a way to improve the initial design. Your Task: Go back to the first steps in the process and add some ideas about the problem you are trying to solve. The engineering design process is more like a wheel than a series of steps…it’s a constant cycle.
Define the Problem Research the Problem Redesign The design process is. Develop a Engineeri Communica Possible ng te continuous cycle. Solutions Design Choose the Best Solution Test and Evaluate Create a Prototype
Manufacturing How much would your cost be to manufacture? Cost of Materials – a materials engineer has decided you will use a material that costs $30 for each square yard (yd²). $30/1 yd² material Material Cost _______ How many products will fit on 1 yd² of material? _______ Material cost per item _______ Labor cost _______ 1 yd Overhead cost _______ 1 yd Total Production Cost _______
Manufacturing How much would your cost be to manufacture? As a manufacturing engineer you don’t want to waste materials because that increases the cost of the product. Try to create as many items as possible out of the $30 sheet. Start by figuring out how much material you will need to make one. If you can, unfold your mock-up so that it creates a pattern (also called a template). Lay it out on a clean sheet of your design notebook and draw a rectangle around the outside to show much material you will need to make another. You will probably have some waste. Measure the length and width of the rectangle then calculate the area: Area=length x width = ______ inches x ______ inches = _______ inches² Material Cost _______ How many products will fit on 1 yd² of material? _______ Material cost per item _______ Labor cost _______ Overhead cost _______ Total Production Cost _______
Manufacturing How much would your cost be to manufacture? In order to determine how many patterns you can fit onto one square yard of material, you will need to convert the area from square yards to square inches. Calculate the number of square inches in a square yard. Remember: Area (A) is length (l) multiplied by width (w). A=l x w(how many inches are in a yard? ) 1 yd²= ______ in² Material Cost _______ How many products will fit on 1 yd² of material? _______ Material cost per item _______ Labor cost _______ Overhead cost _______ Total Production Cost _______
Manufacturing How much would your cost be to manufacture? If you were to lay out your shoe template onto a square yard and trace it so the patterns are easy to cut out, how many items could you fit on one square yard? What would the material cost be for one item? Remember one square yard of material cost $30. Use the following formula to help: Material cost = cost for 1 yd² / # of holders on 1 yd² = ____ Material Cost _______ How many products will fit on 1 yd² of material? _______ Material cost per item _______ Labor cost _______ Overhead cost _______ Total Production Cost _______
The Cost of Manufacturing How much would your cost be to manufacture? Can you reduce the cost by further reducing the waste? Try making two or three templates and fitting them together in different ways to minimize waste. Sketch a pattern that results in minimum waste with at least 2 templates together in your notebook. How many templates can you fit on one square yard? Calculate the lowest material cost for one item. Use this information and the fact that 1 yard of material is $30. Material Cost _______ How many products will fit on 1 yd² of material? _______ Material cost per item _______ Labor cost _______ Overhead cost _______ Total Production Cost _______
The Cost of Manufacturing The Cost of Labor… In addition to buying the materials, the manufacturer needs to pay the employees. If the factory worker is paid $15 per hour, how much will he earn in an 8 -hour day? Earnings for a 5 day work week? Earning for a 52 -week year? If he can make 1 item every 10 minutes, how many can he make in an 8 hour day? Using the daily pay rate you Material Cost _______ How many products will fit on 1 yd² of material? _______ Material cost per item _______ Labor cost _______ Overhead cost _______ Total Production Cost _______
The Cost of Manufacturing Overhead Cost… The cost to rent the factory, pay the utility bills, and other business maintenance costs are grouped together as the cost of overhead. The easiest way to estimate manufacturing overhead on a single product is to determine plant overhead during a year and divide by the total number of products produced in that time. Assume your factory can produce 100, 000 items per year, and the overhead costs are $200, 000. What is the overhead cost per item? Material Cost _______ How many products will fit on 1 yd² of material? _______ Material cost per item _______ Labor cost _______ Overhead cost _______ Total Production Cost _______
The Cost of Manufacturing Total Production Cost… Using all of your figures, calculate the cost to produce one item. material cost + labor cost + overhead = total production cost Material Cost _______ How many products will fit on 1 yd² of material? _______ Material cost per item _______ Labor cost _______ Overhead cost _______ Total Production Cost _______
The Cost of Manufacturing Manufacturer’s Markup… You can’t sell a product for the same amount it costs you to produce it and make money (profit), but you can’t mark it up too much or the customer might go elsewhere. The markup is a percentage added to the cost of production. For example, to make a 10% profit you would add 10% of the total production cost to the total cost of production. To find 10% of the total production cost multiply the cost by. 10. To make 25% profit, the manufacturer multiples the production cost by. 25 and adds that value to the cost of production. The final sum is the wholesale cost. prod cost + (manufacturer’s markup x prod cost) = wholesale cost Total Production Cost _______ Wholesale Cost _______ Item Volume _______ Items per box _______ Wholesale $ per case _______ Cost per case with shipping _______
The Cost of Manufacturing Packing for Shipment… Factories do not sell products individually, but instead in full boxes, called cases to stores that sell to individual customers. Assume your holders will be tightly packed in a shipping box with cardboard packaging to protect them. To find the volume of one item in cubic inches, measure the overall volume of the assembled mock-up, adding about ¼” on all sides to allow for the cardboard packaging. Length (in) Width (in) Height (in) Items Measurements Packaging Measure = item +. 25 Volume (V) is length (l) multiplied by width (w) multiplied by height (h). What is the volume packaging? Volume = l xwxh V packaging = _____ in. x _____ in. = _____in³ Total Production Cost _______ Wholesale Cost _______ Item Volume _______ Items per box _______ Wholesale $ per case _______ Cost per case with shipping _______
The Cost of Manufacturing Packing for Shipment… The company has a big supply of shipping boxes, or cases, that are 18 in. long, 12 in wide, and 10 in high. What is the volume of one shipping box. How many items could you fit inside one case? Show you calculated your answer. Total Production Cost _______ Wholesale Cost _______ Item Volume _______ Items per box _______ Wholesale $ per case _______ Cost per case with shipping _______
The Cost of Manufacturing What you will charge per case… Calculate the price your manufacturing plant will need to charge for a case. Total Production Cost _______ Wholesale Cost _______ Item Volume _______ Wholesale Cost Per Item x Items per box = wholesale cost per box Items per box _______ Shipping and handling is $25 per box Wholesale $ per case _______ Wholesale Cost Per box + Shipping and Handling = total store cost Cost per case with shipping _______
The Cost of Manufacturing Retail Pricing… When a store buys items, it pays a “wholesale price. ” The store then sales the product for a higher “retail price” that is usually 50% more than the wholesale price. When setting the wholesale price per unit, your must consider all of the following: costs it takes to produce one unit The amount of money you want to make beyond your costs (your “profit”) Whether people will buy your product at the final “retail price” Total Production Cost _______ Wholesale Cost _______ Item Volume _______ Items per box _______ Wholesale $ per case _______ Cost per case with shipping _______
The Cost of Manufacturing Retail Price… Calculate the retail price. Assume the store owner would need to charge a markup of 50% to cover salaries, rent, overhead, and profit. Total Store Cost / Items per box = Store Cost per Item Store Cost of Each Item + (store’s cost markup x store cost of each item) = Retail price Total Production Cost _______ Wholesale Cost _______ Item Volume _______ Items per box _______ Wholesale $ per case _______ Cost per case with shipping _______ Manufacture’s Markup _______
The Cost of Manufacturing What are the trade-offs… Competition often means that the manufacturer has to find a way reduce the cost of the product or go out of business. The last step is to think about how you might reduce costs. Reducing the cost almost always involves trade-offs. Trade-off is a design choice in which one benefit is chosen at the expense of another.
The Cost of Manufacturing What are the trade-offs… Write about one trade-off that would make the product less expensive. Do you think this is a good trade-off? Write about one trade-off you think would help sell more products.
1. 2 Essential Questions Revisited Essential Questions: How are technologies redesigned to meet people’s needs? What is a mock-up and how does it help the design process? How is mathematics used to determine costs and feasibility? What do industrial designers, engineers, and scientists do?
Task 1. 3: Engineering Drawing Essential Questions: Why are engineering drawings important? What kinds of drawings are most useful to engineers and why?
Drawing Game Sit across from your partner with a manila folder between you Arrange your blocks any way you’d like and make a drawing to show they are positioned (you have 2 minutes). Give your drawing to your partner and have him/her arrange their blocks just as you have drawn them. Watch this process, but do not help. (you have 2 minutes). Remove the folder so your partner can compare his or her blocks with yours…Are they the same? Switch and follow the same process with your partner drawing.
What did you learn? How easy or difficult would this task be if they you were restricted to describing only in writing how to arrange the blocks rather than using drawings? How difficult would it be to create something really complicated, like an entire house, skyscraper, or an airplane?
Measurement The first step in creating and understanding engineering drawings is accurate measurement.
Reading a Ruler When reading a ruler, you want to find out how far the item is from zero. When reading a ruler, you must locate the zero marking, this may vary depending on the ruler. On some rulers, the zeros start at the end, but on others it starts about 1/4 of an inch from the end. If you do not check your ruler beforehand you will not be getting an accurate measurement.
Types of Measurements Standard – inches, feet, yards, and miles Metric – millimeters, centimeters, decimeters, decameters, kilometers, etc.
Reading a Standard Ruler
The Standard Measurement A B C D
Scale is a ratio of a length used in a drawing to portray the actual length of the object. In the drawing below, 1 inch represents 2 inches on the actual box so the scale is 1/2 or 1: 2. 1” Drawing 2” 1” 2”
Practicing Scale Keeping with the 1: 2 scale from the last slide, what would the scaled dimensions be in a drawing of the actual block shown below? Sketch the drawing and record the 1: 2 scale in your design notebook. 1: 2 scale H= ____ W= ____ L= ____ H=2” What would the scale be if you wanted to make it 3 times bigger? L=3” W=2”
Practicing Scale The actual gear represented on the card at your desk has an outside diameter (including gear teeth) of 16”. Measure the drawing on the card, sketch the gear in your notebook and record the correct scale (see below) Actual Size = 16 inches Scale: ______ model actual
Practicing Scale When writing scale as a ratio, use the same units on both sides of the colon. Do not mix units! For example: 1: 4 means 1 inch: 4 inches, or 1 foot: 4 feet – not 1 inch: 4 feet What is the scale if a 4 inch length on a drawing corresponds to a 4 -foot length on the actual object? A building has a wall of windows that is 12 feet across. If a scale of 1: 24 is used, how wide is the wall of windows on the drawing in inches?
Practicing Scale Car designers build models of new designs because, unlike a drawing, a model can be seen from all sides. If you build a 1: 10 model of a car that is 15 feet long, how long would the model be? Give your answer in inches.
Practicing Scale If you are a carpenter following a 1: 20 blueprint for a house and you measure one wall on the blueprint to be 8 inches long, how long should you build the wall for the house? Give your answer in inches. If you discovered that the architect who made the blueprint made a mistake, and the scale should really have been 1: 25, how would you need to change the length of the wall of the house?
4 Types of Drawings 1. Orthographic Drawings Shows the top, sides, and bottom of an object Also called multi-view drawings Should be drawn to scale
4 Types of Drawings 2. Isometric Drawings Isometric is from greek meaning “equal measure” Depth is shown by slanting the edges up at a 30 degree angle from the horizontal Especially useful to engineers because it shows depth, and each line is drawn to scale
4 Types of Drawings 3. Oblique Drawings Show the front, top, and one side of an object. Front drawn as front view and horizontal edges drawn at a 45 degree angle to give the impression of depth. Not drawn to scale, therefore not as useful to engineers
4 Types of Drawings 4. Perspective Drawings Show objects as they would appear to the naked eye, or as they would appear in a photograph Lines showing depth converge toward an imaginary vanishing point, creating the appearance of distance
Orthographic Drawing Typically, you only need the front, top, and side view in an orthographic drawing These views are two dimensional and do not show any depth…pay attention only to the faces of the object that can be seen from the side of the object you are drawing Let’s practice identifying views…
Orthographic Drawing Practice identifying the views of the following objects by shading the corresponding sides with matching colors or patterns:
Orthographic Drawing Practice identifying the views of the following objects by shading the corresponding sides with matching colors or patterns:
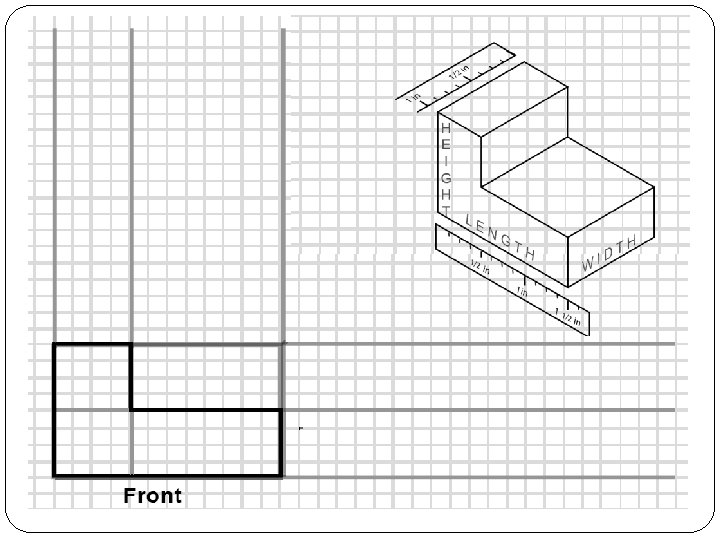
Creating your 1 st Orthographic Drawing Step 1: Draw the front view – starting in lower left corner of the paper Measure the length & height of the drawing and decide on the scale for the drawing Draw light construction lines to frame the front view then make any other relevant measurements and draw the shape using the construction lines as a guide. Color in the front, top, and side view of the diagram above
Creating your 1 st Orthographic Drawing Step 2: Prepare to draw the top and side views Draw construction lines extending upward and to the right from the front view (as shown below)
Creating your 1 st Orthographic Drawing Step 3: Draw the top view Use the construction lines you drew to place the top view Measure the width of the object to ensure you have the correct size
Creating your 1 st Orthographic Drawing Step 4: Draw the right side view Use the construction lines you drew to place the right side view
Creating your 1 st Orthographic Drawing Step 5: Verify correctness and erase construction lines
Orthographic Drawing Practice Draw a multi-view drawing of the following block: 1. 2.
Orthographic Drawing Practice Solution
Orthographic Drawing Practice Solution
Orthographic Drawing Practice Draw a multi-view drawing of the following block: 3. 4.
Orthographic Drawing Practice Solution
Orthographic Drawing Practice Solution
Orthographic Drawing Practice Draw a multi-view drawing of the following block: 5.
Orthographic Drawing Practice Solution
Hidden Lines Hidden lines are drawn as dashed lines and show hidden features of the object (ie. Holes, false ledges, etc) They show things you could see if you could look through objects
Dimensioning All engineering drawings should indicate dimensions - the distances and locations on the actual object Dimensions usually consist of a dimension line, capped by two arrowheads and broken in the middle for the measured distance Two extension lines may extend from the edges of the object to show clearly where the dimension line begins and ends Note: dimension and extension lines should be drawn lighter than object lines
Dimensioning
Title Blocks Title blocks are used to give essential information on technical drawings Located on the lower-right side of the engineering drawing and typically include: Name of the drafter Title of drawing Scale Date
Final Orthographic Practice Create orthographic drawings for the following blocks. Include a Title Block and dimensions. Scale is 1: 12 1” = 12”
Do Now… Complete the missing view of the object below.
Review Remember… Orthographic Drawings are drawn to scale Draw Top, Front, and Right Side as follows: Let’s review worksheet problems 5 -7, 5 -8, 5 -9, 5 -10, and 5 -17
Creating Isometric Drawings Step 1 – Draw front corner, slanting lines at 30 degrees Step 2 – Keeping the lines parallel to your initial corner sketch lines and using a ruler to maintain correct size, draw the front view shape Step 3 – Complete drawing, ensuring lines stay parallel
Another way to create isometric drawings… Step 1 – Draw front corner, slanting lines at 30 degrees Step 2 – Lightly draw an isometric box that the entire shape will fit in Step 3 – sketch details of the shape on the front, top, and side Step 4 – Erase lines that are not needed
Practice Create Isometric drawings of the following part:
Practice Create Isometric drawings of the following part:
For Homework…