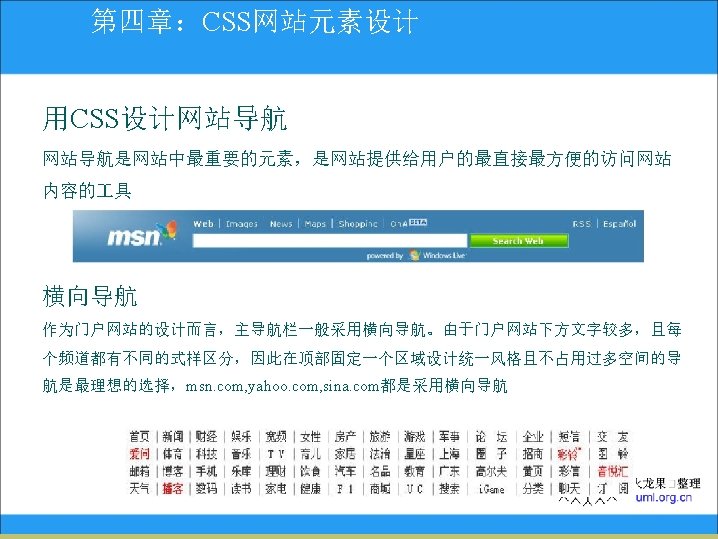
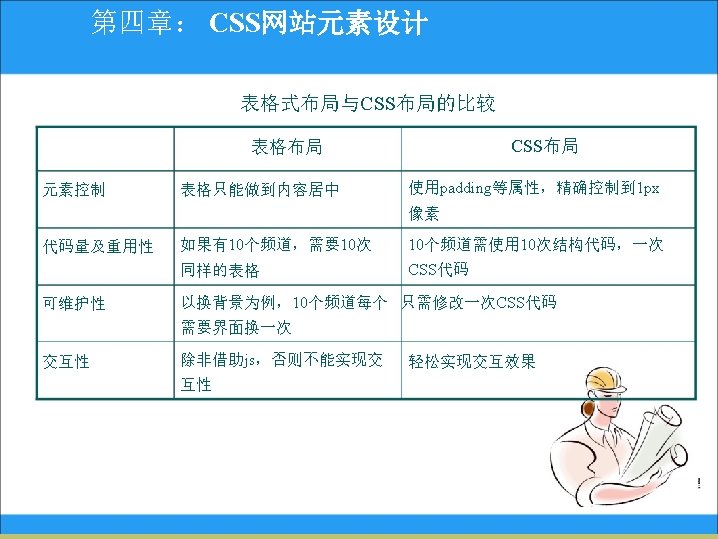
WebCSS VS CSS Css content Float right div

 Css代码: #content{ Float: right; /*div右对齐*/ Margin-top: 10 px; /*div有10像素的上外边距*/ Margin-right:")
第一章 Web标准与CSS布局 VS. CSS布局(代码) Css代码: #content{ Float: right; /*div右对齐*/ Margin-top: 10 px; /*div有10像素的上外边距*/ Margin-right: 20 px; /*同上右外边距*/ Margin-bottom: 10 px; /*同上下外边距*/ Margin-left: 10 px; /*同上右外边距*/ Background-color: blue; /*背景色为蓝色*/ Text-align: center; /*内容居中*/ Line-height: 160%; /行高为默认值的160%/ Width: 50%; /*对象宽度为页面的50%*/ }
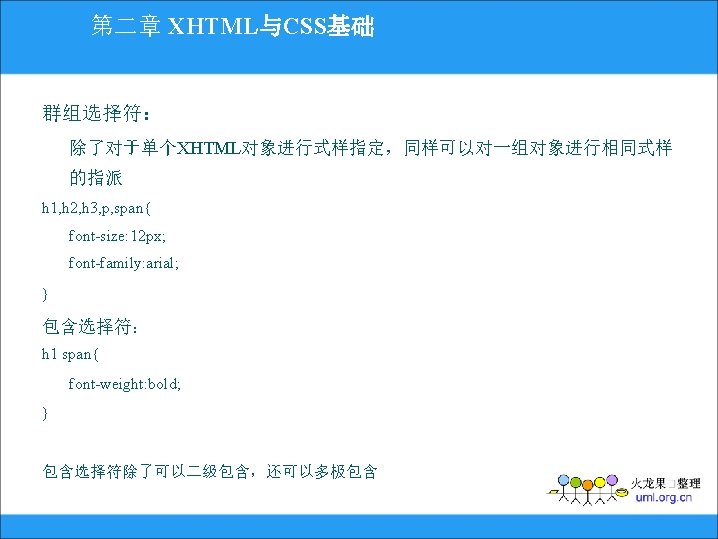
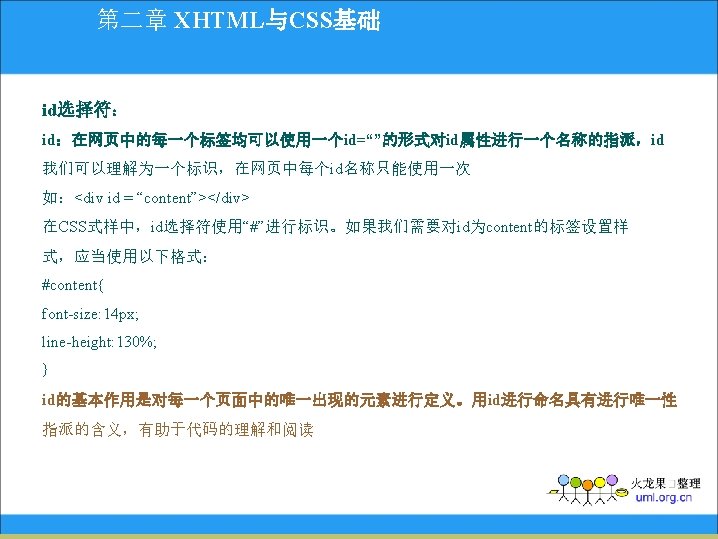

第二章 XHTML与CSS基础 伪类及伪对象列表 伪类 : visited : link : first-letter : hover : focus : first-line : active : first-child : before 伪对象 : after
 width: 12 px em 相对于当前对象内文本的字体尺寸 font-size:")
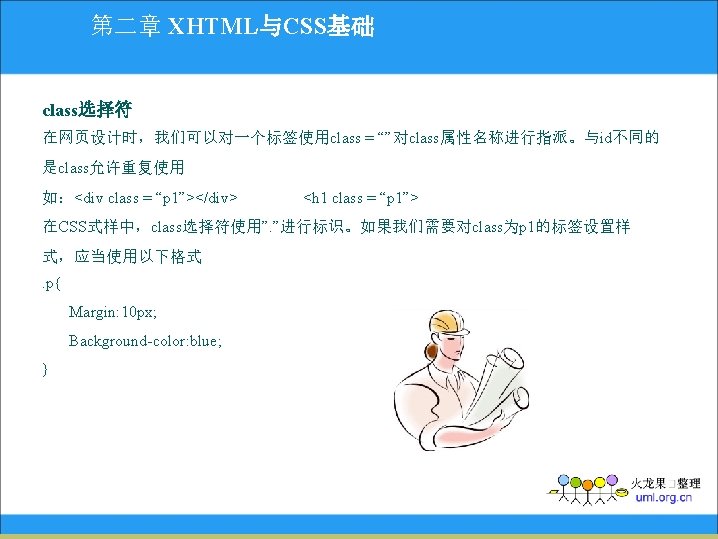
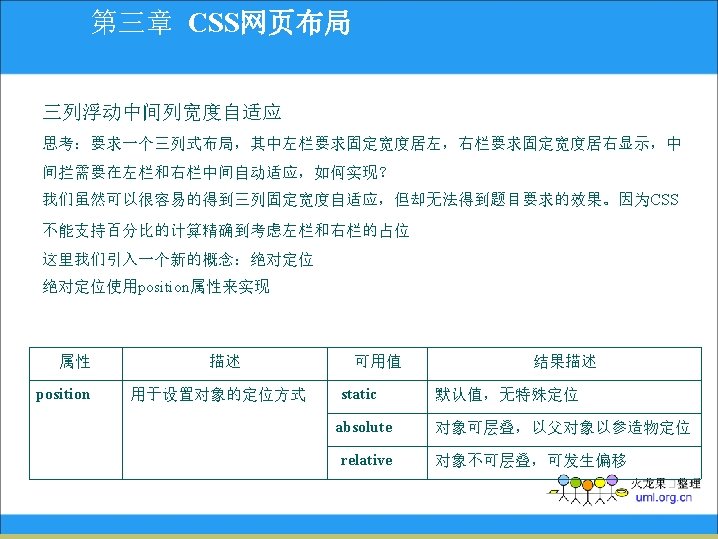
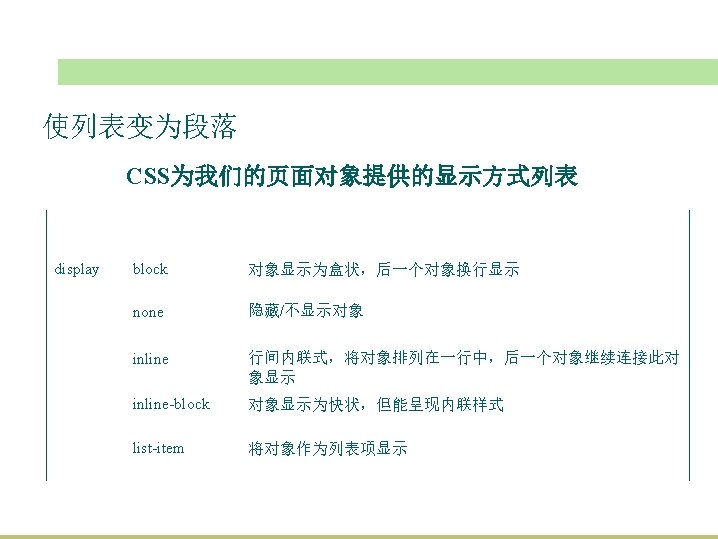
第二章 XHTML与CSS基础 CSS数值单位列表 单位 描述 示例 px 像素(pixel) width: 12 px em 相对于当前对象内文本的字体尺寸 font-size: 1. 2 em 相当于当前字符的1. 2倍高 ex 相对于字符高度的相对尺寸 font-size: 1. 2 ex pt 点/镑(point) font-size: 9 pt pc 派卡(pica) font-size: 0. 5 pc in 英寸(inch) height: 12 in mm 毫米(millimeter) font-size: 4 mm cm 厘米(centimeter) font-size 0. 2 cm
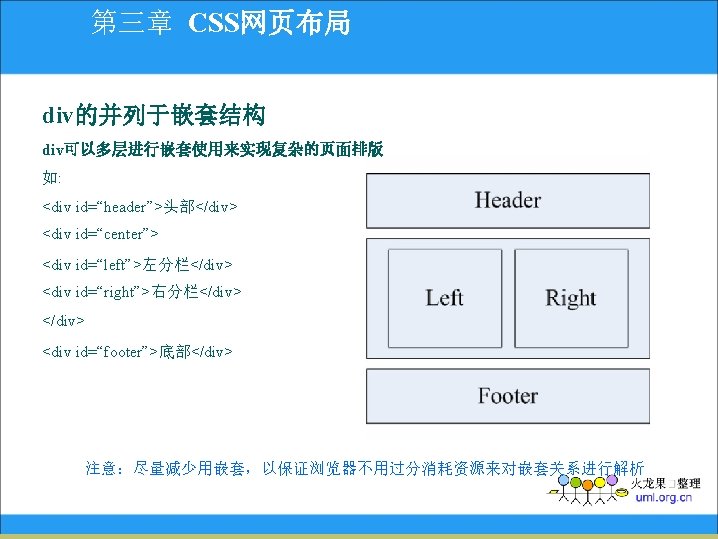
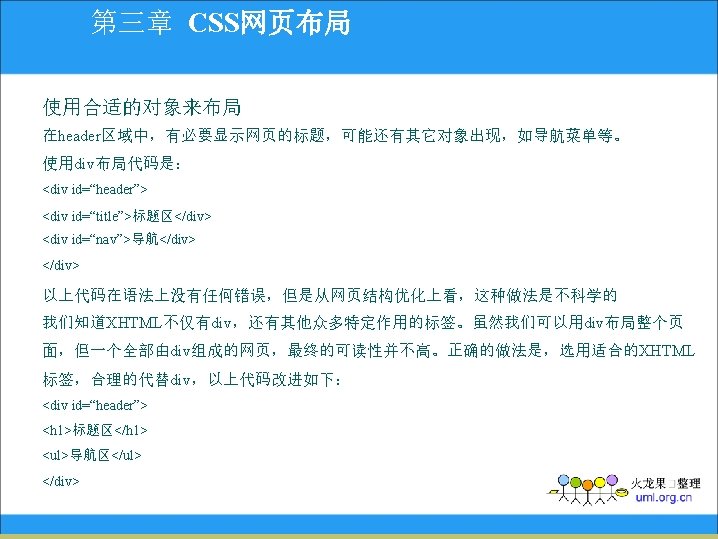

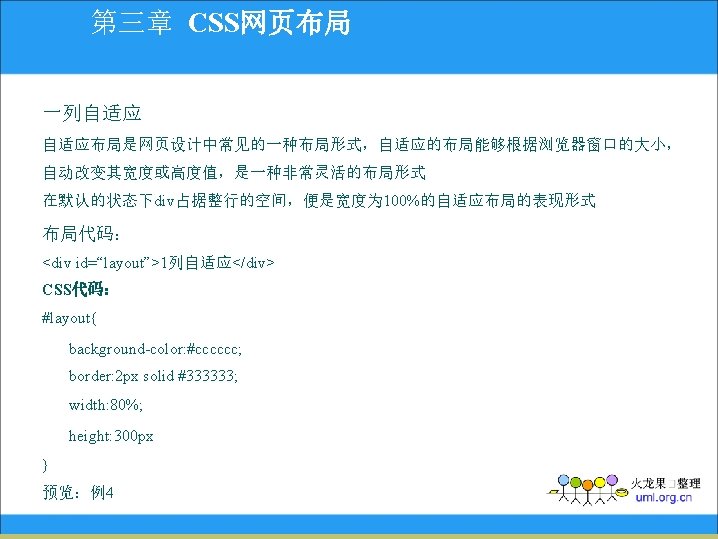
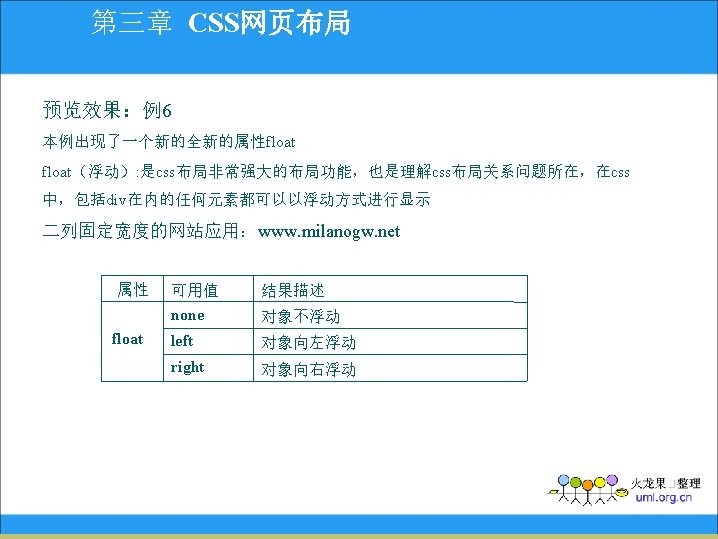
第三章 CSS网页布局 一列固定宽度 布局代码: <div id=“layout”>1列固定宽度</div> CSS代码: #layout{ background-color: #cccccc; border: 2 px solid #333333; width: 300 px; height: 300 px } 预览:例3 Border: 2 px solid #333333 的意思是border的缩写,详情请看CSS 2. 0手册

第三章 CSS网页布局 一列固定宽度居中 布局代码: <div id=“layout”>1列固定宽度居中</div> CSS代码: #layout{ background-color: #cccccc; border: 2 px solid #333333; width: 300 px; height: 300 px; margin: 0 px auto; } 效果预览:例5

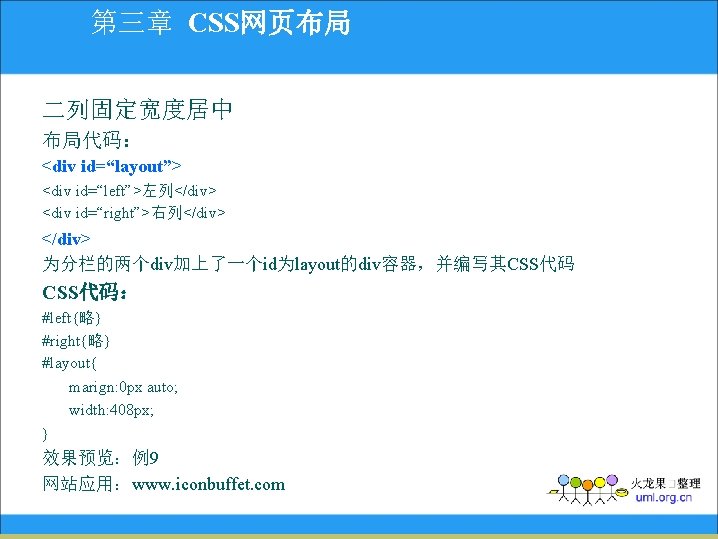
第三章 CSS网页布局 二列固定宽度 布局代码: <div id=“left”>左列</div> <div id=“right”>右列</div> CSS代码: #left{ background-color: #cccccc; border: 2 px solid #333333; width: 300 px; height: 300 px; fioat: left; } #right{ background-color: #cccccc; border: 2 px solid #333333; width: 300 px; height: 300 px; float: left; }

第三章 CSS网页布局 二列宽度自适应 布局代码: <div id=“left”>左列</div> <div id=“right”>右列</div> CSS代码: #left{ background-color: #cccccc; border: 2 px solid #333333; width: 30%; height: 300 px; fioat: left; } #right{ background-color: #cccccc; border: 2 px solid #333333; width: 70%; height: 300 px; float: left; }
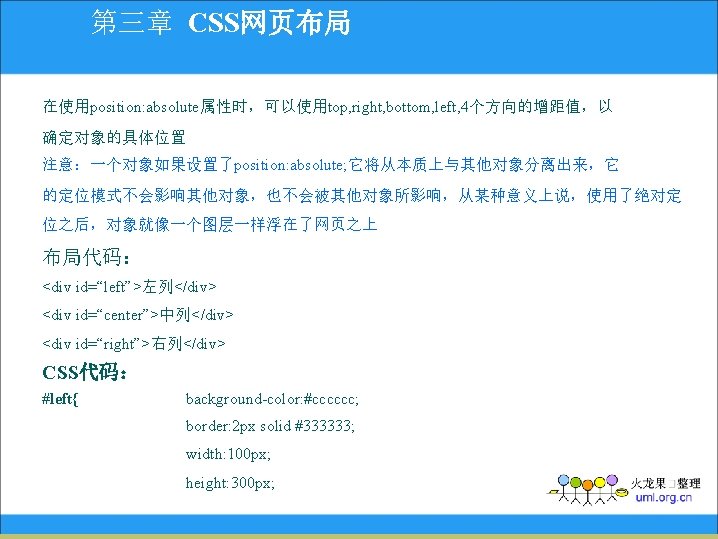

第三章 CSS网页布局 position: absolute; top: 0 px; left: 0 px } #right{ background-color: #cccccc; border: 2 px solid #333333; width: 100%; height: 300 px; position: absolute; top: 0 px; left: 0 px }

第三章 CSS网页布局 #center{ background-color: #cccccc; border: 2 px solid #333333; height: 300 px; margin-left: 100 px; margin-right: 100 px; } *{ margin: 0; padding: 0; } //IE默认有一定的内外补丁,所以我们必须把它默认的内外补丁清除,才能够准确的定位 效果展示:例10
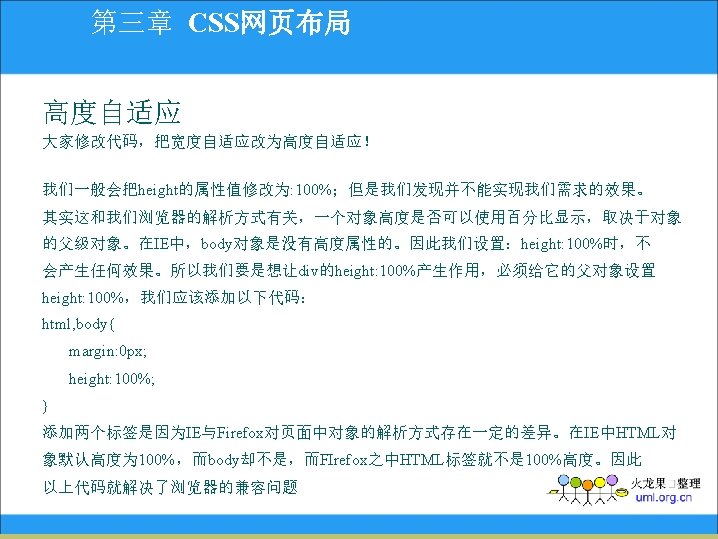

第三章 CSS网页布局 布局代码: <div id="center">中列</div> CSS代码: html, body{ padding: 0 px; margin: 0 px; height: 100%; } #center{ background-color: #cccccc; border: 2 px solid #333333; height: 100%; }

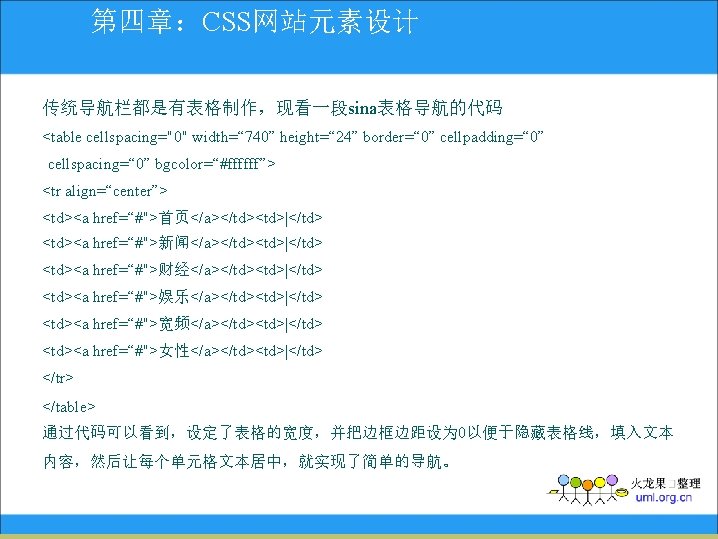
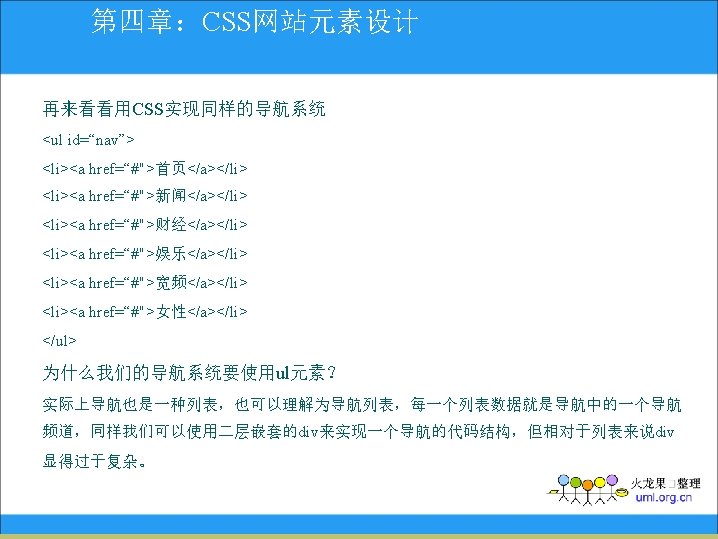

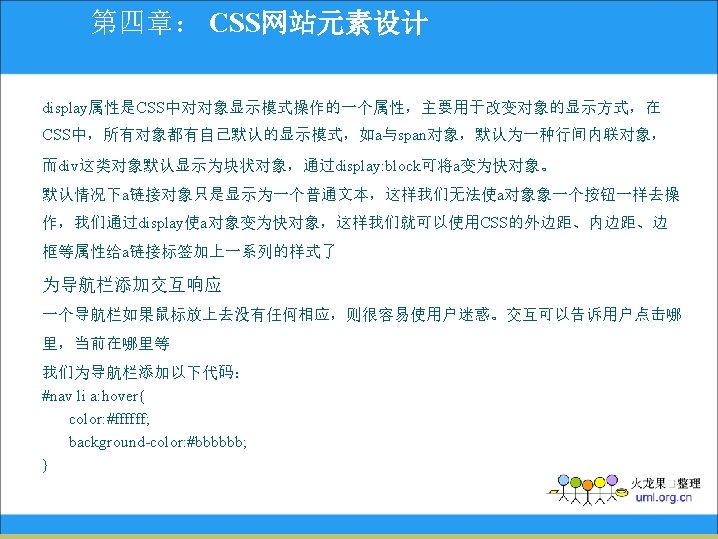
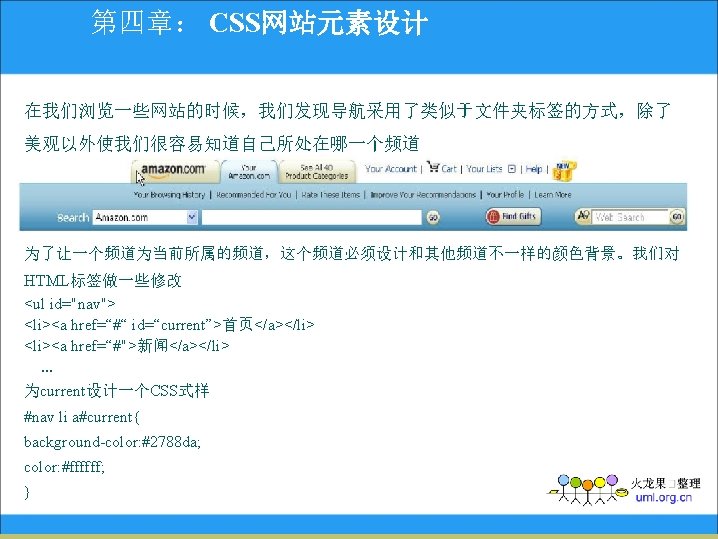
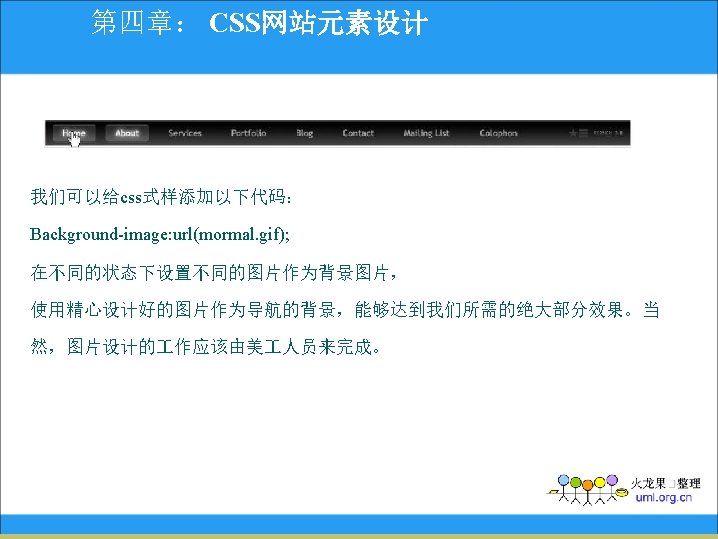
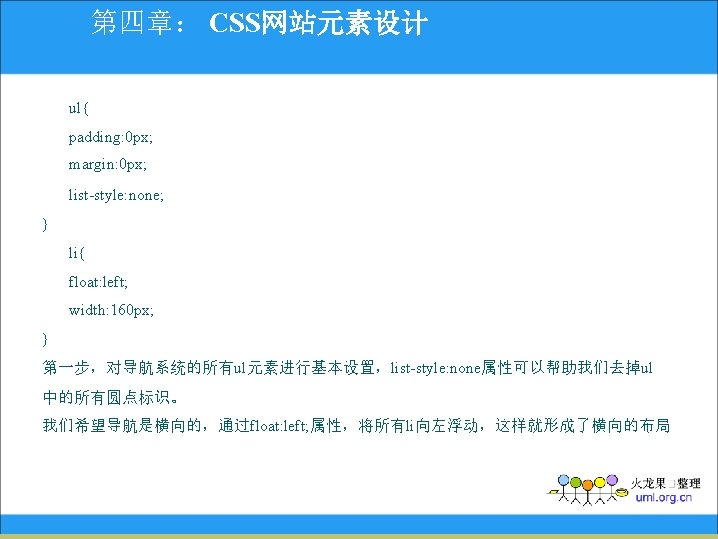
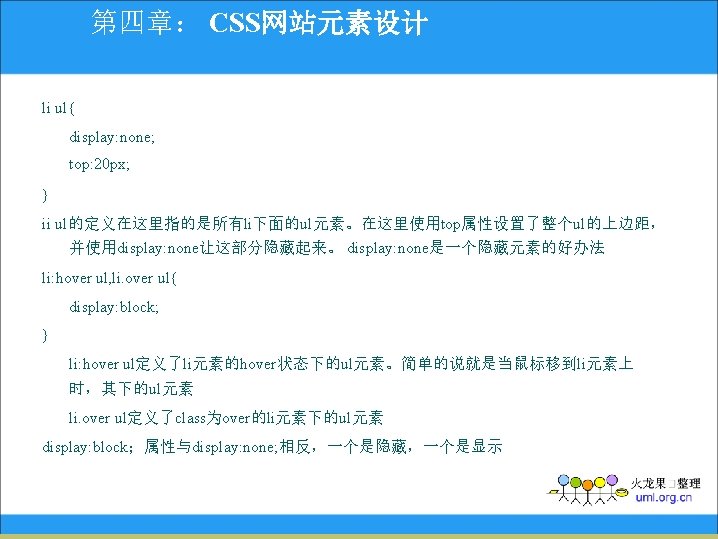
第四章: CSS网站元素设计 下边我们为ul定义css式样 #nav li{ float: left; } #nav li a{ color: #000000; text-decoration: none; padding-top: 4 px; display: block; width: 97 px; height: 22 px; text-align: center; background-color: #cecece; margin-left: 2 px; } 这里display: block是重点

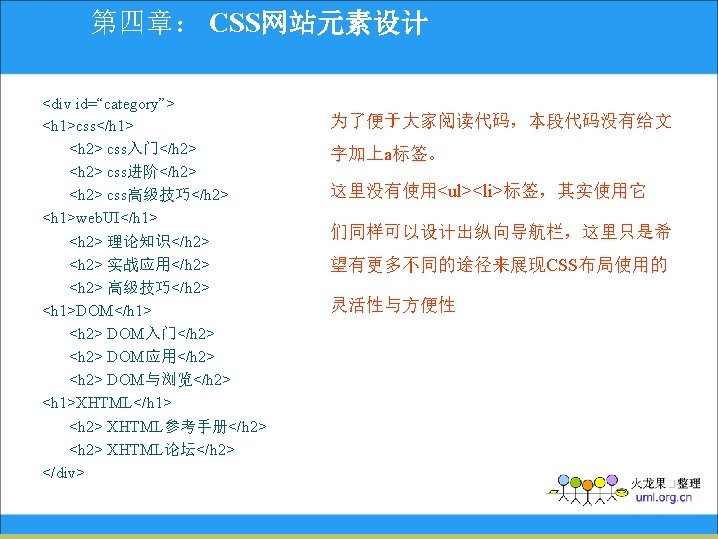

第四章: CSS网站元素设计 CSS代码: #category{ width: 100 px; border-right: 1 px solid #c 5 c 6 c 4; border-bottom: 1 px solid #c 5 c 6 c 4; border-left: 1 px solid #c 5 c 6 c 4; } #category h 1{ margin: 0 px; padding: 4 px; font-size: 12 px; font-weight: bold; border-top: 1 px solid #c 5 c 6 c 4; background-color: #f 4 f 4 f 4; }

第四章: CSS网站元素设计 #category h 2{ margin: 0 px; padding: 4 px; font-size: 12 px; font-weight: normal; } 我们发现在category h 2和category h 1中有部分重复代码我们可以优化一下 #category{ width: 100 px; border-color: c 5 c 6 c 4; border-style: solid; border-width: 0 px 1 px 1 px; }

第四章: CSS网站元素设计 #category h 1, #category h 2{ margin: 0 px; padding: 4 px; font-size: 12 px; } #category{ border-top: 1 px solid #c 5 c 6 c 4; background-color: #f 4 f 4 f 4; } #category{ font-weight: normal }
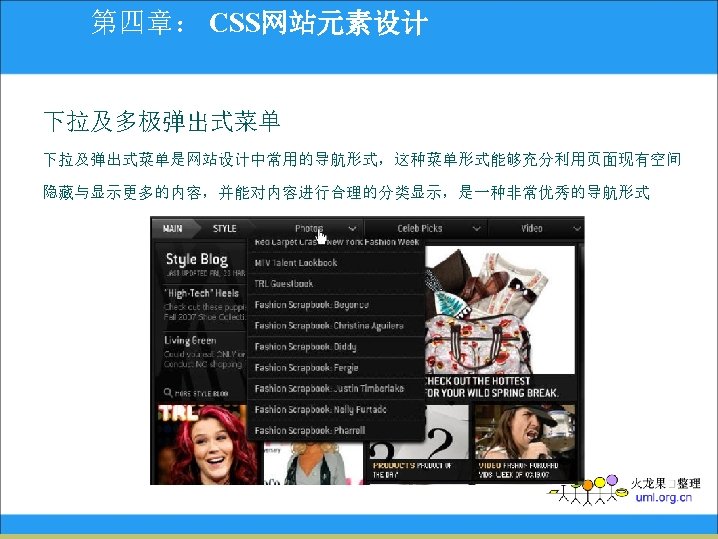

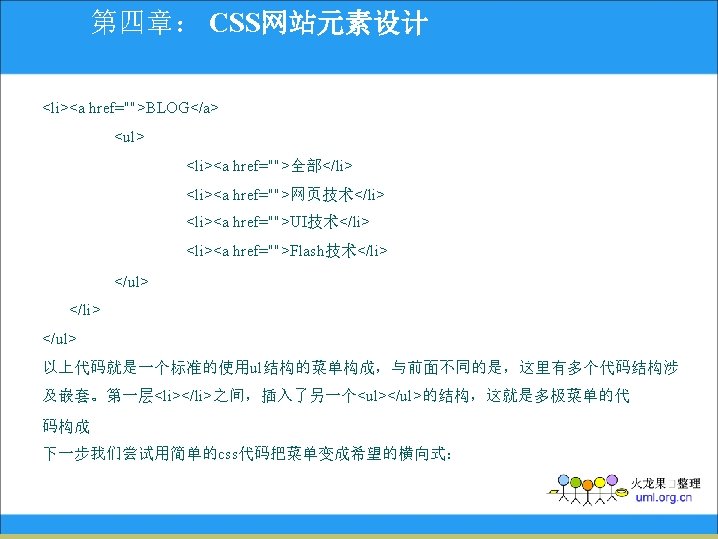
第四章: CSS网站元素设计 结构代码: <ul id="nav"> <li><a href="">文章</a> <ul> <li><a href="">css教程</li> <li><a href="">DOM教程</li> <li><a href="">XML教程</li> <li><a href="'>Flash教程</li> </ul> </li> <li><a href="">参考</a> <ul> <li><a href="">XHTML</li> <li><a href="">XML</li> <li><a href="">CSS</li> </ul> </li>

第四章: CSS网站元素设计 背景色 CSS可以更灵活的设置背景色. 例如以下效果: XHTML代码: <h 1>16进制颜色值</h 1> <h 2>RGB颜色值</h 2> <h 3>颜色名称</h 3> <h 4>透明背景</h 4> CSS代码: body{background-color: #ededed; } h 1{background-color: #6 e 768 f; } h 2{background-color: rgb(53, 161, 32); } h 3{background-color: mediumslateblue; } h 4{background-color: transparent; }

第四章: CSS网站元素设计 背景图片 XHTML代码: <div id=“content”> <div> CSS代码: #content{ border: 1 px solid #000 fff; height: 500 px; background-image: url(pic/bg 1. jpg); } 预览效果
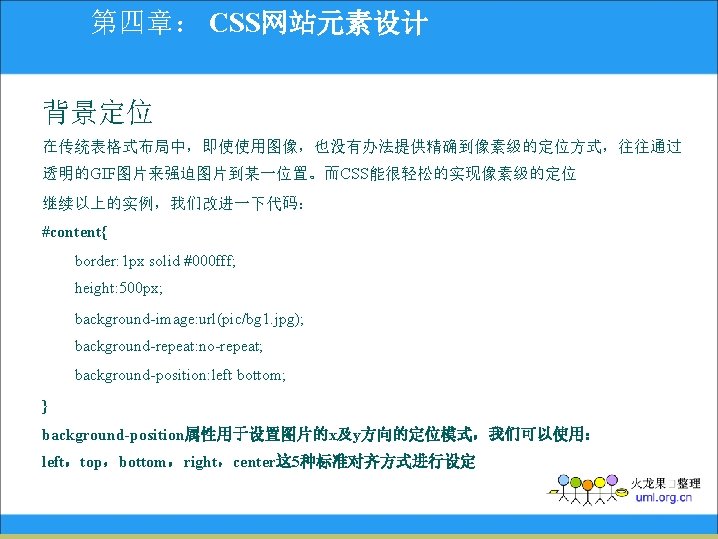
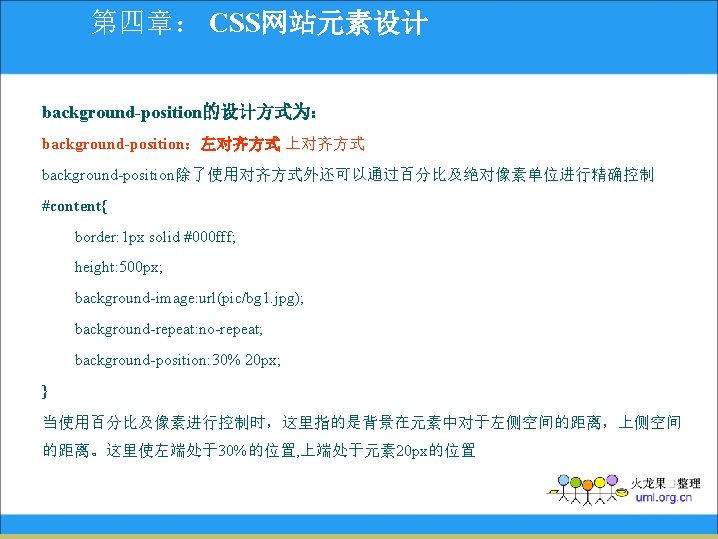


第四章: CSS网站元素设计 body的background-attachment属性便是用于控制背景滚动方式。默认为scroll, 也可以使用fixed的值来表示背景为固定位置 背景属性的缩写 与其他CSS属性一样,背景的属性代码也可以采用缩写形式编写,基本语法是: background: 背景色 背景图片 背景平铺模式 背景滚动模式 背景定位 我们对以下代码进行缩写: #content{ background-color: #EDEDED; background-image: url(pic/bg 1. jpg); background-repeat: no-repeat; background-position: 30% 20 px; } # content{background: #EDEDED url(pic/bg 1. jpg) no-repeat 30% 20 px; }
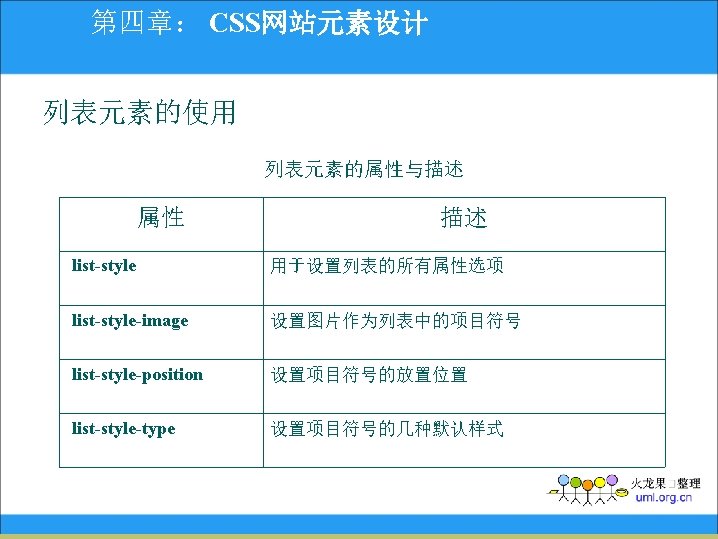
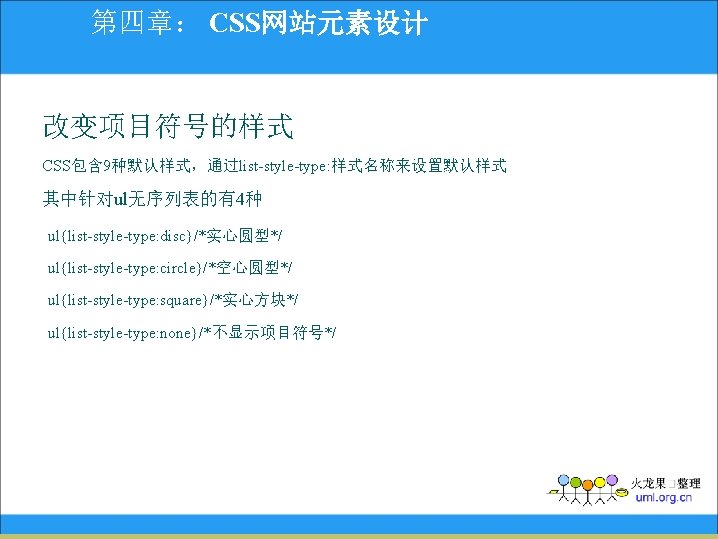

第四章: CSS网站元素设计 ol列表出去none外,有5种 ol{list-style-type: decimal}/*阿拉伯数字*/ ol{list-style-type: lower-roman}/*小写罗马数字*/ ol{list-style-type: upper-roman}/*大写罗马数字*/ ol{list-style-type: lower-alpha}/*小写英文字母*/ ol{list-style-type: upper-alpha}/*大写英文字母*/
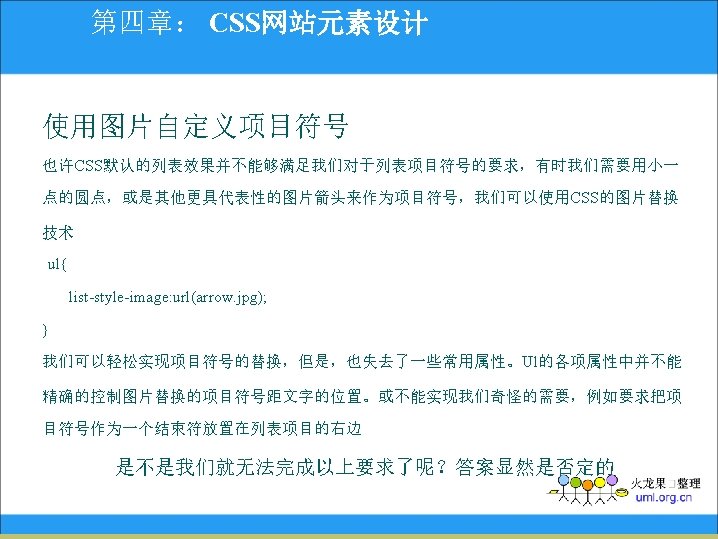

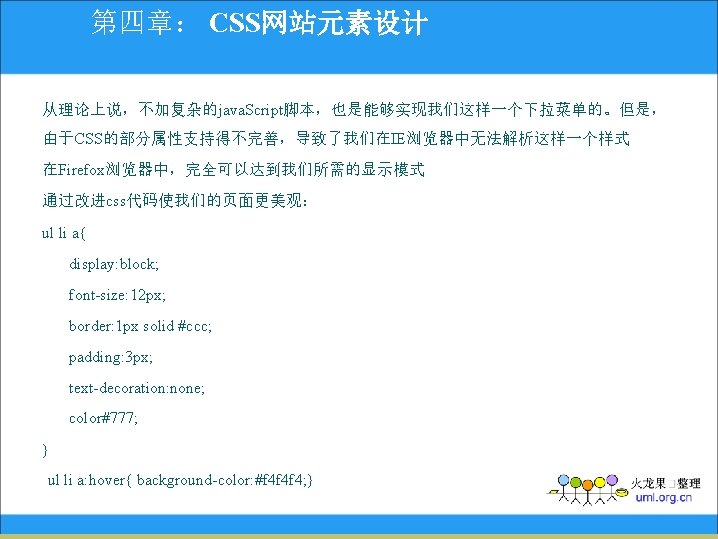
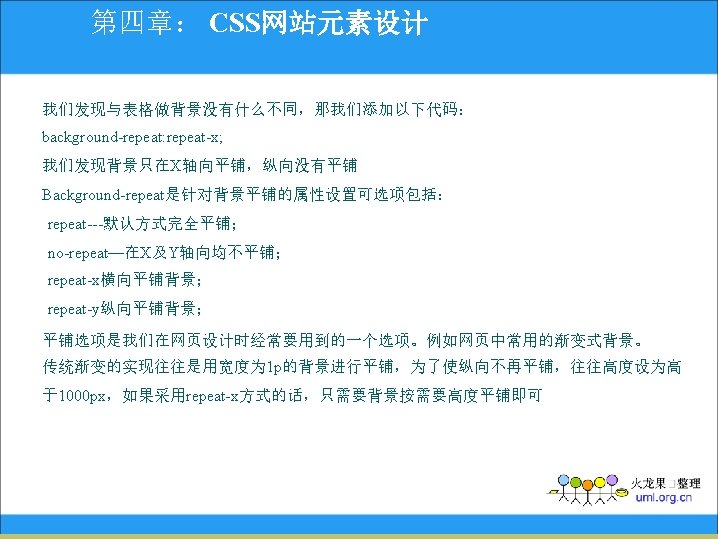
第四章: CSS网站元素设计 首先我们需要知道的是, ul标签和其他标签一样,支持CSS中的大部分公用属性。这之中当然 包括background-color, background-image. 我们完全可以使用背景来代替list-style的项 目符号 重新编写CSS代码: ul{ list-style-type: none; } li{ background-image: url(arrow. jpg); background-repeat: no-repeat; background-position: 90 px 3 px; padding-left: 20 px; } 我们通过精确的控制背景就能轻松达到所需的效果

第四章: CSS网站元素设计 原格式如:例3 我们添加以下代码: ul{ display: inline; margin-left: 5 px; padding: 0 px; } ul li{ display: inline; list-style-type: none; } h 1, h 2{ font-size: 16 px; display: inline; font-weight: normal; }
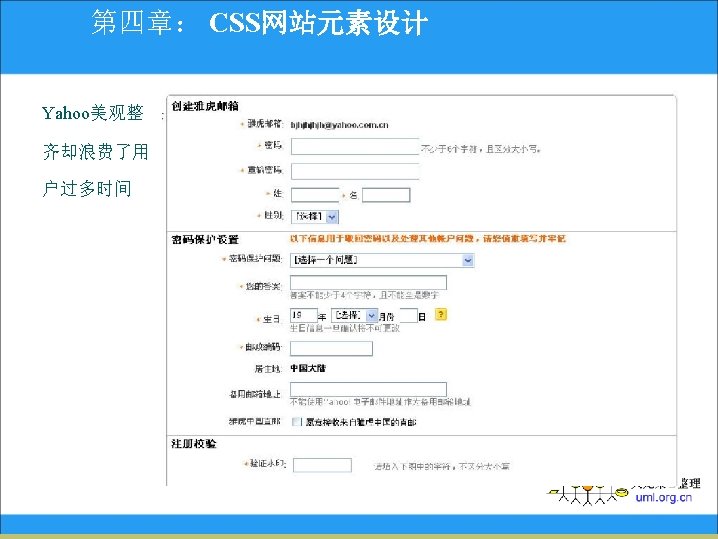
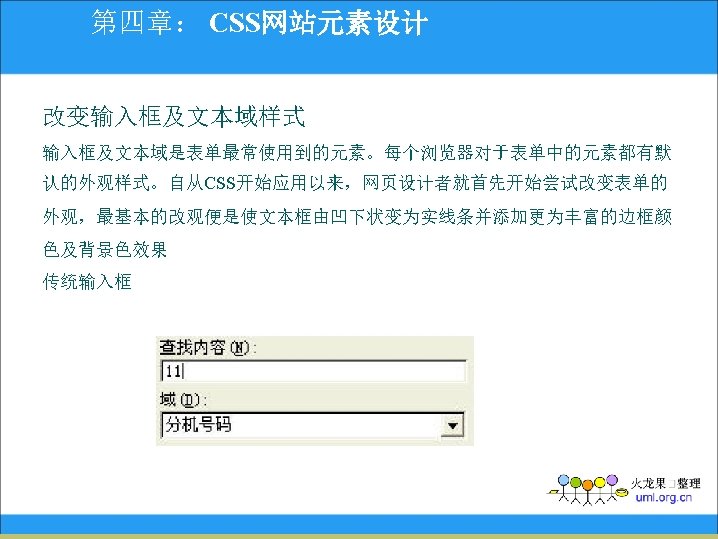

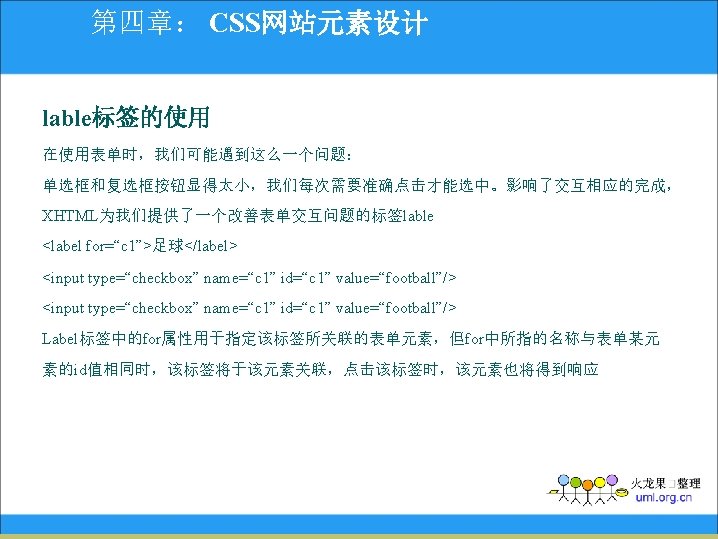
第四章: CSS网站元素设计 XHTML代码: <input class="textinput" type="text"> <textarea class="textinput" cols="30" rows="10"> </textarea> CSS代码:. textinput{ background-color: #cccccc; border-width: 2 px; border-style: border; border-color: #la 3 f 95; }

第四章: CSS网站元素设计 图片输入框设计 在我们网上冲浪或玩儿游戏的过程中经常看到一些富有创意的输入框。我们接下来就做一个 圆角输入框 XHTML代码: <input type=“text” name=“name” id=“name”/> <input type=“text” name=“password” id=“password”/> CSS代码: #name, password{ background-image: url(name. jpg) border: none; width: 210 px; height: 37 px; line-height: 40 px; text-indent: 80 px; } #password{ background-image: url(password. jpg); }

第四章: CSS网站元素设计 改变按钮样式 按钮是表单设计中不可缺少的元素,我们同样可以通过边框,背景色以及背景图片来设置按 钮风格 传统按钮: 添加以下CSS代码: #b 1, #b 2, #b 3{ width: 60 px; height: 60 px; font-weight: bold; font-size: 20 px; border-style: 2 px droove; } #b 1{background: url(pic/button 1. jpg) no-repeat -5 px 0 px; } #b 2{background: url(pic/button 2. jpg) no-repeat -2 px 0 px; } #b 3{background: url(pic/button 3. jpg) no-repeat 0 px 4 px; }

第四章: CSS网站元素设计 添加以下XHTML代码: <input type="button" value="1" id="b 1"> <input type="button" value="2" id="b 2"> <input type="button" value="3" id="b 3"> 得到如下效果的按钮:
- Slides: 95