Mininet Ryu Lab Mininet Ryu Lab 01 02

Mininet & Ryu Lab

Mininet & Ryu Lab 01 02 03 Oracle VM Virtual. Box & Ubuntu 18. 04. 5 04 Ryu SDN Framework 05 實作 Putty Mininet

Oracle VM Virtual. Box &Ubuntu 18. 04

Introduction Oracle VM Virtual. Box & Ubuntu 14. 04 1. Oracle VM Virtual. Box Running multiple operating systems simultaneously. Easier software installations. Testing and disaster recovery. Infrastructure consolidation. 2. Ubuntu 18. 04 A freely available Linux based operating system

Oracle VM Virtual. Box Software Defined Networks Download Virtual. Box Step 1 : Select for window The download URL

Oracle VM Virtual. Box Software Defined Networks Install Virtual. Box Step 2 -1 : Select next >

Oracle VM Virtual. Box Software Defined Networks Install Virtual. Box Step 2 -2 : Select next >

Oracle VM Virtual. Box Software Defined Networks Install Virtual. Box Step 2 -3 : Select Yes

Oracle VM Virtual. Box Software Defined Networks Install Virtual. Box Step 2 -4 : Select Install

Oracle VM Virtual. Box Software Defined Networks Install Virtual. Box Step 2 -5 : Select Install

Oracle VM Virtual. Box Software Defined Networks Install Virtual. Box Step 2 -6 : Waiting for installation

Oracle VM Virtual. Box Software Defined Networks Install Virtual. Box Step 2 -7 : Select Finish

Oracle VM Virtual. Box & Ubuntu 18. 04 Software Defined Networks Download Ubuntu 18. 04 Step 3 : Select 18. 04 LTS The download URL

Oracle VM Virtual. Box & Ubuntu 18. 04 Software Defined Networks Install Ubuntu 18. 04 Step 4 -1 : Open Virtual. Box and Add new

Oracle VM Virtual. Box & Ubuntu 18. 04 Software Defined Networks Install Ubuntu 18. 04 Step 4 -2 : Enter a name and Select the version

Oracle VM Virtual. Box & Ubuntu 18. 04 Software Defined Networks Install Ubuntu 18. 04 Step 4 -3 : The recommended value is about one-half of the physical memory (2048 MB)

Oracle VM Virtual. Box & Ubuntu 18. 04 Software Defined Networks Install Ubuntu 18. 04 Step 4 -4 : Select create a virtual hard drive

Oracle VM Virtual. Box & Ubuntu 18. 04 Software Defined Networks Install Ubuntu 18. 04 Step 4 -5 : Select the VDI type

Oracle VM Virtual. Box & Ubuntu 18. 04 Software Defined Networks Install Ubuntu 18. 04 Step 4 -6 : Select the dynamic type

Oracle VM Virtual. Box & Ubuntu 18. 04 Software Defined Networks Install Ubuntu 18. 04 Step 4 -7 : Set the virtual hard disk size (50 GB)

Oracle VM Virtual. Box & Ubuntu 18. 04 Software Defined Networks Install Ubuntu 18. 04 Step 4 -8 : Select settings

Oracle VM Virtual. Box & Ubuntu 18. 04 Software Defined Networks Install Ubuntu 18. 04 Step 4 -9 : Select virtual discs (iso)

Oracle VM Virtual. Box & Ubuntu 18. 04 Software Defined Networks Install Ubuntu 18. 04 Step 4 -10 : Select the file

Oracle VM Virtual. Box & Ubuntu 18. 04 Software Defined Networks Install Ubuntu 18. 04 Step 4 -11 : Select Ok

Oracle VM Virtual. Box & Ubuntu 18. 04 Software Defined Networks Install Ubuntu 18. 04 Step 4 -12 : Add network interface 2 and Set localhost insterface then select ok

Oracle VM Virtual. Box & Ubuntu 18. 04 Software Defined Networks Install Ubuntu 18. 04 Step 4 -13 : Start

Oracle VM Virtual. Box & Ubuntu 18. 04 Software Defined Networks Install Ubuntu 18. 04 Step 4 -14 : Select Ubuntu 18. 04

Oracle VM Virtual. Box & Ubuntu 18. 04 Software Defined Networks Install Ubuntu 18. 04 Step 4 -15 : Select Install Ubuntu

Oracle VM Virtual. Box & Ubuntu 18. 04 Software Defined Networks Install Ubuntu 18. 04 Step 4 -16 : Select English and Select Continue

Oracle VM Virtual. Box & Ubuntu 18. 04 Software Defined Networks Install Ubuntu 18. 04 Step 4 -17 : Select Countinue

Oracle VM Virtual. Box & Ubuntu 18. 04 Software Defined Networks Install Ubuntu 18. 04 Step 4 -18 : Select Install Now

Oracle VM Virtual. Box & Ubuntu 18. 04 Software Defined Networks Install Ubuntu 18. 04 Step 4 -19 : Select Continue

Oracle VM Virtual. Box & Ubuntu 18. 04 Software Defined Networks Install Ubuntu 18. 04 Step 4 -20 : Select Continue

Oracle VM Virtual. Box & Ubuntu 18. 04 Software Defined Networks Install Ubuntu 18. 04 Step 4 -21 : Set name/password and Select Continue Password:user

Oracle VM Virtual. Box & Ubuntu 18. 04 Software Defined Networks Install Ubuntu 18. 04 Step 4 -22 : Waiting for installation

Oracle VM Virtual. Box & Ubuntu 18. 04 Software Defined Networks Install Ubuntu 18. 04 Step 4 -23 : Select shutdown

Oracle VM Virtual. Box & Ubuntu 18. 04 Software Defined Networks Install Ubuntu 18. 04 Step 4 -24 : Select shutdown

Oracle VM Virtual. Box & Ubuntu 18. 04 Software Defined Networks Install Ubuntu 18. 04 Step 4 -25 : Remove the virtual disc

Oracle VM Virtual. Box & Ubuntu 18. 04 Software Defined Networks Install Ubuntu 18. 04 Step 4 -26 : Start again

Oracle VM Virtual. Box & Ubuntu 18. 04 Software Defined Networks Install Ubuntu 18. 04 Step 4 -27 : The installation is complete

Oracle VM Virtual. Box & Ubuntu 18. 04 Software Defined Networks Install Basic tools Step 5 -1 : Open terminal

Oracle VM Virtual. Box & Ubuntu 18. 04 Software Defined Networks Install Basic tools Step 5 -2 : Update the server's package list $ sudo apt-get update Command line Update info

Oracle VM Virtual. Box & Ubuntu 18. 04 Software Defined Networks Install Basic tools Step 5 -3 : Install vim $ sudo apt-get install vim -y Command line Install info

Oracle VM Virtual. Box & Ubuntu 18. 04 Software Defined Networks Install Basic tools Step 5 -4 : Install vim $ sudo apt-get install git Command line Install info

Oracle VM Virtual. Box & Ubuntu 18. 04 Software Defined Networks Install Basic tools Step 5 -3 : Install vim $ sudo apt-get install ssh Command line Install info

Putty

Introduction Putty Pu. TTY is a free SSH, Telnet and Rlogin client for Windows systems.

Putty Software Defined Networks Download Putty Step 1 : Select 64 -bit or 32 -bit The download URL

Putty Software Defined Networks Start Putty Step 2 : Check the virtual machine IP

Putty Software Defined Networks Start Putty Step 2 : Check the virtual machine IP

Putty Software Defined Networks Start Putty Step 3 : Open Putty and Save settings

Putty Software Defined Networks Start Putty Step 3 -1 : Open Putty and Setting

Putty Software Defined Networks Start Putty Step 3 -2 : Open Putty and Setting Password:sdncontroller

Putty Software Defined Networks Start Putty Step 3 -3 : Open Putty and Setting

Mininet

Introduction Mininet creates a realistic virtual network. Running real kernel, switch and application code, on a single machine with a single command.

Oracle VM Virtual. Box & Ubuntu 18. 04 Software Defined Networks Install Basic tools Step 5 -2 : Update the server's package list $ sudo apt-get update Command line Update info

Oracle VM Virtual. Box & Ubuntu 18. 04 Software Defined Networks Install Basic tools Step 5 -3 : Install vim $ sudo apt-get install vim -y Command line Install info

Oracle VM Virtual. Box & Ubuntu 18. 04 Software Defined Networks Install Basic tools Step 5 -4 : Install vim $ sudo apt-get install git Command line Install info

Oracle VM Virtual. Box & Ubuntu 18. 04 Software Defined Networks Install Basic tools Step 5 -3 : Install vim $ sudo apt-get install ssh Command line Install info

Mininet Software Defined Networks Installation Mininet Step 1 : Update system in ubuntu $ sudo apt-get update Command line Update info

Mininet Software Defined Networks Installation Mininet Step 2 : Download Mininet installer from source code $ git clone git: //github. com/mininet Command line

Mininet Software Defined Networks Installation Mininet Step 3 -1 : Install Mininet $ cd mininet $ util/install. sh -a // -a : install everything that is included Command line Install info

Mininet Software Defined Networks Installation Mininet Step 3 -2 : Install Mininet Install info

Mininet Software Defined Networks Installation Mininet Step 4 -1 : Test the basic Mininet functionality $ sudo mn --test pingall Command line Test info

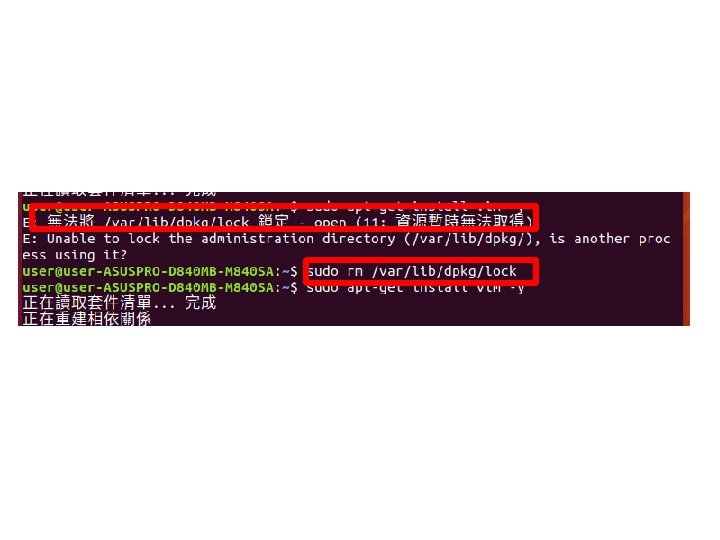
Installation Mininet Step 4 -1 -1 : Cannot find required executable ifconfig. sudo apt install net-tools

Mininet Software Defined Networks Installation Mininet Step 4 -2 : Test the basic Mininet functionality Test info ref : Install Mininet (option 2)

Ryu SDN Framework

Introduction Ryu SDN Framework Ryu is a component-based software defined networking framework. Fully written in Python. Ryu supports various protocols for managing network devices Open. Flow 1. 0, 1. 2, 1. 3, 1. 4, Netconf, OF-config, SNMP etc.

Ryu SDN Framework Software Defined Networks Installation Ryu Step 1 : Update the server's package list $ sudo apt-get update Command line Install info

Ryu SDN Framework Software Defined Networks Installation Ryu Step 2 : Install the plugin $ sudo apt-get install python 3 -pip -y Command line Install info

Ryu SDN Framework Software Defined Networks Installation Ryu Step 3 : Install Ryu ◎ $ sudo pip 3 install ryu Command line Install info

Ryu SDN Framework Software Defined Networks Installation Ryu Step 3 : Open Ryu $ ryu-manager Command line Install info

Ryu SDN Framework Software Defined Networks Installation Ryu Step 3 -1 : Open Ryu sudo git clone git: //github. com/osrg/ryu. git

Ryu SDN Framework Software Defined Networks Installation Ryu Step 3 -2 : Open Ryu 回上一層 sudo git clone git: //github. com/osrg/ryu. git

Ryu SDN Framework Software Defined Networks Installation Ryu Step 3 -3 : Open Ryu sudo apt-get install python-pip python-dev build-essential pip install -r tools/pip-requires python setup. py install

 建立網路拓墣 topo 1 (奇數) : linear topo")
Lab Ryu SDN Framework 建立簡單拓樸 連接外部控制器Ryu 使用Miniedit(GUI) 建立網路拓墣 topo 1 (奇數) : linear topo 2 (偶數) : tree 使用Open v. Switch(ovs) 設定Flow

Mininet 基本指令 Software Defined Networks mn 可以搭配的參數 -h, --help:顯示說明資訊。 -c, --clean:清除與結束網路。 --controller=CONTROLLER:設定控制器。 --topo=TOPO:設定拓樸類型,預設有linear, tree, single…等。 --switch=SWITCH:設定交換機類型,可設定為ovsk(Ov. S)。

Lab 1

Mininet lab 1 Software Defined Networks 建立簡單拓墣 single Step 1 : $ sudo mn --topo single, 3 Command line Create info

Mininet lab 1 Software Defined Networks 建立簡單拓墣 single Step 2 : 測試連線狀態 mininet> pingall Command line Test info

Mininet lab 1 Software Defined Networks 建立簡單拓墣 single Step 3 : 關閉離開Mininet mininet> exit Command line Exit info

Lab 2

Mininet lab 2 Software Defined Networks 連接外部控制器Ryu Step 1 : 開�控制器 Ryu $ ryu-manager ryu. app. simple_switch Command line Create info
 $ sudo")
Mininet lab 2 Software Defined Networks 連接外部控制器Ryu Step 2 : 另一視窗建立簡單拓墣 tree(樹狀) $ sudo mn --topo tree, 2, 3 --controller remote, ip=127. 0. 0. 1 Command line Create info

Mininet lab 2 Software Defined Networks 連接外部控制器Ryu Step 3 : 測試連線狀態 mininet> pingall Command line Test info Ryu info

Mininet lab 2 Software Defined Networks 連接外部控制器 Ryu Step 3 : 關閉離開Mininet mininet> exit Command line Exit info

Lab 3
 設定Flow Step 1 : 了解主要的四大類指令")
Mininet lab 3 Software Defined Networks 使用Open v. Switch(ovs) 設定Flow Step 1 : 了解主要的四大類指令 ovs-vsctl:用於�詢和更新 Open v. Switch配置(在ovsdb-server的幫助下),可 用於Switch新增/刪除、VLAN的建立等等。 ovs-ofctl:用來管理Open. Flow Switch上的flow,例如建立flow來傳送封包。 ovs-dpctl:創建,修改和刪除Open v. Switch封包路徑的 具。 ovs-appctl:用來管理Open v. Switch的 具,可以� 生名為vlog的紀錄檔來 協 助除錯。
 設定Flow Step 2 : 建立簡單拓樸 $ sudo mn")
Mininet lab 3 使用Open v. Switch(ovs) 設定Flow Step 2 : 建立簡單拓樸 $ sudo mn --topo single, 3 --controller remote Command line Create info
 設定Flow Step 3 : 測試未設定Flow 的連線狀態 mininet> pingall")
Mininet lab 3 使用Open v. Switch(ovs) 設定Flow Step 3 : 測試未設定Flow 的連線狀態 mininet> pingall Command line Test info
 設定Flow Step 4 : 檢�網路拓樸連線狀況 mininet> net Command")
Mininet lab 3 使用Open v. Switch(ovs) 設定Flow Step 4 : 檢�網路拓樸連線狀況 mininet> net Command line Net info
 設定Flow Step 5 : 設定Switch 上的 Open. Flow")
Mininet lab 3 使用Open v. Switch(ovs) 設定Flow Step 5 : 設定Switch 上的 Open. Flow 版本 mininet> sh ovs-vsctl set bridge s 1 protocols=Open. Flow 13 Command line
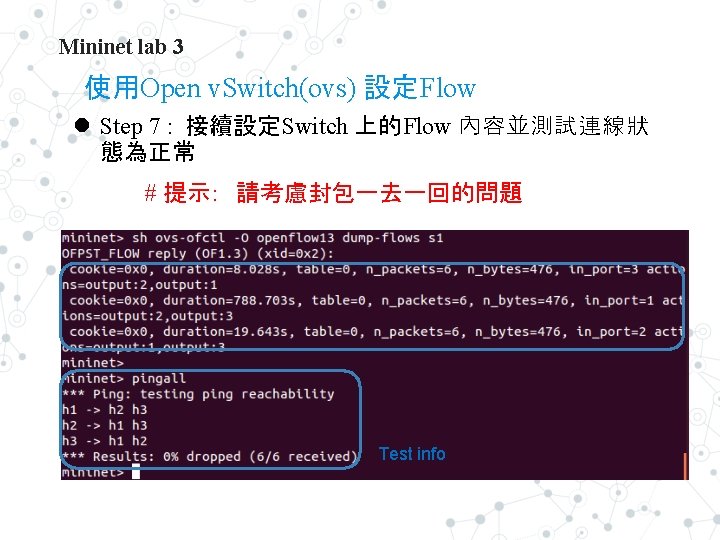
 設定Flow Step 6 : 設定Switch 上的Flow 內容並檢�設定�容 mininet>")
Mininet lab 3 使用Open v. Switch(ovs) 設定Flow Step 6 : 設定Switch 上的Flow 內容並檢�設定�容 mininet> sh ovs-ofctl -O openflow 13 add-flow s 1 in_port=1, action=output: 2, output: 3 mininet> sh ovs-ofctl -O openflow 13 dump-flows s 1 Command line
- Slides: 98