12 Topics q Cooling system diagnosis q Cooling



- Slides: 68
(12 Topics) q Cooling system diagnosis q Cooling system problems q Water pump service q Thermostat service q Cooling system hose service q Radiator and pressure cap service
q Fan belt service q Engine fan service q Freeze plug service q Coolant service q Flushing a cooling system q Temperature gauge service
q Gather information: m. Talk to the owner or service writer to find out as much as possible about the symptoms m. A Cooling System Diagnosis Chart in the service manual can be very helpful when problems are difficult to locate and correct.
On-Board Diagnostics q Cooling-related problems may set a diagnostic trouble code on some systems if temperatures seem out of range. muse a scan tool to analyze the system m. MIL lamp may be on mdata will indicate engine temperature meven failure to bleed a system of air could cause erratic temperature sensing
Cooling System Functions often monitored by the OBD II system: q. Coolant Temperature q. Engine oil Temperature q. Belt Tension q. Other related functions
Visual Inspection of Cooling System q Perform a visual inspection for: mcoolant leaks mloose or missing fan belts mlow coolant level mwater pump noises mplugged radiator fins mcoolant in the oil (oil looks milky) mcombustion leakage into coolant
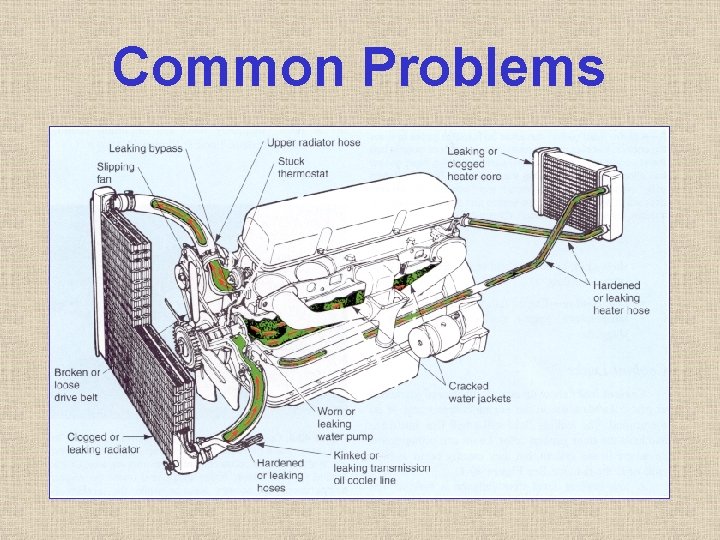
Common Problems
q Coolant leaks q Overheating q Overcooling
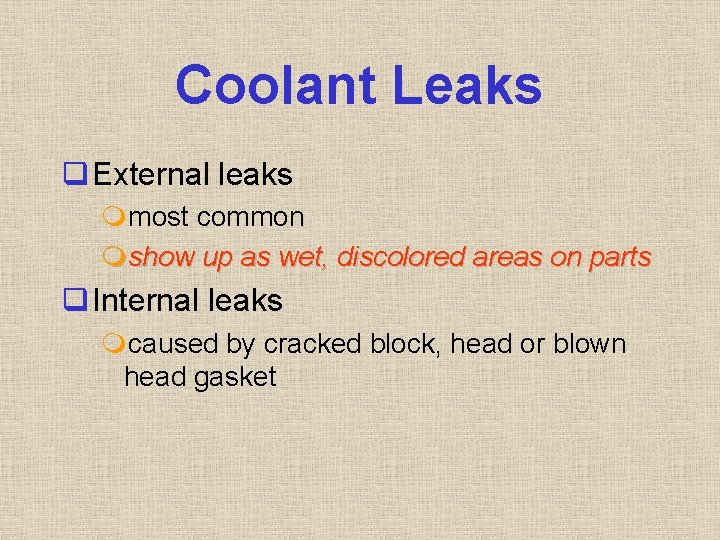
Coolant Leaks q External leaks mmost common mshow up as wet, discolored areas on parts q Internal leaks mcaused by cracked block, head or blown head gasket
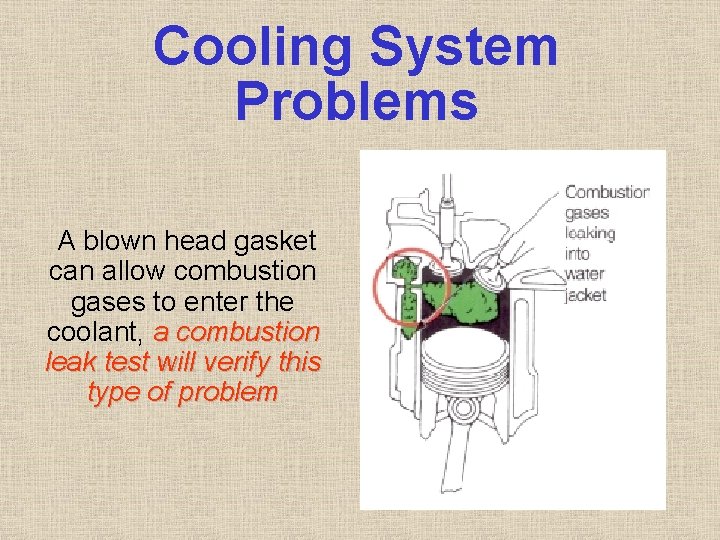
Cooling System Problems A blown head gasket can allow combustion gases to enter the coolant, a combustion leak test will verify this type of problem
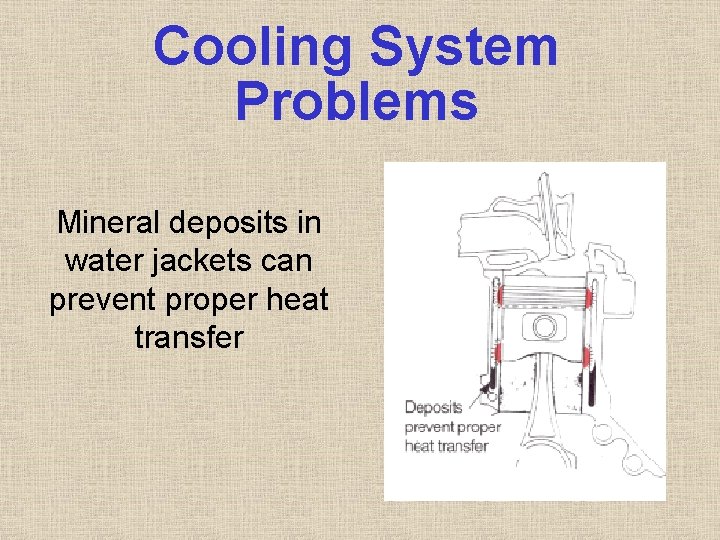
Cooling System Problems Mineral deposits in water jackets can prevent proper heat transfer
Cooling System Problems A cracked part or blown gasket can allow coolant to leak into the engine oil and cause a milky white substance to form in the valve covers
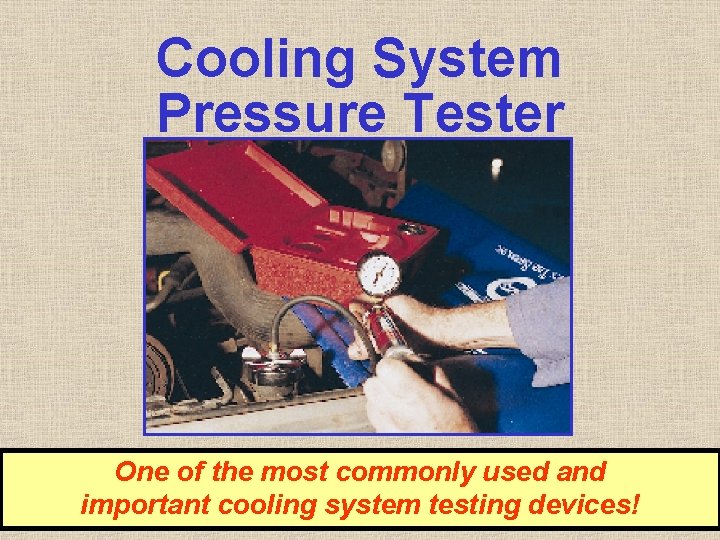
Cooling System Pressure Tester One of the most commonly used and important cooling system testing devices!
Cooling System Pressure Test TO AVOID SERIOUS BURNS, NEVER REMOVE A RADIATOR CAP WHEN ENGINE IS HOT! q Install pressure tester on filler neck q Pump the tester to pressurize system Use cap rating for maximum psi to avoid serious damage to cooling system q Low air pressure is forced into the system mcauses coolant to pour or drip from any leak
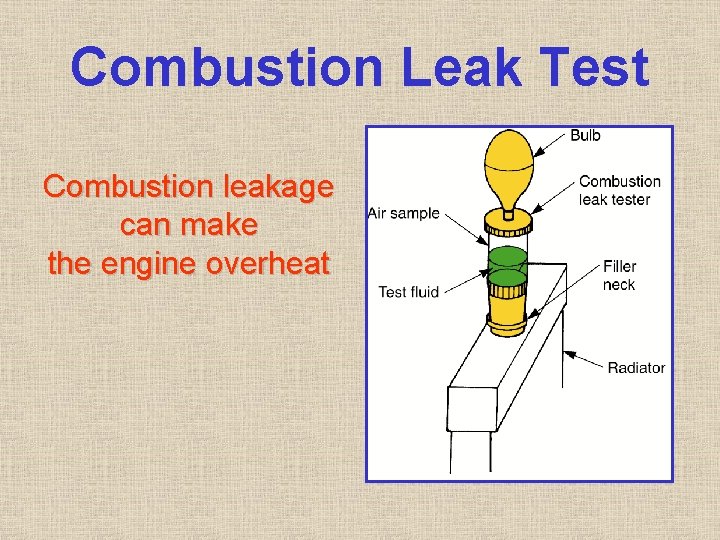
Combustion Leak Test q Should be performed when indications of a blown head gasket, cracked head, or cracked block are suspected. q Checks for the presence of combustion gases in the coolant q Place combustion leak tester on filler neck q Start engine and squeeze tester bulb, pulling air through test fluid q If combustion gases are present in the radiator, fluid changes color (from blue to yellow)
Combustion Leak Test Combustion leakage can make the engine overheat
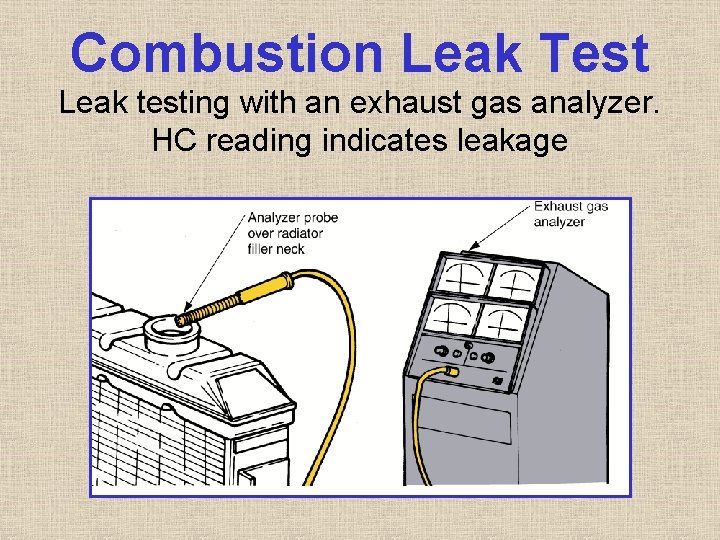
Combustion Leak Test Leak testing with an exhaust gas analyzer. HC reading indicates leakage
Causes of Overheating q Low coolant level q Rust or scale accumulation in coolant q Stuck thermostat q Retarded ignition q Loose fan/water pump belt q Bad water pump q Collapsed lower hose q Missing fan shroud or fan problems q Ice in the coolant
Causes of Overcooling q Stuck thermostat (open) q Locked fan clutch q Shorted fan switch Indications of Overcooling q Heater does not get hot q Temperature gage remains cold q Poor fuel economy
q A bad pump may leak, fail to circulate coolant, or produce a grinding sound q Common Causes of Water Pump Failure: mrust in the cooling system mlack of coolant movertightened belts
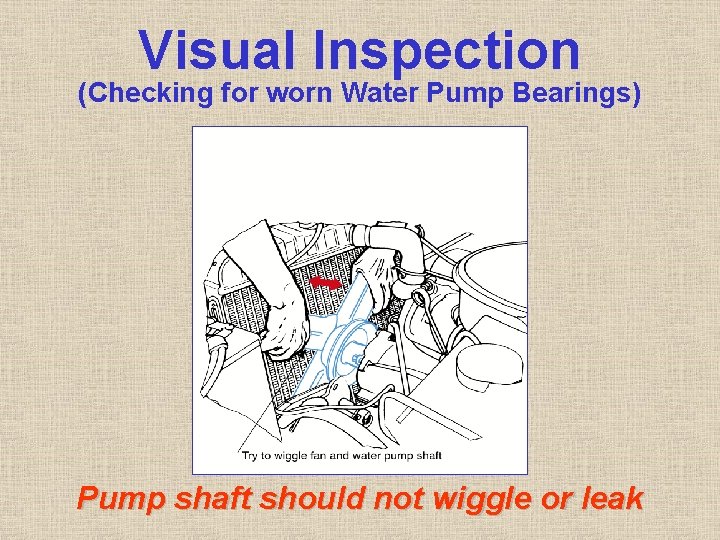
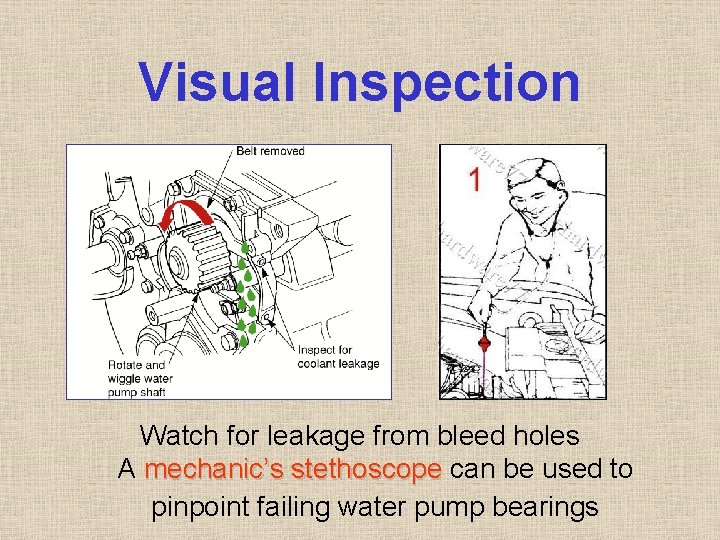
Visual Inspection (Checking for worn Water Pump Bearings) Pump shaft should not wiggle or leak
Visual Inspection Watch for leakage from bleed holes A mechanic’s stethoscope can be used to pinpoint failing water pump bearings
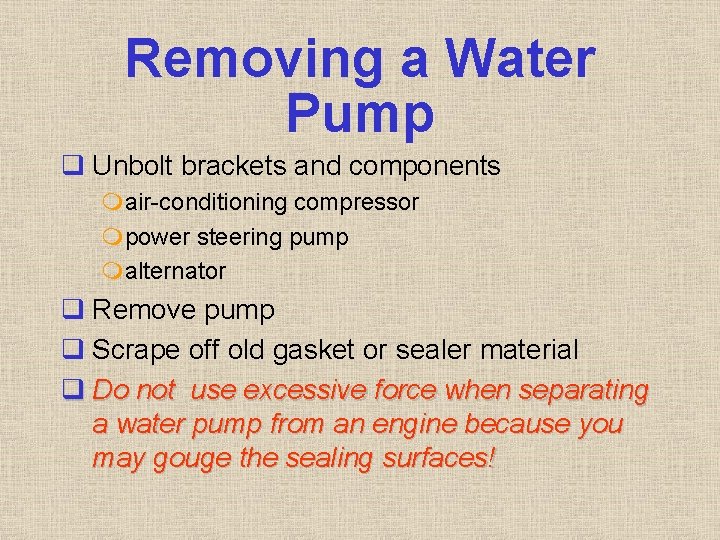
Removing a Water Pump q Unbolt brackets and components mair-conditioning compressor mpower steering pump malternator q Remove pump q Scrape off old gasket or sealer material q Do not use excessive force when separating a water pump from an engine because you may gouge the sealing surfaces!
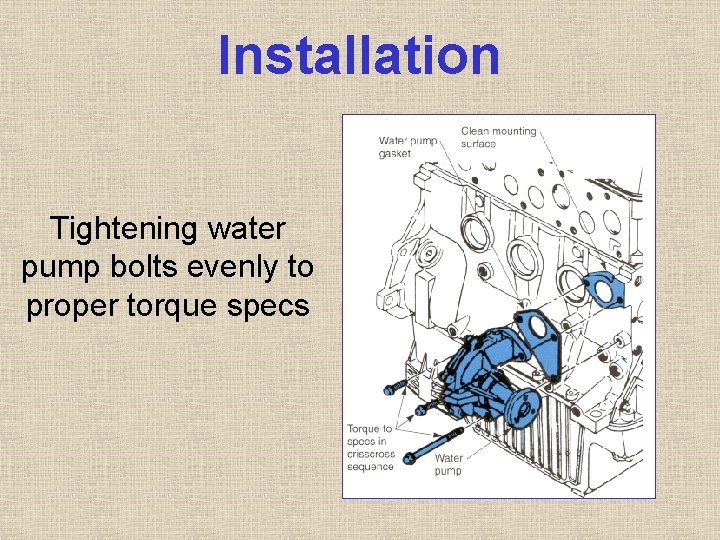
Installing a New Water Pump (Most Technicians prefer to install a new water pump rather than rebuilding the old one, because it is more cost effective and comes with a better warranty) q Fit pump onto the engine q Start all bolts by hand q Torque all fasteners to specifications q Use sealer where specified q Install the other components
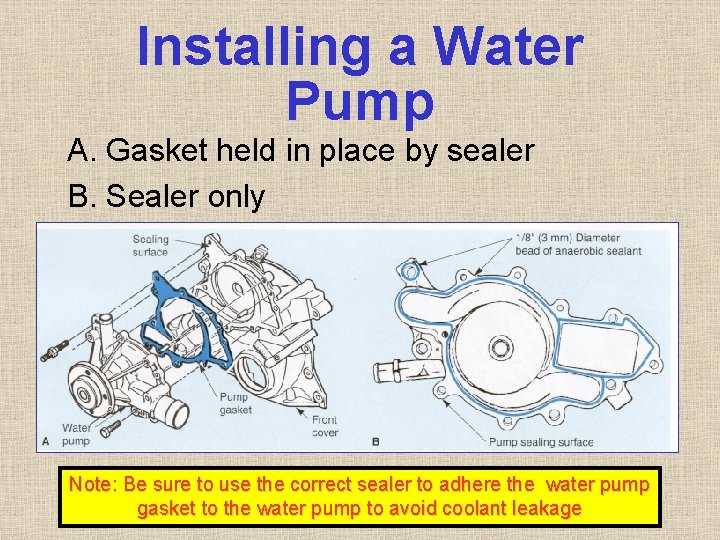
Installing a Water Pump A. Gasket held in place by sealer B. Sealer only Note: Be sure to use the correct sealer to adhere the water pump gasket to the water pump to avoid coolant leakage
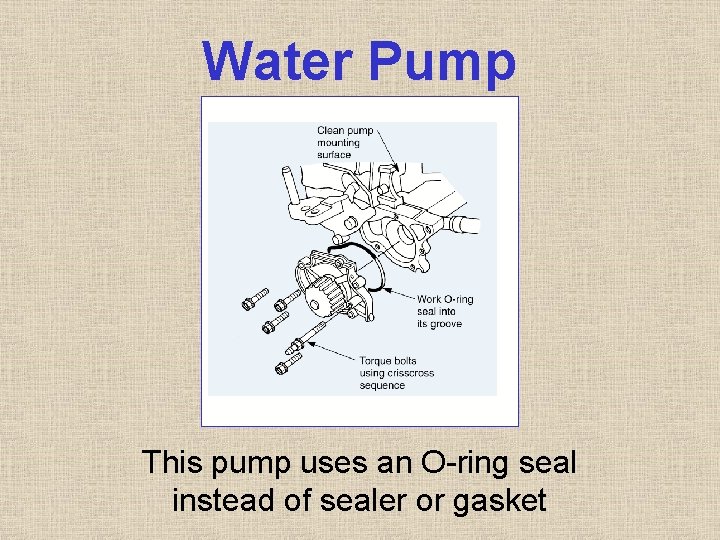
Water Pump This pump uses an O-ring seal instead of sealer or gasket
Installation Tightening water pump bolts evenly to proper torque specs
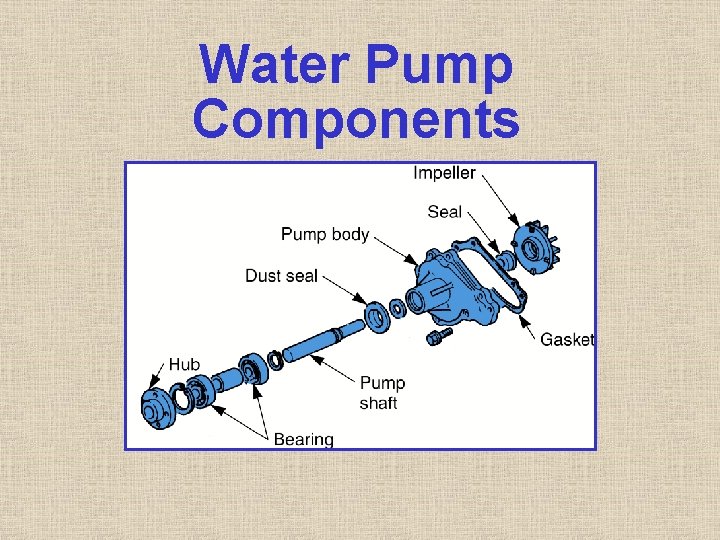
Water Pump Components
q A stuck thermostat can cause engine overheating or overcooling q Stuck open–overcooling mloss of efficiency, power, mileage mhigh emissions q Stuck closed–overheating mengine damage
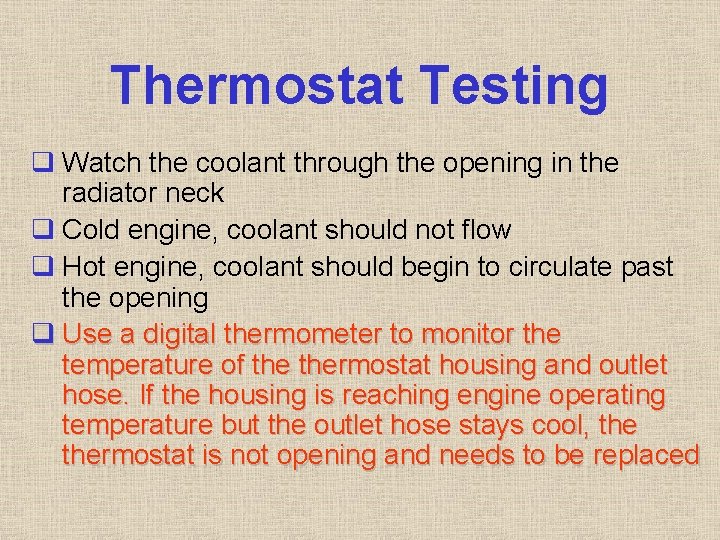
Thermostat Testing q Watch the coolant through the opening in the radiator neck q Cold engine, coolant should not flow q Hot engine, coolant should begin to circulate past the opening q Use a digital thermometer to monitor the temperature of thermostat housing and outlet hose. If the housing is reaching engine operating temperature but the outlet hose stays cool, thermostat is not opening and needs to be replaced
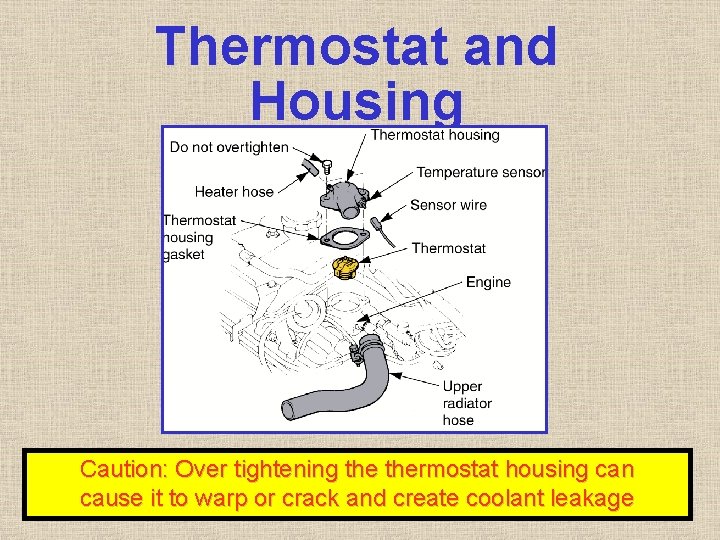
Thermostat and Housing Caution: Over tightening thermostat housing can cause it to warp or crack and create coolant leakage
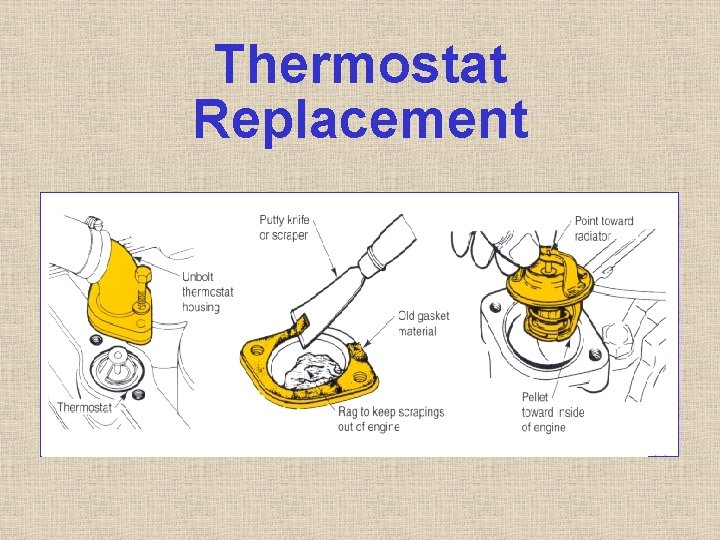
Thermostat Replacement
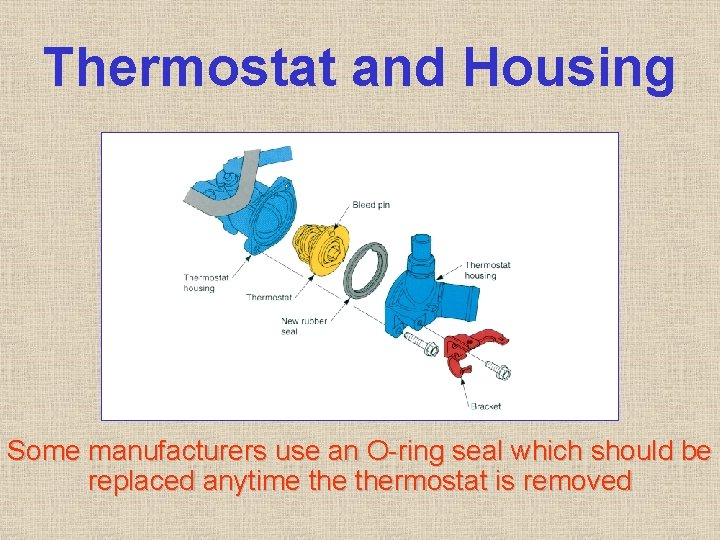
Thermostat and Housing Some manufacturers use an O-ring seal which should be replaced anytime thermostat is removed
Bleeding the Cooling System q A bleed valve is sometimes provided to help eliminate trapped air in the cooling system q Cars with low hood lines require a bleed screw to empty air pockets q Trapped air can cause overheating or a buildup of heat called a hot spot
Bleeding the Cooling System q Fill the system q Start and warm the engine q Crack open the bleed screw until all air is purged from the system q Never remove a cooling system bleed screw or any clamp on a hot, pressurized system!
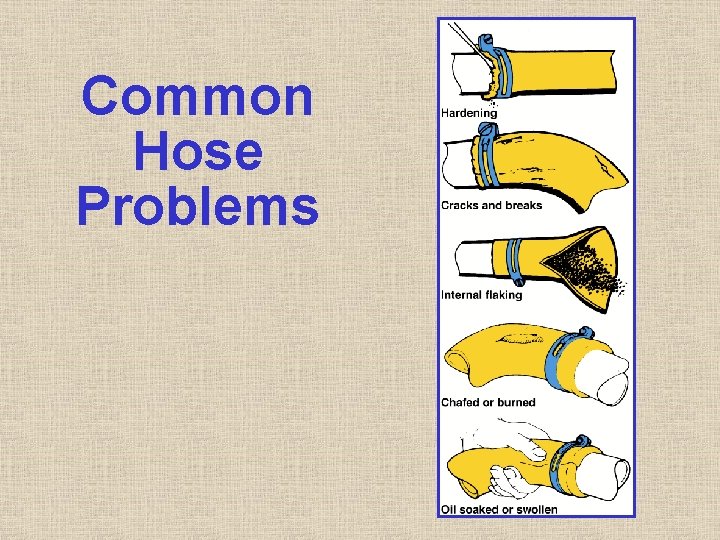
Hoses deteriorate and become soft and mushy or hard and brittle and should be replaced
Common Hose Problems
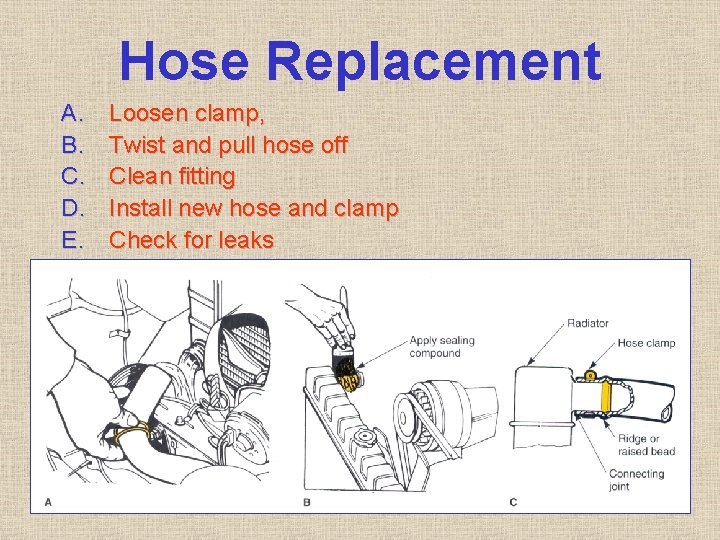
Hose Replacement A. B. C. D. E. Loosen clamp, Twist and pull hose off Clean fitting Install new hose and clamp Check for leaks
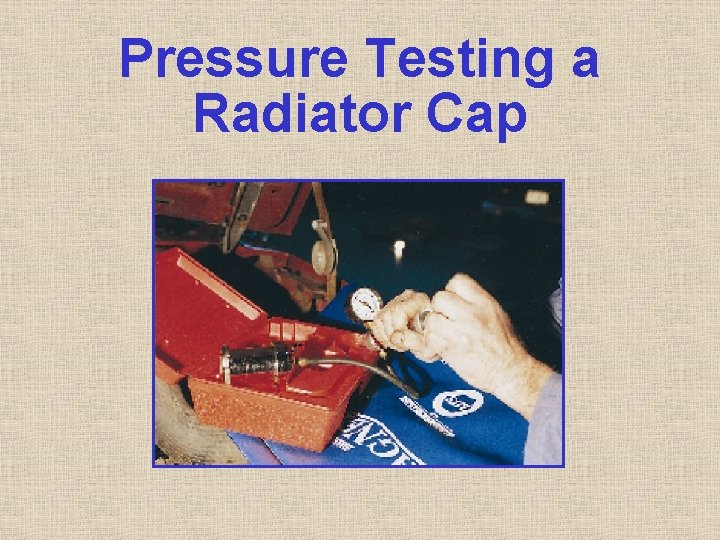
Inspecting the Radiator and Pressure Cap Conditions that can limit airflow through the radiator q Inspect radiator fins for debris and rot q Make sure the shroud is in place q Perform a Radiator Cap Pressure Test which measures cap opening pressure mchecks sealing washer condition TO AVOID SERIOUS BURNS, NEVER REMOVE A RADIATOR CAP WHEN ENGINE IS HOT!
Pressure Testing a Radiator Cap
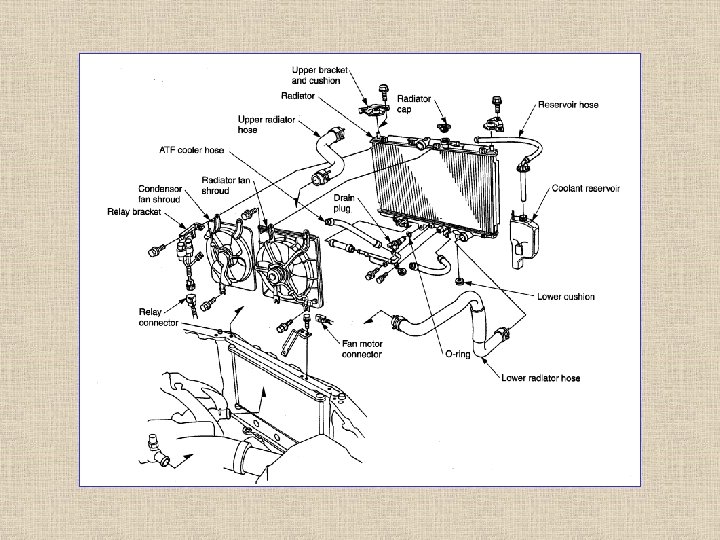
Radiator Removal q Place a catch pan under the cool radiator q Open the petcock to drain system q Disconnect hoses and oil cooler lines q Disconnect wires going to sensors and fan motors q Remove any brackets and radiator
Radiator Removal
Radiator Repair q Most repairs are done by a radiator shop q Radiator shops disassemble, clean, repair, reassemble and test radiators q When installing radiator, make sure the rubber mounts are in place
q An over tightened fan/water pump belt can cause water pump bearing failure q A loose fan belt will slip and squeal and may cause overheating q Inspect the condition and tension q Use a belt tension gauge to adjust belts
q A faulty fan cause overheating, overcooling, vibration and water pump damage q Check for bent blades, cracks or fluid leakage
Testing a Thermostatic Fan Clutch q Start the engine q When cold, fan should slip q When warm, clutch should engage myou should hear the rush of air
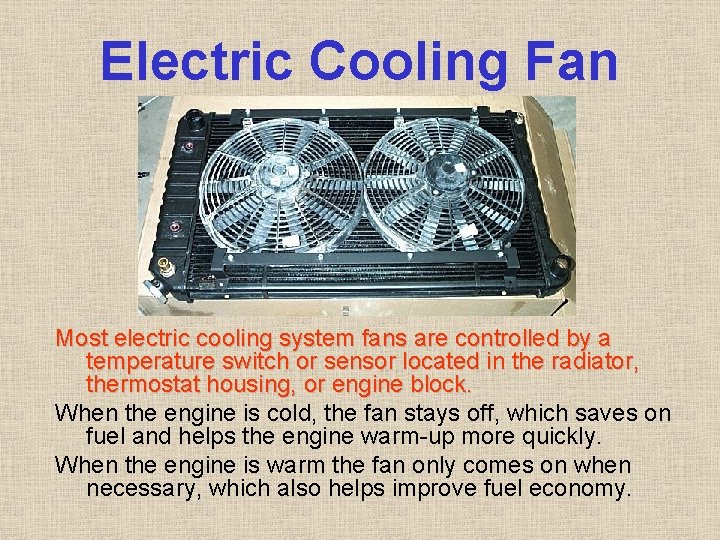
Electric Cooling Fan Most electric cooling system fans are controlled by a temperature switch or sensor located in the radiator, thermostat housing, or engine block. When the engine is cold, the fan stays off, which saves on fuel and helps the engine warm-up more quickly. When the engine is warm the fan only comes on when necessary, which also helps improve fuel economy.
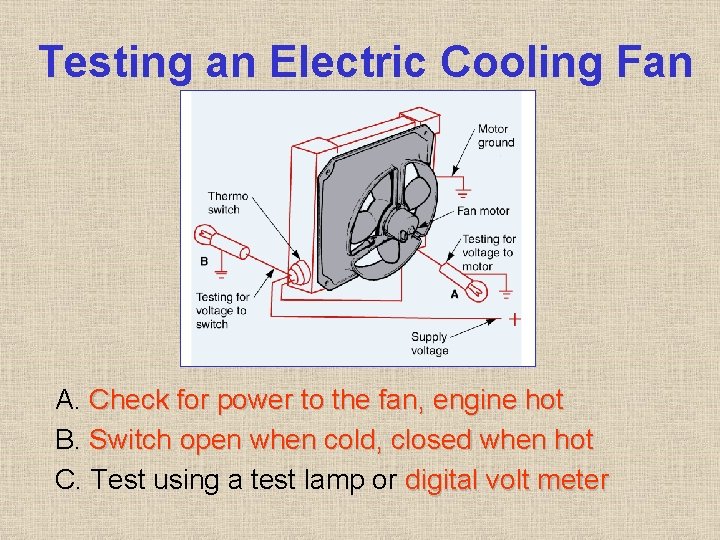
Testing an Electric Cooling Fan A. Check for power to the fan, engine hot B. Switch open when cold, closed when hot C. Test using a test lamp or digital volt meter
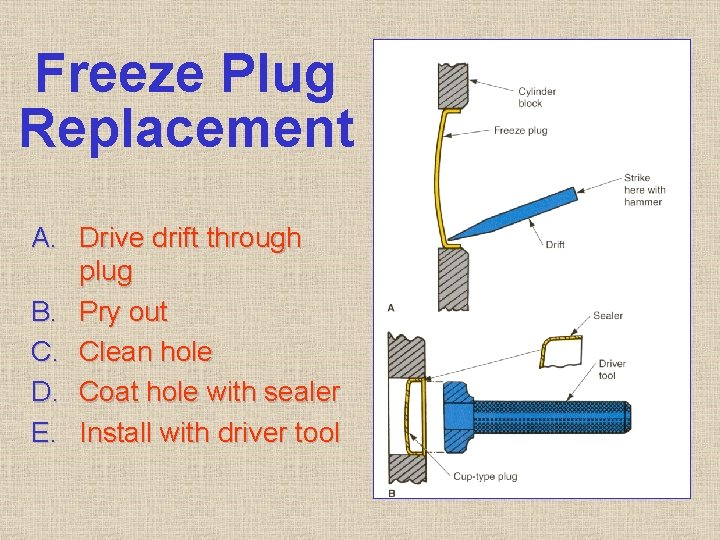
Leaking freeze plugs cause coolant loss and overheating Occasional replacement may be necessary because of corrosion Freeze plugs are made thinner than the metal in the engine block and will fail much sooner than other parts of the engine
Freeze Plug Replacement A. Drive drift through plug B. Pry out C. Clean hole D. Coat hole with sealer E. Install with driver tool
Coolant should be checked and changed at regular intervals (according to manufacturer’s recommendations) q. Breaks down and becomes conductive q. Rust preventative properties are lost q. Boiling and freezing properties may become compromised.
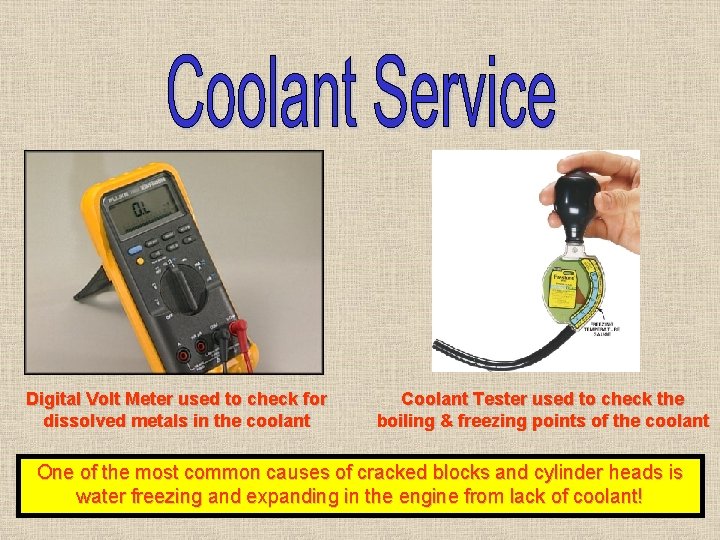
Digital Volt Meter used to check for dissolved metals in the coolant Coolant Tester used to check the boiling & freezing points of the coolant One of the most common causes of cracked blocks and cylinder heads is water freezing and expanding in the engine from lack of coolant!
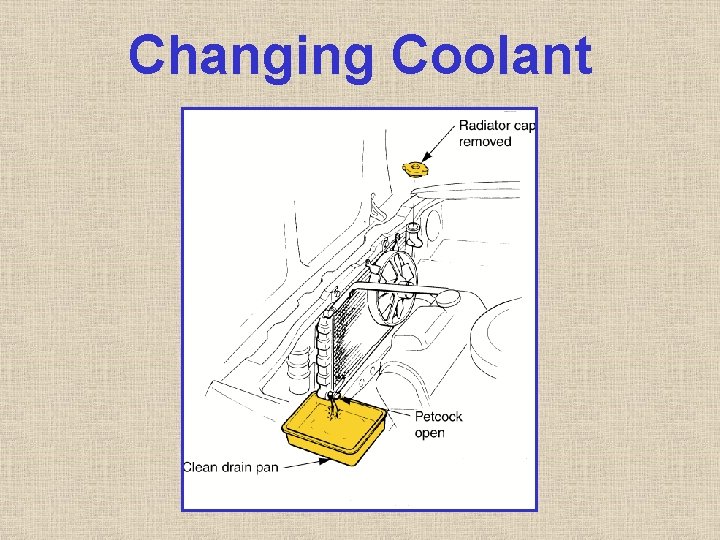
Changing Coolant
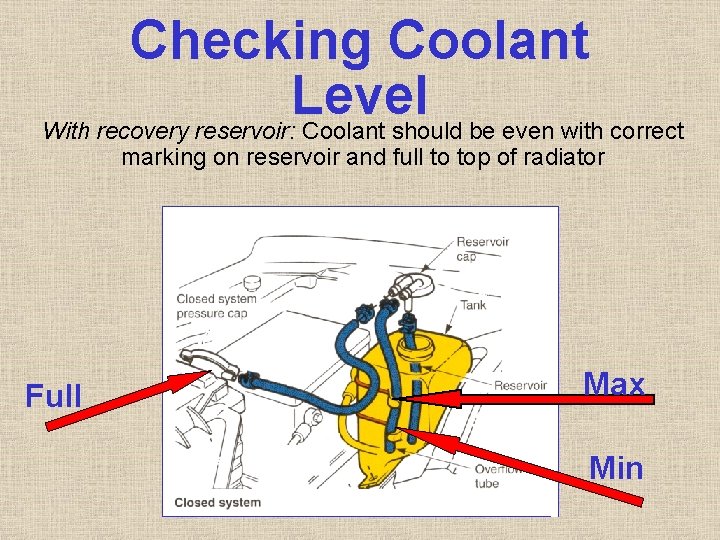
Checking Coolant Level With recovery reservoir: Coolant should be even with correct marking on reservoir and full to top of radiator Full Max Min
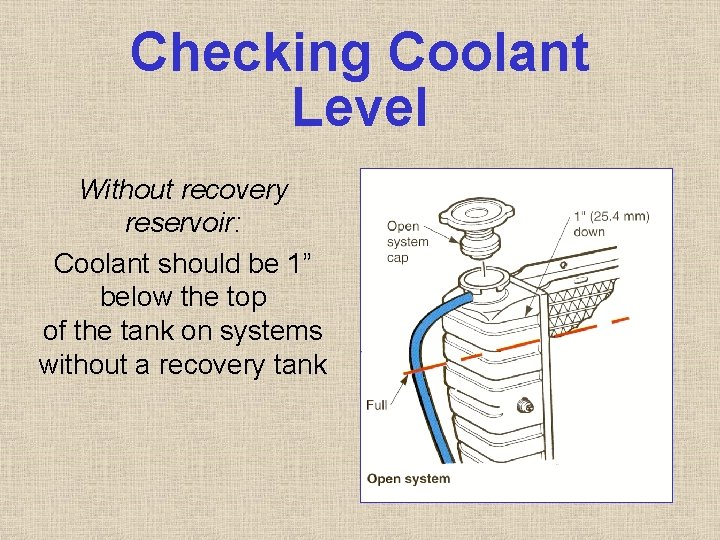
Checking Coolant Level Without recovery reservoir: Coolant should be 1” below the top of the tank on systems without a recovery tank
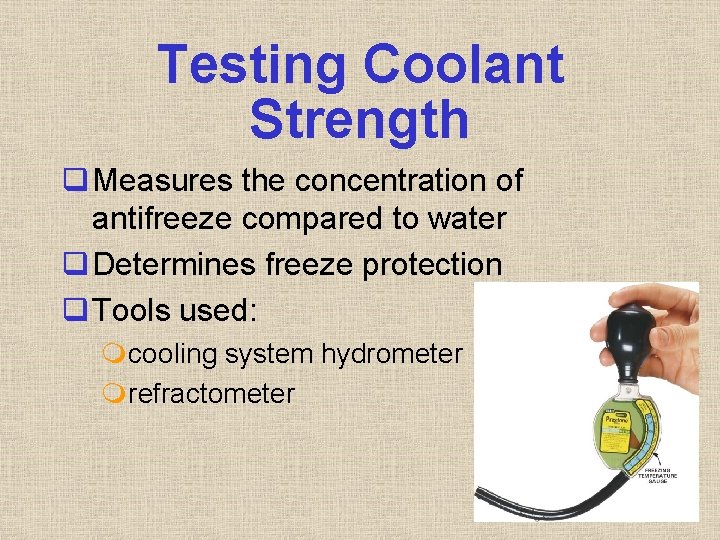
Testing Coolant Strength q Measures the concentration of antifreeze compared to water q Determines freeze protection q Tools used: mcooling system hydrometer mrefractometer
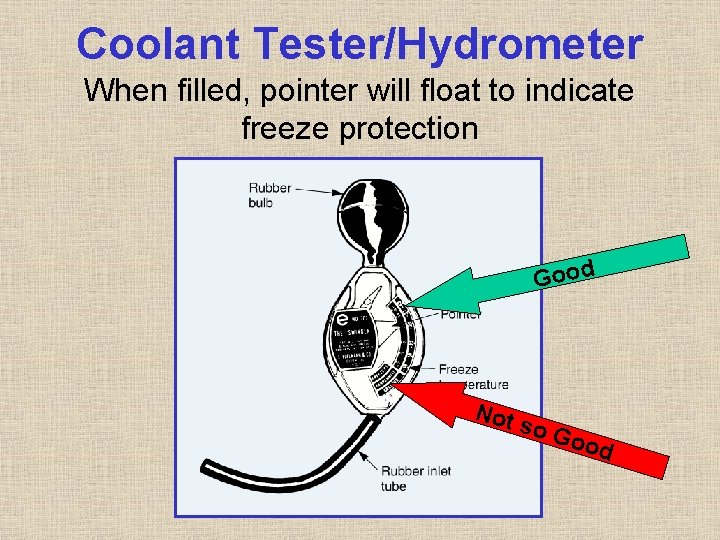
Coolant Tester/Hydrometer When filled, pointer will float to indicate freeze protection Good Not so G ood
q Cleans rust and scale from the system. q Rust (iron oxide) is very harmful to the cooling system. It can cause premature failure of the water pump, block small passages in the radiator core, and cause electrolysis to occur. q May involve running a cleaning chemical through the system q Methods: mfast flushing mreverse flushing mchemical flushing
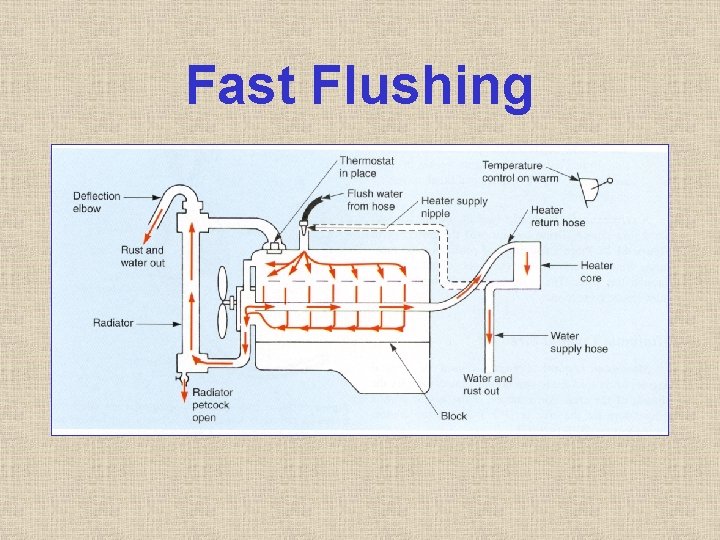
Fast Flushing
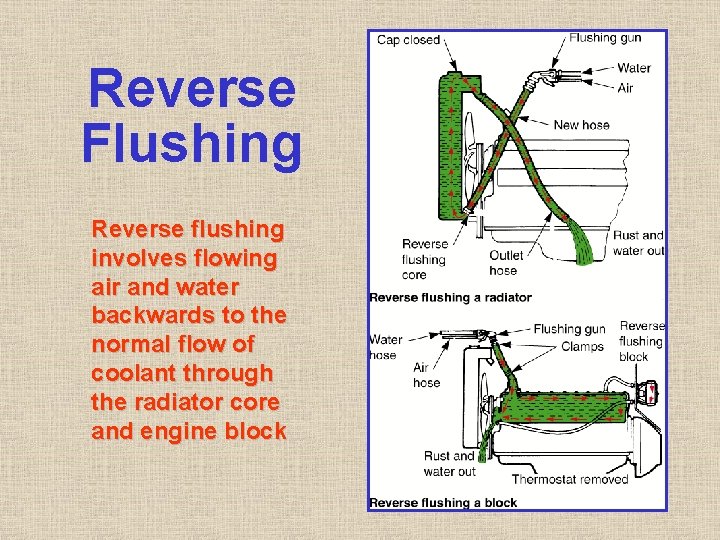
Reverse Flushing Reverse flushing involves flowing air and water backwards to the normal flow of coolant through the radiator core and engine block
Chemical Flushing q Used when scale buildup is causing overheating q Chemical cleaner is added to the coolant q Engine is operated for a specific amount of time q System is flushed with water
Gauge problems may include the gauge reading too hot, too cold, or not moving at all
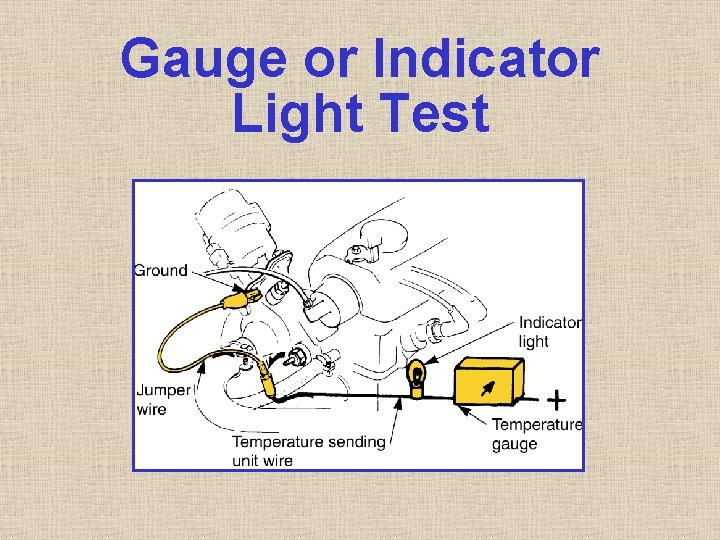
Gauge or Indicator Light Test q Disconnect wire from temperature sending unit q Turn key on, ground wire q If gauge sweeps or light glows as wire is grounded this indicates the gauge is working. The sending unit may require replacement q Check service manual before this test
Gauge Tester q Used if the gauge is suspected of being faulty or out of calibration q Special device with a variable resistor, resistor replaces the temperature sending unit in the temperature gauge circuit Using Gauge Tester q Set tester to a specified resistance q Connect tester as in diagram on next slide q Gauge should read as specified
Gauge or Indicator Light Test
Questions? q Refer to Duffy textbook chapter 40 q Scroll back through power-point q Ask fellow student for help q After following all the above steps, check with your instructor © Goodheart-Willcox Co. , Inc.