The Microscope Types of Microscopes 1 Compound Light


 u")


- Slides: 28
The Microscope
Types of Microscopes • 1. Compound Light Microscope: allows light to pass through an image and use two lenses to magnify object 2. Electron Microscope: Uses beams of electrons to form an image Transmission Electron Microscope (TEM) Scanning Electron Microscope (SEM)
• A. TEM- Shines a beam of light through a thin species to form image • B. SEM- Shines a narrow beam of electrons on the surface to form image
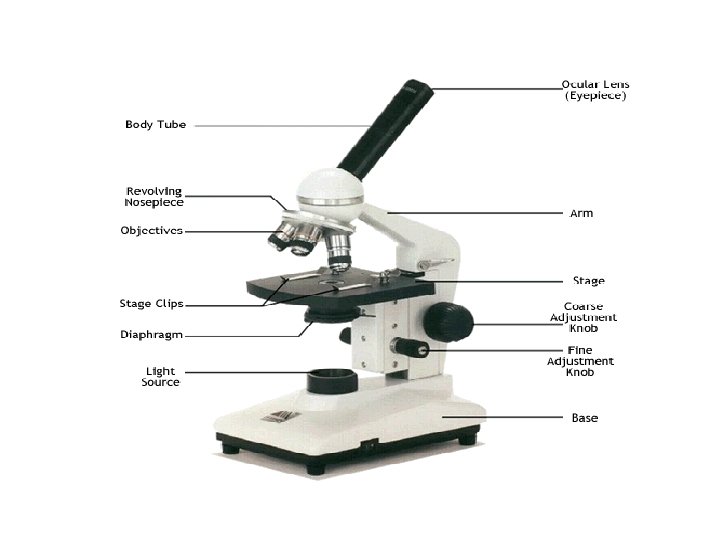
Parts of the microscope • Eyepiece: contains a lens capable of 10 x magnification • Revolving Nosepiece: turns to change from one power to another • Low power objective: attached to the revolving nosepiece and contains a lens capable of 4 x magnification
• Medium power objective: attached to the revolving nosepiece and contains a lens capable of 10 x magnification • High power objective: attached to the revolving nosepiece and contains a lens capable of 43 x magnification • Diaphragm: regulates the amount of light entering the scope
• Coarse Adjustment: brings objects into rapid but coarse focus • Fine Adjustment: brings objects slowly into fine focus
• Mirror/lamp: directs light into the scope adjustment • Stage Clips: holds glass slide and specimen in place • Stage Opening: allows light to pass through the stage • Stage: supports slide
• To calculate the power of magnification, multiply the power of the ocular lens by the power of the objective lens. • We can see better detail with higher powers of magnification, but we cannot see as much of the image.
When using the microscope… • 1 -Turn on the microscope and then rotate the nosepiece to click the red-banded objective into place. • 2 -Place a slide on the stage and secure it using the stage clips. Use the coarse adjustment knob (large knob) to get the image into view and then use the fine adjustment knob (small knob) to make it clearer.
• 3 - Once you have the image in view, rotate the nosepiece to view it under different powers. Draw what you see on your worksheet! • Be careful with the largest objective! Sometimes there is not enough room and you will not be able to use it! • 4 - When you are done, turn off the microscope and put up the slides you used.
Preparation of Specimens for Light Microscopy 1. Smear: Spread a thin film of material containing microorganisms over slide surface. Allow to air dry. 2. Fixing: Process that kills microorganisms and attaches them to a microscope slide. Fixing preserves and minimizes distortion of cells. Two main methods of fixation: u Heat fixation: Pass over Bunsen burner flame several times. u Chemical fixation: Cover with methanol for 1 minute.
Preparation of Specimens for Light Microscopy 3. Staining: Coloring microorganisms with a dye that emphasizes certain structures. Before staining a sample, it must be fixed. Stains are salts composed of a positive ion (cation) and a negative ion (anion). The colored ion is called the chromophore. Two types of dyes: A. Basic dyes B. Acidic dyes
Preparation of Specimens for Light Microscopy A. Basic dyes: u. Most commonly used dyes. u. Examples: u. Crystal violet u Methylene blue u Saffranin
Preparation of Specimens for Light Microscopy B. Acidic dyes: u Color is in negative ions. u. Stain the background: negative staining. u Bacteria do not stain with acidic dyes. u Used to observe cell shape, size, and capsules. u Minimal distortion because heat fixing is not necessary as dye is not taken up by cells. u Examples: u Eosin u Nigrosin u India ink.
Preparation of Specimens for Microscopy 1. Simple Stains u Aqueous or alcohol solution of a single basic dye. u Primary purpose is to stain entire microorganism to view cell shape and basic structures. u Procedure: u Stain is applied for a certain time, and then washed off. u Slide is dried and examined. u Mordant: May be used to increase stain intensity. Increases affinity of stain for specimen. u Examples: Safranin, methylene blue, crystal violet, and carbolfuchsin.
Preparation of Specimens for Microscopy 2. Differential Stains u React differently to different types of bacteria. u Can be used to distinguish among different groups of bacteria. u There are two important differential stains used in microbiology: A. Gram stain B. Acid-Fast stain
Preparation of Specimens for Microscopy 2. Differential Stains A. Gram Stain u Developed in 1884 by Hans Gram, a Danish microbiologist. u The most useful staining procedure in medical microbiology. u Distinguishes bacteria of two large and medically important groups: u Gram-positive bacteria u Gram-negative bacteria u Provides useful information for disease treatment.
Preparation of Specimens for Microscopy 2. Differential Stains Steps of Gram Stain 1. Primary stain: Cover a heat fixed smear with a basic dye (crystal violet). u All cells, gram-positive and gram-negative, are stained with crystal violet (appear purple). 2. Mordant: After smear is rinsed with water, an iodine mordant solution is applied. u Crystal violet-iodine [CV-I] complex forms
Preparation of Specimens for Microscopy 2. Differential Stains Steps of Gram Stain 3. Decolorizing: Slide is washed with alcohol, which will remove stain from Gram-negative cells but not from Gram-positive cells. u Gram-negative cells will be decolorized. u Gram-positive cells will remain purple. 4. Counterstain: Alcohol is rinsed off. Safranin is applied, which will stain cells that were decolorized. u Gram-negative cells are stained pink. u Gram-positive cells remain purple.
Preparation of Specimens for Microscopy 2. Differential Stain What accounts for the differential staining between Gram-positive and Gramnegative cells? u. Gram-positive cells have very thick peptidoglycan cell walls, whereas gram-negative cells have very thin cell walls. Crystal violet easily penetrates both cell types. u. Because of its larger size, the crystal violet-iodine complex [CV-I] is not easily removed from gram-positive cells, due to their thick cell wall. The CV-I complex is readily washed out of gram-negative cells with alcohol. u Counterstain only colors gram-negative cells.
Preparation of Specimens for Microscopy 2. Differential Stain Applications and Limitations of the Gram stain Chemotherapy: u. Gram-positive cells with their very thick peptidoglycan cell walls, are susceptible to penicillins and cephalosporins. u. Gram-negative cells with their thin cell walls and lipopolysaccharide layer are resistant to these antibiotics. u Limitations: u Not all bacterial cells stain well with the Gram-stain. u Gram-stain only works well on young bacterial cultures, that are actively growing. Therefore it is best to use cultures that are 18 to 24 hours old. u Older cultures (over 24 -48 hours), are often gram-variable.
Preparation of Specimens for Microscopy 2. Differential Stains B. Acid-Fast Stain (Ziehl-Nielsen Stain) u Modification of a method developed in 1882 by Paul Ehrlich. u Used to detect tuberculosis and leprosy causing organisms of the genus Mycobacterium and pathogens of the genus Nocardia. u These bacteria have waxy cell walls, which makes them difficult to stain.
Preparation of Specimens for Microscopy 2. Differential Stains Steps of Acid-Fast Stain 1. Primary stain: u Cover a heat fixed smear with carbolfuchsin, a red basic dye. u Gently heat for several minutes to increase penetration and retention of dye. u Allow to cool and rinse with water.
Preparation of Specimens for Microscopy 2. Differential Stains Steps of Acid-Fast Stain 2. Decolorizing: Slide is washed with acid-alcohol. u Non acid-fast cells will be decolorized. u Acid-fast cells will remain red. 3. Counterstain: Acid-alcohol is rinsed off. Methylene blue is applied, which will stain cells that were decolorized. u Non acid-fast cells are stained blue. u Acid-fast cells remain red.
Preparation of Specimens for Microscopy 3. Special Stains Used to color and isolate specific parts of microorganisms such as: u Endospores u Capsules u Flagella
Preparation of Specimens for Microscopy 3. Special Stains A. Endospore Stain u Endospores are extremely resistant, dormant structures that are formed by some gram-positive bacteria to protect them from harsh environmental conditions: heat, drought, chemicals, radiation, etc. u Ordinary staining methods cannot penetrate thick endospore wall. u Most commonly used method is Schaeffer-Fulton endospore stain.
Preparation of Specimens for Microscopy 3. Special Stains B. Flagella Stain u Flagella are appendages used for locomotion that are too thin to be seen easily with a light microscope. u Staining procedures are difficult. Usually involve using a mordant and coating the flagellar surface with a dye or metal (e. g. : silver). u The number and arrangement of flagella can be used as diagnostic aids.