Power Point Tutorial Step 1 Getting started Open


 ► In the layout section, choose “Title and")
 • Place your cursor in the text box. • Hit")
 ► Insert text on the Contents section ►")

 ► In the layout section, choose “Title and")


 ► In the layout section, choose “Title and")


- Slides: 43
Power. Point Tutorial
Step #1 Getting started: ► Open Power. Point ► Select Blank Presentation When you first open Power. Point you will see what's called the Normal view.
Step #1 • 1 The slide pane is the big area in the middle. This is the area you will work in to create your slides.
Step #1 • 2 On each slide, you will see various boxes with the dotted borders which are called placeholders. This is where you type your text.
Step #1 3 On the left of the screen are thumbnail versions of the slides in your presentation; the slide you're working will be highlighted.
Step #1 4 The bottom area is the notes pane, this is where you type speaker notes that you can refer to when you present. You can also print speaker notes to use when presenting a slide show.
Power. Point Presentation New Perspectives on Microsoft Office Power. Point 2007 8
Switching Views and Navigating a Presentation At the lower right of the Power. Point window, on the status bar to the left of the Zoom slider, are three buttons you can use to switch views – Normal view – Slide Sorter view – Slide Show view New Perspectives on Microsoft Office Power. Point 2007 9
Viewing a Presentation in Slide Show View • Slide Show view is the view you use when you present an on-screen presentation to an audience • When you click the Slide Show button on the status bar, the slide show starts beginning with the current slide • When you click the Slide Show button on the View tab on the Ribbon or press the F 5 key, the slide show starts at the beginning of the presentation 10
Viewing a Presentation in Slide Show View • Slide Sorter view displays thumbnails (miniature version) of slides. This view enables us to view multiple slides similtaneously. - Find the slide easily - Change orders - Delete, cut, copy one or more slides - Double click to turn back to normal view 11
Step #2 Adding Additional Slides : When you open a new Power. Point document you will only see one slide. In order to add more slides you need to create them, to do this you have a few options.
Step #2 Adding Additional Slides : 1 Clicking on the top portion of the New Slide command, on the Home tab is the easiest method because a new slide will be added immediately.
Step #2 Adding Additional Slides : 2 If you click the bottom part of the New Slide command, a box will appear and you will see a gallery of layouts
Step #2 Adding a Design Theme: 1 Themes group provides thumbnails of different design options. 2 To see additional themes, click the More arrow button on the right of the group. 3 When you point and hover on any theme thumbnail, a preview of theme will appear on the slide. To apply theme to your slides, click on the thumbnail design you like.
Step #3 Insert title: ► Place cursor in the title box and type Introduction to Information Technology Select (Title Only) After selecting, type your name
Step #4 Move title box: ► Place pointer on the edge of the title box, and drag it to the middle of the page
Step #5 Format font: ► Place cursor in the title box and highlight the title to change the Font
Formatting Text 2. To change the text font, color and size use commands in the Font group. - Underline the heading - Change the font size
Add a new slide (Slide 2) ► In the layout section, choose “Title and Content” layout ► Place cursor in the title box, and type the title for your second slide. “COMPUTER”
Insert Text (Slide 2) • Place your cursor in the text box. • Hit backspace on your keyboard to delete the bullet point (If there is any)
Add a new slide (Slide 2) ► Insert text on the Contents section ► Insert text: Computer is an electronic device which performs information process cycle operations
Adding images to your presentations You can insert images from your computer, search Microsoft's large selection of clip art to find the image you need, or add a screenshot of your own. Once an image has been inserted, you can resize and move it to the location you want.
Add a new slide (Slide 3) ► In the layout section, choose “Title and Content” layout ► Place cursor in the title box, and type the title for your second slide. “Input Devices”
Insert Text • Place your cursor in the text box. • Use bullet points to type your main points (hit enter after each one).
Insert Text: • • • Keyboard Mouse Microphone
Add a new slide (Slide 4) ► In the layout section, choose “Title and Content” layout ► Place cursor in the title box, and type the title for your second slide. “Output Devices”
Insert Text: • • • Printer Speaker Monitor
Transitions • Transitions are motion effects that, when in Slide Show View, add movement to your slides as you advance from one slide to another. • There are many transitions to choose from; each one allows you to control the speed and even add sound.
There are three categories of unique transitions to choose from, all of which can be found on the Transitions tab:
To apply a transition: 1. Select the slide you wish to modify. 2. Click the Transitions tab. 3. Locate the Transition to This Slide group. 4. Click a transition to apply it to the selected slide. This will automatically preview the transition as well.
To preview a transition: • Click the Preview command on the Transitions tab.
To modify the duration: 1. Select the slide that includes the transition you wish to modify. 2. In the Duration field in the Timing group, enter the amount of time you want the transition to take.
To remove a transition: 1. Select the slide you wish to modify. 2. Choose None from the gallery in the Transition to This Slide group.
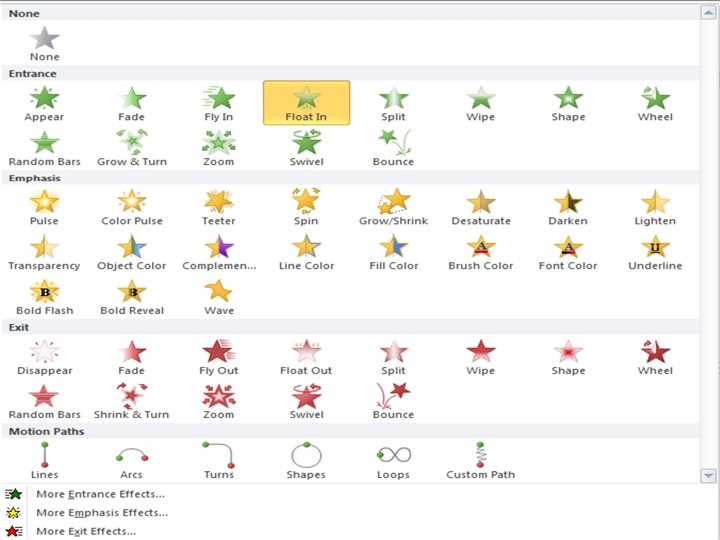
Slide Animations • Slide animations create animated effects to text and graphics during a slide show. • There a variety of animations that can be applied to text or graphics in multiple ways from a single word to all of the text on a slide.
The Animation Pane • The Animation Pane displays all of the animations you have applied to each slide. • It also enables you to modify each animation similar to the Timing group and play the animations applied to the slide.
• Finally, when all animations are applied you can preview the current slide by clicking on the Preview command.
Presenting Slide Show • Once your slide show is completed, you will need to learn how to present it to an audience. To view your slide show go to the Start Slide Show group. To start on the first slide click the From Beginning command. To start on the current slide click the From Current Slide command.
• Another way to quickly preview a slide is to click on the Slide Show button in the lower right part of the Power. Point window. The slide show will begin from the slide selected on the Slides tab. • To end your slide show press the ESC button on your keyboard. This will return you to your screen as you left.
To stop or end a slide show • To end slide show, select the menu box options command click End Show. • You can also press the "Esc" key at the top left of your keyboard to end the show.
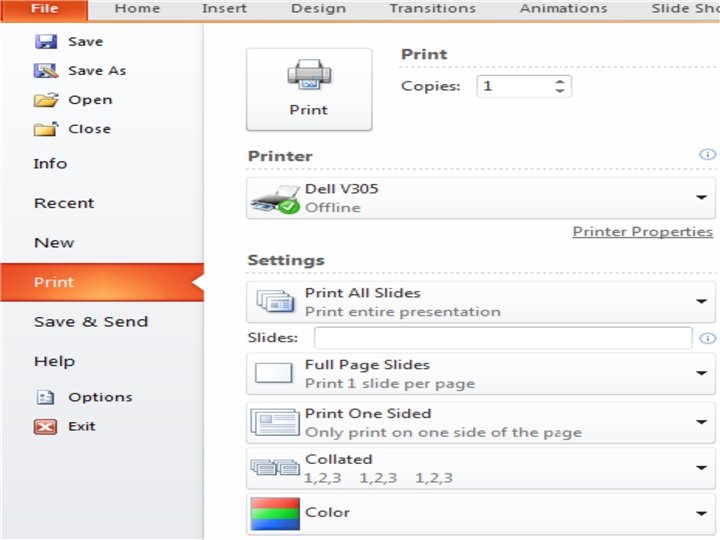
Printing • Click the File tab • Select Print. The Print pane appears, with the print settings on the left and the Preview on the right. • You can also press CTRL + P
Print Layout The different options are: • Full Page Slides – print out with each slide on a full page • Handouts - print out with up nine slides per page • Notes Page - print out of one slide per page including any notes you may have added in the • Outline View - print out of your text from all of your slides in an outline format.