Chapter 5 Pictorial sketching Contents Freehand sketching techniques


- Slides: 52

Chapter 5 Pictorial sketching

Contents Freehand sketching techniques Pictorial projections - Axonometric - Oblique Isometric projection vs isometric sketch Isometric sketch from an orthographic views Isometric sketch of an object Oblique sketch

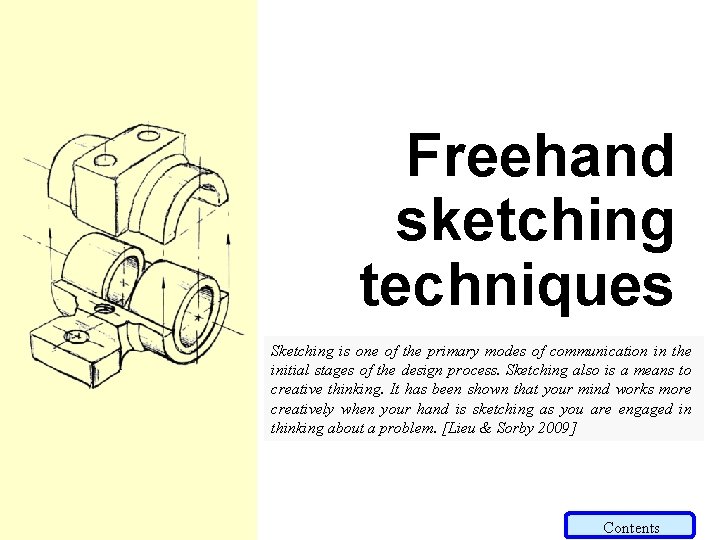
Freehand sketching techniques Sketching is one of the primary modes of communication in the initial stages of the design process. Sketching also is a means to creative thinking. It has been shown that your mind works more creatively when your hand is sketching as you are engaged in thinking about a problem. [Lieu & Sorby 2009] Contents

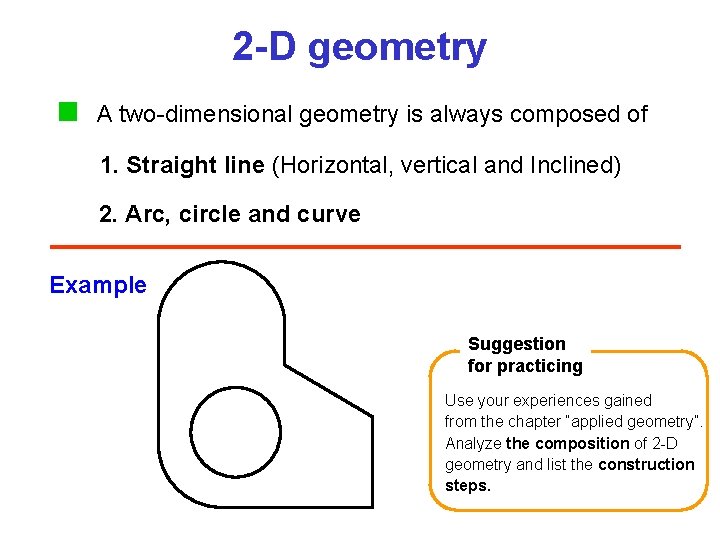
2 -D geometry A two-dimensional geometry is always composed of 1. Straight line (Horizontal, vertical and Inclined) 2. Arc, circle and curve Example Suggestion for practicing Use your experiences gained from the chapter “applied geometry”. Analyze the composition of 2 -D geometry and list the construction steps.

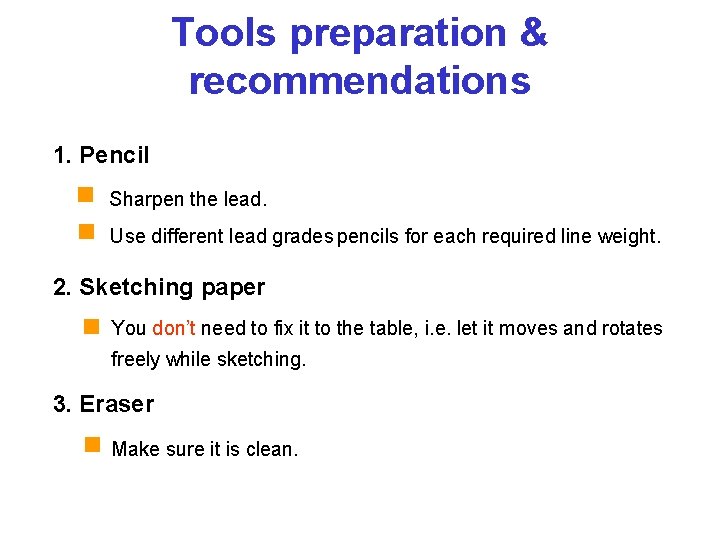
Tools preparation & recommendations 1. Pencil Sharpen the lead. Use different lead grades pencils for each required line weight. 2. Sketching paper You don’t need to fix it to the table, i. e. let it moves and rotates freely while sketching. 3. Eraser Make sure it is clean.

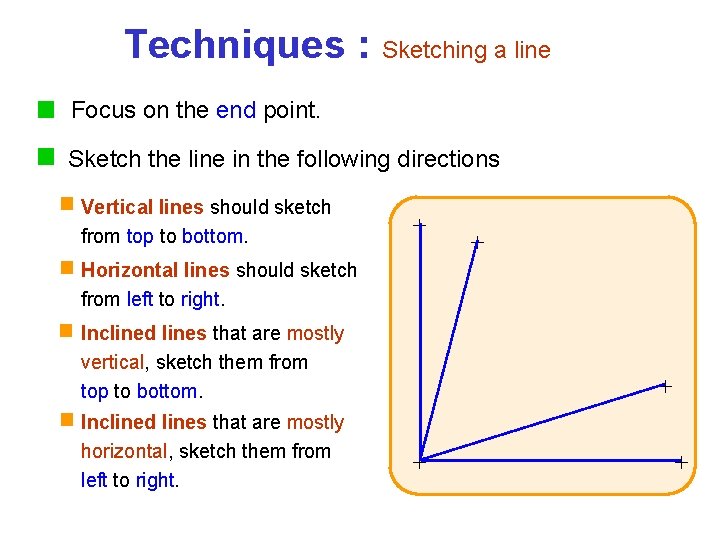
Techniques : Sketching a line Focus on the end point. Sketch the line in the following directions Vertical lines should sketch from top to bottom. + + Horizontal lines should sketch from left to right. Inclined lines that are mostly vertical, sketch them from top to bottom. Inclined lines that are mostly horizontal, sketch them from left to right. + + +

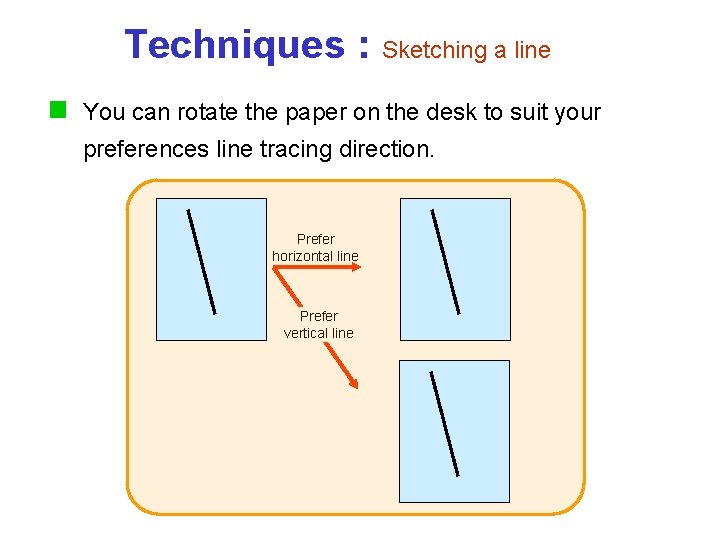
Techniques : Sketching a line You can rotate the paper on the desk to suit your preferences line tracing direction. Prefer horizontal line Prefer vertical line

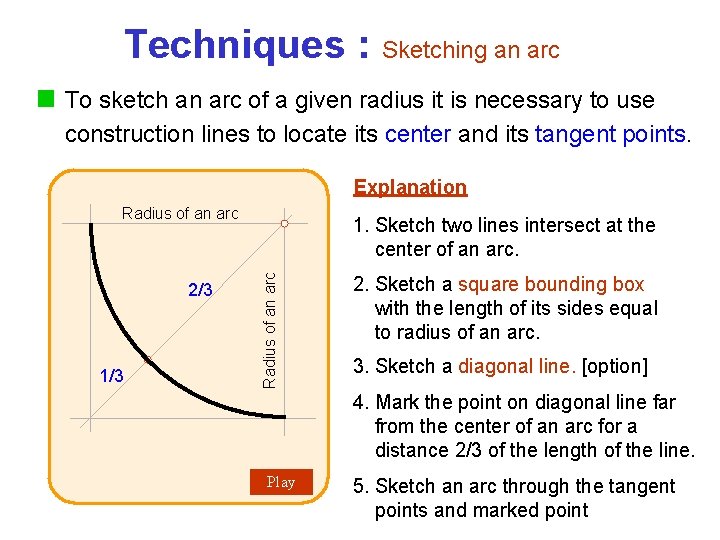
Techniques : Sketching an arc To sketch an arc of a given radius it is necessary to use construction lines to locate its center and its tangent points. Explanation Radius of an arc 1/3 Radius of an arc 2/3 1. Sketch two lines intersect at the center of an arc. 2. Sketch a square bounding box with the length of its sides equal to radius of an arc. 3. Sketch a diagonal line. [option] 4. Mark the point on diagonal line far from the center of an arc for a distance 2/3 of the length of the line. Play 5. Sketch an arc through the tangent points and marked point

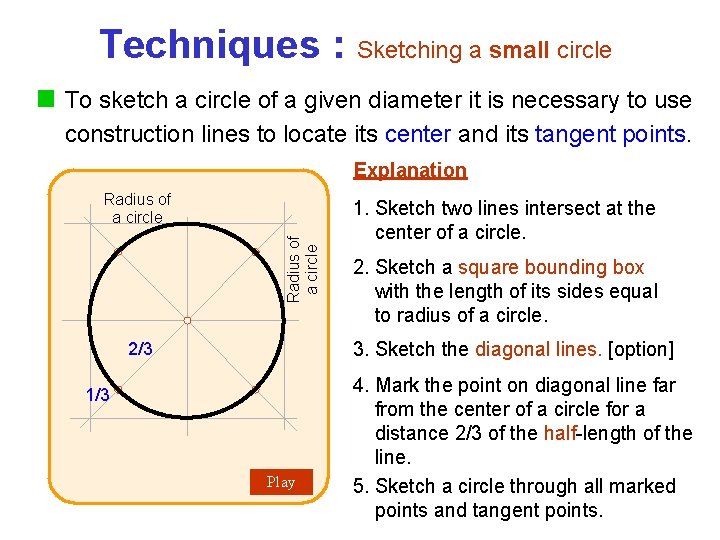
Techniques : Sketching a small circle To sketch a circle of a given diameter it is necessary to use construction lines to locate its center and its tangent points. Explanation Radius of a circle 1. Sketch two lines intersect at the center of a circle. 2. Sketch a square bounding box with the length of its sides equal to radius of a circle. 3. Sketch the diagonal lines. [option] 2/3 1/3 Play 4. Mark the point on diagonal line far from the center of a circle for a distance 2/3 of the half-length of the line. 5. Sketch a circle through all marked points and tangent points.

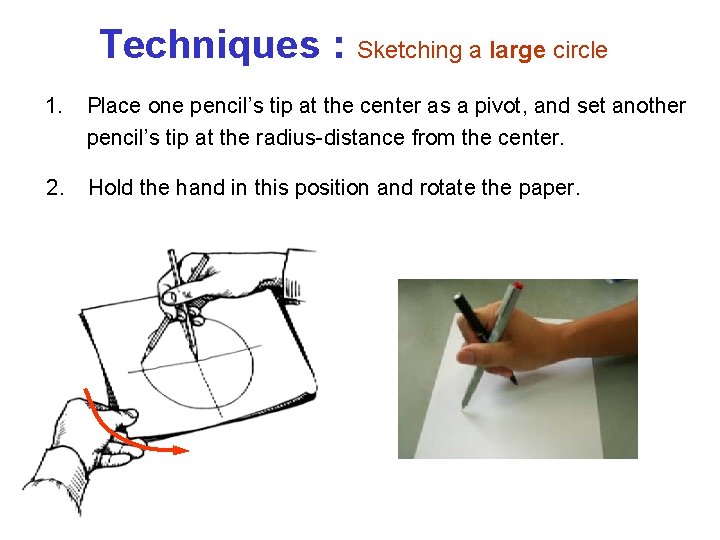
Techniques : Sketching a large circle 1. Place one pencil’s tip at the center as a pivot, and set another pencil’s tip at the radius-distance from the center. 2. Hold the hand in this position and rotate the paper.

Pictorial projection Contents

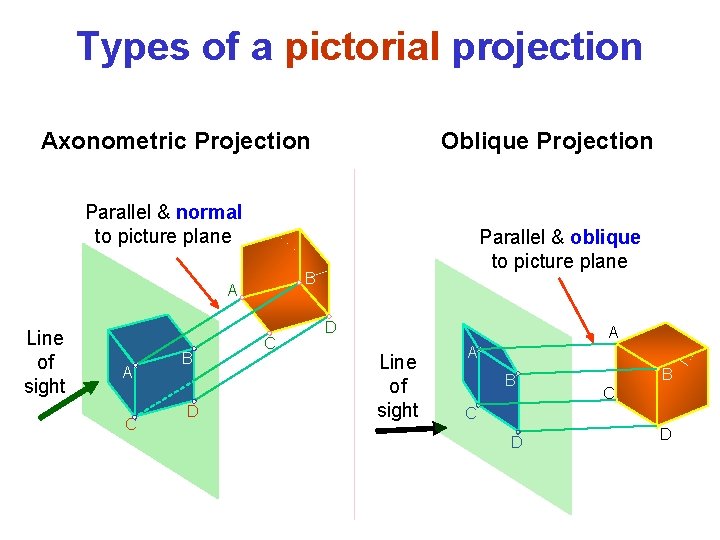
Types of a pictorial projection Axonometric Projection Oblique Projection Parallel & normal to picture plane B A Line of sight A C B D Parallel & oblique to picture plane C D A Line of sight A B B C C D D

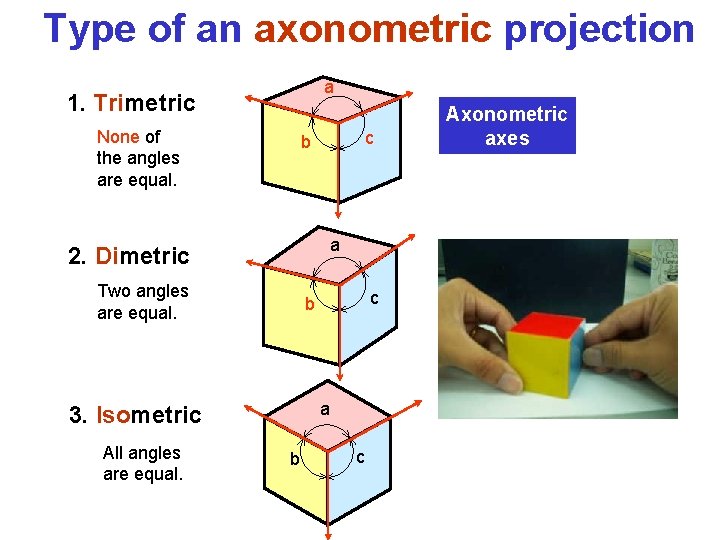
Type of an axonometric projection a 1. Trimetric None of the angles are equal. a 2. Dimetric Two angles are equal. c b a 3. Isometric All angles are equal. c b b c Axonometric axes

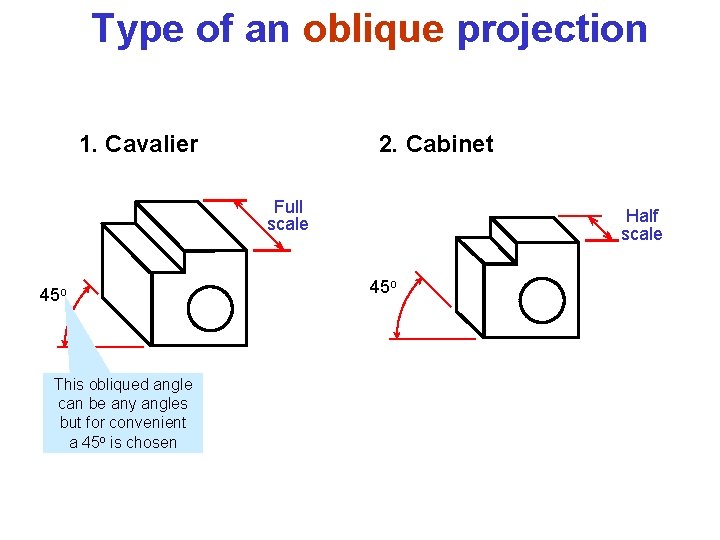
Type of an oblique projection 1. Cavalier 2. Cabinet Full scale 45 o This obliqued angle can be any angles but for convenient a 45 o is chosen Half scale 45 o

Isometric projection vs. Isometric sketch Contents

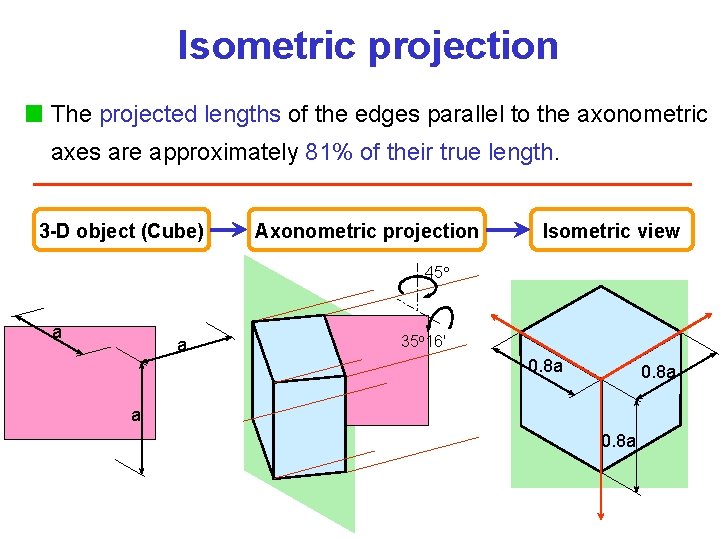
Isometric projection The projected lengths of the edges parallel to the axonometric axes are approximately 81% of their true length. 3 -D object (Cube) Axonometric projection Isometric view 45 a a 35 o 16' 0. 8 a a 0. 8 a

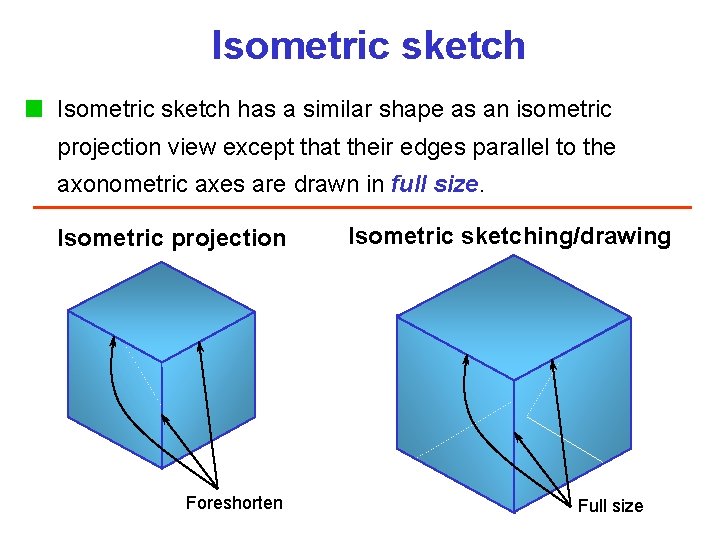
Isometric sketch has a similar shape as an isometric projection view except that their edges parallel to the axonometric axes are drawn in full size. Isometric projection Foreshorten Isometric sketching/drawing Full size

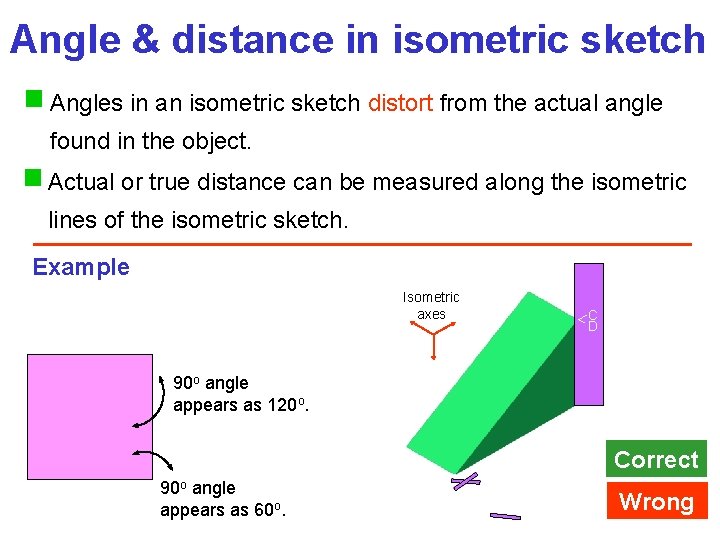
Angle & distance in isometric sketch Angles in an isometric sketch distort from the actual angle found in the object. Actual or true distance can be measured along the isometric lines of the isometric sketch. Example Isometric axes 90 o angle appears as 120 o. 90 o angle appears as 60 o. C D B A Correct Wrong

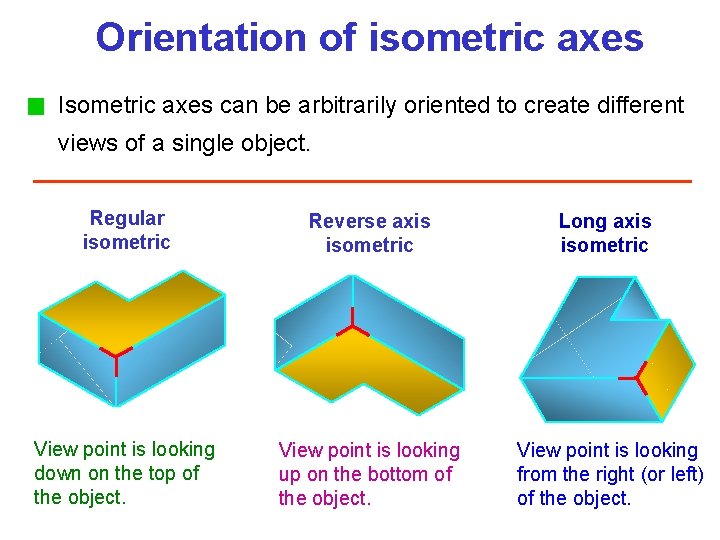
Orientation of isometric axes Isometric axes can be arbitrarily oriented to create different views of a single object. Regular isometric Reverse axis isometric Long axis isometric View point is looking down on the top of the object. View point is looking up on the bottom of the object. View point is looking from the right (or left) of the object.

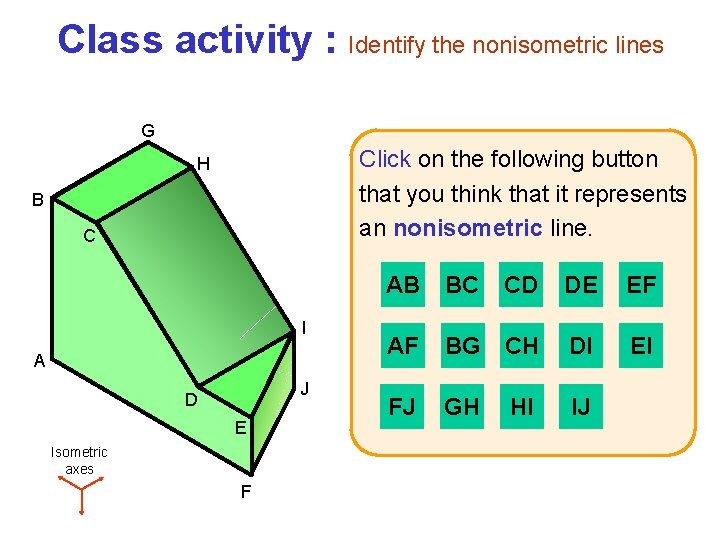
Class activity : Identify the nonisometric lines G Click on the following button that you think that it represents an nonisometric line. H B C I A J D E Isometric axes F AB BC CD DE EF AF BG CH DI EI FJ GH IJ HI

Isometric sketching From an orthographic views Contents

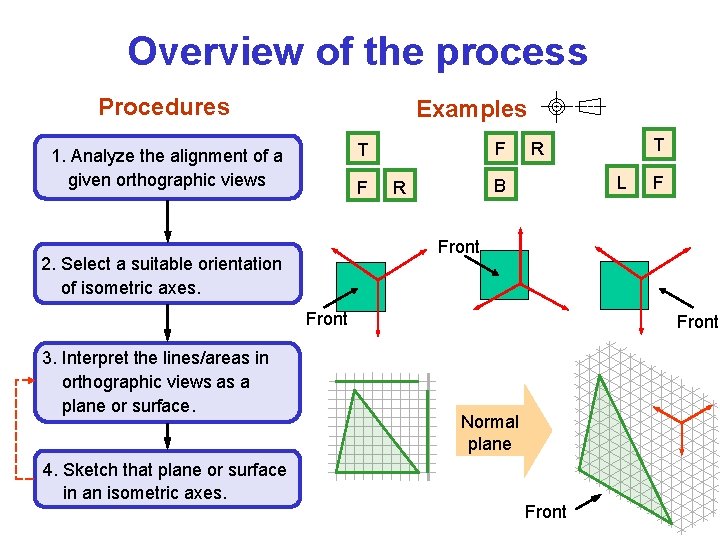
Overview of the process Procedures Examples F T 1. Analyze the alignment of a given orthographic views F L B R Front 4. Sketch that plane or surface in an isometric axes. F Front 2. Select a suitable orientation of isometric axes. 3. Interpret the lines/areas in orthographic views as a plane or surface. T R Front Normal plane Front

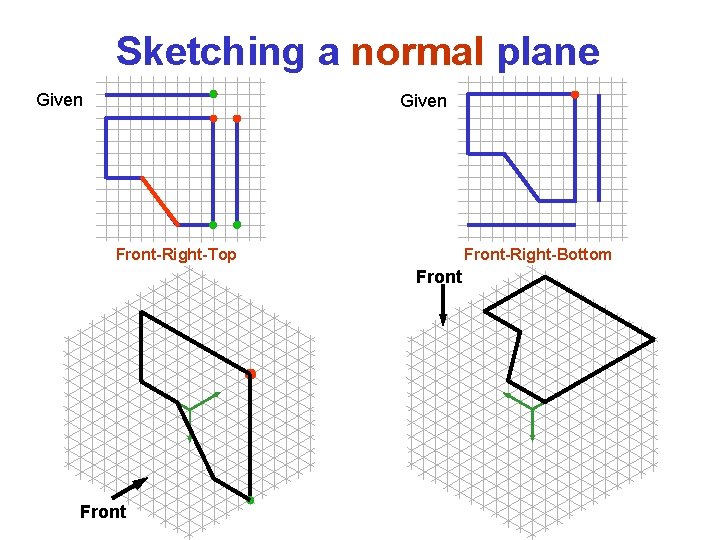
Sketching a normal plane Given Front-Right-Top Front-Right-Bottom Front

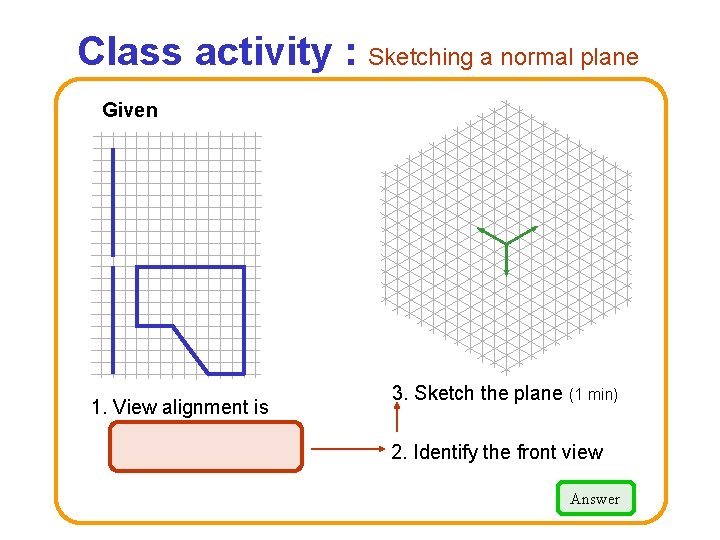
Class activity : Sketching a normal plane Given Front 1. View alignment is Front-Right-Bottom 3. Sketch the plane (1 min) 2. Identify the front view Answer

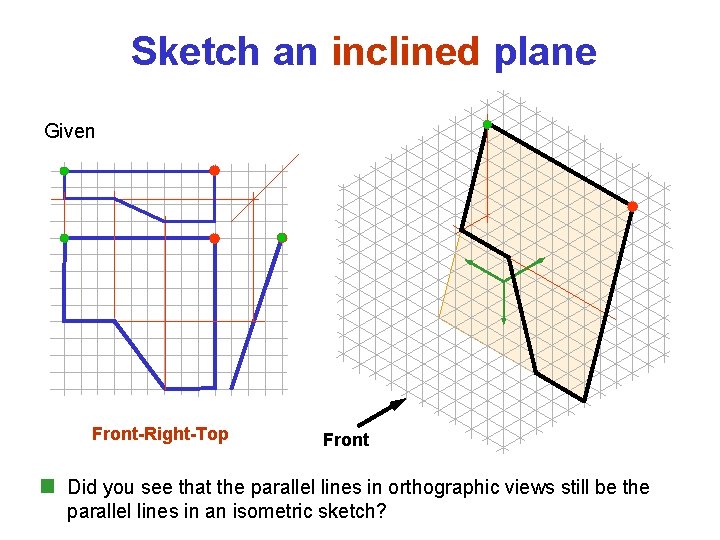
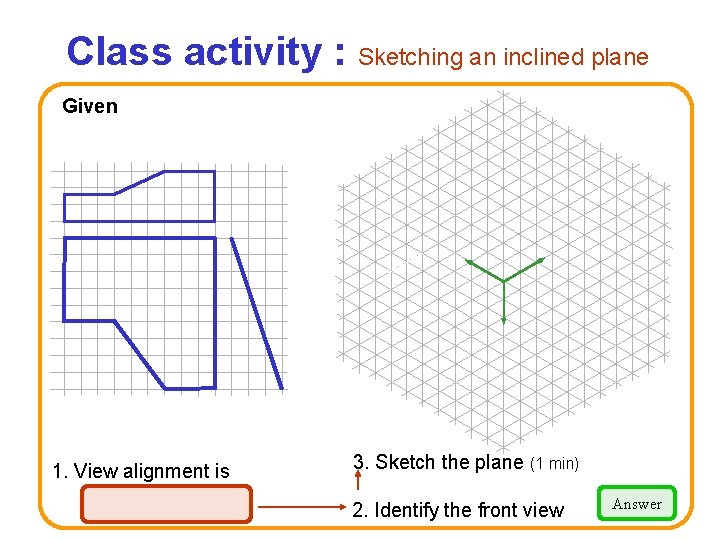
Sketch an inclined plane Given Front-Right-Top Front Did you see that the parallel lines in orthographic views still be the parallel lines in an isometric sketch?

Class activity : Sketching an inclined plane Given Front 1. View alignment is Front-Right-Top 3. Sketch the plane (1 min) 2. Identify the front view Answer

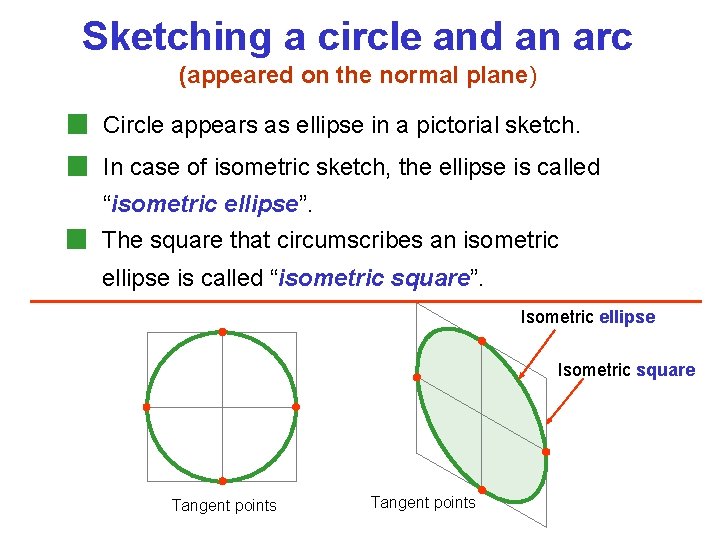
Sketching a circle and an arc (appeared on the normal plane) Circle appears as ellipse in a pictorial sketch. In case of isometric sketch, the ellipse is called “isometric ellipse”. The square that circumscribes an isometric ellipse is called “isometric square”. Isometric ellipse Isometric square Tangent points

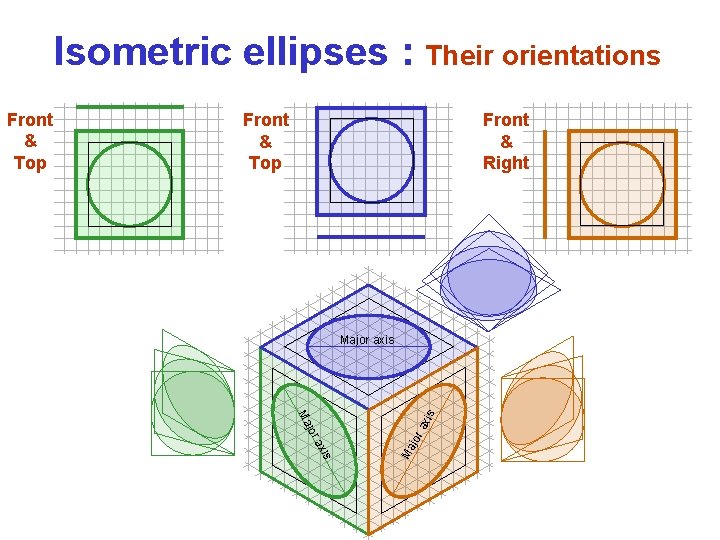
Isometric ellipses : Their orientations Front & Top Front & Right xis jor ra jo Ma ax is Major axis Ma Front & Top

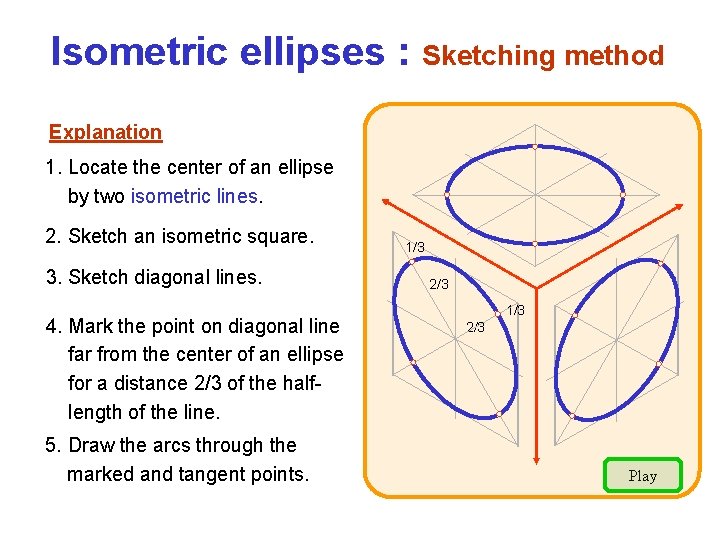
Isometric ellipses : Sketching method Explanation 1. Locate the center of an ellipse by two isometric lines. 2. Sketch an isometric square. 3. Sketch diagonal lines. 4. Mark the point on diagonal line far from the center of an ellipse for a distance 2/3 of the halflength of the line. 5. Draw the arcs through the marked and tangent points. 1/3 2/3 Play

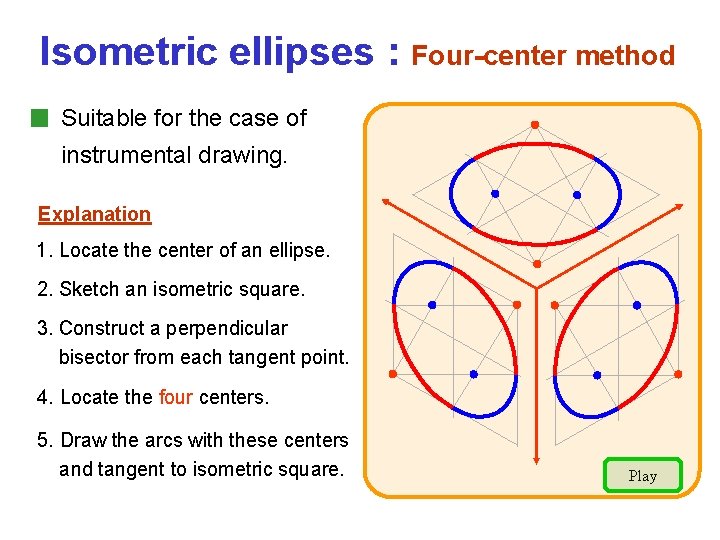
Isometric ellipses : Four-center method Suitable for the case of instrumental drawing. Explanation 1. Locate the center of an ellipse. 2. Sketch an isometric square. 3. Construct a perpendicular bisector from each tangent point. 4. Locate the four centers. 5. Draw the arcs with these centers and tangent to isometric square. Play

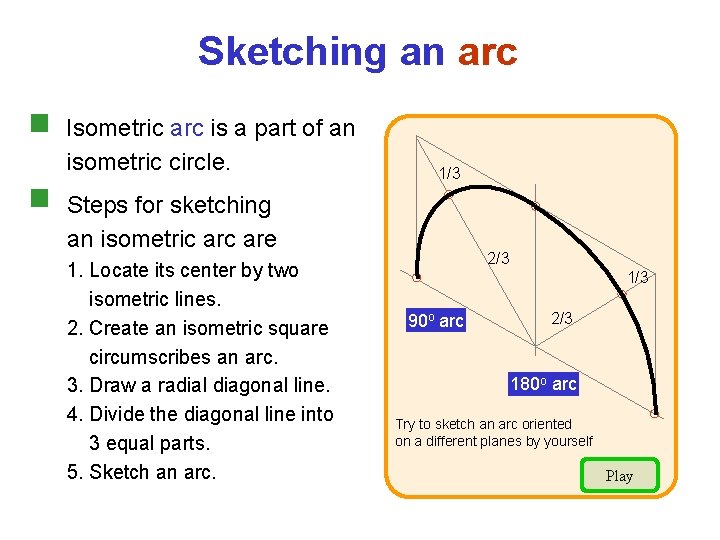
Sketching an arc Isometric arc is a part of an isometric circle. 1/3 Steps for sketching an isometric are 1. Locate its center by two isometric lines. 2. Create an isometric square circumscribes an arc. 3. Draw a radial diagonal line. 4. Divide the diagonal line into 3 equal parts. 5. Sketch an arc. 2/3 1/3 90 o arc 2/3 180 o arc Try to sketch an arc oriented on a different planes by yourself Play

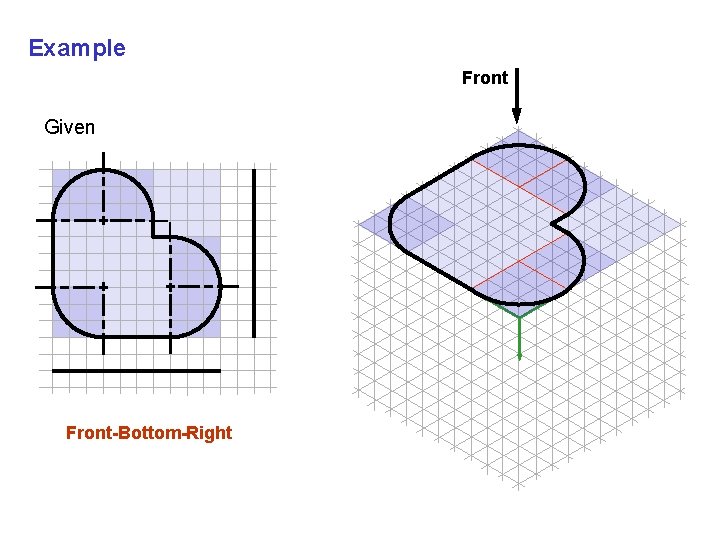
Example Front Given Front-Bottom-Right

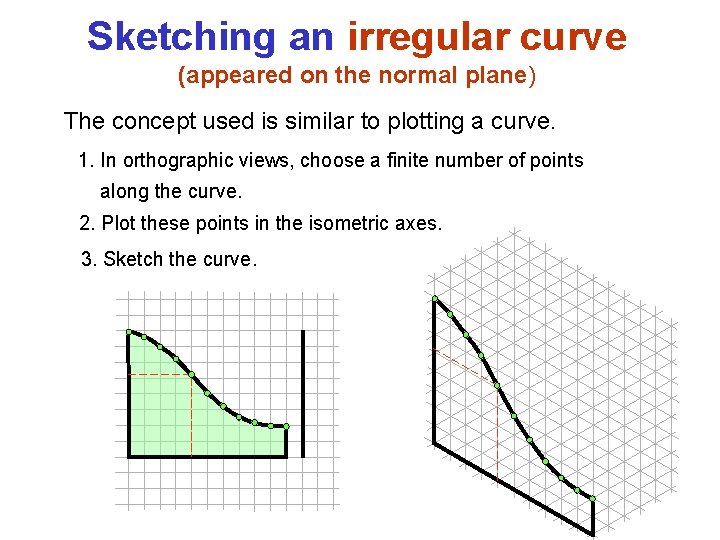
Sketching an irregular curve (appeared on the normal plane) The concept used is similar to plotting a curve. 1. In orthographic views, choose a finite number of points along the curve. 2. Plot these points in the isometric axes. 3. Sketch the curve.

Isometric sketching of an object Contents

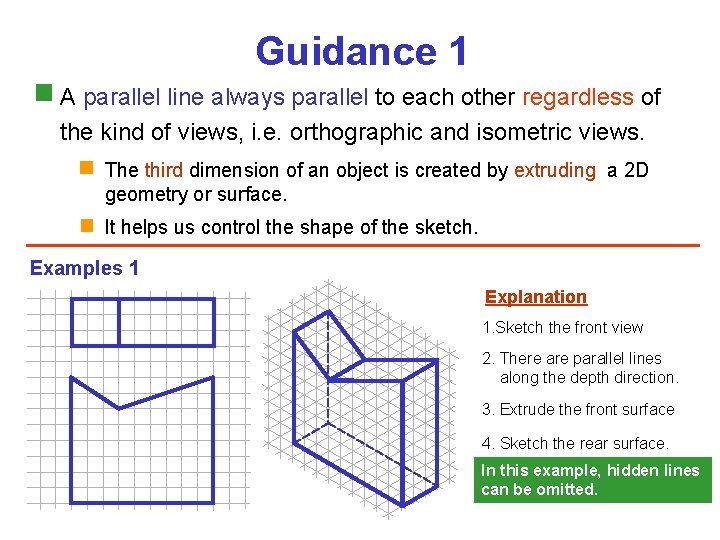
Guidance 1 A parallel line always parallel to each other regardless of the kind of views, i. e. orthographic and isometric views. The third dimension of an object is created by extruding a 2 D geometry or surface. It helps us control the shape of the sketch. Examples 1 Explanation 1. Sketch the front view 2. There are parallel lines along the depth direction. 3. Extrude the front surface 4. Sketch the rear surface. In this example, hidden lines can be omitted.

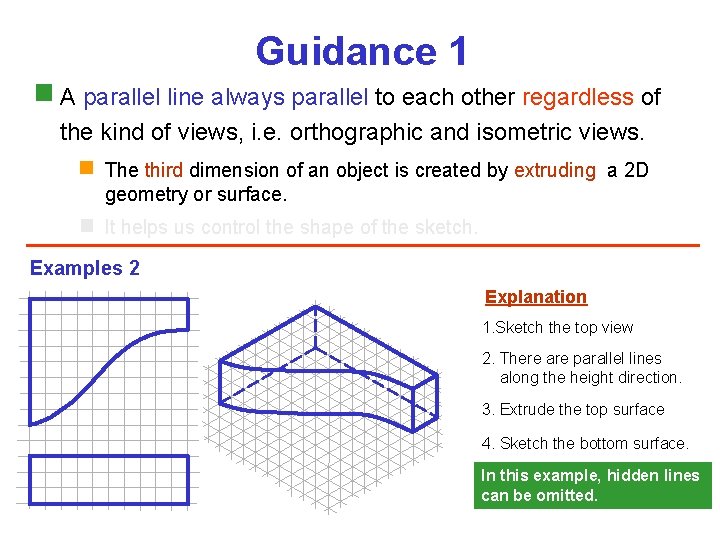
Guidance 1 A parallel line always parallel to each other regardless of the kind of views, i. e. orthographic and isometric views. The third dimension of an object is created by extruding a 2 D geometry or surface. It helps us control the shape of the sketch. Examples 2 Explanation 1. Sketch the top view 2. There are parallel lines along the height direction. 3. Extrude the top surface 4. Sketch the bottom surface. In this example, hidden lines can be omitted.

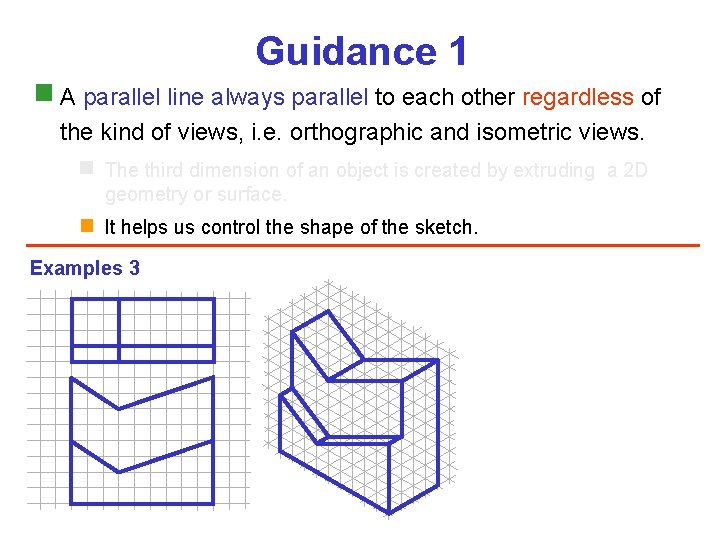
Guidance 1 A parallel line always parallel to each other regardless of the kind of views, i. e. orthographic and isometric views. The third dimension of an object is created by extruding a 2 D geometry or surface. It helps us control the shape of the sketch. Examples 3

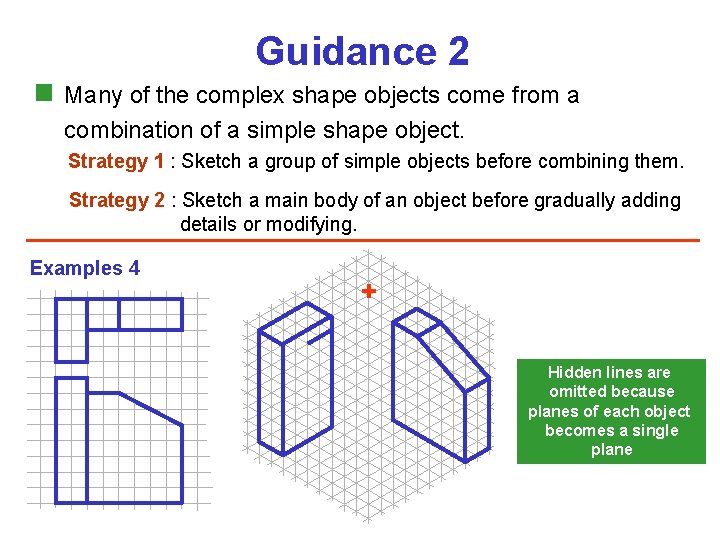
Guidance 2 Many of the complex shape objects come from a combination of a simple shape object. Strategy 1 : Sketch a group of simple objects before combining them. Strategy 2 : Sketch a main body of an object before gradually adding details or modifying. Examples 4 + Hidden lines are omitted because planes of each object becomes a single plane

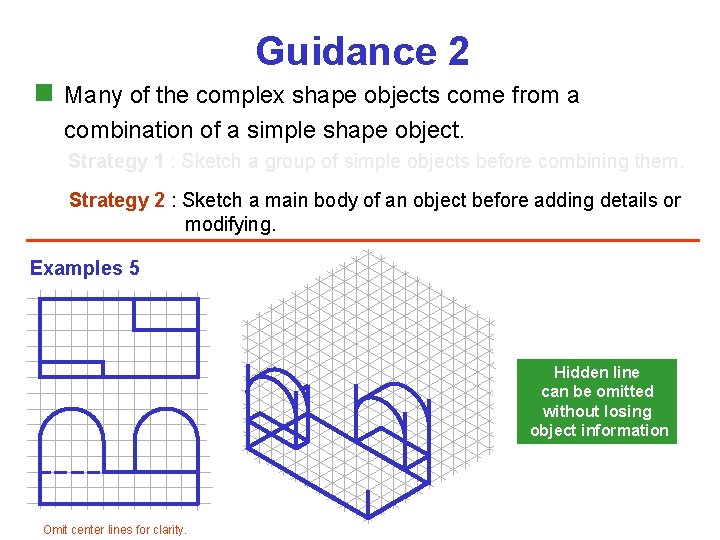
Guidance 2 Many of the complex shape objects come from a combination of a simple shape object. Strategy 1 : Sketch a group of simple objects before combining them. Strategy 2 : Sketch a main body of an object before adding details or modifying. Examples 5 Hidden line can be omitted without losing object information Omit center lines for clarity.

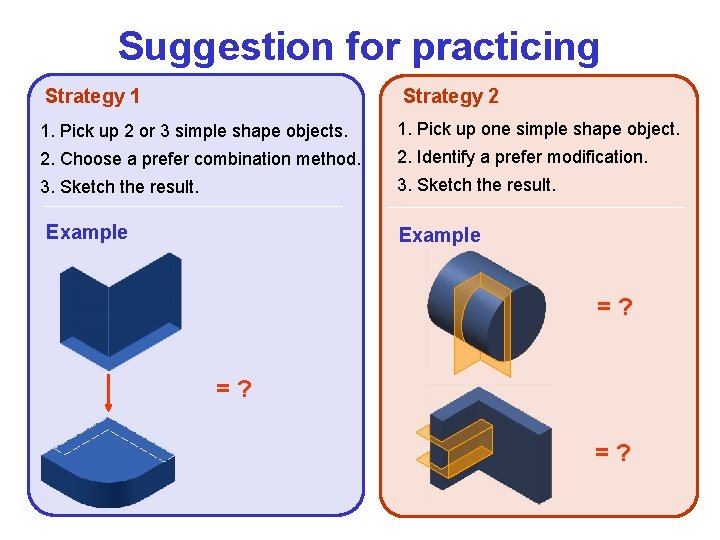
Suggestion for practicing Strategy 1 Strategy 2 1. Pick up 2 or 3 simple shape objects. 1. Pick up one simple shape object. 2. Choose a prefer combination method. 2. Identify a prefer modification. 3. Sketch the result. Example =? =? =?

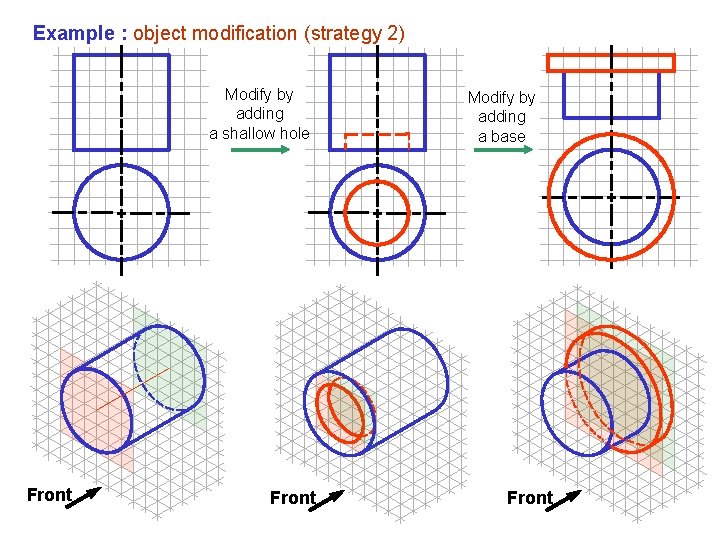
Example : object modification (strategy 2) Modify by adding a shallow hole Front Modify by adding a base Front

Oblique sketching Contents

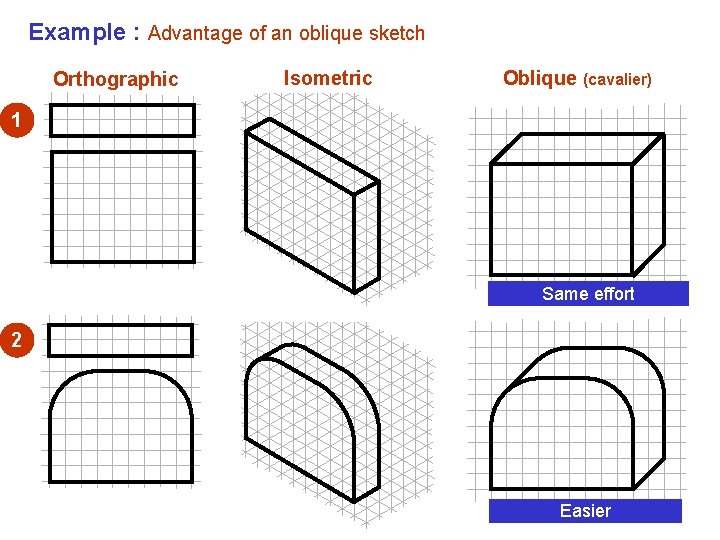
Example : Advantage of an oblique sketch Orthographic Isometric Oblique (cavalier) 1 Same effort 2 Easier

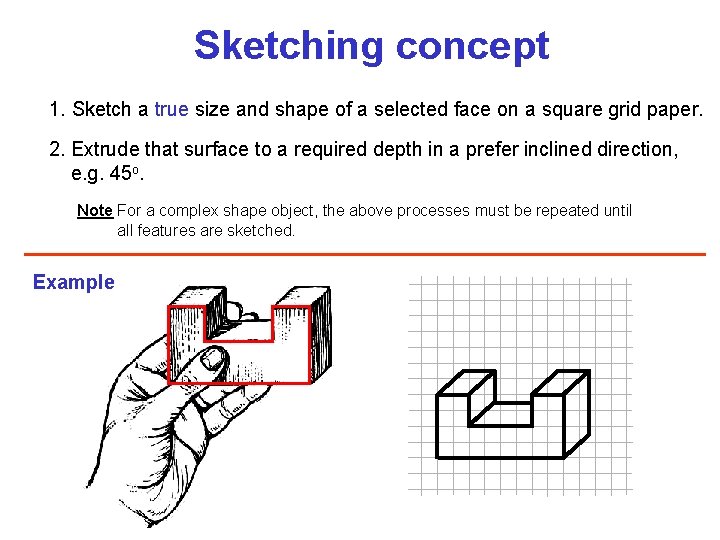
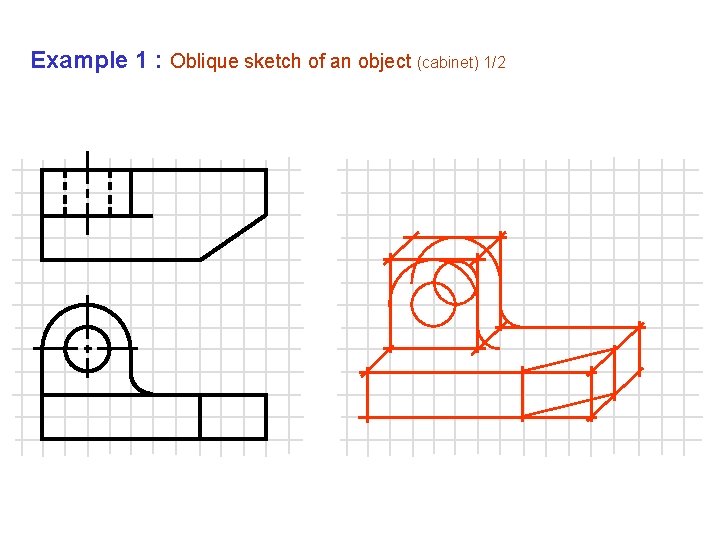
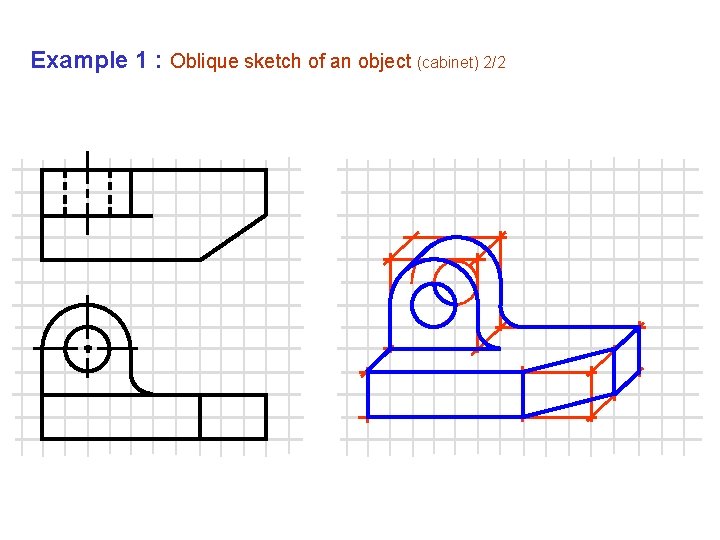
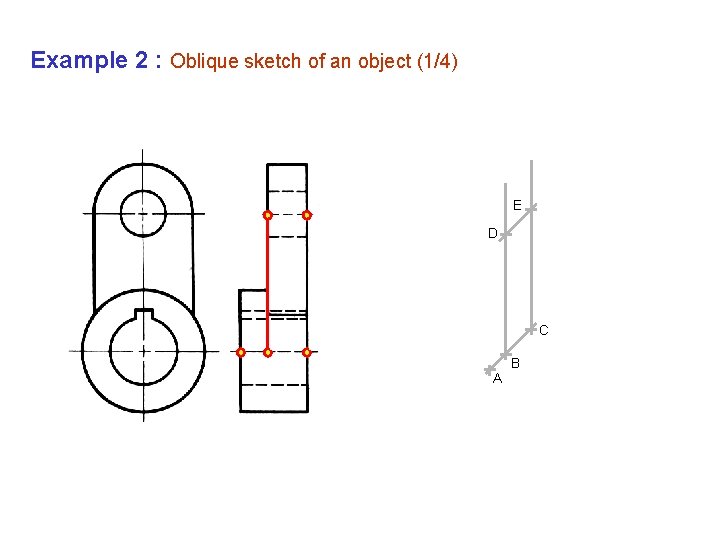
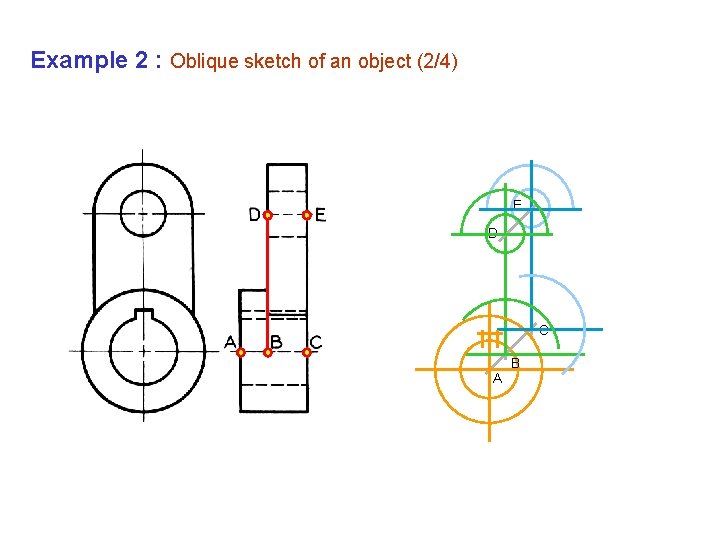
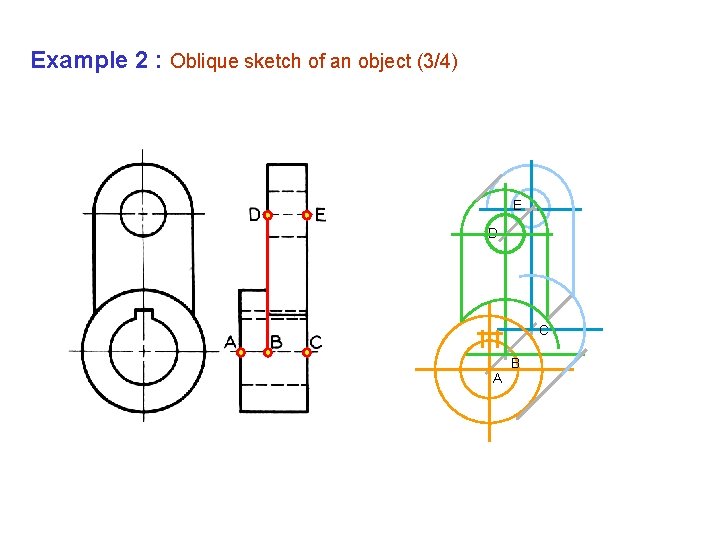
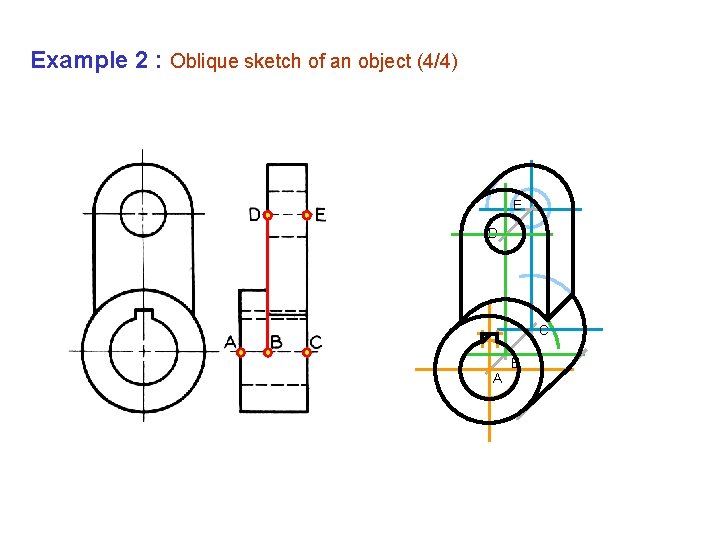
Sketching concept 1. Sketch a true size and shape of a selected face on a square grid paper. 2. Extrude that surface to a required depth in a prefer inclined direction, e. g. 45 o. Note For a complex shape object, the above processes must be repeated until all features are sketched. Example

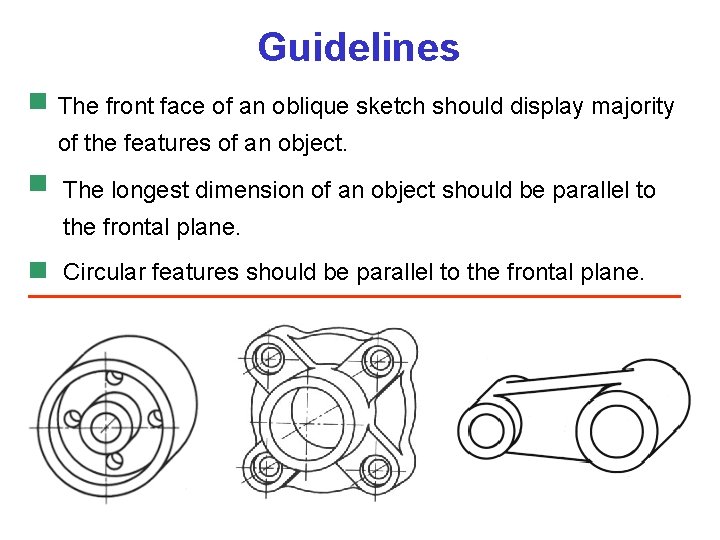
Guidelines The front face of an oblique sketch should display majority of the features of an object. The longest dimension of an object should be parallel to the frontal plane. Circular features should be parallel to the frontal plane.

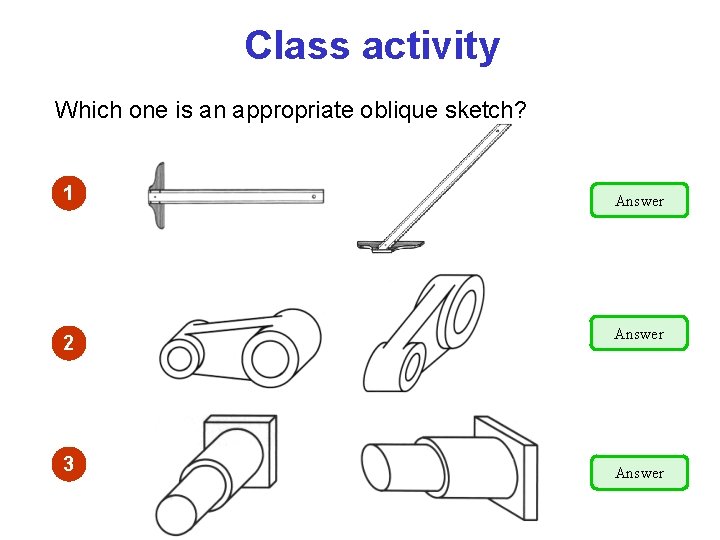
Class activity Which one is an appropriate oblique sketch? 1 2 3 Answer

Example 1 : Oblique sketch of an object (cabinet) 1/2

Example 1 : Oblique sketch of an object (cabinet) 2/2

Example 2 : Oblique sketch of an object (1/4) E D C B A

Example 2 : Oblique sketch of an object (2/4) E D C B A

Example 2 : Oblique sketch of an object (3/4) E D C B A

Example 2 : Oblique sketch of an object (4/4) E D C B A