Chapter 5 Sketching Applications Why Sketching Sketching i

 – – Drawing without drafting")


 – Horizon Line – Ground Line")
- Slides: 18
Chapter 5 Sketching Applications
Why Sketching? • Sketching (i. e. , freehand drawing) – – Drawing without drafting equipment Only paper, pencil, and an eraser needed Fast, visual communication Asset for communicating technical concepts • All lines are related in sketches – Size and direction • Sketches should be proportional – Actual size depends on paper and sketch size
Sketching Tools & Materials • Soft lead pencil • Initially type of paper is not critical as long as the idea can be conveyed • Grid paper is best to define scale
Sketching Tools and Materials • Pencils – Should have soft lead • Common No. 2 • Mechanical pencil with H, F, or HB lead • Automatic 0. 7 -mm or 0. 9 -mm pencil with F or HB lead – Point should be slightly rounded • Paper – Almost any type works
Sketching Straight Lines
Sketching Circular Objects • Trammel Method – Make a trammel or use scale – Place pencil on one point while holding the end and rotate around center point – Nail and string method • Hand compass Method – Use your hand as the center and rotate the paper How did you do? Practice Sketch freehand
Measurement and Proportion • Proportion of lines to each other are more important then the size of the sketch itself • The first line sketched determines the ______of the drawing • The second line determines the ______ of the drawing • Use your pencil to establish measurements if no scale is available
Sketching Procedures • • • Before sketching try to visualize the object or finished product Sketch very light lines of the outline Add details being careful to keep the proportion correct Darken in the desired lines of the final sketch Use a grid to create irregular shapes Use Construction Lines Box out drawings
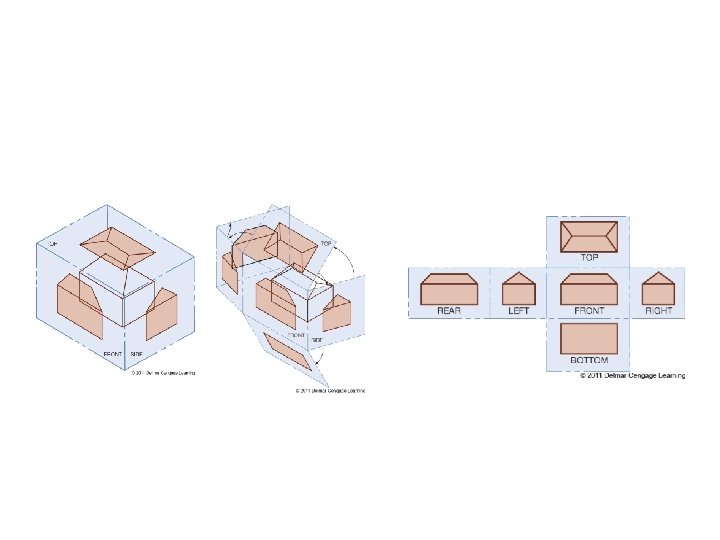
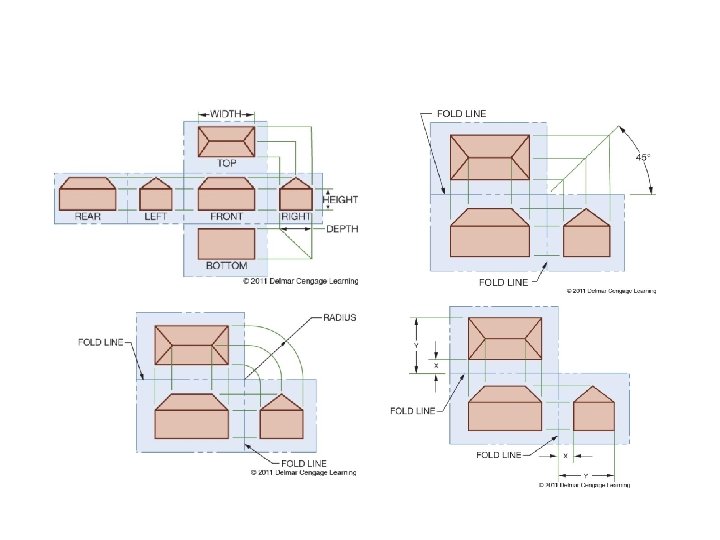
Multiview Projection • Establishes two or more views of an object as projected on two or more planes – Uses orthographic projection techniques • Elevations – Two-dimensional exterior views of a structure • Proper view selection – Six primary views
Multiview Details • Use the front, left side, right side, and back as elevations Where do all drawings come from? Floor Plans Roof Plan Cross Section Electrical Site
________ or ________Sketches ______ = 90º • Mirror Line • Height • Width
Practical Application of Orthographic Projection • Any projection of features onto an imaginary perpendicular plane – Lines of sight are perpendicular to the plane – Objects are true size if they are parallel to the plane – Objects are foreshortened if they are not parallel to the plane – Alignment of views is critical
Application Exercise
One and Two Point ______Projection Sketches • Determine best view for the front • Set up isometric axes • Sketch overall block • Add details
Setting up Sketches • Perspective – Vanishing point(s) – Horizon Line – Ground Line • Isometric – Horizontal ground line – Perpendicular line – Two 30° lines