Motorola APX 8000 XE Presented By Lt Gjonlekaj

Motorola APX 8000 XE Presented By: Lt. Gjonlekaj
 • Multi-Screen View (Top screen & main")
New Features • Voice Annunciation (Announces channel) • Multi-Screen View (Top screen & main display) • Mayday Retention (Will hold last 15 transmissions) • Multi-Zone Capabilities (Enhanced interoperability communications) • Multi-Band Radio (VHF, UHF and 700/800 MHz) • Mini Light on Mic (Operates on Emergency Activation & manually) • Alpha-Numeric ID (Will display many more position-based ID’s) • Bluetooth Technology Built Within (Future use purposes)
 Main Display Speaker Channel Selector EA Button Battery Level")
Top Display ABC Switch (Unprogrammed) Main Display Speaker Channel Selector EA Button Battery Level Indicator Menu Select Buttons On/Off Volume Control Knob Concentric Switch (Unprogrammed) Battery Level Indicator 4 -Way Navigation Button Channel Display Home Button (Returns channel to ‘Westbury Fireground 1’ in ‘Home Zone Firegrounds’)

Top Side Button Short Press - Illuminates Screen Long Press - Reverses Orientation of Top Screen PTT Button Side Buttons 1 & 2: 1 - One Dot - Channel Annunciation Announces current channel radio is selected on 2 - Two Dot - Recent Calls (Mayday Retention) Will emphasize on details later
 EA Alert Button Transmit Light Volume Up/Down Button PTT Button")
Remote Speaker Mic (RSM) EA Alert Button Transmit Light Volume Up/Down Button PTT Button Channel Annunciation Mini Light Mics Rear Mic Note: This RSM has 5 Mics on it: Front, Top, Back Mic has noise cancelling features that filter a significant amount of background noise

Transmitting When Using Scott Mask Members MUST place Mic on Voicemitter Transmitting Without Using Scott Mask 1 - Aim RSM towards mouth and drive transmission into Mics 2 - Ensure hand does not cover Mics

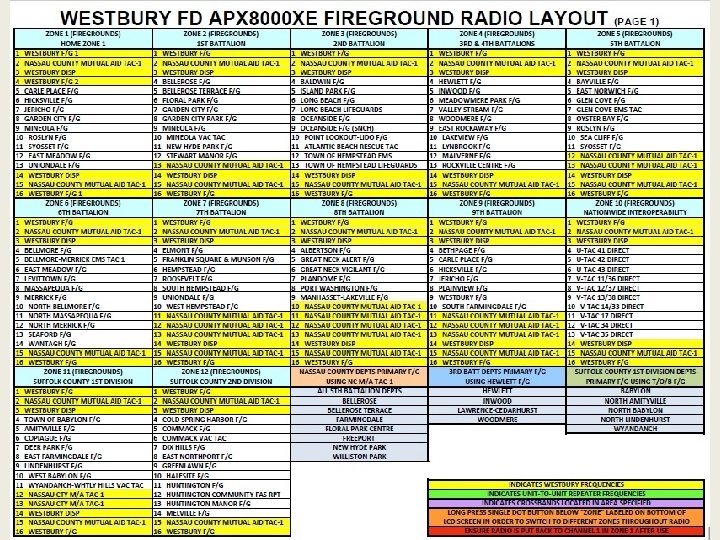
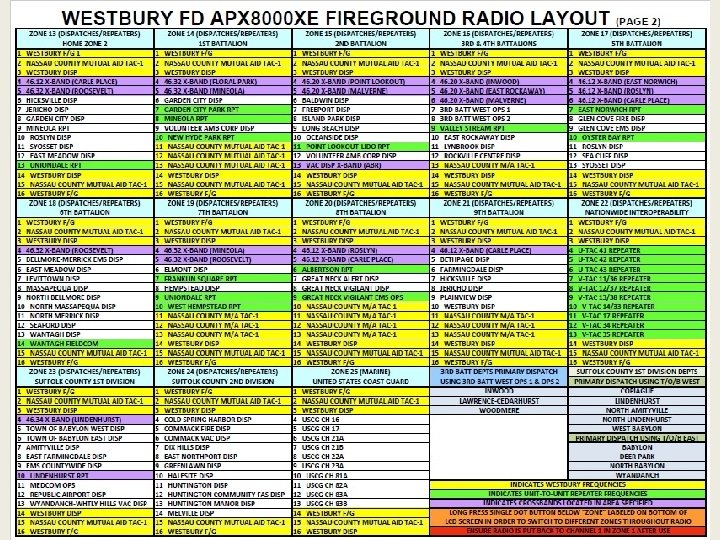
Changing Zones • Press Menu button beneath ‘Zone’ • ‘Select Zone’ screen will appear • Use 4 Way Navigation button to scroll up and down to view different zones • Press Menu button beneath ‘Sel’ (Select) to select desired zone • Use Channel Selector Dial on top of radio to select desired channel in chosen zone

Mini Light Use • Press and hold light button down for a couple of seconds to activate light • To turn light off, press and hold light button for a couple seconds

Emergency Alert Activation By User • Mini light blinks out SOS signal (3 -Dots, 3 -Dashes, 3 -Dots) • Main screen displays ‘Emergency’ in an orange stripe

Emergency Alert Received Main Display • • • Displays ‘EA received’ Also displays Alpha-Numeric ID of Radio Holds display for approximately 8 seconds Top Display • • • Displays ‘EA RCVD’ Alternates between EA RCVD and Alpha-Numeric ID of radio giving EA Holds display for approximately 8 seconds
 • ‘Recent Calls’")
Recalling EA Activations • Press Two-Dot Button button under ‘Rcnt’ (Recent) • ‘Recent Calls’ screen appears The last 15 calls with radio ID will display from most recent to the previous 15 calls Each call is time stamped (Times may not be all accurate on radios) • Calls that display a yellow Triangle were EA activated transmissions. • Use 4 Way Navigation button to scroll up or down for additional received transmissions.

Battery Latch • One is located on each side Removing Batteries • Squeeze battery latches on each side simultaneously • Push battery body down with thumb from other hand

Charging Batteries • Batteries must only be charged in chargers specifically designated for use with the APX radios • Batteries can be in different states of charging, as identified by colored light designations • Only use batteries with one of the green light indications Green Light Steady Green - Fully Charged Blinking Green - Trickle Mode Charge is at 90% or better Green/Amber Alternate Blinking Fully charged (This indicator is for Radio Vendor informational purposes only) Red Light Steady Red - In Rapid Charge Blinking Red - Not Charging /Re-insert Amber Light Steady Amber - Is re-conditioning where current battery level gets drained first then recharges. Should transition to Red (charging) then solid Green, blinking Green or Green/Amber eventually ONLY USE - STEADY GREEN, FLASHING GREEN, OR ALTERNATE BLINKING GREEN/AMBER BATTERIES

Weekly Maintenance & Inspection 1 - Change Battery Weekly Retrieve battery from gang charger Check 4 digit Date Code to ensure battery has not exceeded life use capacity Date Code (Manufactured Date) First 2 digits represent Year Last 2 digits represent Week Insert battery into portable radio and ensure clicks are heard and battery is seated properly 2 - Ensure Remote Mic security screw is tight 3 - Ensure antenna is secure, hand tight 4 - Ensure Rear Mic and EA Button are clear of debris Note: Ensure channel is set to WESTBURY F/G 1 in HOME ZONE F/G

Setting Time The times on the portable radios are not synchronized and may be slightly off Additionally, the times must be reset for Standard and Daylight savings time 2 - Click button under ‘Edit’ 3 - Use Navigation Button to adjust time and date 1 - Click button under ‘Clck’ (Clock) 4 - Click button under ‘Ok’ when done
- Slides: 17