MECHANICAL PROPERTIES OF MATERIALS 1 StressStrain Relationships 2007
- Slides: 40

MECHANICAL PROPERTIES OF MATERIALS 1. Stress‑Strain Relationships © 2007 John Wiley & Sons, Inc. M P Groover, Fundamentals of Modern Manufacturing 3/e

Mechanical Properties in Design and Manufacturing Mechanical properties determine a material’s behavior when subjected to mechanical stresses § Properties include elastic modulus, ductility, hardness, and various measures of strength § Dilemma: mechanical properties desirable to the designer, such as high strength, usually make manufacturing more difficult § The manufacturing engineer should appreciate the design viewpoint § And the designer should be aware of the manufacturing viewpoint © 2007 John Wiley & Sons, Inc. M P Groover, Fundamentals of Modern Manufacturing 3/e

Stress‑Strain Relationships Three types of static stresses to which materials can be subjected: 1. Tensile - tend to stretch the material 2. Compressive - tend to squeeze it 3. Shear - tend to cause adjacent portions of material to slide against each other § Stress‑strain curve - basic relationship that describes mechanical properties for all three types © 2007 John Wiley & Sons, Inc. M P Groover, Fundamentals of Modern Manufacturing 3/e

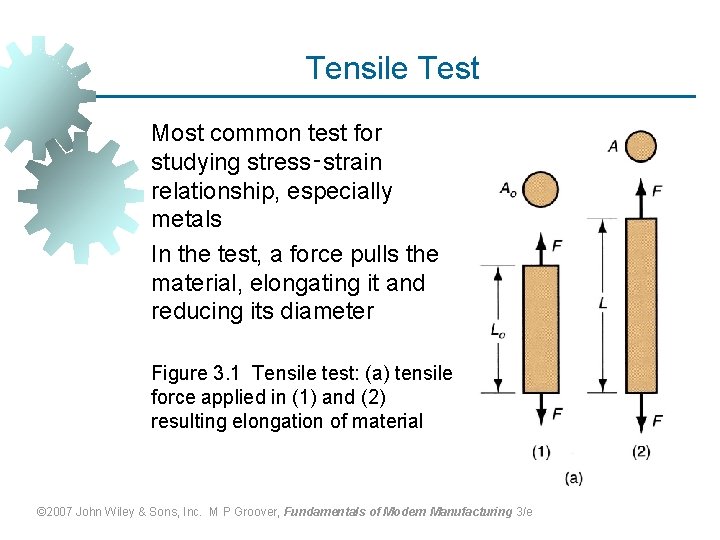
Tensile Test Most common test for studying stress‑strain relationship, especially metals In the test, a force pulls the material, elongating it and reducing its diameter Figure 3. 1 Tensile test: (a) tensile force applied in (1) and (2) resulting elongation of material © 2007 John Wiley & Sons, Inc. M P Groover, Fundamentals of Modern Manufacturing 3/e

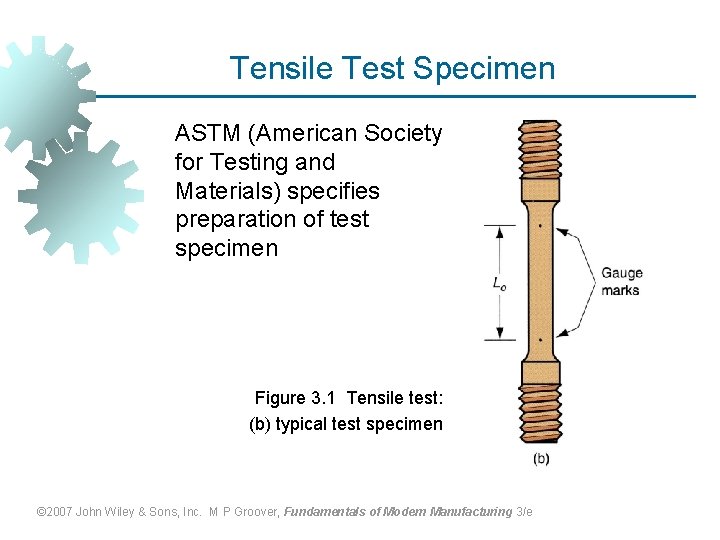
Tensile Test Specimen ASTM (American Society for Testing and Materials) specifies preparation of test specimen Figure 3. 1 Tensile test: (b) typical test specimen © 2007 John Wiley & Sons, Inc. M P Groover, Fundamentals of Modern Manufacturing 3/e

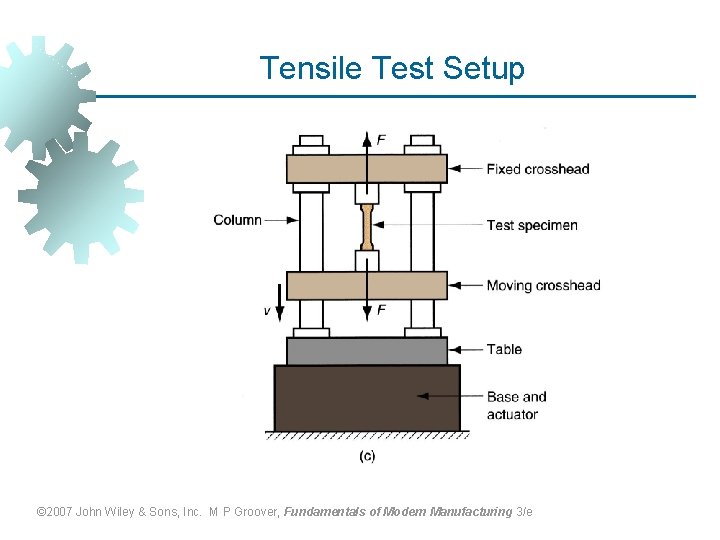
Tensile Test Setup © 2007 John Wiley & Sons, Inc. M P Groover, Fundamentals of Modern Manufacturing 3/e

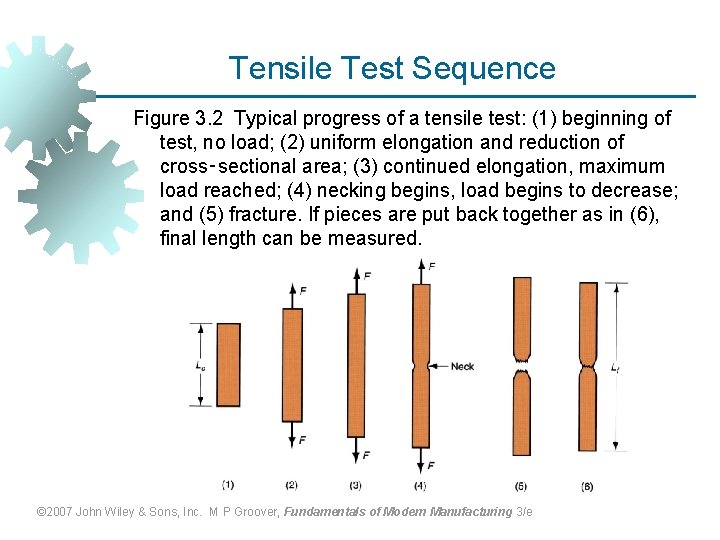
Tensile Test Sequence Figure 3. 2 Typical progress of a tensile test: (1) beginning of test, no load; (2) uniform elongation and reduction of cross‑sectional area; (3) continued elongation, maximum load reached; (4) necking begins, load begins to decrease; and (5) fracture. If pieces are put back together as in (6), final length can be measured. © 2007 John Wiley & Sons, Inc. M P Groover, Fundamentals of Modern Manufacturing 3/e

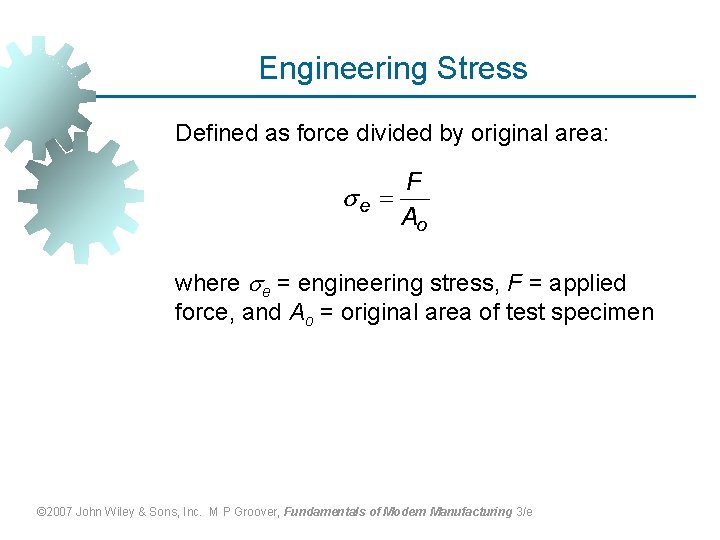
Engineering Stress Defined as force divided by original area: where e = engineering stress, F = applied force, and Ao = original area of test specimen © 2007 John Wiley & Sons, Inc. M P Groover, Fundamentals of Modern Manufacturing 3/e

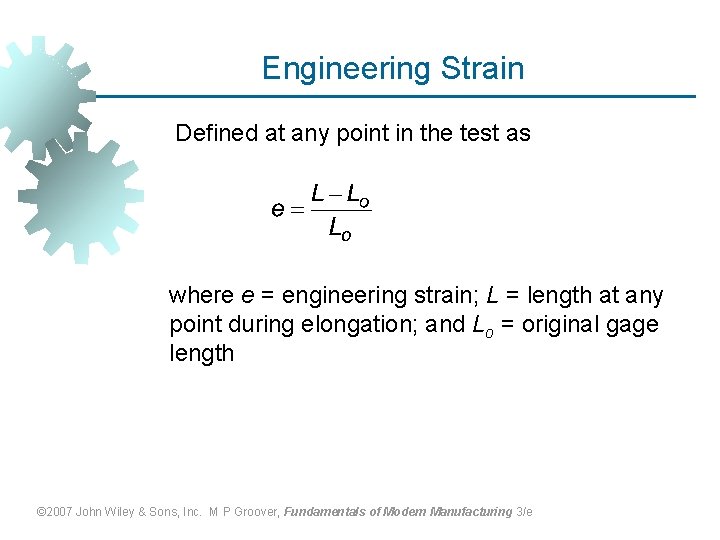
Engineering Strain Defined at any point in the test as where e = engineering strain; L = length at any point during elongation; and Lo = original gage length © 2007 John Wiley & Sons, Inc. M P Groover, Fundamentals of Modern Manufacturing 3/e

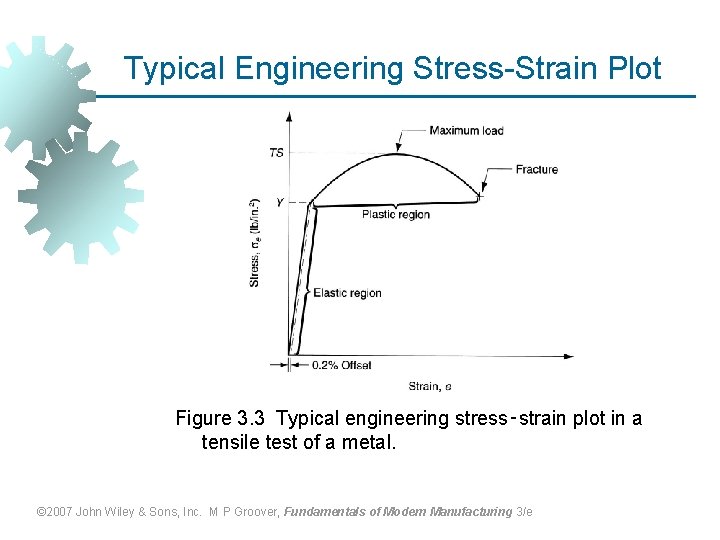
Typical Engineering Stress-Strain Plot Figure 3. 3 Typical engineering stress‑strain plot in a tensile test of a metal. © 2007 John Wiley & Sons, Inc. M P Groover, Fundamentals of Modern Manufacturing 3/e

Two Regions of Stress‑Strain Curve The two regions indicate two distinct forms of behavior: 1. Elastic region – prior to yielding of the material 2. Plastic region – after yielding of the material © 2007 John Wiley & Sons, Inc. M P Groover, Fundamentals of Modern Manufacturing 3/e

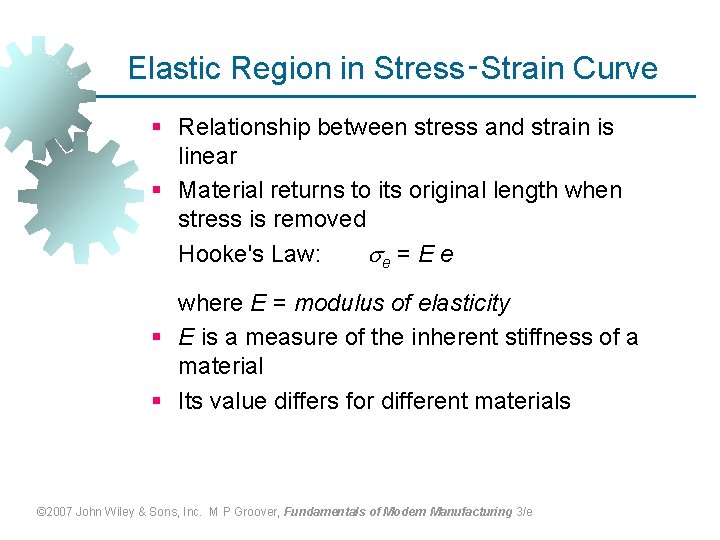
Elastic Region in Stress‑Strain Curve § Relationship between stress and strain is linear § Material returns to its original length when stress is removed Hooke's Law: e = E e where E = modulus of elasticity § E is a measure of the inherent stiffness of a material § Its value differs for different materials © 2007 John Wiley & Sons, Inc. M P Groover, Fundamentals of Modern Manufacturing 3/e

Yield Point in Stress‑Strain Curve § As stress increases, a point in the linear relationship is finally reached when the material begins to yield § Yield point Y can be identified by the change in slope at the upper end of the linear region § Y = a strength property § Other names for yield point = yield strength, yield stress, and elastic limit © 2007 John Wiley & Sons, Inc. M P Groover, Fundamentals of Modern Manufacturing 3/e

Plastic Region in Stress‑Strain Curve § Yield point marks the beginning of plastic deformation § The stress-strain relationship is no longer guided by Hooke's Law § As load is increased beyond Y, elongation proceeds at a much faster rate than before, causing the slope of the curve to change dramatically © 2007 John Wiley & Sons, Inc. M P Groover, Fundamentals of Modern Manufacturing 3/e

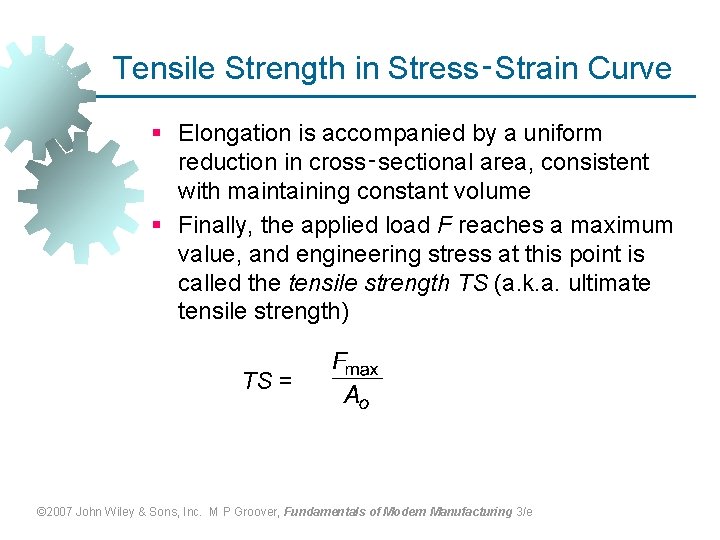
Tensile Strength in Stress‑Strain Curve § Elongation is accompanied by a uniform reduction in cross‑sectional area, consistent with maintaining constant volume § Finally, the applied load F reaches a maximum value, and engineering stress at this point is called the tensile strength TS (a. k. a. ultimate tensile strength) TS = © 2007 John Wiley & Sons, Inc. M P Groover, Fundamentals of Modern Manufacturing 3/e

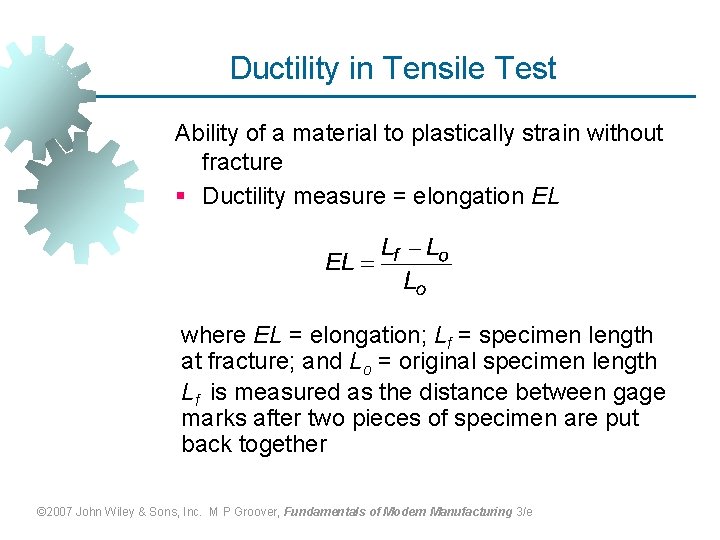
Ductility in Tensile Test Ability of a material to plastically strain without fracture § Ductility measure = elongation EL where EL = elongation; Lf = specimen length at fracture; and Lo = original specimen length Lf is measured as the distance between gage marks after two pieces of specimen are put back together © 2007 John Wiley & Sons, Inc. M P Groover, Fundamentals of Modern Manufacturing 3/e

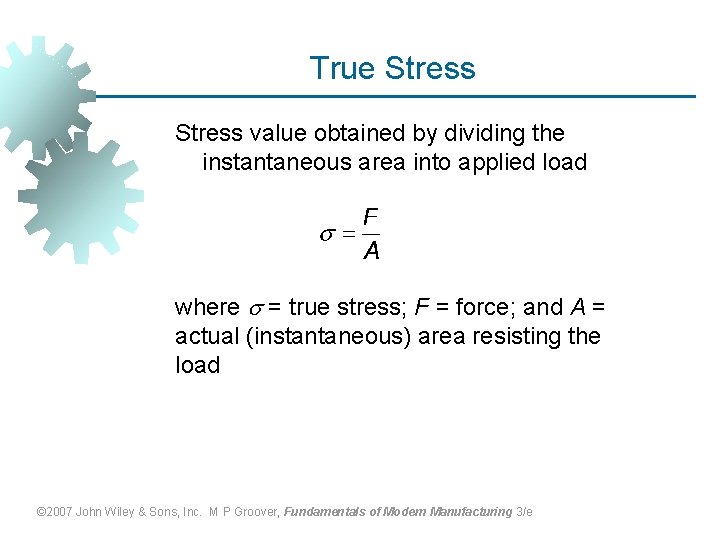
True Stress value obtained by dividing the instantaneous area into applied load where = true stress; F = force; and A = actual (instantaneous) area resisting the load © 2007 John Wiley & Sons, Inc. M P Groover, Fundamentals of Modern Manufacturing 3/e

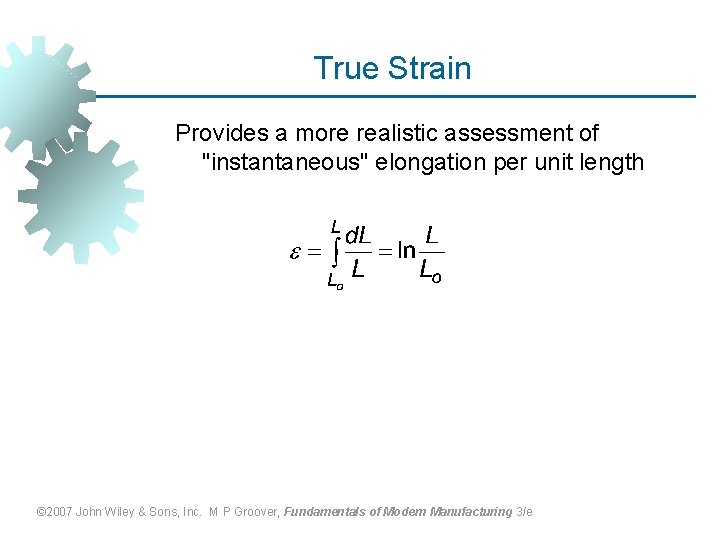
True Strain Provides a more realistic assessment of "instantaneous" elongation per unit length © 2007 John Wiley & Sons, Inc. M P Groover, Fundamentals of Modern Manufacturing 3/e

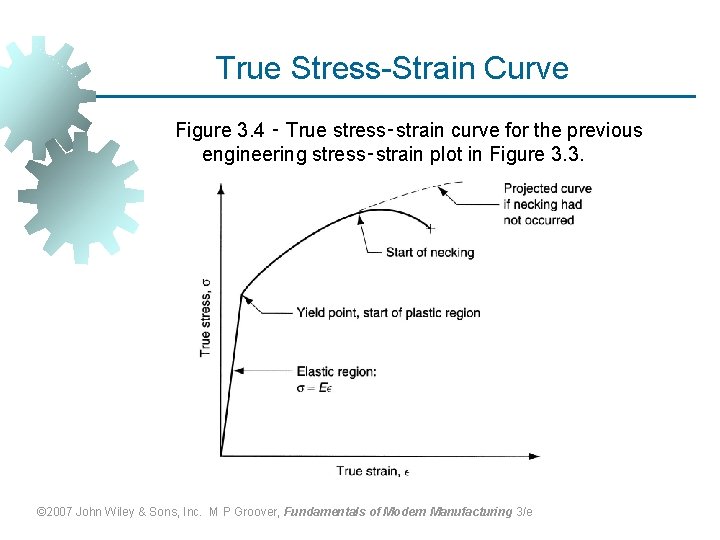
True Stress-Strain Curve Figure 3. 4 ‑ True stress‑strain curve for the previous engineering stress‑strain plot in Figure 3. 3. © 2007 John Wiley & Sons, Inc. M P Groover, Fundamentals of Modern Manufacturing 3/e

Strain Hardening in Stress-Strain Curve § Note that true stress increases continuously in the plastic region until necking § In the engineering stress‑strain curve, the significance of this was lost because stress was based on an incorrect area value § It means that the metal is becoming stronger as strain increases § This is the property called strain hardening © 2007 John Wiley & Sons, Inc. M P Groover, Fundamentals of Modern Manufacturing 3/e

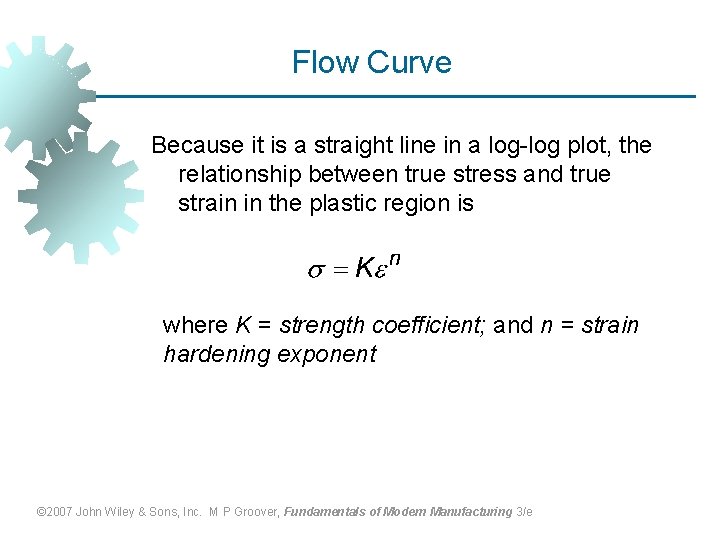
Flow Curve Because it is a straight line in a log-log plot, the relationship between true stress and true strain in the plastic region is where K = strength coefficient; and n = strain hardening exponent © 2007 John Wiley & Sons, Inc. M P Groover, Fundamentals of Modern Manufacturing 3/e

Categories of Stress-Strain Relationship § § § Perfectly elastic Elastic and perfectly plastic Elastic and strain hardening © 2007 John Wiley & Sons, Inc. M P Groover, Fundamentals of Modern Manufacturing 3/e

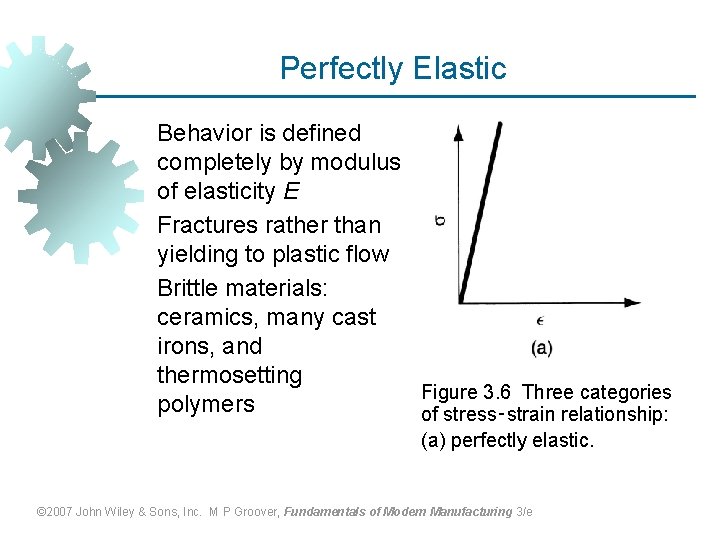
Perfectly Elastic Behavior is defined completely by modulus of elasticity E Fractures rather than yielding to plastic flow Brittle materials: ceramics, many cast irons, and thermosetting Figure 3. 6 Three categories polymers of stress‑strain relationship: (a) perfectly elastic. © 2007 John Wiley & Sons, Inc. M P Groover, Fundamentals of Modern Manufacturing 3/e

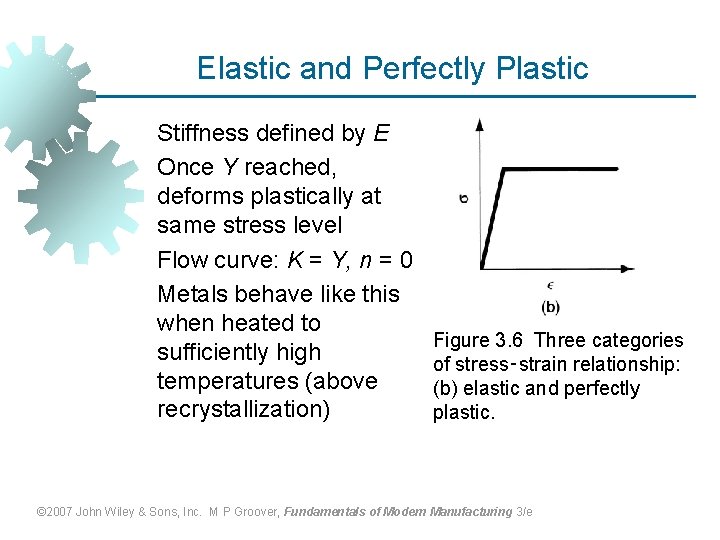
Elastic and Perfectly Plastic Stiffness defined by E Once Y reached, deforms plastically at same stress level Flow curve: K = Y, n = 0 Metals behave like this when heated to sufficiently high temperatures (above recrystallization) Figure 3. 6 Three categories of stress‑strain relationship: (b) elastic and perfectly plastic. © 2007 John Wiley & Sons, Inc. M P Groover, Fundamentals of Modern Manufacturing 3/e

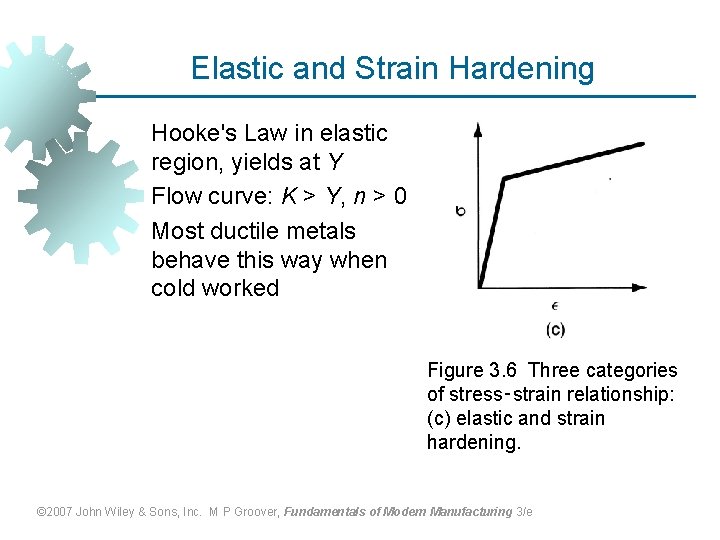
Elastic and Strain Hardening Hooke's Law in elastic region, yields at Y Flow curve: K > Y, n > 0 Most ductile metals behave this way when cold worked Figure 3. 6 Three categories of stress‑strain relationship: (c) elastic and strain hardening. © 2007 John Wiley & Sons, Inc. M P Groover, Fundamentals of Modern Manufacturing 3/e

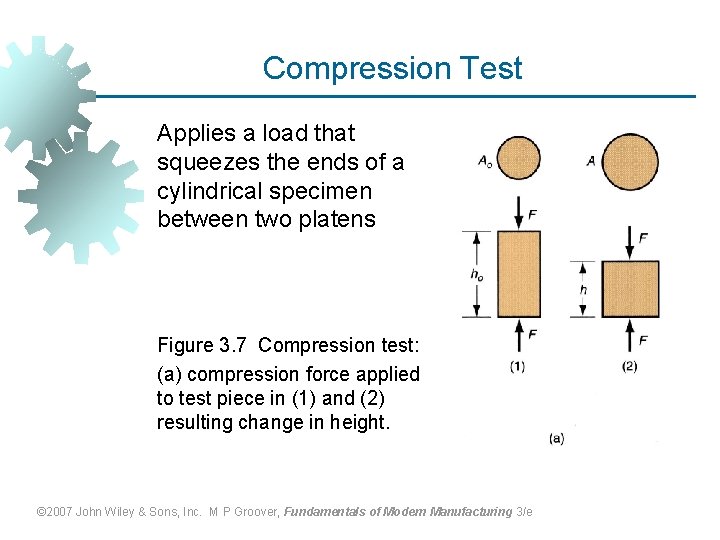
Compression Test Applies a load that squeezes the ends of a cylindrical specimen between two platens Figure 3. 7 Compression test: (a) compression force applied to test piece in (1) and (2) resulting change in height. © 2007 John Wiley & Sons, Inc. M P Groover, Fundamentals of Modern Manufacturing 3/e

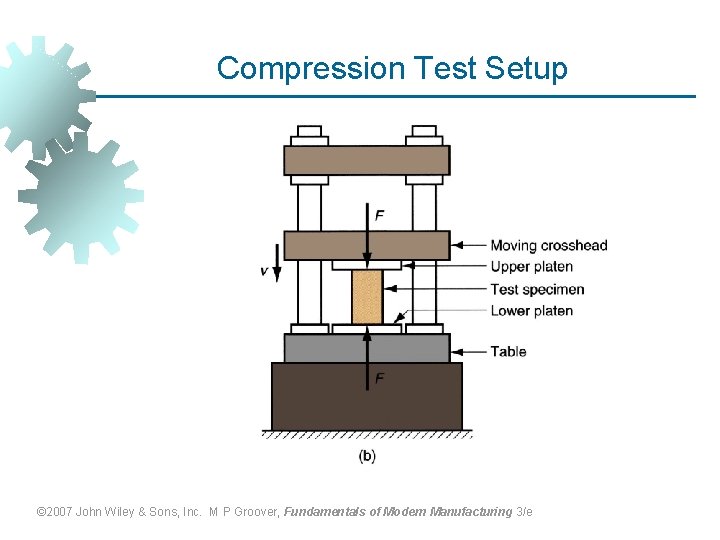
Compression Test Setup © 2007 John Wiley & Sons, Inc. M P Groover, Fundamentals of Modern Manufacturing 3/e

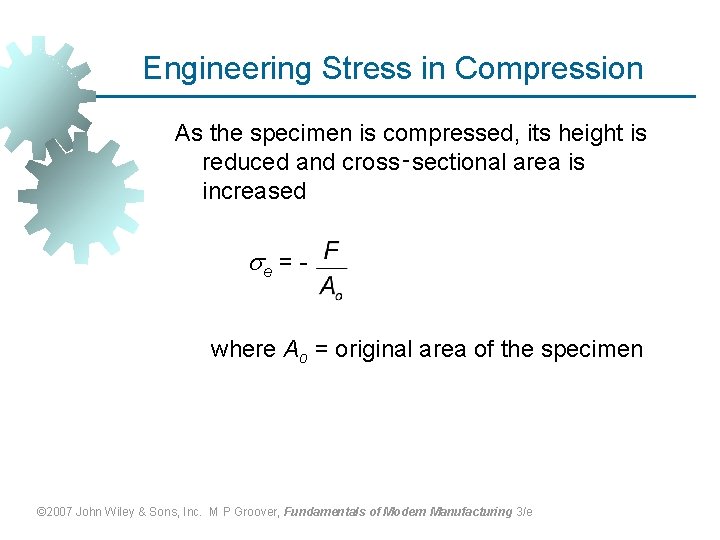
Engineering Stress in Compression As the specimen is compressed, its height is reduced and cross‑sectional area is increased e = where Ao = original area of the specimen © 2007 John Wiley & Sons, Inc. M P Groover, Fundamentals of Modern Manufacturing 3/e

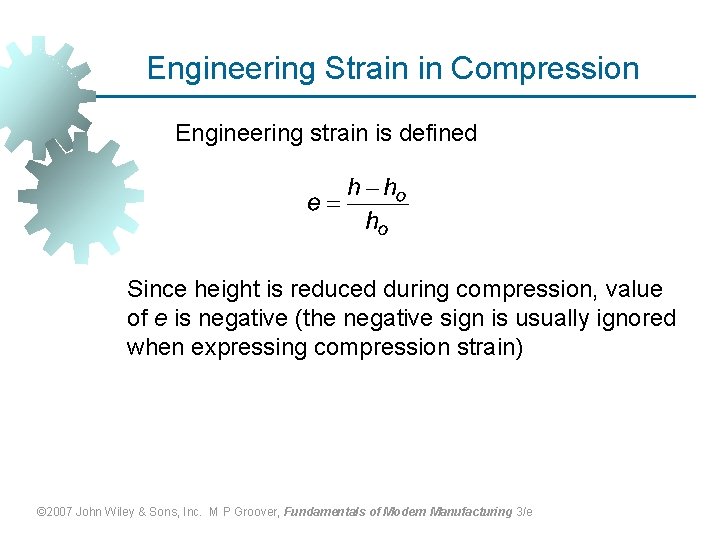
Engineering Strain in Compression Engineering strain is defined Since height is reduced during compression, value of e is negative (the negative sign is usually ignored when expressing compression strain) © 2007 John Wiley & Sons, Inc. M P Groover, Fundamentals of Modern Manufacturing 3/e

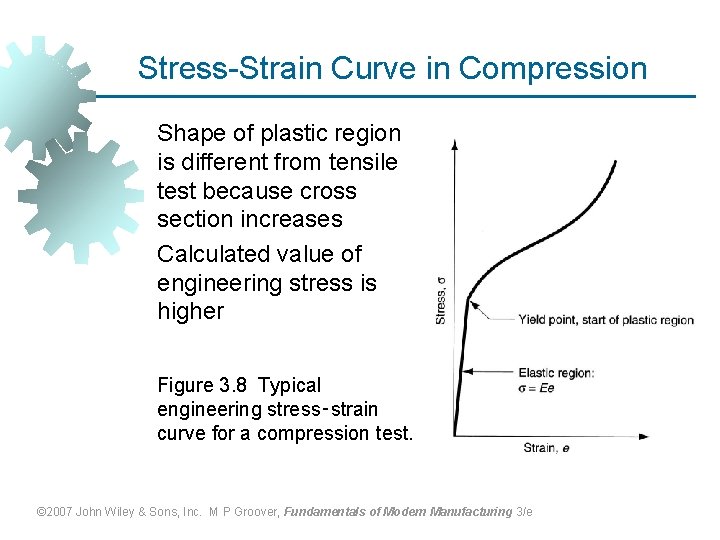
Stress-Strain Curve in Compression Shape of plastic region is different from tensile test because cross section increases Calculated value of engineering stress is higher Figure 3. 8 Typical engineering stress‑strain curve for a compression test. © 2007 John Wiley & Sons, Inc. M P Groover, Fundamentals of Modern Manufacturing 3/e

Tensile Test vs. Compression Test § Although differences exist between engineering stress‑strain curves in tension and compression, the true stress‑strain relationships are nearly identical § Since tensile test results are more common, flow curve values (K and n) from tensile test data can be applied to compression operations § When using tensile K and n data for compression, ignore necking, which is a phenomenon peculiar to straining induced by tensile stresses © 2007 John Wiley & Sons, Inc. M P Groover, Fundamentals of Modern Manufacturing 3/e

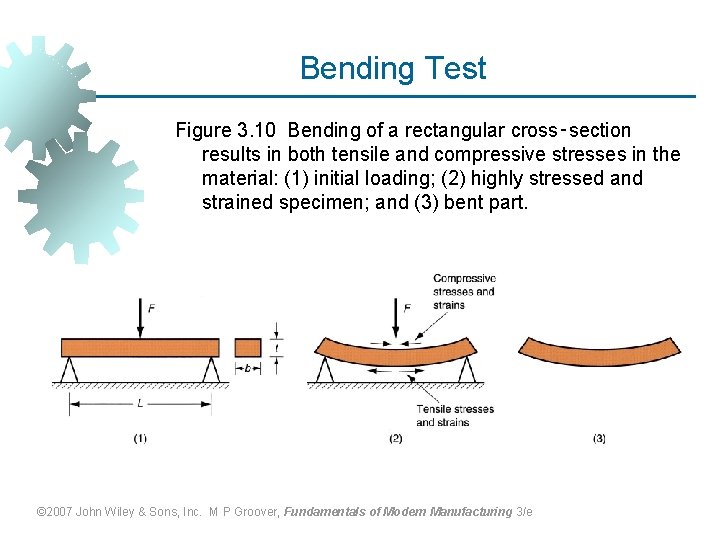
Testing of Brittle Materials § Hard brittle materials (e. g. , ceramics) possess elasticity but little or no plasticity § Often tested by a bending test (also called flexure test) § Specimen of rectangular cross‑section is positioned between two supports, and a load is applied at its center © 2007 John Wiley & Sons, Inc. M P Groover, Fundamentals of Modern Manufacturing 3/e

Bending Test Figure 3. 10 Bending of a rectangular cross‑section results in both tensile and compressive stresses in the material: (1) initial loading; (2) highly stressed and strained specimen; and (3) bent part. © 2007 John Wiley & Sons, Inc. M P Groover, Fundamentals of Modern Manufacturing 3/e

Testing of Brittle Materials § Brittle materials do not flex § They deform elastically until fracture § Failure occurs because tensile strength of outer fibers of specimen are exceeded § Failure type: cleavage - common with ceramics and metals at low temperatures, in which separation rather than slip occurs along certain crystallographic planes © 2007 John Wiley & Sons, Inc. M P Groover, Fundamentals of Modern Manufacturing 3/e

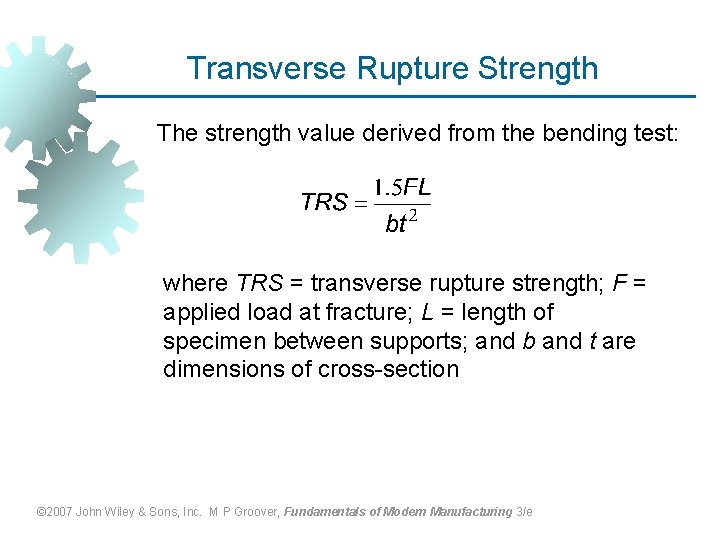
Transverse Rupture Strength The strength value derived from the bending test: where TRS = transverse rupture strength; F = applied load at fracture; L = length of specimen between supports; and b and t are dimensions of cross-section © 2007 John Wiley & Sons, Inc. M P Groover, Fundamentals of Modern Manufacturing 3/e

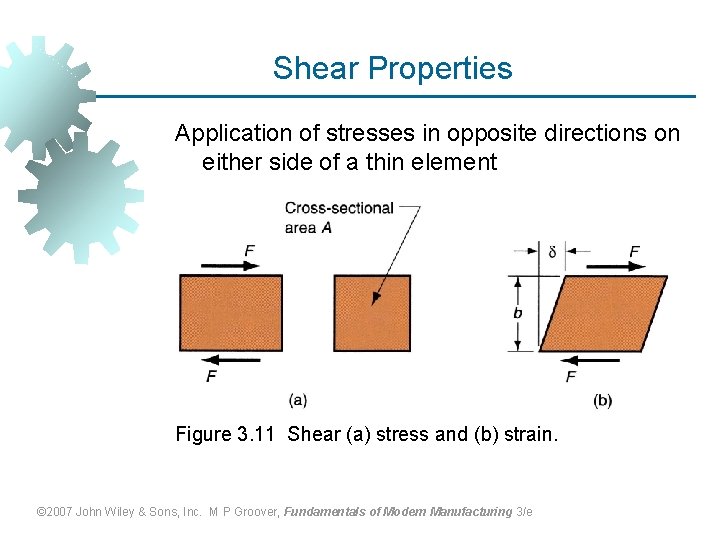
Shear Properties Application of stresses in opposite directions on either side of a thin element Figure 3. 11 Shear (a) stress and (b) strain. © 2007 John Wiley & Sons, Inc. M P Groover, Fundamentals of Modern Manufacturing 3/e

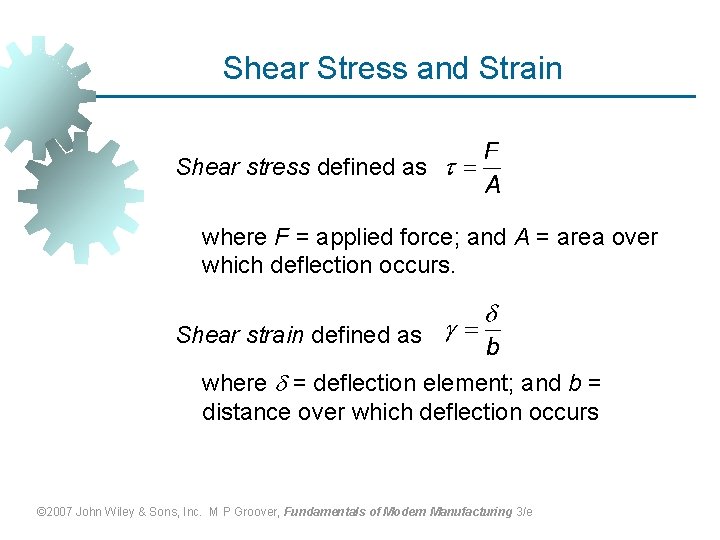
Shear Stress and Strain Shear stress defined as where F = applied force; and A = area over which deflection occurs. Shear strain defined as where = deflection element; and b = distance over which deflection occurs © 2007 John Wiley & Sons, Inc. M P Groover, Fundamentals of Modern Manufacturing 3/e

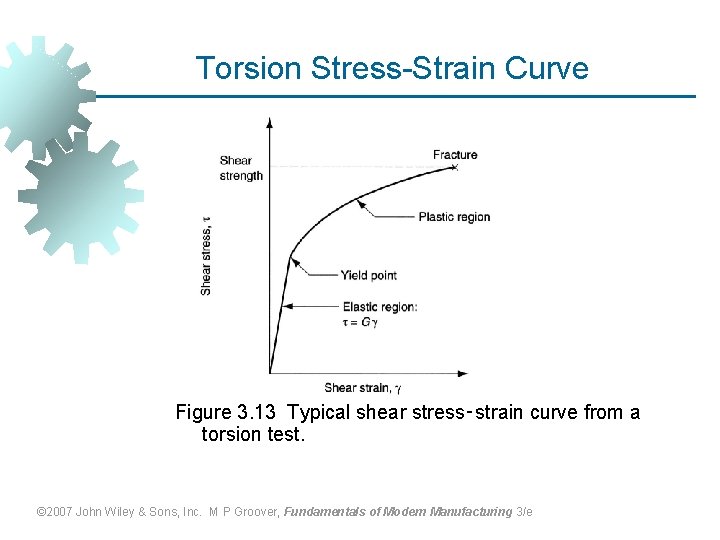
Torsion Stress-Strain Curve Figure 3. 13 Typical shear stress‑strain curve from a torsion test. © 2007 John Wiley & Sons, Inc. M P Groover, Fundamentals of Modern Manufacturing 3/e

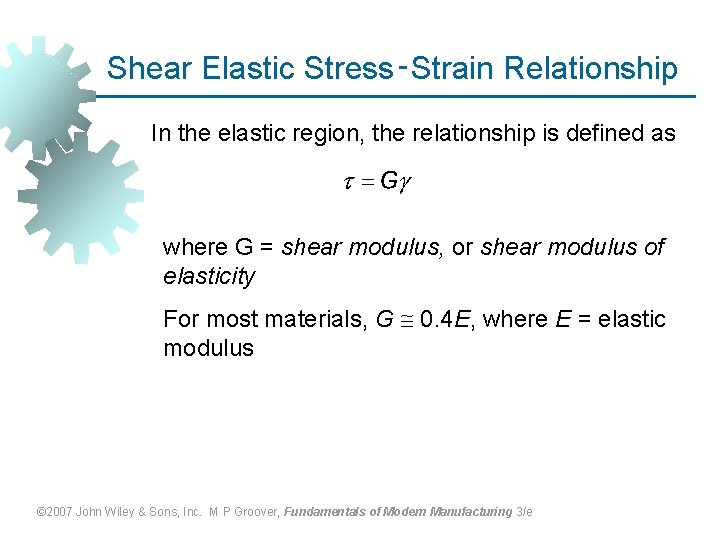
Shear Elastic Stress‑Strain Relationship In the elastic region, the relationship is defined as where G = shear modulus, or shear modulus of elasticity For most materials, G 0. 4 E, where E = elastic modulus © 2007 John Wiley & Sons, Inc. M P Groover, Fundamentals of Modern Manufacturing 3/e

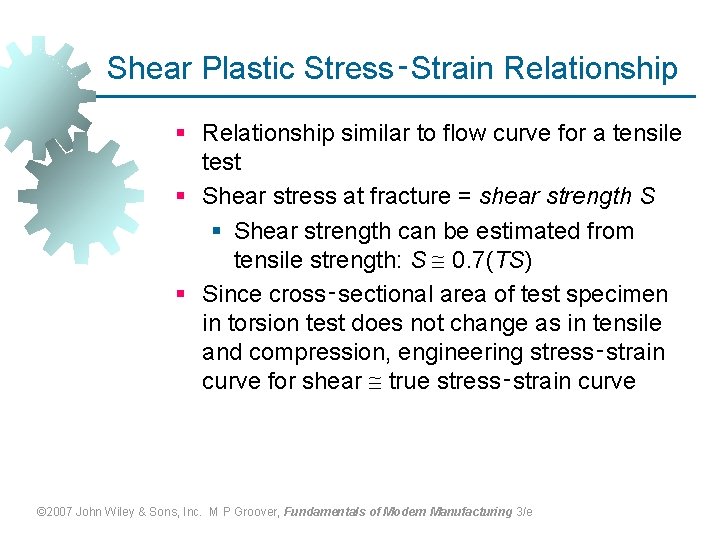
Shear Plastic Stress‑Strain Relationship § Relationship similar to flow curve for a tensile test § Shear stress at fracture = shear strength S § Shear strength can be estimated from tensile strength: S 0. 7(TS) § Since cross‑sectional area of test specimen in torsion test does not change as in tensile and compression, engineering stress‑strain curve for shear true stress‑strain curve © 2007 John Wiley & Sons, Inc. M P Groover, Fundamentals of Modern Manufacturing 3/e