Manufacturing Processes Chapter 3 Mechanical Properties Of Materials
- Slides: 41

Manufacturing Processes Chapter 3: Mechanical Properties Of Materials Dr. Yazan Al-Zain Department of Industrial Engineering University of Jordan, Amman-Jordan

Introduction • Mechanical properties of a material determine its behavior when subjected to mechanical stress (examples on materials under stress are aluminum alloy from which an airplane wing is constructed and the steel in an automobile axle). • Mechanical properties include: elastic modulus, ductility, hardness, etc. • Two opposite objectives for the product in design and manufacturing: – In design: the objective for the product is to withstand stresses without significant change in geometry (dependent on elastic modulus and yield stress). – In manufacturing: the objective is to alter the geometry by applying stresses that exceed the yield strength of the material. Note: it is helpful for the manufacturing engineer to appreciate the design objective and for the designer to be aware of the manufacturing objective.

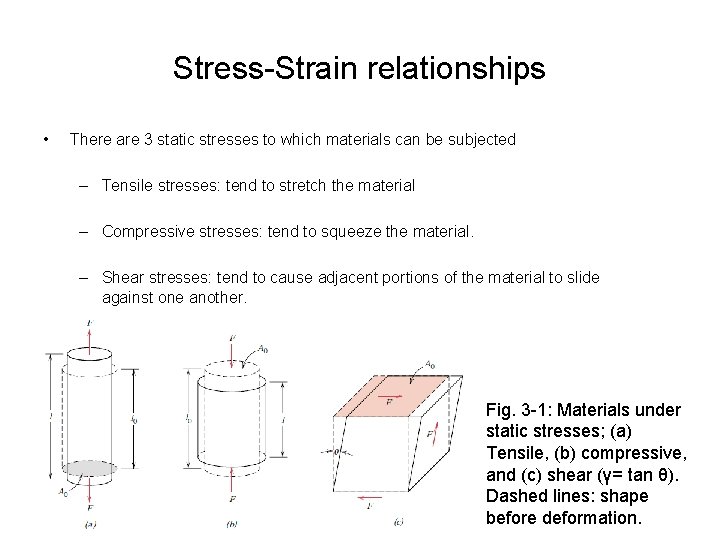
Stress-Strain relationships • There are 3 static stresses to which materials can be subjected – Tensile stresses: tend to stretch the material – Compressive stresses: tend to squeeze the material. – Shear stresses: tend to cause adjacent portions of the material to slide against one another. Fig. 3 -1: Materials under static stresses; (a) Tensile, (b) compressive, and (c) shear (γ= tan θ). Dashed lines: shape before deformation.

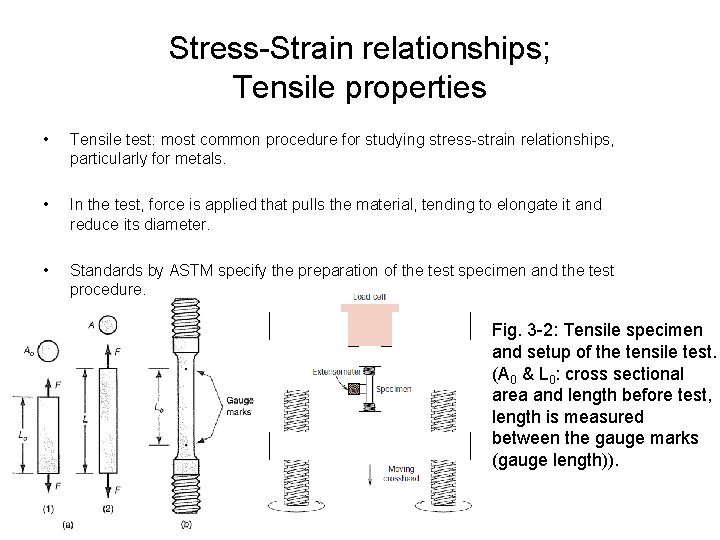
Stress-Strain relationships; Tensile properties • Tensile test: most common procedure for studying stress-strain relationships, particularly for metals. • In the test, force is applied that pulls the material, tending to elongate it and reduce its diameter. • Standards by ASTM specify the preparation of the test specimen and the test procedure. Fig. 3 -2: Tensile specimen and setup of the tensile test. (A 0 & L 0: cross sectional area and length before test, length is measured between the gauge marks (gauge length)).

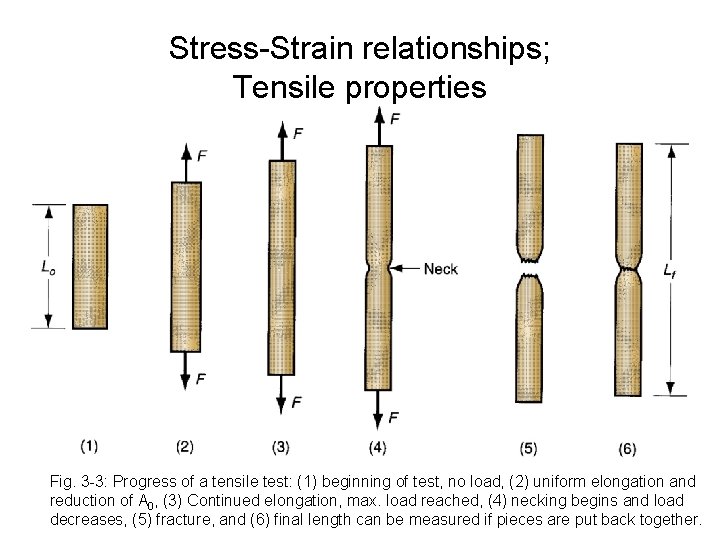
Stress-Strain relationships; Tensile properties Fig. 3 -3: Progress of a tensile test: (1) beginning of test, no load, (2) uniform elongation and reduction of A 0, (3) Continued elongation, max. load reached, (4) necking begins and load decreases, (5) fracture, and (6) final length can be measured if pieces are put back together.

Stress-Strain relationships; Tensile properties • There are two different types of stress-strain curves: (1) Engineering stress-strain and (2) True stress-strain. The first is more important in design and the second is more important in manufacturing. (1) Engineering Stress-Strain: stress and strain defined relative to the original area and length of the specimen. – Important in design as the designer assumes that the strains experienced by any component will NOT significantly change its shape. The components are designed to withstand the anticipated stresses encountered in service.

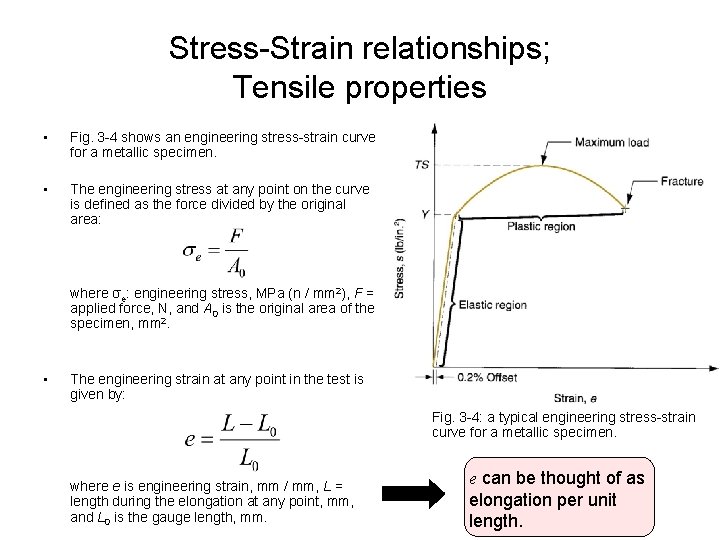
Stress-Strain relationships; Tensile properties • Fig. 3 -4 shows an engineering stress-strain curve for a metallic specimen. • The engineering stress at any point on the curve is defined as the force divided by the original area: where σe: engineering stress, MPa (n / mm 2), F = applied force, N, and A 0 is the original area of the specimen, mm 2. • The engineering strain at any point in the test is given by: Fig. 3 -4: a typical engineering stress-strain curve for a metallic specimen. where e is engineering strain, mm / mm, L = length during the elongation at any point, mm, and L 0 is the gauge length, mm. e can be thought of as elongation per unit length.

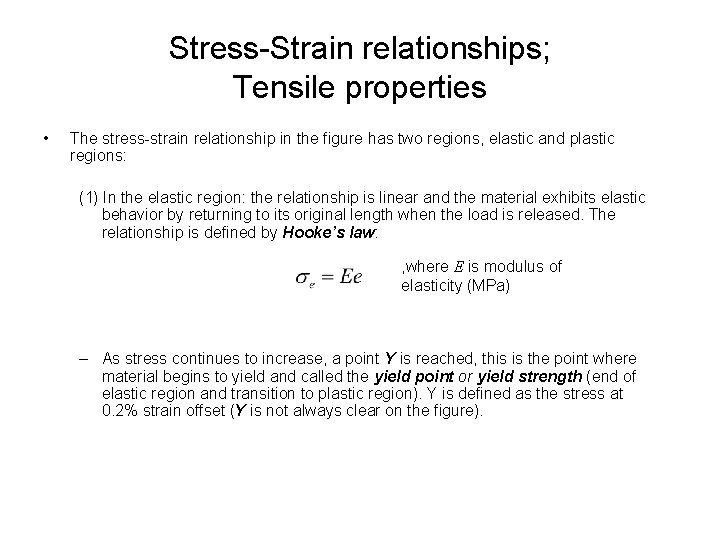
Stress-Strain relationships; Tensile properties • The stress-strain relationship in the figure has two regions, elastic and plastic regions: (1) In the elastic region: the relationship is linear and the material exhibits elastic behavior by returning to its original length when the load is released. The relationship is defined by Hooke’s law: , where E is modulus of elasticity (MPa) – As stress continues to increase, a point Y is reached, this is the point where material begins to yield and called the yield point or yield strength (end of elastic region and transition to plastic region). Y is defined as the stress at 0. 2% strain offset (Y is not always clear on the figure).

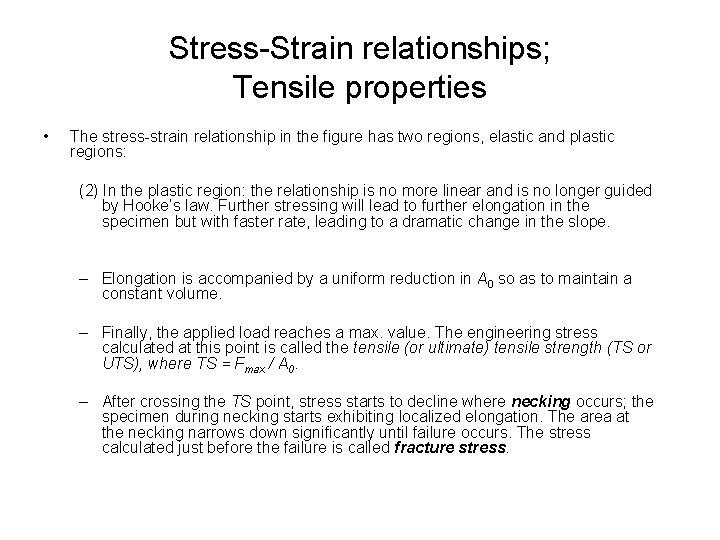
Stress-Strain relationships; Tensile properties • The stress-strain relationship in the figure has two regions, elastic and plastic regions: (2) In the plastic region: the relationship is no more linear and is no longer guided by Hooke’s law. Further stressing will lead to further elongation in the specimen but with faster rate, leading to a dramatic change in the slope. – Elongation is accompanied by a uniform reduction in A 0 so as to maintain a constant volume. – Finally, the applied load reaches a max. value. The engineering stress calculated at this point is called the tensile (or ultimate) tensile strength (TS or UTS), where TS = Fmax / A 0. – After crossing the TS point, stress starts to decline where necking occurs; the specimen during necking starts exhibiting localized elongation. The area at the necking narrows down significantly until failure occurs. The stress calculated just before the failure is called fracture stress.

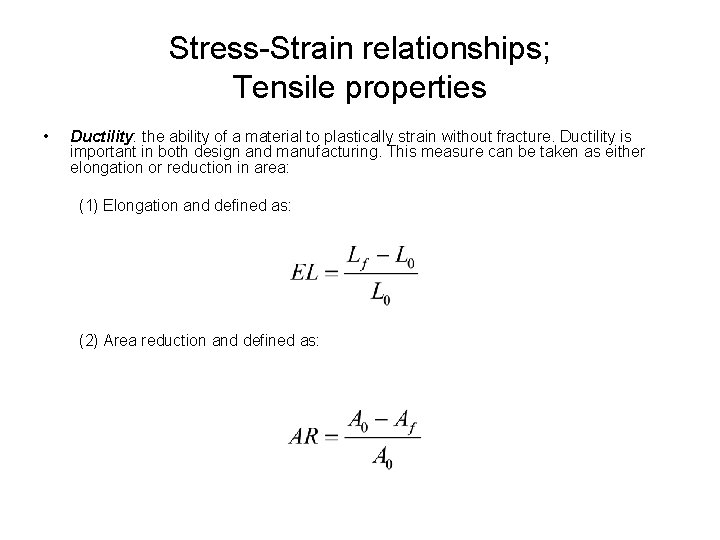
Stress-Strain relationships; Tensile properties • Ductility: the ability of a material to plastically strain without fracture. Ductility is important in both design and manufacturing. This measure can be taken as either elongation or reduction in area: (1) Elongation and defined as: (2) Area reduction and defined as:

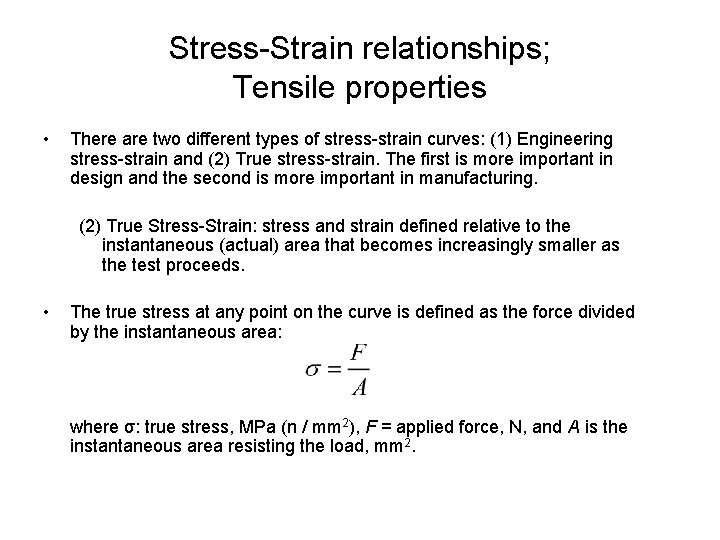
Stress-Strain relationships; Tensile properties • There are two different types of stress-strain curves: (1) Engineering stress-strain and (2) True stress-strain. The first is more important in design and the second is more important in manufacturing. (2) True Stress-Strain: stress and strain defined relative to the instantaneous (actual) area that becomes increasingly smaller as the test proceeds. • The true stress at any point on the curve is defined as the force divided by the instantaneous area: where σ: true stress, MPa (n / mm 2), F = applied force, N, and A is the instantaneous area resisting the load, mm 2.

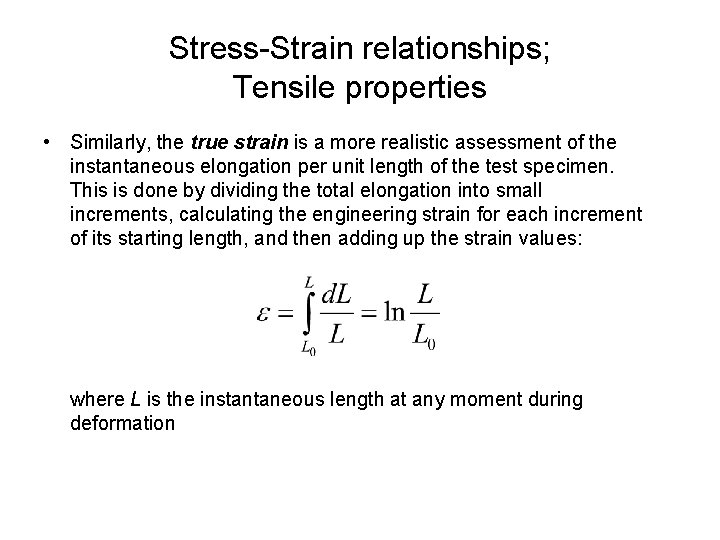
Stress-Strain relationships; Tensile properties • Similarly, the true strain is a more realistic assessment of the instantaneous elongation per unit length of the test specimen. This is done by dividing the total elongation into small increments, calculating the engineering strain for each increment of its starting length, and then adding up the strain values: where L is the instantaneous length at any moment during deformation

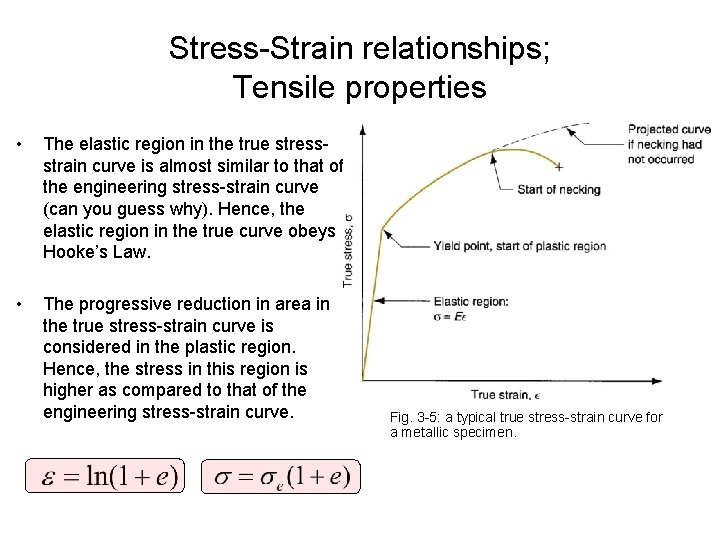
Stress-Strain relationships; Tensile properties • The elastic region in the true stressstrain curve is almost similar to that of the engineering stress-strain curve (can you guess why). Hence, the elastic region in the true curve obeys Hooke’s Law. • The progressive reduction in area in the true stress-strain curve is considered in the plastic region. Hence, the stress in this region is higher as compared to that of the engineering stress-strain curve. Fig. 3 -5: a typical true stress-strain curve for a metallic specimen.

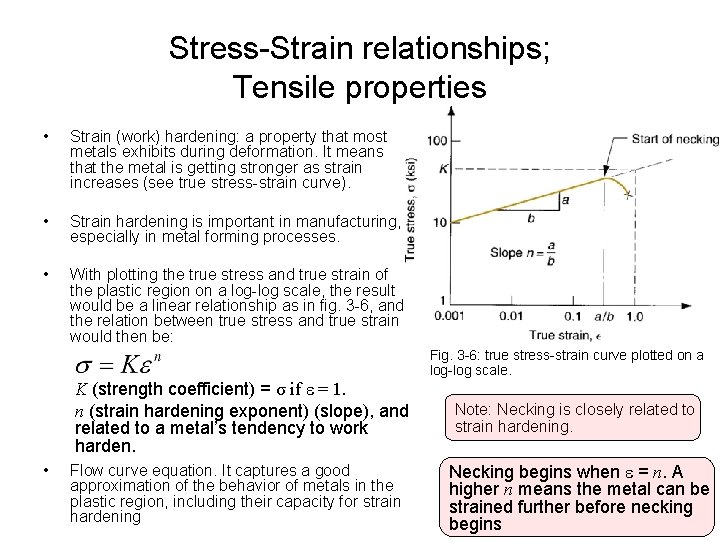
Stress-Strain relationships; Tensile properties • Strain (work) hardening: a property that most metals exhibits during deformation. It means that the metal is getting stronger as strain increases (see true stress-strain curve). • Strain hardening is important in manufacturing, especially in metal forming processes. • With plotting the true stress and true strain of the plastic region on a log-log scale, the result would be a linear relationship as in fig. 3 -6, and the relation between true stress and true strain would then be: K (strength coefficient) = σ if = 1. n (strain hardening exponent) (slope), and related to a metal’s tendency to work harden. • Flow curve equation. It captures a good approximation of the behavior of metals in the plastic region, including their capacity for strain hardening Fig. 3 -6: true stress-strain curve plotted on a log-log scale. Note: Necking is closely related to strain hardening. Necking begins when = n. A higher n means the metal can be strained further before necking begins

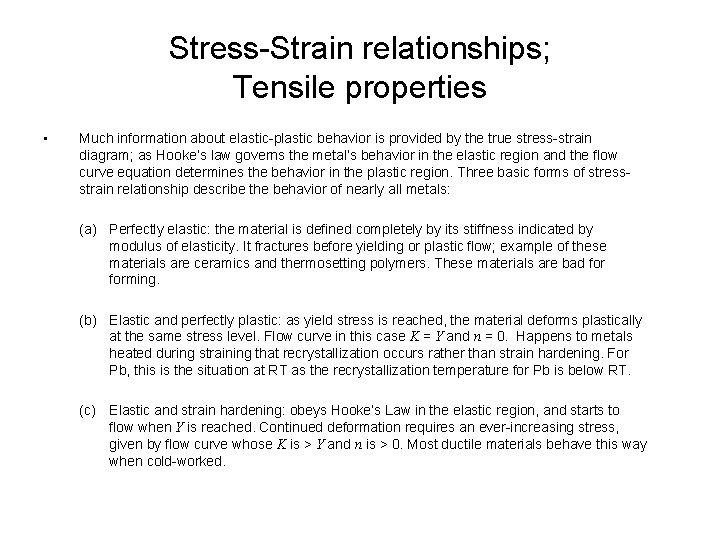
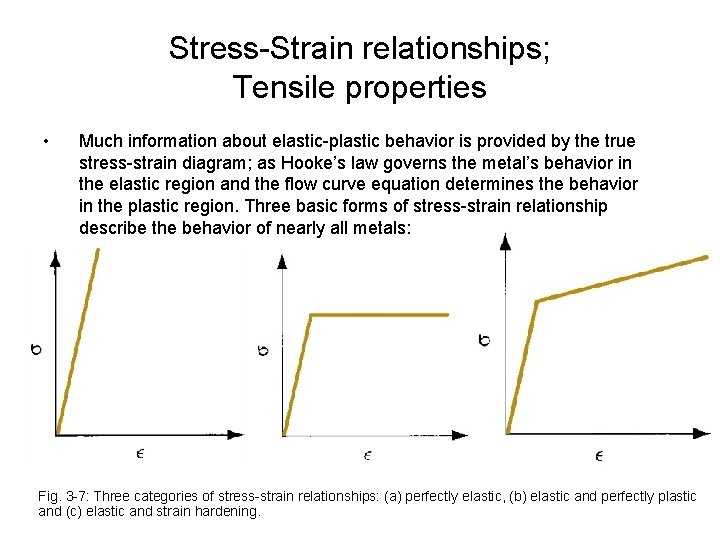
Stress-Strain relationships; Tensile properties • Much information about elastic-plastic behavior is provided by the true stress-strain diagram; as Hooke’s law governs the metal’s behavior in the elastic region and the flow curve equation determines the behavior in the plastic region. Three basic forms of stressstrain relationship describe the behavior of nearly all metals: (a) Perfectly elastic: the material is defined completely by its stiffness indicated by modulus of elasticity. It fractures before yielding or plastic flow; example of these materials are ceramics and thermosetting polymers. These materials are bad forming. (b) Elastic and perfectly plastic: as yield stress is reached, the material deforms plastically at the same stress level. Flow curve in this case K = Y and n = 0. Happens to metals heated during straining that recrystallization occurs rather than strain hardening. For Pb, this is the situation at RT as the recrystallization temperature for Pb is below RT. (c) Elastic and strain hardening: obeys Hooke’s Law in the elastic region, and starts to flow when Y is reached. Continued deformation requires an ever-increasing stress, given by flow curve whose K is > Y and n is > 0. Most ductile materials behave this way when cold-worked.

Stress-Strain relationships; Tensile properties • Much information about elastic-plastic behavior is provided by the true stress-strain diagram; as Hooke’s law governs the metal’s behavior in the elastic region and the flow curve equation determines the behavior in the plastic region. Three basic forms of stress-strain relationship describe the behavior of nearly all metals: Fig. 3 -7: Three categories of stress-strain relationships: (a) perfectly elastic, (b) elastic and perfectly plastic and (c) elastic and strain hardening.

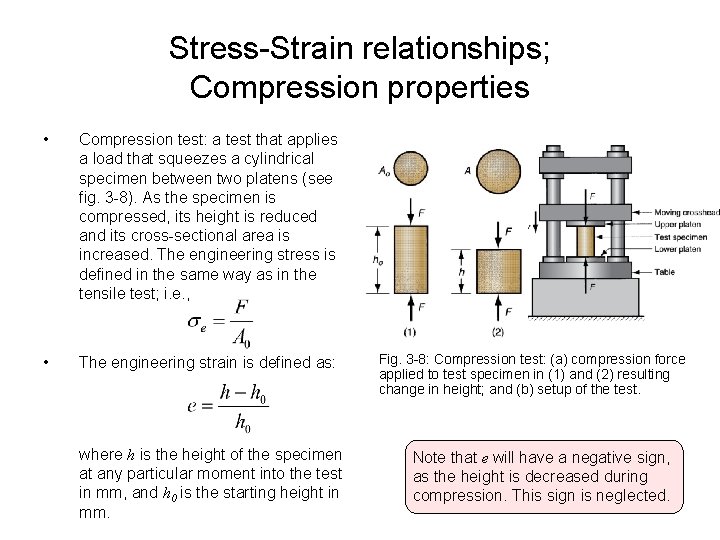
Stress-Strain relationships; Compression properties • Compression test: a test that applies a load that squeezes a cylindrical specimen between two platens (see fig. 3 -8). As the specimen is compressed, its height is reduced and its cross-sectional area is increased. The engineering stress is defined in the same way as in the tensile test; i. e. , • The engineering strain is defined as: where h is the height of the specimen at any particular moment into the test in mm, and h 0 is the starting height in mm. Fig. 3 -8: Compression test: (a) compression force applied to test specimen in (1) and (2) resulting change in height; and (b) setup of the test. Note that e will have a negative sign, as the height is decreased during compression. This sign is neglected.

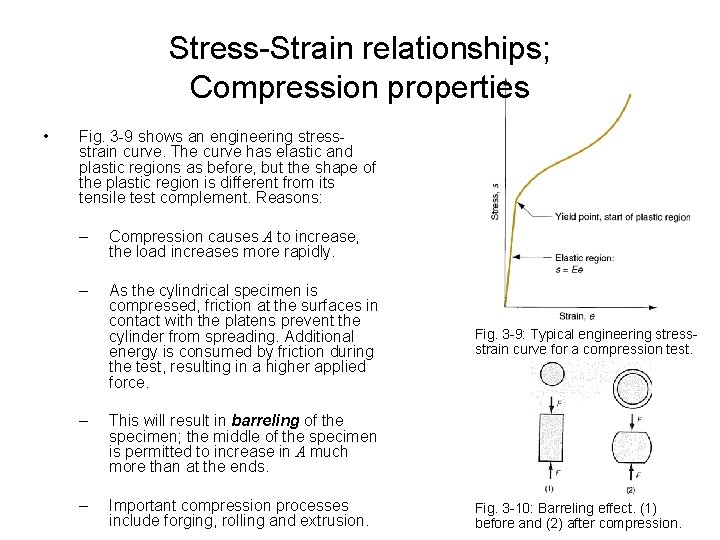
Stress-Strain relationships; Compression properties • Fig. 3 -9 shows an engineering stressstrain curve. The curve has elastic and plastic regions as before, but the shape of the plastic region is different from its tensile test complement. Reasons: – Compression causes A to increase, the load increases more rapidly. – As the cylindrical specimen is compressed, friction at the surfaces in contact with the platens prevent the cylinder from spreading. Additional energy is consumed by friction during the test, resulting in a higher applied force. – This will result in barreling of the specimen; the middle of the specimen is permitted to increase in A much more than at the ends. – Important compression processes include forging, rolling and extrusion. Fig. 3 -9: Typical engineering stressstrain curve for a compression test. Fig. 3 -10: Barreling effect. (1) before and (2) after compression.

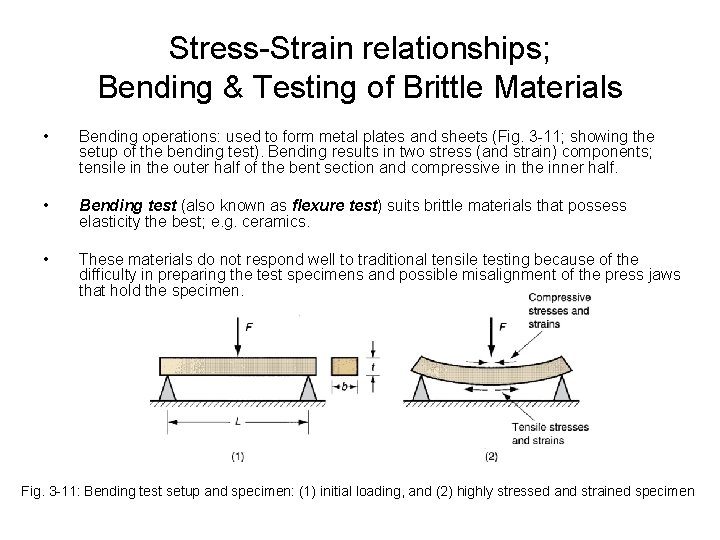
Stress-Strain relationships; Bending & Testing of Brittle Materials • Bending operations: used to form metal plates and sheets (Fig. 3 -11; showing the setup of the bending test). Bending results in two stress (and strain) components; tensile in the outer half of the bent section and compressive in the inner half. • Bending test (also known as flexure test) suits brittle materials that possess elasticity the best; e. g. ceramics. • These materials do not respond well to traditional tensile testing because of the difficulty in preparing the test specimens and possible misalignment of the press jaws that hold the specimen. Fig. 3 -11: Bending test setup and specimen: (1) initial loading, and (2) highly stressed and strained specimen

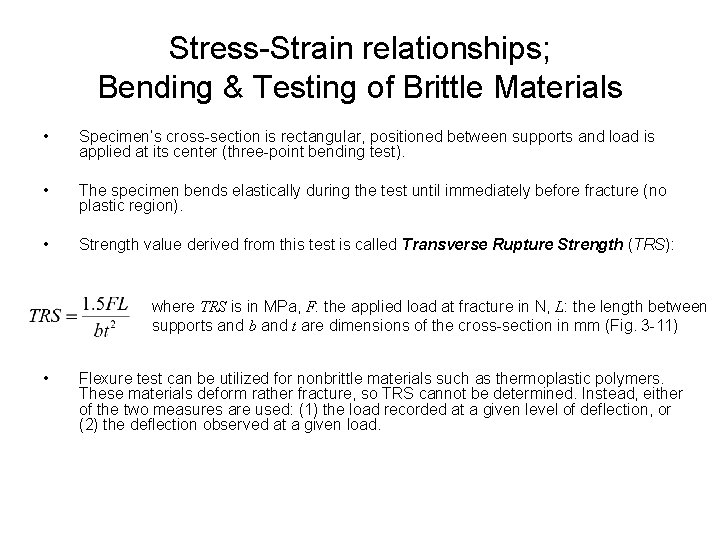
Stress-Strain relationships; Bending & Testing of Brittle Materials • Specimen’s cross-section is rectangular, positioned between supports and load is applied at its center (three-point bending test). • The specimen bends elastically during the test until immediately before fracture (no plastic region). • Strength value derived from this test is called Transverse Rupture Strength (TRS): where TRS is in MPa, F: the applied load at fracture in N, L: the length between supports and b and t are dimensions of the cross-section in mm (Fig. 3 -11) • Flexure test can be utilized for nonbrittle materials such as thermoplastic polymers. These materials deform rather fracture, so TRS cannot be determined. Instead, either of the two measures are used: (1) the load recorded at a given level of deflection, or (2) the deflection observed at a given load.

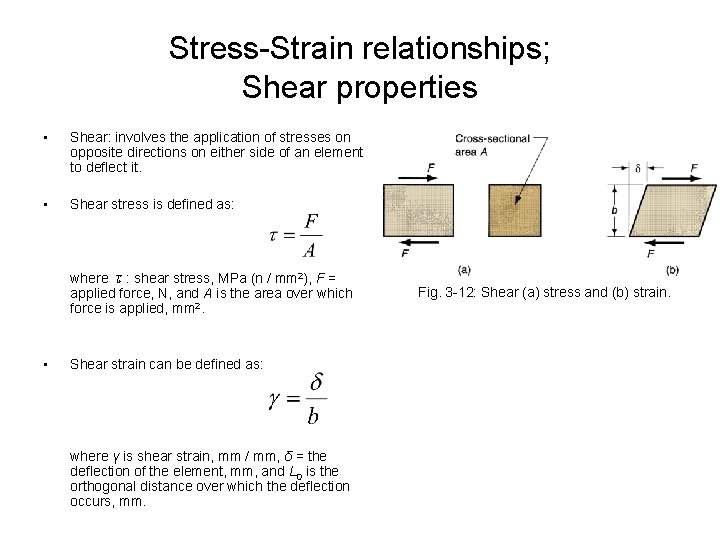
Stress-Strain relationships; Shear properties • Shear: involves the application of stresses on opposite directions on either side of an element to deflect it. • Shear stress is defined as: where τ: shear stress, MPa (n / mm 2), F = applied force, N, and A is the area over which force is applied, mm 2. • Shear strain can be defined as: where γ is shear strain, mm / mm, δ = the deflection of the element, mm, and L 0 is the orthogonal distance over which the deflection occurs, mm. Fig. 3 -12: Shear (a) stress and (b) strain.

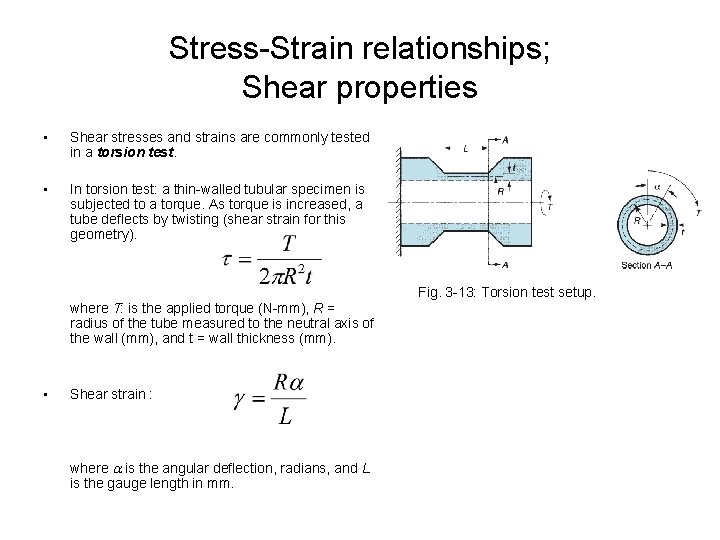
Stress-Strain relationships; Shear properties • Shear stresses and strains are commonly tested in a torsion test. • In torsion test: a thin-walled tubular specimen is subjected to a torque. As torque is increased, a tube deflects by twisting (shear strain for this geometry). Fig. 3 -13: Torsion test setup. where T: is the applied torque (N-mm), R = radius of the tube measured to the neutral axis of the wall (mm), and t = wall thickness (mm). • Shear strain : where is the angular deflection, radians, and L is the gauge length in mm.

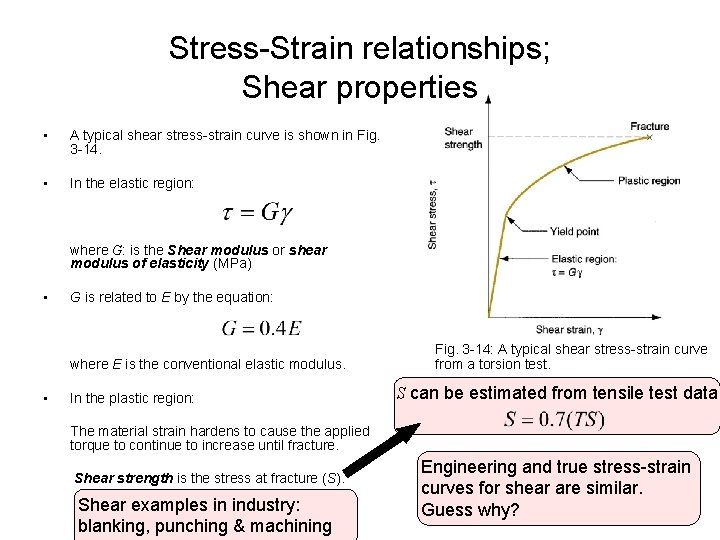
Stress-Strain relationships; Shear properties • A typical shear stress-strain curve is shown in Fig. 3 -14. • In the elastic region: where G: is the Shear modulus or shear modulus of elasticity (MPa) • G is related to E by the equation: where E is the conventional elastic modulus. • In the plastic region: Fig. 3 -14: A typical shear stress-strain curve from a torsion test. S can be estimated from tensile test data The material strain hardens to cause the applied torque to continue to increase until fracture. Shear strength is the stress at fracture (S). Shear examples in industry: blanking, punching & machining Engineering and true stress-strain curves for shear are similar. Guess why?

Hardness • Hardness: is a measure of a material’s resistance to localized plastic deformation (permanent indentation). • High hardness: material is resistant to scratching and wear. • Mohs scale (qualitative): ranges from 1 on the soft end for talc to 10 for diamond. • There is a good correlation between the material’s hardness and its strength.

Hardness • Hardness tests are performed more frequently than any other mechanical test for several reasons: – They are simple and inexpensive—ordinarily no special specimen need to be prepared, and the testing apparatus is relatively inexpensive. – The test is nondestructive—the specimen is neither fractured nor excessively deformed; a small indentation is the only deformation. – Other mechanical properties often may be estimated from hardness data, such as tensile strength

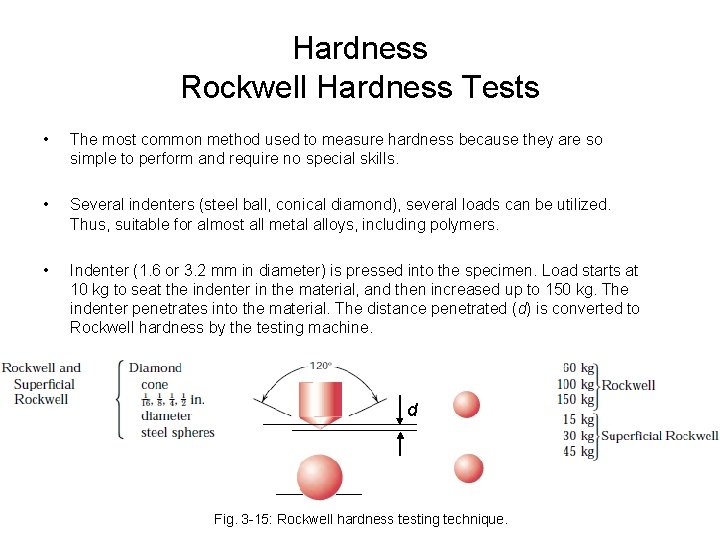
Hardness Rockwell Hardness Tests • The most common method used to measure hardness because they are so simple to perform and require no special skills. • Several indenters (steel ball, conical diamond), several loads can be utilized. Thus, suitable for almost all metal alloys, including polymers. • Indenter (1. 6 or 3. 2 mm in diameter) is pressed into the specimen. Load starts at 10 kg to seat the indenter in the material, and then increased up to 150 kg. The indenter penetrates into the material. The distance penetrated (d) is converted to Rockwell hardness by the testing machine. d Fig. 3 -15: Rockwell hardness testing technique.

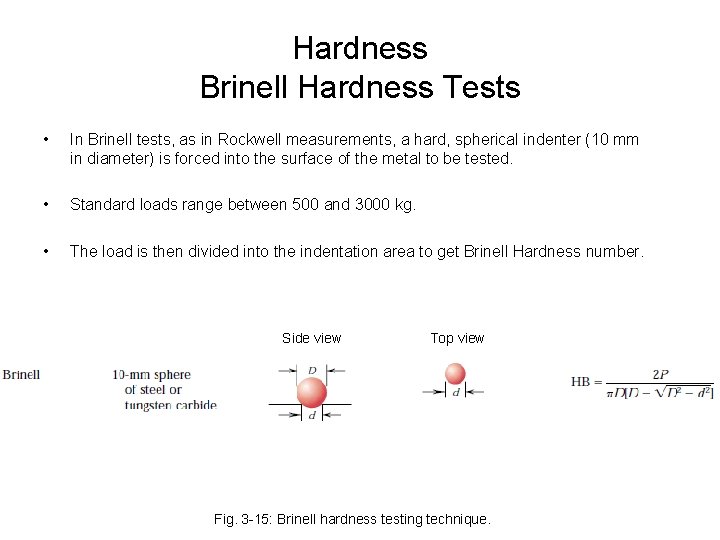
Hardness Brinell Hardness Tests • In Brinell tests, as in Rockwell measurements, a hard, spherical indenter (10 mm in diameter) is forced into the surface of the metal to be tested. • Standard loads range between 500 and 3000 kg. • The load is then divided into the indentation area to get Brinell Hardness number. Side view Top view Fig. 3 -15: Brinell hardness testing technique.

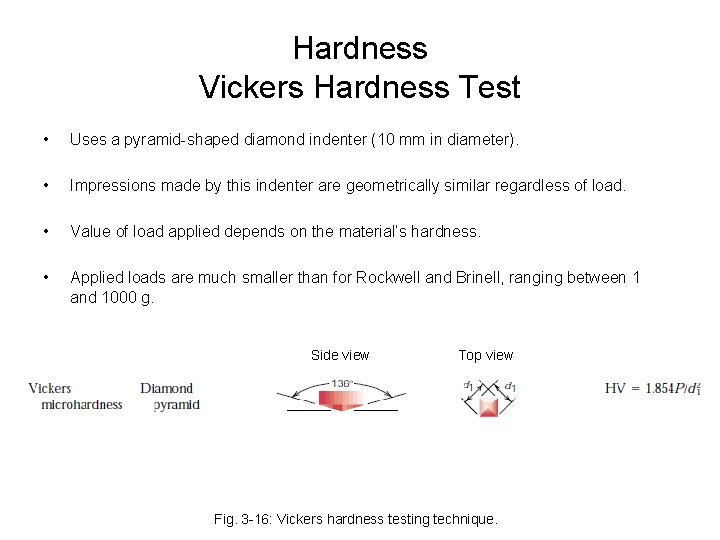
Hardness Vickers Hardness Test • Uses a pyramid-shaped diamond indenter (10 mm in diameter). • Impressions made by this indenter are geometrically similar regardless of load. • Value of load applied depends on the material’s hardness. • Applied loads are much smaller than for Rockwell and Brinell, ranging between 1 and 1000 g. Side view Top view Fig. 3 -16: Vickers hardness testing technique.

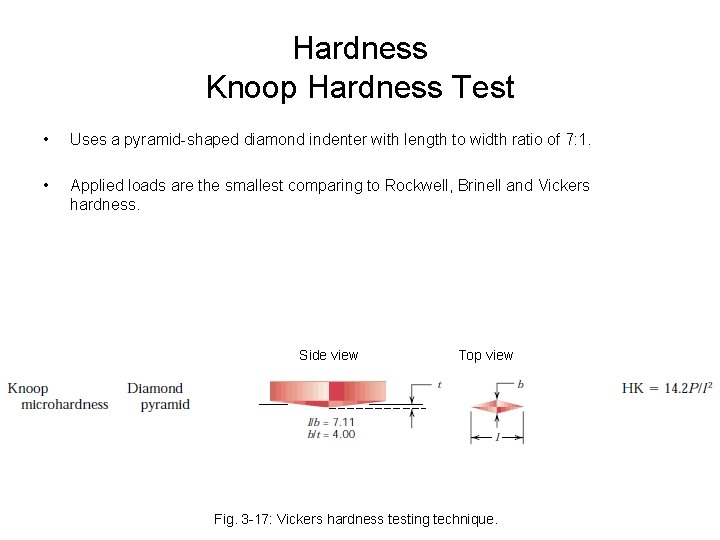
Hardness Knoop Hardness Test • Uses a pyramid-shaped diamond indenter with length to width ratio of 7: 1. • Applied loads are the smallest comparing to Rockwell, Brinell and Vickers hardness. Side view Top view Fig. 3 -17: Vickers hardness testing technique.

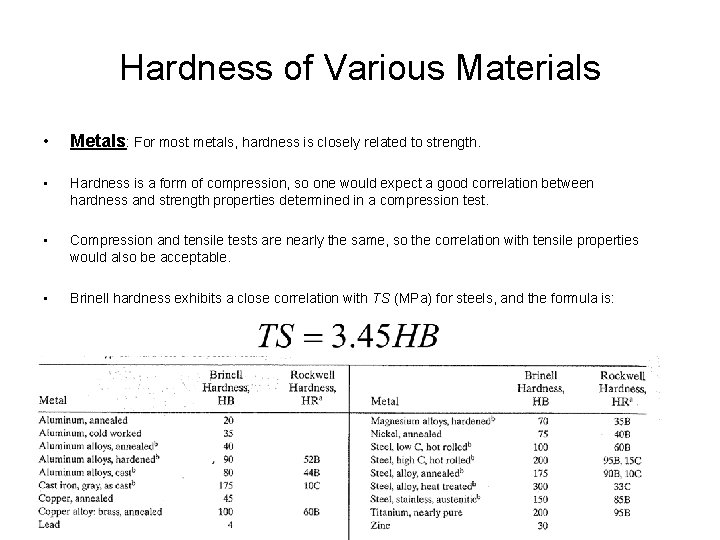
Hardness of Various Materials • Metals: For most metals, hardness is closely related to strength. • Hardness is a form of compression, so one would expect a good correlation between hardness and strength properties determined in a compression test. • Compression and tensile tests are nearly the same, so the correlation with tensile properties would also be acceptable. • Brinell hardness exhibits a close correlation with TS (MPa) for steels, and the formula is:

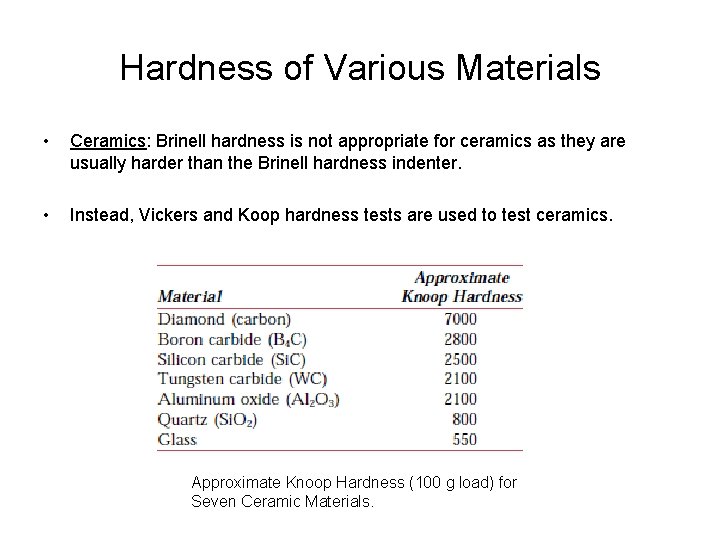
Hardness of Various Materials • Ceramics: Brinell hardness is not appropriate for ceramics as they are usually harder than the Brinell hardness indenter. • Instead, Vickers and Koop hardness tests are used to test ceramics. Approximate Knoop Hardness (100 g load) for Seven Ceramic Materials.

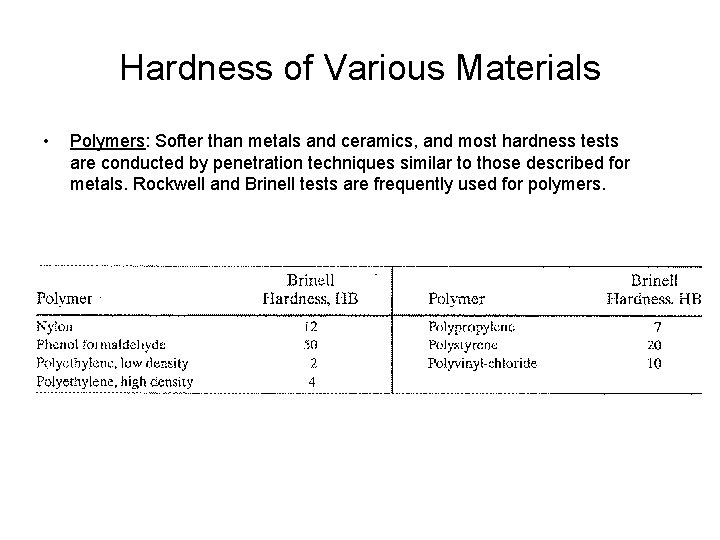
Hardness of Various Materials • Polymers: Softer than metals and ceramics, and most hardness tests are conducted by penetration techniques similar to those described for metals. Rockwell and Brinell tests are frequently used for polymers.

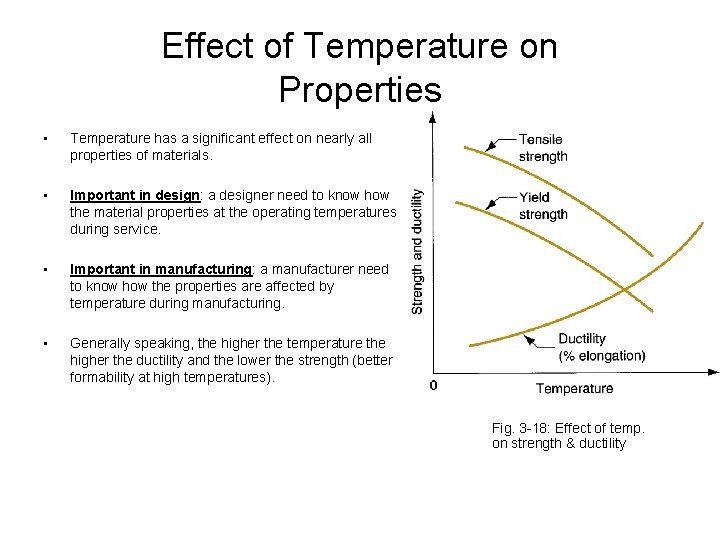
Effect of Temperature on Properties • Temperature has a significant effect on nearly all properties of materials. • Important in design: a designer need to know how the material properties at the operating temperatures during service. • Important in manufacturing: a manufacturer need to know how the properties are affected by temperature during manufacturing. • Generally speaking, the higher the temperature the higher the ductility and the lower the strength (better formability at high temperatures). Fig. 3 -18: Effect of temp. on strength & ductility

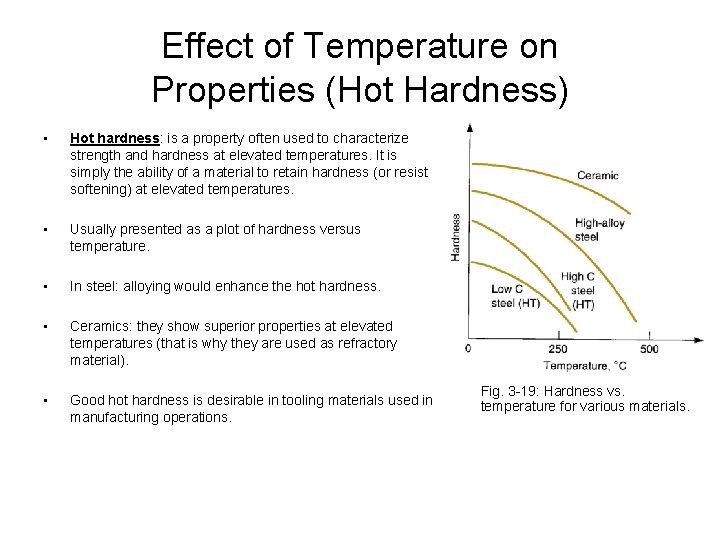
Effect of Temperature on Properties (Hot Hardness) • Hot hardness: is a property often used to characterize strength and hardness at elevated temperatures. It is simply the ability of a material to retain hardness (or resist softening) at elevated temperatures. • Usually presented as a plot of hardness versus temperature. • In steel: alloying would enhance the hot hardness. • Ceramics: they show superior properties at elevated temperatures (that is why they are used as refractory material). • Good hot hardness is desirable in tooling materials used in manufacturing operations. Fig. 3 -19: Hardness vs. temperature for various materials.

Effect of Temperature on Properties (Recrystallization Temp. ) • Recrystallization: is the process in which new strain-free grains are formed. The temperature at which this process happens is called the Recrystallization Temperature ( one half the melting temperature (0. 5 Tmelting)). • If metals were deformed at room temperature, they would behave in accordance with the flow curve equation. • If metals where deformed at high temperatures, say recrystallization temperature, then they would have an elastic and superplastic behavior (no strain hardening). • This is due to the formation of new strain-free grains at elevated temperatures. • Higher strain can be endured at recrystallization temperature. Power spent to carry out deformation is significantly reduced. • Metal forming at recrystallization temperature is called Hot Working.

Fluid Properties • Unlike solids, fluids flow; they take the shape of the container that holds them. • Fluids include liquids and gases. • Many manufacturing processes are done by converting the materials from the solid state to the liquid state. • Examples are: metal casting, glass blowing and polymer molding.

Fluid Properties Viscosity • All fluids can flow. However, the tendency to flow differs for different fluids. • Viscosity: is the resistance to flow, that is characteristic of a fluid. It is the property that determines fluid flow, and a measure of the internal friction that arises when velocity gradients are present in the fluid. • In other words, the more viscous the fluid is, the higher the internal friction and the greater the resistance to flow. • Fluidity: is the reciprocal of viscosity; the ease with which a fluid flows.

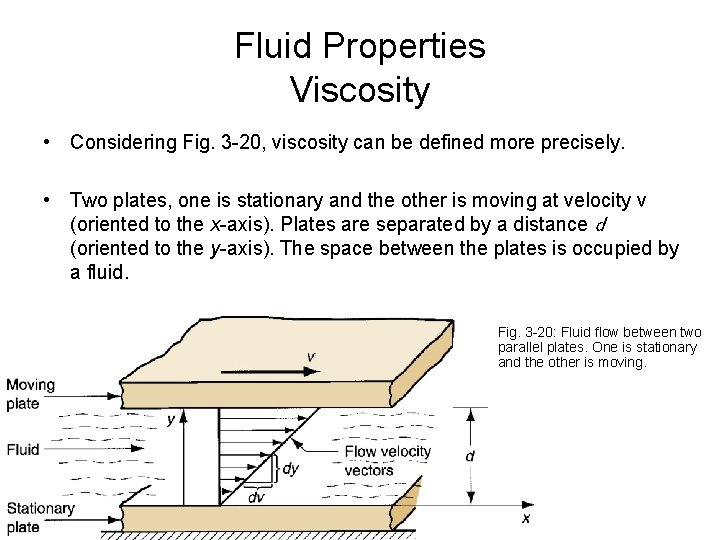
Fluid Properties Viscosity • Considering Fig. 3 -20, viscosity can be defined more precisely. • Two plates, one is stationary and the other is moving at velocity ν (oriented to the x-axis). Plates are separated by a distance d (oriented to the y-axis). The space between the plates is occupied by a fluid. Fig. 3 -20: Fluid flow between two parallel plates. One is stationary and the other is moving.

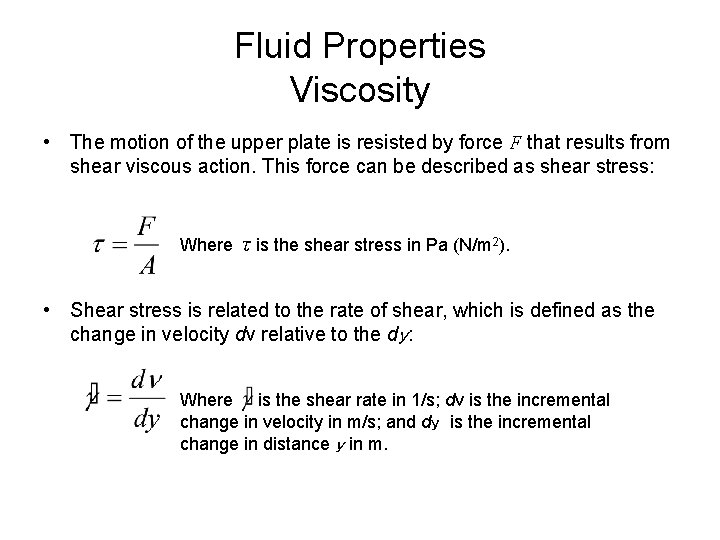
Fluid Properties Viscosity • The motion of the upper plate is resisted by force F that results from shear viscous action. This force can be described as shear stress: Where τis the shear stress in Pa (N/m 2). • Shear stress is related to the rate of shear, which is defined as the change in velocity dν relative to the dy: Where is the shear rate in 1/s; dν is the incremental change in velocity in m/s; and dy is the incremental change in distance y in m.

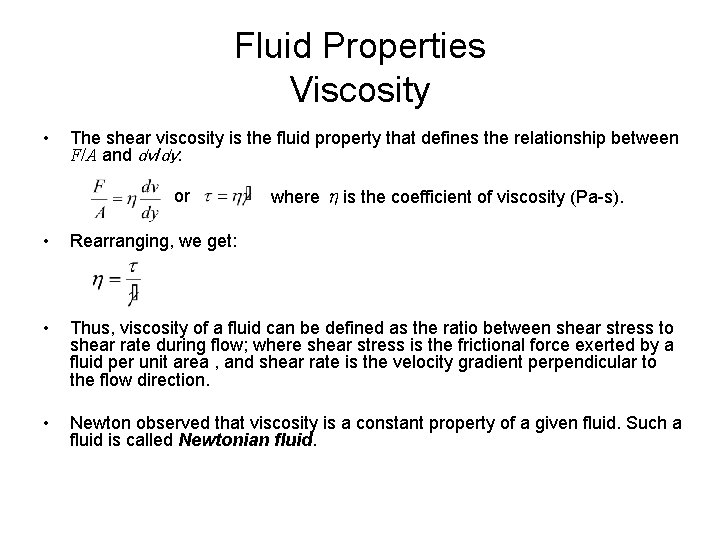
Fluid Properties Viscosity • The shear viscosity is the fluid property that defines the relationship between F/A and dv/dy: or where ηis the coefficient of viscosity (Pa-s). • Rearranging, we get: • Thus, viscosity of a fluid can be defined as the ratio between shear stress to shear rate during flow; where shear stress is the frictional force exerted by a fluid per unit area , and shear rate is the velocity gradient perpendicular to the flow direction. • Newton observed that viscosity is a constant property of a given fluid. Such a fluid is called Newtonian fluid.

Fluid Properties Viscosity in Manufacturing Processes • In metals: many manufacturing processes require melting the metal; e. g. welding and casting. • Success in these operations require low viscosity so that the molten metal fills the mold cavity or weld seam before solidifying. • In forming processes, lubricants and coolants are used, and again the success of these fluids depends to some extent on their viscosity. • In glasses: they exhibit gradual transition from solid to liquid. They become less and less viscous with the increase in temperature, until they can be finally shaped by blowing or molding at around 1100 ºC.