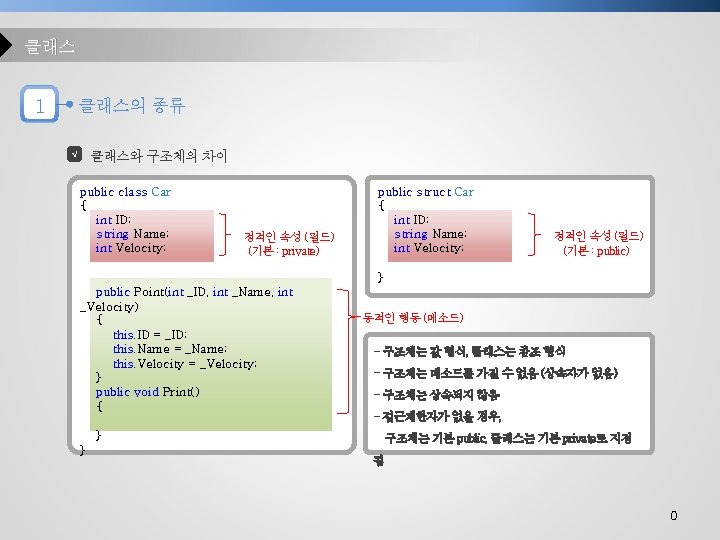
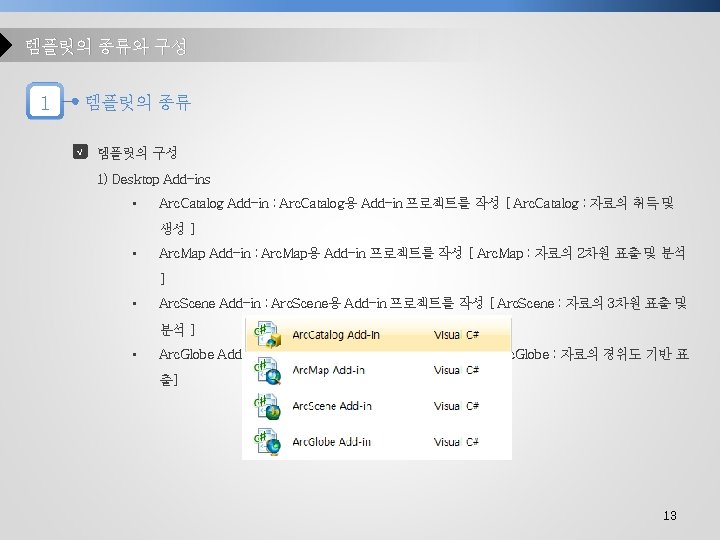
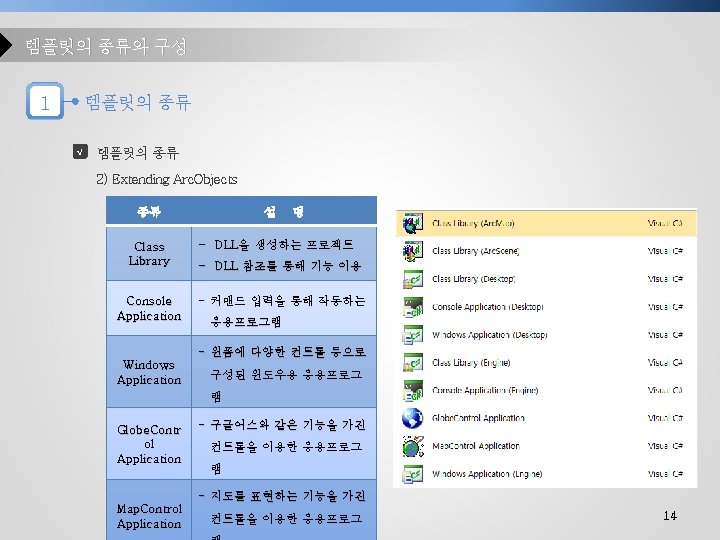
CONTENTS I Arc Object SDK II Arc Object

CONTENTS I Arc. Object SDK 설치 II Arc. Object III 템플릿의 종류와 구성 IV 메소드의 구현 V 숙제 2
. Net Framework 3. 5 이상")
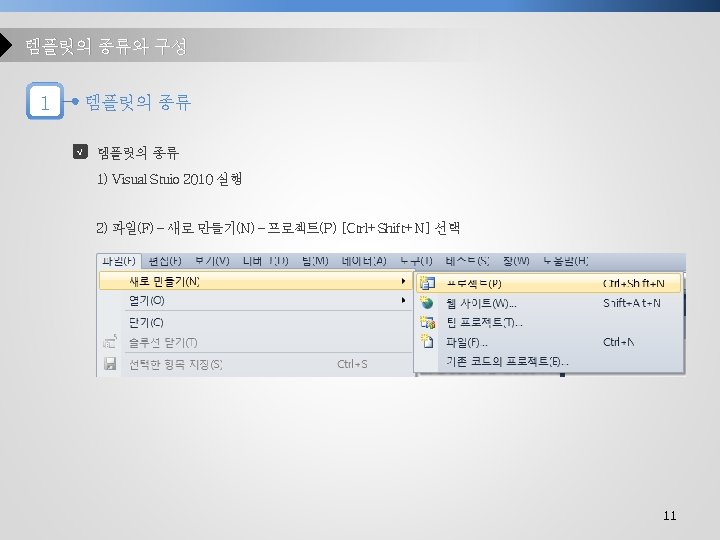
Arc. Object SDK 설치 1 설치과정 √ 조건 1). Net Framework 3. 5 이상 설치 (3. 5, 4. 0, 4. 5) 2) Visual Studio 2010 설치 상태 3) Arc. GIS for Desktop 설치 3
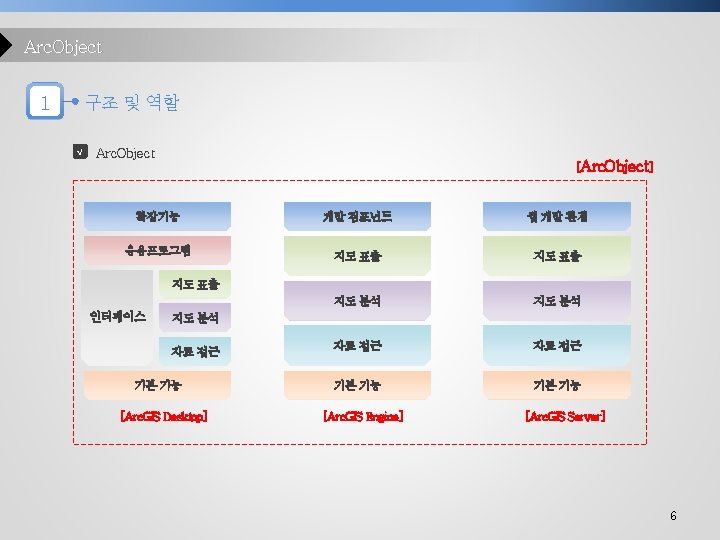
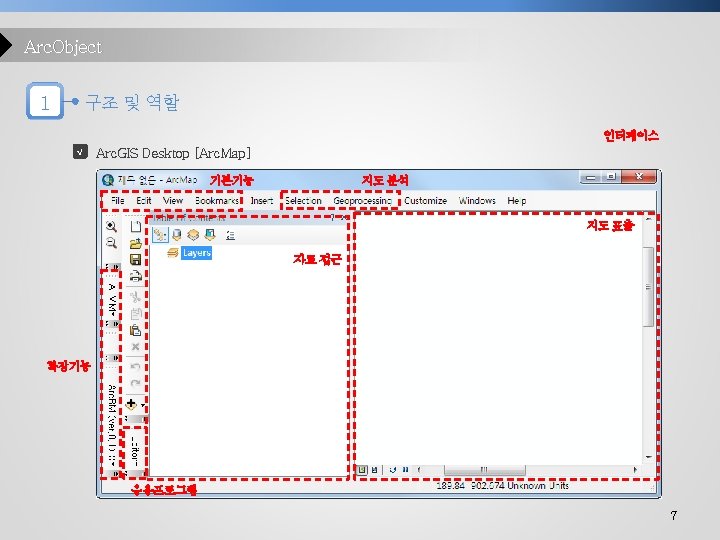

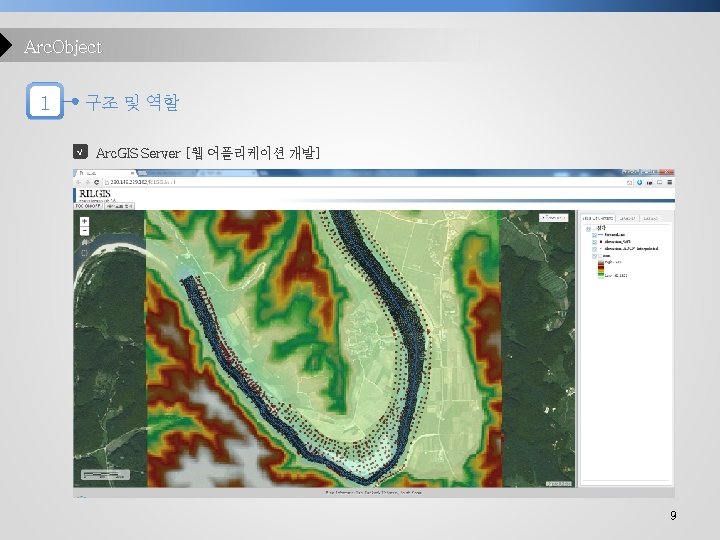
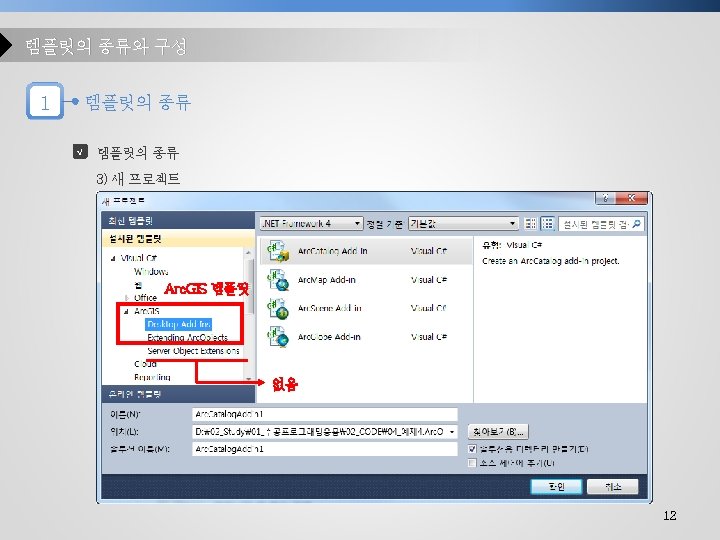
Arc. Object 1 구조 및 역할 √ Arc. GIS Engine 8

 Add-ins 메타정보")
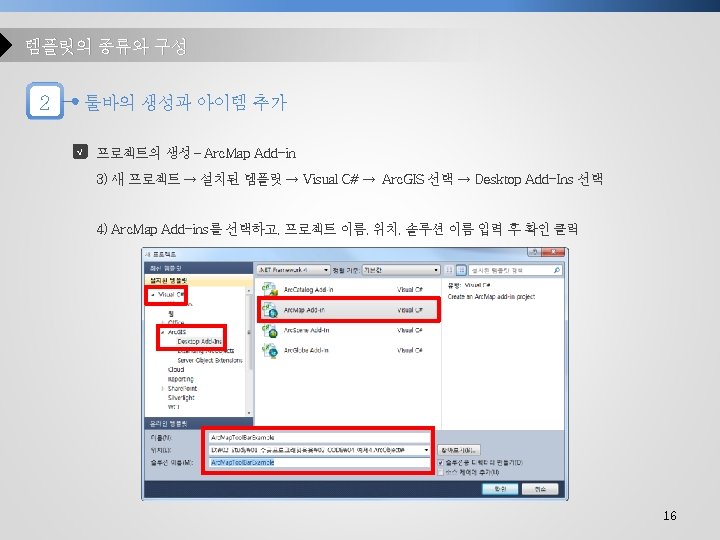
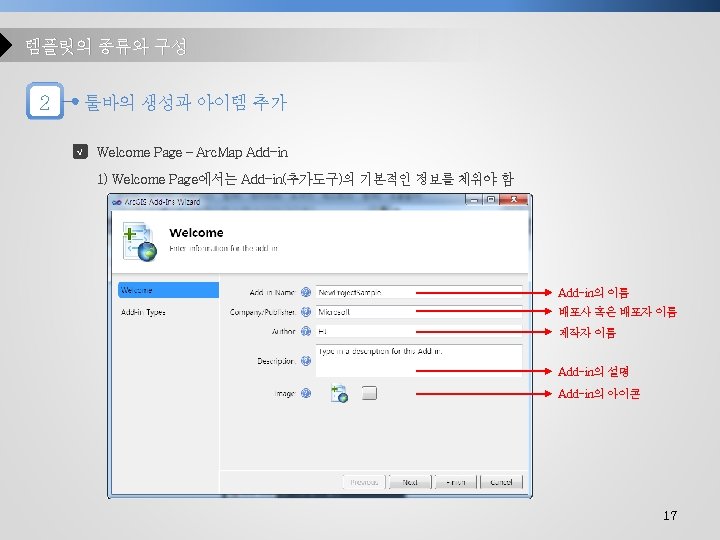
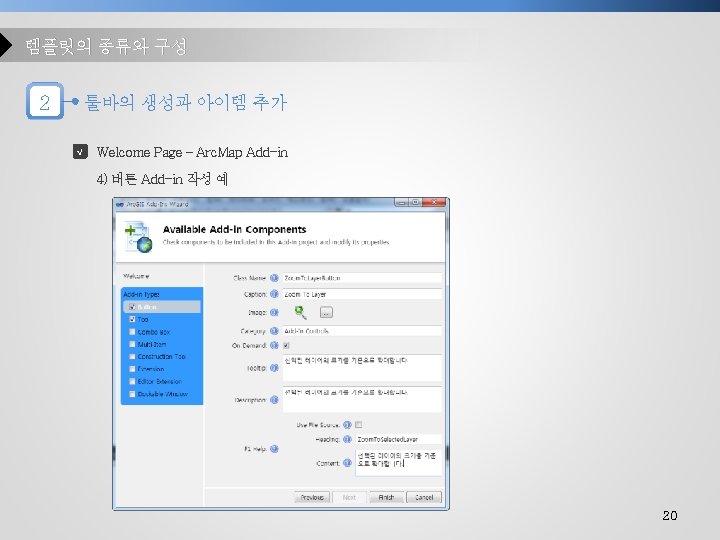
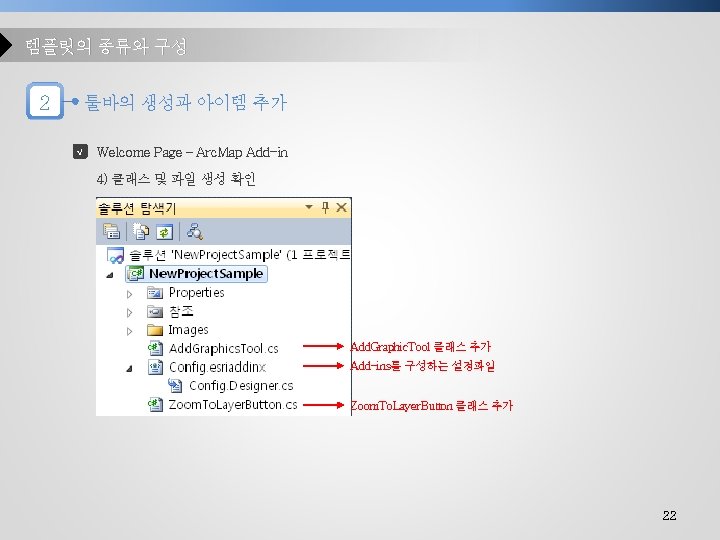
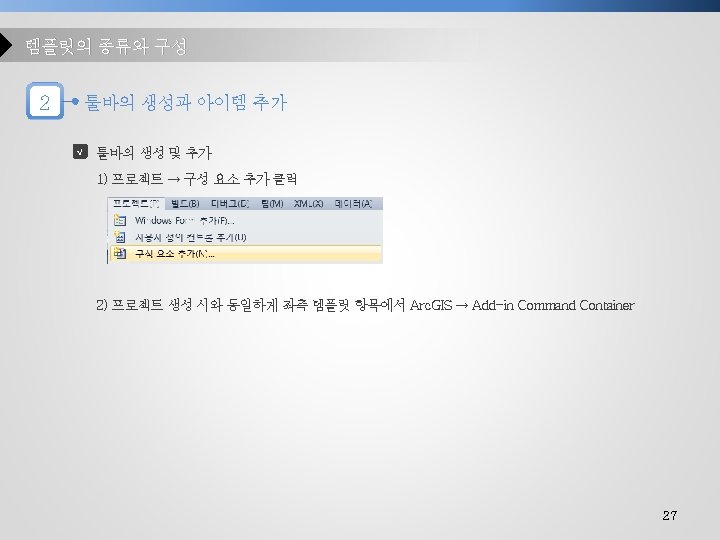
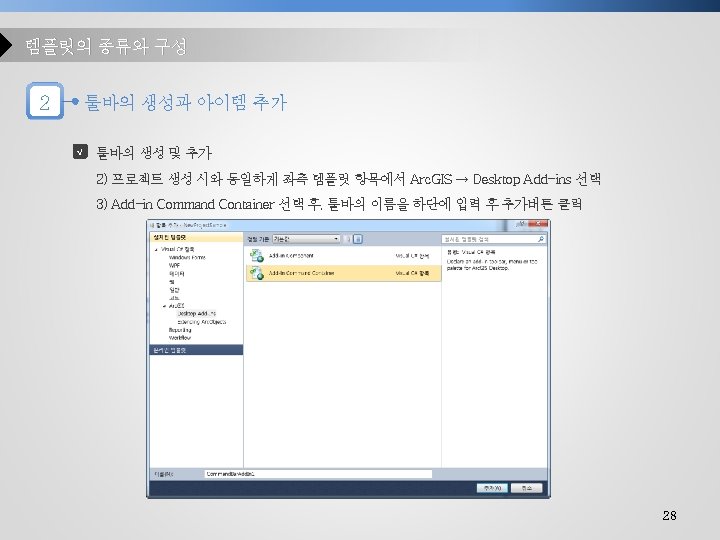
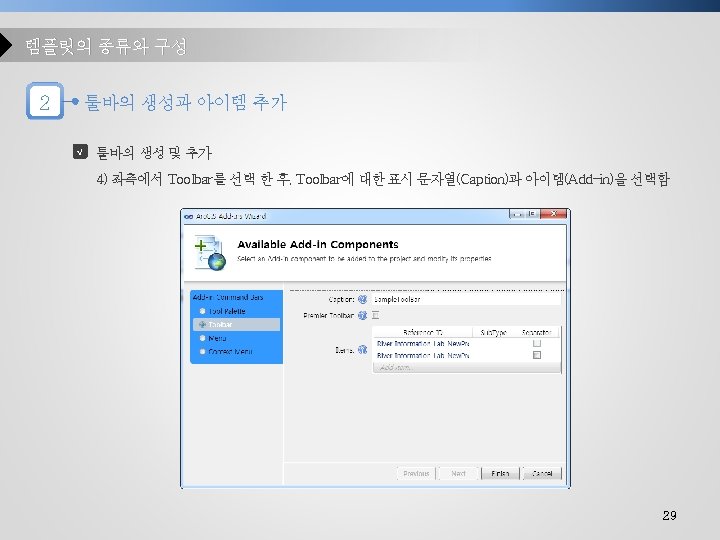
템플릿의 종류와 구성 2 툴바의 생성과 아이템 추가 √ Config. esriaddinx 1) Add-ins 메타정보 : <ESRI. Configuration>내용<ESRI. Configuration> <ESRI. Configuration xmlns="http: //schemas. esri. com/Desktop/Add. Ins" xmlns: xsi="http: //www. w 3. org/2001/XMLSchema-instance"> Add-ins 이름 <Name>Custom_Button_And_Tool</Name> <Add. In. ID>{c 72478 ef-5151 -4 dda-a 7 fb-cbf 8 c 0 d 9 a 34 b}</Add. In. ID> <Description>This project shown that is creating custom button and tool</Description> <Version>1. 0</Version> <Image>Images₩New. Project. Sample. png</Image> <Author>Hojun, You</Author> Add-ins 이 름 Add-ins 아이콘 Add-ins 제작자 <Company>River Information Lab</Company> 배포자 <Date>2015 -03 -11</Date> 날짜 <Targets>. . . </Targets> <Add. In language="CLR 4. 0" library="New. Project. Sample. dll" namespace="New. Project. Sample">. . . </Add. In> Add-in 정보들 </ESRI. Configuration> 23
 Add-in 정보")
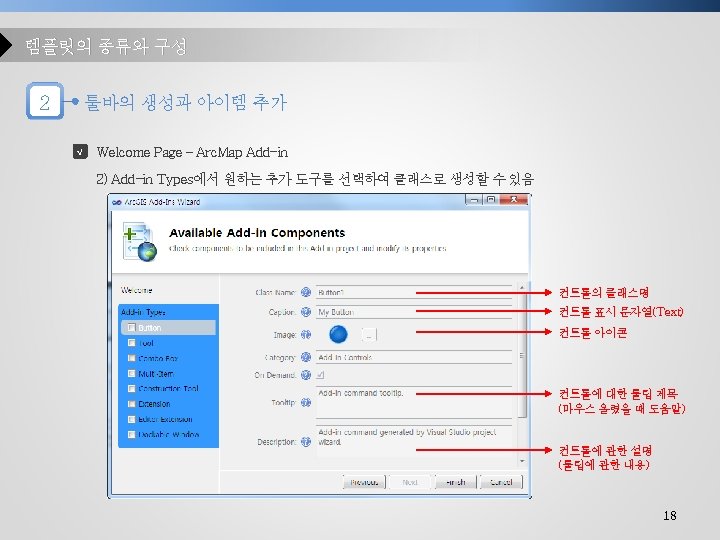
템플릿의 종류와 구성 2 툴바의 생성과 아이템 추가 √ Config. esriaddinx 2) Add-in 정보 : <Command>내용</Command> <Commands> <Button id="River_Information_Lab_New. Project. Sample_Zoom. To. Layer. Button" Add-in ID class="Zoom. To. Layer. Button“ message=" 선택된 레이어의 크기를 기준으로 확대합니다. “ caption="Zoom To Layer“ Add-in 정보 tip=" 선택된 레이어의 크기를 기준으로 확대합니다. “ category="Add-In Controls“ image="Images₩Zoom. To. Layer. Button. png"> <Help heading="Zoom. To. Selected. Layer“>선택된 레이어의 크기를 기준으로 확대합니다. </Help> </Button> Add-in ID <Tool id="River_Information_Lab_New. Project. Sample_Add. Graphics. Tool“ class="Add. Graphics. Tool” message="클릭된 점을 연결하는 선을 그립니다. (Graphic)“ caption="Add Graphics Tool” Add-in 정보 tip=" 클릭된 점을 연결하는 선을 그립니다. (Graphic)” category="Add-In Controls” image="Images₩Add. Graphics. Tool. png"> <Help heading="Add Graphics Tool"> 클릭된 점을 연결하는 선을 그립니다. (Graphic)</Help> </Tool> </Commands> 24
 This.")
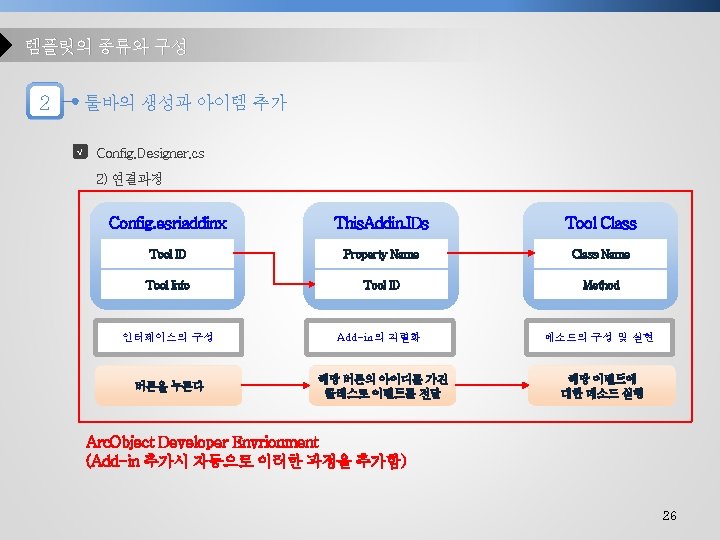
템플릿의 종류와 구성 2 툴바의 생성과 아이템 추가 √ Config. Designer. cs 1) This. Addin Class internal static This. Addin {. . . Config. esriaddinx 과 동일한 필드 정의. . . internal static class IDs { internal static string Zoom. To. Layer. Button { get { return “River_Information_Lab_New. Project. Sample_Zoom. To. Layer. Button”; } internal static string Add. Graphics. Tool { get { return “River_Information_Lab_New. Project. Sample_Add. Graphics. Tool”; } } } 25
")
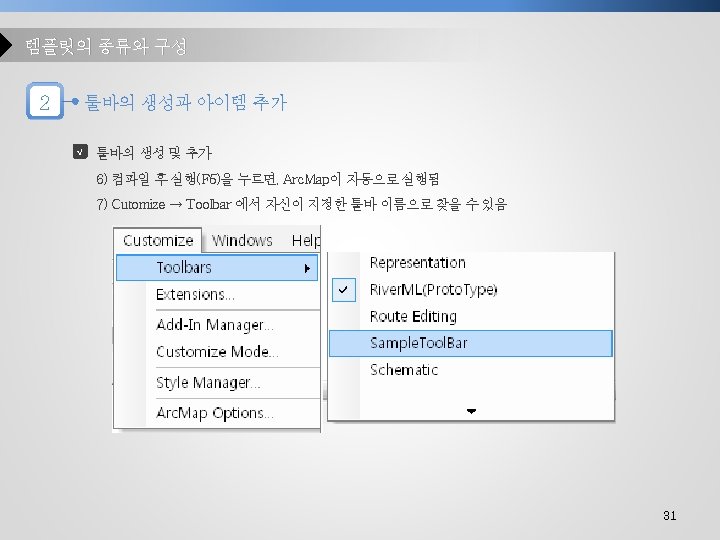
템플릿의 종류와 구성 2 툴바의 생성과 아이템 추가 √ 툴바의 생성 및 추가 5) Config. esriaddinx 추가된 내용 확인 <Toolbars> <Toolbar id="River_Information_Lab_New. Project. Sample_Sample. Tool. Bar” caption="Sample. Tool. Bar“ 툴바 정보 show. Initially="false"> <Items> <Button ref. ID="River_Information_Lab_New. Project. Sample_Zoom. To. Layer. Button" /> 아이템 <Tool ref. ID="River_Information_Lab_New. Project. Sample_Add. Graphics. Tool" /> </Items> </Toolbars> 30
")
IV. 메소드의 구현 1. 이벤트 지정 2. 메소드 작성 (w. Arc. GIS Snippet Finder) 3. 참조추가 4. 예제 1. Zoom To Layer Button 5. 예제 2. Add Graphics Tool 32
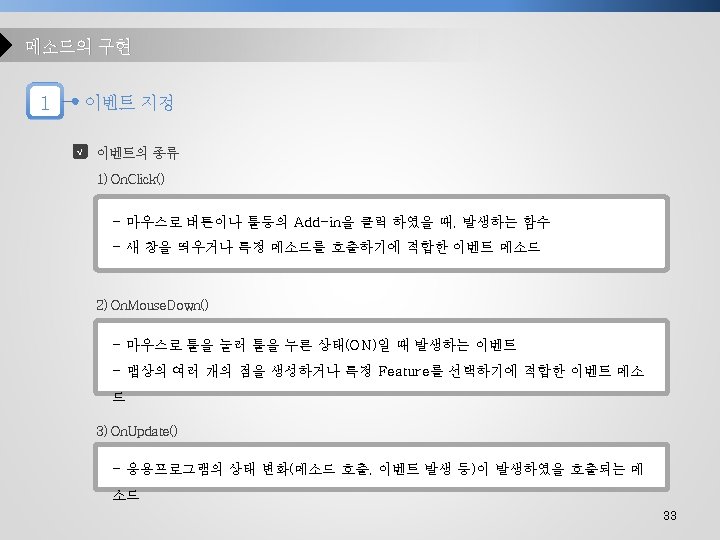
 이벤트 메소드 (On. Click, On.")
메소드의 구현 1 이벤트 지정 √ 이벤트 지정 1) 이벤트 메소드 (On. Click, On. Mouse. Down 등)는 일종의 클라이언트 코드 protected override void On. Click() { Function 1(); Function 2(); Function 3(); } public void Function 1(); { //Code } public void Function 2(); { //Code } public void Function 3(); { //Code } 34
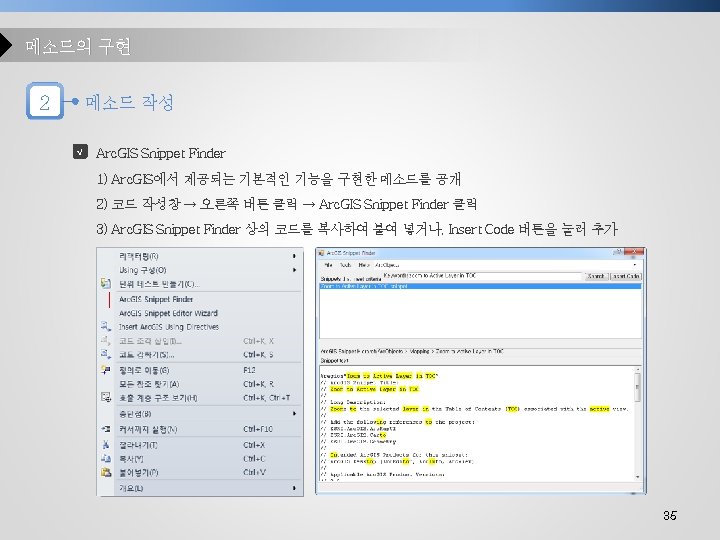
 Arc. GIS Snippet")
메소드의 구현 2 메소드 작성 √ Arc. GIS Snippet Finder 3) Arc. GIS Snippet Finder를 통해 검색된 메소드는 대부분의 경우 주석이 존재함 // // // // // // // Arc. GIS Snippet Title: Zoom to Active Layer in TOC 메소드 이름 Long Description: Zooms to the selected layer in the Table of Contents (TOC) associated with the active view. 메소드 설명 Add the following references to the project: ESRI. Arc. GIS. Arc. Map. UI 동작을 구현하기 위해 필요함 참조 ESRI. Arc. GIS. Carto ESRI. Arc. GIS. Geometry Intended Arc. GIS Products for this snippet: Arc. GIS Desktop (Arc. Editor, Arc. Info, Arc. View) Applicable Arc. GIS Product Versions: 9. 2 9. 3. 1 10. 0 Required Arc. GIS Extensions: (NONE) 지원하는 제품군 지원하는 제품 버전 필요한 Arc. GIS 확장 툴 (라이선스 필요) Notes: This snippet is intended to be inserted at the base level of a Class. It is not intended to be nested within an existing Method. 참고사항 36

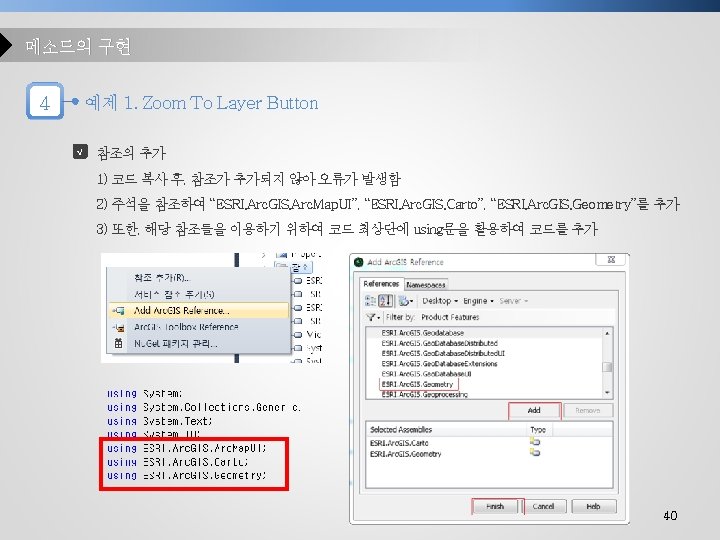
메소드의 구현 4 예제 1. Zoom To Layer Button √ Arc. GIS Snippet Finder를 이용한 코드의 검색 1) Arc. GIS Snippet Finder에서 상단의 콤보박스를 “Arc. Object”로 변경 2) Keyword에 “Zoom to Active Layer in TOC”를 추가하고 Search버튼 클릭 3) 검색된 목록에서 “Zoom to Active Layer in TOC”를 더블 클릭 후, 내용을 복사 public class Zoom. To. Layer. Button : ESRI. Arc. GIS. Desktop. Add. Ins. Button { public Zoom. To. Layer. Button() { } protected override void On. Click() { Arc. Map. Application. Current. Tool = null; } protected override void On. Update() { Enabled = Arc. Map. Application != null; } // 복사위치 } 39
 On.")
메소드의 구현 4 예제 1. Zoom To Layer Button √ 이벤트 지정 1) On. Click 메소드에 아래와 같은 코드를 추가 후, 실행 2) 임의의 Shapefile을 열어 Zoom to Layer가 실행되는지 확인 public class Zoom. To. Layer. Button : ESRI. Arc. GIS. Desktop. Add. Ins. Button { public Zoom. To. Layer. Button() { } protected override void On. Click() { Zoom. To. Active. Layer. In. TOC(Arc. Map. Application. Document as Imxdocument); Arc. Map. Application. Current. Tool = null; } protected override void On. Update() { Enabled = Arc. Map. Application != null; } } 41

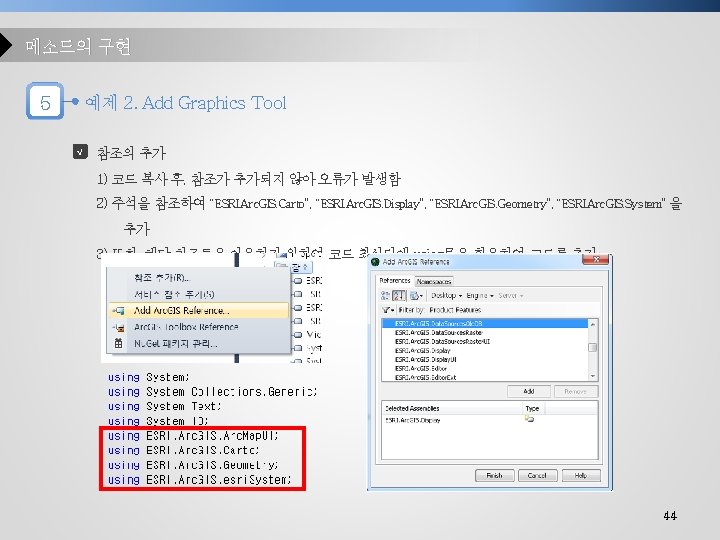
메소드의 구현 5 예제 2. Add Graphics Tool √ Arc. GIS Snippet Finder를 이용한 코드의 검색 1) Arc. GIS Snippet Finder에서 상단의 콤보박스를 “Arc. Object”로 변경 2) Keyword에 “Add Graphic to Map”를 추가하고 Search버튼 클릭 3) 검색된 목록에서 “Add Graphic to Map”를 더블 클릭 후, 내용을 복사 public class Add. Graphics. Tool : ESRI. Arc. GIS. Desktop. Add. Ins. Tool { public Add. Graphics. Tool() { } protected override void On. Update() { Enabled = Arc. Map. Application != null; } // 복사위치 } 42

메소드의 구현 5 예제 2. Add Graphics Tool √ Arc. GIS Snippet Finder를 이용한 코드의 검색 4) Arc. GIS Snippet Finder에서 상단의 콤보박스를 “Arc. Object”로 변경 5) Keyword에 “Get Polyline”를 추가하고 Search버튼 클릭 6) 검색된 목록에서 “Get Polyline”를 더블 클릭 후, 내용을 복사 public class Add. Graphics. Tool : ESRI. Arc. GIS. Desktop. Add. Ins. Tool { public Add. Graphics. Tool() { } protected override void On. Update() { Enabled = Arc. Map. Application != null; } // Add Graphic to Map // 복사위치 } 43
 On. Mouse")
메소드의 구현 5 예제 2. Add Graphics Tool √ 이벤트 지정 1) On. Mouse 메소드를 아래와 같은 코드를 추가하여 생성 protected override void On. Mouse. Down(ESRI. Arc. GIS. Desktop. Add. Ins. Tool. Mouse. Event. Args arg) { //Arc. Map 정적 클래스를 활용하여 현재 활성화된 창(뷰)를 획득한다. IActive. View active. View = Arc. Map. Document. Active. View; //사용자 마우스 클릭으로부터 폴리라인을 생성한다. IPolyline polyline = Get. Polyline. From. Mouse. Clicks(active. View); //폴리라인을 그리기 위해 컬러를 지정한다. ESRI. Arc. GIS. Display. IRgb. Color rgb. Color = new ESRI. Arc. GIS. Display. Rgb. Color. Class(); rgb. Color. Red =255; //창(뷰어)상의 유저가 그린 그래픽을 추가한다 Add. Graphic. To. Map(active. View. Focus. Map, polyline, rgb. Color); //그래픽이 포함된 활성화된 창(뷰어)만 다시 그린다 active. View. Partial. Refresh(esri. View. Draw. Phase. esri. View. Graphics, null); } 45
 On. Mouse")
메소드의 구현 5 예제 2. Add Graphics Tool √ 이벤트 지정 2) On. Mouse 메소드를 아래에서 지정한 위치에 입력 3) 실행 후, Add Graphics Tool 을 클릭하여 툴을 활성화 하면, Map에 선을 그릴 수 있음 public class Add. Graphics. Tool : ESRI. Arc. GIS. Desktop. Add. Ins. Tool { public Add. Graphics. Tool() { } // 복사 위치 protected override void On. Update() { Enabled = Arc. Map. Application != null; } // Add Graphic to Map // Get Polyline } 46

- Slides: 49