CHAPTER 3 MICROSOFT WORD MICROSOFT WORD 2013 Part


: Click Start button. Step (2):")


- Slides: 44
CHAPTER 3 MICROSOFT WORD
MICROSOFT WORD 2013 • Part I
MICROSOFT WORD 2013 • Word - Home • • Word - Getting Started • • Word - Explore Window • • Word - Backstage View • • Word - Entering Text • • Word - Move Around • • Word - Save Document • • Word - Open Document • • Word - Close Document • Word - Context Help •
MICROSOFT WORD 2013 • What is a Microsoft Word? • Microsoft Word 2013 is a word-processing program, designed to help you create professional-quality documents. With the finest document-formatting tools, Word helps you organize and write your documents more efficiently. Word also includes powerful editing and revising tools so that you can collaborate with others easily. • Word is a powerful word processing application that allows users to produce typed documents.
COUNT… • Word processors enable anyone to produce, with a little practice, beautifully laid out documents, to produce letters, dissertations, CVs, or whatever. • Word processing software is designed to create documents such as letters, reports, newspaper and articles. This type of software succeeded. • Because it allowed text to be edited without having to retype the whole document. Ms Word, 5 Word. Perfect & Word pro are some examples of word processing products.
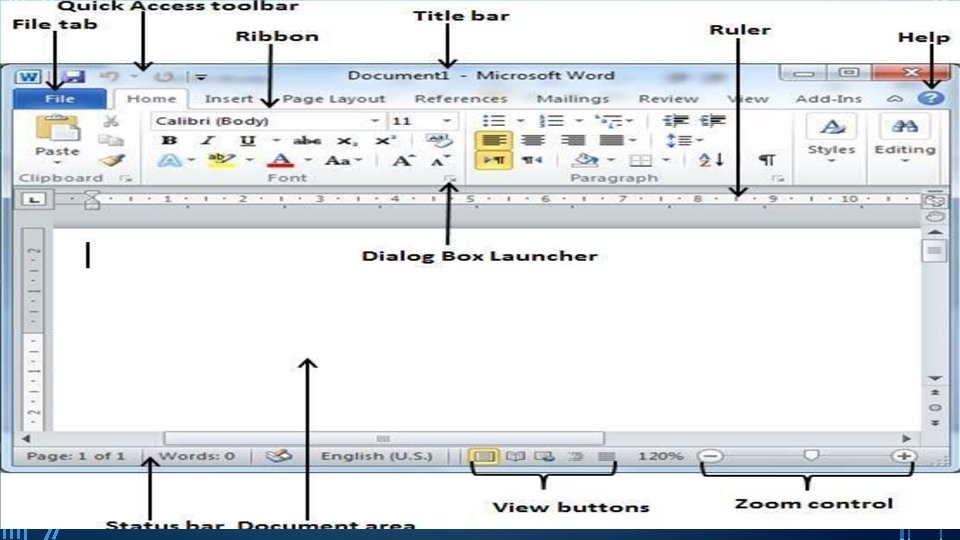
GETTING STARTED - MICROSOFT WORD 2013. 2 STEP (1): Click Start button. Step (2): Click All Programs option from the menu. Step (3): Search for Microsoft Office from the sub menu and click it. Step (4): Search for Microsoft Word 2013 from the submenu and click it. This will launch Microsoft Word 2013 application and you will see the following word window. Following is the basic window which you get when you start word application. Let us understand various important parts of this window.
• The File tab replaces the Office button from Word 2007. You can click it to check Backstage view, which is the place to come when you need to open or save files, create new documents, print a document, and do other file-related operations. • Quick Access Toolbar: • This you will find just above the File tab and its purpose is to provide a convenient resting place for the Word most frequently used commands. You can customize this toolbar based on your comfort.
RIBBON: • Tabs: They appear across the top of the Ribbon and contain groups of related commands. Home, Insert, Page Layout are example of ribbon tabs. • • Groups: They organize related commands; each group name appears below the group on the Ribbon. For example group of commands related to fonts or or group of commands related to alignment etc. • • Commands: Commands appear within each group as mentioned
TABS • The Home tab gives you access to some of the most commonly used commands for working with Word 2013, including copying and pasting, formatting, aligning paragraphs, and choosing document styles. The Home tab is selected by default whenever you open Word.
INSERT • The Insert tab allows you to insert pictures, charts, tables, shapes, cover pages, and more to your document, which can help you communicate information visually and add style to your document.
DESIGN • The Design tab gives you access to a variety of design tools, including document formatting, effects, and page borders, which can give your document a polished look.
PAGE LAYOUT • The Page Layout tab allows you to change the print formatting of your document, including margin width, page orientation, page breaks, and more. These commands will be especially helpful when preparing to print a document.
REFERENCES • The References tab allows you add annotations to your document, such as footnotes and citations. From here, you can also add a table of contents, captions, and a bibliography. These commands are especially helpful when composing academic papers.
MAIL MERGE • You can use the Mail Merge feature in the Mailings tab to quickly compose letters, address envelopes, and create labels. This is especially useful when you need to send a letter to many different recipients.
REVIEW TAB • You can use the Review tab to access Word's powerful editing features, including adding comments and tracking changes. These features make it easy to share and collaborate on documents.
VIEW TAB • The View tab allows you to switch between different views for your document and split the screen to view two parts of your document at once. These commands will also be helpful when preparing to print a document.
CONTEXTUAL TABS • Contextual tabs will appear on the Ribbon when working with certain items, such as tables and pictures. These tabs contain special command groups that can help you format these items as needed.
CONT…. • Certain programs, such as Adobe Acrobat Reader, may install additional tabs to the Ribbon. These tabs are called Add-ins. • Title bar: • This lies in the middle and at the top or the window. Title bar shows the program and document titles. • Rulers: • Word has two rulers - a horizontal ruler and a vertical ruler. The horizontal ruler appears just beneath the Ribbon and is used to set margins and tab stops. The vertical ruler appears on the left edge of the Word window and is used to gauge the vertical position of elements on the page. • Help: • The Help Icon can be used to get word related help anytime you like. This provides nice tutorial on various subjects related to word.
• • Zoom Control: Zoom control lets you zoom in for a closer look at your text. The zoom control consists of a slider that you can slide left or right to zoom in or out, . and + buttons you can click to increase or decrease the zoom factor. • View Buttons: • The group of buttons located to the left of the Zoom control, near the bottom of the screen, lets you switch among Word's various document views. • • • Print Layout view: This displays pages exactly as they will appear when printed. • • Read Mode view: to hide the writing tools and menus and to leave more room for the pages themselves. Read Mode automatically fits the page layout to your device, using columns and larger font sizes, both of which you can adjust. • Web Layout view: This shows how a document appears when viewed by a Web browser, such as Internet Explorer.
CONT… • Document Area: • The area where you type. The flashing vertical bar is called the insertion point and it represents the location where text will appear when you type. • Status Bar: • This displays document information as well as the insertion point location. From left to right, this bar contains the total number of pages and words in the document, language etc. • You can configure the status bar by right-clicking anywhere on it and by selecting or deselecting options from the provided list. • Dialog Box Launcher: • This appears as very small arrow in the lower-right corner of many groups on the Ribbon. Clicking this button opens a dialog box or task pane that provides more
CONT…. • The Backstage view has been introduced in Word 2013 and acts as the central place for managing your documents. The backstage view helps in creating new documents, saving and opening documents, printing and sharing documents, and so on. • Getting to the Backstage View is easy: Just click the File tab, located in the upper-left corner of the Word Ribbon. If you already do not have any opened document then you will see a window listing down all the recently opened documents as follows:
CONT… • Compatibility Mode: If the document is not a native Word 2007/2013 document, a Convert button appears here, enabling you to easily update its format. Otherwise, this category does not appear. • • Permissions: You can use this option to protect your word document. You can set a password so that nobody can open your document, or you can lock the document so that nobody can edit your document. • • Prepare for Sharing: This section highlights important information you should know about your document before you send it to others, such as a record of the edits you made as you developed the document. • • Versions: If the document has been saved several times, you may be able to access previous versions of it from this section. • Document Properties: • When you click Info option available in the first column, it displays various properties in the third column of the backstage view. These properties include document size, number of pages in the document, total number of words in
ENTER TEXT • Let us see how easy is to enter text in a word document. Hope you are aware that when you start a word, it displays a new document by default as shown below: Document area is the area where you type your text. The flashing vertical bar is called the insertion point and it represents the location where text will appear when you type.
MOVE AROUND • Word provides a number of ways to move around a document using the mouse and the keyboard. • First let us create some sample text before we proceed. To create a sample text there is a short cut available. Open a new document and type =rand() and just press enter to see the magic. Word will create following content for you:
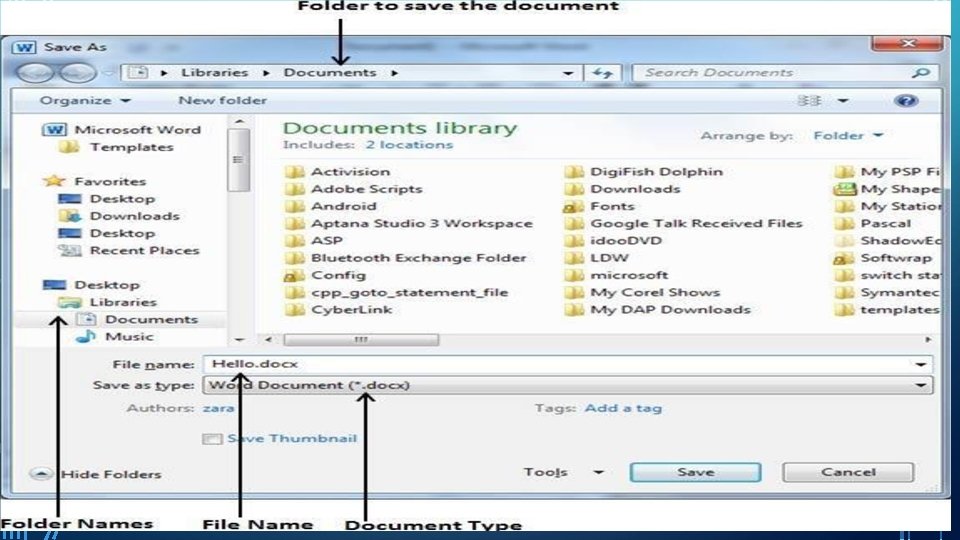
SAVE DOCUMENT-MICROSOFT WORD 2013 SAVING NEW DOCUMENT: • Once you are done with typing in your new word document, it is time to save your document to avoid losing work you have done on a Word document. Following are the steps to save an edited word document: • Step (1): Click the File tab and select Save As option. • Save Document • Microsoft Word 2013 • Step (2): Select a folder where you would like to save the document, Enter file name which you want to give to your document and Select a Save as type, by default it is. docx format. • Step (3): Finally, click on Save button and your document will be saved with the entered name in the selected folder. • Ctrl + S • File tab.
OPEN DOCUMENT - MICROSOFT WORD 2013 • A new, blank document always opens when you start Microsoft Word. But suppose that you want start another new document while you are working on another document, or you closed already opened document and want to start a new document. Here are the steps to open a new document: • Step (1): Click the File tab and select New option. • Step (2): When you select New option from the first column, • Ctrl + N
CONTEXT HELP - MICROSOFT WORD 2013 • Microsoft Office provides more than one methods for calling up help when you need it. Few easiest methods are given in our tutorial: • Using Help Icon: • You can also have similar help window as shown above, by clicking the Help icon located just above the right edge of the ribbon which is shown below:
EDITING DOCUMENTS • Part II
INSERT TEXT • Many times it is required to go back and insert an additional text in an existing line. Microsoft word provides two ways to insert text in existing text and we will show to use both the methods of inserting text: • Insert and Add Text: • Step (1): Click the location where you want to insert text or you can use keyboard arrows to locate the place where you would like to insert the text. • Step (2): Start typing your text you want to insert. Word inserts the text to the left of the insertion point, moving existing text to the right.
INSERT AND REPLACE TEXT: • In this insertion mode, text will be added into the existing content but same time it will over write all the content which comes in its way. • Step (1): Right-click the status bar and select Overtype option from the displayed menu. • Step (2): Click on the Insert text available at the status bar and it will switch to Overtype mode as shown below: • Step (3): Now click the location where you want to insert text or you can use keyboard arrows to locate the place where you would like to insert the text. • Step (4): Start typing your text you want to insert. Word would replace the existing text with the newly typed text without moving position of the exiting test.
SELECT TEXT • Selecting a text is one of the most important skill required while editing a word document. You can perform various operation on a selected text like you can delete it, copy it, move it, apply formatting to it, change its capitalization etc. • SN Component & Selection Method • • • Selecting text between two points 1 Click at the start of the block of text, hold down Shift, and click at the end of the block. 2 Selecting a single word Simply double click anywhere on the word you want to select. 3 Selecting a paragraph Simply triple click anywhere on the paragraph you want to select. 4 Selecting a sentence Hold down Ctrl key and click anywhere in the sentence you want to select. 5 Selecting a column of text Hold down Alt, click and hold the mouse button, and drag over the column you want to select.
USING THE SELECTION BAR: • You can use selection bar to select various components of a document as described in the following table: • SN Component & Selection Method • 1 Selecting a line • Bring your mouse in selection bar area and click in front of the line you want to select. • 2 Selecting a paragraph • Bring your mouse in selection bar area and double click in front of the paragraph you want to select. • 3 Selecting the document • Bring your mouse in selection bar area and triple click.
USING THE KEYBOARD: • Keyboard provides very good support when you want to select various components of the document as described in the following table: • Ctrl + A Press Ctrl + A keys to select the entire document. • 2 Shift Keep pressing Sift key and use any of the arrow keys to select the text. • 3 F 8 Press F 8 and then use any of the arrows keys to select the text. • 4 Ctrl + Shift + F 8 Press Ctrl + Shift + F 8 and then use any of the arrows keys to select column of the text.
Delete Text • It is very common to delete text and retype the content in your word document. You might type something you did not want to type or there is something extra which is not required in the document. Regardless of the reason, Word offers you various ways of deleting the text in partial or complete content of the document. • SN Component Selection & Delete Methods • 1 Deleting text between two points • Click at the start of the block of text, hold down Shift, and click at the end of the block to select the text and finally press either backspace or delete key. • 2 Deleting a single word • Simply double click anywhere on the word you want to delete and finally press either backspace or delete key.
• 3 Deleting a paragraph • Simply triple click anywhere on the paragraph you want to delete and finally press either backspace or delete key. • 4 • Hold down Ctrl key and click anywhere in the sentence you want to delete and finally press either backspace or delete key. • 5 • Hold down Alt, click and hold the mouse button, and drag over the column you want to delete and finally press either backspace or delete key. • 6 • Bring your mouse in selection bar area and click in front of the line you want to delete and finally press either backspace or delete key. • 7 • Press Ctrl + A keys to delete the entire document and finally press either backspace or Deleting a sentence Deleting a column of text Deleting a line Deleting entire document content
MOVE TEXT • Sometime it is required to move a text from one location to another location in the same document or in any another document. You can move text from one location in a document to another by using dragand-drop technique with the help of mouse. This tutorial will teach you how to use drag and drop technique to move a text.
COPY, CUT & PASTE • Previous tutorial explained how we can select desired text and move it to any other location in the same document or in any other document. This tutorial will teach you how to use copy, cut and paste techniques to duplicate a text leaving orignal text intact or removing original text completely. • To use copy and paste or cut and paste operations, word makes use of a temporary memory which is called clipboard. • • Find & Replace While working on editing a document you come across a situation very frequently when you want to search a particular word in your document and many times you will be willing to replace this word with another word at all the few or all the places throughout of the document. This tutorial will teach you how to find a word or phrase in a word document and how to replace existing word with any other word using simple steps.
SPELL CHECK AND GRAMMAR • Microsoft Word provides a decent Spelling and Grammar Checker which enables you to search for and correct all spelling and grammar mistakes in your document. Word is intelligent enough to identify misspelled or misused, as well as grammar errors and underlines them as follows. • A red underline beneath spelling errors. • A green underline beneath grammar errors. • A blue line under correctly spelled but misused words. • Check Spelling and Grammar using Review tab:
FORMATTING TEXT • Part III
FORMATTING PAGES • Part IV
WORKING WITH TABLES • Part V
CONT… • End