VERTICAL SCANNING INTERFEROMETRY VSI 1 powering your process
- Slides: 47

VERTICAL SCANNING INTERFEROMETRY VSI 1 powering your process.

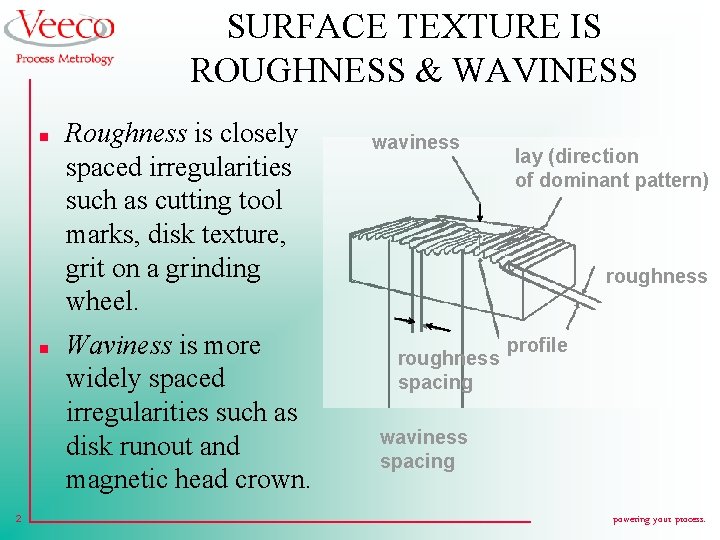
SURFACE TEXTURE IS ROUGHNESS & WAVINESS n n 2 Roughness is closely spaced irregularities such as cutting tool marks, disk texture, grit on a grinding wheel. Waviness is more widely spaced irregularities such as disk runout and magnetic head crown. waviness lay (direction of dominant pattern) roughness spacing profile waviness spacing powering your process.

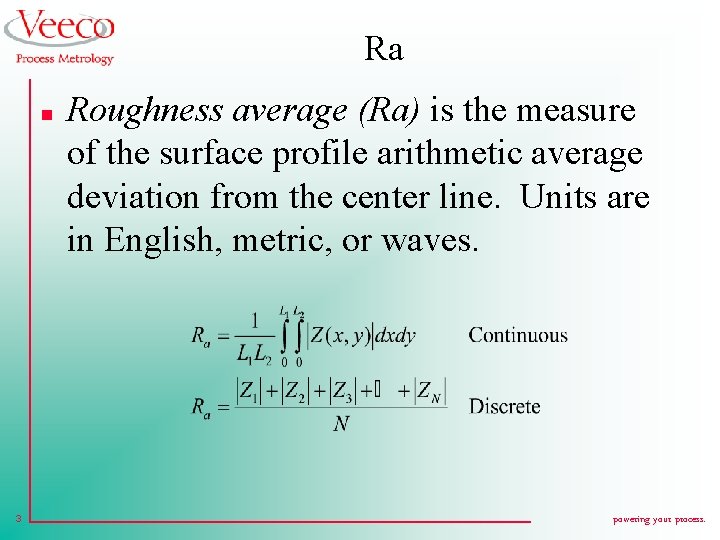
Ra n 3 Roughness average (Ra) is the measure of the surface profile arithmetic average deviation from the center line. Units are in English, metric, or waves. powering your process.

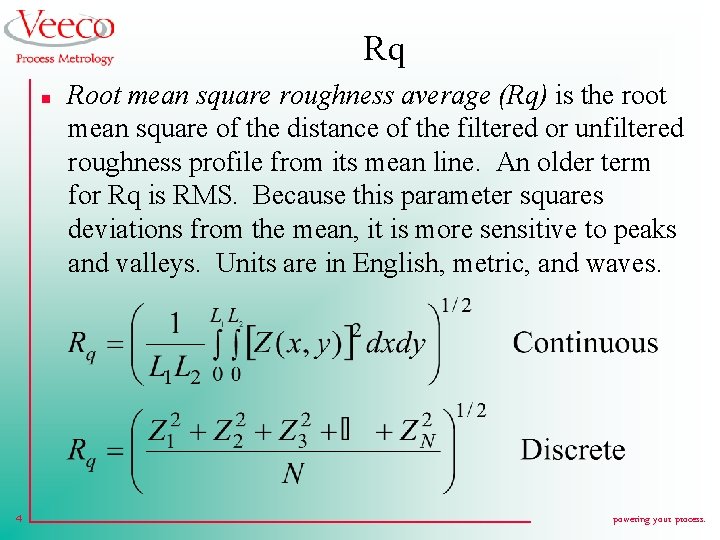
Rq n 4 Root mean square roughness average (Rq) is the root mean square of the distance of the filtered or unfiltered roughness profile from its mean line. An older term for Rq is RMS. Because this parameter squares deviations from the mean, it is more sensitive to peaks and valleys. Units are in English, metric, and waves. powering your process.

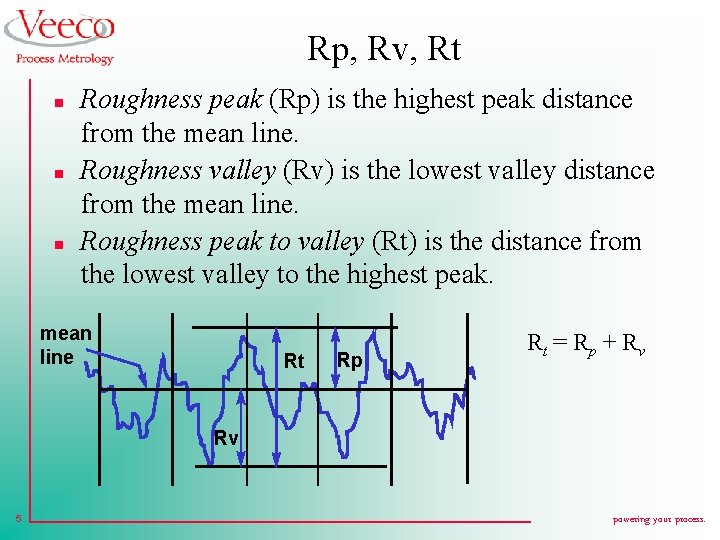
Rp, Rv, Rt n n n Roughness peak (Rp) is the highest peak distance from the mean line. Roughness valley (Rv) is the lowest valley distance from the mean line. Roughness peak to valley (Rt) is the distance from the lowest valley to the highest peak. mean line Rt Rp Rt = Rp + Rv Rv 5 powering your process.

APPLICATIONS n n 6 Ra is a stable, easily implemented parameter. Rq is more sensitive to peaks and valleys. Better for discriminating different types of surfaces. n Peaks are important for friction and wear. n Valleys are significant for lubrication. powering your process.

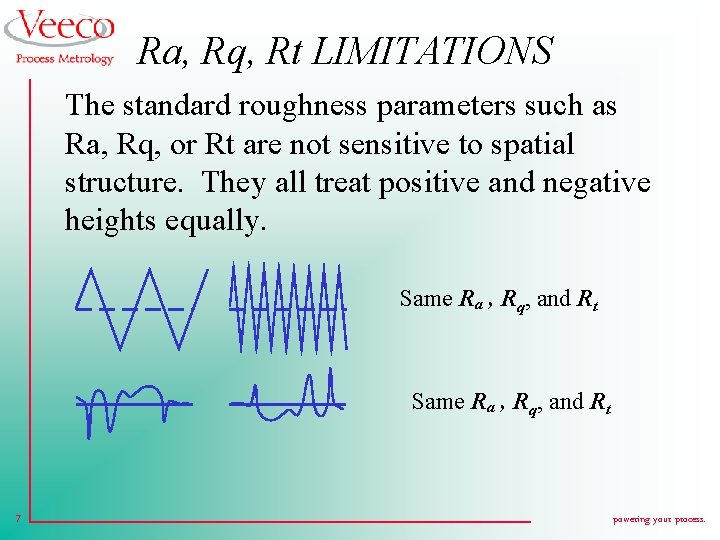
Ra, Rq, Rt LIMITATIONS The standard roughness parameters such as Ra, Rq, or Rt are not sensitive to spatial structure. They all treat positive and negative heights equally. Same Ra , Rq, and Rt 7 powering your process.

SURFACE FILTERING n n 8 Surface filtering is user defined roughness and waviness! Roughness is closely spaced irregularities such as cutting tool marks, disk texture, grit on a grinding wheel. This can be more closely analyzed by subtracting the shape of the sample. powering your process.

SURFACE FILTERING (Continued) n n 9 Waviness is more widely spaced irregularities such as disk runout, magnetic head crown, etc. This can be more closely analyzed by using a low pass filter. Flaws are discrete infrequent irregularities such as disk damage due to head slap, contamination, ESD damage, etc. powering your process.

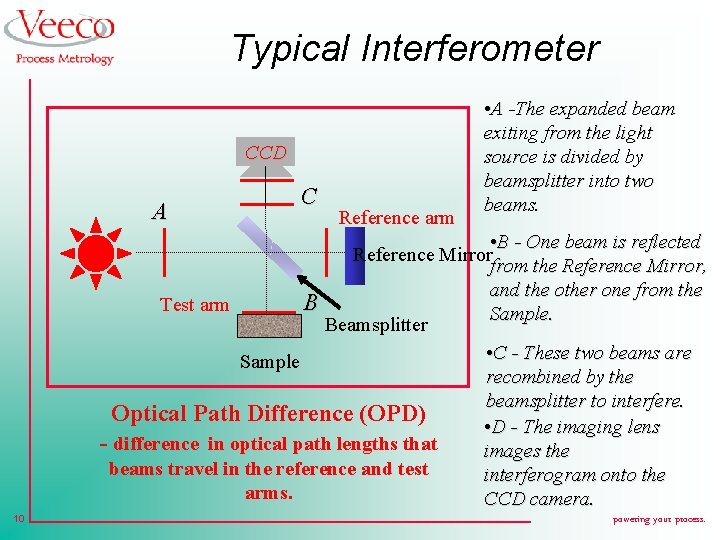
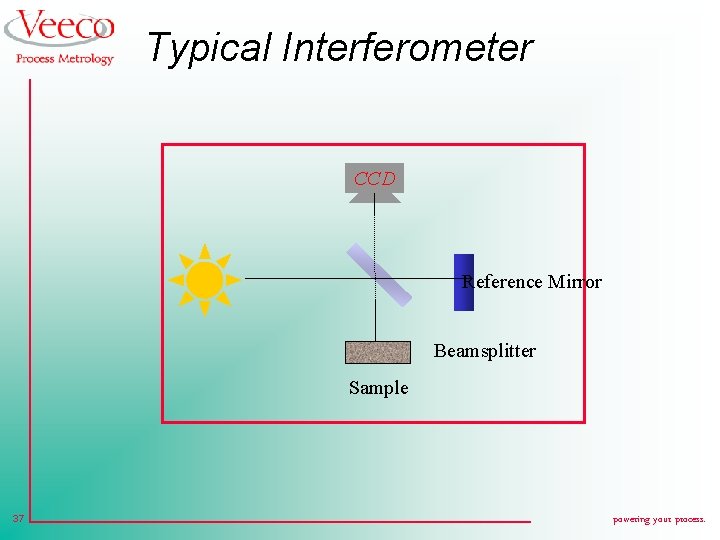
Typical Interferometer CCD C A Reference arm • B - One beam is reflected Reference Mirror from the Reference Mirror, and the other one from the B Sample. Beamsplitter Test arm Sample Optical Path Difference (OPD) - difference in optical path lengths that beams travel in the reference and test arms. 10 • A -The expanded beam exiting from the light source is divided by beamsplitter into two beams. • C - These two beams are recombined by the beamsplitter to interfere. • D - The imaging lens images the interferogram onto the CCD camera. powering your process.

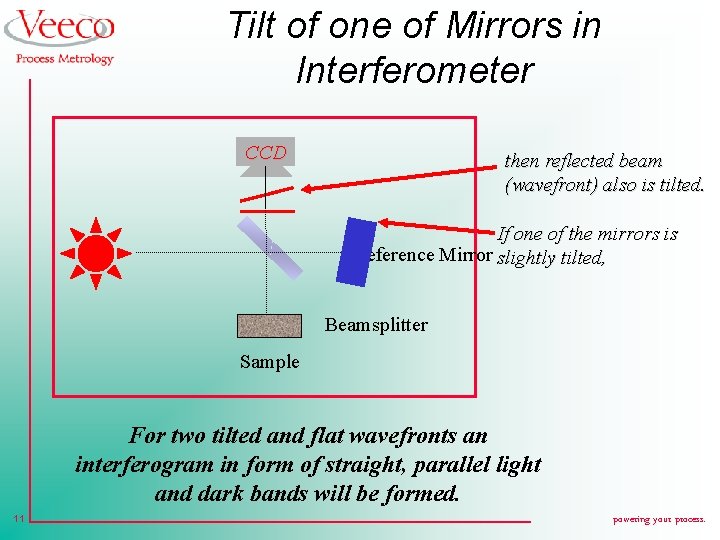
Tilt of one of Mirrors in Interferometer CCD then reflected beam (wavefront) also is tilted. If one of the mirrors is Reference Mirror slightly tilted, Beamsplitter Sample For two tilted and flat wavefronts an interferogram in form of straight, parallel light and dark bands will be formed. 11 powering your process.

Interferogram 12 powering your process.

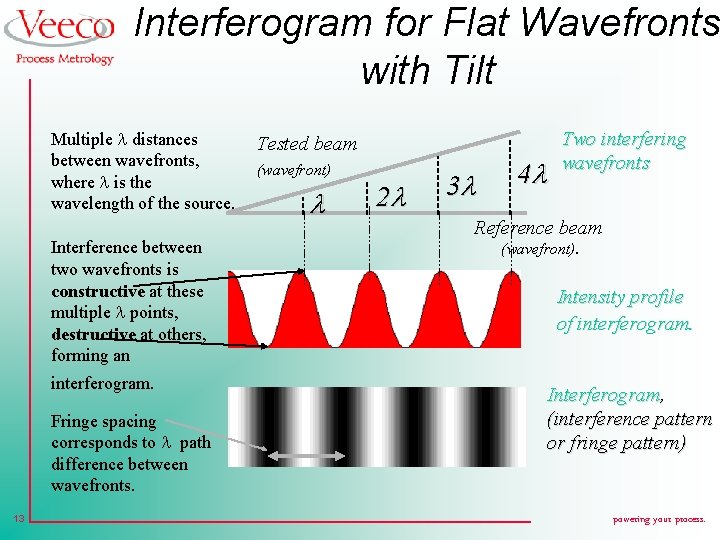
Interferogram for Flat Wavefronts with Tilt Multiple distances between wavefronts, where is the wavelength of the source. Interference between two wavefronts is constructive at these multiple points, destructive at others, forming an interferogram. Fringe spacing corresponds to path difference between wavefronts. 13 Tested beam (wavefront) 2 3 4 Two interfering wavefronts Reference beam (wavefront). Intensity profile of interferogram. Interferogram, (interference pattern or fringe pattern) powering your process.

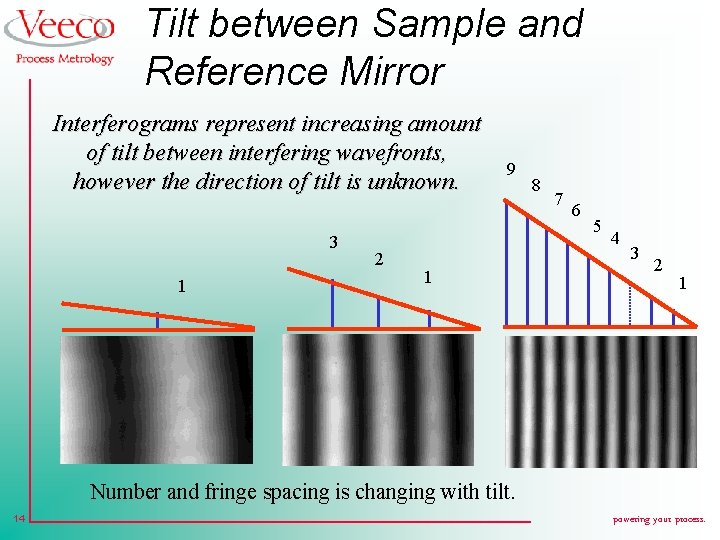
Tilt between Sample and Reference Mirror Interferograms represent increasing amount of tilt between interfering wavefronts, however the direction of tilt is unknown. 3 1 2 9 1 8 7 6 5 4 3 2 1 Number and fringe spacing is changing with tilt. 14 powering your process.

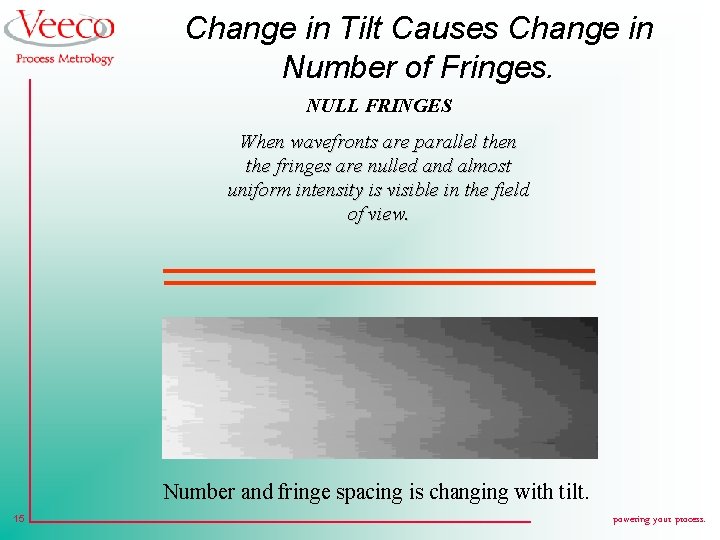
Change in Tilt Causes Change in Number of Fringes. NULL FRINGES When wavefronts are parallel then the fringes are nulled and almost uniform intensity is visible in the field of view. Number and fringe spacing is changing with tilt. 15 powering your process.

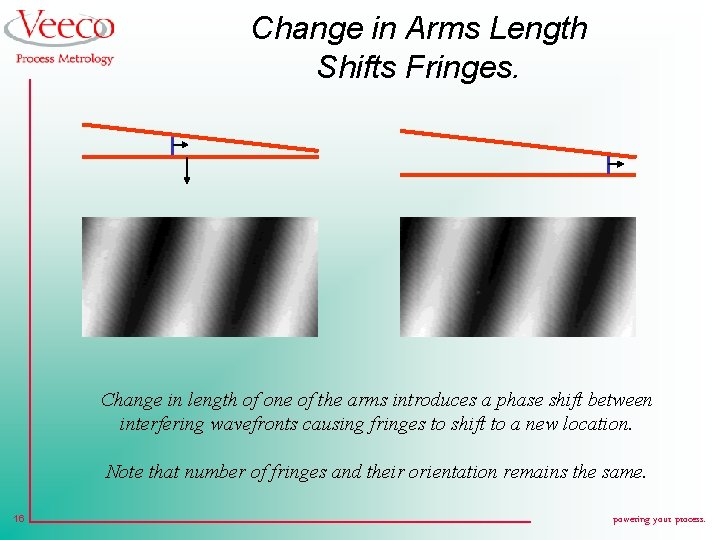
Change in Arms Length Shifts Fringes. Change in length of one of the arms introduces a phase shift between interfering wavefronts causing fringes to shift to a new location. Note that number of fringes and their orientation remains the same. 16 powering your process.

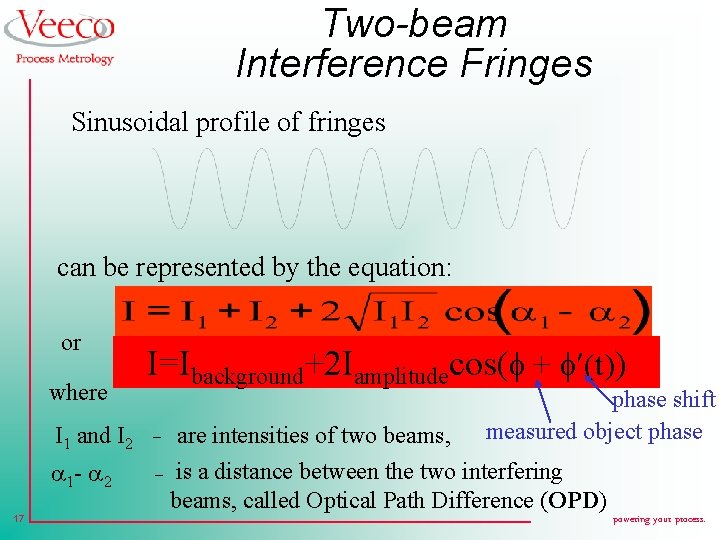
Two-beam Interference Fringes Sinusoidal profile of fringes can be represented by the equation: or where 17 I=Ibackground+2 Iamplitudecos(f + f (t)) I 1 and I 2 ¯ 1 - 2 ¯ are intensities of two beams, phase shift measured object phase is a distance between the two interfering beams, called Optical Path Difference (OPD) powering your process.

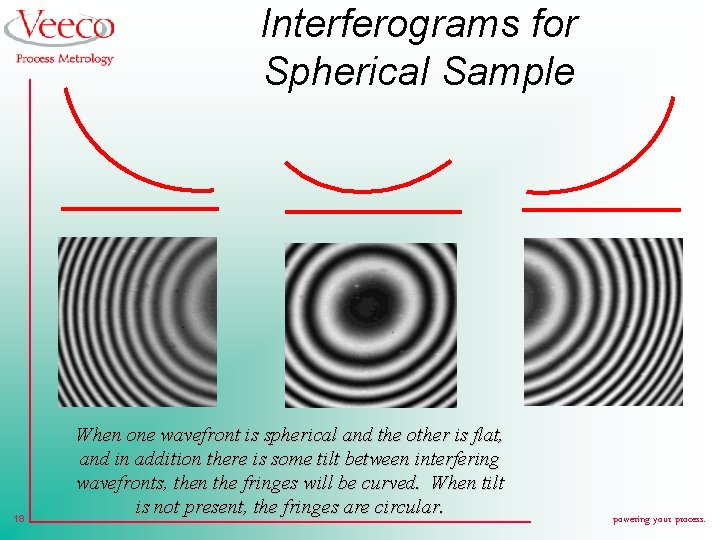
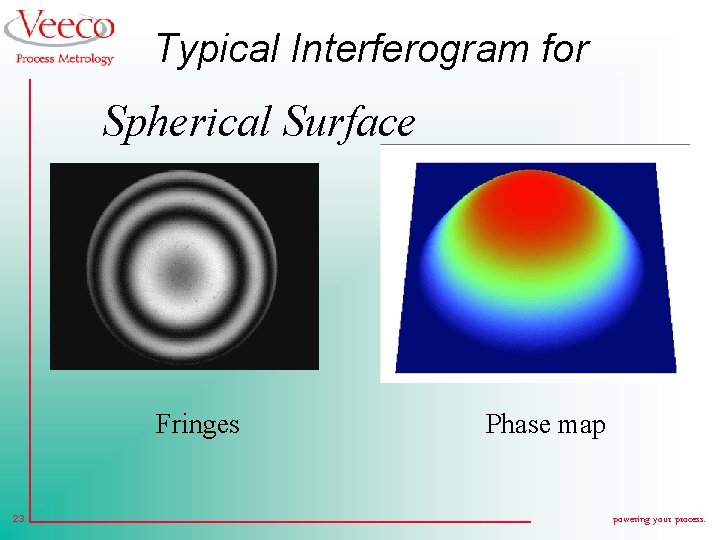
Interferograms for Spherical Sample 18 When one wavefront is spherical and the other is flat, and in addition there is some tilt between interfering wavefronts, then the fringes will be curved. When tilt is not present, the fringes are circular. powering your process.

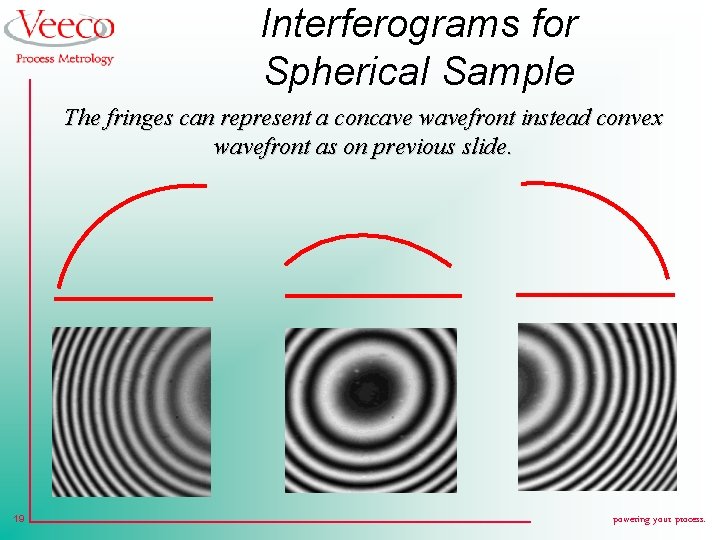
Interferograms for Spherical Sample The fringes can represent a concave wavefront instead convex wavefront as on previous slide. 19 powering your process.

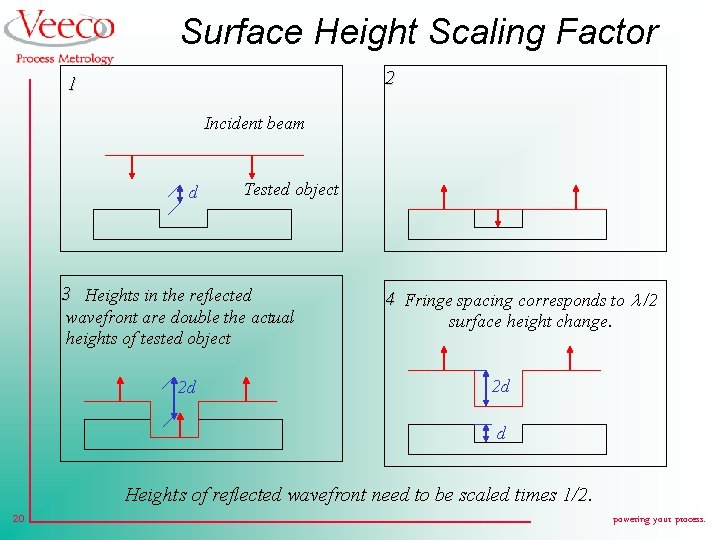
Surface Height Scaling Factor 2 1 Incident beam d Tested object 3 Heights in the reflected wavefront are double the actual heights of tested object 2 d 4 Fringe spacing corresponds to /2 surface height change. 2 d d Heights of reflected wavefront need to be scaled times 1/2. 20 powering your process.

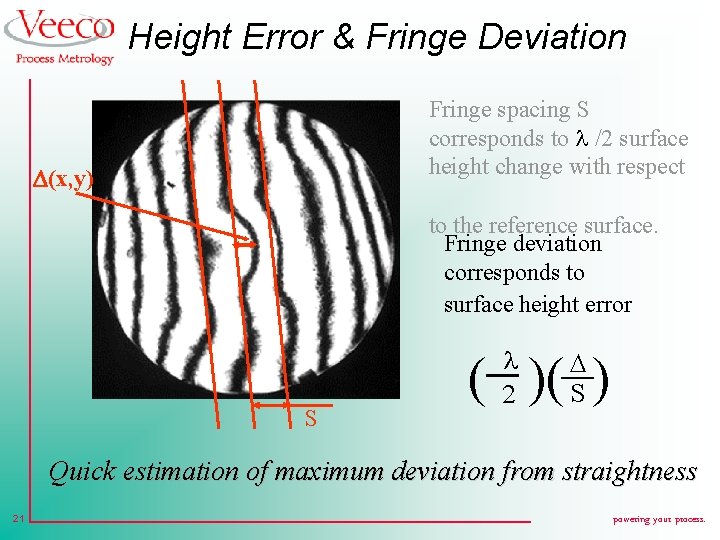
Height Error & Fringe Deviation Fringe spacing S corresponds to /2 surface height change with respect D(x, y) to the reference surface. Fringe deviation corresponds to surface height error S 2 D S ( )( ) Quick estimation of maximum deviation from straightness 21 powering your process.

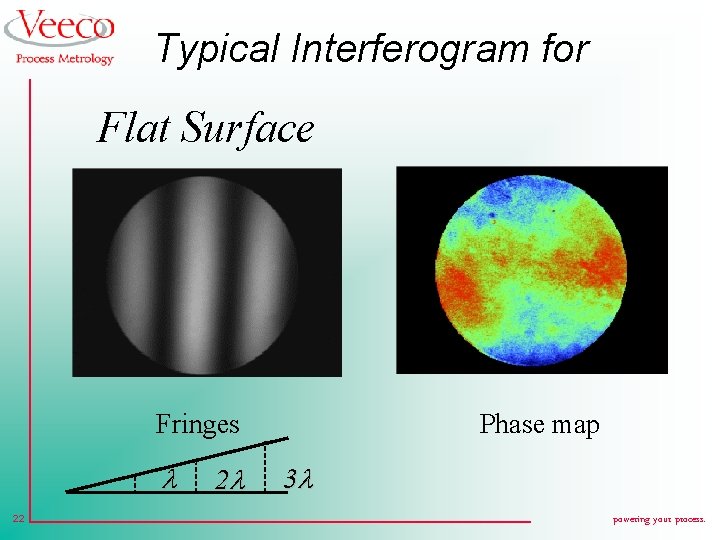
Typical Interferogram for Flat Surface Fringes 22 2 Phase map 3 powering your process.

Typical Interferogram for Spherical Surface Fringes 23 Phase map powering your process.

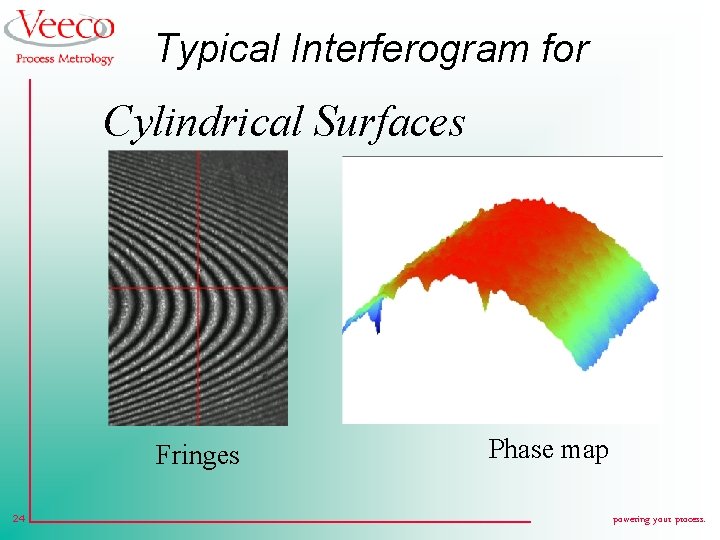
Typical Interferogram for Cylindrical Surfaces Fringes 24 Phase map powering your process.

White Light Interferogram 25 powering your process.

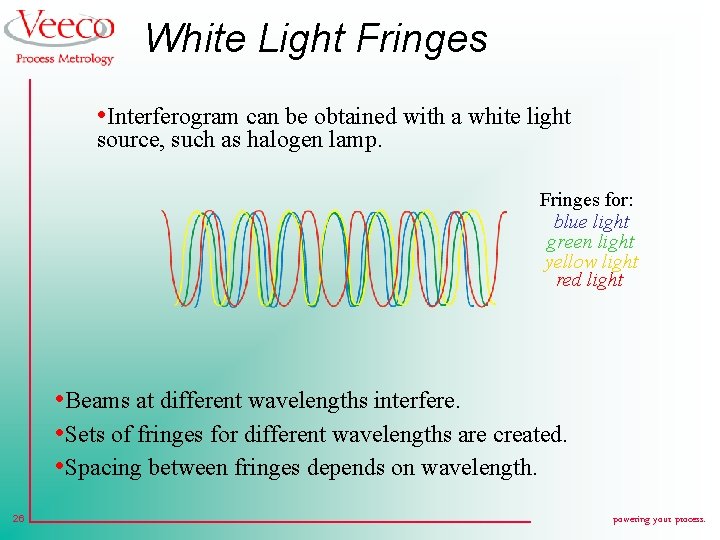
White Light Fringes • Interferogram can be obtained with a white light source, such as halogen lamp. Fringes for: blue light green light yellow light red light • Beams at different wavelengths interfere. • Sets of fringes for different wavelengths are created. • Spacing between fringes depends on wavelength. 26 powering your process.

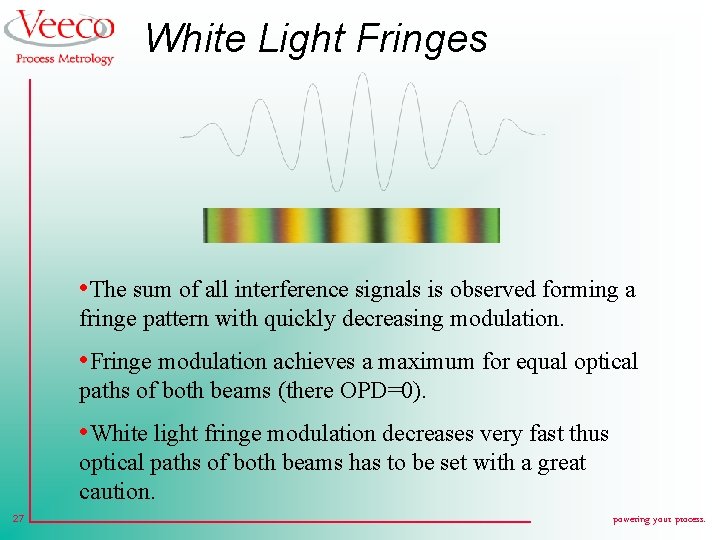
White Light Fringes • The sum of all interference signals is observed forming a fringe pattern with quickly decreasing modulation. • Fringe modulation achieves a maximum for equal optical paths of both beams (there OPD=0). • White light fringe modulation decreases very fast thus optical paths of both beams has to be set with a great caution. 27 powering your process.

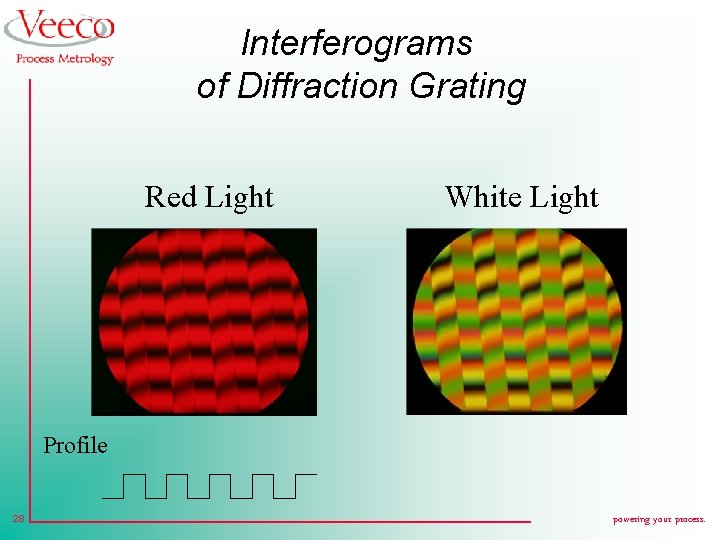
Interferograms of Diffraction Grating Red Light White Light Profile 28 powering your process.

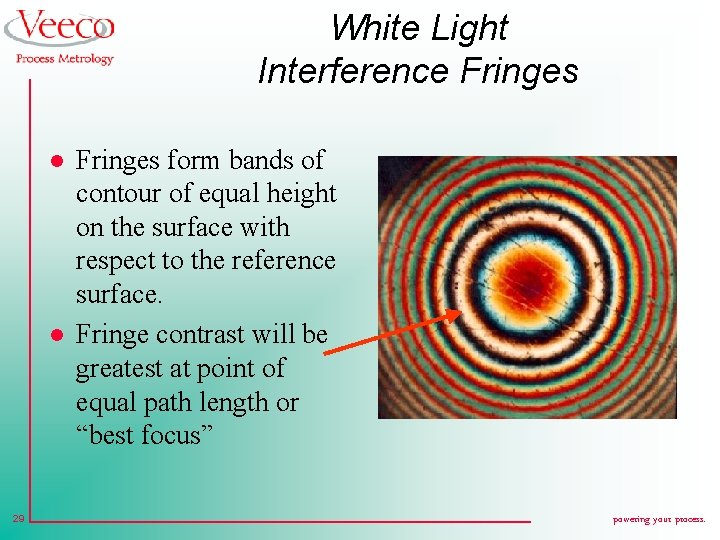
White Light Interference Fringes l l 29 Fringes form bands of contour of equal height on the surface with respect to the reference surface. Fringe contrast will be greatest at point of equal path length or “best focus” powering your process.

Principles of Vertical Scanning Interferometry l. A difference between the reference and test optical paths causes a difference in phase l Interference is perfectly constructive only when there is ZERO optical path difference l Best focus corresponds to zero optical path difference 30 powering your process.

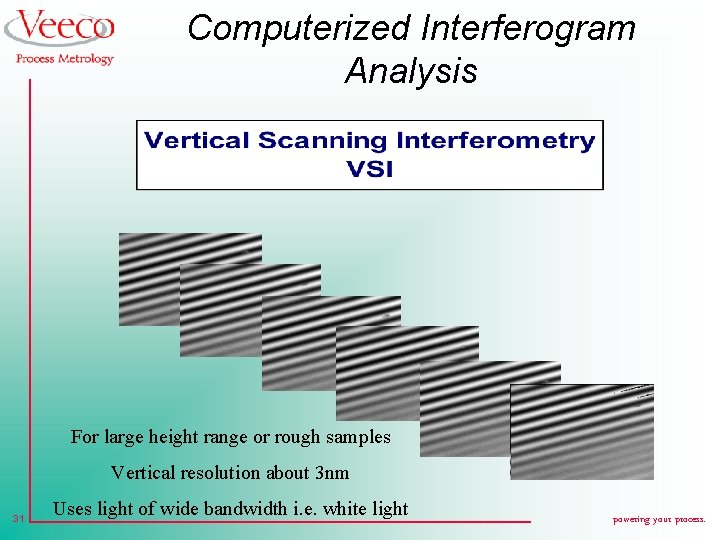
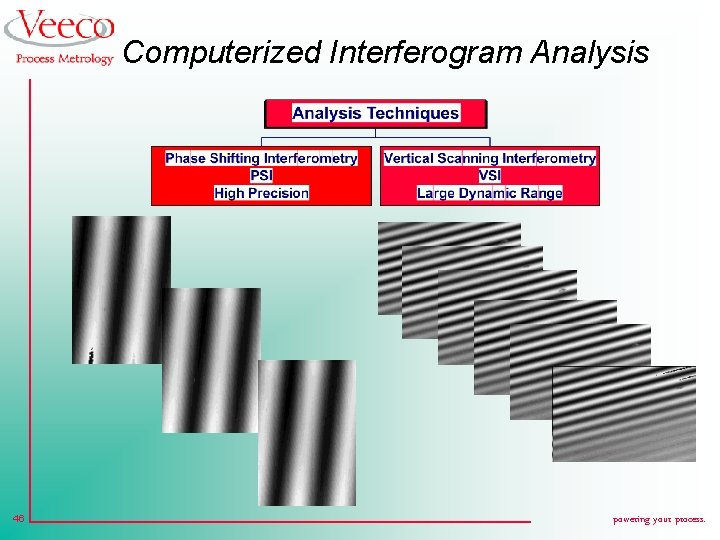
Computerized Interferogram Analysis For large height range or rough samples Vertical resolution about 3 nm 31 Uses light of wide bandwidth i. e. white light powering your process.

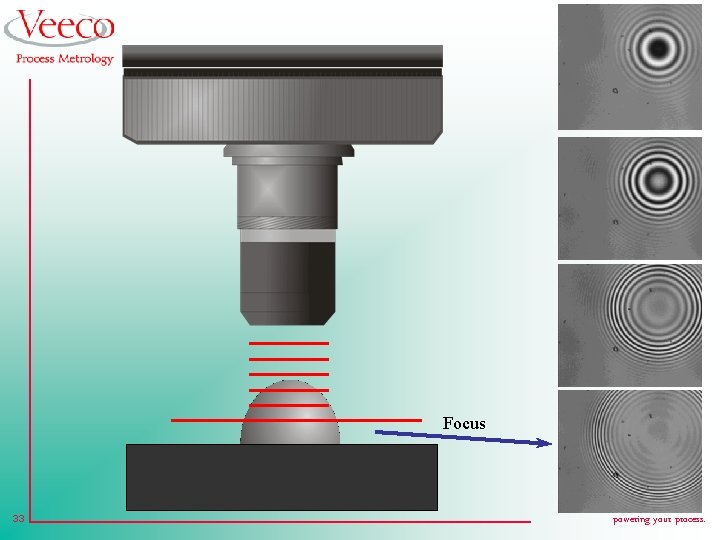
Focus 32 powering your process.

Focus 33 powering your process.

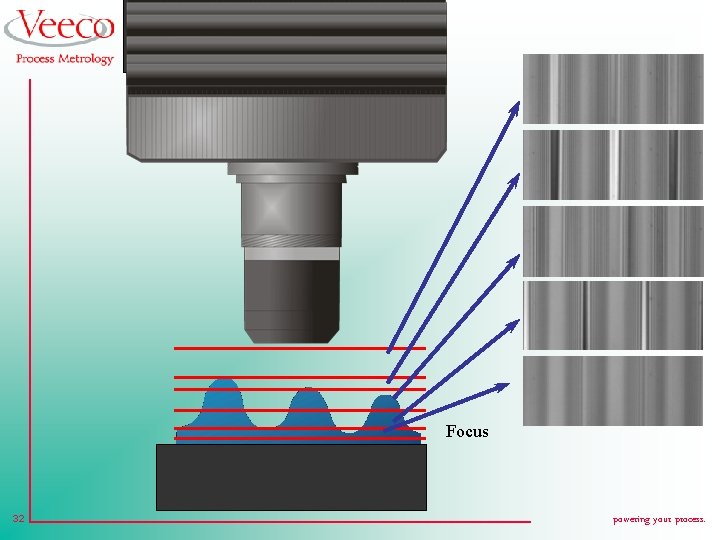
Vertical Scanning Interferometry l l l 34 Measure changes in surface height up to 1 mm. Measure the intensity at each pixel as the objective is moving vertically. Analyze the intensity while moving through focus to determine the height of the surface at each pixel. powering your process.

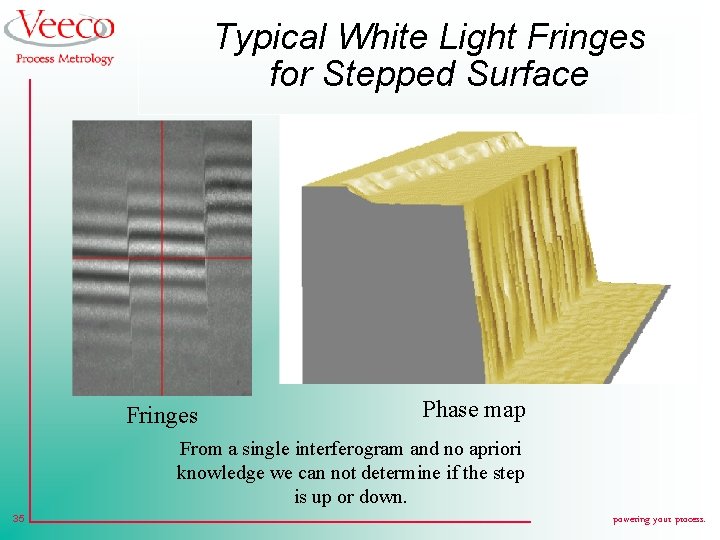
Typical White Light Fringes for Stepped Surface Fringes Phase map From a single interferogram and no apriori knowledge we can not determine if the step is up or down. 35 powering your process.

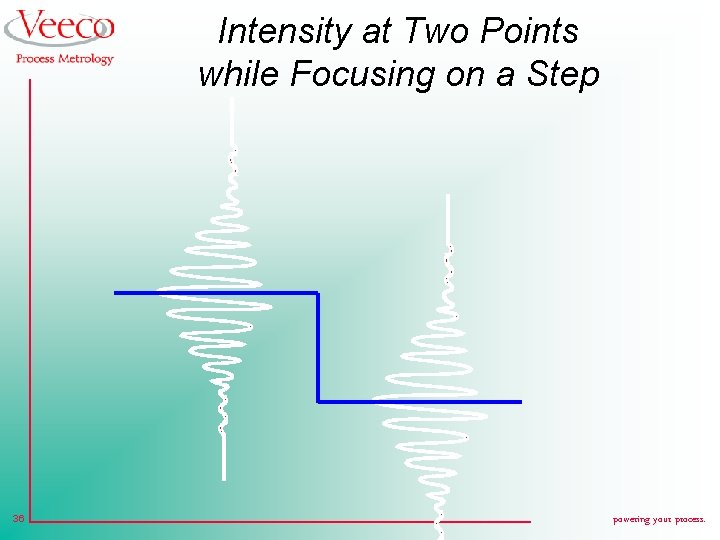
Intensity at Two Points while Focusing on a Step 36 powering your process.

Typical Interferometer CCD Reference Mirror Beamsplitter Sample 37 powering your process.

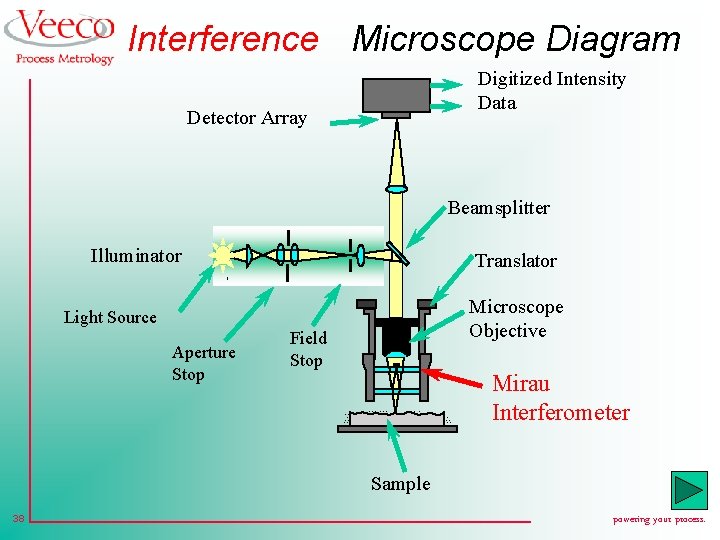
Interference Microscope Diagram Digitized Intensity Data Detector Array Beamsplitter Illuminator Translator Microscope Objective Light Source Aperture Stop Field Stop Mirau Interferometer Sample 38 powering your process.

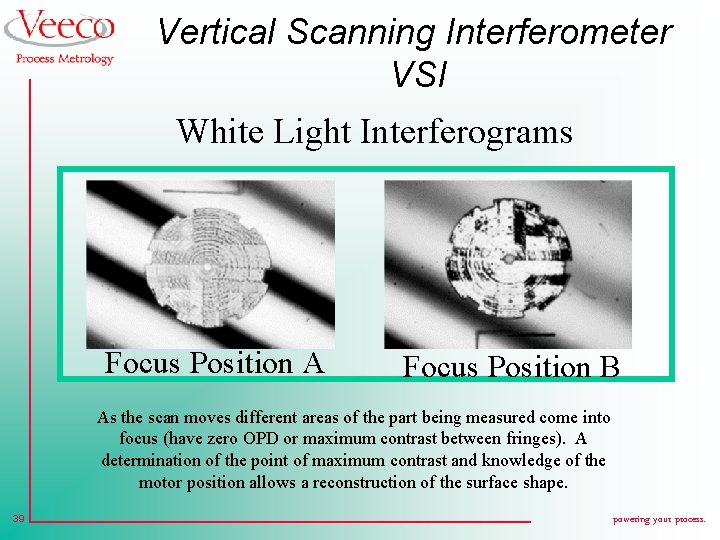
Vertical Scanning Interferometer VSI White Light Interferograms Focus Position A Focus Position B As the scan moves different areas of the part being measured come into focus (have zero OPD or maximum contrast between fringes). A determination of the point of maximum contrast and knowledge of the motor position allows a reconstruction of the surface shape. 39 powering your process.

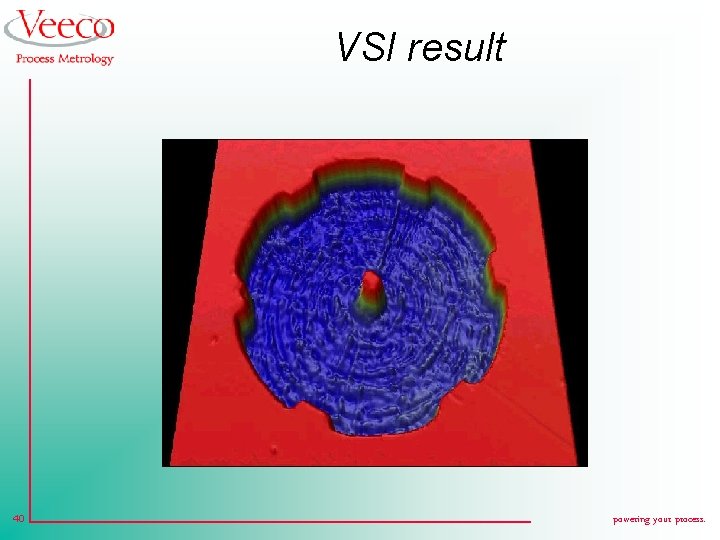
VSI result 40 powering your process.

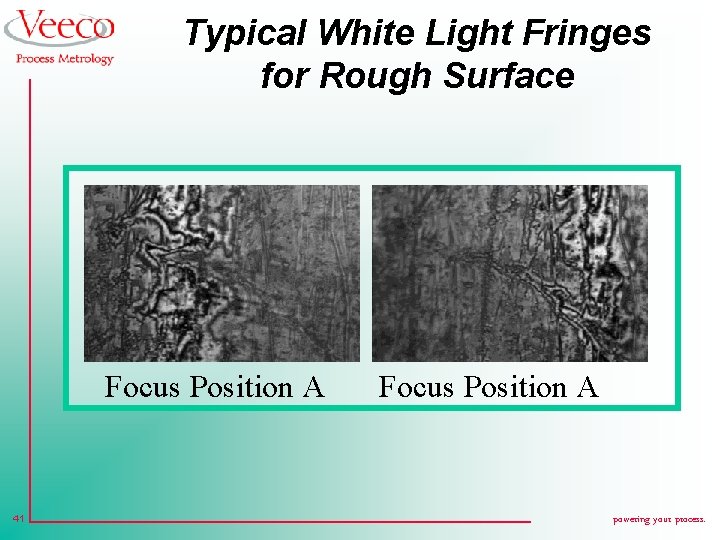
Typical White Light Fringes for Rough Surface Focus Position A 41 Focus Position A powering your process.

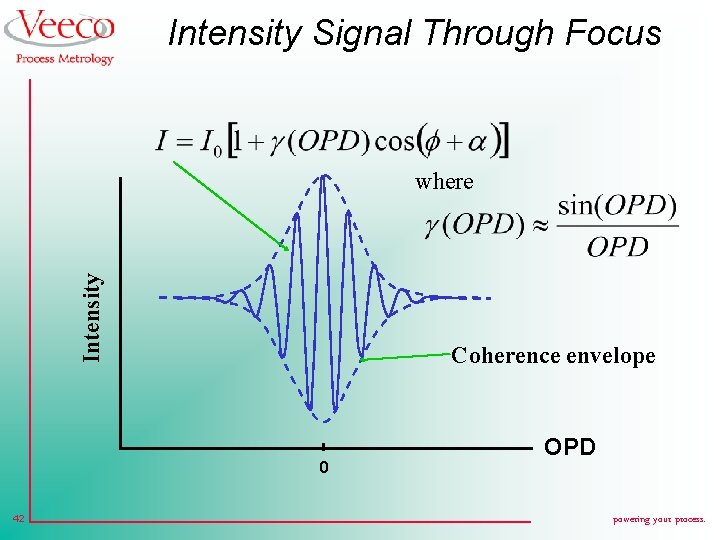
Intensity Signal Through Focus Intensity where Coherence envelope 0 42 OPD powering your process.

Principles Of Operation l l l 43 The coherence function has a maximum when the OPD is zero (i. e. when you are in best focus). Position of the peak of the coherence function gives a relative measure of surface height. Locate the peak of the coherence function at every pixel in order to reconstruct the surface. powering your process.

Advantages of VSI l True 3 D measurement of surface area. l Ability to measure non-specular surfaces. l Good results with low contrast fringes. l Results independent of intensity variations across field of view. l Vertical height limited only by scanner and objective working distance. l No step height ambiguities. l Tested area always in focus. 44 powering your process.

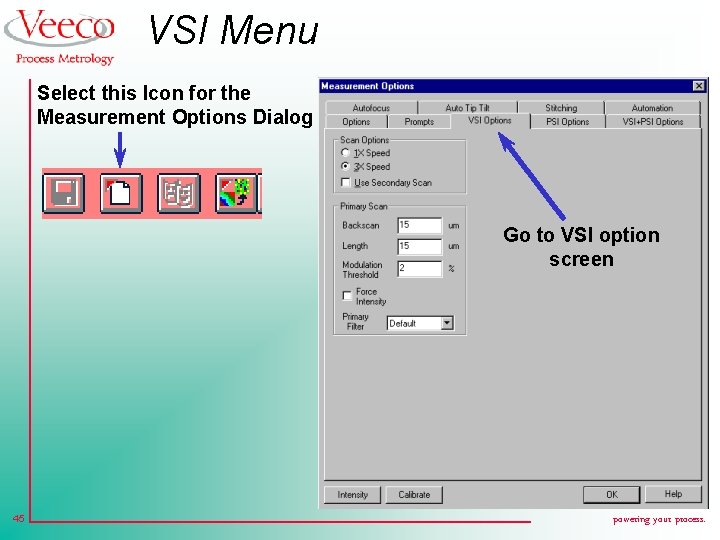
VSI Menu Select this Icon for the Measurement Options Dialog Go to VSI option screen 45 powering your process.

Computerized Interferogram Analysis 46 powering your process.

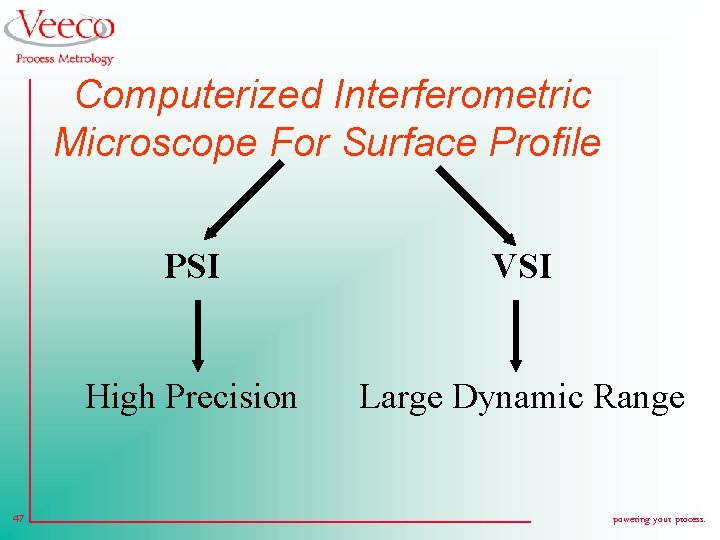
Computerized Interferometric Microscope For Surface Profile 47 PSI VSI High Precision Large Dynamic Range powering your process.