Understanding Variation and Statistical Process Control Process Variation
- Slides: 30

Understanding Variation and Statistical Process Control: Process Variation and Statistical Process Control (SPC) www. nano 4 me. org © 2017 The Pennsylvania State University Statistical Process Control 1

Outline • • Normal and Special Cause Variation Specification Limits vs Control Limits Calculations for the Individuals Chart. Nelson Rules to determine out-of-control signals (special cause variation) from process data. • Calculations for the X bar & R Chart. • Advantages of subgroup data collection. www. nano 4 me. org © 2017 The Pennsylvania State University Statistical Process Control 2

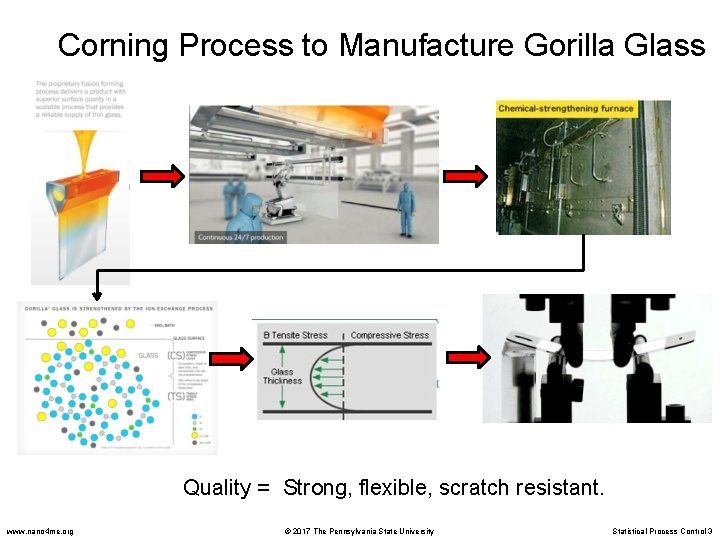
Corning Process to Manufacture Gorilla Glass Quality = Strong, flexible, scratch resistant. www. nano 4 me. org © 2017 The Pennsylvania State University Statistical Process Control 3

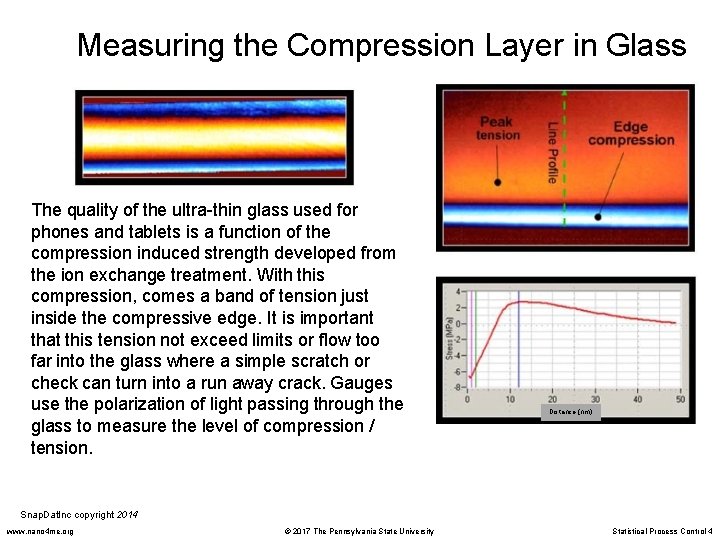
Measuring the Compression Layer in Glass The quality of the ultra-thin glass used for phones and tablets is a function of the compression induced strength developed from the ion exchange treatment. With this compression, comes a band of tension just inside the compressive edge. It is important that this tension not exceed limits or flow too far into the glass where a simple scratch or check can turn into a run away crack. Gauges use the polarization of light passing through the glass to measure the level of compression / tension. Distance (nm) Snap. Dat. Inc copyright 2014 www. nano 4 me. org © 2017 The Pennsylvania State University Statistical Process Control 4

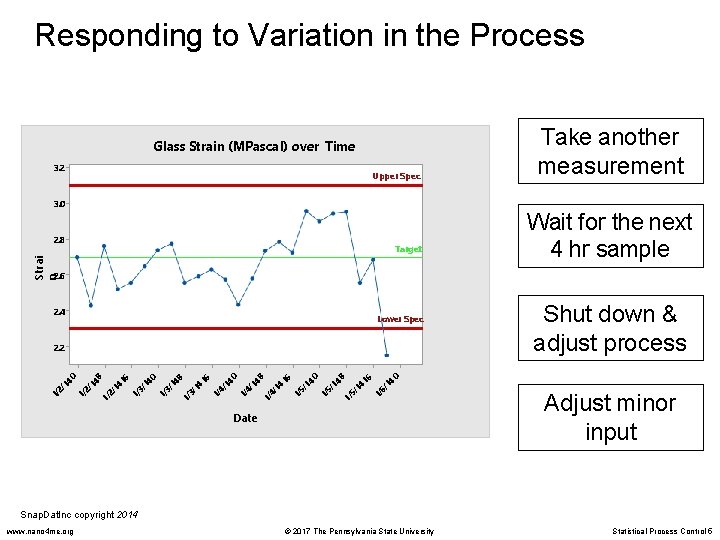
Responding to Variation in the Process Glass Strain (MPascal) over Time 3. 2 Upper Spec 3. 0 2. 8 Strai n Target Take another measurement Wait for the next 4 hr sample 2. 6 2. 4 Lower Spec 2. 2 0 8 0 8 16 16 40 40 48 4 4 14 14 /1 /1 14 14 / / 5 5 2/ 3 3 2/ 6 4 4 / / / / / 2 3 4 5 1 1 1 1 1/ 1/ Date Shut down & adjust process Adjust minor input Snap. Dat. Inc copyright 2014 www. nano 4 me. org © 2017 The Pennsylvania State University Statistical Process Control 5

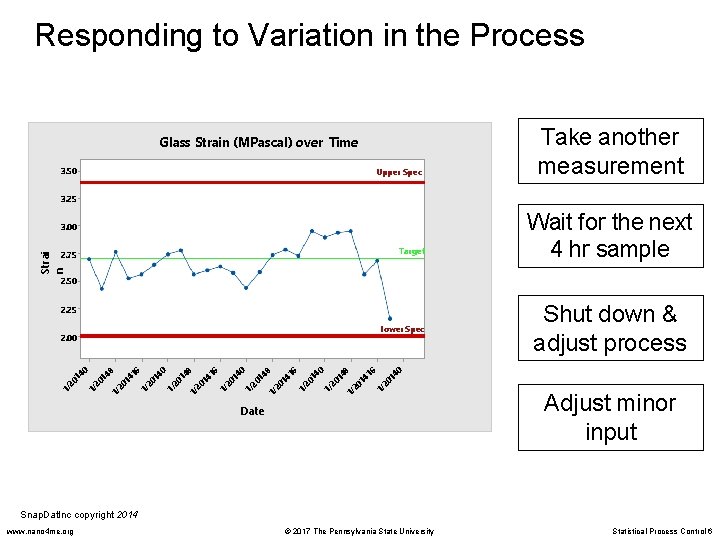
Responding to Variation in the Process Glass Strain (MPascal) over Time 3. 50 Upper Spec Take another measurement 3. 25 3. 00 Target Strai n 2. 75 Wait for the next 4 hr sample 2. 50 2. 25 Lower Spec 2. 00 16 16 40 40 48 14 14 01 01 14 01 01 14 2 2 0 2 0 2 2 2 2 1/ 1/ 1/ 1/ Date Shut down & adjust process Adjust minor input Snap. Dat. Inc copyright 2014 www. nano 4 me. org © 2017 The Pennsylvania State University Statistical Process Control 6

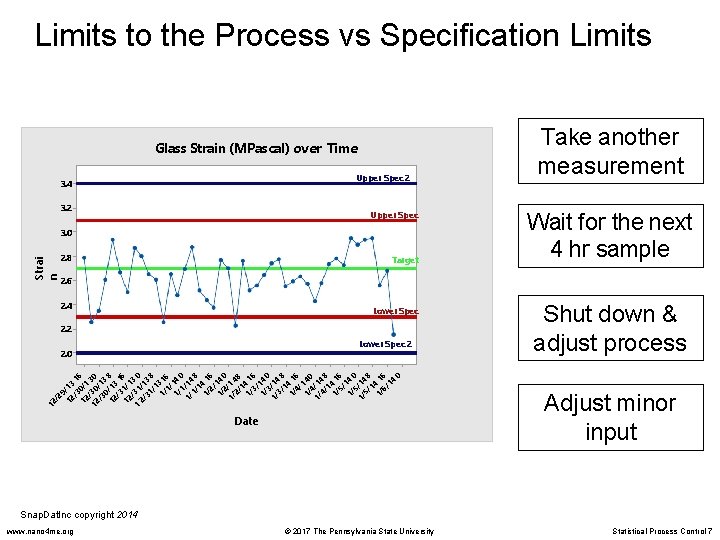
Limits to the Process vs Specification Limits Glass Strain (MPascal) over Time Upper Spec 2 3. 4 3. 2 Upper Spec Strai n 3. 0 2. 8 Target Take another measurement Wait for the next 4 hr sample 2. 6 2. 4 Lower Spec 2. 2 Lower Spec 2 2. 0 16 30 3 8 16 3 0 3 8 16 4 0 48 1 6 4 0 4 8 16 4 0 3 /1 /1 13 /1 /1 14 /1 /1 14 /1 1 0 0 / 1 1 1/ /1 /1 / /2 /2 / /3 /3 / /4 /4 / /5 /5 / /6 / 29 2/3 /30 2/3 /3 1 1 1/1 1 1 1/2 1 1 1/3 1 1 1/4 1 1 1/5 1 / 2 1 1 12 12 1 Date Shut down & adjust process Adjust minor input Snap. Dat. Inc copyright 2014 www. nano 4 me. org © 2017 The Pennsylvania State University Statistical Process Control 7

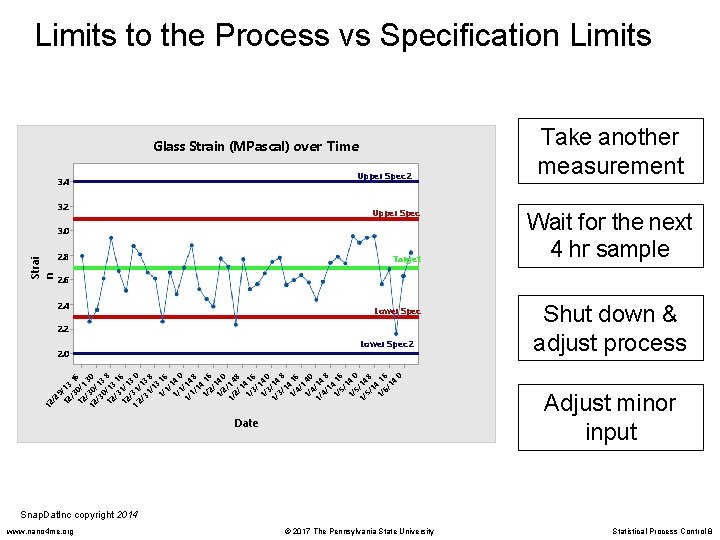
Limits to the Process vs Specification Limits Glass Strain (MPascal) over Time Upper Spec 2 3. 4 3. 2 Upper Spec Strai n 3. 0 2. 8 Target Take another measurement Wait for the next 4 hr sample 2. 6 2. 4 Lower Spec 2. 2 Lower Spec 2 2. 0 16 30 3 8 16 3 0 3 8 16 4 0 48 1 6 4 0 4 8 16 4 0 3 /1 /1 13 /1 /1 14 /1 /1 14 /1 1 / /1 /1 1/ /2 /2 2/ /3 /3 3/ /4 /4 4/ /5 /5 5/ /6 9/ 30 30 0/ 31 31 1 1/ 1 1/ /2 12/ 12/ 2/3 1 1 1/ 2 1 1 1 Date Shut down & adjust process Adjust minor input Snap. Dat. Inc copyright 2014 www. nano 4 me. org © 2017 The Pennsylvania State University Statistical Process Control 8

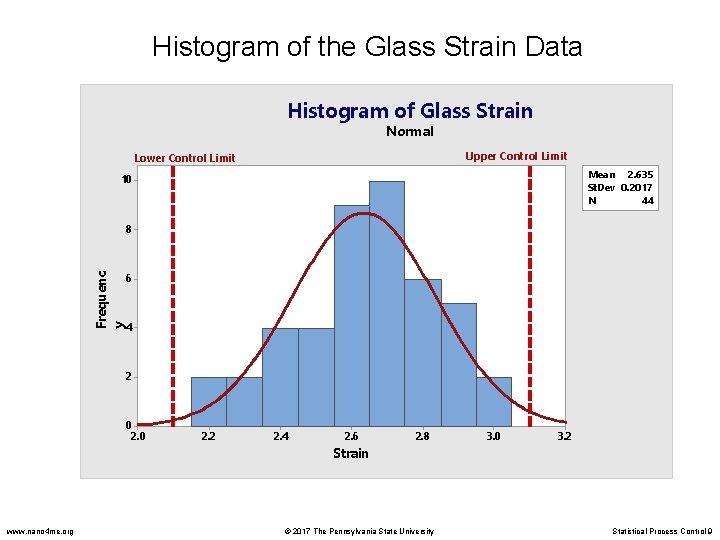
Histogram of the Glass Strain Data Histogram of Glass Strain Normal Upper Control Limit Lower Control Limit Mean 2. 635 St. Dev 0. 2017 N 44 10 Frequenc y 8 6 4 2 0 2. 2 2. 4 2. 6 2. 8 3. 0 3. 2 Strain www. nano 4 me. org © 2017 The Pennsylvania State University Statistical Process Control 9

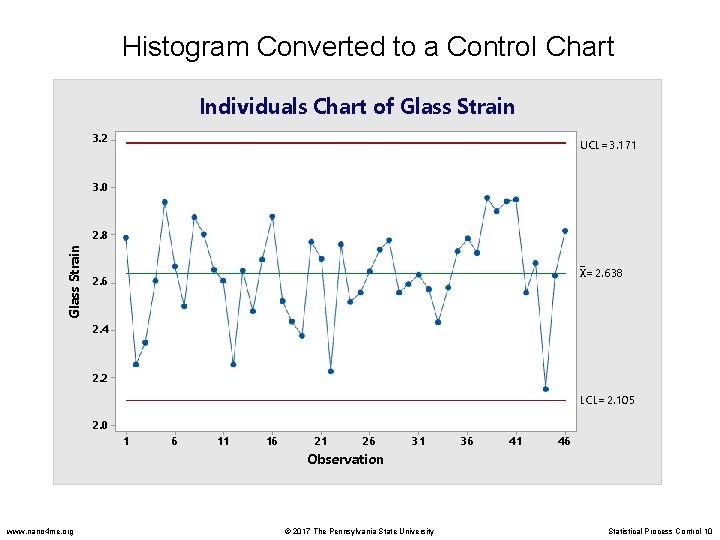
Histogram Converted to a Control Chart Individuals Chart of Glass Strain 3. 2 UCL=3. 171 3. 0 Glass Strain 2. 8 _ X=2. 638 2. 6 2. 4 2. 2 LCL=2. 105 2. 0 1 6 11 16 21 26 31 36 41 46 Observation www. nano 4 me. org © 2017 The Pennsylvania State University Statistical Process Control 10

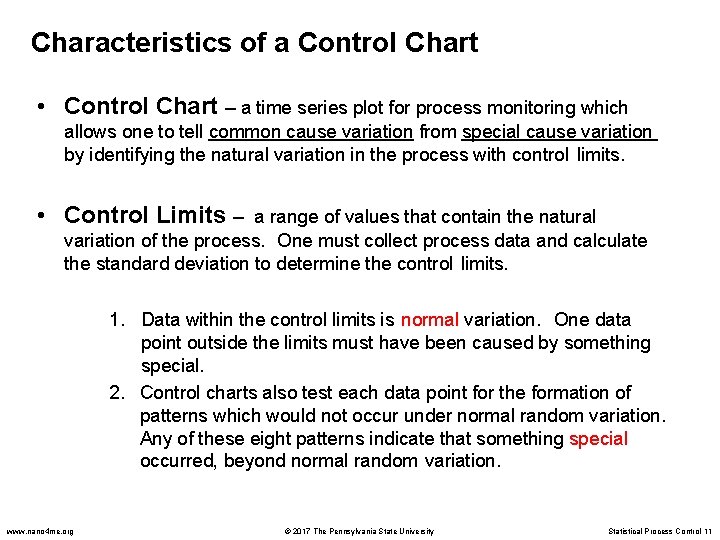
Characteristics of a Control Chart • Control Chart – a time series plot for process monitoring which allows one to tell common cause variation from special cause variation by identifying the natural variation in the process with control limits. • Control Limits – a range of values that contain the natural variation of the process. One must collect process data and calculate the standard deviation to determine the control limits. 1. Data within the control limits is normal variation. One data point outside the limits must have been caused by something special. 2. Control charts also test each data point for the formation of patterns which would not occur under normal random variation. Any of these eight patterns indicate that something special occurred, beyond normal random variation. www. nano 4 me. org © 2017 The Pennsylvania State University Statistical Process Control 11

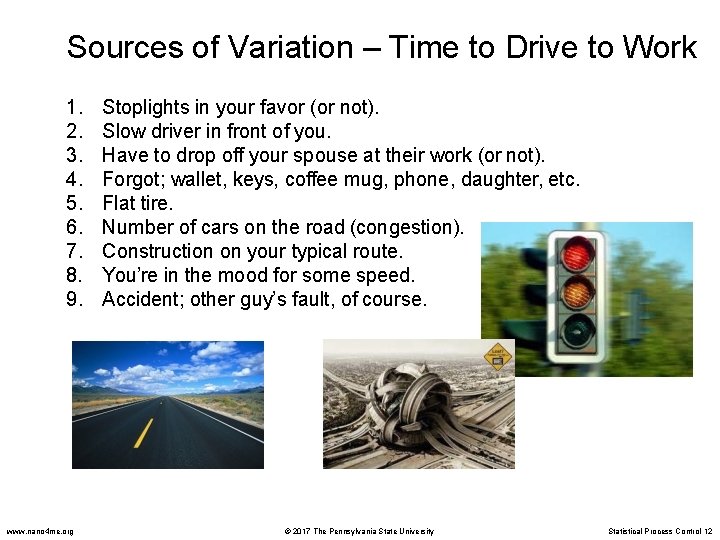
Sources of Variation – Time to Drive to Work 1. 2. 3. 4. 5. 6. 7. 8. 9. www. nano 4 me. org Stoplights in your favor (or not). Slow driver in front of you. Have to drop off your spouse at their work (or not). Forgot; wallet, keys, coffee mug, phone, daughter, etc. Flat tire. Number of cars on the road (congestion). Construction on your typical route. You’re in the mood for some speed. Accident; other guy’s fault, of course. © 2017 The Pennsylvania State University Statistical Process Control 12

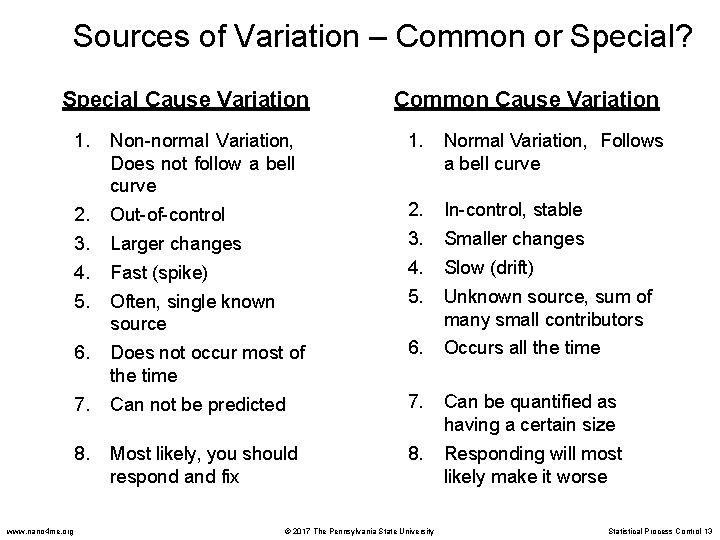
Sources of Variation – Common or Special? Special Cause Variation www. nano 4 me. org Common Cause Variation 1. Non-normal Variation, Does not follow a bell curve 1. Normal Variation, Follows a bell curve 2. 3. 4. 5. Out-of-control 2. 3. 4. 5. In-control, stable 6. Does not occur most of the time 6. Occurs all the time 7. Can not be predicted 7. Can be quantified as having a certain size 8. Most likely, you should respond and fix 8. Responding will most likely make it worse Larger changes Fast (spike) Often, single known source © 2017 The Pennsylvania State University Smaller changes Slow (drift) Unknown source, sum of many small contributors Statistical Process Control 13

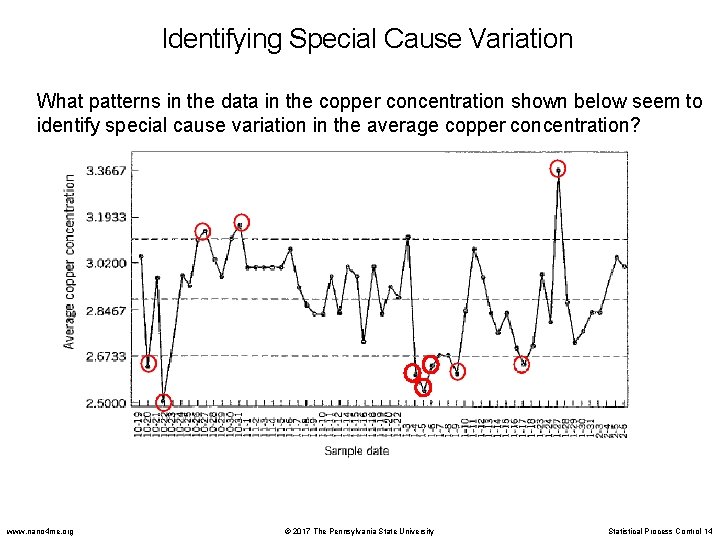
Identifying Special Cause Variation What patterns in the data in the copper concentration shown below seem to identify special cause variation in the average copper concentration? www. nano 4 me. org © 2017 The Pennsylvania State University Statistical Process Control 14

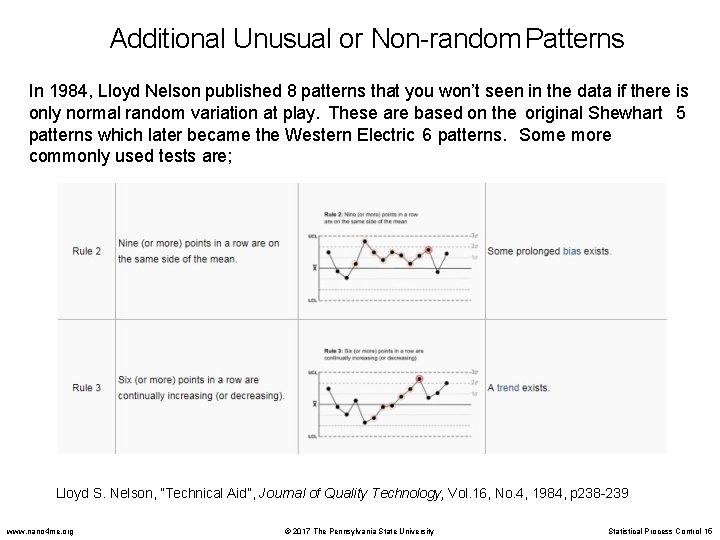
Additional Unusual or Non-random Patterns In 1984, Lloyd Nelson published 8 patterns that you won’t seen in the data if there is only normal random variation at play. These are based on the original Shewhart 5 patterns which later became the Western Electric 6 patterns. Some more commonly used tests are; Lloyd S. Nelson, “Technical Aid”, Journal of Quality Technology, Vol. 16, No. 4, 1984, p 238 -239 www. nano 4 me. org © 2017 The Pennsylvania State University Statistical Process Control 15

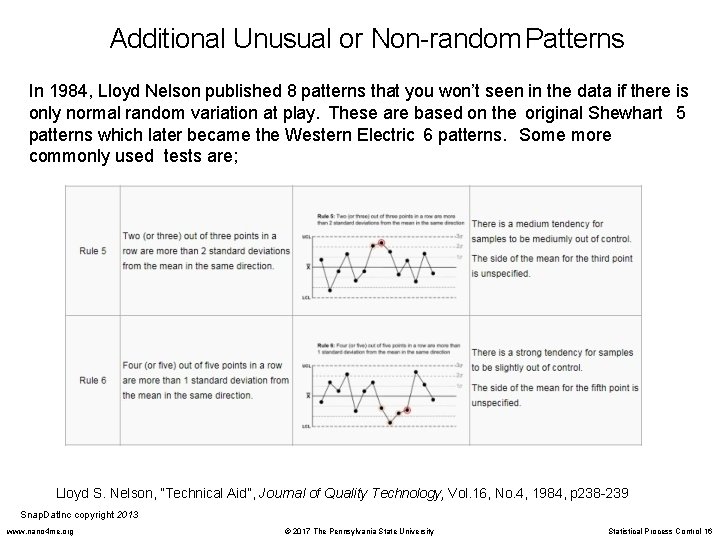
Additional Unusual or Non-random Patterns In 1984, Lloyd Nelson published 8 patterns that you won’t seen in the data if there is only normal random variation at play. These are based on the original Shewhart 5 patterns which later became the Western Electric 6 patterns. Some more commonly used tests are; Lloyd S. Nelson, “Technical Aid”, Journal of Quality Technology, Vol. 16, No. 4, 1984, p 238 -239 Snap. Dat. Inc copyright 2013 www. nano 4 me. org © 2017 The Pennsylvania State University Statistical Process Control 16

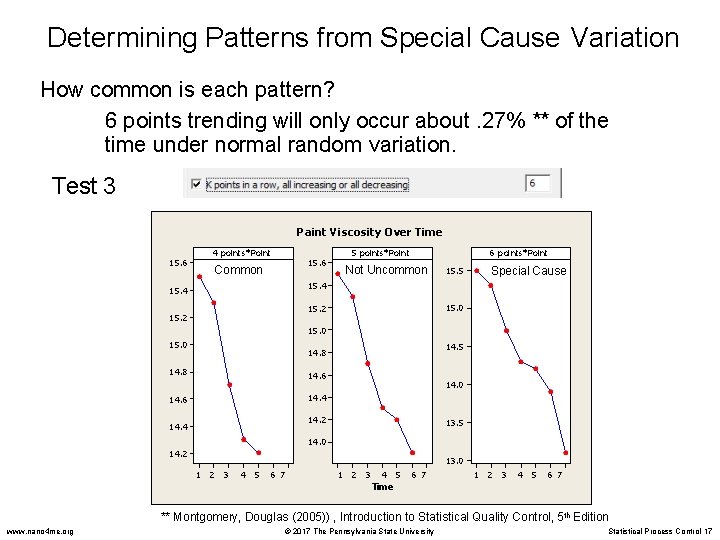
Determining Patterns from Special Cause Variation How common is each pattern? 6 points trending will only occur about. 27% ** of the time under normal random variation. Test 3 Paint Viscosity Over Time 4 points*Point 15. 6 5 points*Point 15. 6 Common 6 points*Point Not Uncommon Special Cause 15. 5 15. 4 15. 0 15. 2 15. 0 14. 5 14. 8 14. 6 14. 4 14. 0 14. 2 14. 4 13. 5 14. 0 14. 2 13. 0 1 2 3 4 5 6 7 Time ** Montgomery, Douglas (2005)) , Introduction to Statistical Quality Control, 5 th Edition www. nano 4 me. org © 2017 The Pennsylvania State University Statistical Process Control 17

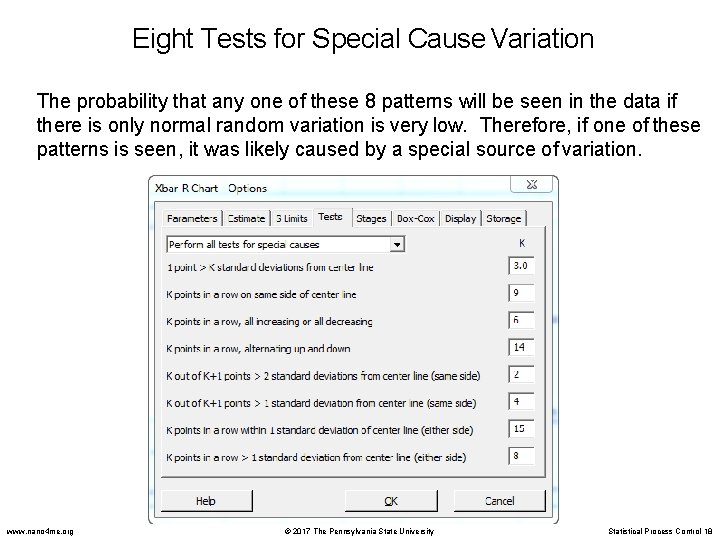
Eight Tests for Special Cause Variation The probability that any one of these 8 patterns will be seen in the data if there is only normal random variation is very low. Therefore, if one of these patterns is seen, it was likely caused by a special source of variation. www. nano 4 me. org © 2017 The Pennsylvania State University Statistical Process Control 18

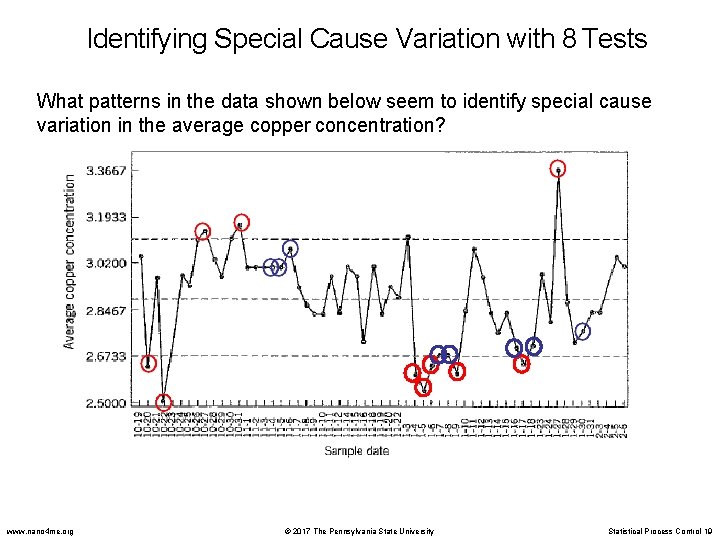
Identifying Special Cause Variation with 8 Tests What patterns in the data shown below seem to identify special cause variation in the average copper concentration? www. nano 4 me. org © 2017 The Pennsylvania State University Statistical Process Control 19

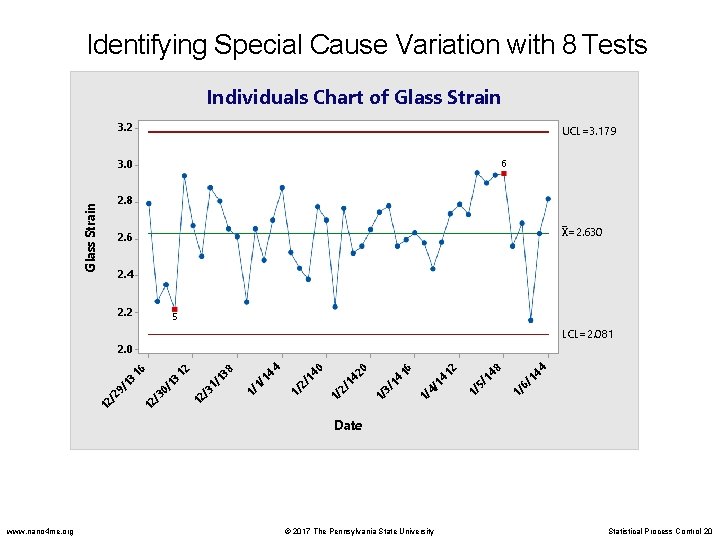
Identifying Special Cause Variation with 8 Tests Individuals Chart of Glass Strain 3. 2 UCL=3. 179 Glass Strain 3. 0 6 2. 8 _ X=2. 630 2. 6 2. 4 2. 2 5 LCL=2. 081 2. 0 3 /1 9 /2 12 16 3 /1 0 /3 12 12 8 13 / 1 /3 2 1 4 14 / 1 1/ 0 0 14 42 / 1 2 2/ 1/ 1/ 6 41 1 3/ 1/ 4 /1 4 1/ 12 8 14 / 5 1/ 4 14 / 6 1/ Date www. nano 4 me. org © 2017 The Pennsylvania State University Statistical Process Control 20

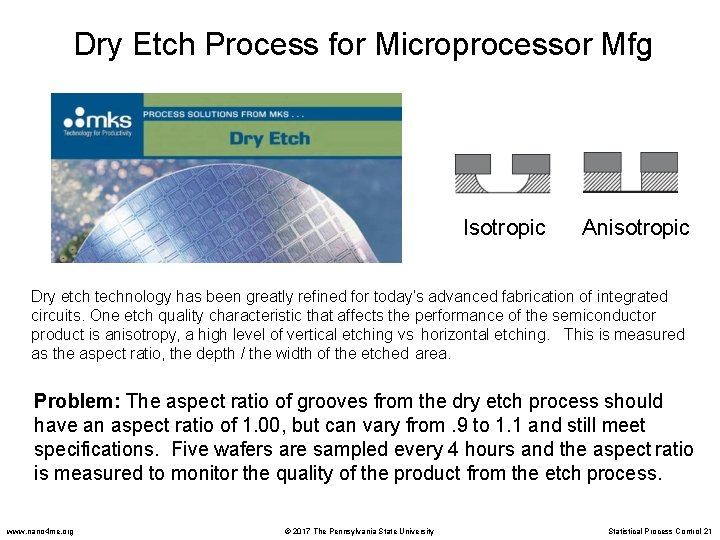
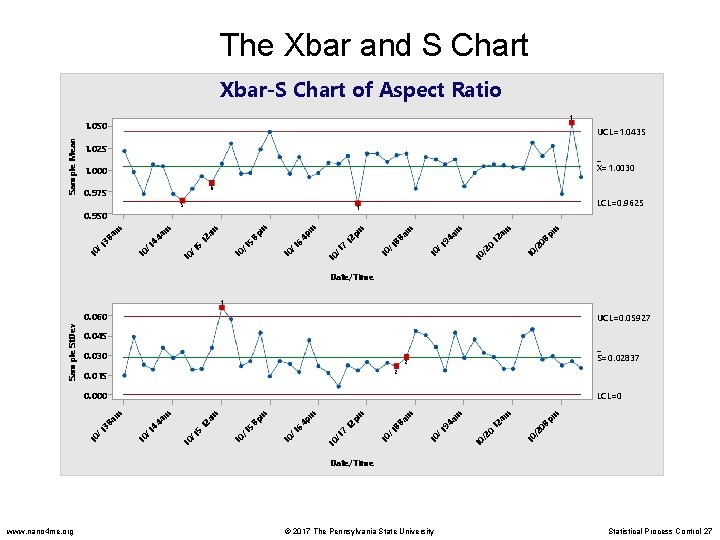
Dry Etch Process for Microprocessor Mfg Isotropic Anisotropic Dry etch technology has been greatly refined for today’s advanced fabrication of integrated circuits. One etch quality characteristic that affects the performance of the semiconductor product is anisotropy, a high level of vertical etching vs horizontal etching. This is measured as the aspect ratio, the depth / the width of the etched area. Problem: The aspect ratio of grooves from the dry etch process should have an aspect ratio of 1. 00, but can vary from. 9 to 1. 1 and still meet specifications. Five wafers are sampled every 4 hours and the aspect ratio is measured to monitor the quality of the product from the etch process. www. nano 4 me. org © 2017 The Pennsylvania State University Statistical Process Control 21

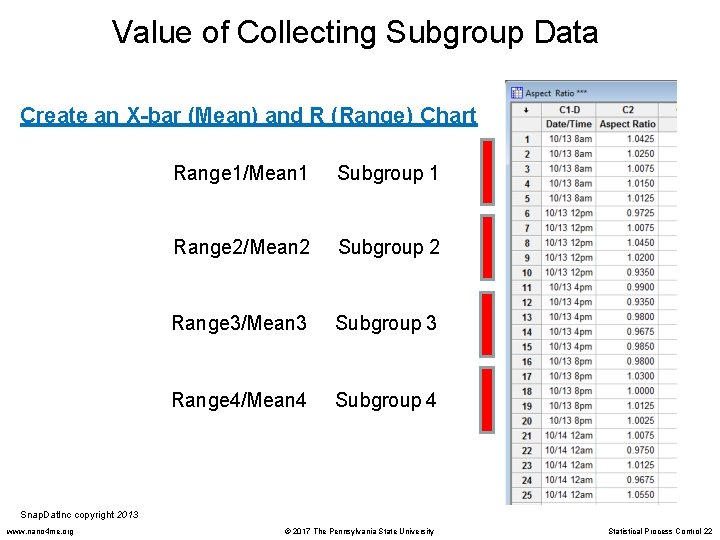
Value of Collecting Subgroup Data Create an X-bar (Mean) and R (Range) Chart Range 1/Mean 1 Subgroup 1 Range 2/Mean 2 Subgroup 2 Range 3/Mean 3 Subgroup 3 Range 4/Mean 4 Subgroup 4 Snap. Dat. Inc copyright 2013 www. nano 4 me. org © 2017 The Pennsylvania State University Statistical Process Control 22

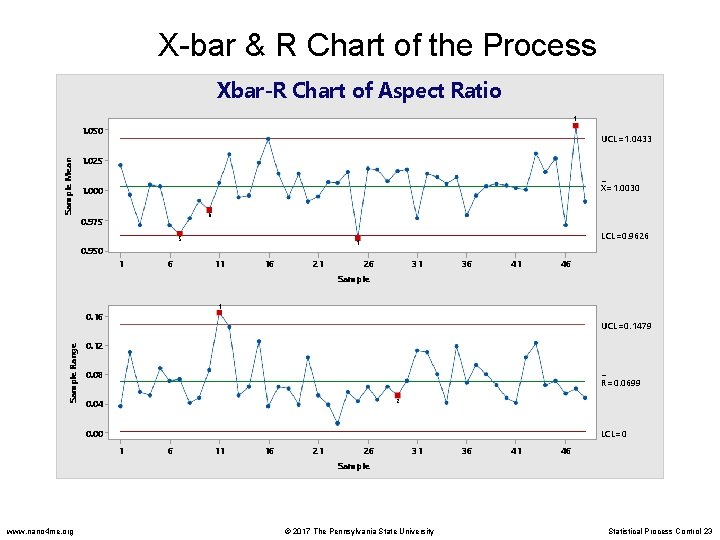
X-bar & R Chart of the Process Xbar-R Chart of Aspect Ratio 1 Sample Mean 1. 050 UCL=1. 0433 1. 025 _ X=1. 0030 1. 000 6 0. 975 5 0. 950 1 6 LCL=0. 9626 1 11 16 21 26 31 36 41 46 Sample 1 Sample Range 0. 16 UCL=0. 1479 0. 12 _ R=0. 0699 0. 08 2 0. 04 0. 00 LCL=0 1 6 11 16 21 26 31 36 41 46 Sample www. nano 4 me. org © 2017 The Pennsylvania State University Statistical Process Control 23

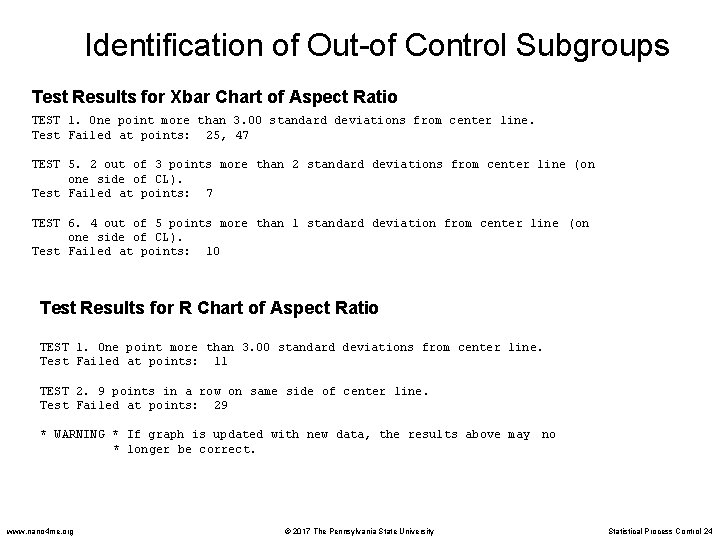
Identification of Out-of Control Subgroups Test Results for Xbar Chart of Aspect Ratio TEST 1. One point more than 3. 00 standard deviations from center line. Test Failed at points: 25, 47 TEST 5. 2 out of 3 points more than 2 standard deviations from center line (on one side of CL). Test Failed at points: 7 TEST 6. 4 out of 5 points more than 1 standard deviation from center line (on one side of CL). Test Failed at points: 10 Test Results for R Chart of Aspect Ratio TEST 1. One point more than 3. 00 standard deviations from center line. Test Failed at points: 11 TEST 2. 9 points in a row on same side of center line. Test Failed at points: 29 * WARNING * If graph is updated with new data, the results above may no * longer be correct. www. nano 4 me. org © 2017 The Pennsylvania State University Statistical Process Control 24

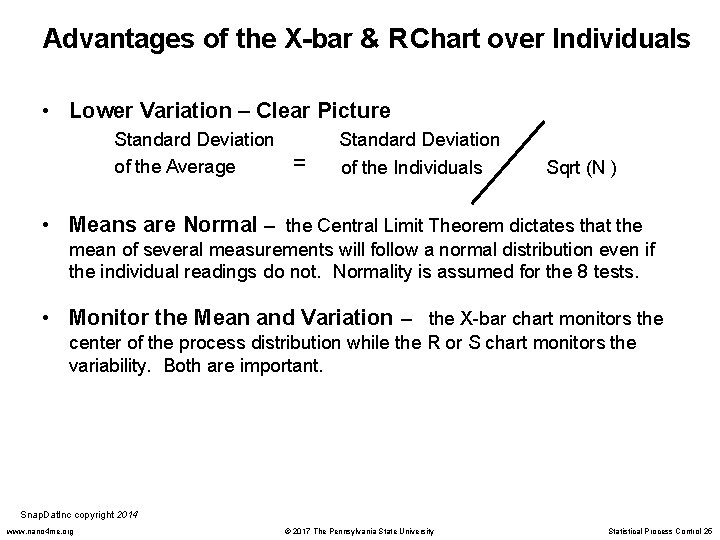
Advantages of the X-bar & R Chart over Individuals • Lower Variation – Clear Picture Standard Deviation of the Average = Standard Deviation of the Individuals Sqrt (N ) • Means are Normal – the Central Limit Theorem dictates that the mean of several measurements will follow a normal distribution even if the individual readings do not. Normality is assumed for the 8 tests. • Monitor the Mean and Variation – the X-bar chart monitors the center of the process distribution while the R or S chart monitors the variability. Both are important. Snap. Dat. Inc copyright 2014 www. nano 4 me. org © 2017 The Pennsylvania State University Statistical Process Control 25

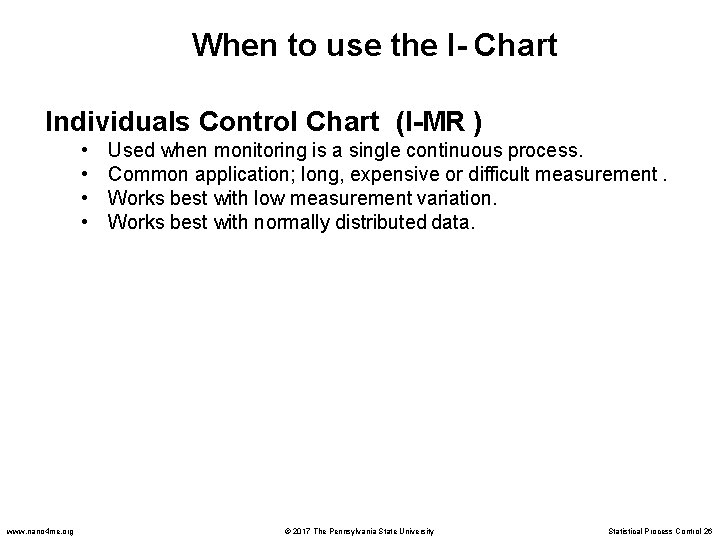
When to use the I- Chart Individuals Control Chart (I-MR ) • • www. nano 4 me. org Used when monitoring is a single continuous process. Common application; long, expensive or difficult measurement. Works best with low measurement variation. Works best with normally distributed data. © 2017 The Pennsylvania State University Statistical Process Control 26

The Xbar and S Chart Xbar-S Chart of Aspect Ratio 1 Sample Mean 1. 050 UCL=1. 0435 1. 025 _ X=1. 0030 1. 000 6 0. 975 5 m 8 a 3 /1 10 am 44 /1 0 1 LCL=0. 9625 1 0. 950 5 /1 10 am 12 5 /1 10 m 8 p 6 /1 10 m 4 p m 2 p 1 7 /1 10 88 /1 0 1 am 94 /1 0 1 am 0 /2 10 am 12 08 /2 0 1 pm Date/Time 1 Sample St. Dev 0. 060 UCL=0. 05927 0. 045 0. 030 _ S=0. 02837 2 2 0. 015 LCL=0 0. 000 m 8 a 3 /1 10 am 4 14 / 10 5 /1 10 am 12 5 /1 10 m 8 p 6 /1 10 m 4 p m 2 p 1 7 /1 10 88 /1 0 1 am 94 /1 0 1 am 0 /2 10 am 12 8 20 / 10 pm Date/Time www. nano 4 me. org © 2017 The Pennsylvania State University Statistical Process Control 27

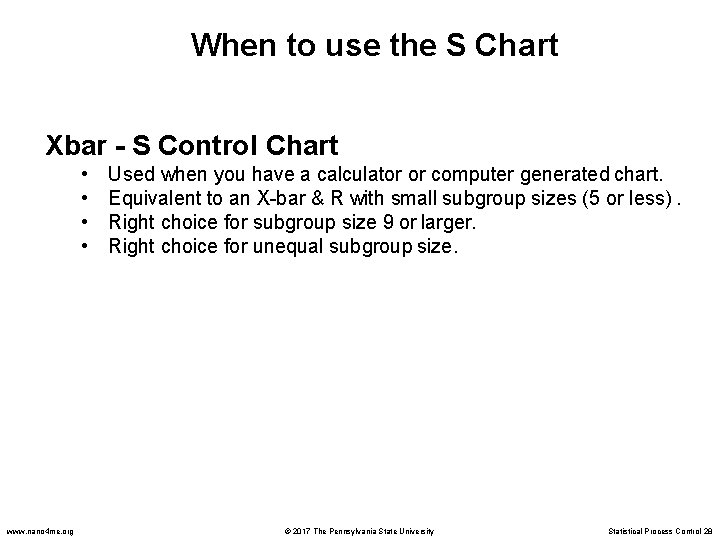
When to use the S Chart Xbar - S Control Chart • • www. nano 4 me. org Used when you have a calculator or computer generated chart. Equivalent to an X-bar & R with small subgroup sizes (5 or less). Right choice for subgroup size 9 or larger. Right choice for unequal subgroup size. © 2017 The Pennsylvania State University Statistical Process Control 28

Conclusions • The complexity of modern nanoscale processes demand accurate control plans that minimize the false alarms and detect changes to the process that require remediation. Control charts are a key tool in these plans. • Control limits define the normal variation in the process which does not require follow-up and distinguishes it from the special cause variation that should be addressed. • Eight patterns in the response data from your process have been identified as having a low probability of occurrence without a special cause. Modern software can be used to identify these patterns in your data to trigger an appropriate response. • If process data is collected in subgroups and analyzed using control charts for subgrouped data, the sensitivity of the chart to special cause variation and the information about the process are improved over the standard control chart of individual data points. www. nano 4 me. org © 2017 The Pennsylvania State University Statistical Process Control 29

References Automotive Industry Action Group, (2005). Statistical Process Control 2 nd Edition. AIAG Press, Detroit, MI. Hoyer, Robert W. and Ellis, Wayne C. , “A Graphical Exploration of SPC”, Quality Progress, May, 1996, p 65 -73. Lloyd S. Nelson, “Technical Aid”, Journal of Quality Technology, Vol. 16, No. 4, 1984, p 238 -239. Montgomery, Douglas (2005). Introduction to Statistical Quality Control , 5 th Edition. John Wiley & Sons Inc. Hoboken NJ. Wheeler, Donald J. and Chambers, David S. (1992). Understanding Statistical Process Control. SPC Press: Knoxville, TN. www. nano 4 me. org © 2017 The Pennsylvania State University Statistical Process Control 30