ASP Medical Clinic sept 2012 ASP Medical Clinic


 No pulse. . activate EMS… Get")


")
 AEDs are computerized devices that allow laypersons to attempt defibrillation")

 n n n AED is recommended to be used in")
, check for return of")


 (1")


 (effective cough) Unconscious Start CPR ASP Medical Clinic/")
 - Present of Universal")
 Conscious n 5 back blows n 5 abdominal thrusts (Heimlich")
 Stand behind the victim and wrap")


- Slides: 79
ASP Medical Clinic/ sept 2012
ASP Medical Clinic/ sept 2012
Cardiopulmonary Resuscitation A - Airway B - Breathing C - Circulation D- Defibrillation
Time is Critical! Brain damage begins in 4– 6 min n Brain damage irreversible in 8– 10 min n Circulation must be restored within 4– 6 minutes.
Causes of Cardiac Arrest n n n Heart disease Respiratory arrest Medical emergencies Drowning and suffocation Congenital heart defects Trauma
The cause of cardiac arrest is important BUT do not delay CPR to obtain history
CPR AGE CATEGORIES ADULT 9+ CHILD 1 -9 INFANT 0 -1
BASIC LIFE SUPPORT Dr. M. Hajikarimi Interventinal cardiologist
Chain of Survival The 5 links in adult chain of survival are: - Early access - Early CPR - Rapid defibrillation Effective advance life support - Integrated post-cardiac arrest care ASP Medical Clinic/ sept 2012 9
CAB VS ABC? ? ? ASP Medical Clinic/ sept 2012 10
CAB VS ABC? ? ? n The previous sequence of the “ABC” of basic life support—airway, breathing, compression—has been changed to “CAB”—compression, airway, breathing—based on the recognition that compression alone is the better strategy because it minimizes interruptions in perfusion and avoids excessive ventilation ASP Medical Clinic/ sept 2012
EMERGENCY ACTION PRINCIPLES Assessment D = Danger R = Response C A B = Circulation = Airway = Breathing ASP Medical Clinic/ sept 2012 12
Danger n Make sure the scene is safe for you and victim Response n Tap the victim’s shoulder and shout, “Are you all right? ” n No response, activate EMS “ 999” n Check pulse and breathing ASP Medical Clinic/ sept 2012 13
CHECK RESPONSE Shake shoulders gently Ask “Are you all right? ” If he responds • Leave as you find him. • Find out what is wrong. • Reassess regularly.
SHOUT FOR HELP
No more Look, Listen and Feel n n 1. 2. 3. should not delay activating EMS 3 things remain simultaneously : Response Breathing Pulse ( within 10 second) ASP Medical Clinic/ sept 2012 16
n Check for a pulse (≤ 10 seconds) No pulse. . activate EMS… Get AED
CHECK BREATHING
Chest Compression n Compress the center of victims' chest n Start compression within 10 seconds of recognition of cardiac arrest n Allow complete chest recoil after each compression n Minimize interruption in compressions (limit lest than 10 sec) Push hard, push fast: - compress at a rate of at least 100/min - Compress depth at least 2 inches (5 cm) n ASP Medical Clinic/ sept 2012 19
TO LOCATE THE LANDMARK FOR EXTERNAL CHEST COMPRESSION The technique of costal margin that is as follows: 1. Run your index and middle fingers up the lower margin of the rib cage and locate the sternal notch with your middle finger. The index finger is place next to the middle finger on the lower and of the sternum. n
CONT. TO LOCATE THE LANDMARK FOR EXTERNAL CHEST COMPRESSION 2. The heel of the other hand (the one nearest the victim’s head) is placed on the lower half of the sternum, and the other hand is placed on the top of the hand on the sternum so that the hands are parallel.
CONT. TO LOCATE THE LANDMARK FOR EXTERNAL CHEST COMPRESSION 3. Your fingers may be either extended or interlaced but must be kept off the chest.
CONT. TO LOCATE THE LANDMARK FOR EXTERNAL CHEST COMPRESSION 4. Lock your elbows into position, the arms are straightened and shoulders directly over the victim’s sternum. Keep the heel of your hand lightly in contact with the chest during the relaxation phase of chest compression to maintain correct hand position.
CONT. Circulation PUSH HARD- PUSH FAST: equal compression and relaxation allowing recoil of chest wall. n Chest compression – ventilation 30: 2, for 5 cycles (2 minutes rate of 100 per minute. n Depth of 1. 5 to 2 inches. n
CPR – 1 Rescuer n If there is no pulse, find your landmarks, lower half of the sternum, between the nipples
CPR – 1 Rescuer n Begin chest compressions
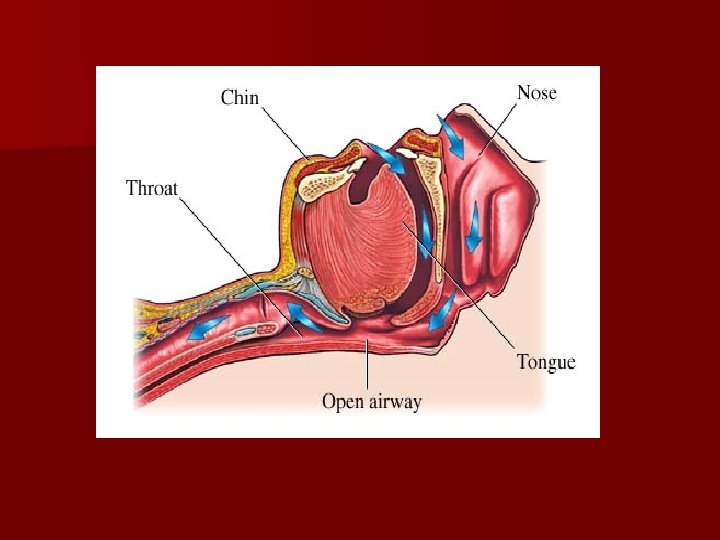
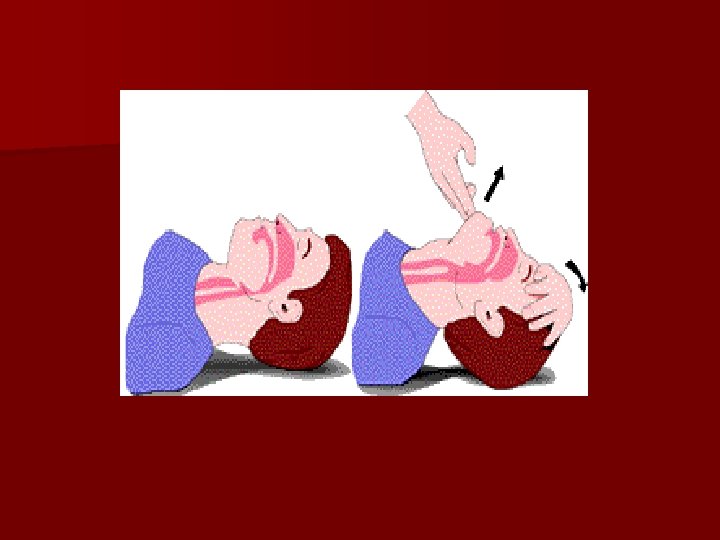
AIRWAY Open the airway by the head tilt / chin lift maneuver for all victims n Health care personnel use: – Jaw thrust in trauma patient – CHIN LIFT n
Head tilt – chin lift
Head tilt – jaw thrust
Cont. AIRWAY
Breathing n Give effective breaths that make chest raise n Avoid excessive ventilation n Ratio 30: 2 n Recheck after 5 cycles 33
Breathing devices 1 -way valve face mask - Deliver air over 1 second to make the victim’s chest raise n 2. Bag-Mask - Use the E-C clamp technique to hold mask in place while you lift up the jaw to open airway - Squeeze the bag to give breath (1 second each) while watching for chest rise 34
Breathing Mouth – to -Mask If you are uncomfortable doing mouth-tomouth then skip it and Just do Compressions
Rescue Breathing n To perform when victim has pulse but no breathing n Give 1 breath every 5 to 6 seconds (about 10 to 12 breaths per minute) n Rescuer’s exhaled air contain approximately 17% oxygen and 4% carbon dioxide n Give each breath 1 second n Each breath should result in visible chest rise n Check pulse every 2 minutes 36
Rescue Breathing n Avoid giving breaths too rapidly, too forcefully and with too much volume as it will cause gastric inflation. n Gastric inflation can resulting victim vomit, aspiration or pneumonia n To reduce risk of gastric inflation: Take 1 second to deliver each breath Deliver air until you make victim’s chest rise 1. 2. 37
38
Automated Extenal Defibrillator (AED)
Automated External Defibrillator (AED) AEDs are computerized devices that allow laypersons to attempt defibrillation safely. Here a few facts about defibrillation: v It is the most effective treatment for Ventricular Fibrillation, the most common initial rhythm present in a victim of sudden cardiac arrest. v The probability of successful defibrillation decreases rapidly over time
Use of an AED v v v v Power on the AED Apply pads to the victim's bare chest Plug the pads into the AED "Clear" the victim and allow it to analyze If a shock is advised, "clear" the victim again and press the shock button Continue chest compressions power button Every 2 minutes the AED will repeat the steps shock button
AUTOMATED EXTERNAL DEFIBRILLATION (AED) n n n AED is recommended to be used in adults and children 1 year of age and older. Not recommended for infants below one year and neonates. Indications: unresponsiveness, absence of breathing, absence of detectable pulse. Contra indications: responsiveness, presence of breathing, presence of detectable pulse. For sudden witnessed collapse in adult and child, use the AED once it is available. For un-witnessed cardiac arrest in the pre-hospital setting, use the AED after 5 cycles of CPR (about 2 minutes) The AED machine must be able to accurately and reliably recognise paediatric shockable rhythms and be capable of delivering energy dose. Uses: for adult and children 1 year and above, anywhere, Health care provider who holds valid certificate in BLS. Most AEDs are equipped with small pads and means of reducing the energy dose. If child pads/ system is not available, adult's pads/system can be used but paediatric pads can not be used for adults.
Reassessment After 5 cycles of compressions and ventilations (30: 2), check for return of carotid pulse/ femoral pulse and spontaneous breathing. n According to the findings (after 2 minutes): – There is pulse – place in the recovery position, monitor vital signs until EMS arrives. – There is pulse but no breathing: continue rescue breathing every 56 seconds (10 -12 breaths). Recheck pulse every 2 minutes. – No pulse or breathing continue CPR 30: 2. , until AED arrives or ACLS provider arrives. n
RECOVERY POSITION If there is pulse and casualty is breathing. ASP Medical Clinic/ sept 2012 3/4/2021 44 44 NURSING - KDU COLLEGE
STEP 1 If the victim is breathing normally – place the victim in recovery position. 45 ASPNURSING Medical Clinic/ - KDU sept COLLEGE 2012
STEP 2 46 ASPNURSING Medical Clinic/ - KDU sept COLLEGE 2012
STEP 3 47 ASPNURSING Medical Clinic/ - KDU sept COLLEGE 2012
STEP 4 48 ASPNURSING Medical Clinic/ - KDU sept COLLEGE 2012
ASP Medical Clinic/ sept 2012
Child CPR v v v v Check for responsiveness Yell for help but don't leave the victim Check for breathing Max. of 10 seconds Check for movement Begin chest compressions After 30 compressions give 2 breaths Continue 30 compressions and 2 breaths for 5 cycles or 2 minutes If still no response, activate 911 and get the AED
Hand Placement - Child v Rescuer can use one or two hands to do compressions v Place heel of one hand in center of chest in line with nipple line. v Lean forward so your shoulders are over your hands v Press straight down with elbows straight v Push down at least 1/3 to ½ depth of chest v Push at a rate (speed) of 100 compressions per minute v If one arm is not strong enough use both hands.
Child CPR - Reminders v v v v Take 5 -10 seconds to check for breathing and movement Ensure chest rises with each breath Place hands in the center of the chest for compressions Use 1 or 2 hands for compressions Allow chest to recoil completely Compression rate: 100/minute Compress 1/3 to 1/2 the depth of the chest Phone 911 after 5 cycles of CPR if you are alone
Infant CPR v v v v Check for responsiveness Yell for help but don't leave the victim Check for breathing Max. of 10 seconds Check for movement Begin chest compressions After 30 compressions give 2 breaths Continue 30 compressions and 2 breaths for 5 cycles or 2 minutes If still no response, activate 911 and get the AED
Infant Compressions
Infant Mouth – to – Mouth and Nose Resuscitation
Infant CPR - Reminders v v v v Take 5 -10 seconds to check for breathing and movement Ensure chest rises with each breath Perform compressions using 2 fingers placed 1 finger width below the nipple line Allow chest to recoil completely Compression rate: 100/minute Compress 1/3 the depth of the chest Phone 911 after 5 cycles of CPR if you are alone AED can now be used for infants
Activate 911 Compression Location Compression Method Adult Child Infant (age 9 and older) (1 year to puberty) (less than 1 year) as soon as victim is found Center of the chest between the nipples Heal of 1 hand with the other on top Compression Rate Compression. Ventilation Ratio AED if alone, after 5 cycles of CPR Just below the nipple line same as adult or 2 fingers heal of 1 hand for (2 hands encirclingthumb for 2 -rescuer) small children 100 per minute 30: 2 (or “hands only”) 30: 2 yes Yes (adult pads only) (child pads preferable. If none, use adult)
Remember!!! n Push hard, push fast, full chest recoil, minimize interruptions in CPR!
Thumpversion & coughversion Thumpversion coughversion The technique is considered optional for responding to a pulseless cardiac arrest in the absence of monitoring when a defibrillator is not immediately available. n It should not be used unmonitored in a patient with a rapid tachycardia without complete loss of consciousness. n n n one or two blows delivered firmly to the junction of the middle and lower thirds of the sternum from a height of 8 to 10 inches. requires that the patient still be conscious, is so-called coughinduced cardiac compression. n It is a conscious act of forceful coughing by the patient that may support forward flow by cyclical increases in intrathoracic pressure during VF or may cause conversion of sustained VT.
ASP Medical Clinic/ sept 2012
61
UNIVERSAL SIGN OF CHOKING n n n The victim clutches his neck with the thumb & index finger. Inability to speak, inability to cough. High pitched sounds or no sound during inhalation Increased difficulty to breathe Bluish skin color (cyanosis)
Assess Severity Severe Mild (ineffective cough) (effective cough) Unconscious Start CPR ASP Medical Clinic/ sept 2012 Conscious 5 abdominal thrusts Encourage cough Continue to check for deterioration to ineffective cough or until obstruction relieved. 63
ADULT – FOREIGN BODY AIRWAY OBSTRUCTION n MILD (effective cough) - Present of Universal Choking Sign - Ask : Are You Choke? Can You Speak? Can I Help You? n Encourage cough n Continue to check for deterioration to ineffective cough or until obstruction relieved 64
n SEVERE (ineffective cough) Conscious n 5 back blows n 5 abdominal thrusts (Heimlich maneuver) n n n Back Blows Stand to the side and slightly behind the victim. Support the chest with one hand lean the victim forward…. ? ? ? Give 5 blows between the shoulder blades with the heel of your hand. If fail then use abdominal thrust. 65
n n n n Abdominal Thrust (Heimlich Maneuver) Stand behind the victim and wrap both arms round the waist. Clench your fist with 1 hand Place thumb side of your fist against the victim’s abdomen, in the midline, slightly above the navel and well below breastbone. Grasp your fist firmly with your other hand press your fist into victim’s abdomen with quick, forceful upwards thrust. Repeat thrusts until object is expelled from airway or victim become unconscious Give each new thrust with a separate, distinct movement to relieve the obstruction ASP Medical Clinic/ sept 2012 66
ABDOMINAL THRUST 67
Adult Choking - Responsive 1/2 way between navel and xyphoid
n Unconscious Start CPR n Open airway and remove foreign object with finger sweep if it is visible or else DO NOT APPLY BLIND FINGER SWEEP. n 69
Special Precautions: CHEST THRUST should be apply for obese and pregnancy victim. 70
Child Choking - Responsive
Child Choking - Responsive Performing first aid for a choking child is very similar to an adult. If the child does not clearly grab their throat other danger signs for a child an adult include: v Inability to speak v Weak, ineffective coughing v Noisy breathing or high-pitched sounds while inhaling v Difficulty breathing v Bluish skin color v Loss of consciousness if blockage is not cleared v
Child Choking Unresponsive v Lower them to the ground and begin the steps of CPR v Look in the mouth before each breath v If you see the object, you can remove it v Don't forget to call 911 and get the AED v Do not perform a blind finger sweep
INFANT FOREIGN BODY AIRWAY OBSTRUCTION CONSCIOUS CHOKING INFANT n Determine airway obstruction, observe breathing difficulties. n If breathing difficulty increases or persists or breathing is absent perform back slaps and chest thrusts. n Hold the infant in a prone position, resting on your forearm. Support the infant’s head firmly by holding the jaw. The rescuer’s forearm should rest on / her thigh to support the infant. Deliver five back slaps forcefully between the infant’s shoulder blades, using the heel of the hand.
Cont. INFANT FOREIGN BODY AIRWAY OBSTRUCTION n After delivering the back slaps, turn the infant while the head and neck are firmly supported between your hands, with the head lower than trunk. Deliver up to 5 quick chest thrusts in the same location for infant’s CPR. The series of 5 back slaps and 5 chest thrusts should be continued until the foreign is expelled or infant becomes unconscious.
Infant Choking Step 1: Back Blows Step 2: Chest Thrusts
Infant Choking Step 3: Object Removal • Only remove object if you can see it. • No blind finger sweeps • If object not visible go back to back blows and chest thrusts
WHEN THE INFANT BECOMES OR FOUND UNCONSCIOUS n n Call out “HELP” if others respond, activate the EMS system. Position the infant: keep the infant face up. Immediately start CPR. For 5 cycles (2 minutes) then activate EMS if you are alone. Each time the airway is opened during CPR, the rescuer should look for an object in the victim’s mouth and remove it.
THANK YOU