Metallurgical Testing Mohammud Hanif Dewan Maritime Lecturer Trainer



- Slides: 21

Metallurgical Testing Mohammud Hanif Dewan, Maritime Lecturer & Trainer, Bangladesh 1

Non-Destructive Testing - This is carried out on components rather than on test pieces, they are designed to indicate flaws occurring due or after manufacture. They give no indication of the mechanical properties of the material. - Surface flaws may be detected by visual means aided by dye penetrant or magnetic crack detection. - Internal flaws may be detected by X-ray or ultrasonic testing. - In addition to this there are special equipment able to exam machine finish. 2

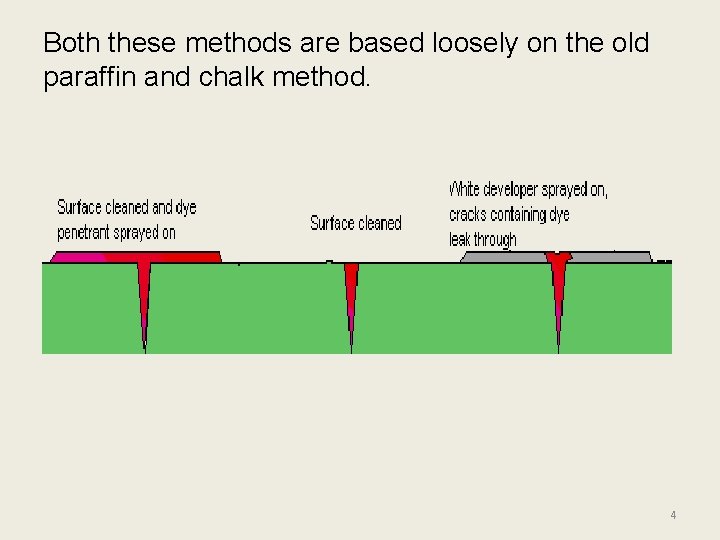
Liquid Penetrant Methods - The surface is first cleaned using an volatile cleaner and degreaser. - A fluorescent dye is then applied and a certain time allowed for it to enter any flaws under capillary action. Using the cleaning spray, the surface is then wiped clean. -An ultra violet light is shone on the surface, any flaws showing up as the dye fluoresce. Dye penetrant method - The surface is cleaned and the low viscosity penetrant sprayed on. - After a set time the surface is again cleaned. A developer is then used which coats the surface in a fine white chalky dust he dye seeps out and stains the developer typically a red colour. 3

Both these methods are based loosely on the old paraffin and chalk method. 4

Magnetic crack detection A component is place between two poles of a magnet The lines of magnetism concentrate around flaws. Magnetic particles are then applied, in a light oil or dry sprayed, onto the surface where they indicate the lines of magnetism and any anomalies. This method of testing a has a few limitations. Firstly it cannot be used on materials which cannot be magnetised such as austenitic steel and nonferrous metals. Secondly it would not detect a crack which ran parallel to the lines of magnetism. 5

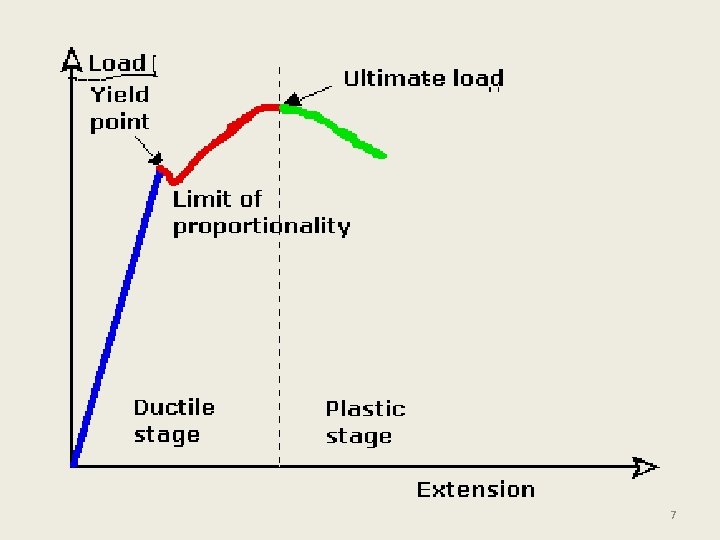
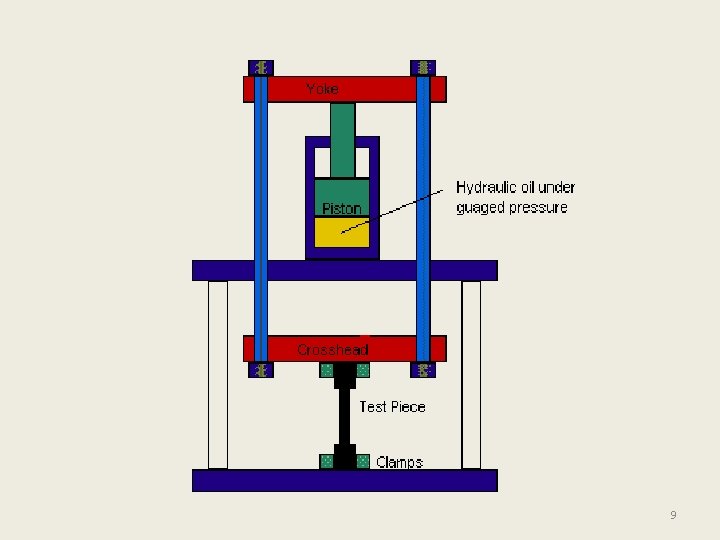
Tensile Testing Method: - When a material is tested under a tensile load, it changes shape by elongating. - Initially the extension is in proportion to the increasing tensile load. - If a graph is plotted showing extension for various loads, then a straight line is obtained at first. - If the loading is continued the graph deviates as shown. - Within the limit of the straight line, if the load is removed the material will return to its original length. - When the test piece reaches the Yield point there is a failure of the crystalline structure of the metal, not along the grain boundaries as has been the case, but through the grains themselves. This is known as slip. - A partial recovery is made at the lower yield point, then the extension starts to increase. - If the load is removed at any stage along the curve Y-U the material will have a corresponding permanent deformation. This termed permanent set. - Maximum loading occurs at the ultimate Load U and at this stage local wasting or extension will start. Normally this starts at about the centre of the specimen and will rapidly be followed by failure. 6

7

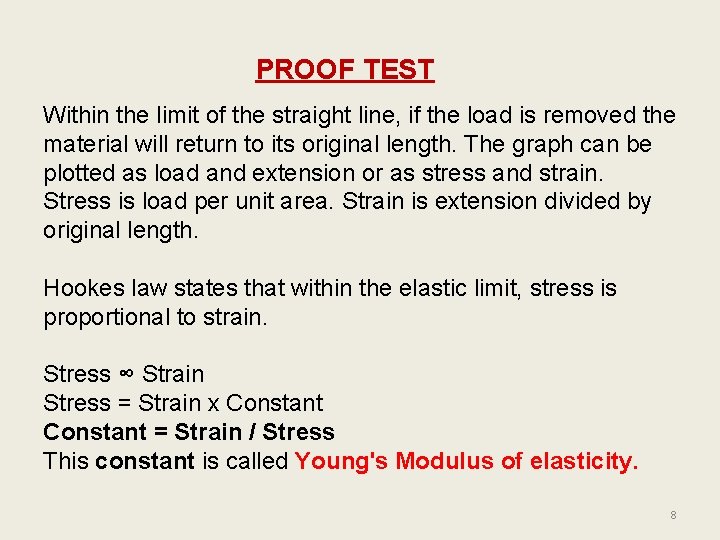
PROOF TEST Within the limit of the straight line, if the load is removed the material will return to its original length. The graph can be plotted as load and extension or as stress and strain. Stress is load per unit area. Strain is extension divided by original length. Hookes law states that within the elastic limit, stress is proportional to strain. Stress ∞ Strain Stress = Strain x Constant = Strain / Stress This constant is called Young's Modulus of elasticity. 8

9

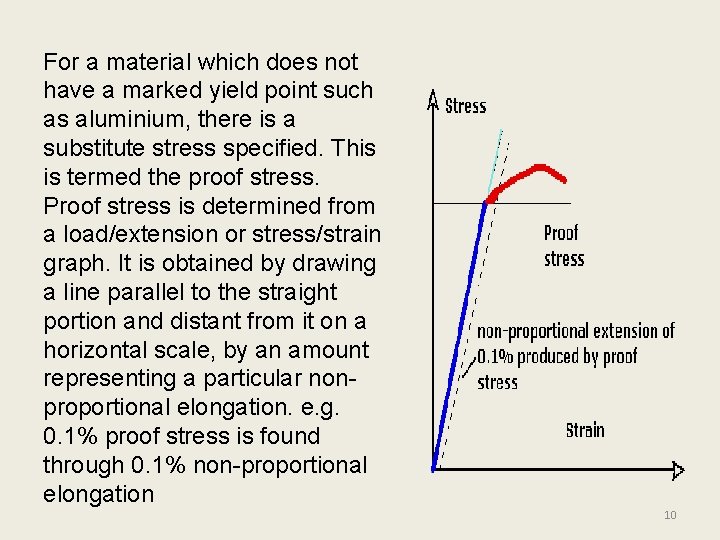
For a material which does not have a marked yield point such as aluminium, there is a substitute stress specified. This is termed the proof stress. Proof stress is determined from a load/extension or stress/strain graph. It is obtained by drawing a line parallel to the straight portion and distant from it on a horizontal scale, by an amount representing a particular nonproportional elongation. e. g. 0. 1% proof stress is found through 0. 1% non-proportional elongation 10

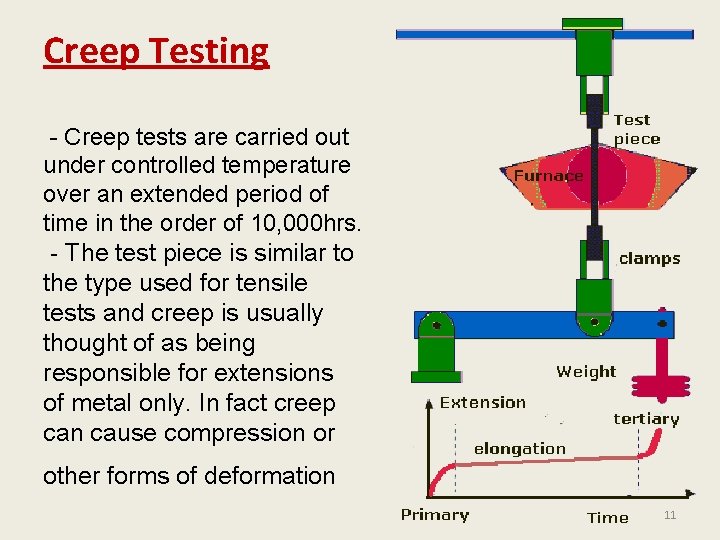
Creep Testing - Creep tests are carried out under controlled temperature over an extended period of time in the order of 10, 000 hrs. - The test piece is similar to the type used for tensile tests and creep is usually thought of as being responsible for extensions of metal only. In fact creep can cause compression or other forms of deformation 11

- Temperature of the test is around that of recrystallization which for steels starts around 400 o. C. For other metals the recrystallization temperature is different being about 200 o. C for copper and room temperature for tin and lead. - At the start of the test the initial load must be applied without shock. This load, normally well below the limit strength limit of the material, will extend the test piece slowly. - The load is kept steady through the test and the temperature is maintained accurately. - Extension is plotted and is seen to proceed in three distinct stages. 12

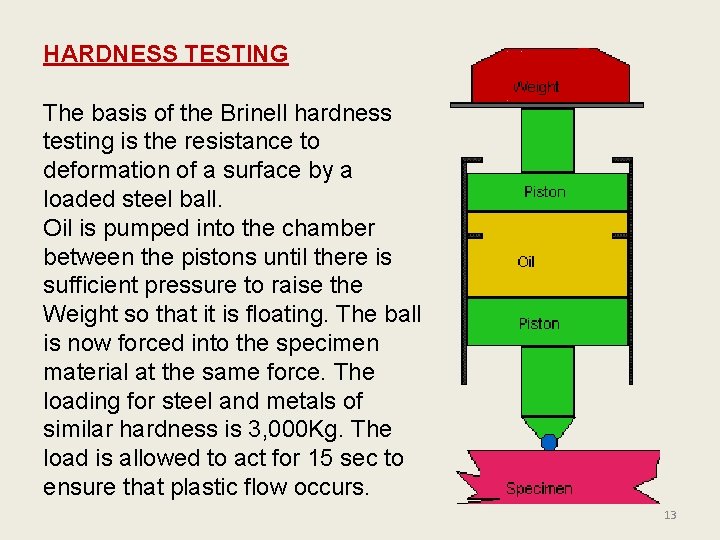
HARDNESS TESTING The basis of the Brinell hardness testing is the resistance to deformation of a surface by a loaded steel ball. Oil is pumped into the chamber between the pistons until there is sufficient pressure to raise the Weight so that it is floating. The ball is now forced into the specimen material at the same force. The loading for steel and metals of similar hardness is 3, 000 Kg. The load is allowed to act for 15 sec to ensure that plastic flow occurs. 13

The surface diameter of the indentation is measured with the aid of a microscope which is traversed over the test piece on a graduated slide with a vernier. Cross wires in he microscope enable the operator to accurately align the instrument. Both the loading and ball diameter (10 mm) are known, by measuring the indentation diameter the hardness can be calculated. For softer materials the loading is reduced, copper being 1000 Kg and aluminium 500 Kg. The diameter of the indentation must be less than half the ball diameter. 14

The thickness of the specimen must be not less than 10 x the depth of the impression. The edge of the impression will tend to sink with the ball if the surface has been work hardened; otherwise the local deformation will tend to cause piling up of the metal around the indent If the hardness test is used on very hard materials, the steel ball will flatten. This method is not reliable for reading over 600. It is used in preference to other methods where the material has large crystals, e. g. Cast iron. Mild Steel 130, Cast Iron 200, white cast iron 400, nitrided surface 750. 15

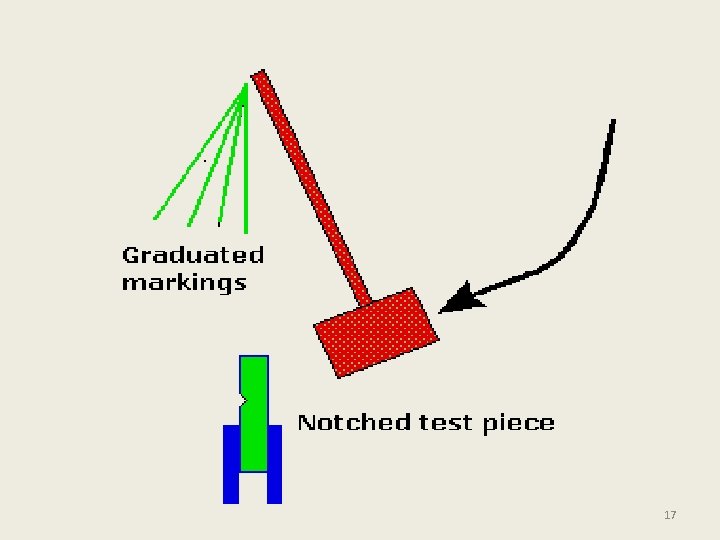
BRITTLE FRACTURE TESTING Under low temperature conditions , impact or shock loading on a material can cause cracking in a material which is normally ductile at room temperature Critical stressing in a material Griffith equation sc = Kic / ж Pc where sc is the critical stress in a material Kic is the fracture toughness of a material Pc is the micro-crack length within the materials The presence of these micro cracks (porous materials or defects) can act to cause transcrystalline type failures with a bright crystalline appearance. Testing is carried out via the Charpy notched piece test at various temperatures between -200 o to +200 o. C 16

17

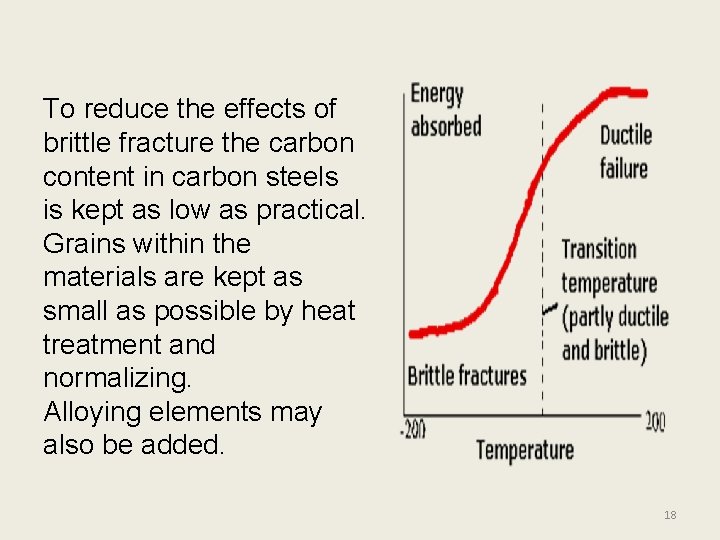
To reduce the effects of brittle fracture the carbon content in carbon steels is kept as low as practical. Grains within the materials are kept as small as possible by heat treatment and normalizing. Alloying elements may also be added. 18

Factors which affect the transition temperature are 1. Elements; Carbon, silicon, phosphorus and sulphur raise the temperature. Nickel and manganese lower the temperature. 2. Grain size; the smaller the grain size the lower the transition temperature, hence grain refinement is beneficial. 3. Work hardening; this appears to increase transition temperature. 4. Notches; possibly occurring during assembly e. g. weld defects or machine marks. Notches can increase tendency to brittle fracture. 19

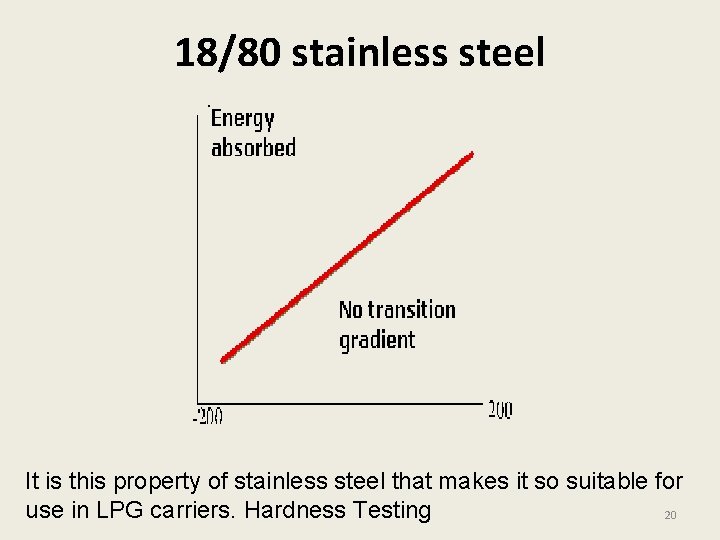
18/80 stainless steel It is this property of stainless steel that makes it so suitable for use in LPG carriers. Hardness Testing 20

ANY QUESTION? THANK YOU! 21